The ability to manually check OBD2 codes on a GMC Sonoma depends on the vehicle’s year of manufacture; earlier models (pre-1996) used OBD1, which can be checked manually using a paper clip, while later models use OBD2, which typically requires a scan tool. MERCEDES-DIAGNOSTIC-TOOL.EDU.VN can guide you through the process of accessing diagnostic information, whether it’s through a manual method for older vehicles or with the aid of a scan tool for newer, OBD2-compliant models, ensuring accurate troubleshooting and maintenance. This involves understanding your vehicle’s diagnostic system, using code readers, and learning about common diagnostic trouble codes (DTCs).
Contents
- 1. Understanding OBD1 and OBD2 Systems
- 2. Identifying Your GMC Sonoma’s Diagnostic System
- 3. Manual OBD1 Code Retrieval Method
- 4. Tools and Materials for Manual OBD1 Code Check
- 5. Step-by-Step Guide to Manually Checking OBD1 Codes
- 6. Understanding OBD1 Trouble Codes
- 7. Limitations of Manual OBD1 Code Checking
- 8. Introduction to OBD2 Systems and Scan Tools
- 9. Why Scan Tools Are Necessary for OBD2
- 10. Types of OBD2 Scan Tools
Table of Contents
- Understanding OBD1 and OBD2 Systems
- Identifying Your GMC Sonoma’s Diagnostic System
- Manual OBD1 Code Retrieval Method
- Tools and Materials for Manual OBD1 Code Check
- Step-by-Step Guide to Manually Checking OBD1 Codes
- Understanding OBD1 Trouble Codes
- Limitations of Manual OBD1 Code Checking
- Introduction to OBD2 Systems and Scan Tools
- Why Scan Tools Are Necessary for OBD2
- Types of OBD2 Scan Tools
- Using an OBD2 Scan Tool: A Step-by-Step Guide
- Interpreting OBD2 Trouble Codes
- Common OBD2 Codes for GMC Sonoma
- Advanced Diagnostic Procedures with OBD2
- When to Consult a Professional Mechanic
- Benefits of Using MERCEDES-DIAGNOSTIC-TOOL.EDU.VN
- Maintaining Your GMC Sonoma’s Health
- Troubleshooting Common Issues Manually
- Tips for Accurate Diagnosis
- Understanding Vehicle Diagnostics
- How to Choose the Right Scan Tool
- Common Mistakes to Avoid
- The Future of Automotive Diagnostics
- Resources for GMC Sonoma Owners
- FAQ Section
- Contact Us
1. Understanding OBD1 and OBD2 Systems
What are the key differences between OBD1 and OBD2 diagnostic systems? On-Board Diagnostics (OBD) systems are crucial for monitoring a vehicle’s performance and identifying potential issues. The first generation, OBD1, was manufacturer-specific and lacked standardization. In contrast, OBD2, introduced in 1996, is standardized across all vehicles sold in the United States, providing a universal interface for diagnostics. According to the Environmental Protection Agency (EPA), OBD2 was mandated to improve emission control and provide technicians with better diagnostic capabilities. OBD2 systems offer more detailed data and a wider range of diagnostic parameters compared to OBD1.
OBD1, used in vehicles manufactured before 1996, varies significantly between different car manufacturers. This means that the diagnostic tools and connectors used for a Ford OBD1 system are different from those used for a GM or Toyota system. OBD1 systems typically provide a limited set of trouble codes, and accessing these codes often requires specific knowledge and tools unique to each manufacturer. For example, some OBD1 systems require grounding certain terminals in the diagnostic connector and counting the flashes of the check engine light to interpret the codes, as detailed in older GM service manuals.
OBD2, on the other hand, offers a standardized diagnostic approach. All OBD2-compliant vehicles have a standard 16-pin diagnostic connector (DLC) located within easy reach of the driver. The OBD2 system monitors a wide array of vehicle parameters, including emissions, engine performance, and transmission functions. It uses standardized Diagnostic Trouble Codes (DTCs) that are consistent across all manufacturers. This standardization allows technicians to use a single scan tool to diagnose issues in any OBD2-compliant vehicle, making the diagnostic process more efficient and accessible.
The transition to OBD2 was driven by stricter emissions regulations and the need for more comprehensive vehicle diagnostics. The EPA’s mandate for OBD2 aimed to reduce air pollution by ensuring that vehicles could be accurately diagnosed and repaired when emissions-related problems occurred. As noted in a study by the National Center for Vehicle Emissions Control and Safety, OBD2 systems have significantly improved the accuracy and efficiency of vehicle diagnostics, leading to better emission control and reduced repair times.
The key differences between OBD1 and OBD2 can be summarized as follows:
- Standardization: OBD2 is standardized across all manufacturers, while OBD1 is manufacturer-specific.
- Diagnostic Connector: OBD2 uses a standard 16-pin DLC, while OBD1 connectors vary by manufacturer.
- Trouble Codes: OBD2 employs standardized DTCs, while OBD1 codes are manufacturer-specific and less detailed.
- Data Parameters: OBD2 monitors a wider range of vehicle parameters compared to OBD1.
- Accessibility: OBD2 is more accessible due to its standardized interface, allowing for easier diagnostics with universal scan tools.
2. Identifying Your GMC Sonoma’s Diagnostic System
How do I determine whether my GMC Sonoma uses OBD1 or OBD2? To identify whether your GMC Sonoma uses OBD1 or OBD2, check the year of manufacture; models produced before 1996 typically use OBD1, while those from 1996 onward use OBD2. Examine the diagnostic connector; OBD2 connectors are standardized 16-pin ports, whereas OBD1 connectors vary in shape and size depending on the manufacturer. Consulting your vehicle’s owner’s manual can also provide this information.
The year of manufacture is the most straightforward indicator. If your GMC Sonoma was made in 1995 or earlier, it is almost certainly equipped with an OBD1 system. If it was made in 1996 or later, it will have an OBD2 system. However, there can be some overlap during transition years, so it is always best to confirm by checking the diagnostic connector.
The diagnostic connector is another reliable way to determine the type of system your GMC Sonoma uses. OBD2 connectors are standardized, featuring a 16-pin trapezoidal shape. This connector is usually located under the dashboard, within easy reach of the driver. OBD1 connectors, on the other hand, vary in shape and size depending on the vehicle manufacturer. For GMC vehicles with OBD1, the connector is typically a 12-pin ALDL (Assembly Line Diagnostic Link) connector. It may be rectangular or D-shaped and is often found under the dash, near the center console, or in the engine compartment.
To further clarify, here are steps to locate and identify the diagnostic connector:
- Check Under the Dashboard: Look under the driver’s side dashboard. Use a flashlight to help you see better.
- Inspect the Connector: Examine the shape and number of pins. A 16-pin trapezoidal connector indicates OBD2.
- Consult the Owner’s Manual: Refer to your GMC Sonoma’s owner’s manual for the exact location and type of diagnostic connector.
If you are still unsure, consulting a trusted mechanic or referring to online resources specific to your GMC Sonoma’s model year can provide additional clarity. Websites like the National Highway Traffic Safety Administration (NHTSA) often have vehicle specifications and technical information that can help you determine the diagnostic system your vehicle uses.
Identifying the correct diagnostic system is crucial for using the appropriate diagnostic procedures and tools. Attempting to use OBD2 tools on an OBD1 system, or vice versa, will not provide accurate results and may potentially damage the vehicle’s electronic components.
3. Manual OBD1 Code Retrieval Method
Is it possible to manually retrieve OBD1 codes on a GMC Sonoma? Yes, you can manually retrieve OBD1 codes on a GMC Sonoma by using a paper clip to bridge specific terminals on the ALDL connector, then counting the check engine light flashes to interpret the codes. This method allows you to access basic diagnostic information without needing a scan tool.
The manual method for retrieving OBD1 codes involves using a simple tool, such as a paper clip or a jumper wire, to connect specific terminals on the Assembly Line Diagnostic Link (ALDL) connector. This action puts the vehicle’s computer into diagnostic mode, which then signals any stored trouble codes by flashing the “Check Engine” light.
To perform this procedure accurately, follow these steps:
-
Locate the ALDL Connector: Find the ALDL connector, typically located under the dashboard on the driver’s side or near the center console.
-
Prepare the Jumper: Take a paper clip or a jumper wire and bend it into a U-shape.
-
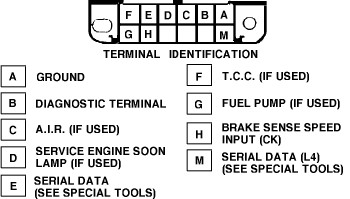
Connect the Terminals: Insert the ends of the paper clip into the correct terminals on the ALDL connector. For most GM vehicles, including the GMC Sonoma, you will need to connect terminal A (ground) to terminal B (diagnostic test terminal). Terminal A is usually located in the top right corner of the connector.
 Image
Image -
Turn on the Ignition: Turn the ignition key to the “ON” position, but do not start the engine.
-
Observe the “Check Engine” Light: Watch the “Check Engine” light on the dashboard. The light will begin to flash a series of codes. Each code consists of two sets of flashes, separated by a short pause. For example, a code 12 will be displayed as one flash, a short pause, and then two flashes. The code 12 indicates that the system is in diagnostic mode and is functioning correctly. This code will usually be displayed three times at the beginning of the diagnostic sequence.
-
Record the Codes: Write down each code as it is displayed. The codes will be repeated three times each before the system loops back to code 12 or moves on to the next stored code.
-
Interpret the Codes: Refer to a GMC Sonoma OBD1 code chart to interpret the meaning of each code. This chart can be found in the vehicle’s service manual or online resources.
This manual method allows you to access basic diagnostic information without the need for specialized tools. However, it is essential to accurately identify the correct terminals on the ALDL connector and to correctly interpret the trouble codes. Incorrectly connecting the terminals or misinterpreting the codes can lead to inaccurate diagnoses and unnecessary repairs.
4. Tools and Materials for Manual OBD1 Code Check
What tools and materials are needed for manually checking OBD1 codes on a GMC Sonoma? To manually check OBD1 codes on a GMC Sonoma, you will need a paper clip or jumper wire, a vehicle repair manual or reliable online OBD1 code chart, and a pen and paper to record the codes. These simple tools allow you to access and interpret basic diagnostic information.
The process of manually checking OBD1 codes on your GMC Sonoma requires minimal tools and materials. Here’s a detailed list:
- Paper Clip or Jumper Wire: This is the primary tool used to bridge the terminals on the ALDL connector. A standard paper clip bent into a U-shape works effectively. Alternatively, a small jumper wire with alligator clips can provide a more secure connection.
- Vehicle Repair Manual or OBD1 Code Chart: A reliable reference is crucial for interpreting the trouble codes displayed by the “Check Engine” light. A vehicle-specific repair manual for your GMC Sonoma will contain detailed OBD1 code charts. If you don’t have a manual, numerous online resources provide OBD1 code charts for GM vehicles. Ensure that the chart you use is specific to the year and model of your GMC Sonoma for accurate interpretation.
- Pen and Paper: You will need a pen and paper to record the trouble codes as they are flashed by the “Check Engine” light. It’s important to write down each code accurately to avoid misinterpretation.
- Flashlight (Optional): A flashlight can be helpful for locating the ALDL connector, especially if it is in a dimly lit area under the dashboard.
- Terminal Cleaning Supplies (Optional): If the terminals on the ALDL connector are corroded or dirty, you may need a small wire brush or electrical contact cleaner to ensure a good connection.
Here’s why each of these tools is essential:
- Paper Clip/Jumper Wire: This tool creates the necessary electrical connection between the terminals on the ALDL connector, which puts the vehicle’s computer into diagnostic mode.
- Repair Manual/Code Chart: This provides the key to understanding the numerical codes displayed by the “Check Engine” light, linking each code to a specific problem within the vehicle.
- Pen and Paper: Accurate recording of the codes is vital for correct diagnosis. Writing them down ensures you don’t miss or misremember any codes.
- Flashlight: Proper lighting is necessary to locate the ALDL connector and ensure you are connecting the correct terminals.
- Cleaning Supplies: Clean terminals ensure a reliable connection, which is essential for accurate code retrieval.
By gathering these simple tools and materials, you can effectively perform a manual OBD1 code check on your GMC Sonoma. Remember to always consult a reliable code chart to accurately interpret the codes and proceed with appropriate troubleshooting steps.
5. Step-by-Step Guide to Manually Checking OBD1 Codes
How can I manually check the OBD1 codes on my GMC Sonoma? To manually check OBD1 codes on your GMC Sonoma, locate the ALDL connector, use a paper clip to connect terminals A and B, turn the ignition to the “ON” position, and count the “Check Engine” light flashes to read the diagnostic codes. Accurately recording and interpreting these codes will help you diagnose the issue.
Here’s a detailed step-by-step guide to help you through the process:
Step 1: Gather Your Tools
Before you begin, make sure you have the following tools:
- Paper clip or jumper wire
- GMC Sonoma repair manual or reliable OBD1 code chart
- Pen and paper
- Flashlight (optional)
Step 2: Locate the ALDL Connector
The ALDL connector is typically located under the dashboard on the driver’s side. It may also be near the center console. Use a flashlight if needed to locate it. The connector is usually a 12-pin connector, either rectangular or D-shaped.
Step 3: Prepare the Jumper Wire
Bend the paper clip into a U-shape. This will be used to connect the terminals on the ALDL connector.
Step 4: Connect Terminals A and B
Insert the ends of the paper clip into terminals A and B on the ALDL connector. Terminal A is typically the top right corner terminal (ground), and terminal B is the terminal next to it (diagnostic test terminal). Ensure that the paper clip makes good contact with the terminals.
Step 5: Turn on the Ignition
Insert your key into the ignition and turn it to the “ON” position. Do not start the engine.
Step 6: Observe the “Check Engine” Light
Watch the “Check Engine” light on the dashboard. The light will start to flash a series of codes. The first code you will likely see is code 12, which indicates that the system is in diagnostic mode. Code 12 consists of one flash, a short pause, and then two flashes. This code will be repeated three times.
Step 7: Record the Trouble Codes
After the initial code 12 is displayed, any stored trouble codes will be flashed by the “Check Engine” light. Each code will be displayed three times. Write down each code as it appears. For example, if the light flashes twice, pauses, and then flashes five times, the code is 25.
Step 8: Interpret the Codes
Refer to your GMC Sonoma repair manual or the OBD1 code chart to interpret the meaning of each code. The chart will provide a description of the problem associated with each code.
Step 9: Clear the Codes (Optional)
After you have diagnosed and repaired the issue, you may want to clear the stored trouble codes. To do this, disconnect the negative battery cable for about 30 seconds. Reconnect the battery cable, and the codes should be cleared.
Step 10: Verify the Repair
After clearing the codes, start the engine and drive the vehicle to see if the “Check Engine” light comes back on. If the light stays off, the repair was successful. If the light comes back on, there may be another issue that needs to be addressed.
By following these steps, you can effectively check the OBD1 codes on your GMC Sonoma and gain valuable insight into potential problems. Remember to always consult a reliable code chart and take appropriate safety precautions when working on your vehicle.
6. Understanding OBD1 Trouble Codes
What do the OBD1 trouble codes mean for a GMC Sonoma? OBD1 trouble codes for a GMC Sonoma provide specific information about detected issues within the vehicle’s systems, such as engine, transmission, or emissions. Each code corresponds to a particular fault, which can help pinpoint the source of the problem, although they are less detailed than OBD2 codes.
OBD1 trouble codes are numerical codes that the vehicle’s computer system generates when it detects a problem. These codes are displayed through the “Check Engine” light by flashing a specific sequence. Understanding what these codes mean is essential for diagnosing and repairing your GMC Sonoma.
Here are some common OBD1 trouble codes for GMC Sonoma and their meanings:
- Code 12: System is operating normally (displayed at the beginning of the diagnostic sequence).
- Code 13: Oxygen sensor circuit open or no activity.
- Code 14: Engine coolant temperature sensor circuit low (high temperature indicated).
- Code 15: Engine coolant temperature sensor circuit high (low temperature indicated).
- Code 21: Throttle position sensor circuit high.
- Code 22: Throttle position sensor circuit low.
- Code 32: EGR (Exhaust Gas Recirculation) system failure.
- Code 33: MAP (Manifold Absolute Pressure) sensor circuit high (low vacuum).
- Code 34: MAP sensor circuit low (high vacuum).
- Code 41: Ignition control circuit fault.
- Code 42: EST (Electronic Spark Timing) circuit fault.
- Code 43: Knock sensor circuit fault.
- Code 44: Lean exhaust indication (oxygen sensor).
- Code 45: Rich exhaust indication (oxygen sensor).
- Code 51: PROM (Programmable Read-Only Memory) error.
Each of these codes indicates a specific issue within the vehicle’s systems. For example, Code 13 suggests that the oxygen sensor is not functioning correctly, which can affect the engine’s air-fuel mixture and emissions. Code 14 or 15 indicates a problem with the engine coolant temperature sensor, which can affect the engine’s ability to regulate temperature properly. Code 32 points to a malfunction in the EGR system, which is responsible for reducing NOx emissions.
When you retrieve an OBD1 code, it is essential to consult a reliable code chart to understand its meaning and potential causes. Keep in mind that OBD1 codes are less specific than OBD2 codes, so further diagnosis may be necessary to pinpoint the exact cause of the problem.
Here’s a table summarizing the common OBD1 codes and their meanings:
| Code | Description | Possible Causes |
|---|---|---|
| 12 | System operating normally | Indicates the diagnostic mode is active and the system is functioning correctly. |
| 13 | Oxygen sensor circuit open or no activity | Faulty oxygen sensor, wiring issues, or vacuum leaks. |
| 14 | Engine coolant temperature sensor circuit low | Faulty coolant sensor, shorted wiring, or low coolant level. |
| 15 | Engine coolant temperature sensor circuit high | Faulty coolant sensor, open wiring, or excessive coolant temperature. |
| 21 | Throttle position sensor circuit high | Faulty TPS sensor, wiring issues, or improper adjustment. |
| 22 | Throttle position sensor circuit low | Faulty TPS sensor, wiring issues, or improper adjustment. |
| 32 | EGR system failure | Faulty EGR valve, vacuum leaks, or blocked EGR passages. |
| 33 | MAP sensor circuit high (low vacuum) | Faulty MAP sensor, vacuum leaks, or wiring issues. |
| 34 | MAP sensor circuit low (high vacuum) | Faulty MAP sensor, vacuum leaks, or wiring issues. |
| 41 | Ignition control circuit fault | Faulty ignition module, wiring issues, or distributor problems. |
| 42 | EST circuit fault | Faulty ignition module, wiring issues, or ECM (Engine Control Module) problems. |
| 43 | Knock sensor circuit fault | Faulty knock sensor, wiring issues, or engine problems causing excessive knocking. |
| 44 | Lean exhaust indication (oxygen sensor) | Vacuum leaks, faulty oxygen sensor, or fuel delivery problems. |
| 45 | Rich exhaust indication (oxygen sensor) | Faulty oxygen sensor, fuel delivery problems, or restricted air intake. |
| 51 | PROM error | Faulty PROM chip, ECM (Engine Control Module) problems. |
By understanding these OBD1 trouble codes, you can take the first step in diagnosing and repairing your GMC Sonoma. Remember to always consult a reliable code chart and perform thorough diagnostic procedures to pinpoint the exact cause of the problem.
7. Limitations of Manual OBD1 Code Checking
What are the limitations of manually checking OBD1 codes on a GMC Sonoma? Manual OBD1 code checking on a GMC Sonoma has limitations, including less detailed information compared to OBD2 systems, potential for misinterpretation of codes, and inability to access live data or perform advanced diagnostics. These limitations may require additional diagnostic tools for accurate troubleshooting.
While manually checking OBD1 codes on your GMC Sonoma can provide valuable information, it’s important to be aware of its limitations:
- Less Detailed Information: OBD1 systems provide less detailed information compared to OBD2 systems. OBD1 codes often point to a general area of concern rather than a specific component or circuit. This means that further diagnosis is typically required to pinpoint the exact cause of the problem.
- Potential for Misinterpretation: Manually counting the flashes of the “Check Engine” light can be prone to errors. It’s easy to miscount the flashes or misinterpret the sequence, leading to an incorrect diagnosis.
- Limited Code Availability: OBD1 systems have a limited number of trouble codes compared to OBD2. This means that some problems may not be represented by a specific code, making diagnosis more challenging.
- Inability to Access Live Data: Unlike OBD2 systems, OBD1 does not provide access to live data, such as sensor readings or engine parameters. This makes it difficult to monitor the vehicle’s performance in real-time and identify intermittent problems.
- No Advanced Diagnostic Functions: OBD1 systems lack advanced diagnostic functions, such as the ability to perform actuator tests or monitor specific system components. This limits your ability to troubleshoot complex problems.
- Manufacturer-Specific Codes: OBD1 codes are often manufacturer-specific, meaning that the same code can have different meanings on different vehicles. This can make it difficult to find accurate code charts and diagnostic information for your GMC Sonoma.
- No Freeze Frame Data: OBD1 systems do not capture freeze frame data, which provides a snapshot of the vehicle’s operating conditions when a trouble code is set. This information can be helpful for diagnosing intermittent problems.
- Complexity of Diagnosis: Due to the limitations mentioned above, diagnosing OBD1 systems can be more complex and time-consuming compared to OBD2 systems. It often requires a deeper understanding of the vehicle’s systems and more extensive troubleshooting procedures.
Here’s a table summarizing the limitations of manual OBD1 code checking:
| Limitation | Description | Impact on Diagnosis |
|---|---|---|
| Less Detailed Information | OBD1 codes provide general information rather than specific component details. | Requires further diagnosis to pinpoint the exact cause of the problem. |
| Potential for Misinterpretation | Manually counting flashes can lead to errors. | Can result in incorrect diagnoses and unnecessary repairs. |
| Limited Code Availability | OBD1 systems have fewer trouble codes compared to OBD2. | Some problems may not be represented by a specific code, making diagnosis more challenging. |
| Inability to Access Live Data | OBD1 does not provide real-time sensor readings or engine parameters. | Difficult to monitor vehicle performance and identify intermittent problems. |
| No Advanced Diagnostic Functions | OBD1 lacks actuator tests or component monitoring. | Limits ability to troubleshoot complex problems. |
| Manufacturer-Specific Codes | Codes can have different meanings on different vehicles. | Difficult to find accurate code charts and diagnostic information. |
| No Freeze Frame Data | OBD1 does not capture operating conditions when a trouble code is set. | Makes it harder to diagnose intermittent problems. |
| Complexity of Diagnosis | Requires deeper understanding and more extensive troubleshooting. | Can be more time-consuming and require specialized knowledge. |
Despite these limitations, manually checking OBD1 codes can be a useful starting point for diagnosing problems on your GMC Sonoma. However, for more accurate and comprehensive diagnostics, consider using additional tools and resources, such as a professional scan tool or the expertise of a qualified mechanic.
8. Introduction to OBD2 Systems and Scan Tools
What is an OBD2 system, and why are scan tools necessary? An OBD2 system is a standardized onboard diagnostic system that provides detailed information about a vehicle’s performance and emissions. Scan tools are necessary because they interface with the OBD2 system to read and interpret diagnostic trouble codes (DTCs), access live data, and perform advanced diagnostic functions, enabling accurate troubleshooting.
The On-Board Diagnostics II (OBD2) system is a significant advancement over its predecessor, OBD1. Mandated in 1996 for all vehicles sold in the United States, OBD2 provides a standardized and comprehensive approach to vehicle diagnostics. The primary goal of OBD2 is to monitor vehicle emissions and ensure compliance with environmental regulations. However, it also offers valuable diagnostic information for technicians and vehicle owners.
Key features of the OBD2 system include:
- Standardized Connector: All OBD2-compliant vehicles have a standard 16-pin Diagnostic Link Connector (DLC) located within easy reach, typically under the dashboard on the driver’s side.
- Standardized Trouble Codes: OBD2 uses standardized Diagnostic Trouble Codes (DTCs) that are consistent across all manufacturers. This allows technicians to use a single scan tool to diagnose issues in any OBD2-compliant vehicle.
- Comprehensive Monitoring: OBD2 monitors a wide array of vehicle parameters, including engine performance, emissions control systems, transmission functions, and more.
- Live Data Access: OBD2 provides access to live data, allowing technicians to monitor sensor readings, engine parameters, and other critical information in real-time.
- Freeze Frame Data: When a trouble code is set, OBD2 captures freeze frame data, which provides a snapshot of the vehicle’s operating conditions at the time the code was triggered.
- Readiness Monitors: OBD2 includes readiness monitors that indicate whether the vehicle’s emission control systems have been tested and are functioning correctly.
Scan tools are essential for accessing and interpreting the information provided by the OBD2 system. While OBD1 systems could sometimes be diagnosed manually by counting the flashes of the “Check Engine” light, OBD2 systems require a scan tool to retrieve and decode the trouble codes.
Here’s why scan tools are necessary for OBD2:
- Code Retrieval: Scan tools allow you to retrieve the Diagnostic Trouble Codes (DTCs) stored in the vehicle’s computer. These codes provide valuable information about the nature and location of the problem.
- Code Interpretation: Scan tools decode the DTCs and provide a description of the problem associated with each code. This helps you understand the meaning of the codes and guide your diagnostic efforts.
- Live Data Monitoring: Scan tools allow you to monitor live data, such as sensor readings, engine parameters, and other critical information. This helps you diagnose intermittent problems and identify issues that may not trigger a trouble code.
- Advanced Diagnostic Functions: Some scan tools offer advanced diagnostic functions, such as the ability to perform actuator tests, reset trouble codes, and reprogram certain vehicle systems.
- Efficiency and Accuracy: Scan tools provide a fast and accurate way to diagnose vehicle problems, saving time and reducing the risk of misdiagnosis.
According to a study by the Society of Automotive Engineers (SAE), the use of OBD2 scan tools has significantly improved the efficiency and accuracy of vehicle diagnostics, leading to faster repair times and reduced costs for vehicle owners.
In summary, the OBD2 system provides a standardized and comprehensive approach to vehicle diagnostics, but it requires the use of a scan tool to access and interpret the information it provides. Scan tools are essential for retrieving trouble codes, monitoring live data, and performing advanced diagnostic functions, enabling accurate and efficient troubleshooting.
9. Why Scan Tools Are Necessary for OBD2
Why can’t I manually check OBD2 codes like OBD1? You cannot manually check OBD2 codes like OBD1 because OBD2 systems use a complex digital interface that requires a scan tool to communicate with the vehicle’s computer, retrieve diagnostic trouble codes (DTCs), and access live data. The standardization and complexity of OBD2 necessitate specialized tools.
The transition from OBD1 to OBD2 brought significant advancements in vehicle diagnostics. While OBD1 systems allowed for manual code retrieval through methods like counting “Check Engine” light flashes, OBD2 systems employ a more sophisticated digital communication protocol that requires specialized scan tools.
Here are the primary reasons why scan tools are necessary for OBD2:
- Digital Communication: OBD2 systems use a digital communication protocol, such as Controller Area Network (CAN), to transmit data between the vehicle’s computer and external devices. This digital communication is more complex than the analog signals used in OBD1 systems, requiring a scan tool to interpret the data.
- Standardized Interface: While OBD2 provides a standardized 16-pin DLC, the communication protocols and data formats are complex and require a scan tool to translate into understandable information.
- Error Correction and Data Integrity: OBD2 systems incorporate error correction and data integrity checks to ensure that the diagnostic information is accurate and reliable. Scan tools are equipped to handle these checks and ensure that the retrieved data is valid.
- Access to Multiple Systems: OBD2 systems monitor a wide range of vehicle systems, including the engine, transmission, ABS, and more. Scan tools can communicate with these different systems and retrieve trouble codes from each, providing a comprehensive view of the vehicle’s health.
- Live Data Monitoring: One of the key advantages of OBD2 is its ability to provide live data, such as sensor readings, engine parameters, and other critical information. Scan tools are necessary to access and display this live data in a usable format.
- Advanced Diagnostic Functions: Many scan tools offer advanced diagnostic functions, such as the ability to perform actuator tests, reset trouble codes, and reprogram certain vehicle systems. These functions require specialized software and hardware that are not available through manual methods.
- Complexity of Trouble Codes: OBD2 trouble codes are more detailed and specific than OBD1 codes. Scan tools provide a description of the problem associated with each code, making it easier to understand the nature of the issue.
- Compliance with Standards: OBD2 systems are designed to comply with industry standards and regulations. Scan tools are designed to communicate with these systems in a standardized way, ensuring compatibility and accuracy.
According to a technical report by the California Air Resources Board (CARB), OBD2 scan tools are essential for accessing the diagnostic information required to maintain vehicle emissions compliance. The report emphasizes the importance of using certified scan tools to ensure accurate and reliable diagnostics.
In summary, the complexity and sophistication of OBD2 systems necessitate the use of scan tools for code retrieval, data interpretation, and advanced diagnostic functions. Manual methods are not sufficient for accessing the wealth of information provided by OBD2, making scan tools an indispensable tool for modern vehicle diagnostics.
10. Types of OBD2 Scan Tools
What are the different types of OBD2 scan tools available? There are several types of OBD2 scan tools available, ranging from basic code readers to advanced professional-grade scanners. Basic code readers retrieve and display diagnostic trouble codes (DTCs). Mid-range scanners offer additional features like live data streaming and freeze frame data. Advanced professional scanners provide comprehensive diagnostics, including bi-directional controls and system programming.
The market offers a wide variety of OBD2 scan tools, each with its own set of features and capabilities. Choosing the right scan tool depends on your needs, budget, and level of expertise.
Here are the main types of OBD2 scan tools:
- Basic Code Readers: These are the simplest and most affordable type of scan tool. They can retrieve and display Diagnostic Trouble Codes (DTCs) and provide a brief description of the problem. Basic code readers are suitable for simple diagnostics and clearing trouble codes.
- Mid-Range Scanners: These scanners offer more features than basic code readers, such as the ability to view live data, freeze frame data, and perform basic diagnostic tests. They typically have a larger display screen and a more user-friendly interface. Mid-range scanners are a good choice for DIYers and hobbyists who want more diagnostic capabilities.
- Advanced Professional Scanners: These are the most comprehensive and feature-rich type of scan tool. They offer advanced diagnostic functions, such as bi-directional controls, system programming, and access to manufacturer-specific codes and data. Professional scanners are typically used by automotive technicians and repair shops.
- Smartphone-Based Scanners: These scanners consist of a Bluetooth or Wi-Fi adapter that plugs into the OBD2 port and communicates with a smartphone or tablet app. They offer a range of features, from basic code reading to advanced diagnostics, depending on the app and adapter. Smartphone-based scanners are a convenient and affordable option for many users.
- Built-In Vehicle Diagnostic Systems: Some modern vehicles come equipped with built-in diagnostic systems that can display trouble codes and provide basic diagnostic information on the vehicle’s display screen. These systems are not as comprehensive as dedicated scan tools, but they can be useful for quick diagnostics.
Here’s a table summarizing the different types of OBD2 scan tools:
| Type of Scan Tool | Features | Target User |
|---|---|---|
| Basic Code Readers | Retrieves and displays DTCs, provides brief descriptions. | DIYers, vehicle owners needing basic diagnostics. |
| Mid-Range Scanners | Live data, freeze frame data, basic diagnostic tests. | DIYers, hobbyists seeking more diagnostic capabilities. |
| Advanced Professional Scanners | Bi-directional controls, system programming, manufacturer-specific codes and data. | Automotive technicians, repair shops. |
| Smartphone-Based Scanners | Varies depending on app and adapter, from basic code reading to advanced diagnostics. | General users wanting convenient and affordable diagnostics. |
| Built-In Vehicle Systems | Displays trouble codes and basic diagnostic information on the vehicle’s screen. | Vehicle owners for quick diagnostics. |
When choosing an OBD2 scan tool, consider the following factors:
- Features: Determine which features are most important to you, such as live data, freeze frame data