Figuring out how to test your 2008 Impala’s EVAP system using an OBD2 scanner is essential for maintaining your vehicle’s performance and complying with emissions standards. At MERCEDES-DIAGNOSTIC-TOOL.EDU.VN, we provide expert guidance on diagnosing and resolving EVAP system issues, so you can keep your Impala running smoothly. Dive in to learn practical steps and tips for using your OBD2 scanner effectively, avoiding costly repairs.
Contents
- 1. What Is the EVAP System and Why Is Testing It Important?
- 1.1 The Environmental Impact of EVAP Systems
- 1.2 How EVAP Systems Affect Fuel Efficiency
- 1.3 Preventing Engine Problems with EVAP System Maintenance
- 2. Understanding the P0440 Code and Other Common EVAP Codes
- 2.1 Decoding the P0440 Code
- 2.2 Interpreting the P0441 Code
- 2.3 Recognizing the P0455 Code
- 3. Essential Tools for Testing the EVAP System
- 3.1 Choosing the Right OBD2 Scanner
- 3.2 Using a Smoke Machine for Leak Detection
- 3.3 Multimeter for Electrical Testing
- 4. Step-by-Step Guide: How to Test EVAP Impala 2008 From OBD2 Scanner
- 4.1 Connecting the OBD2 Scanner
- 4.2 Reading Diagnostic Trouble Codes (DTCs)
- 4.3 Performing a Visual Inspection
- 4.4 Conducting Functional Tests with the OBD2 Scanner
- 5. Detailed Steps for Using an OBD2 Scanner to Test the EVAP System
- 5.1 Navigating the OBD2 Scanner Menu
- 5.2 Interpreting Live Data
- 5.3 Performing EVAP System Tests
- 6. Common Causes of EVAP System Failures in the 2008 Impala
- 6.1 Faulty Gas Cap
- 6.2 Cracked Hoses
- 6.3 Malfunctioning Purge Valve
- 6.4 Defective Vent Valve
- 7. How to Use a Smoke Machine to Locate EVAP Leaks
- 7.1 Preparing the Vehicle for Smoke Testing
- 7.2 Introducing Smoke into the EVAP System
- 7.3 Identifying Leak Sources
- 8. Testing the EVAP Purge Valve with a Multimeter
- 8.1 Locating the Purge Valve
- 8.2 Checking the Electrical Circuit
- 8.3 Testing the Solenoid
- 9. Diagnosing EVAP System Problems Without an OBD2 Scanner
- 9.1 Visual Inspection
- 9.2 Checking the Gas Cap
- 9.3 Listening for Leaks
- 10. Step-by-Step Guide: Replacing the EVAP Purge Valve
- 10.1 Gathering Necessary Tools and Parts
- 10.2 Disconnecting the Old Purge Valve
- 10.3 Installing the New Purge Valve
- 10.4 Testing the New Purge Valve
- 11. Step-by-Step Guide: Replacing the EVAP Vent Valve
- 11.1 Gathering Necessary Tools and Parts
- 11.2 Disconnecting the Old Vent Valve
- 11.3 Installing the New Vent Valve
- 11.4 Testing the New Vent Valve
- 12. Maintaining Your 2008 Impala’s EVAP System for Optimal Performance
- 12.1 Regular Gas Cap Inspections
- 12.2 Hose Inspections
- 12.3 Scheduled Maintenance
- 13. Understanding Fuel Trim and Its Impact on the EVAP System
- 13.1 What Is Fuel Trim?
- 13.2 How EVAP Leaks Affect Fuel Trim
- 13.3 Using Fuel Trim Data for Diagnosis
- 14. The Role of the Fuel Tank Pressure Sensor in EVAP System Testing
- 14.1 How the Fuel Tank Pressure Sensor Works
- 14.2 Testing the Fuel Tank Pressure Sensor
- 14.3 Replacing the Fuel Tank Pressure Sensor
- 15. Advanced Diagnostic Techniques for Complex EVAP System Issues
- 15.1 Pressure Testing the EVAP System
- 15.2 Component Testing
- 15.3 Using a Scan Tool for Advanced Diagnostics
- 16. Troubleshooting Tips for Intermittent EVAP System Problems
- 16.1 Checking for Loose Connections
- 16.2 Monitoring Live Data Over Time
- 16.3 Performing a Thorough Visual Inspection
- 17. Understanding the EVAP System Drive Cycle
- 17.1 What Is a Drive Cycle?
- 17.2 How to Perform an EVAP System Drive Cycle
- 17.3 Common Mistakes to Avoid
- 18. The Importance of Using OEM Parts for EVAP System Repairs
- 18.1 Why Choose OEM Parts?
- 18.2 Avoiding Aftermarket Parts
- 18.3 Ensuring Proper Fit and Function
- 19. How to Clear EVAP System Codes After Repair
- 19.1 Using an OBD2 Scanner to Clear Codes
- 19.2 Verifying the Repair
- 19.3 Performing a Drive Cycle
- 20. Seeking Professional Help for Complex EVAP System Repairs
- 20.1 When to Seek Professional Help
- 20.2 Finding a Qualified Mechanic
- 20.3 Getting a Second Opinion
- 21. Understanding EVAP System Regulations and Compliance
- 21.1 EPA Regulations
- 21.2 State and Local Regulations
- 21.3 Ensuring Compliance
- 22. The Future of EVAP System Technology
- 22.1 Advancements in EVAP Systems
- 22.2 Hybrid and Electric Vehicle EVAP Systems
- 22.3 The Role of Technology in Reducing Emissions
- 23. Real-World Examples of EVAP System Problems and Solutions
- 23.1 Case Study 1: Faulty Gas Cap
- 23.2 Case Study 2: Cracked Hoses
- 23.3 Case Study 3: Malfunctioning Purge Valve
- 24. Frequently Asked Questions (FAQs) About EVAP Systems
- 24.1 What is the purpose of the EVAP system?
- 24.2 How often should I test my EVAP system?
- 24.3 Can I drive with an EVAP system problem?
- 24.4 What are the common symptoms of an EVAP system problem?
- 24.5 How can I clear an EVAP system code?
- 24.6 What tools do I need to test the EVAP system?
- 24.7 How do I use a smoke machine to find EVAP leaks?
- 24.8 What is a fuel tank pressure sensor?
- 24.9 How do I perform an EVAP system drive cycle?
- 24.10 Why should I use OEM parts for EVAP system repairs?
- 25. Conclusion: Maintaining Your 2008 Impala’s EVAP System for Longevity
1. What Is the EVAP System and Why Is Testing It Important?
The Evaporative Emission Control (EVAP) system is designed to prevent fuel vapors from escaping into the atmosphere. Testing it is vital for environmental protection, fuel efficiency, and preventing potential engine problems. According to the EPA, a faulty EVAP system can significantly contribute to air pollution and reduce fuel economy by up to 20%.
1.1 The Environmental Impact of EVAP Systems
EVAP systems play a crucial role in reducing hydrocarbon emissions. These emissions contribute to smog and other environmental issues. Regular testing ensures the system is functioning correctly, minimizing its environmental footprint.
1.2 How EVAP Systems Affect Fuel Efficiency
A malfunctioning EVAP system can lead to fuel vapor leaks, decreasing fuel efficiency. By testing and maintaining the system, you can ensure that fuel is used efficiently, saving money at the pump.
1.3 Preventing Engine Problems with EVAP System Maintenance
Ignoring EVAP system issues can lead to more significant engine problems. Regular testing helps identify and address minor issues before they escalate, preventing costly repairs down the line.
2. Understanding the P0440 Code and Other Common EVAP Codes
The P0440 code indicates a general EVAP system fault. Other common codes include P0441 (EVAP Incorrect Purge Flow) and P0455 (EVAP Large Leak Detected). Understanding these codes is the first step in diagnosing EVAP system problems.
2.1 Decoding the P0440 Code
The P0440 code is a broad indicator of an EVAP system issue. It means the engine control unit (ECU) has detected a leak or malfunction somewhere in the system. Further diagnostics are needed to pinpoint the exact cause.
2.2 Interpreting the P0441 Code
The P0441 code suggests there is an issue with the EVAP purge flow. This could be due to a faulty purge valve, a blocked hose, or a problem with the ECU.
2.3 Recognizing the P0455 Code
The P0455 code indicates a large leak in the EVAP system. Common causes include a loose or damaged gas cap, a cracked hose, or a faulty vent valve.
3. Essential Tools for Testing the EVAP System
To effectively test the EVAP system, you’ll need an OBD2 scanner, a smoke machine, and a multimeter. These tools help you diagnose leaks, valve issues, and electrical problems within the system.
3.1 Choosing the Right OBD2 Scanner
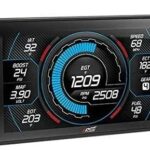
An OBD2 scanner is essential for reading diagnostic trouble codes (DTCs) and monitoring EVAP system parameters. Look for a scanner that supports live data streaming and EVAP system testing functions. Brands like Autel, Launch, and Bosch offer reliable options.
3.2 Using a Smoke Machine for Leak Detection
A smoke machine introduces smoke into the EVAP system to identify leaks. This tool can quickly locate cracks or loose connections in hoses, valves, and the fuel tank.
3.3 Multimeter for Electrical Testing
A multimeter is used to test the electrical components of the EVAP system, such as solenoids and sensors. It can help you determine if these components are receiving power and functioning correctly.
4. Step-by-Step Guide: How to Test EVAP Impala 2008 From OBD2 Scanner
Testing the EVAP system on your 2008 Impala involves several steps, including connecting the OBD2 scanner, reading diagnostic codes, performing a visual inspection, and conducting functional tests.
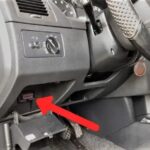
4.1 Connecting the OBD2 Scanner
Locate the OBD2 port under the dashboard on the driver’s side. Plug in your OBD2 scanner and turn the ignition to the “ON” position without starting the engine.
4.2 Reading Diagnostic Trouble Codes (DTCs)
Use the OBD2 scanner to read any stored diagnostic trouble codes (DTCs). Record these codes, as they will provide valuable information about potential EVAP system issues.
4.3 Performing a Visual Inspection
Visually inspect all EVAP system components, including hoses, valves, and the gas cap. Look for cracks, leaks, or damage. Pay close attention to areas around the fuel tank and purge valve.
4.4 Conducting Functional Tests with the OBD2 Scanner
Many OBD2 scanners have built-in functional tests for the EVAP system. These tests can activate components like the purge valve and vent valve, allowing you to check their operation. Follow the scanner’s instructions to perform these tests.
5. Detailed Steps for Using an OBD2 Scanner to Test the EVAP System
To use an OBD2 scanner effectively, you’ll need to understand how to navigate its menus, interpret live data, and perform specific EVAP system tests.
5.1 Navigating the OBD2 Scanner Menu
Familiarize yourself with your OBD2 scanner’s menu options. Look for sections like “Read Codes,” “Live Data,” and “Functional Tests.” Consult your scanner’s manual for detailed instructions.
5.2 Interpreting Live Data
Live data provides real-time information about the EVAP system’s operation. Monitor parameters like fuel tank pressure, purge valve duty cycle, and vent valve position. Compare these values to the manufacturer’s specifications to identify any discrepancies.
5.3 Performing EVAP System Tests
Use the OBD2 scanner to perform EVAP system tests, such as the “EVAP Leak Test” or “Purge Valve Test.” These tests can help you pinpoint specific issues within the system.
6. Common Causes of EVAP System Failures in the 2008 Impala
Several factors can lead to EVAP system failures in the 2008 Impala, including a faulty gas cap, cracked hoses, a malfunctioning purge valve, and a defective vent valve.
6.1 Faulty Gas Cap
A loose or damaged gas cap is a common cause of EVAP system leaks. Ensure the gas cap is properly tightened and in good condition. Replace it if necessary.
6.2 Cracked Hoses
EVAP system hoses can crack or deteriorate over time, leading to leaks. Inspect all hoses for signs of damage and replace any that are cracked or worn.
6.3 Malfunctioning Purge Valve
The purge valve controls the flow of fuel vapors from the EVAP system to the engine. A faulty purge valve can cause incorrect purge flow and trigger a DTC.
6.4 Defective Vent Valve
The vent valve allows fresh air to enter the EVAP system. A defective vent valve can cause pressure imbalances and trigger a DTC.
7. How to Use a Smoke Machine to Locate EVAP Leaks
A smoke machine is a valuable tool for locating EVAP leaks. By introducing smoke into the system, you can easily identify the source of the leak.
7.1 Preparing the Vehicle for Smoke Testing
Ensure the engine is off and cool. Disconnect the EVAP system vent hose and connect the smoke machine to the system. Seal any openings to prevent smoke from escaping.
7.2 Introducing Smoke into the EVAP System
Turn on the smoke machine and allow it to fill the EVAP system with smoke. Watch for smoke escaping from any leaks.
7.3 Identifying Leak Sources
Carefully inspect all EVAP system components for smoke. Common leak sources include hoses, valves, and the fuel tank. Mark any leaks you find for repair.
8. Testing the EVAP Purge Valve with a Multimeter
A multimeter can be used to test the EVAP purge valve’s electrical circuit and solenoid. This test can help you determine if the purge valve is functioning correctly.
8.1 Locating the Purge Valve
The purge valve is typically located on or near the engine. Consult your vehicle’s repair manual for the exact location.
8.2 Checking the Electrical Circuit
Disconnect the purge valve’s electrical connector and use a multimeter to check for voltage and continuity. Ensure the circuit is receiving power and there are no breaks in the wiring.
8.3 Testing the Solenoid
Use a multimeter to measure the resistance of the purge valve’s solenoid. Compare the reading to the manufacturer’s specifications. An incorrect reading indicates a faulty solenoid.
9. Diagnosing EVAP System Problems Without an OBD2 Scanner
While an OBD2 scanner is the most effective tool for diagnosing EVAP system problems, you can still perform some basic troubleshooting without one.
9.1 Visual Inspection
Perform a thorough visual inspection of all EVAP system components. Look for cracks, leaks, or damage. Pay close attention to the gas cap and hoses.
9.2 Checking the Gas Cap
Ensure the gas cap is properly tightened and in good condition. A loose or damaged gas cap is a common cause of EVAP system leaks.
9.3 Listening for Leaks
With the engine running, listen for any hissing or whistling sounds near the EVAP system components. These sounds may indicate a leak.
10. Step-by-Step Guide: Replacing the EVAP Purge Valve
Replacing the EVAP purge valve is a straightforward process that can often be done at home with basic tools.
10.1 Gathering Necessary Tools and Parts
You’ll need a new EVAP purge valve, a socket set, a wrench, and a screwdriver. Ensure the new purge valve is compatible with your 2008 Impala.
10.2 Disconnecting the Old Purge Valve
Locate the purge valve and disconnect its electrical connector and hoses. Use a wrench or socket to remove the valve from its mounting bracket.
10.3 Installing the New Purge Valve
Install the new purge valve in the mounting bracket and tighten the fasteners. Reconnect the hoses and electrical connector.
10.4 Testing the New Purge Valve
Start the engine and use an OBD2 scanner to clear any stored DTCs. Monitor the EVAP system for any new codes or issues.
11. Step-by-Step Guide: Replacing the EVAP Vent Valve
Replacing the EVAP vent valve is another common repair that can be done at home.
11.1 Gathering Necessary Tools and Parts
You’ll need a new EVAP vent valve, a socket set, a wrench, and a screwdriver. Ensure the new vent valve is compatible with your 2008 Impala.
11.2 Disconnecting the Old Vent Valve
Locate the vent valve and disconnect its electrical connector and hoses. Use a wrench or socket to remove the valve from its mounting bracket.
11.3 Installing the New Vent Valve
Install the new vent valve in the mounting bracket and tighten the fasteners. Reconnect the hoses and electrical connector.
11.4 Testing the New Vent Valve
Start the engine and use an OBD2 scanner to clear any stored DTCs. Monitor the EVAP system for any new codes or issues.
12. Maintaining Your 2008 Impala’s EVAP System for Optimal Performance
Regular maintenance is essential for keeping your 2008 Impala’s EVAP system in good working condition.
12.1 Regular Gas Cap Inspections
Check the gas cap regularly for damage or wear. Replace it if necessary to prevent leaks.
12.2 Hose Inspections
Inspect the EVAP system hoses regularly for cracks or deterioration. Replace any damaged hoses to prevent leaks.
12.3 Scheduled Maintenance
Follow the manufacturer’s recommended maintenance schedule for the EVAP system. This may include replacing the purge valve or vent valve at specific intervals.
13. Understanding Fuel Trim and Its Impact on the EVAP System
Fuel trim refers to the adjustments made by the engine control unit (ECU) to maintain the correct air-fuel ratio. EVAP system problems can affect fuel trim, leading to poor engine performance.
13.1 What Is Fuel Trim?
Fuel trim is the ECU’s way of compensating for variations in the air-fuel mixture. Short-term fuel trim (STFT) adjusts quickly, while long-term fuel trim (LTFT) adjusts over time.
13.2 How EVAP Leaks Affect Fuel Trim
EVAP leaks can cause the ECU to add more fuel to compensate for the lean condition, resulting in a positive fuel trim value. Monitoring fuel trim can help you identify EVAP system problems.
13.3 Using Fuel Trim Data for Diagnosis
Use an OBD2 scanner to monitor STFT and LTFT values. Significant deviations from zero may indicate an EVAP system issue.
14. The Role of the Fuel Tank Pressure Sensor in EVAP System Testing
The fuel tank pressure sensor monitors the pressure inside the fuel tank. This sensor plays a crucial role in EVAP system testing and leak detection.
14.1 How the Fuel Tank Pressure Sensor Works
The fuel tank pressure sensor measures the pressure inside the fuel tank and sends this information to the ECU. The ECU uses this data to monitor the EVAP system’s performance.
14.2 Testing the Fuel Tank Pressure Sensor
Use an OBD2 scanner to monitor the fuel tank pressure sensor’s readings. Compare these values to the manufacturer’s specifications. An incorrect reading indicates a faulty sensor.
14.3 Replacing the Fuel Tank Pressure Sensor
If the fuel tank pressure sensor is faulty, replace it with a new one. Follow the manufacturer’s instructions for installation.
15. Advanced Diagnostic Techniques for Complex EVAP System Issues
For complex EVAP system issues, you may need to use advanced diagnostic techniques, such as pressure testing and component testing.
15.1 Pressure Testing the EVAP System
Pressure testing involves sealing the EVAP system and applying pressure to check for leaks. This technique can help you locate hard-to-find leaks.
15.2 Component Testing
Component testing involves testing individual EVAP system components, such as valves and sensors, to ensure they are functioning correctly.
15.3 Using a Scan Tool for Advanced Diagnostics
Advanced scan tools offer features like bidirectional control and component activation, allowing you to perform more comprehensive EVAP system diagnostics.
16. Troubleshooting Tips for Intermittent EVAP System Problems
Intermittent EVAP system problems can be challenging to diagnose. Here are some troubleshooting tips to help you pinpoint the issue.
16.1 Checking for Loose Connections
Inspect all electrical connectors and hoses for loose connections. Secure any loose connections to prevent intermittent problems.
16.2 Monitoring Live Data Over Time
Use an OBD2 scanner to monitor live data over time. This can help you identify patterns or trends that may indicate an intermittent issue.
16.3 Performing a Thorough Visual Inspection
Perform a thorough visual inspection of all EVAP system components. Look for any signs of damage or wear that may be causing the intermittent problem.
17. Understanding the EVAP System Drive Cycle
The EVAP system drive cycle is a series of driving conditions that must be met for the ECU to perform a self-test of the EVAP system.
17.1 What Is a Drive Cycle?
A drive cycle is a specific set of driving conditions that allows the ECU to run its diagnostic tests. Completing a drive cycle can help you clear EVAP system monitors.
17.2 How to Perform an EVAP System Drive Cycle
Consult your vehicle’s repair manual for the specific drive cycle instructions. Generally, it involves a combination of highway and city driving.
17.3 Common Mistakes to Avoid
Avoid aggressive driving during the drive cycle. Maintain a steady speed and avoid sudden acceleration or braking.
18. The Importance of Using OEM Parts for EVAP System Repairs
Using Original Equipment Manufacturer (OEM) parts for EVAP system repairs ensures proper fit and function.
18.1 Why Choose OEM Parts?
OEM parts are designed to meet the manufacturer’s specifications, ensuring proper performance and reliability.
18.2 Avoiding Aftermarket Parts
Aftermarket parts may not meet the same standards as OEM parts, potentially leading to future problems.
18.3 Ensuring Proper Fit and Function
OEM parts are guaranteed to fit and function correctly, reducing the risk of leaks or malfunctions.
19. How to Clear EVAP System Codes After Repair
After repairing an EVAP system problem, it’s essential to clear the diagnostic trouble codes (DTCs) from the ECU.
19.1 Using an OBD2 Scanner to Clear Codes
Use an OBD2 scanner to clear the stored DTCs. Follow the scanner’s instructions to erase the codes.
19.2 Verifying the Repair
After clearing the codes, monitor the EVAP system for any new codes or issues. This will help you verify that the repair was successful.
19.3 Performing a Drive Cycle
Perform an EVAP system drive cycle to ensure the ECU completes its self-test. This will help you confirm that the EVAP system is functioning correctly.
20. Seeking Professional Help for Complex EVAP System Repairs
For complex EVAP system repairs, it’s best to seek professional help from a qualified mechanic.
20.1 When to Seek Professional Help
If you’re unable to diagnose or repair the EVAP system problem yourself, or if you lack the necessary tools or expertise, seek professional help.
20.2 Finding a Qualified Mechanic
Look for a mechanic with experience in EVAP system diagnostics and repair. Ask for references and check online reviews.
20.3 Getting a Second Opinion
If you’re unsure about a diagnosis or repair recommendation, get a second opinion from another mechanic.
21. Understanding EVAP System Regulations and Compliance
EVAP systems are subject to environmental regulations to reduce emissions. Understanding these regulations is essential for compliance.
21.1 EPA Regulations
The Environmental Protection Agency (EPA) sets regulations for EVAP systems to reduce hydrocarbon emissions.
21.2 State and Local Regulations
Some states and local areas have additional regulations for EVAP systems. Check your local regulations for compliance.
21.3 Ensuring Compliance
Regularly test and maintain your EVAP system to ensure compliance with environmental regulations.
22. The Future of EVAP System Technology
EVAP system technology is constantly evolving to improve efficiency and reduce emissions.
22.1 Advancements in EVAP Systems
New EVAP systems are being developed with improved leak detection and vapor recovery capabilities.
22.2 Hybrid and Electric Vehicle EVAP Systems
Hybrid and electric vehicles also have EVAP systems to manage fuel vapors. These systems are designed to be highly efficient and reliable.
22.3 The Role of Technology in Reducing Emissions
Technology plays a crucial role in reducing emissions from EVAP systems and improving air quality.
23. Real-World Examples of EVAP System Problems and Solutions
Examining real-world examples of EVAP system problems and solutions can provide valuable insights into diagnosing and repairing these issues.
23.1 Case Study 1: Faulty Gas Cap
A common problem is a faulty gas cap, leading to a P0455 code. The solution is to replace the gas cap with a new one.
23.2 Case Study 2: Cracked Hoses
Cracked hoses can cause EVAP system leaks. The solution is to inspect and replace any damaged hoses.
23.3 Case Study 3: Malfunctioning Purge Valve
A malfunctioning purge valve can cause incorrect purge flow. The solution is to test and replace the purge valve.
24. Frequently Asked Questions (FAQs) About EVAP Systems
Addressing frequently asked questions about EVAP systems can help you better understand these complex systems.
24.1 What is the purpose of the EVAP system?
The EVAP system prevents fuel vapors from escaping into the atmosphere.
24.2 How often should I test my EVAP system?
Test your EVAP system regularly, especially if you notice any symptoms of a problem.
24.3 Can I drive with an EVAP system problem?
Driving with an EVAP system problem can reduce fuel efficiency and cause environmental damage.
24.4 What are the common symptoms of an EVAP system problem?
Common symptoms include a check engine light, poor fuel economy, and a fuel odor.
24.5 How can I clear an EVAP system code?
Use an OBD2 scanner to clear the stored DTCs after repairing the problem.
24.6 What tools do I need to test the EVAP system?
You’ll need an OBD2 scanner, a smoke machine, and a multimeter.
24.7 How do I use a smoke machine to find EVAP leaks?
Introduce smoke into the EVAP system and watch for smoke escaping from any leaks.
24.8 What is a fuel tank pressure sensor?
The fuel tank pressure sensor monitors the pressure inside the fuel tank.
24.9 How do I perform an EVAP system drive cycle?
Consult your vehicle’s repair manual for the specific drive cycle instructions.
24.10 Why should I use OEM parts for EVAP system repairs?
OEM parts ensure proper fit and function, reducing the risk of future problems.
25. Conclusion: Maintaining Your 2008 Impala’s EVAP System for Longevity
Regular testing and maintenance of your 2008 Impala’s EVAP system are crucial for environmental protection, fuel efficiency, and preventing engine problems. By understanding the EVAP system, using the right tools, and following proper diagnostic procedures, you can keep your Impala running smoothly and efficiently. For expert guidance and assistance, contact us at MERCEDES-DIAGNOSTIC-TOOL.EDU.VN.
Is your 2008 Impala showing signs of EVAP system issues? Don’t wait for minor problems to turn into major repairs. Contact MERCEDES-DIAGNOSTIC-TOOL.EDU.VN today for professional diagnostic tools, expert services in unlocking hidden features, and reliable repair guidance. Reach out to us at 789 Oak Avenue, Miami, FL 33101, United States, or connect via Whatsapp at +1 (641) 206-8880. Visit our website at MERCEDES-DIAGNOSTIC-TOOL.EDU.VN for immediate assistance. Let us help you keep your Mercedes running at its best with our comprehensive diagnostic solutions and support.