The Yamaha Diagnostic Connector 4 Pin To Obd2 adapter is a crucial tool for mechanics and motorcycle enthusiasts alike. It enables the connection of standard OBD2 diagnostic tools to Yamaha motorcycles, facilitating comprehensive diagnostics and troubleshooting. MERCEDES-DIAGNOSTIC-TOOL.EDU.VN provides in-depth guides and support to help you effectively use this adapter. This empowers users to diagnose issues, clear error codes, and optimize performance with enhanced vehicle insight, streamlining maintenance and repair processes.
Contents
- 1. Understanding the Yamaha Diagnostic Connector 4 Pin to OBD2 Adapter
- 1.1 What is an OBD2 Adapter?
- 1.2 Why is a 4-Pin Connector Needed for Yamaha Motorcycles?
- 1.3 Primary Function of the Adapter
- 2. Identifying the Need for a Yamaha Diagnostic Connector 4 Pin to OBD2 Adapter
- 2.1 Recognizing Diagnostic Port Types on Yamaha Motorcycles
- 2.2 Symptoms Indicating the Need for Diagnostics
- 2.3 Confirming Compatibility with Your Motorcycle Model
- 3. Essential Components of a Yamaha Diagnostic Connector 4 Pin to OBD2 Adapter
- 3.1 The 4-Pin Connector
- 3.2 The OBD2 Connector
- 3.3 Wiring and Pinout Configuration
- 3.4 Housing and Protective Features
- 4. Step-by-Step Guide: Connecting the Yamaha Diagnostic Connector 4 Pin to OBD2 Adapter
- 4.1 Preparing Your Motorcycle for Diagnostic Connection
- 4.2 Connecting the 4-Pin Connector to Your Yamaha Motorcycle
- 4.3 Connecting the OBD2 Connector to Your Diagnostic Tool
- 4.4 Verifying the Connection and Power Supply
- 5. Utilizing OBD2 Diagnostic Tools with the Yamaha Adapter
- 5.1 Selecting a Compatible OBD2 Scanner or Tool
- 5.2 Reading Diagnostic Trouble Codes (DTCs)
- 5.3 Interpreting Diagnostic Data and Error Codes
- 5.4 Clearing Error Codes and Resetting the ECU
- 6. Advanced Diagnostic Procedures with the Yamaha Adapter
- 6.1 Accessing Live Engine Data Streams
- 6.2 Performing Sensor Tests and Actuator Tests
- 6.3 Customizing Motorcycle Settings (If Supported)
- 7. Common Issues and Troubleshooting Tips
- 7.1 Adapter Not Connecting to the Motorcycle’s ECU
- 7.2 Diagnostic Tool Not Recognizing the Adapter
- 7.3 Inaccurate Readings or Error Codes
- 8. Maintaining and Caring for Your Yamaha Diagnostic Connector 4 Pin to OBD2 Adapter
- 8.1 Cleaning and Storing the Adapter
- 8.2 Inspecting for Damage and Wear
- 8.3 Ensuring Proper Wiring and Pinout Integrity
- 9. Benefits of Using a Yamaha Diagnostic Connector 4 Pin to OBD2 Adapter
- 9.1 Cost-Effective Diagnostic Solutions
- 9.2 Enhanced Troubleshooting Capabilities
- 9.3 Improved Motorcycle Performance and Longevity
- 9.4 Convenience and Accessibility
- 10. Choosing the Right Yamaha Diagnostic Connector 4 Pin to OBD2 Adapter
- 10.1 Evaluating Adapter Quality and Durability
- 10.2 Checking Compatibility with Your Motorcycle Model and Year
- 10.3 Reading Customer Reviews and Ratings
- 10.4 Considering Additional Features and Functionality
- 11. Where to Purchase a Yamaha Diagnostic Connector 4 Pin to OBD2 Adapter
- 11.1 Online Retailers and Marketplaces
- 11.2 Motorcycle Parts and Accessories Stores
- 11.3 Direct from Manufacturers
- 11.4 Local Auto Parts Stores
- 12. Case Studies: Successful Diagnostic Applications
- 12.1 Diagnosing a Fuel System Issue
- 12.2 Resolving an Ignition System Problem
- 12.3 Identifying a Sensor Malfunction
- 13. Safety Precautions While Using the Yamaha Diagnostic Connector 4 Pin to OBD2 Adapter
- 13.1 Disconnecting the Battery During Certain Procedures
- 13.2 Avoiding Damage to the Motorcycle’s Electrical System
- 13.3 Following Manufacturer’s Instructions
- 13.4 Seeking Professional Assistance When Needed
- 14. Future Trends in Motorcycle Diagnostics
- 14.1 Wireless Diagnostic Adapters
- 14.2 Smartphone App Integration
- 14.3 Enhanced Diagnostic Capabilities
- 15. Conclusion: Embracing the Power of Diagnostic Tools
- FAQ: Yamaha Diagnostic Connector 4 Pin to OBD2 Adapter
- 1. What is a Yamaha diagnostic connector 4 pin to OBD2 adapter?
- 2. Why do I need a Yamaha diagnostic connector 4 pin to OBD2 adapter?
- 3. Which Yamaha motorcycle models are compatible with the 4-pin to OBD2 adapter?
- 4. How do I connect the Yamaha diagnostic connector 4 pin to OBD2 adapter?
- 5. What can I do with an OBD2 scanner and the Yamaha adapter?
- 6. What if the adapter doesn’t connect to my motorcycle’s ECU?
- 7. Can I use any OBD2 scanner with this adapter?
- 8. How do I interpret diagnostic data and error codes?
- 9. Are there any safety precautions I should take while using the adapter?
- 10. Where can I purchase a Yamaha diagnostic connector 4 pin to OBD2 adapter?
1. Understanding the Yamaha Diagnostic Connector 4 Pin to OBD2 Adapter
The Yamaha diagnostic connector 4 pin to OBD2 adapter serves as a bridge between older Yamaha motorcycles and modern OBD2 diagnostic equipment. But what exactly does this entail?
1.1 What is an OBD2 Adapter?
An OBD2 (On-Board Diagnostics II) adapter is an interface that allows you to connect a vehicle’s computer system to diagnostic tools. According to the Environmental Protection Agency (EPA), OBD2 systems have been standardized in vehicles sold in the United States since 1996. This standardization simplifies vehicle diagnostics, but older systems like those found in some Yamaha motorcycles require an adapter.
1.2 Why is a 4-Pin Connector Needed for Yamaha Motorcycles?
Older Yamaha motorcycles use a proprietary 4-pin diagnostic connector, which is different from the standard 16-pin OBD2 port found in cars and newer motorcycles. The 4-pin connector provides access to essential diagnostic data, but it needs an adapter to interface with standard OBD2 scanners. This adapter translates the signals, enabling mechanics to read and interpret diagnostic information.
1.3 Primary Function of the Adapter
The adapter’s primary function is to convert the 4-pin Yamaha diagnostic signal to the OBD2 format. This conversion allows users to:
- Read diagnostic trouble codes (DTCs)
- Clear error codes
- Access live engine data
- Perform basic diagnostics
Without this adapter, it would be impossible to use standard OBD2 scanners on these Yamaha motorcycles.
2. Identifying the Need for a Yamaha Diagnostic Connector 4 Pin to OBD2 Adapter
Knowing when you need this adapter is crucial for effective motorcycle maintenance.
2.1 Recognizing Diagnostic Port Types on Yamaha Motorcycles
Yamaha motorcycles can have different diagnostic port types depending on the year and model. Newer models often feature the standard OBD2 port, while older ones use the 4-pin connector. Identifying the port type on your motorcycle is the first step in determining if you need an adapter. The 4-pin connector is typically a small, round, or square connector located near the battery or under the seat.
2.2 Symptoms Indicating the Need for Diagnostics
Several symptoms might indicate the need for diagnostics on your Yamaha motorcycle:
- Check engine light is illuminated
- Poor engine performance
- Reduced fuel economy
- Difficulty starting the engine
- Unusual noises or vibrations
If you experience any of these issues, running a diagnostic check can help pinpoint the problem.
2.3 Confirming Compatibility with Your Motorcycle Model
Before purchasing an adapter, it’s essential to confirm compatibility with your specific Yamaha motorcycle model and year. Not all adapters work with all models. Consult the adapter’s product description or the manufacturer’s website to ensure it supports your motorcycle. You can also check online forums and communities for user feedback on compatibility.
3. Essential Components of a Yamaha Diagnostic Connector 4 Pin to OBD2 Adapter
Understanding the key components will help you appreciate the adapter’s functionality and ensure you have everything needed for diagnostics.
3.1 The 4-Pin Connector
This connector is designed to plug directly into the diagnostic port of your Yamaha motorcycle. It is built to provide a secure and reliable connection, ensuring accurate data transfer.
3.2 The OBD2 Connector
The OBD2 connector is a 16-pin interface that connects to your diagnostic scanner or tool. This standardized connector ensures compatibility with a wide range of diagnostic devices.
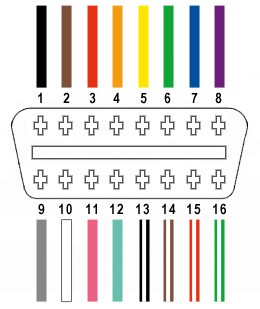
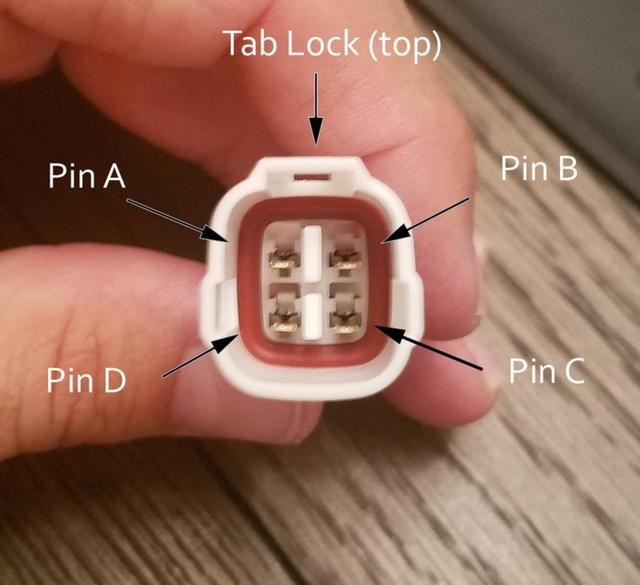
3.3 Wiring and Pinout Configuration
The wiring configuration within the adapter is crucial for proper signal conversion. Typically, the wiring maps the following pins:
- Pin 4 (Chassis Ground) to OBD2 Pin 4
- Pin 6 (CAN High) to OBD2 Pin 6
- Pin 14 (CAN Low) to OBD2 Pin 14
- Pin 16 (Battery Power) to OBD2 Pin 16
Incorrect wiring can lead to inaccurate readings or even damage to your motorcycle’s ECU (Engine Control Unit).
3.4 Housing and Protective Features
The adapter’s housing protects the internal wiring and connectors from environmental factors such as moisture, dust, and physical damage. Look for adapters with robust housings made from durable materials.
 Yamaha Diagnostic Connector
4. Step-by-Step Guide: Connecting the Yamaha Diagnostic Connector 4 Pin to OBD2 Adapter
Connecting the adapter correctly is vital for accurate diagnostics. Follow these steps to ensure a smooth process.
4.1 Preparing Your Motorcycle for Diagnostic Connection
Before connecting the adapter, make sure your motorcycle is turned off. Locate the diagnostic port, which is usually found under the seat or near the battery. Clean the port if necessary to ensure a good connection.
4.2 Connecting the 4-Pin Connector to Your Yamaha Motorcycle
Align the 4-pin connector with the diagnostic port on your motorcycle. Push the connector in firmly until it clicks or is securely in place. Ensure the connection is snug to prevent any loose contact during diagnostics.
4.3 Connecting the OBD2 Connector to Your Diagnostic Tool
Plug the OBD2 connector into your diagnostic tool or scanner. Ensure it fits securely. Turn on your diagnostic tool and follow the manufacturer’s instructions for connecting to the vehicle.
4.4 Verifying the Connection and Power Supply
Once both connectors are connected, verify that your diagnostic tool is receiving power and communicating with the motorcycle’s ECU. Check for any error messages or connection issues. If there are problems, double-check the connections and ensure the adapter is compatible with your motorcycle model.
5. Utilizing OBD2 Diagnostic Tools with the Yamaha Adapter
Once the adapter is connected, you can use OBD2 diagnostic tools to read and interpret data from your Yamaha motorcycle.
5.1 Selecting a Compatible OBD2 Scanner or Tool
Choose an OBD2 scanner or tool that is compatible with motorcycles. Some scanners are designed primarily for cars and may not support the communication protocols used by Yamaha motorcycles. Look for scanners that specifically list motorcycle compatibility in their specifications.
5.2 Reading Diagnostic Trouble Codes (DTCs)
After connecting the scanner, use it to read any diagnostic trouble codes (DTCs) stored in the motorcycle’s ECU. These codes provide valuable information about potential issues. Record the codes for further analysis.
5.3 Interpreting Diagnostic Data and Error Codes
Each DTC corresponds to a specific problem in the motorcycle’s system. Consult the motorcycle’s service manual or online resources to interpret the codes. Common codes relate to issues with the engine, fuel system, ignition system, or sensors.
5.4 Clearing Error Codes and Resetting the ECU
After addressing the underlying issues, use the OBD2 scanner to clear the error codes and reset the ECU. This step turns off the check engine light and allows the motorcycle to relearn optimal settings.
6. Advanced Diagnostic Procedures with the Yamaha Adapter
Beyond basic error code reading, the Yamaha diagnostic connector 4 pin to OBD2 adapter can facilitate advanced diagnostic procedures.
6.1 Accessing Live Engine Data Streams
The adapter allows you to access live engine data streams, providing real-time information about various parameters such as engine speed, throttle position, coolant temperature, and sensor readings. This data can help diagnose intermittent problems and fine-tune engine performance.
6.2 Performing Sensor Tests and Actuator Tests
Some OBD2 scanners support sensor and actuator tests, which allow you to verify the functionality of individual components. For example, you can test the oxygen sensor, fuel injectors, or ignition coils to ensure they are operating correctly.
6.3 Customizing Motorcycle Settings (If Supported)
Depending on the motorcycle model and the capabilities of your diagnostic tool, you may be able to customize certain settings such as idle speed, fuel mixture, or ignition timing. However, exercise caution when modifying these settings, as incorrect adjustments can negatively impact performance and reliability.
7. Common Issues and Troubleshooting Tips
Even with the right adapter and tools, you may encounter issues during the diagnostic process. Here are some common problems and troubleshooting tips.
7.1 Adapter Not Connecting to the Motorcycle’s ECU
If the adapter fails to connect to the motorcycle’s ECU, check the following:
- Ensure the adapter is compatible with your motorcycle model.
- Verify that the connectors are securely plugged in.
- Check the motorcycle’s battery voltage and ensure it is sufficient.
- Inspect the adapter’s wiring for any damage or loose connections.
7.2 Diagnostic Tool Not Recognizing the Adapter
If your diagnostic tool does not recognize the adapter, try the following:
- Update the diagnostic tool’s software to the latest version.
- Ensure the diagnostic tool supports motorcycle diagnostics.
- Try a different diagnostic tool to rule out compatibility issues.
7.3 Inaccurate Readings or Error Codes
Inaccurate readings or error codes can result from a faulty adapter, damaged wiring, or issues with the motorcycle’s sensors. Check the following:
- Inspect the adapter’s wiring and connectors for damage.
- Verify the accuracy of sensor readings with a multimeter.
- Replace any faulty sensors or components.
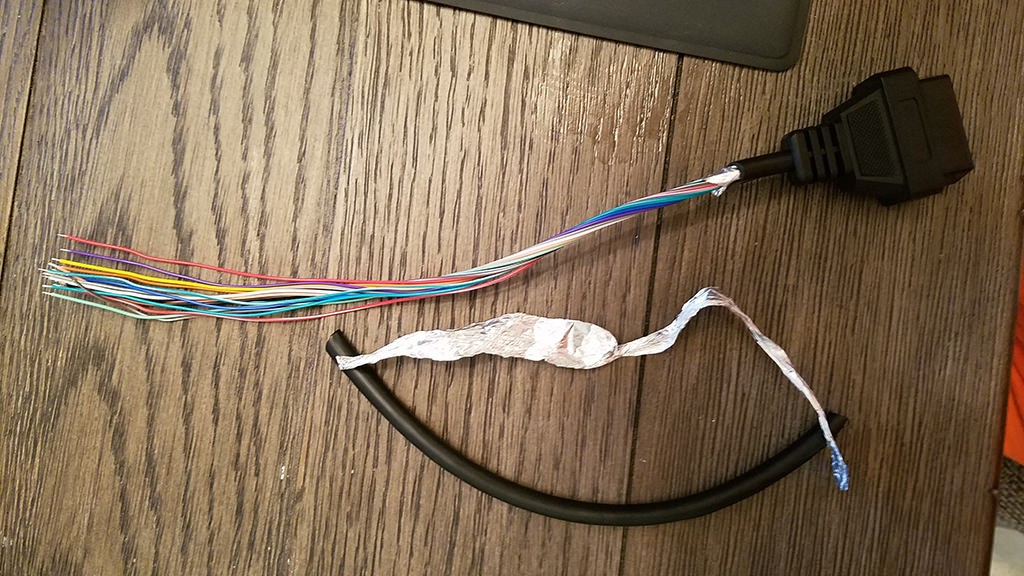 Stripped sheath and shielding
8. Maintaining and Caring for Your Yamaha Diagnostic Connector 4 Pin to OBD2 Adapter
Proper maintenance ensures your adapter remains in good working condition, providing reliable diagnostic results.
8.1 Cleaning and Storing the Adapter
Keep the adapter clean and free from dirt, moisture, and contaminants. Use a dry cloth to wipe down the connectors and housing after each use. Store the adapter in a dry, protected location to prevent damage.
8.2 Inspecting for Damage and Wear
Regularly inspect the adapter for any signs of damage or wear, such as frayed wires, cracked housings, or corroded connectors. Replace the adapter if you notice any significant damage.
8.3 Ensuring Proper Wiring and Pinout Integrity
Periodically check the adapter’s wiring and pinout configuration to ensure they are intact. Use a multimeter to verify the continuity of each wire and the integrity of the connections.
9. Benefits of Using a Yamaha Diagnostic Connector 4 Pin to OBD2 Adapter
Investing in a Yamaha diagnostic connector 4 pin to OBD2 adapter offers numerous benefits for motorcycle owners and mechanics.
9.1 Cost-Effective Diagnostic Solutions
Using an adapter and OBD2 scanner can save you money on diagnostic fees at the motorcycle dealership. You can quickly identify and address issues yourself, reducing the need for expensive professional services.
9.2 Enhanced Troubleshooting Capabilities
The adapter provides access to a wealth of diagnostic data, allowing you to troubleshoot problems more effectively. You can pinpoint the root cause of issues and make informed decisions about repairs.
9.3 Improved Motorcycle Performance and Longevity
Regular diagnostics and maintenance can improve your motorcycle’s performance and extend its lifespan. By addressing issues promptly, you can prevent more serious problems from developing.
9.4 Convenience and Accessibility
With the adapter and an OBD2 scanner, you can perform diagnostics at your convenience, without having to schedule an appointment at a dealership. This is especially useful for riders who prefer to maintain their motorcycles themselves.
10. Choosing the Right Yamaha Diagnostic Connector 4 Pin to OBD2 Adapter
Selecting the appropriate adapter involves considering several factors to ensure compatibility and performance.
10.1 Evaluating Adapter Quality and Durability
Look for adapters made from high-quality materials with robust housings and secure connectors. A durable adapter will withstand the rigors of regular use and provide reliable performance over time.
10.2 Checking Compatibility with Your Motorcycle Model and Year
Verify that the adapter is compatible with your specific Yamaha motorcycle model and year. Consult the product description or manufacturer’s website for compatibility information.
10.3 Reading Customer Reviews and Ratings
Read customer reviews and ratings to get insights into the adapter’s performance and reliability. Pay attention to feedback regarding compatibility, ease of use, and durability.
10.4 Considering Additional Features and Functionality
Some adapters offer additional features such as Bluetooth connectivity, smartphone app integration, or enhanced diagnostic capabilities. Consider these features when choosing an adapter to meet your specific needs.
11. Where to Purchase a Yamaha Diagnostic Connector 4 Pin to OBD2 Adapter
You can purchase Yamaha diagnostic connector 4 pin to OBD2 adapters from various sources, both online and offline.
11.1 Online Retailers and Marketplaces
Many online retailers and marketplaces such as Amazon, eBay, and specialized automotive parts websites offer a wide selection of adapters. Compare prices, read reviews, and check compatibility before making a purchase.
11.2 Motorcycle Parts and Accessories Stores
Motorcycle parts and accessories stores often carry diagnostic adapters and tools. These stores can provide expert advice and assistance in choosing the right adapter for your motorcycle.
11.3 Direct from Manufacturers
Some manufacturers sell adapters directly to consumers through their websites. Purchasing directly from the manufacturer can ensure you are getting a genuine product with full warranty support.
11.4 Local Auto Parts Stores
Local auto parts stores may also carry diagnostic adapters, although the selection may be more limited. Check with your local stores to see if they have the adapter you need in stock.
12. Case Studies: Successful Diagnostic Applications
Real-world examples illustrate the effectiveness of using a Yamaha diagnostic connector 4 pin to OBD2 adapter for motorcycle maintenance.
12.1 Diagnosing a Fuel System Issue
A motorcycle owner noticed poor fuel economy and erratic engine performance on their Yamaha motorcycle. Using an adapter and OBD2 scanner, they read a DTC indicating a problem with the fuel injector circuit. After inspecting the fuel injectors and replacing a faulty one, the motorcycle’s performance returned to normal.
12.2 Resolving an Ignition System Problem
A mechanic used an adapter to diagnose a Yamaha motorcycle with starting problems. The OBD2 scanner revealed a code related to the ignition coil. Testing the ignition coil confirmed it was not functioning correctly. Replacing the coil resolved the starting issue.
12.3 Identifying a Sensor Malfunction
A rider experienced intermittent engine stalling on their Yamaha motorcycle. The adapter and OBD2 scanner identified a faulty oxygen sensor. Replacing the sensor eliminated the stalling issue and improved engine performance.
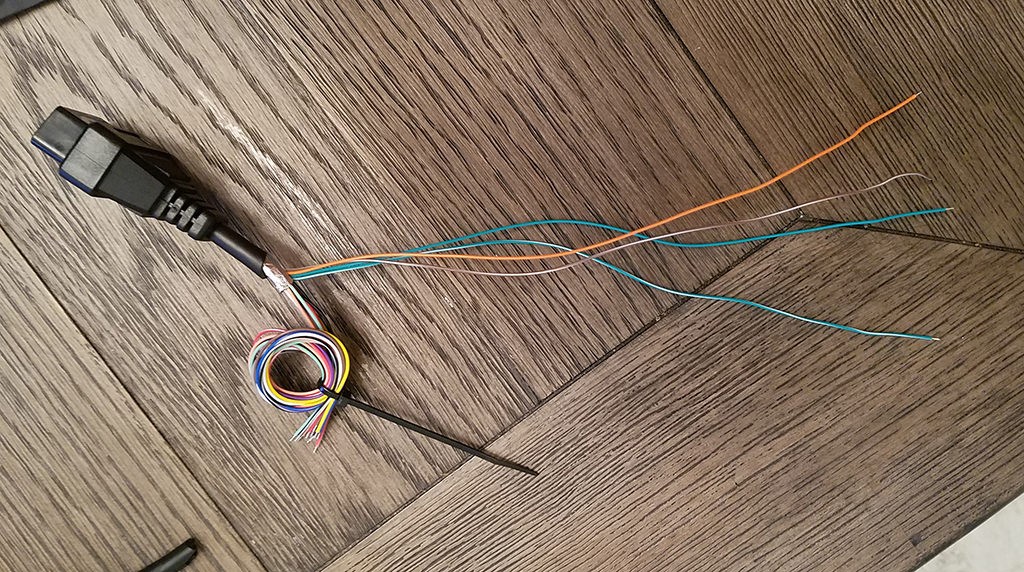 Separated 4 wires being used
13. Safety Precautions While Using the Yamaha Diagnostic Connector 4 Pin to OBD2 Adapter
Safety should always be a top priority when working with diagnostic tools and motorcycle electrical systems.
13.1 Disconnecting the Battery During Certain Procedures
Disconnect the motorcycle’s battery before performing any diagnostic procedures that involve electrical components. This prevents accidental shorts or damage to the ECU.
13.2 Avoiding Damage to the Motorcycle’s Electrical System
Be careful not to damage the motorcycle’s electrical system when connecting or disconnecting the adapter. Avoid forcing connectors and ensure they are properly aligned.
13.3 Following Manufacturer’s Instructions
Always follow the manufacturer’s instructions for using the adapter and diagnostic tool. This ensures you are using the equipment correctly and safely.
13.4 Seeking Professional Assistance When Needed
If you are unsure about any diagnostic procedures or encounter complex issues, seek professional assistance from a qualified motorcycle mechanic.
14. Future Trends in Motorcycle Diagnostics
The field of motorcycle diagnostics is constantly evolving, with new technologies and tools emerging regularly.
14.1 Wireless Diagnostic Adapters
Wireless diagnostic adapters are becoming increasingly popular, offering greater convenience and flexibility. These adapters connect to your smartphone or tablet via Bluetooth or Wi-Fi, allowing you to perform diagnostics remotely.
14.2 Smartphone App Integration
Many diagnostic tools now offer smartphone app integration, providing user-friendly interfaces and advanced features. These apps can display live data, record diagnostic sessions, and provide troubleshooting guidance.
14.3 Enhanced Diagnostic Capabilities
Future diagnostic tools will likely offer enhanced capabilities such as advanced sensor testing, actuator control, and ECU programming. These tools will provide even greater insights into motorcycle systems and enable more precise repairs.
15. Conclusion: Embracing the Power of Diagnostic Tools
The Yamaha diagnostic connector 4 pin to OBD2 adapter is an invaluable tool for motorcycle owners and mechanics alike. It provides access to essential diagnostic data, enabling you to troubleshoot issues, improve performance, and extend the lifespan of your motorcycle. By understanding the adapter’s function, connecting it correctly, and using it in conjunction with OBD2 diagnostic tools, you can take control of your motorcycle’s maintenance and ensure it runs smoothly for years to come.
Are you ready to enhance your motorcycle diagnostics? Contact MERCEDES-DIAGNOSTIC-TOOL.EDU.VN today for expert guidance and support on using the Yamaha diagnostic connector 4 pin to OBD2 adapter! Our team is here to help you unlock the full potential of your diagnostic tools and keep your motorcycle running at its best. Reach out to us at 789 Oak Avenue, Miami, FL 33101, United States, or give us a call on Whatsapp at +1 (641) 206-8880. Visit our website MERCEDES-DIAGNOSTIC-TOOL.EDU.VN for more information and resources.
FAQ: Yamaha Diagnostic Connector 4 Pin to OBD2 Adapter
1. What is a Yamaha diagnostic connector 4 pin to OBD2 adapter?
It’s a device that connects older Yamaha motorcycles with a 4-pin diagnostic port to standard OBD2 diagnostic tools.
2. Why do I need a Yamaha diagnostic connector 4 pin to OBD2 adapter?
You need it to use modern OBD2 scanners on older Yamaha motorcycles that have a 4-pin diagnostic port instead of the standard OBD2 port.
3. Which Yamaha motorcycle models are compatible with the 4-pin to OBD2 adapter?
Compatibility varies, so check the adapter’s product description or the manufacturer’s website to ensure it supports your specific model and year.
4. How do I connect the Yamaha diagnostic connector 4 pin to OBD2 adapter?
First, locate the 4-pin diagnostic port on your Yamaha motorcycle. Then, plug the 4-pin connector into the motorcycle’s port and the OBD2 connector into your diagnostic tool.
5. What can I do with an OBD2 scanner and the Yamaha adapter?
You can read and clear diagnostic trouble codes (DTCs), access live engine data, perform sensor tests, and customize motorcycle settings if supported.
6. What if the adapter doesn’t connect to my motorcycle’s ECU?
Ensure the adapter is compatible, the connectors are secure, the motorcycle’s battery voltage is sufficient, and inspect the adapter’s wiring for damage.
7. Can I use any OBD2 scanner with this adapter?
No, choose an OBD2 scanner that is compatible with motorcycles and supports the communication protocols used by Yamaha motorcycles.
8. How do I interpret diagnostic data and error codes?
Consult your motorcycle’s service manual or online resources to understand the specific meaning of the diagnostic trouble codes (DTCs) you retrieve.
9. Are there any safety precautions I should take while using the adapter?
Yes, disconnect the battery during certain procedures, avoid damage to the motorcycle’s electrical system, follow the manufacturer’s instructions, and seek professional assistance when needed.
10. Where can I purchase a Yamaha diagnostic connector 4 pin to OBD2 adapter?
You can purchase it from online retailers, motorcycle parts stores, directly from manufacturers, and local auto parts stores. Contact MERCEDES-DIAGNOSTIC-TOOL.EDU.VN for more guidance and support on using the Yamaha diagnostic connector 4 pin to OBD2 adapter! Call on Whatsapp at +1 (641) 206-8880.
 Wiring diagram
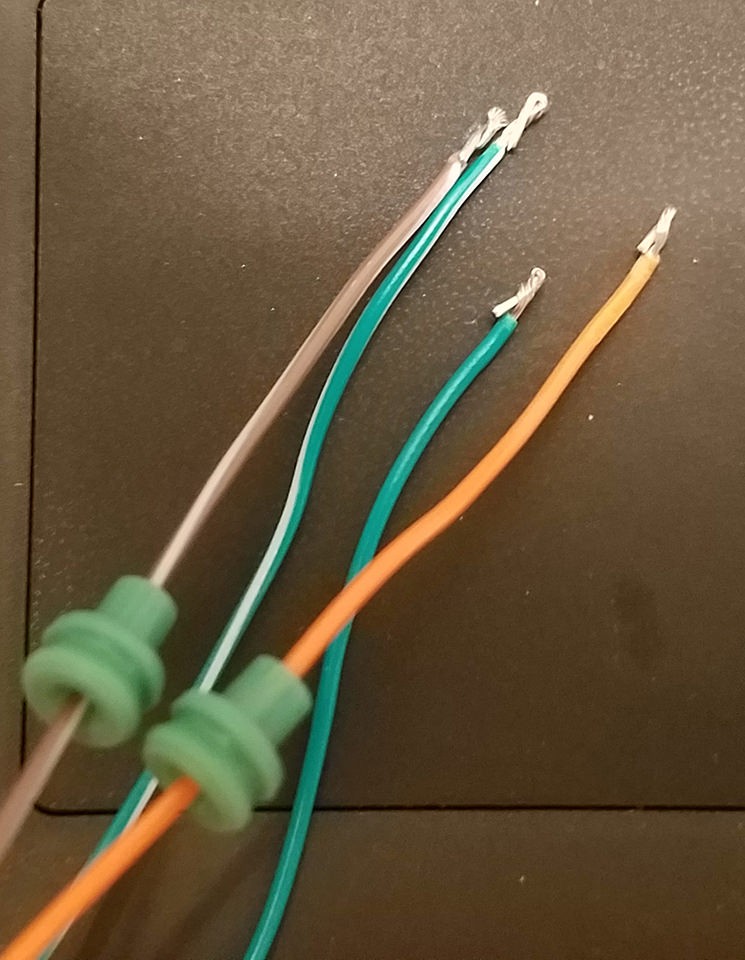
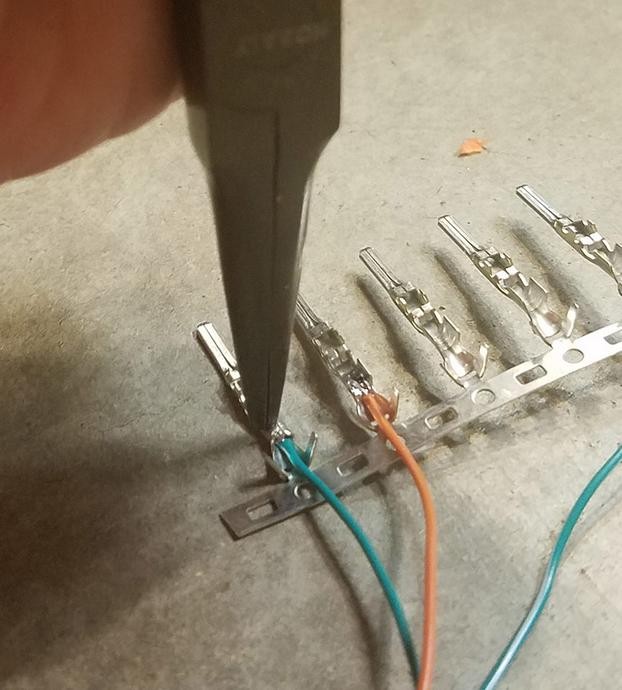
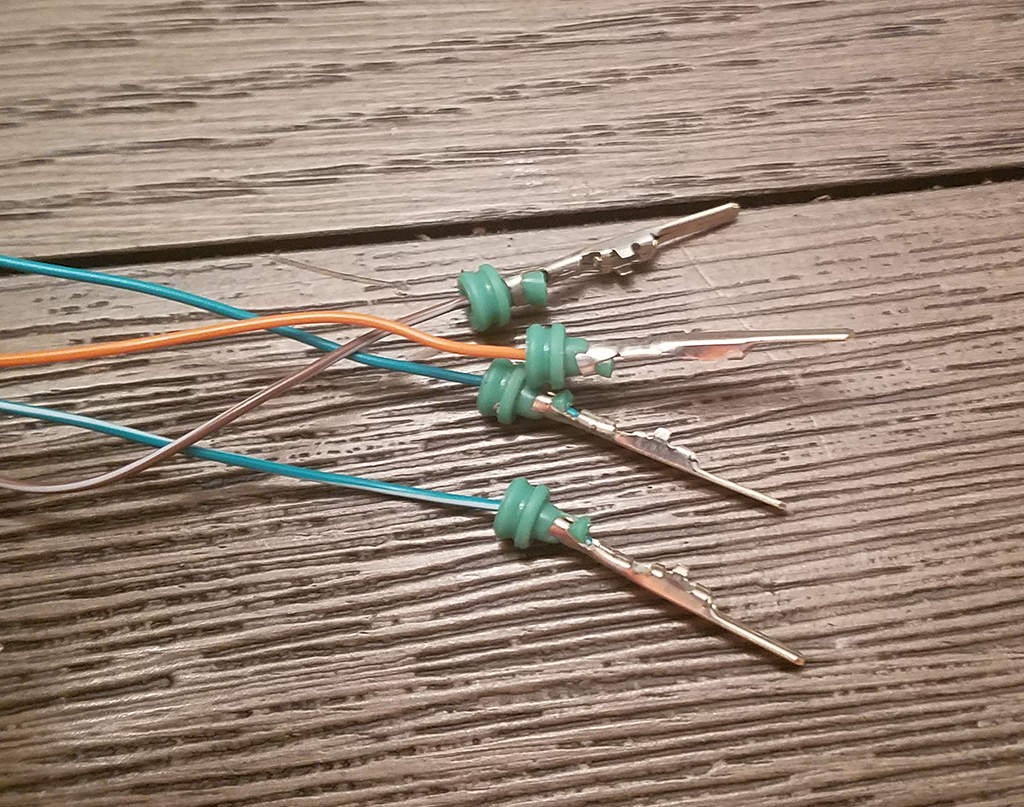
 Connector pins
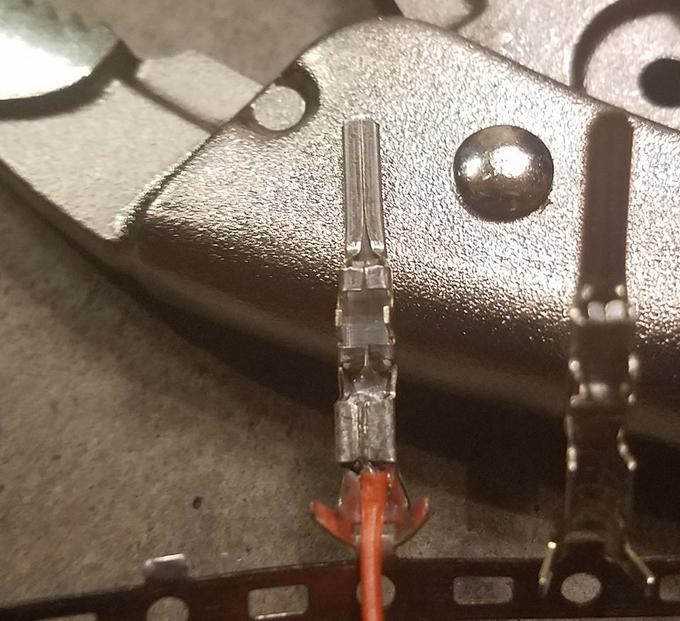
 Crimping the connector
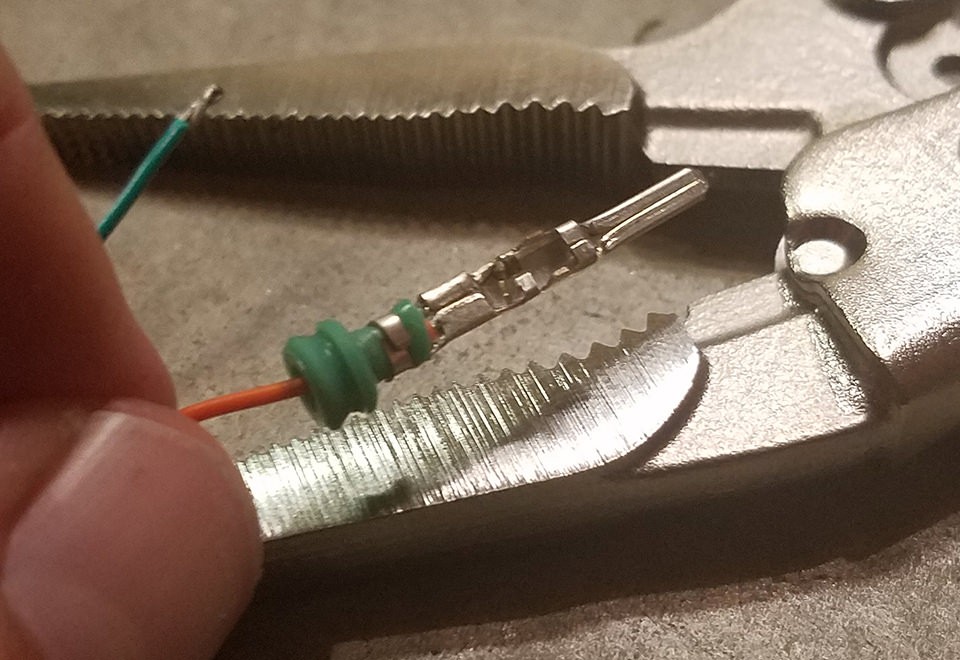
 Crimped connector
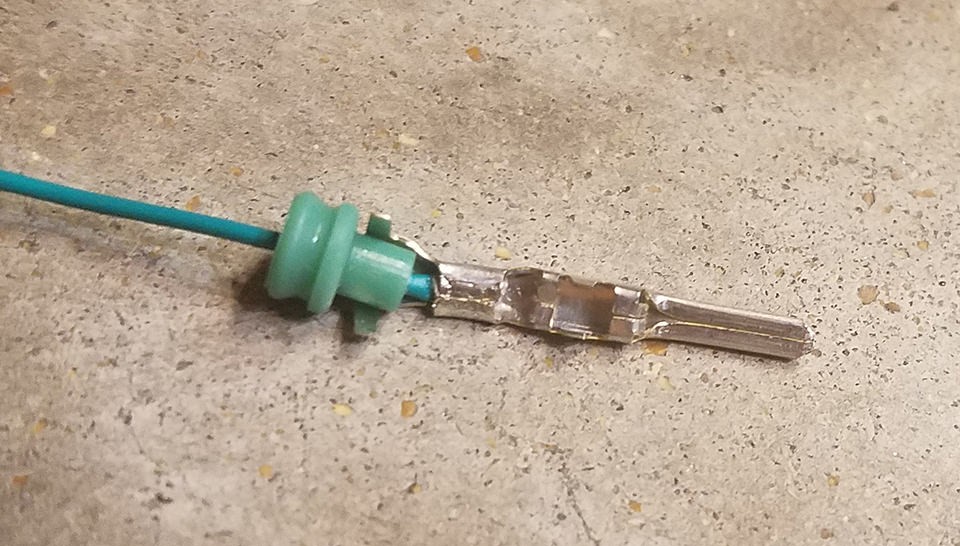 Sealed connector
 Sealed and crimped
 Connector sealed
 Final connector
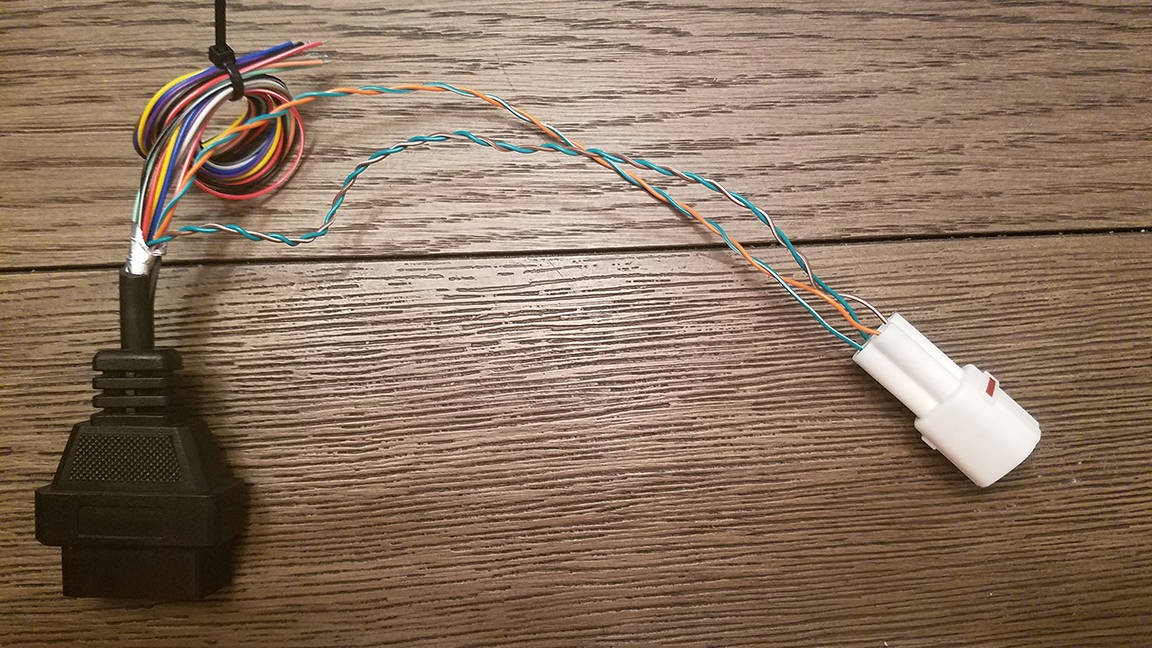 Finished product
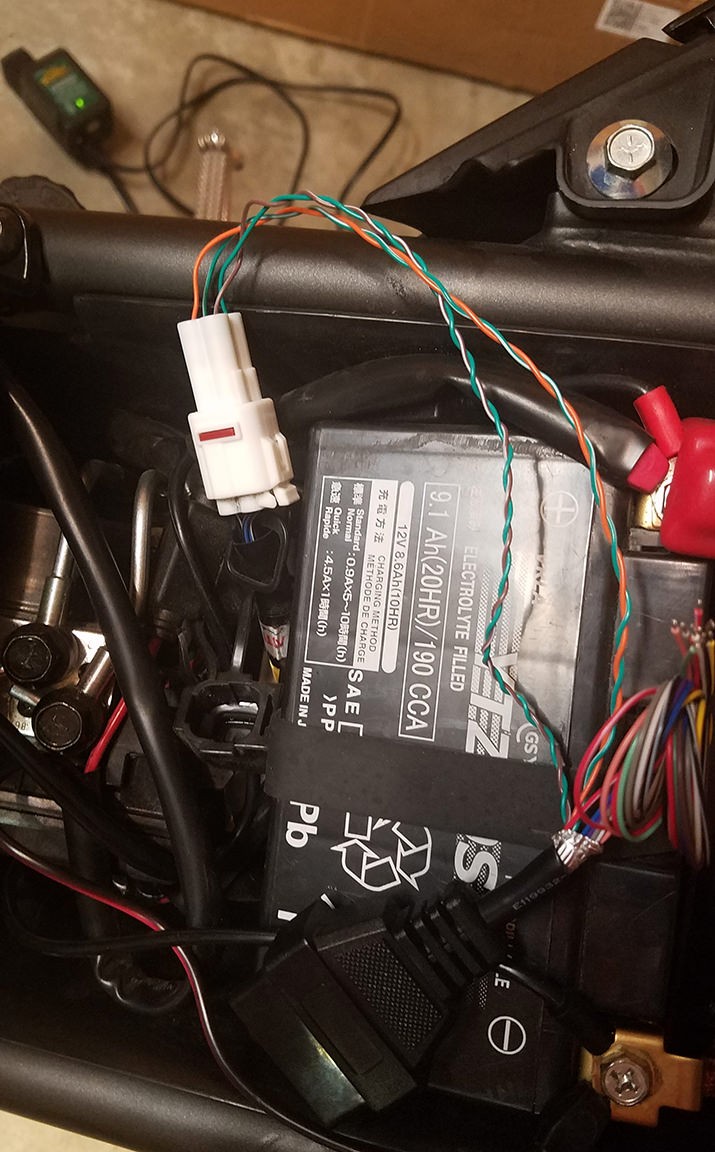 Final product detail