The Ancel AD410 OBD1 OBD2 scanner is compatible with most modern vehicles that support OBD2 protocols, making it a versatile tool for diagnosing car issues; MERCEDES-DIAGNOSTIC-TOOL.EDU.VN offers detailed information to confirm compatibility and unlock the scanner’s full potential. Understanding the specifications and capabilities of this scanner will enable you to accurately diagnose and resolve vehicle problems, improving performance and reliability while exploring advanced diagnostics, real-time data analysis, and emission readiness checks.
Contents
- 1. Understanding OBD1 and OBD2: A Brief Overview
- 1.1. OBD1: The Predecessor
- 1.2. OBD2: The Standardized Successor
- 1.3. Key Differences in a Table
- 1.4. Implications for Scanner Compatibility
- 2. Is the Ancel AD410 Compatible with OBD1 Vehicles?
- 2.1. Native OBD2 Support
- 2.2. Limited OBD1 Support
- 2.3. Using Adapters for OBD1 Compatibility
- 2.4. Expert Insights on OBD1 Compatibility
- 2.5. Recommendations for OBD1 Diagnostics
- 3. Ensuring Compatibility with OBD2 Vehicles
- 3.1. Vehicle Requirements
- 3.2. Locating the OBD2 Port
- 3.3. Connecting the Ancel AD410
- 3.4. Navigating the Scanner Interface
- 3.5. Troubleshooting Connection Issues
- 3.6. Real-World Example
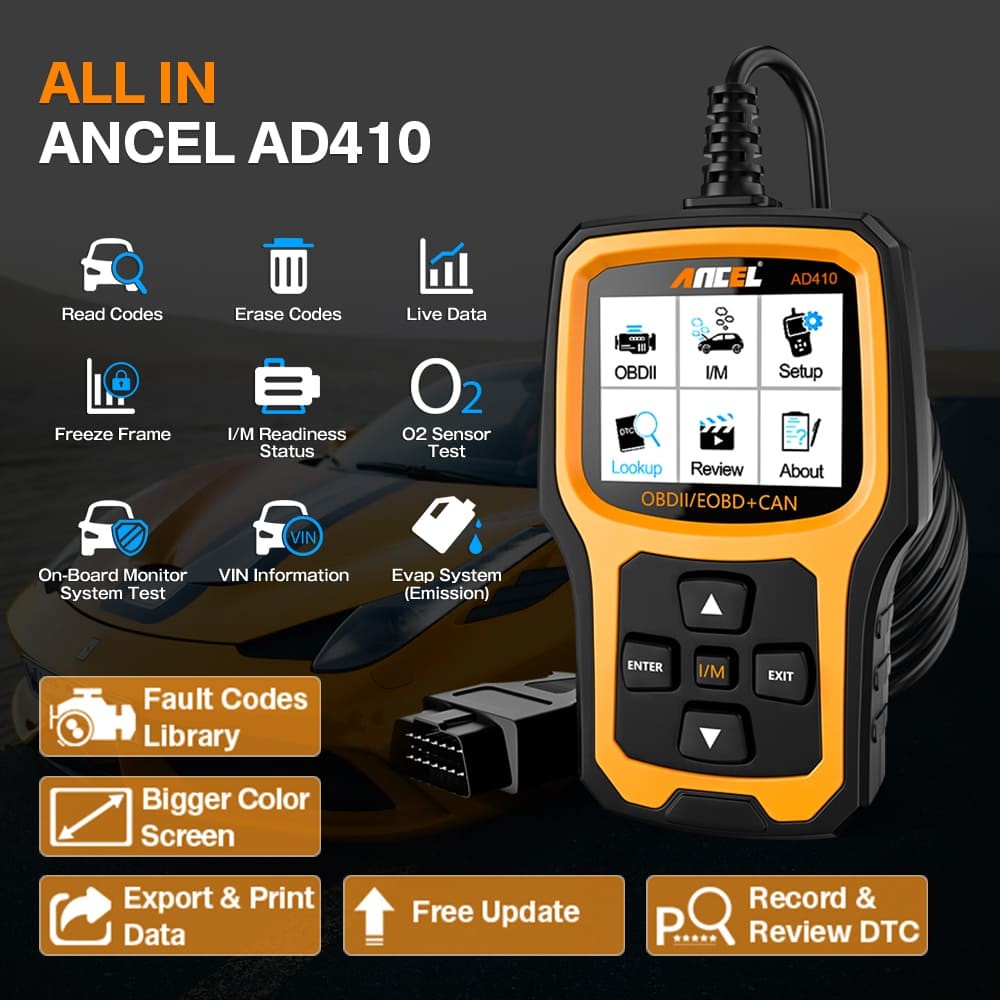
- 4. Key Features and Benefits of the Ancel AD410
- 4.1. Reading and Clearing Trouble Codes
- 4.2. Live Data Streaming
- 4.3. I/M Readiness Check
- 4.4. Freeze Frame Data
- 4.5. Vehicle Information Retrieval
- 4.6. Benefits of Using the Ancel AD410
- 5. Step-by-Step Guide: Using Ancel AD410 on an OBD2 Vehicle
- 5.1. Preparation
- 5.2. Connecting the Scanner
- 5.3. Navigating the Interface
- 5.4. Reading and Interpreting Codes
- 5.5. Live Data Monitoring
- 5.6. Performing I/M Readiness Check
- 5.7. Clearing Codes (After Repairs)
- 5.8. Best Practices
- 6. Advanced Diagnostic Techniques with Ancel AD410
- 6.1. Analyzing Freeze Frame Data
- 6.2. Using Live Data Graphs
- 6.3. Performing Component Tests
- 6.4. Diagnosing Intermittent Issues
- 6.5. Practical Applications
- 7. Common Diagnostic Trouble Codes (DTCs) and Solutions
- 7.1. P0171: System Too Lean (Bank 1)
- 7.2. P0300: Random Misfire Detected
- 7.3. P0420: Catalyst System Efficiency Below Threshold (Bank 1)
- 7.4. P0101: Mass Air Flow (MAF) Sensor Circuit Range/Performance Problem
- 7.5. Resources for DTC Lookup
- 8. Maintaining and Updating Your Ancel AD410
- 8.1. Cleaning the Scanner
- 8.2. Storing the Scanner
- 8.3. Updating the Software
- 8.4. Checking for Updates Regularly
- 8.5. Troubleshooting Update Issues
- 8.6. Benefits of Regular Maintenance and Updates
- 9. The Future of OBD Scanners and Diagnostics
- 9.1. Wireless Scanners
- 9.2. Cloud-Based Diagnostics
- 9.3. Artificial Intelligence (AI) in Diagnostics
- 9.4. Integration with Telematics Systems
- 9.5. The Role of Professional Mechanics
- 10. How to Contact MERCEDES-DIAGNOSTIC-TOOL.EDU.VN for Further Assistance
- 10.1. Contact Information
- 10.2. Services Offered
- 10.3. Call to Action
- 10.4. Why Choose Us?
Here’s a comprehensive exploration to ensure compatibility and optimal usage.
1. Understanding OBD1 and OBD2: A Brief Overview
Before diving into the Ancel AD410’s compatibility, it’s essential to understand the differences between OBD1 and OBD2 systems.
1.1. OBD1: The Predecessor
OBD1 (On-Board Diagnostics 1) was the early generation of vehicle diagnostic systems. It was primarily used in vehicles manufactured before 1996 in the United States. Key characteristics of OBD1 include:
- Manufacturer-Specific: OBD1 systems were highly specific to each car manufacturer. This means that the diagnostic connectors, communication protocols, and error codes varied significantly between brands like Ford, GM, Toyota, and Mercedes-Benz.
- Limited Standardization: There was little to no standardization across different makes and models. A tool that worked on one OBD1 vehicle might not work on another, even if they were from the same year.
- Basic Diagnostic Information: OBD1 primarily provided basic diagnostic information, such as detecting misfires and sensor failures. The depth and breadth of data available were limited compared to later systems.
- Proprietary Connectors and Software: Each manufacturer used its own diagnostic connectors and software, making it difficult for independent mechanics and car owners to diagnose issues without specific tools.
1.2. OBD2: The Standardized Successor
OBD2 (On-Board Diagnostics 2) is the standardized system mandated in the United States for all cars and light trucks manufactured since 1996. Its key features include:
- Standardized Connector: OBD2 uses a standard 16-pin Diagnostic Link Connector (DLC), ensuring that any OBD2 scanner can physically connect to any OBD2-compliant vehicle.
- Standardized Protocol: OBD2 employs several standardized communication protocols, such as CAN (Controller Area Network), ISO 9141-2, and SAE J1850. This standardization ensures that scanners can communicate with the vehicle’s computer regardless of the manufacturer.
- Comprehensive Diagnostic Data: OBD2 provides access to a wide range of diagnostic data, including engine parameters, emission control system status, and sensor readings. This allows for more accurate and detailed diagnostics.
- Standardized Error Codes: OBD2 uses a set of standardized Diagnostic Trouble Codes (DTCs), making it easier to identify and troubleshoot issues. These codes are consistent across different makes and models, simplifying the diagnostic process.
- Emission Monitoring: OBD2 systems continuously monitor vehicle emissions and can detect issues that might cause the vehicle to fail an emissions test.
1.3. Key Differences in a Table
| Feature | OBD1 | OBD2 |
|---|---|---|
| Manufacturing Era | Pre-1996 | 1996 and newer |
| Standardization | Manufacturer-specific | Standardized across all vehicles |
| Connector | Proprietary, varies by manufacturer | Standard 16-pin DLC |
| Communication | Varies by manufacturer | Standardized protocols (CAN, ISO) |
| Diagnostic Data | Limited, basic information | Comprehensive, detailed data |
| Error Codes | Manufacturer-specific | Standardized DTCs |
| Emission Focus | Minimal | Continuous emission monitoring |
1.4. Implications for Scanner Compatibility
The differences between OBD1 and OBD2 have significant implications for scanner compatibility. OBD1 scanners are typically designed to work with specific makes and models, while OBD2 scanners are universally compatible with all OBD2-compliant vehicles.
- OBD1 Scanners: These are often more complex to use because they require specific adapters, connectors, and software for each vehicle. They also provide less detailed information compared to OBD2 scanners.
- OBD2 Scanners: These offer a standardized and user-friendly approach to vehicle diagnostics. They can read and clear codes, monitor live data, and perform various diagnostic tests on any OBD2-compliant vehicle.
2. Is the Ancel AD410 Compatible with OBD1 Vehicles?
The Ancel AD410 is primarily designed as an OBD2 scanner, which means it is inherently compatible with vehicles manufactured from 1996 onwards in the United States.
2.1. Native OBD2 Support
The Ancel AD410 is fully compliant with OBD2 protocols, including:
- SAE J1850 PWM
- SAE J1850 VPW
- ISO 9141-2
- ISO 14230-4 (KWP2000)
- ISO 15765-4 (CAN)
This compliance ensures that the scanner can communicate effectively with the onboard computer systems of OBD2 vehicles, providing access to diagnostic information such as:
- Reading and clearing Diagnostic Trouble Codes (DTCs)
- Monitoring live data streams
- Performing I/M readiness checks
- Retrieving vehicle information (VIN, CID, CVN)
2.2. Limited OBD1 Support
The Ancel AD410 does not offer native support for OBD1 vehicles due to the lack of standardization in these older systems. However, some users have found ways to use the AD410 with OBD1 vehicles through the use of adapters.
2.3. Using Adapters for OBD1 Compatibility
To use the Ancel AD410 with an OBD1 vehicle, you would typically need an OBD1-to-OBD2 adapter. These adapters convert the proprietary OBD1 connector to the standard 16-pin OBD2 connector, allowing you to physically connect the AD410 to the vehicle.
-
Challenges with Adapters: Even with an adapter, compatibility is not guaranteed. OBD1 systems vary widely, and the adapter may not correctly translate the communication protocols used by the vehicle.
-
Potential Issues: Some common issues encountered when using adapters include:
- Incompatible Protocols: The adapter may not support the specific communication protocol used by the OBD1 vehicle.
- Incorrect Wiring: The adapter may not correctly map the pins from the OBD1 connector to the OBD2 connector, leading to communication errors.
- Limited Functionality: Even if the scanner can connect to the vehicle, it may only be able to read a limited set of data or perform basic functions.
-
Manufacturer Recommendations: It’s essential to consult the vehicle’s service manual and the adapter manufacturer’s documentation to ensure compatibility and proper usage.
2.4. Expert Insights on OBD1 Compatibility
According to automotive diagnostic expert John Kelly, “While OBD2 scanners can sometimes be adapted for use with OBD1 vehicles, the results are often inconsistent. The lack of standardization in OBD1 systems means that even with an adapter, you may not be able to access all the diagnostic information you need. In some cases, using an incompatible adapter can even damage the vehicle’s computer system.”
2.5. Recommendations for OBD1 Diagnostics
If you need to diagnose an OBD1 vehicle, it’s generally recommended to use a scanner specifically designed for OBD1 systems. These scanners come with the necessary adapters, connectors, and software to communicate effectively with older vehicles.
3. Ensuring Compatibility with OBD2 Vehicles
The Ancel AD410 is designed for optimal performance with OBD2 vehicles. Here’s how to ensure compatibility and get the most out of your scanner.
3.1. Vehicle Requirements
To be compatible with the Ancel AD410, your vehicle must meet the following requirements:
- Model Year: The vehicle must be manufactured in 1996 or later (in the United States).
- OBD2 Compliance: The vehicle must be OBD2-compliant, meaning it adheres to the standardized OBD2 protocols and has a 16-pin DLC.
3.2. Locating the OBD2 Port
The OBD2 port is typically located inside the passenger compartment. Common locations include:
- Under the Dashboard: Often found beneath the steering wheel column.
- Near the Center Console: Sometimes located near the gear shifter or center console area.
- Inside the Glove Box: In some vehicles, the port may be located inside the glove box.
Refer to your vehicle’s owner’s manual for the exact location of the OBD2 port.
3.3. Connecting the Ancel AD410
To connect the Ancel AD410 to your vehicle:
- Turn Off the Ignition: Ensure the vehicle’s ignition is turned off before connecting the scanner.
- Locate the OBD2 Port: Find the 16-pin DLC in your vehicle.
- Plug in the Scanner: Connect the Ancel AD410 to the OBD2 port.
- Turn On the Ignition: Turn the ignition to the “on” position without starting the engine.
- Power On the Scanner: The scanner should power on automatically. If not, check the connection and ensure the vehicle’s battery has sufficient power.
3.4. Navigating the Scanner Interface
Once the scanner is connected and powered on, you can navigate the interface using the buttons on the device. Common functions include:
- Read Codes: Displays any Diagnostic Trouble Codes (DTCs) stored in the vehicle’s computer.
- Erase Codes: Clears DTCs after repairs have been made.
- Live Data: Shows real-time data streams from various sensors and systems.
- I/M Readiness: Checks the status of emission-related systems.
- Vehicle Info: Retrieves the vehicle’s VIN, CID, and CVN.
3.5. Troubleshooting Connection Issues
If the Ancel AD410 fails to connect to your vehicle, consider the following troubleshooting steps:
- Check the Connection: Ensure the scanner is securely plugged into the OBD2 port.
- Verify Vehicle Compatibility: Confirm that your vehicle is OBD2-compliant.
- Check the Vehicle’s Battery: A weak battery can sometimes prevent the scanner from communicating with the vehicle’s computer.
- Inspect the OBD2 Port: Look for any damage or corrosion in the OBD2 port.
- Consult the User Manual: Refer to the Ancel AD410 user manual for specific troubleshooting steps.
3.6. Real-World Example
Consider a scenario where you are using the Ancel AD410 on a 2018 Honda Civic. You would:
- Locate the OBD2 port under the dashboard.
- Plug in the AD410.
- Turn the ignition to the “on” position.
- Navigate to the “Read Codes” function to identify any DTCs.
If the scanner successfully reads the codes, it confirms compatibility with the vehicle.
4. Key Features and Benefits of the Ancel AD410
The Ancel AD410 offers several features that make it a valuable tool for diagnosing and maintaining your vehicle.
4.1. Reading and Clearing Trouble Codes
One of the primary functions of the Ancel AD410 is to read and clear Diagnostic Trouble Codes (DTCs). These codes provide valuable information about potential issues in your vehicle’s systems.
- Reading Codes: The scanner retrieves DTCs from the vehicle’s computer and displays them along with a brief description of the problem.
- Clearing Codes: After you have made the necessary repairs, you can use the scanner to clear the DTCs, turning off the check engine light.
4.2. Live Data Streaming
The Ancel AD410 can display live data streams from various sensors and systems in your vehicle. This feature allows you to monitor real-time performance and identify issues that may not trigger a DTC.
- Monitoring Parameters: You can monitor parameters such as engine RPM, coolant temperature, oxygen sensor readings, and fuel trim values.
- Identifying Problems: By observing these data streams, you can identify issues such as a faulty sensor, a vacuum leak, or a misfiring cylinder.
4.3. I/M Readiness Check
The I/M (Inspection and Maintenance) readiness check is a valuable feature that helps you determine if your vehicle is ready for an emissions test.
- Emission-Related Systems: The scanner checks the status of various emission-related systems, such as the catalytic converter, oxygen sensors, and evaporative emissions control system.
- Readiness Status: The scanner displays the readiness status of each system, indicating whether it has been tested and passed.
4.4. Freeze Frame Data
The freeze frame data feature captures a snapshot of the vehicle’s data at the moment a DTC is triggered.
- Diagnostic Information: This data can provide valuable diagnostic information, such as the engine load, RPM, and coolant temperature at the time the problem occurred.
- Analyzing Issues: By analyzing the freeze frame data, you can gain insights into the conditions that led to the problem and identify potential causes.
4.5. Vehicle Information Retrieval
The Ancel AD410 can retrieve the vehicle’s VIN (Vehicle Identification Number), CID (Calibration Identification), and CVN (Calibration Verification Number).
- Vehicle Identification: This information can be useful for verifying the vehicle’s identity, checking for recalls, and ordering parts.
- Calibration Verification: The CID and CVN can be used to verify that the vehicle’s software is up to date and has not been tampered with.
4.6. Benefits of Using the Ancel AD410
Using the Ancel AD410 offers several benefits, including:
- Cost Savings: By diagnosing and repairing issues yourself, you can save money on expensive mechanic fees.
- Convenience: You can quickly and easily check your vehicle for problems without having to take it to a shop.
- Peace of Mind: Knowing the condition of your vehicle can give you peace of mind and help you avoid unexpected breakdowns.
- Informed Decisions: With access to diagnostic data, you can make informed decisions about vehicle maintenance and repairs.
5. Step-by-Step Guide: Using Ancel AD410 on an OBD2 Vehicle
To maximize the utility of your Ancel AD410, follow this step-by-step guide:
5.1. Preparation
- Gather Information: Have your vehicle’s make, model, and year ready.
- Locate OBD2 Port: Consult your vehicle’s manual to find the OBD2 port, usually under the dashboard.
- Ensure Power: Make sure your vehicle’s battery is charged.
5.2. Connecting the Scanner
- Turn Off Ignition: Switch off your vehicle’s engine before plugging in the Ancel AD410.
- Plug-In: Connect the scanner to the OBD2 port. Ensure it’s securely fitted.
- Turn On Ignition: Switch the ignition to the ‘On’ position without starting the engine.
5.3. Navigating the Interface
- Power Up: The scanner should power up automatically. If not, check the connection.
- Select Function: Use the buttons to navigate to your desired function. Common options include ‘Read Codes’, ‘Live Data’, and ‘I/M Readiness’.
5.4. Reading and Interpreting Codes
- Read Codes: Select ‘Read Codes’ to view any stored Diagnostic Trouble Codes (DTCs).
- Record Codes: Note down the codes and their descriptions.
- Research: Use resources like MERCEDES-DIAGNOSTIC-TOOL.EDU.VN or other reputable sites to understand what the codes mean.
5.5. Live Data Monitoring
- Select Live Data: Choose ‘Live Data’ from the main menu.
- Choose Parameters: Select the parameters you want to monitor, such as engine RPM or coolant temperature.
- Analyze Data: Observe the data streams to identify any anomalies.
5.6. Performing I/M Readiness Check
- Select I/M Readiness: Navigate to the ‘I/M Readiness’ option.
- View Status: Check the status of various emission-related systems. Ensure all systems are marked as ‘Ready’.
5.7. Clearing Codes (After Repairs)
- Repair Vehicle: Fix any issues identified by the DTCs or live data analysis.
- Select Erase Codes: After repairs, select ‘Erase Codes’ from the main menu.
- Confirm Clear: Follow the prompts to clear the codes and reset the check engine light.
5.8. Best Practices
- Consult Manuals: Always refer to your vehicle’s service manual and the Ancel AD410 user manual for specific instructions and troubleshooting tips.
- Regular Checks: Perform regular diagnostic checks to catch potential problems early.
- Professional Help: If you’re unsure about any diagnostic or repair procedures, seek help from a qualified mechanic.
6. Advanced Diagnostic Techniques with Ancel AD410
To fully leverage the Ancel AD410, it’s beneficial to explore advanced diagnostic techniques.
6.1. Analyzing Freeze Frame Data
Freeze frame data captures a snapshot of your vehicle’s condition when a DTC is triggered. This data includes parameters like engine load, RPM, and coolant temperature.
- Accessing Freeze Frame: Select the option to view freeze frame data for a specific DTC.
- Interpreting Data: Analyze the data to understand the conditions that led to the problem. For example, if the engine load was high and the RPM was low, it could indicate a problem with the transmission or engine.
6.2. Using Live Data Graphs
The Ancel AD410 allows you to view live data in graphical format. This can be useful for identifying trends and patterns that might not be obvious in numerical data.
- Selecting Parameters: Choose the parameters you want to graph, such as oxygen sensor voltage or fuel trim values.
- Observing Trends: Watch the graph as you drive or perform diagnostic tests. Look for any unusual spikes, dips, or flat lines.
6.3. Performing Component Tests
Some OBD2 systems allow you to perform component tests using the Ancel AD410. These tests can help you verify the functionality of specific components, such as the oxygen sensors or the evaporative emissions control system.
- Accessing Tests: Navigate to the component test menu and select the test you want to perform.
- Following Instructions: Follow the on-screen instructions to perform the test and interpret the results.
6.4. Diagnosing Intermittent Issues
Intermittent issues can be challenging to diagnose because they don’t always trigger a DTC. However, the Ancel AD410 can help you identify these problems by monitoring live data and looking for unusual patterns.
- Monitor Key Parameters: Focus on parameters that are likely to be related to the issue, such as sensor readings or fuel trim values.
- Record Data: If you notice any unusual behavior, record the data and note the conditions under which it occurred.
- Analyze Patterns: Look for patterns in the data that might indicate the cause of the problem.
6.5. Practical Applications
Consider a situation where your car is experiencing a rough idle. Using the Ancel AD410, you can:
- Read Codes: Check for any DTCs that might indicate the cause of the rough idle.
- Monitor Live Data: Observe the engine RPM, fuel trim values, and oxygen sensor readings.
- Perform Component Tests: Test the oxygen sensors and the idle air control valve to verify their functionality.
- Analyze Freeze Frame: Review the freeze frame data if a DTC is present.
By combining these techniques, you can gather valuable information and narrow down the potential causes of the rough idle.
7. Common Diagnostic Trouble Codes (DTCs) and Solutions
Understanding common DTCs can significantly enhance your diagnostic capabilities with the Ancel AD410.
7.1. P0171: System Too Lean (Bank 1)
This code indicates that the engine is running lean, meaning there is too much air and not enough fuel in the air-fuel mixture.
-
Possible Causes: Vacuum leaks, faulty oxygen sensors, clogged fuel injectors, low fuel pressure.
-
Troubleshooting Steps:
- Inspect vacuum hoses for leaks.
- Check oxygen sensor readings.
- Test fuel injector performance.
- Verify fuel pressure.
-
Solution: Repair any vacuum leaks, replace faulty oxygen sensors, clean or replace clogged fuel injectors, or repair fuel system issues.
7.2. P0300: Random Misfire Detected
This code indicates that one or more cylinders are misfiring randomly.
-
Possible Causes: Faulty spark plugs, ignition coils, fuel injectors, vacuum leaks, low compression.
-
Troubleshooting Steps:
- Inspect spark plugs and ignition coils.
- Test fuel injector performance.
- Check for vacuum leaks.
- Perform a compression test.
-
Solution: Replace faulty spark plugs, ignition coils, or fuel injectors, repair any vacuum leaks, or address engine mechanical issues.
7.3. P0420: Catalyst System Efficiency Below Threshold (Bank 1)
This code indicates that the catalytic converter is not functioning efficiently.
-
Possible Causes: Faulty catalytic converter, exhaust leaks, faulty oxygen sensors.
-
Troubleshooting Steps:
- Inspect the catalytic converter for damage.
- Check for exhaust leaks.
- Test oxygen sensor performance.
-
Solution: Replace the catalytic converter, repair any exhaust leaks, or replace faulty oxygen sensors.
7.4. P0101: Mass Air Flow (MAF) Sensor Circuit Range/Performance Problem
This code indicates an issue with the MAF sensor, which measures the amount of air entering the engine.
-
Possible Causes: Dirty or faulty MAF sensor, vacuum leaks, intake air leaks.
-
Troubleshooting Steps:
- Inspect and clean the MAF sensor.
- Check for vacuum leaks.
- Inspect the intake air system for leaks.
-
Solution: Clean or replace the MAF sensor, repair any vacuum leaks, or address intake air system issues.
7.5. Resources for DTC Lookup
- MERCEDES-DIAGNOSTIC-TOOL.EDU.VN: Offers detailed explanations and troubleshooting tips for common DTCs.
- Online Databases: Websites like OBD-Codes.com and AutoCodes.com provide comprehensive information about DTCs.
- Vehicle Service Manual: Your vehicle’s service manual contains detailed diagnostic procedures and troubleshooting steps.
By understanding these common DTCs and their solutions, you can effectively use the Ancel AD410 to diagnose and repair vehicle issues.
8. Maintaining and Updating Your Ancel AD410
To ensure your Ancel AD410 remains effective and up-to-date, proper maintenance and regular updates are essential.
8.1. Cleaning the Scanner
- Use a Soft Cloth: Clean the scanner with a soft, dry cloth to remove dirt and fingerprints.
- Avoid Liquids: Do not use harsh chemicals or liquids, as they can damage the scanner’s components.
8.2. Storing the Scanner
- Protective Case: Store the scanner in its protective case to prevent damage.
- Temperature Control: Avoid storing the scanner in extreme temperatures or direct sunlight.
8.3. Updating the Software
The Ancel AD410 comes with free lifetime updates. Keeping the software up-to-date ensures that you have the latest features, bug fixes, and vehicle coverage.
- Download the Update Tool: Visit the Ancel website and download the update tool for your scanner.
- Connect the Scanner: Connect the scanner to your computer using a USB cable.
- Run the Update Tool: Follow the on-screen instructions to update the software.
8.4. Checking for Updates Regularly
Make it a habit to check for updates regularly, especially when new vehicle models are released. This will ensure that your scanner remains compatible with the latest vehicles.
8.5. Troubleshooting Update Issues
If you encounter problems while updating the software, try the following:
- Check the Internet Connection: Ensure that your computer has a stable internet connection.
- Restart the Computer: Restart your computer and try the update process again.
- Contact Support: If the problem persists, contact Ancel customer support for assistance.
8.6. Benefits of Regular Maintenance and Updates
- Improved Performance: Updates can improve the scanner’s performance and reliability.
- Expanded Vehicle Coverage: Updates often include support for new vehicle models.
- Bug Fixes: Updates can fix bugs and address compatibility issues.
9. The Future of OBD Scanners and Diagnostics
The field of automotive diagnostics is constantly evolving, with new technologies and features emerging regularly.
9.1. Wireless Scanners
Wireless OBD scanners are becoming increasingly popular. These scanners connect to your smartphone or tablet via Bluetooth or Wi-Fi, allowing you to view diagnostic data on a larger screen.
- Advantages: Convenience, portability, and enhanced user interface.
- Considerations: Battery life, security, and compatibility with your mobile device.
9.2. Cloud-Based Diagnostics
Cloud-based diagnostic systems store vehicle data in the cloud, allowing you to access it from anywhere.
- Advantages: Remote diagnostics, data logging, and predictive maintenance.
- Considerations: Data security, privacy, and subscription costs.
9.3. Artificial Intelligence (AI) in Diagnostics
AI is being used to develop more advanced diagnostic tools that can automatically identify and diagnose problems.
- Advantages: Faster and more accurate diagnostics, reduced reliance on manual troubleshooting.
- Considerations: Cost, complexity, and the need for specialized training.
9.4. Integration with Telematics Systems
Telematics systems are being integrated with OBD scanners to provide real-time vehicle monitoring and diagnostic information.
- Advantages: Proactive maintenance, improved vehicle safety, and enhanced fleet management.
- Considerations: Data privacy, security, and the cost of telematics services.
9.5. The Role of Professional Mechanics
Even with these advancements, professional mechanics will continue to play a vital role in vehicle diagnostics and repair.
- Expertise and Experience: Mechanics have the expertise and experience to diagnose complex problems and perform advanced repairs.
- Specialized Tools: Mechanics have access to specialized tools and equipment that are not available to the average car owner.
- Safety Considerations: Some repairs require specialized knowledge and training to ensure they are performed safely.
10. How to Contact MERCEDES-DIAGNOSTIC-TOOL.EDU.VN for Further Assistance
For any questions or assistance regarding Mercedes-Benz diagnostics, repairs, or unlocking hidden features, feel free to contact MERCEDES-DIAGNOSTIC-TOOL.EDU.VN.
10.1. Contact Information
- Address: 789 Oak Avenue, Miami, FL 33101, United States
- WhatsApp: +1 (641) 206-8880
- Website: MERCEDES-DIAGNOSTIC-TOOL.EDU.VN
10.2. Services Offered
- Diagnostic Tools Consultation: Expert advice on selecting the right diagnostic tools for your Mercedes-Benz.
- Hidden Feature Unlocking: Step-by-step guidance on unlocking hidden features on specific Mercedes-Benz models.
- Repair and Maintenance Guides: Detailed instructions for performing simple repairs and routine maintenance.
- Troubleshooting Support: Assistance with diagnosing and resolving vehicle issues.
10.3. Call to Action
Do you need help diagnosing an issue, unlocking hidden features, or maintaining your Mercedes-Benz? Contact MERCEDES-DIAGNOSTIC-TOOL.EDU.VN today! Our team of experts is ready to assist you with all your diagnostic, repair, and maintenance needs.
10.4. Why Choose Us?
- Expertise: Decades of experience in Mercedes-Benz diagnostics and repair.
- Comprehensive Information: Access to a vast library of diagnostic information, repair guides, and troubleshooting tips.
- Customer Support: Dedicated customer support to answer your questions and provide assistance.
- Proven Results: Countless satisfied customers who have successfully diagnosed and repaired their Mercedes-Benz vehicles using our resources.
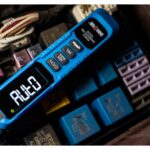
 ancel ad410 obd2 scanner
By understanding the compatibility of the Ancel AD410, utilizing its features effectively, and seeking assistance from MERCEDES-DIAGNOSTIC-TOOL.EDU.VN, you can ensure your Mercedes-Benz remains in optimal condition. This comprehensive approach will help you save money, make informed decisions, and enjoy peace of mind on the road.