Tesla Model 3 Obd2 Port provides access to crucial vehicle data. At MERCEDES-DIAGNOSTIC-TOOL.EDU.VN, we guide you on utilizing this port for diagnostics and customization safely and efficiently. Explore its capabilities with our expert insights, ensuring you get the most out of your Tesla while minimizing risks.
Contents
- 1. Understanding the Tesla Model 3 OBD2 Port
- 1.1. What is an OBD2 Port?
- 1.2. Why Tesla Model 3 Doesn’t Have a Standard OBD2 Port
- 1.3. Location of the Tesla Model 3 Diagnostic Connector
- 1.4. Tools Required to Access the Tesla Model 3 OBD2 Port
- 1.5. Safety Precautions Before Plugging in the Cable
- 2. Step-by-Step Installation Guide for Tesla Model 3 OBD2 Cable
- 2.1. Preparing the Tesla Model 3 for Installation
- 2.2. Accessing the Diagnostic Connector
- 2.3. Removing the Rear Center Console Cover
- 2.4. Connecting the Tesla Model 3 Diagnostic Cable
- 2.5. Connecting the OBD2 Dongle and Final Checks
- 3. Popular OBD2 Apps and Software for Tesla Model 3
- 3.1. Scan My Tesla
- 3.2. TM-Spy
- 3.3. TeslaLogger
- 3.4. Torque Pro
- 3.5. Other Compatible OBD2 Apps
- 4. Unlocking Hidden Features and Customization Options
- 4.1. Understanding Tesla’s Hidden Features
- 4.2. Popular Hidden Features to Unlock
- 4.3. Tools and Software Required for Unlocking Features
- 4.4. Step-by-Step Guide to Unlocking a Specific Feature
- 4.5. Risks and Precautions When Unlocking Features
- 5. Diagnosing Common Issues Using the OBD2 Port
- 5.1. Reading Diagnostic Trouble Codes (DTCs)
- 5.2. Common DTCs in Tesla Model 3
- 5.3. Interpreting DTCs and Their Meanings
- 5.4. Using OBD2 Data to Monitor Vehicle Health
- 5.5. Key Parameters to Monitor
- 6. Common Issues and Troubleshooting Tips
- 6.1. Connection Problems with the OBD2 Dongle
- 6.2. Inaccurate or Missing Data
- 6.3. Error Messages and Fault Codes
- 6.4. Seeking Professional Assistance
- 7. Maintaining and Servicing Your Tesla Model 3
- 7.1. Recommended Maintenance Schedule
- 7.2. Using OBD2 Data for Maintenance
- 7.3. Tips for Extending the Life of Your Tesla Model 3
- 7.4. The Role of MERCEDES-DIAGNOSTIC-TOOL.EDU.VN in Tesla Maintenance
- 8. Advanced Diagnostics and Customization
- 8.1. Accessing Advanced Parameters and PIDs
- 8.2. Customizing Vehicle Settings and Parameters
- 8.3. Using Tesla Toolbox and Other Advanced Tools
- 8.4. Precautions and Risks of Advanced Customization
- 8.5. The Importance of Expert Knowledge and Guidance
- 9. Future Trends in Tesla Diagnostics and Customization
- 9.1. Over-the-Air (OTA) Updates and Diagnostics
- 9.2. Integration with Tesla’s Diagnostic Tools
- 9.3. The Role of Artificial Intelligence (AI) in Diagnostics
- 9.4. Enhanced Security Measures
- 9.5. The Future of MERCEDES-DIAGNOSTIC-TOOL.EDU.VN
- 10. Frequently Asked Questions (FAQ) About Tesla Model 3 OBD2 Port
- 10.1. What is the Tesla Model 3 OBD2 port used for?
- 10.2. Where is the OBD2 port located in the Tesla Model 3?
- 10.3. What tools do I need to access the Tesla Model 3 OBD2 port?
- 10.4. Is it safe to use the OBD2 port on my Tesla Model 3?
- 10.5. Can I unlock hidden features using the OBD2 port?
- 10.6. Will using the OBD2 port void my Tesla warranty?
- 10.7. What are some popular apps for Tesla Model 3 diagnostics?
- 10.8. How can I diagnose common issues using the OBD2 port?
- 10.9. How often should I perform maintenance on my Tesla Model 3?
- 10.10. Where can I get help with Tesla Model 3 diagnostics and customization?
1. Understanding the Tesla Model 3 OBD2 Port
The On-Board Diagnostics (OBD2) port is a standardized interface used in most modern vehicles, allowing access to the vehicle’s computer systems for diagnostics and monitoring. However, Tesla vehicles, including the Model 3, do not have a standard OBD2 port readily accessible to the user. Instead, they use a proprietary connector that requires a special adapter cable to interface with standard OBD2 tools. Understanding this distinction is crucial for anyone looking to diagnose issues or monitor their Tesla Model 3’s performance.
1.1. What is an OBD2 Port?
An OBD2 port is a 16-pin connector that provides access to a vehicle’s computer system. It was standardized in the mid-1990s to allow technicians to easily diagnose problems using a scan tool. According to the Environmental Protection Agency (EPA), all cars and light trucks manufactured for sale in the United States after January 1, 1996, are required to support OBD2 diagnostics. This standardization ensures that any compliant scan tool can read diagnostic trouble codes (DTCs) and other data from any OBD2-compliant vehicle.
1.2. Why Tesla Model 3 Doesn’t Have a Standard OBD2 Port
Tesla vehicles, including the Model 3, deviate from the standard by using a proprietary diagnostic connector. This decision is primarily driven by Tesla’s unique approach to vehicle diagnostics and data access. Unlike traditional automakers, Tesla heavily relies on over-the-air (OTA) updates and its own diagnostic software. By using a proprietary connector, Tesla maintains greater control over the data accessed and the tools used for diagnostics, ensuring that only authorized equipment can make changes to the vehicle’s software. Tesla’s approach also helps protect against potential security vulnerabilities that could arise from using a standard, more widely accessible OBD2 port.
1.3. Location of the Tesla Model 3 Diagnostic Connector
The diagnostic connector in the Tesla Model 3 is located at the rear of the center console, beneath the air vents. Accessing it requires removing a small plastic panel at the bottom of the center console between the two front seats. This panel is held in place by several push-fit clips. Once the panel is removed, the Tesla proprietary diagnostic connector is revealed.
1.4. Tools Required to Access the Tesla Model 3 OBD2 Port
To access the diagnostic information on a Tesla Model 3, you’ll need specific tools:
- Tesla Model 3 Diagnostic Cable: This adapter cable converts the Tesla proprietary connector to a standard OBD2 interface.
- OBD2 Dongle: A compatible OBD2 dongle, such as the OBDLink LX or MX+, is necessary to read the data from the OBD2 port.
- Suitable App or Software: You’ll need an app or software designed to interpret the data, such as Scan My Tesla or TM-Spy.
1.5. Safety Precautions Before Plugging in the Cable
Before connecting any equipment to your Tesla Model 3, it’s essential to take certain safety precautions:
- Turn Off the Tesla: Ensure the Tesla Model 3 is completely turned off before plugging the cable into the diagnostic connector. The shutdown process takes about 15 minutes and can be initiated from the main screen in the Tesla.
- Avoid Damage: Failure to turn off the car before inserting the cable could potentially damage the vehicle’s electronic systems or trigger errors.
- Inspect the Cable: Always check the diagnostic cable for any signs of damage before each use to prevent potential issues.
- Risk Responsibility: Connecting equipment to your Tesla is done entirely at your own risk. It’s crucial to understand that Carvitas or MERCEDES-DIAGNOSTIC-TOOL.EDU.VN cannot be held responsible for any damage to your vehicle caused by improper use of the diagnostic tools or cables.
2. Step-by-Step Installation Guide for Tesla Model 3 OBD2 Cable
Installing the OBD2 cable in your Tesla Model 3 involves a few simple steps. This section provides a detailed guide to ensure a smooth and safe installation process.
2.1. Preparing the Tesla Model 3 for Installation
Before you begin, make sure your Tesla Model 3 is ready for the installation process. Follow these steps:
- Turn Off the Vehicle: From the main screen, initiate the shutdown process. This ensures all systems are powered down, preventing potential electronic issues. According to Tesla’s official guidelines, a complete shutdown minimizes the risk of damaging the car’s computer systems.
- Wait 15 Minutes: Allow approximately 15 minutes for the vehicle to completely shut down. This step is crucial for a safe installation.
2.2. Accessing the Diagnostic Connector
The diagnostic connector is located in the rear of the center console. Here’s how to access it:
- Move Front Seats Forward: Slide both front seats all the way forward to create more space in the back.
- Locate the Plastic Panel: Go to the back seat and find the small plastic panel at the bottom of the center console, between the front seats.
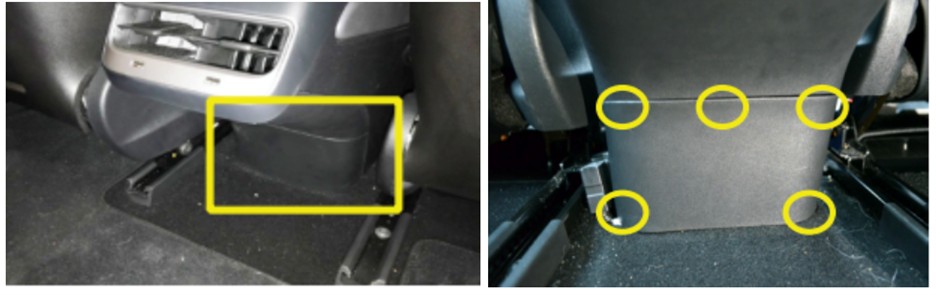 Accessing the Tesla Model 3 diagnostic port by removing the rear console cover
2.3. Removing the Rear Center Console Cover
The plastic panel is held in place by five push-fit clips. Follow these steps to remove it safely:
- Use an Allen Wrench or Screwdriver: Slide the short end of an Allen wrench or L-shaped screwdriver under the panel on the right side.
- Rotate the Tool: Rotate the tool so the short end is vertical.
- Pull the Panel: Pull the tool toward you, parallel to the floor, to loosen the bottom right clip.
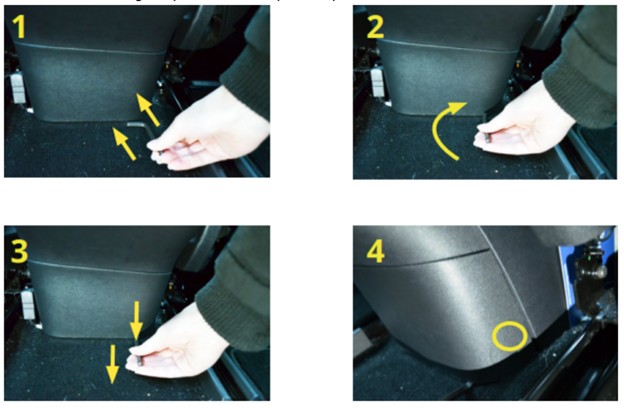 Using an Allen wrench to remove the Tesla Model 3 rear console cover
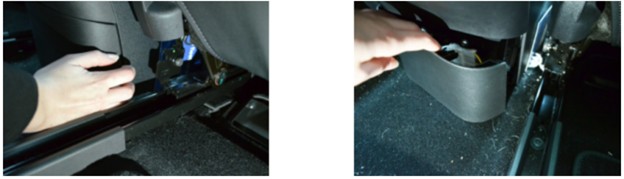
- Loosen Remaining Clips: Use your hands to pull the panel toward you and loosen the clip at the top right, then loosen and open the remaining three clips.
- Remove the Panel: Pull the panel free to reveal the Tesla proprietary diagnostic connector.
 Removing the final clips to access the diagnostic port in a Tesla Model 3
2.4. Connecting the Tesla Model 3 Diagnostic Cable
Now that you have access to the diagnostic connector, follow these steps to connect the cable:
- Release the White Connector: Press the clip that holds the white connector in place and slide it to the left to release it.
- Plug in the Cables: Plug the two white ends of the diagnostic cable into the corresponding connectors in the vehicle.
- Ensure a Secure Fit: Push the connectors until they click into place. They are designed to fit only one way, ensuring proper alignment.
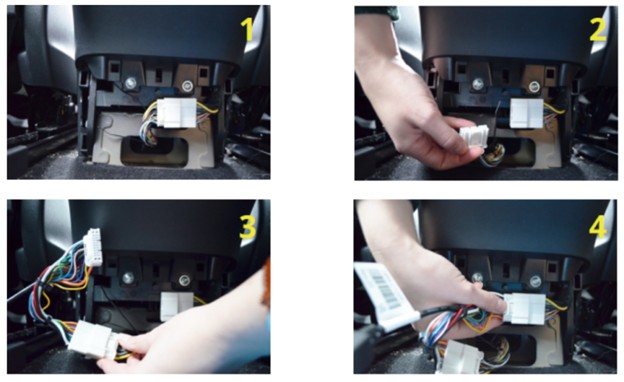 Connecting the OBD2 adapter cable to the Tesla Model 3 diagnostic port
2.5. Connecting the OBD2 Dongle and Final Checks
With the diagnostic cable connected, you can now plug in the OBD2 dongle and perform the final checks:
- Plug in the OBD2 Dongle: Connect the OBD2 dongle to the diagnostic cable.
- Connect to Your Device: Connect the OBD2 dongle to your phone or tablet via Bluetooth or Wi-Fi, depending on the dongle’s capabilities.
- Verify Connection: Ensure that the app or software you are using recognizes the OBD2 dongle and is receiving data from the vehicle.
3. Popular OBD2 Apps and Software for Tesla Model 3
Several apps and software programs are available for accessing and interpreting data from the Tesla Model 3’s OBD2 port. Here are some of the most popular options:
3.1. Scan My Tesla
Scan My Tesla is a popular app specifically designed for Tesla vehicles. It provides a wide range of diagnostic information, including battery health, motor performance, and temperature readings. According to user reviews on the Tesla Motors Club forum, Scan My Tesla is highly regarded for its comprehensive data and user-friendly interface.
3.2. TM-Spy
TM-Spy is another well-regarded app for Tesla diagnostics. It offers real-time data monitoring, historical data logging, and customizable dashboards. TM-Spy is particularly useful for tracking battery degradation and identifying potential issues before they become major problems. The app also supports exporting data for further analysis.
3.3. TeslaLogger
TeslaLogger is a software solution that runs on a Raspberry Pi or a similar device. It continuously logs data from your Tesla, providing detailed insights into driving habits, charging patterns, and vehicle performance. TeslaLogger is popular among Tesla owners who want to track long-term data and optimize their vehicle usage.
3.4. Torque Pro
Torque Pro is a versatile OBD2 app that works with a wide range of vehicles, including the Tesla Model 3 (when used with the appropriate adapter cable). It allows you to monitor various parameters, read diagnostic trouble codes, and even customize the display with real-time gauges. Torque Pro is a cost-effective option for basic diagnostics and performance monitoring.
3.5. Other Compatible OBD2 Apps
In addition to the apps listed above, many other OBD2 apps may be compatible with the Tesla Model 3, provided they support custom PIDs (Parameter IDs) and can communicate with the vehicle’s computer system. Some popular alternatives include OBD Fusion, Car Scanner ELM OBD2, and Dr. Prius/Dr. Hybrid (which can also provide valuable insights into the Tesla’s battery health).
4. Unlocking Hidden Features and Customization Options
One of the most appealing aspects of accessing the Tesla Model 3 OBD2 port is the ability to unlock hidden features and customize vehicle settings. This section explores some of the popular customization options and the tools required to implement them.
4.1. Understanding Tesla’s Hidden Features
Tesla vehicles often have features that are not enabled by default but can be unlocked through software modifications. These hidden features may include advanced driver-assistance functions, performance enhancements, or cosmetic customizations. Accessing and enabling these features can enhance the overall driving experience and personalize the vehicle to your preferences.
4.2. Popular Hidden Features to Unlock
Some of the most popular hidden features that Tesla owners seek to unlock include:
- Acceleration Boost: This feature enhances the vehicle’s acceleration performance, providing quicker off-the-line speeds.
- Heated Rear Seats: Enabling heated rear seats can improve passenger comfort, especially in colder climates.
- Fog Lights: Activating fog lights can enhance visibility in adverse weather conditions.
- Range Increase: In some cases, hidden software settings can unlock additional battery capacity, increasing the vehicle’s range.
4.3. Tools and Software Required for Unlocking Features
Unlocking hidden features on a Tesla Model 3 typically requires specialized software and diagnostic tools. Some popular options include:
- Tesla Toolbox: This software allows advanced users to access and modify various vehicle settings.
- Scan My Tesla: In addition to diagnostics, Scan My Tesla can also be used to enable certain hidden features.
- Custom Firmware Modifications: Some advanced users develop custom firmware modifications to unlock a wider range of features.
4.4. Step-by-Step Guide to Unlocking a Specific Feature
The process of unlocking a specific feature varies depending on the software and tools used. However, here is a general outline of the steps involved:
- Connect to the Vehicle: Use the Tesla Model 3 diagnostic cable and OBD2 dongle to connect your computer to the vehicle’s diagnostic port.
- Launch the Software: Open the Tesla Toolbox or other compatible software.
- Access Vehicle Settings: Navigate to the section of the software that allows you to modify vehicle settings.
- Identify the Feature: Locate the specific feature you want to unlock.
- Enable the Feature: Toggle the setting to enable the feature.
- Apply Changes: Save the changes and apply them to the vehicle’s software.
- Reboot the Vehicle: Reboot the vehicle to ensure the changes take effect.
- Test the Feature: Test the newly enabled feature to verify that it is working correctly.
4.5. Risks and Precautions When Unlocking Features
While unlocking hidden features can be exciting, it’s essential to be aware of the potential risks and take necessary precautions:
- Warranty Voidance: Modifying the vehicle’s software may void the warranty, as it could be considered tampering.
- Software Instability: Incorrect modifications can lead to software instability or malfunctions.
- Data Corruption: Improper use of diagnostic tools can potentially corrupt vehicle data.
- Security Vulnerabilities: Unlocking certain features may expose the vehicle to security vulnerabilities.
To minimize these risks, it’s crucial to:
- Research Thoroughly: Research the specific feature you want to unlock and the tools required.
- Follow Instructions Carefully: Follow the instructions provided by the software developers or experienced users.
- Back Up Data: Back up the vehicle’s data before making any modifications.
- Proceed with Caution: Proceed with caution and only make changes if you are comfortable with the risks involved.
5. Diagnosing Common Issues Using the OBD2 Port
The OBD2 port can be a valuable tool for diagnosing common issues in your Tesla Model 3. By reading diagnostic trouble codes (DTCs) and monitoring various parameters, you can identify potential problems and take corrective action.
5.1. Reading Diagnostic Trouble Codes (DTCs)
Diagnostic trouble codes (DTCs) are standardized codes that indicate specific issues with the vehicle’s systems. When a problem is detected, the vehicle’s computer stores a DTC, which can be read using an OBD2 scan tool.
5.2. Common DTCs in Tesla Model 3
Some common DTCs in the Tesla Model 3 include:
- Battery-Related Codes: These codes indicate issues with the battery pack, such as low voltage, temperature anomalies, or cell imbalances.
- Motor-Related Codes: These codes indicate issues with the electric motor, such as overheating, performance degradation, or sensor failures.
- BMS (Battery Management System) Codes: These codes indicate issues with the battery management system, which monitors and controls the battery pack.
- Thermal Management System Codes: These codes indicate issues with the vehicle’s thermal management system, which regulates the temperature of the battery and motor.
- Charging System Codes: These codes indicate issues with the charging system, such as slow charging, charging errors, or component failures.
5.3. Interpreting DTCs and Their Meanings
Each DTC has a specific meaning that can help you identify the source of the problem. Online databases and diagnostic software can provide detailed information about each code, including potential causes and recommended solutions. For example, a code related to battery voltage might indicate a faulty battery cell, a problem with the charging system, or a wiring issue.
5.4. Using OBD2 Data to Monitor Vehicle Health
In addition to reading DTCs, the OBD2 port can be used to monitor various parameters related to vehicle health. This data can provide valuable insights into the performance and condition of the vehicle’s systems.
5.5. Key Parameters to Monitor
Some key parameters to monitor include:
- Battery Voltage: Monitoring battery voltage can help you identify potential issues with the battery pack or charging system.
- Battery Temperature: Monitoring battery temperature can help you ensure that the battery is operating within its optimal temperature range.
- Motor Temperature: Monitoring motor temperature can help you prevent overheating and potential damage.
- Cell Balance: Monitoring cell balance can help you identify potential issues with individual battery cells.
- Charging Current and Voltage: Monitoring charging current and voltage can help you ensure that the charging system is functioning correctly.
By regularly monitoring these parameters, you can detect potential problems early and take corrective action before they become major issues.
6. Common Issues and Troubleshooting Tips
Even with the best tools and information, you may encounter issues when using the OBD2 port on your Tesla Model 3. This section provides troubleshooting tips for some common problems.
6.1. Connection Problems with the OBD2 Dongle
One common issue is difficulty establishing a connection between the OBD2 dongle and your device. Here are some troubleshooting tips:
- Check Compatibility: Ensure that the OBD2 dongle is compatible with the Tesla Model 3 and the app or software you are using.
- Verify Bluetooth or Wi-Fi Connection: Make sure that Bluetooth or Wi-Fi is enabled on your device and that the OBD2 dongle is properly paired.
- Restart the Dongle and Device: Try restarting both the OBD2 dongle and your device.
- Update Firmware: Check for firmware updates for the OBD2 dongle and install them if available.
- Try a Different App or Device: If possible, try using a different app or device to see if the problem persists.
6.2. Inaccurate or Missing Data
Another common issue is inaccurate or missing data from the OBD2 port. Here are some potential causes and solutions:
- Incorrect PIDs: Ensure that the app or software you are using is configured with the correct PIDs for the Tesla Model 3.
- Faulty Sensors: If the data is consistently inaccurate, there may be a problem with one or more of the vehicle’s sensors.
- Wiring Issues: Check for any loose or damaged wiring connections.
- Software Glitches: Try restarting the vehicle or updating the software.
6.3. Error Messages and Fault Codes
Encountering error messages and fault codes is a common part of the diagnostic process. Here’s how to handle them:
- Record the Codes: Write down the exact error codes and their descriptions.
- Research the Codes: Use online databases or diagnostic software to research the meaning of the codes and potential causes.
- Follow Diagnostic Procedures: Follow the recommended diagnostic procedures to identify the source of the problem.
- Consult a Professional: If you are unsure about how to proceed, consult a qualified technician.
6.4. Seeking Professional Assistance
In some cases, diagnosing and resolving issues with your Tesla Model 3 may require professional assistance. Consider seeking help from a qualified technician if:
- You are Unsure How to Proceed: If you are not comfortable working on your vehicle or are unsure about how to diagnose the problem, it’s best to consult a professional.
- The Problem is Complex: Some issues may be complex and require specialized knowledge and tools to resolve.
- The Problem Affects Safety: If the problem affects the safety of the vehicle, it’s essential to have it repaired by a qualified technician.
7. Maintaining and Servicing Your Tesla Model 3
Regular maintenance and servicing are essential for keeping your Tesla Model 3 in optimal condition. This section provides an overview of the key maintenance tasks and how the OBD2 port can assist with these tasks.
7.1. Recommended Maintenance Schedule
Tesla recommends following a specific maintenance schedule to ensure the long-term reliability of your vehicle. The recommended maintenance tasks include:
- Tire Rotation: Rotate the tires every 6,250 miles (10,000 km) to ensure even wear.
- Brake Inspection: Inspect the brakes regularly and replace them as needed.
- Fluid Checks: Check and top off fluids as needed, including coolant, brake fluid, and windshield washer fluid.
- Cabin Air Filter Replacement: Replace the cabin air filter every year or 12,500 miles (20,000 km).
- Battery Inspection: Inspect the battery pack for any signs of damage or degradation.
7.2. Using OBD2 Data for Maintenance
The OBD2 port can be used to monitor various parameters related to maintenance, such as:
- Battery Health: Monitoring battery voltage, temperature, and cell balance can help you assess the overall health of the battery pack.
- Brake Wear: Monitoring brake pad thickness and rotor condition can help you determine when to replace the brakes.
- Fluid Levels: Monitoring fluid levels can help you identify leaks or low fluid conditions.
- Software Updates: Checking for software updates can help you ensure that your vehicle is running the latest version of the software.
7.3. Tips for Extending the Life of Your Tesla Model 3
In addition to following the recommended maintenance schedule, here are some tips for extending the life of your Tesla Model 3:
- Charge Regularly: Charge the battery regularly to maintain its health and performance.
- Avoid Extreme Temperatures: Avoid exposing the battery to extreme temperatures, as this can accelerate degradation.
- Drive Smoothly: Drive smoothly and avoid aggressive acceleration and braking, as this can put unnecessary stress on the motor and battery.
- Keep the Vehicle Clean: Keep the vehicle clean to prevent corrosion and damage.
- Address Issues Promptly: Address any issues promptly to prevent them from becoming major problems.
7.4. The Role of MERCEDES-DIAGNOSTIC-TOOL.EDU.VN in Tesla Maintenance
At MERCEDES-DIAGNOSTIC-TOOL.EDU.VN, we are committed to providing Tesla owners with the tools and information they need to maintain and service their vehicles effectively. We offer a range of diagnostic tools, software solutions, and expert advice to help you keep your Tesla Model 3 in optimal condition.
8. Advanced Diagnostics and Customization
For advanced users, the Tesla Model 3 OBD2 port can be used for more in-depth diagnostics and customization. This section explores some of the advanced capabilities and the tools required to implement them.
8.1. Accessing Advanced Parameters and PIDs
Advanced diagnostics often require accessing parameters and PIDs (Parameter IDs) that are not typically available through standard OBD2 apps. These parameters can provide more detailed information about the vehicle’s systems and performance.
8.2. Customizing Vehicle Settings and Parameters
Advanced users can also customize various vehicle settings and parameters to personalize their driving experience. This may involve modifying settings related to performance, handling, or comfort.
8.3. Using Tesla Toolbox and Other Advanced Tools
To access advanced parameters and customize vehicle settings, you’ll need specialized tools such as Tesla Toolbox or other advanced diagnostic software. These tools provide a deeper level of access to the vehicle’s computer systems.
8.4. Precautions and Risks of Advanced Customization
Advanced customization can be rewarding, but it also comes with risks. Modifying vehicle settings can potentially void the warranty, cause software instability, or even damage the vehicle. It’s essential to proceed with caution and only make changes if you are comfortable with the risks involved.
8.5. The Importance of Expert Knowledge and Guidance
When performing advanced diagnostics and customization, it’s crucial to have expert knowledge and guidance. Seek advice from experienced Tesla technicians or advanced users to ensure that you are proceeding safely and effectively.
9. Future Trends in Tesla Diagnostics and Customization
The field of Tesla diagnostics and customization is constantly evolving. This section explores some of the future trends and potential developments in this area.
9.1. Over-the-Air (OTA) Updates and Diagnostics
Tesla is known for its over-the-air (OTA) updates, which can improve vehicle performance, add new features, and fix bugs. In the future, OTA updates may also include advanced diagnostic capabilities, allowing Tesla to remotely monitor vehicle health and diagnose issues.
9.2. Integration with Tesla’s Diagnostic Tools
As Tesla continues to develop its diagnostic tools, there may be increased integration with third-party OBD2 apps and software. This could provide users with access to more detailed diagnostic information and customization options.
9.3. The Role of Artificial Intelligence (AI) in Diagnostics
Artificial intelligence (AI) is playing an increasingly important role in vehicle diagnostics. AI algorithms can analyze data from the OBD2 port and other sensors to identify potential issues and predict failures. In the future, AI may be used to provide personalized maintenance recommendations and even automate certain diagnostic tasks.
9.4. Enhanced Security Measures
As vehicles become more connected, security is a growing concern. Future Tesla vehicles may include enhanced security measures to protect against hacking and unauthorized access to the vehicle’s systems.
9.5. The Future of MERCEDES-DIAGNOSTIC-TOOL.EDU.VN
At MERCEDES-DIAGNOSTIC-TOOL.EDU.VN, we are committed to staying at the forefront of Tesla diagnostics and customization. We will continue to provide our customers with the latest tools, information, and expert advice to help them get the most out of their Tesla vehicles.
10. Frequently Asked Questions (FAQ) About Tesla Model 3 OBD2 Port
Here are some frequently asked questions about the Tesla Model 3 OBD2 port:
10.1. What is the Tesla Model 3 OBD2 port used for?
The Tesla Model 3 OBD2 port is used for accessing the vehicle’s computer systems for diagnostics, monitoring, and customization.
10.2. Where is the OBD2 port located in the Tesla Model 3?
The OBD2 port is located at the rear of the center console, beneath the air vents.
10.3. What tools do I need to access the Tesla Model 3 OBD2 port?
You will need a Tesla Model 3 diagnostic cable, an OBD2 dongle, and a suitable app or software.
10.4. Is it safe to use the OBD2 port on my Tesla Model 3?
Yes, but it’s essential to take certain safety precautions, such as turning off the vehicle before plugging in the cable and inspecting the cable for damage.
10.5. Can I unlock hidden features using the OBD2 port?
Yes, but it’s essential to be aware of the potential risks and take necessary precautions.
10.6. Will using the OBD2 port void my Tesla warranty?
Modifying the vehicle’s software may void the warranty, so it’s essential to proceed with caution.
10.7. What are some popular apps for Tesla Model 3 diagnostics?
Some popular apps include Scan My Tesla, TM-Spy, and Torque Pro.
10.8. How can I diagnose common issues using the OBD2 port?
You can read diagnostic trouble codes (DTCs) and monitor various parameters to identify potential problems.
10.9. How often should I perform maintenance on my Tesla Model 3?
Tesla recommends following a specific maintenance schedule, which includes tire rotation, brake inspection, and fluid checks.
10.10. Where can I get help with Tesla Model 3 diagnostics and customization?
You can get help from qualified technicians, experienced users, or resources like MERCEDES-DIAGNOSTIC-TOOL.EDU.VN.
Do you want to diagnose, repair, unlock hidden features, and maintain your Mercedes-Benz? Contact us at 789 Oak Avenue, Miami, FL 33101, United States. Whatsapp: +1 (641) 206-8880. Or visit our website: MERCEDES-DIAGNOSTIC-TOOL.EDU.VN for more information and expert assistance.