The Duke 390 Obd2 4 Pin adapter is essential for accessing real-time engine data and performing diagnostics on your motorcycle. MERCEDES-DIAGNOSTIC-TOOL.EDU.VN provides comprehensive solutions for reading diagnostic data, unlocking hidden features, and ensuring optimal performance. Understanding the specific pin configuration and utilizing the right tools can empower you to maintain your bike efficiently and effectively.
Contents
- 1. What is the Purpose of the Duke 390 OBD2 4 Pin Connector?
- 1.1 Understanding On-Board Diagnostics (OBD2)
- 1.2 Key Functions of the OBD2 Connector
- 1.3 Importance of Accurate Pin Configuration
- 2. What are the Key Components of the Duke 390 OBD2 4 Pin Adapter?
- 2.1 Detailed Look at the OBD2 Connector
- 2.2 The Duke 390 Specific 4 Pin Connector
- 2.3 Wiring and Cable Quality
- 2.4 Protective Housing and Insulation
- 3. How Do You Identify the Pinout Configuration for Your Duke 390?
- 3.1 Consulting the Service Manual
- 3.2 Online Forums and Communities
- 3.3 Using a Multimeter for Verification
- 3.4 Color-Coded Wiring Diagrams
- 4. What Diagnostic Tools are Compatible with the Duke 390 OBD2 4 Pin?
- 4.1 Basic OBD2 Code Readers
- 4.2 Advanced Diagnostic Scanners
- 4.3 Smartphone Apps and Bluetooth Adapters
- 4.4 KTM Diagnostic Tools
- 4.5 Comparison Table of Diagnostic Tools
- 5. Step-by-Step Guide to Connecting and Using the Duke 390 OBD2 4 Pin Adapter
- 5.1 Gathering Necessary Tools and Materials
- 5.2 Locating the Diagnostic Port on Your Duke 390
- 5.3 Connecting the Adapter Cable
- 5.4 Using the Diagnostic Tool or App
- 5.5 Safety Precautions
- 6. What Common Issues Can You Diagnose With a Duke 390 OBD2 Adapter?
- 6.1 Reading and Clearing Diagnostic Trouble Codes (DTCs)
- 6.2 Monitoring Engine Performance Parameters
- 6.3 Identifying Sensor Failures
- 6.4 Diagnosing Fuel System Issues
- 6.5 Detecting Ignition System Problems
- 6.6 Case Studies
- 7. How Can You Use the OBD2 Adapter to Improve Your Duke 390’s Performance?
- 7.1 ECU Remapping and Tuning
- 7.2 Monitoring Aftermarket Performance Parts
- 7.3 Data Logging and Analysis
- 7.4 Performance Enhancement Tips
- 8. What are the Safety Precautions When Working With OBD2 Adapters?
- 8.1 Disconnecting the Battery
- 8.2 Verifying Pinout Configuration
- 8.3 Using High-Quality Cables and Connectors
- 8.4 Following Diagnostic Tool Instructions
- 8.5 Avoiding ECU Damage
- 8.6 Protective Gear
- 9. How to Troubleshoot Common Issues With Your Duke 390 OBD2 Adapter
- 9.1 No Connection to the ECU
- 9.2 Inaccurate Data Readings
- 9.3 Error Codes Not Displaying
- 9.4 Adapter Not Powering On
- 9.5 When to Seek Professional Help
- 10. What Future Developments Can We Expect in Duke 390 Diagnostics?
- 10.1 Enhanced Wireless Connectivity
- 10.2 Cloud-Based Diagnostics
- 10.3 Artificial Intelligence (AI) Integration
- 10.4 Improved Data Visualization
- 10.5 Remote Diagnostics
- 10.6 Integration with Mobile Apps
- 10.7 Research and Development
- Contact MERCEDES-DIAGNOSTIC-TOOL.EDU.VN for Expert Assistance
- FAQ: Duke 390 OBD2 4 Pin
- 1. What is the Duke 390 OBD2 4 pin connector used for?
- 2. Where can I find the pinout configuration for my Duke 390 OBD2 4 pin connector?
- 3. What diagnostic tools are compatible with the Duke 390 OBD2 4 pin connector?
- 4. How do I connect the Duke 390 OBD2 4 pin adapter to my motorcycle?
- 5. What common issues can I diagnose with a Duke 390 OBD2 adapter?
- 6. Can I use the OBD2 adapter to improve my Duke 390’s performance?
- 7. What safety precautions should I take when working with OBD2 adapters?
- 8. What should I do if my diagnostic tool cannot connect to the ECU?
- 9. How can I update the software on my OBD2 diagnostic tool?
- 10. Where can I get professional help with my Duke 390 OBD2 adapter?
1. What is the Purpose of the Duke 390 OBD2 4 Pin Connector?
The Duke 390 OBD2 4 pin connector serves as an interface to access the motorcycle’s Engine Control Unit (ECU) data, which allows for real-time diagnostics, performance monitoring, and troubleshooting. This connector facilitates communication between diagnostic tools and the bike’s computer, enabling users to read error codes, monitor engine parameters, and perform necessary maintenance.
1.1 Understanding On-Board Diagnostics (OBD2)
On-Board Diagnostics (OBD2) is a standardized system used in modern vehicles to monitor and report the performance of various engine components. It allows mechanics and vehicle owners to identify issues by reading diagnostic trouble codes (DTCs) and analyzing real-time data. According to the Environmental Protection Agency (EPA), OBD2 systems have been mandatory in all cars sold in the USA since 1996, enhancing vehicle maintenance and environmental compliance.
1.2 Key Functions of the OBD2 Connector
The OBD2 connector performs several critical functions:
- Retrieving Diagnostic Trouble Codes (DTCs): It enables the reading of error codes that indicate specific issues within the engine or related systems.
- Real-Time Data Monitoring: It provides access to live engine data, such as coolant temperature, oil pressure, and RPM.
- System Testing: It allows for active testing of components, such as fuel injectors and sensors, to verify their functionality.
- ECU Reprogramming: In some advanced applications, it can be used to reprogram the ECU to optimize performance or address software glitches.
1.3 Importance of Accurate Pin Configuration
Accurate pin configuration is crucial to ensure proper communication between the diagnostic tool and the ECU. Incorrect wiring can lead to misdiagnosis, data corruption, or even damage to the ECU. Therefore, it’s essential to verify the pinout information specific to the Duke 390 model year before making any connections.
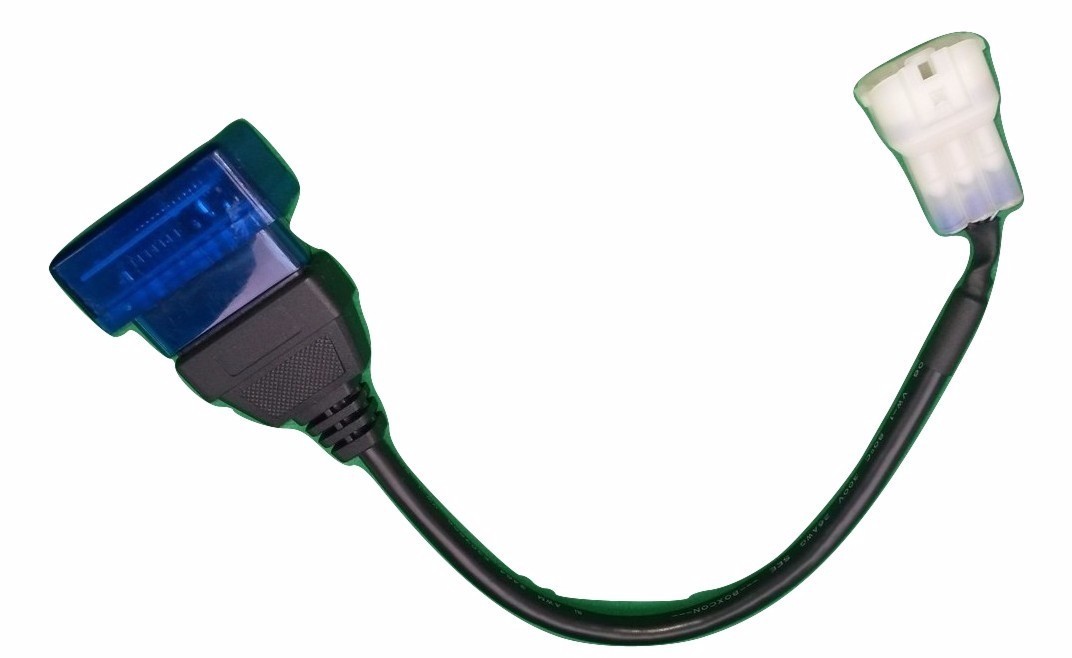 Duke 390 OBD2 Connector
2. What are the Key Components of the Duke 390 OBD2 4 Pin Adapter?
The Duke 390 OBD2 4 pin adapter typically consists of several key components, including the OBD2 connector, the 4 pin connector specific to the Duke 390, and the wiring that connects these two. Each pin serves a specific function, such as power, ground, CAN high, and CAN low, which are essential for transmitting data between the bike’s ECU and the diagnostic tool.
2.1 Detailed Look at the OBD2 Connector
The OBD2 connector is a standardized 16-pin interface, though not all pins are always used in every application. The commonly used pins include:
- Pin 4 & 5: Ground
- Pin 6: CAN High (Controller Area Network High)
- Pin 14: CAN Low (Controller Area Network Low)
- Pin 16: Battery Power (+12V)
2.2 The Duke 390 Specific 4 Pin Connector
The Duke 390 uses a proprietary 4 pin connector to interface with its diagnostic system. This connector includes:
- 12V+ (Power): Supplies power to the diagnostic tool.
- CAN LO (CAN Low): Transmits the lower-level CAN signal.
- Ground: Provides a common ground reference.
- CAN HI (CAN High): Transmits the higher-level CAN signal.
2.3 Wiring and Cable Quality
The quality of wiring and cable is crucial for reliable data transmission. High-quality cables are shielded to reduce interference and ensure accurate communication. The wire gauge should be appropriate for the current it carries to prevent voltage drop and overheating.
2.4 Protective Housing and Insulation
The connector and wiring should be protected by durable housing and insulation to withstand environmental conditions such as temperature variations, moisture, and vibration. This protection helps prevent corrosion and physical damage that could compromise the connection.
3. How Do You Identify the Pinout Configuration for Your Duke 390?
Identifying the correct pinout configuration for your Duke 390 is critical for safe and effective diagnostics. The pinout specifies which wire connects to which pin on both the OBD2 connector and the Duke 390’s diagnostic port. This information can typically be found in the motorcycle’s service manual or through online resources specific to your bike’s model and year.
3.1 Consulting the Service Manual
The service manual is the most reliable source of pinout information. It provides detailed wiring diagrams and connector layouts specific to your Duke 390 model. The manual will accurately show the location and function of each pin, ensuring you make the correct connections.
3.2 Online Forums and Communities
Online forums and communities dedicated to the Duke 390 can be valuable resources. Experienced owners and mechanics often share pinout diagrams and wiring schematics. However, it’s important to verify the information from multiple sources to ensure accuracy.
3.3 Using a Multimeter for Verification
A multimeter can be used to verify the pinout configuration. By testing continuity between the pins on the diagnostic port and known points on the motorcycle’s electrical system, you can confirm the function of each pin. This method helps prevent errors and ensures the correct connections are made.
3.4 Color-Coded Wiring Diagrams
Color-coded wiring diagrams can simplify the process of identifying the correct pinout. These diagrams use different colors to represent each wire, making it easier to trace connections and avoid mistakes. Ensure the diagram matches your bike’s model year, as wire colors can change between model years.
4. What Diagnostic Tools are Compatible with the Duke 390 OBD2 4 Pin?
Several diagnostic tools are compatible with the Duke 390 OBD2 4 pin connector, ranging from basic code readers to advanced diagnostic scanners. These tools allow you to read and clear diagnostic trouble codes (DTCs), monitor real-time engine data, and perform various diagnostic tests. Choosing the right tool depends on your specific needs and budget.
4.1 Basic OBD2 Code Readers
Basic OBD2 code readers are inexpensive and easy to use. They can read and clear DTCs, providing a quick way to identify and resolve common engine issues. These readers are suitable for basic troubleshooting and maintenance tasks.
4.2 Advanced Diagnostic Scanners
Advanced diagnostic scanners offer more comprehensive features, such as real-time data monitoring, component testing, and ECU programming. These scanners are typically used by professional mechanics and offer a wide range of diagnostic capabilities.
4.3 Smartphone Apps and Bluetooth Adapters
Smartphone apps like Torque Pro, combined with Bluetooth OBD2 adapters, provide a convenient and affordable diagnostic solution. These apps can display real-time engine data, read and clear DTCs, and offer customizable dashboards. The Bluetooth adapter plugs into the OBD2 port and communicates with the smartphone via Bluetooth.
4.4 KTM Diagnostic Tools
KTM also offers proprietary diagnostic tools designed specifically for their motorcycles. These tools provide the most comprehensive diagnostic capabilities and are typically used by KTM dealerships and authorized service centers.
4.5 Comparison Table of Diagnostic Tools
| Tool Type | Features | User Level | Cost |
|---|---|---|---|
| Basic OBD2 Code Reader | Read and Clear DTCs | Beginner | $20 – $50 |
| Advanced Diagnostic Scanner | Real-Time Data, Component Testing, ECU Programming | Professional | $200 – $1000+ |
| Smartphone App + Adapter | Real-Time Data, Read/Clear DTCs, Customizable Dashboards | Intermediate | $30 – $100 |
| KTM Diagnostic Tool | Comprehensive Diagnostics, KTM Specific Functions | Professional | $500+ |
5. Step-by-Step Guide to Connecting and Using the Duke 390 OBD2 4 Pin Adapter
Connecting and using the Duke 390 OBD2 4 pin adapter involves several steps to ensure a safe and effective diagnostic process. This guide provides a detailed walkthrough to help you connect the adapter and use it with a diagnostic tool.
5.1 Gathering Necessary Tools and Materials
Before starting, gather the necessary tools and materials:
- Duke 390 OBD2 4 pin adapter cable
- OBD2 diagnostic tool or smartphone with OBD2 app
- Multimeter (optional, for verifying connections)
- Service manual or pinout diagram for your Duke 390 model
- Basic hand tools (screwdrivers, pliers, wire strippers)
5.2 Locating the Diagnostic Port on Your Duke 390
The diagnostic port is typically located under the seat or near the battery compartment. Consult your service manual to find the exact location for your model year.
5.3 Connecting the Adapter Cable
- Disconnect the Battery: To prevent electrical shorts, disconnect the negative terminal of the battery before making any connections.
- Connect the 4 Pin Connector: Plug the 4 pin connector into the diagnostic port on your Duke 390. Ensure the connector is fully seated and securely connected.
- Connect the OBD2 Connector: Plug the OBD2 connector into your diagnostic tool or Bluetooth adapter.
- Verify Connections: Use a multimeter to verify the continuity and voltage of each pin connection. This step is crucial to ensure the correct connections and prevent damage.
- Reconnect the Battery: Once all connections are verified, reconnect the negative terminal of the battery.
5.4 Using the Diagnostic Tool or App
- Power On: Turn on your diagnostic tool or smartphone and launch the OBD2 app.
- Connect to the Bike: Follow the app’s instructions to connect to the bike’s ECU via the OBD2 adapter. This may involve pairing the Bluetooth adapter or selecting the appropriate vehicle profile.
- Read Diagnostic Codes: Use the tool or app to read diagnostic trouble codes (DTCs). Record any codes that are displayed.
- Monitor Real-Time Data: View real-time engine data, such as coolant temperature, RPM, and sensor readings.
- Perform Diagnostic Tests: If your tool supports it, perform diagnostic tests on specific components to verify their functionality.
- Clear Diagnostic Codes: After addressing any issues, clear the DTCs to reset the ECU.
- Verify the Fix: Start the bike and monitor the engine to ensure the issue is resolved and no new codes appear.
5.5 Safety Precautions
- Always disconnect the battery before making electrical connections.
- Verify the pinout configuration before connecting the adapter cable.
- Use high-quality cables and connectors to ensure reliable data transmission.
- Follow the instructions provided by the diagnostic tool or app.
- If unsure, consult a professional mechanic.
6. What Common Issues Can You Diagnose With a Duke 390 OBD2 Adapter?
Using a Duke 390 OBD2 adapter, you can diagnose a wide range of common issues, from simple sensor failures to more complex engine problems. This capability allows you to identify and address issues early, preventing further damage and costly repairs.
6.1 Reading and Clearing Diagnostic Trouble Codes (DTCs)
The most common use of the OBD2 adapter is to read and clear diagnostic trouble codes (DTCs). These codes provide valuable information about the nature and location of the problem, helping you to troubleshoot and repair the issue effectively.
6.2 Monitoring Engine Performance Parameters
The OBD2 adapter allows you to monitor real-time engine performance parameters, such as coolant temperature, RPM, throttle position, and oxygen sensor readings. This data can help you identify performance issues, such as overheating, misfires, or fuel delivery problems.
6.3 Identifying Sensor Failures
Sensor failures are a common cause of engine problems. The OBD2 adapter can help you identify faulty sensors by monitoring their readings and comparing them to expected values. Common sensor issues include:
- Oxygen Sensor: Affects fuel economy and emissions.
- Coolant Temperature Sensor: Affects engine temperature readings and fan operation.
- Throttle Position Sensor: Affects throttle response and engine performance.
- Crankshaft Position Sensor: Affects engine timing and starting.
6.4 Diagnosing Fuel System Issues
Fuel system issues, such as faulty fuel injectors, fuel pump problems, or fuel pressure регулятор failures, can cause poor engine performance and fuel economy. The OBD2 adapter can help you diagnose these issues by monitoring fuel-related parameters and performing fuel system tests.
6.5 Detecting Ignition System Problems
Ignition system problems, such as faulty spark plugs, ignition coils, or ignition timing issues, can cause misfires and poor engine performance. The OBD2 adapter can help you diagnose these issues by monitoring ignition-related parameters and performing ignition system tests.
6.6 Case Studies
- Case 1: Overheating: The OBD2 adapter revealed a faulty coolant temperature sensor, causing the engine to overheat. Replacing the sensor resolved the issue.
- Case 2: Poor Fuel Economy: The OBD2 adapter identified a faulty oxygen sensor, leading to poor fuel economy. Replacing the sensor improved fuel efficiency.
- Case 3: Engine Misfires: The OBD2 adapter detected misfires in one cylinder, indicating a faulty spark plug. Replacing the spark plug resolved the misfire issue.
7. How Can You Use the OBD2 Adapter to Improve Your Duke 390’s Performance?
Beyond diagnostics, the Duke 390 OBD2 adapter can be used to improve your bike’s performance through various tuning and optimization techniques. By accessing and modifying ECU parameters, you can enhance throttle response, increase horsepower, and improve fuel efficiency.
7.1 ECU Remapping and Tuning
ECU remapping and tuning involve modifying the ECU’s software to optimize engine performance. This can be done using advanced diagnostic tools or specialized tuning software. Common tuning adjustments include:
- Fuel Mapping: Adjusting the air-fuel ratio to optimize combustion.
- Ignition Timing: Optimizing ignition timing for maximum power and efficiency.
- Rev Limiter: Increasing the rev limiter to allow for higher RPMs.
- Throttle Response: Improving throttle response for quicker acceleration.
7.2 Monitoring Aftermarket Performance Parts
If you’ve installed aftermarket performance parts, such as exhaust systems, air filters, or camshafts, the OBD2 adapter can help you monitor their impact on engine performance. By monitoring real-time data, you can ensure the parts are functioning correctly and optimize their performance.
7.3 Data Logging and Analysis
Data logging involves recording engine parameters over time, allowing you to analyze performance trends and identify areas for improvement. The OBD2 adapter, combined with data logging software, can record parameters such as RPM, throttle position, and sensor readings. This data can be analyzed to fine-tune engine performance and optimize fuel efficiency.
7.4 Performance Enhancement Tips
- Optimize Air-Fuel Ratio: Adjust the air-fuel ratio for maximum power and efficiency.
- Adjust Ignition Timing: Optimize ignition timing for improved throttle response and horsepower.
- Monitor Sensor Readings: Ensure all sensors are functioning correctly and providing accurate data.
- Fine-Tune Throttle Response: Adjust throttle response for quicker acceleration and improved drivability.
- Regular Data Logging: Regularly log engine data to monitor performance trends and identify potential issues.
8. What are the Safety Precautions When Working With OBD2 Adapters?
Working with OBD2 adapters involves certain safety precautions to protect yourself, your motorcycle, and the diagnostic equipment. Following these guidelines ensures a safe and effective diagnostic process.
8.1 Disconnecting the Battery
Before making any electrical connections, always disconnect the negative terminal of the battery. This prevents electrical shorts and protects the ECU from damage.
8.2 Verifying Pinout Configuration
Always verify the pinout configuration before connecting the adapter cable. Incorrect wiring can damage the ECU and diagnostic tool. Consult your service manual or a reliable online resource to confirm the correct pinout for your Duke 390 model.
8.3 Using High-Quality Cables and Connectors
Use high-quality cables and connectors to ensure reliable data transmission and prevent electrical shorts. Low-quality cables can cause inaccurate readings and potentially damage the ECU.
8.4 Following Diagnostic Tool Instructions
Always follow the instructions provided by the diagnostic tool or app. Incorrect usage can lead to misdiagnosis, data corruption, or damage to the ECU.
8.5 Avoiding ECU Damage
Be cautious when performing ECU remapping or programming. Incorrect modifications can damage the ECU and render the bike inoperable. If you’re not experienced with ECU tuning, consult a professional mechanic.
8.6 Protective Gear
Wear appropriate protective gear, such as gloves and safety glasses, when working with electrical components and diagnostic tools. This helps prevent electrical shocks and protects your eyes from debris.
9. How to Troubleshoot Common Issues With Your Duke 390 OBD2 Adapter
Even with proper precautions, you may encounter issues when using your Duke 390 OBD2 adapter. Troubleshooting these issues involves systematically checking the connections, software, and hardware to identify and resolve the problem.
9.1 No Connection to the ECU
If the diagnostic tool or app cannot connect to the ECU, check the following:
- Verify the Adapter Connection: Ensure the adapter cable is securely connected to both the OBD2 port and the Duke 390’s diagnostic port.
- Check the Battery Voltage: Ensure the battery has sufficient voltage to power the ECU and diagnostic tool.
- Verify the Pinout Configuration: Double-check the pinout configuration to ensure the correct connections.
- Test the Adapter Cable: Use a multimeter to test the continuity of the adapter cable and check for shorts or broken wires.
9.2 Inaccurate Data Readings
If the diagnostic tool or app displays inaccurate data readings, check the following:
- Verify Sensor Function: Ensure the sensors are functioning correctly and providing accurate data.
- Check Wiring Connections: Check the wiring connections to the sensors and ECU for corrosion or damage.
- Update Software: Ensure the diagnostic tool or app is running the latest software version.
- Calibrate Sensors: Calibrate the sensors if necessary, following the instructions provided by the diagnostic tool or app.
9.3 Error Codes Not Displaying
If the diagnostic tool or app does not display error codes, check the following:
- Verify ECU Communication: Ensure the diagnostic tool or app is communicating with the ECU.
- Check for Pending Codes: Check for pending codes that may not trigger a warning light.
- Reset the ECU: Reset the ECU and re-run the diagnostic test.
9.4 Adapter Not Powering On
If the OBD2 adapter is not powering on, check the following:
- Verify Battery Voltage: Ensure the battery has sufficient voltage.
- Check Fuse: Check the fuse for the OBD2 port or diagnostic system.
- Test the Adapter: Test the adapter on another vehicle to rule out a faulty adapter.
9.5 When to Seek Professional Help
If you’re unable to resolve the issues with your Duke 390 OBD2 adapter, seek professional help from a qualified mechanic. They have the expertise and equipment to diagnose and repair complex engine and electrical problems.
10. What Future Developments Can We Expect in Duke 390 Diagnostics?
The field of motorcycle diagnostics is continuously evolving, with advancements in technology leading to more sophisticated and user-friendly diagnostic tools. Future developments in Duke 390 diagnostics are expected to include enhanced connectivity, improved data analysis, and more advanced diagnostic capabilities.
10.1 Enhanced Wireless Connectivity
Future OBD2 adapters are expected to feature enhanced wireless connectivity, such as Bluetooth 5.0 and Wi-Fi, providing faster and more reliable data transmission. This will enable real-time data monitoring and remote diagnostics.
10.2 Cloud-Based Diagnostics
Cloud-based diagnostics will allow for data storage and analysis in the cloud, providing access to vast databases of diagnostic information and expert knowledge. This will enable more accurate and efficient troubleshooting.
10.3 Artificial Intelligence (AI) Integration
AI integration will enhance diagnostic capabilities by analyzing data patterns and predicting potential issues before they occur. AI-powered diagnostic tools will provide more accurate and efficient troubleshooting, reducing downtime and repair costs.
10.4 Improved Data Visualization
Future diagnostic tools are expected to feature improved data visualization, with customizable dashboards and interactive graphs. This will make it easier to monitor engine performance and identify potential issues.
10.5 Remote Diagnostics
Remote diagnostics will allow mechanics to diagnose and repair motorcycles remotely, reducing the need for on-site visits. This will improve efficiency and reduce downtime for motorcycle owners.
10.6 Integration with Mobile Apps
Integration with mobile apps will provide a more user-friendly diagnostic experience, with access to diagnostic information, repair manuals, and expert advice on the go. Mobile apps will also enable remote diagnostics and data sharing with mechanics.
10.7 Research and Development
According to a study by MarketsandMarkets, the automotive diagnostics market is projected to reach $49.4 billion by 2026, driven by increasing vehicle complexity and stringent emission regulations. This growth will fuel further research and development in motorcycle diagnostics, leading to more advanced and user-friendly diagnostic tools.
Contact MERCEDES-DIAGNOSTIC-TOOL.EDU.VN for Expert Assistance
Do you need help diagnosing issues, unlocking hidden features, or maintaining your Mercedes-Benz? Contact MERCEDES-DIAGNOSTIC-TOOL.EDU.VN for expert assistance. Our team of experienced technicians is here to provide comprehensive diagnostic services, step-by-step repair guides, and personalized support to keep your vehicle running smoothly. Reach out to us today to learn more about our services and how we can help you get the most out of your Mercedes-Benz.
Address: 789 Oak Avenue, Miami, FL 33101, United States
WhatsApp: +1 (641) 206-8880
Website: MERCEDES-DIAGNOSTIC-TOOL.EDU.VN
FAQ: Duke 390 OBD2 4 Pin
1. What is the Duke 390 OBD2 4 pin connector used for?
The Duke 390 OBD2 4 pin connector is used to access the motorcycle’s Engine Control Unit (ECU) for diagnostics, real-time data monitoring, and troubleshooting.
2. Where can I find the pinout configuration for my Duke 390 OBD2 4 pin connector?
You can find the pinout configuration in the motorcycle’s service manual or through online resources specific to your bike’s model and year.
3. What diagnostic tools are compatible with the Duke 390 OBD2 4 pin connector?
Several diagnostic tools are compatible, including basic code readers, advanced diagnostic scanners, and smartphone apps with Bluetooth adapters.
4. How do I connect the Duke 390 OBD2 4 pin adapter to my motorcycle?
To connect the adapter, disconnect the battery, plug the 4 pin connector into the diagnostic port, connect the OBD2 connector to your diagnostic tool, verify the connections, and reconnect the battery.
5. What common issues can I diagnose with a Duke 390 OBD2 adapter?
You can diagnose a wide range of issues, including reading and clearing diagnostic trouble codes (DTCs), monitoring engine performance parameters, and identifying sensor failures.
6. Can I use the OBD2 adapter to improve my Duke 390’s performance?
Yes, you can use the OBD2 adapter for ECU remapping, monitoring aftermarket performance parts, and data logging to improve your bike’s performance.
7. What safety precautions should I take when working with OBD2 adapters?
Always disconnect the battery, verify the pinout configuration, use high-quality cables, follow diagnostic tool instructions, and avoid ECU damage.
8. What should I do if my diagnostic tool cannot connect to the ECU?
Verify the adapter connection, check the battery voltage, verify the pinout configuration, and test the adapter cable.
9. How can I update the software on my OBD2 diagnostic tool?
Refer to the manufacturer’s instructions for updating the software on your specific OBD2 diagnostic tool.
10. Where can I get professional help with my Duke 390 OBD2 adapter?
You can get professional help from a qualified mechanic who specializes in motorcycle diagnostics and repair.