The 2001 Ford F250 Obd2 Location is typically under the dashboard on the driver’s side; however, if you are unable to locate your OBD2 port, then MERCEDES-DIAGNOSTIC-TOOL.EDU.VN can help you locate it as well as assist in diagnosing other potential issues with your vehicle’s computer. Our services will give you confidence in repairing any issues with your truck while saving you both time and money, using diagnostic scanning and data analysis, computer programming and module reflashing.
Contents
- 1. Understanding the Importance of the OBD2 Port
- 1.1. What is OBD2?
- 1.2. Why is the OBD2 Port Important?
- 1.3. Common Uses of the OBD2 Port
- 2. Locating the OBD2 Port in Your 2001 Ford F250
- 2.1. Standard Location
- 2.2. What to Do if You Can’t Find It
- 2.3. Using Your Owner’s Manual
- 3. Common Issues Preventing OBD2 Scanner Connection
- 3.1. Blown Fuses
- 3.2. Corrosion or Damage to the Port
- 3.3. Faulty OBD2 Scanner
- 3.4. PCM Issues
- 4. Step-by-Step Troubleshooting Guide
- 4.1. Check the Fuses
- 4.2. Inspect the OBD2 Port
- 4.3. Test with a Different Scanner
- 4.4. Check for PCM Issues
- 5. Advanced Diagnostic Tools and Techniques
- 5.1. Using a Multimeter
- 5.2. Professional Diagnostic Scanners
- 5.3. Checking for Wiring Issues
- 6. Understanding the 2001 Ford F250 7.3L Engine and OBD2
- 6.1. Is the 7.3L Power Stroke Fully OBD2 Compliant?
- 6.2. Specific Diagnostic Considerations for the 7.3L Engine
- 6.3. Enhanced OBD2 Protocols
- 7. Common Diagnostic Trouble Codes (DTCs) for the 2001 Ford F250
- 7.1. Powertrain Codes (P-Codes)
- 7.2. Body Codes (B-Codes)
- 7.3. Chassis Codes (C-Codes)
- 7.4. Network Communication Codes (U-Codes)
- 8. Maintaining Your 2001 Ford F250 for Optimal Performance
- 8.1. Regular Maintenance Tasks
Table of Contents
- 1. Understanding the Importance of the OBD2 Port
- 2. Locating the OBD2 Port in Your 2001 Ford F250
- 3. Common Issues Preventing OBD2 Scanner Connection
- 4. Step-by-Step Troubleshooting Guide
- 5. Advanced Diagnostic Tools and Techniques
- 6. Understanding the 2001 Ford F250 7.3L Engine and OBD2
- 7. Common Diagnostic Trouble Codes (DTCs) for the 2001 Ford F250
- 8. Maintaining Your 2001 Ford F250 for Optimal Performance
- 9. Utilizing MERCEDES-DIAGNOSTIC-TOOL.EDU.VN for Your Diagnostic Needs
- 10. Frequently Asked Questions (FAQ)
- 10.1. Where is the OBD2 port located on a 2001 Ford F250?
- 10.2. What does OBD2 stand for?
- 10.3. Why can’t my scanner connect to my 2001 Ford F250?
- 10.4. Which fuses should I check if my OBD2 port isn’t working?
- 10.5. Can I use any OBD2 scanner on my 2001 Ford F250?
- 10.6. What is the PCM, and how does it affect the OBD2 port?
- 10.7. How do I check for corrosion on the OBD2 port?
- 10.8. What are some common issues that can be diagnosed using the OBD2 port on a 2001 Ford F250?
- 10.9. Is the 2001 Ford F250 7.3L Power Stroke engine fully OBD2 compliant?
- 10.10. Where can I get professional diagnostic services for my 2001 Ford F250?
1. Understanding the Importance of the OBD2 Port
The On-Board Diagnostics (OBD2) port in your 2001 Ford F250 is more than just a connection point; it is a gateway to understanding and maintaining your vehicle’s health. This standardized port allows technicians and vehicle owners to access a wealth of diagnostic information, making it easier to identify and address potential issues before they become major problems. By understanding the fundamentals of OBD2, you can take a proactive approach to vehicle maintenance, ensuring your F250 remains reliable and efficient.
1.1. What is OBD2?
OBD2, or On-Board Diagnostics II, is a standardized system used in most vehicles since 1996 to monitor and diagnose engine and emissions-related problems. According to the Environmental Protection Agency (EPA), OBD2 was implemented to ensure vehicles meet stringent emissions standards by providing a way to track the performance of various engine components. This system uses a standardized port, Diagnostic Trouble Codes (DTCs), and communication protocols, making it easier for technicians to diagnose and repair vehicles across different manufacturers.
1.2. Why is the OBD2 Port Important?
The OBD2 port’s importance stems from its ability to provide real-time data about your vehicle’s performance. Some of the key reasons the OBD2 port is essential:
- Emissions Monitoring: The primary function of OBD2 is to monitor the vehicle’s emissions system. It ensures that the vehicle complies with environmental regulations by tracking the performance of components like the catalytic converter, oxygen sensors, and EGR valve.
- Diagnostic Information: The OBD2 port allows access to a wide range of diagnostic information, including engine temperature, RPM, and sensor readings. This data can help identify issues such as misfires, sensor failures, and fuel system problems.
- Early Problem Detection: By regularly scanning your vehicle’s OBD2 port, you can detect potential issues early on, preventing minor problems from escalating into costly repairs. Early detection can save you time and money in the long run.
- Standardization: The OBD2 system is standardized across different makes and models, meaning that any compliant scanner can be used to read diagnostic codes. This standardization simplifies the diagnostic process for technicians and DIY enthusiasts alike.
1.3. Common Uses of the OBD2 Port
The OBD2 port can be used for numerous applications, making it an indispensable tool for vehicle maintenance and repair. Common applications:
- Reading Diagnostic Trouble Codes (DTCs): When your vehicle’s check engine light illuminates, the OBD2 port can be used to read the stored DTCs. These codes provide valuable information about the nature and location of the problem.
- Clearing Diagnostic Trouble Codes: After repairing a problem, you can use an OBD2 scanner to clear the DTCs and reset the check engine light. This ensures that the light only comes on when a new issue arises.
- Real-Time Data Monitoring: OBD2 scanners can display real-time data from various sensors and systems, allowing you to monitor your vehicle’s performance while driving. This is particularly useful for diagnosing intermittent problems or assessing overall engine health.
- Performance Tuning: Some advanced users employ the OBD2 port for performance tuning, using specialized software to modify engine parameters for improved power and efficiency. However, this should be done with caution, as improper tuning can damage the engine.
- Emissions Testing: Many states and countries use the OBD2 port to conduct emissions testing, ensuring that vehicles meet the required standards. This helps to reduce air pollution and maintain environmental quality.
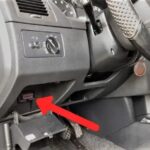
2. Locating the OBD2 Port in Your 2001 Ford F250
Finding the OBD2 port in your 2001 Ford F250 is usually a straightforward process. The port is typically located in a standard location, but knowing where to look can save you time and frustration. If you’re having trouble locating it, this section provides detailed guidance to help you find it quickly and easily.
2.1. Standard Location
In the 2001 Ford F250, the OBD2 port is typically located under the dashboard on the driver’s side. Specifically, it is often found near the steering column or in the vicinity of the pedals. You may need to crouch down and look under the dash to spot the rectangular, 16-pin connector.
The location is designed for easy access, allowing technicians and vehicle owners to quickly connect a scanner and retrieve diagnostic information. The port is often black or gray and may be labeled with “OBD2” or a similar designation.
2.2. What to Do if You Can’t Find It
If you can’t find the OBD2 port in the standard location, there are a few additional steps you can take:
- Check Around the Steering Column: Carefully inspect the area around the steering column. The port may be tucked away slightly out of sight.
- Look Near the Center Console: In some vehicles, the OBD2 port may be located near the center console, particularly if there is a small storage compartment or panel in that area.
- Feel Under the Dash: Sometimes, the port may be hidden behind a plastic panel or wiring harness. Gently feel around under the dash to see if you can locate it by touch.
- Use a Flashlight: A flashlight can be very helpful in illuminating dark areas under the dashboard. Use it to scan the area thoroughly.
- Consult Online Resources: Online forums and vehicle-specific websites often have detailed information and images showing the exact location of the OBD2 port. A quick search may provide the answer you need.
2.3. Using Your Owner’s Manual
Your 2001 Ford F250 owner’s manual is a valuable resource for locating the OBD2 port. The manual typically includes a diagram or description of the port’s location, along with other important information about your vehicle’s systems.
To find the OBD2 port location in your owner’s manual:
- Locate Your Owner’s Manual: If you don’t have a physical copy, you may be able to find a digital version online.
- Check the Index: Look for “OBD2 port,” “diagnostic port,” or “data link connector” in the index.
- Refer to the Diagram: The manual should include a diagram or illustration showing the port’s location under the dashboard.
- Read the Description: The manual may also provide a written description of the port’s location, helping you to pinpoint it more accurately.
3. Common Issues Preventing OBD2 Scanner Connection
Encountering difficulties when trying to connect an OBD2 scanner to your 2001 Ford F250 can be frustrating. Several common issues can prevent a successful connection, ranging from simple problems like blown fuses to more complex issues with the vehicle’s computer system. Understanding these potential problems is the first step in diagnosing and resolving the issue.
3.1. Blown Fuses
One of the most common reasons for an OBD2 scanner not connecting is a blown fuse. The OBD2 port is typically powered by a fuse in the vehicle’s fuse box, and if this fuse is blown, the port will not function.
- Locating the Fuse Box: The fuse box is usually located under the dashboard or in the engine compartment. Consult your owner’s manual for the exact location.
- Identifying the Correct Fuse: Check your owner’s manual for the fuse that powers the OBD2 port. It may be labeled as “OBD,” “Data Link Connector,” or something similar.
- Checking the Fuse: Remove the fuse and inspect it. If the small wire inside the fuse is broken, the fuse is blown and needs to be replaced.
- Replacing the Fuse: Replace the blown fuse with a new one of the same amperage. Ensure the new fuse is properly seated in the fuse box.
If the fuse blows again shortly after replacement, there may be a short circuit in the wiring that needs to be addressed by a professional.
3.2. Corrosion or Damage to the Port
Corrosion or physical damage to the OBD2 port can also prevent a scanner from connecting. The pins inside the port need to make good contact with the scanner for proper communication.
- Visual Inspection: Carefully inspect the OBD2 port for any signs of corrosion, such as rust or green deposits on the pins. Also, check for any physical damage, such as bent or broken pins.
- Cleaning the Port: If you find corrosion, use a contact cleaner specifically designed for electronics to clean the port. Spray the cleaner onto the pins and use a small brush or cotton swab to gently remove the corrosion.
- Straightening Bent Pins: If any of the pins are bent, use a small, precise tool (such as a needle-nose plier) to carefully straighten them. Be gentle to avoid breaking the pins.
- Professional Repair: If the port is severely damaged, it may need to be replaced by a professional technician. Attempting to repair a severely damaged port yourself could cause further damage to the vehicle’s electrical system.
3.3. Faulty OBD2 Scanner
The issue may not be with your vehicle but with the OBD2 scanner itself. A faulty scanner may not be able to connect to any vehicle, regardless of its condition.
- Testing on Another Vehicle: Try connecting the scanner to another vehicle to see if it works. If the scanner fails to connect to multiple vehicles, it is likely the scanner is faulty.
- Checking the Scanner’s Power: Ensure that the scanner is receiving power. Some scanners require batteries, while others draw power from the OBD2 port. If the scanner is not receiving power, it will not be able to communicate with the vehicle.
- Updating the Scanner’s Software: Some scanners require regular software updates to maintain compatibility with newer vehicles and protocols. Check the manufacturer’s website for any available updates.
- Trying a Different Scanner: If possible, try using a different OBD2 scanner to see if it connects to your 2001 Ford F250. This can help you determine whether the issue is with the scanner or the vehicle.
3.4. PCM Issues
The Powertrain Control Module (PCM) is the computer that controls many of your vehicle’s functions, including communication through the OBD2 port. If the PCM is faulty, it may not be able to communicate with the scanner.
- Symptoms of PCM Failure: Common symptoms of PCM failure include a check engine light that won’t turn off, poor engine performance, stalling, and an inability to communicate with diagnostic tools.
- Checking for Error Codes: Use a working scanner to check for any error codes related to the PCM. These codes can provide valuable information about the nature of the problem.
- Professional Diagnosis: Diagnosing PCM issues often requires specialized equipment and knowledge. If you suspect a PCM problem, it is best to take your vehicle to a professional technician for diagnosis and repair.
- PCM Replacement: In some cases, the PCM may need to be replaced. This can be a costly repair, as the PCM needs to be programmed to match your vehicle’s specific configuration.
4. Step-by-Step Troubleshooting Guide
When your OBD2 scanner refuses to connect to your 2001 Ford F250, a systematic approach can help you identify and resolve the problem efficiently. This step-by-step troubleshooting guide covers the most common issues and provides practical solutions to get your scanner working.
4.1. Check the Fuses
The first step in troubleshooting an OBD2 connection issue is to check the fuses. A blown fuse is a common cause of OBD2 port failure and is relatively easy to fix.
- Locate the Fuse Box: Consult your owner’s manual to find the location of the fuse box. It is typically located under the dashboard or in the engine compartment.
- Identify the OBD2 Fuse: Refer to the fuse box diagram in your owner’s manual to identify the fuse that powers the OBD2 port. It may be labeled as “OBD,” “Data Link Connector,” or something similar.
- Inspect the Fuse: Remove the fuse and visually inspect it. If the small wire inside the fuse is broken, the fuse is blown and needs to be replaced.
- Test the Fuse with a Multimeter: For a more accurate assessment, use a multimeter to test the fuse for continuity. Set the multimeter to the continuity setting and touch the probes to each end of the fuse. If the multimeter does not beep or show a reading, the fuse is blown.
- Replace the Fuse: Replace the blown fuse with a new one of the same amperage. Make sure the new fuse is properly seated in the fuse box.
- Test the Connection: After replacing the fuse, try connecting your OBD2 scanner again to see if it now works.
4.2. Inspect the OBD2 Port
If the fuses are intact, the next step is to inspect the OBD2 port for any signs of corrosion or physical damage.
- Visual Inspection: Carefully examine the OBD2 port for any signs of corrosion, such as rust or green deposits on the pins. Also, check for any physical damage, such as bent or broken pins.
- Clean the Port: If you find corrosion, use a contact cleaner specifically designed for electronics to clean the port. Spray the cleaner onto the pins and use a small brush or cotton swab to gently remove the corrosion.
- Straighten Bent Pins: If any of the pins are bent, use a small, precise tool (such as a needle-nose plier) to carefully straighten them. Be gentle to avoid breaking the pins.
- Check for Loose Connections: Ensure that the OBD2 port is securely mounted and that there are no loose connections. If the port is loose, tighten the mounting screws or clips.
- Test the Connection: After cleaning and inspecting the port, try connecting your OBD2 scanner again to see if it now works.
4.3. Test with a Different Scanner
If the OBD2 port appears to be in good condition, the issue may be with your scanner. To rule out a faulty scanner, try testing with a different one.
- Borrow or Rent a Scanner: If possible, borrow an OBD2 scanner from a friend or rent one from an auto parts store.
- Connect the Scanner: Connect the alternative scanner to your 2001 Ford F250’s OBD2 port.
- Attempt to Connect: Follow the scanner’s instructions to attempt to connect to your vehicle’s computer.
- Compare Results: If the alternative scanner connects successfully, the original scanner is likely faulty and may need to be repaired or replaced. If the alternative scanner also fails to connect, the issue is likely with your vehicle.
4.4. Check for PCM Issues
If you’ve ruled out fuses, port issues, and scanner problems, the issue may be with your vehicle’s PCM.
- Check for Other Symptoms: Look for other symptoms of PCM failure, such as a check engine light that won’t turn off, poor engine performance, stalling, and difficulty starting the vehicle.
- Scan for PCM-Related Codes: Use a working scanner to check for any error codes related to the PCM. These codes can provide valuable information about the nature of the problem.
- Inspect PCM Wiring: Check the wiring and connectors leading to the PCM for any signs of damage or corrosion.
- Consult a Professional: Diagnosing PCM issues often requires specialized equipment and knowledge. If you suspect a PCM problem, it is best to take your vehicle to a professional technician for diagnosis and repair.
5. Advanced Diagnostic Tools and Techniques
When basic troubleshooting steps don’t resolve your OBD2 connection issues, advanced diagnostic tools and techniques can help you pinpoint the problem. These methods often require a deeper understanding of automotive electrical systems and may be best performed by experienced technicians.
5.1. Using a Multimeter
A multimeter is a versatile tool that can be used to test the voltage and continuity of the OBD2 port’s wiring. This can help you identify whether the port is receiving power and if there are any breaks in the wiring.
- Prepare the Multimeter: Set the multimeter to the DC voltage setting.
- Locate the Power and Ground Pins: Refer to the OBD2 port pinout diagram to identify the power (typically pin 16) and ground (typically pins 4 and 5) pins.
- Test for Voltage: Connect the multimeter’s positive lead to pin 16 and the negative lead to pin 4 or 5. You should see a reading of approximately 12 volts. If there is no voltage, there is likely a problem with the power supply to the OBD2 port.
- Test for Continuity: Set the multimeter to the continuity setting. Test the continuity between the ground pins (4 and 5) and a known good ground point on the vehicle’s chassis. The multimeter should beep or show a reading, indicating a good ground connection.
- Check Signal Wires: Use the multimeter to check the continuity of the signal wires between the OBD2 port and the PCM. Refer to your vehicle’s wiring diagram to identify the correct wires.
5.2. Professional Diagnostic Scanners
Professional diagnostic scanners offer advanced features and capabilities that go beyond basic code reading. These scanners can perform in-depth diagnostics, access manufacturer-specific data, and perform advanced functions such as module programming and calibration.
- Enhanced Code Reading: Professional scanners can read enhanced codes that are not accessible with basic scanners. These codes can provide more detailed information about the nature and location of the problem.
- Live Data Streaming: Professional scanners can stream live data from various sensors and systems, allowing you to monitor your vehicle’s performance in real-time. This is particularly useful for diagnosing intermittent problems or assessing overall engine health.
- Bi-Directional Control: Some professional scanners offer bi-directional control, allowing you to activate and control various components and systems in the vehicle. This can be used to test the functionality of components such as fuel injectors, solenoids, and relays.
- Module Programming: Professional scanners can be used to program and calibrate various modules in the vehicle, such as the PCM, ABS module, and airbag module. This is often necessary after replacing a module or performing certain repairs.
5.3. Checking for Wiring Issues
Wiring issues, such as shorts, open circuits, and damaged wires, can prevent the OBD2 port from functioning correctly. A thorough inspection of the wiring is essential for diagnosing these problems.
- Visual Inspection: Carefully inspect the wiring harness leading to the OBD2 port for any signs of damage, such as cuts, abrasions, or melted insulation.
- Check Connectors: Examine the connectors at the OBD2 port and the PCM for any signs of corrosion or loose connections. Clean the connectors with a contact cleaner and ensure they are securely connected.
- Perform a Voltage Drop Test: Use a multimeter to perform a voltage drop test on the power and ground wires leading to the OBD2 port. This can help you identify areas of high resistance, which can indicate a wiring problem.
- Use a Wiring Diagram: Refer to your vehicle’s wiring diagram to trace the wiring from the OBD2 port to the PCM and other relevant components. This can help you identify the location of any wiring issues.
6. Understanding the 2001 Ford F250 7.3L Engine and OBD2
The 2001 Ford F250, often equipped with the robust 7.3L Power Stroke diesel engine, presents unique considerations when it comes to OBD2 diagnostics. While the OBD2 system is standardized, understanding the specifics of the 7.3L engine can help you diagnose issues more effectively.
6.1. Is the 7.3L Power Stroke Fully OBD2 Compliant?
The 2001 Ford F250 with the 7.3L Power Stroke engine is OBD2 compliant; however, it’s essential to recognize that the diesel engine’s implementation differs from that of gasoline engines. Diesel engines have different emission control systems and monitoring requirements, which affect the type of data available through the OBD2 port.
- Differences in Monitoring: Diesel engines typically have fewer sensors and monitoring systems compared to gasoline engines, which can limit the amount of diagnostic data available through the OBD2 port.
- Specific Diesel Codes: The 7.3L Power Stroke engine may generate specific diagnostic trouble codes (DTCs) related to its diesel-specific components, such as the fuel injection system, turbocharger, and exhaust gas recirculation (EGR) system.
- Enhanced Diagnostics: While the basic OBD2 functions are standardized, some manufacturers offer enhanced diagnostic capabilities through their proprietary software and scanners. These enhanced features can provide more detailed information about the engine’s performance and potential issues.
6.2. Specific Diagnostic Considerations for the 7.3L Engine
Diagnosing issues on the 2001 Ford F250 with the 7.3L engine requires an understanding of the engine’s unique characteristics and potential problem areas.
- Fuel Injection System: The 7.3L engine uses a Hydraulic Electronic Unit Injector (HEUI) fuel injection system, which is known for its reliability but can be susceptible to issues such as oil leaks, injector failures, and high-pressure oil pump (HPOP) problems.
- Turbocharger: The turbocharger is a critical component of the 7.3L engine, and issues such as boost leaks, bearing failures, and wastegate problems can affect engine performance and fuel economy.
- Exhaust Gas Recirculation (EGR) System: The EGR system is designed to reduce emissions by recirculating exhaust gases back into the engine. Problems with the EGR valve, cooler, or control system can cause issues such as rough idling, poor performance, and increased emissions.
- Glow Plug System: The glow plug system is essential for starting the 7.3L engine in cold weather. Issues with the glow plugs, relay, or wiring can make it difficult to start the engine in cold temperatures.
6.3. Enhanced OBD2 Protocols
To access more detailed diagnostic information on the 2001 Ford F250 with the 7.3L engine, you may need to use enhanced OBD2 protocols. These protocols allow you to access manufacturer-specific data and perform advanced diagnostic functions.
- Ford’s Proprietary Software: Ford offers its proprietary diagnostic software, such as IDS (Integrated Diagnostic System), which provides access to enhanced diagnostic data and functions for Ford vehicles.
- Aftermarket Scanners: Some aftermarket scanners offer enhanced diagnostic capabilities for Ford vehicles, including the 7.3L engine. These scanners may require a software update or a special adapter to access the enhanced data.
- Accessing Enhanced Data: To access the enhanced data, you may need to enter a special code or select a specific vehicle configuration in the scanner’s menu. Consult the scanner’s documentation for instructions on accessing enhanced data.
7. Common Diagnostic Trouble Codes (DTCs) for the 2001 Ford F250
Diagnostic Trouble Codes (DTCs) are codes stored in your vehicle’s computer that help identify the source of a problem. Understanding these codes can significantly aid in diagnosing and repairing your 2001 Ford F250. DTCs are categorized into four main types: Powertrain (P-Codes), Body (B-Codes), Chassis (C-Codes), and Network Communication (U-Codes).
7.1. Powertrain Codes (P-Codes)
Powertrain codes are the most common type of DTC and relate to the engine, transmission, and related components. Here are some common P-Codes for the 2001 Ford F250:
- P0470: Exhaust Pressure Sensor Malfunction. This code indicates a problem with the exhaust pressure sensor, which can affect engine performance and fuel economy.
- P0603: Internal Control Module Keep Alive Memory (KAM) Error. This code indicates a problem with the PCM’s memory, which can cause various drivability issues.
- P1211: Injector Control Pressure Above/Below Desired. This code indicates a problem with the fuel injection system, which can cause rough idling, poor performance, and stalling.
- P1280: Injector Control Pressure Sensor Circuit Low. This code indicates a problem with the injector control pressure sensor circuit.
- P1291: High Side Open – Bank 1 (all 8 injectors). This code means there is an open circuit on the high side of the injectors on bank 1, preventing them from firing correctly.
- P1293: High Side Open – Bank 2. Similar to P1291, this code indicates an open circuit on the high side of the injectors on bank 2.
7.2. Body Codes (B-Codes)
Body codes relate to the vehicle’s body systems, such as the airbags, power windows, and door locks. Common B-Codes are less frequent but can still occur.
- B1318: Battery Voltage Low. This code indicates that the battery voltage is low, which can affect the performance of various electrical systems.
- B1352: Ignition Key-In Circuit Failure. This code indicates a problem with the ignition key-in circuit, which can prevent the vehicle from starting.
7.3. Chassis Codes (C-Codes)
Chassis codes relate to the vehicle’s chassis systems, such as the anti-lock braking system (ABS) and traction control system.
- C1185: ABS Power Relay Output Circuit Failure. This code indicates a problem with the ABS power relay output circuit, which can affect the operation of the ABS system.
- C1230: Rear Wheel Speed Sensor Fault. This code indicates a problem with the rear wheel speed sensor, which can affect the operation of the ABS and traction control systems.
7.4. Network Communication Codes (U-Codes)
Network communication codes relate to the vehicle’s communication network, which allows various modules to communicate with each other.
- U1073: Invalid Data Received From Vehicle Security Module. This code means there is a communication issue with the vehicle security module.
- U1131: Lost Communication with the ABS Module. This code indicates a loss of communication with the ABS module, which can affect the operation of the ABS system.
8. Maintaining Your 2001 Ford F250 for Optimal Performance
Maintaining your 2001 Ford F250 is essential for ensuring its longevity, reliability, and optimal performance. Regular maintenance tasks, coupled with proactive diagnostics, can help you identify and address potential issues before they become major problems.
8.1. Regular Maintenance Tasks
Performing regular maintenance tasks is crucial for keeping your 2001 Ford F250 in top condition. Some of the most important tasks include:
- Oil Changes: Regularly changing the engine oil and filter is essential for lubricating and cooling the engine components. Follow the manufacturer’s recommendations for oil change intervals and use the correct type of oil.
- Fluid Checks and Top-Ups: Check the levels of various fluids, such as coolant, brake fluid, power steering fluid, and transmission fluid. Top up the fluids as needed to maintain proper levels.
- Filter Replacements: Replace the air filter, fuel filter, and cabin air filter at the recommended intervals. Clean filters ensure proper airflow and filtration, which is essential for engine performance and passenger comfort.
- Brake Inspections: Regularly inspect the brake pads, rotors, and calipers for wear and damage. Replace the brake components as needed to maintain safe braking performance.
- **Tire