Chrysler 6 Pin Obd1 To Obd2 Wiring is indeed possible and can be achieved with the right knowledge and tools. MERCEDES-DIAGNOSTIC-TOOL.EDU.VN provides comprehensive guides and solutions to help you successfully connect your older Chrysler vehicles to modern OBD2 scanners. We’ll explore the wiring configurations, potential challenges, and effective solutions, ensuring seamless diagnostics and functionality. Discover effective Chrysler scan tools, troubleshooting solutions, and automotive diagnostic tips.
Contents
- 1. Understanding OBD1 and OBD2 Systems
- 1.1 What is OBD1?
- 1.2 What is OBD2?
- 1.3 Key Differences Between OBD1 and OBD2
- 2. Why Convert Chrysler 6 Pin OBD1 to OBD2?
- 2.1 Access to Modern Diagnostic Tools
- 2.2 Enhanced Diagnostic Capabilities
- 2.3 Future-Proofing Your Vehicle
- 3. Identifying the Chrysler 6 Pin OBD1 Connector
- 3.1 Location of the Connector
- 3.2 Pinout Diagram and Function
- 3.3 Identifying Vehicle Compatibility
- 4. Tools and Materials Needed for the Conversion
- 4.1 OBD2 Connector
- 4.2 Wiring and Connectors
- 4.3 Multimeter
- 4.4 Wiring Diagram
- 4.5 Other Essential Tools
- 5. Step-by-Step Guide to Chrysler 6 Pin OBD1 to OBD2 Wiring
- 5.1 Preparing the OBD1 Connector
- 5.2 Wiring the OBD2 Connector
- 5.3 Verifying the Connections
- 5.4 Testing the OBD2 Connection
- 6. Common Issues and Troubleshooting
- 6.1 Scanner Not Connecting
- 6.2 Incorrect Data Displayed
- 6.3 Grounding Issues
- 7. Advanced Tips for Successful Conversion
- 7.1 Using Logic Inverters
- 7.2 Custom Wiring Solutions
- 7.3 Consulting with Experts
- 8. Benefits of Using MERCEDES-DIAGNOSTIC-TOOL.EDU.VN
- 8.1 Expert Guidance and Support
- 8.2 Comprehensive Resources
- 8.3 Quality Products and Services
- 9. Case Studies: Successful Conversions
- 9.1 Case Study 1: 1994 Chrysler LeBaron
- 9.2 Case Study 2: 1995 Chrysler Town & Country
- 10. FAQ: Chrysler 6 Pin OBD1 to OBD2 Conversion
- 10.1 Is it difficult to convert Chrysler 6 pin OBD1 to OBD2?
- 10.2 What tools do I need for the conversion?
- 10.3 Where can I find a wiring diagram for my Chrysler model?
- 10.4 What if my OBD2 scanner is not connecting?
- 10.5 Do I need a logic inverter for my Chrysler?
- 10.6 Can MERCEDES-DIAGNOSTIC-TOOL.EDU.VN help me with the conversion?
- 10.7 What are the benefits of converting to OBD2?
- 10.8 How do I ensure a solid ground connection?
- 10.9 What should I do if I encounter wiring errors?
- 10.10 Is it worth converting my Chrysler 6 pin OBD1 to OBD2?
- 11. Staying Safe During the Conversion Process
- 11.1 Disconnect the Battery
- 11.2 Use Proper Tools
- 11.3 Insulate Connections
- 11.4 Work in a Well-Ventilated Area
- 11.5 Wear Safety Glasses
- 12. Conclusion: Embracing Modern Diagnostics with Your Classic Chrysler
1. Understanding OBD1 and OBD2 Systems
1.1 What is OBD1?
OBD1, or On-Board Diagnostics 1, was the early generation of automotive diagnostic systems used in vehicles before 1996. These systems were not standardized, meaning each manufacturer, and sometimes even different models within the same manufacturer, had their own unique diagnostic connectors, protocols, and trouble codes. This lack of standardization made it difficult for mechanics and car owners to diagnose issues without specialized tools and knowledge specific to each vehicle. OBD1 systems typically provided basic information, often limited to engine-related problems, and required manual interpretation of codes.
1.2 What is OBD2?
OBD2, or On-Board Diagnostics 2, is a standardized system implemented in all cars sold in the United States after January 1, 1996, as mandated by the Clean Air Act Amendments of 1990. This system provides a universal interface for accessing diagnostic information from a vehicle’s computer. OBD2 standardized the diagnostic connector (a 16-pin Data Link Connector or DLC), the communication protocols, and the diagnostic trouble codes (DTCs). This standardization allows any OBD2 scanner to read diagnostic information from any compliant vehicle, making it much easier to diagnose and repair car problems. OBD2 systems monitor a wide range of vehicle systems, including engine, transmission, emissions, and more, providing more detailed and accurate diagnostic information compared to OBD1.
1.3 Key Differences Between OBD1 and OBD2
The main differences between OBD1 and OBD2 lie in standardization, connector type, communication protocols, and diagnostic capabilities. Here’s a breakdown:
- Standardization: OBD1 was not standardized, while OBD2 is fully standardized across all compliant vehicles.
- Connector: OBD1 systems used various connectors, while OBD2 uses a standard 16-pin DLC.
- Protocols: OBD1 had manufacturer-specific protocols, whereas OBD2 employs standard protocols like ISO 9141-2, SAE J1850 VPW, SAE J1850 PWM, and CAN.
- Diagnostic Capabilities: OBD2 offers more comprehensive monitoring and diagnostic information compared to OBD1.
- Trouble Codes: OBD2 uses standardized DTCs, making it easier to identify and interpret problems across different vehicles.
2. Why Convert Chrysler 6 Pin OBD1 to OBD2?
2.1 Access to Modern Diagnostic Tools
Converting a Chrysler 6 pin OBD1 system to OBD2 allows you to use modern diagnostic tools. OBD2 scanners are widely available, more affordable, and offer enhanced diagnostic capabilities compared to older OBD1 tools. This conversion gives you access to advanced features like live data streaming, freeze frame data, and comprehensive diagnostic reports, making it easier to troubleshoot and repair your vehicle.
2.2 Enhanced Diagnostic Capabilities
OBD2 systems provide more detailed and accurate diagnostic information compared to OBD1. By converting to OBD2, you gain access to a wider range of diagnostic parameters, including real-time data on engine performance, emissions, and other critical systems. This enhanced capability helps you identify problems more quickly and accurately, leading to more effective repairs and maintenance.
2.3 Future-Proofing Your Vehicle
Converting to OBD2 can help future-proof your classic Chrysler vehicle. As technology advances, OBD2 scanners and diagnostic software will continue to improve, offering even more advanced features and capabilities. By making the conversion, you ensure that your vehicle remains compatible with the latest diagnostic tools and technologies, extending its lifespan and maintaining its value.
3. Identifying the Chrysler 6 Pin OBD1 Connector
3.1 Location of the Connector
The Chrysler 6 pin OBD1 connector is typically located in the engine compartment, often near the firewall or on the inner fender. It may be covered by a protective cap. Identifying the connector’s location is the first step in the conversion process. Check your vehicle’s service manual or consult online resources for the specific location of the OBD1 connector in your Chrysler model.
3.2 Pinout Diagram and Function
Understanding the pinout diagram of the Chrysler 6 pin OBD1 connector is crucial for proper wiring. Here’s a typical pinout:
- Pin 1/2: +12V (Battery Power)
- Pin 3: PCM-TX (Powertrain Control Module Transmit)
- Pin 4: GND (Ground)
- Pin 6: PCM-RX (Powertrain Control Module Receive)
Knowing the function of each pin ensures you connect them correctly to the corresponding pins on the OBD2 connector.
 Chrysler 6-pin OBD1 Connector Diagram
3.3 Identifying Vehicle Compatibility
Not all Chrysler vehicles with a 6 pin OBD1 connector are suitable for conversion to OBD2. Check your vehicle’s service manual or consult with automotive diagnostic experts at MERCEDES-DIAGNOSTIC-TOOL.EDU.VN to determine if your specific model is compatible. Compatibility depends on the vehicle’s electronic control systems and the availability of necessary wiring information.
4. Tools and Materials Needed for the Conversion
4.1 OBD2 Connector
You will need a standard female OBD2 connector, which is readily available from automotive parts suppliers or online retailers. Ensure the connector is high-quality and designed for automotive use to withstand harsh conditions.
4.2 Wiring and Connectors
Use automotive-grade wiring of the appropriate gauge to ensure reliable connections. You may also need crimp connectors, solder, and heat shrink tubing to create secure and insulated connections.
4.3 Multimeter
A multimeter is essential for testing continuity and voltage to ensure proper wiring. Use it to verify the connections between the OBD1 and OBD2 connectors and to check for any shorts or open circuits.
4.4 Wiring Diagram
A detailed wiring diagram specific to your Chrysler model is crucial for a successful conversion. This diagram will show you exactly how to connect each pin on the OBD1 connector to the corresponding pin on the OBD2 connector.
4.5 Other Essential Tools
Other tools you may need include a wire stripper, crimping tool, soldering iron, heat gun, and basic hand tools such as screwdrivers and pliers.
5. Step-by-Step Guide to Chrysler 6 Pin OBD1 to OBD2 Wiring
5.1 Preparing the OBD1 Connector
- Disconnect the Battery: Always disconnect the vehicle’s battery before working on any electrical components to prevent shorts and electrical damage.
- Locate the OBD1 Connector: Find the 6 pin OBD1 connector in the engine compartment.
- Inspect the Connector: Check the connector for any damage or corrosion. Clean or replace the connector if necessary.
- Prepare the Wires: Cut the wires on the OBD1 connector, leaving enough length to work with. Strip the ends of each wire to expose the bare conductors.
5.2 Wiring the OBD2 Connector
- Identify OBD2 Connector Pins: Refer to the OBD2 pinout diagram to identify the function of each pin.
- Connect Ground (Pin 4): Connect the ground wire from the OBD1 connector (Pin 4) to OBD2 pins 4 (chassis ground) and 5 (signal ground). Ensure a solid ground connection for proper scanner function.
- Connect Power (Pin 1/2): Connect the +12V wire from the OBD1 connector (Pin 1/2) to OBD2 pin 16 (+12V battery power).
- Connect PCM Transmit (Pin 3): Connect the PCM-TX wire from the OBD1 connector (Pin 3) to OBD2 pin 7 (K-line).
- Connect PCM Receive (Pin 6): Connect the PCM-RX wire from the OBD1 connector (Pin 6) to OBD2 pin 15 (L-line). However, note that some adapters incorrectly route this to pin 15, which is typically for the transmission controller. Ensure it goes to OBD2 pin 6 for PCM-RX.
5.3 Verifying the Connections
- Use a Multimeter: Use a multimeter to check the continuity between each connection. Ensure that each wire is connected to the correct pin on both the OBD1 and OBD2 connectors.
- Check for Shorts: Use the multimeter to check for any shorts between the wires. There should be no continuity between any two wires that are not supposed to be connected.
- Insulate Connections: Use heat shrink tubing or electrical tape to insulate all connections. This will prevent shorts and protect the wires from corrosion and damage.
5.4 Testing the OBD2 Connection
- Reconnect the Battery: Reconnect the vehicle’s battery.
- Plug in the OBD2 Scanner: Plug an OBD2 scanner into the newly wired OBD2 connector.
- Turn on the Ignition: Turn the vehicle’s ignition to the “on” position, but do not start the engine.
- Test the Scanner: Use the OBD2 scanner to read diagnostic information from the vehicle’s computer. If the scanner connects successfully and displays data, the conversion is successful.
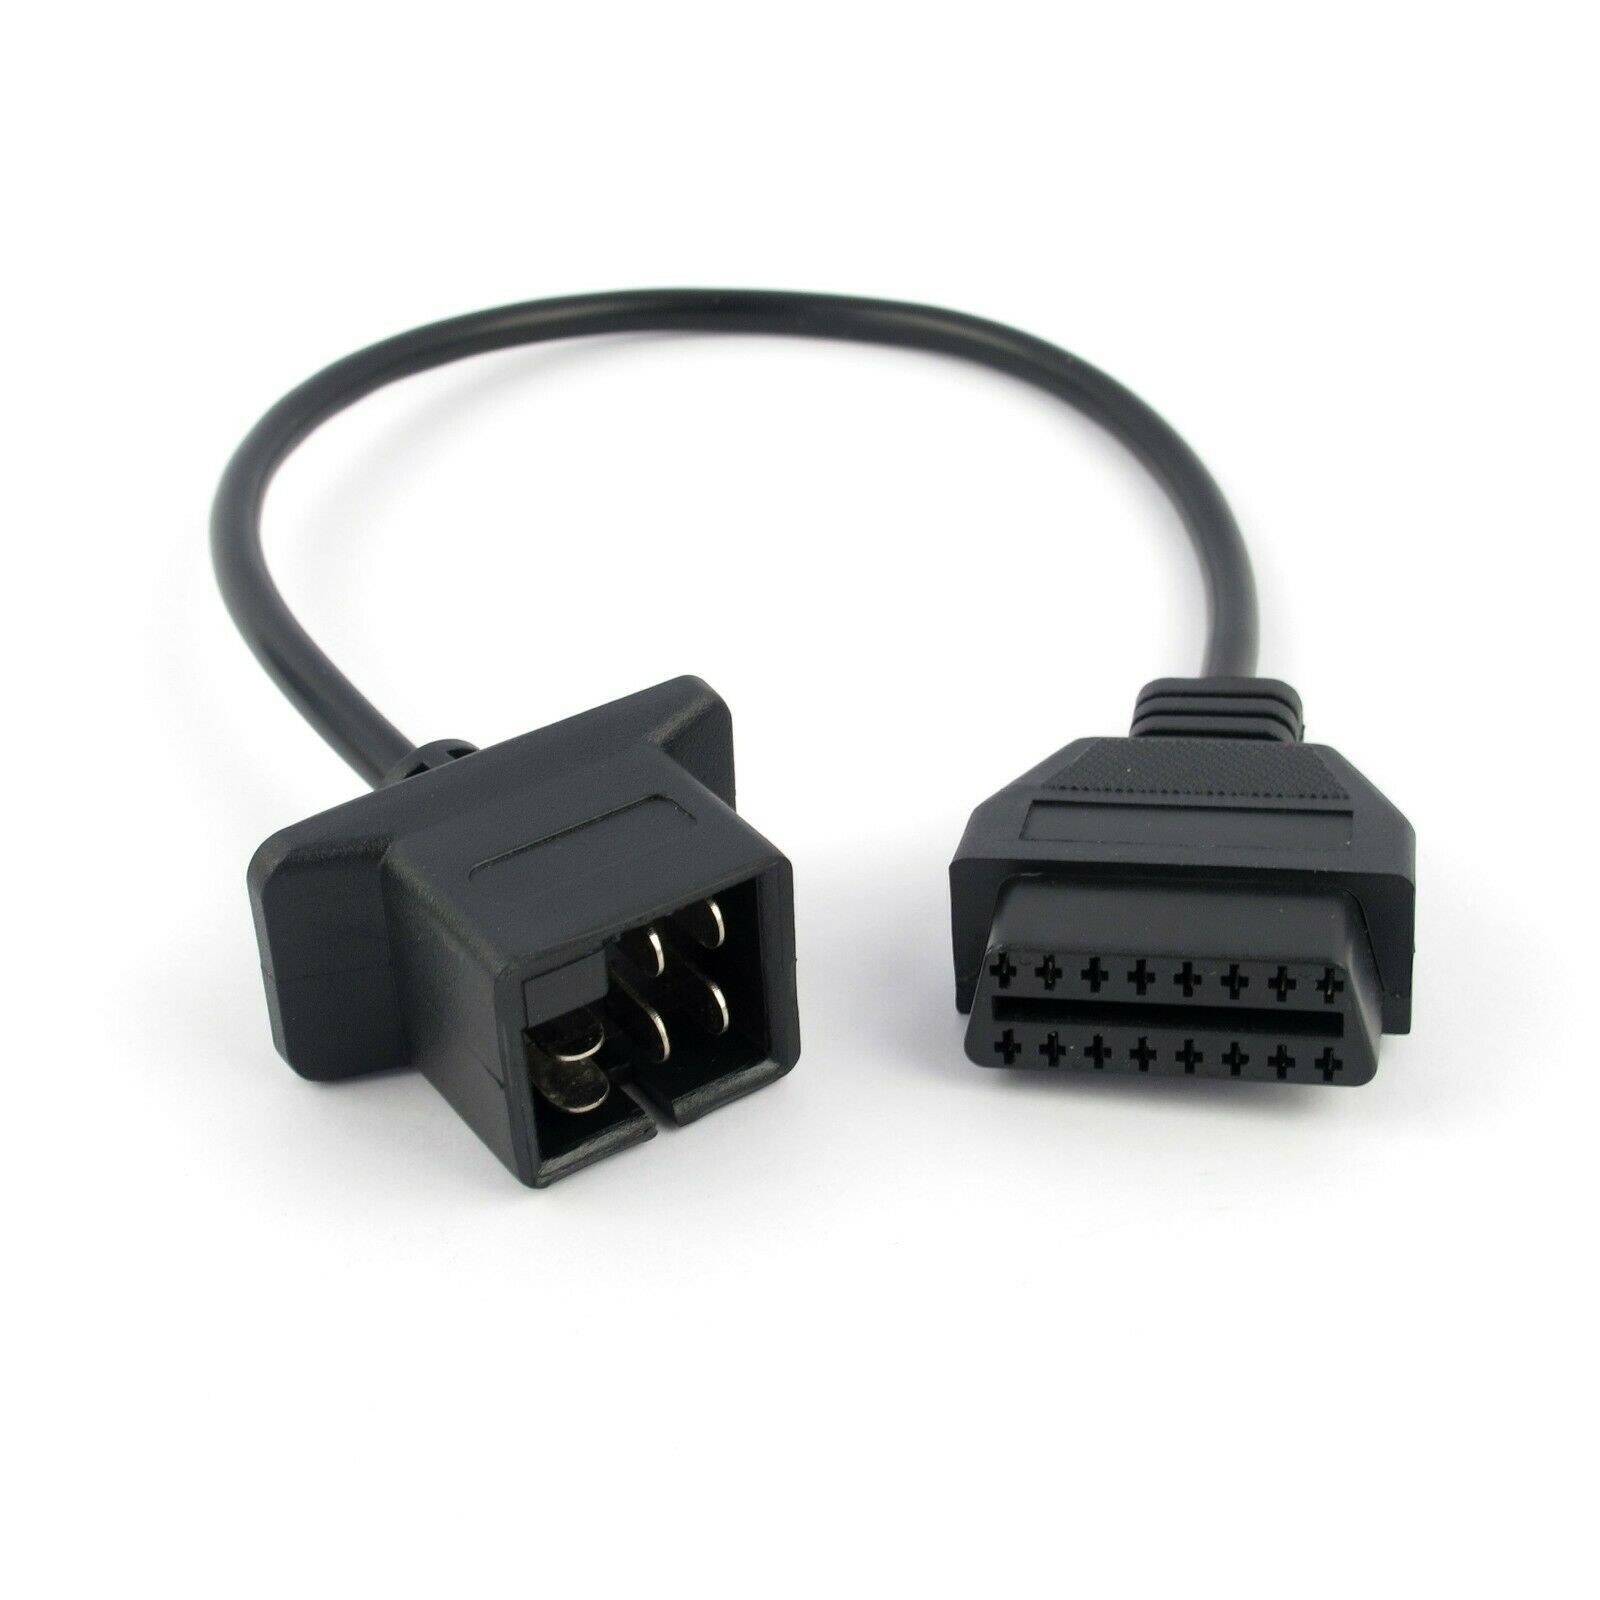 Chrysler 6-pin OBD1 to OBD2 Adapter
6. Common Issues and Troubleshooting
6.1 Scanner Not Connecting
If the OBD2 scanner fails to connect, check the following:
- Ground Connection: Ensure a solid ground connection between the OBD1 and OBD2 connectors.
- Power Connection: Verify that the +12V wire is properly connected and that the OBD2 connector is receiving power.
- Wiring Errors: Double-check the wiring diagram and ensure that all wires are connected to the correct pins.
- Scanner Compatibility: Ensure that the OBD2 scanner is compatible with your vehicle’s communication protocol.
6.2 Incorrect Data Displayed
If the scanner connects but displays incorrect data, check the following:
- Wiring Errors: Double-check the wiring diagram and ensure that all wires are connected to the correct pins.
- Inverted UART Logic: Older cars may have inverted UART-logic in the connector. In this case, a logic inverter circuit must be inserted between the engine connector and the scanner connector.
- Faulty Sensors: The issue may be with the vehicle’s sensors rather than the OBD2 connection.
6.3 Grounding Issues
Grounding issues can cause a variety of problems, including scanner connectivity issues and incorrect data. Ensure that the OBD2 scanner is grounded to the car’s battery. Try switching the scanner on without a USB connection; the green LED should light up.
7. Advanced Tips for Successful Conversion
7.1 Using Logic Inverters
Some older Chrysler vehicles may use inverted UART logic in their OBD1 systems. This means that the signal levels are reversed compared to standard OBD2 systems. To compensate for this, you may need to use a logic inverter circuit between the OBD1 and OBD2 connectors. A 74LS04 logic inverter IC can be used to invert the signals, ensuring proper communication between the vehicle’s computer and the OBD2 scanner.
7.2 Custom Wiring Solutions
If you cannot find a suitable adapter cable or wiring diagram for your specific Chrysler model, you may need to create a custom wiring solution. Use insulated blade crimp terminals to create your own interface wires. The 6.3 mm terminal goes into the engine connector, and the 2.8 mm terminal slides onto the scanner’s OBD-II pins. To avoid short circuits, use insulated female blade crimp terminals or put heat-shrink tubing on the whole metallic part.
7.3 Consulting with Experts
If you are unsure about any aspect of the conversion process, consult with automotive diagnostic experts at MERCEDES-DIAGNOSTIC-TOOL.EDU.VN. Our experienced technicians can provide guidance and support to help you successfully convert your Chrysler 6 pin OBD1 system to OBD2.
8. Benefits of Using MERCEDES-DIAGNOSTIC-TOOL.EDU.VN
8.1 Expert Guidance and Support
MERCEDES-DIAGNOSTIC-TOOL.EDU.VN offers expert guidance and support for all your automotive diagnostic needs. Our team of experienced technicians can provide detailed instructions, troubleshooting tips, and personalized advice to help you successfully convert your Chrysler 6 pin OBD1 system to OBD2.
8.2 Comprehensive Resources
We provide a wide range of comprehensive resources, including detailed wiring diagrams, step-by-step guides, and video tutorials. These resources are designed to help you understand the conversion process and perform it correctly.
8.3 Quality Products and Services
MERCEDES-DIAGNOSTIC-TOOL.EDU.VN offers high-quality OBD2 scanners, adapter cables, and other diagnostic tools and services. Our products are designed to meet the needs of both professional mechanics and DIY enthusiasts.
9. Case Studies: Successful Conversions
9.1 Case Study 1: 1994 Chrysler LeBaron
A customer with a 1994 Chrysler LeBaron was struggling to diagnose an engine problem using an old OBD1 scanner. After consulting with MERCEDES-DIAGNOSTIC-TOOL.EDU.VN, they successfully converted the vehicle’s OBD1 system to OBD2 using a custom wiring solution. The customer was then able to use a modern OBD2 scanner to quickly identify and resolve the engine problem, saving time and money on repairs.
9.2 Case Study 2: 1995 Chrysler Town & Country
Another customer with a 1995 Chrysler Town & Country minivan was experiencing intermittent electrical problems. They converted the vehicle’s OBD1 system to OBD2 using an adapter cable and a logic inverter circuit. This allowed them to use an OBD2 scanner to diagnose and repair the electrical issues, improving the vehicle’s reliability and performance.
10. FAQ: Chrysler 6 Pin OBD1 to OBD2 Conversion
10.1 Is it difficult to convert Chrysler 6 pin OBD1 to OBD2?
Converting a Chrysler 6 pin OBD1 system to OBD2 can be challenging, but with the right tools, wiring diagrams, and guidance, it is achievable.
10.2 What tools do I need for the conversion?
You will need an OBD2 connector, automotive-grade wiring, a multimeter, a wiring diagram, wire stripper, crimping tool, soldering iron, and heat gun.
10.3 Where can I find a wiring diagram for my Chrysler model?
You can find wiring diagrams in your vehicle’s service manual or online resources, or consult with automotive diagnostic experts at MERCEDES-DIAGNOSTIC-TOOL.EDU.VN.
10.4 What if my OBD2 scanner is not connecting?
Check the ground connection, power connection, wiring errors, and scanner compatibility.
10.5 Do I need a logic inverter for my Chrysler?
Older Chrysler vehicles may require a logic inverter due to inverted UART logic in their OBD1 systems.
10.6 Can MERCEDES-DIAGNOSTIC-TOOL.EDU.VN help me with the conversion?
Yes, MERCEDES-DIAGNOSTIC-TOOL.EDU.VN offers expert guidance, comprehensive resources, and quality products to help you with the conversion.
10.7 What are the benefits of converting to OBD2?
Benefits include access to modern diagnostic tools, enhanced diagnostic capabilities, and future-proofing your vehicle.
10.8 How do I ensure a solid ground connection?
Connect the ground wire from the OBD1 connector to both OBD2 pins 4 (chassis ground) and 5 (signal ground).
10.9 What should I do if I encounter wiring errors?
Double-check the wiring diagram and ensure that all wires are connected to the correct pins.
10.10 Is it worth converting my Chrysler 6 pin OBD1 to OBD2?
Yes, converting to OBD2 is worthwhile if you want to use modern diagnostic tools and gain access to enhanced diagnostic capabilities.
11. Staying Safe During the Conversion Process
11.1 Disconnect the Battery
Always disconnect the vehicle’s battery before working on any electrical components to prevent shorts and electrical damage.
11.2 Use Proper Tools
Use the correct tools for the job to avoid damaging the connectors or wires.
11.3 Insulate Connections
Insulate all connections with heat shrink tubing or electrical tape to prevent shorts and protect the wires from corrosion and damage.
11.4 Work in a Well-Ventilated Area
When soldering, work in a well-ventilated area to avoid inhaling harmful fumes.
11.5 Wear Safety Glasses
Wear safety glasses to protect your eyes from debris and solder splatters.
12. Conclusion: Embracing Modern Diagnostics with Your Classic Chrysler
Converting your Chrysler 6 pin OBD1 system to OBD2 opens up a world of modern diagnostic capabilities, allowing you to keep your classic vehicle running smoothly and efficiently. With the right tools, knowledge, and support from MERCEDES-DIAGNOSTIC-TOOL.EDU.VN, you can successfully perform the conversion and enjoy the benefits of enhanced diagnostics.
Ready to upgrade your Chrysler’s diagnostic capabilities? Contact MERCEDES-DIAGNOSTIC-TOOL.EDU.VN today for expert guidance and support. Our team is ready to assist you with all your automotive diagnostic needs. Visit us at 789 Oak Avenue, Miami, FL 33101, United States, or reach out via WhatsApp at +1 (641) 206-8880. For more information, visit our website at MERCEDES-DIAGNOSTIC-TOOL.EDU.VN.