The 2002 Dodge Ram 1500 Slt Obd2 system is an essential diagnostic tool, and at MERCEDES-DIAGNOSTIC-TOOL.EDU.VN, we’re here to guide you through troubleshooting any issues you might encounter. Our expertise will ensure that you accurately diagnose and resolve OBD2-related problems in your Dodge Ram, keeping your vehicle running smoothly and efficiently. By the end of this article, you’ll understand common OBD2 issues, diagnostic procedures, and how our services can help maintain your vehicle’s optimal performance, while covering powertrain malfunctions, sensor failures, and diagnostic errors.
Contents
- 1. What is the 2002 Dodge Ram 1500 SLT OBD2 System?
- 1.1. History and Evolution of OBD Systems
- 1.2. Key Components of the OBD2 System in the 2002 Dodge Ram 1500 SLT
- 1.3. How the OBD2 System Works in the 2002 Dodge Ram 1500 SLT
- 1.4. Importance of OBD2 Compliance and Benefits
- 2. Common OBD2 Trouble Codes for 2002 Dodge Ram 1500 SLT
- 2.1. P0300 – Random/Multiple Cylinder Misfire Detected
- 2.2. P0171 and P0174 – System Too Lean (Bank 1 and Bank 2)
- 2.3. P0420 – Catalyst System Efficiency Below Threshold (Bank 1)
- 2.4. P0442, P0455, P0456 – Evaporative Emission Control System Leak Detected (Small, Large, Very Small)
- 2.5. P0113 – Intake Air Temperature Sensor Circuit High Input
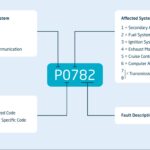
- 2.6. P0700 – Transmission Control System Malfunction
- 2.7. Understanding Generic vs. Manufacturer-Specific Codes
- 3. Step-by-Step OBD2 Diagnostic Process for Your 2002 Dodge Ram 1500 SLT
- 3.1. Gather Necessary Tools and Equipment
- 3.2. Connect the OBD2 Scan Tool
- 3.3. Read and Record the Diagnostic Trouble Codes (DTCs)
- 3.4. Research the DTCs
- 3.5. Perform a Visual Inspection
- 3.6. Perform Specific Diagnostic Tests
- 3.7. Interpret Test Results and Formulate a Diagnosis
- 3.8. Repair or Replace Faulty Components
- 3.9. Clear the DTCs and Retest the System
- 3.10. Verify the Repair
- 4. Tools and Equipment for OBD2 Diagnostics
- 4.1. Essential OBD2 Scan Tools
- 4.2. Multimeters and Electrical Testing Tools
- 4.3. Diagnostic Software and Databases
- 4.4. Specialized Diagnostic Tools
- 4.5. Safety Equipment
- 4.6. Other Useful Tools
- 5. Tips for Accurate OBD2 Diagnosis
- 5.1. Start with the Basics
- 5.2. Understand the System
- 5.3. Verify the Problem
- 5.4. Use the Right Tools
- 5.5. Follow a Systematic Approach
- 5.6. Interpret Test Results Carefully
- 5.7. Be Aware of Intermittent Problems
- 5.8. Don’t Assume Anything
- 5.9. Seek Expert Advice
- 5.10. Document Everything
- 6. When to Seek Professional Help from MERCEDES-DIAGNOSTIC-TOOL.EDU.VN
- 6.1. Complex Diagnostic Issues
- 6.2. Advanced Repairs
- 6.3. Lack of Diagnostic Experience
- 6.4. Time Constraints
- 6.5. Warranty Concerns
- 7. The Role of MERCEDES-DIAGNOSTIC-TOOL.EDU.VN in OBD2 Diagnostics
- 7.1. Expert Consultation and Support
- 7.2. Access to Advanced Diagnostic Tools
- 7.3. Training and Resources
- 7.4. Remote Diagnostic Services
- 7.5. On-Site Diagnostic and Repair Services
- 8. Preventing Future OBD2 Issues
- 8.1. Regular Maintenance
- 8.2. Proactive Monitoring
- 8.3. Address Problems Promptly
- 8.4. Use Quality Parts
- 8.5. Avoid Harsh Driving Conditions
- 8.6. Keep the Vehicle Clean
- 8.7. Store the Vehicle Properly
- 8.8. Keep the Vehicle Updated
1. What is the 2002 Dodge Ram 1500 SLT OBD2 System?
The 2002 Dodge Ram 1500 SLT OBD2 (On-Board Diagnostics II) system is a standardized system used for monitoring and diagnosing a vehicle’s engine and emissions control systems. The OBD2 system in your 2002 Dodge Ram 1500 SLT monitors various engine and transmission parameters to ensure optimal performance and minimal emissions. This system reports any issues to the vehicle’s computer, which can then trigger the malfunction indicator lamp (MIL), commonly known as the “Check Engine” light.
1.1. History and Evolution of OBD Systems
The history of On-Board Diagnostics (OBD) systems dates back to the late 1960s when manufacturers started implementing basic diagnostic capabilities in vehicles to meet stricter emissions standards. The first generation of OBD systems (OBD-I) varied significantly between manufacturers, lacking standardization in diagnostic codes and data accessibility.
The Society of Automotive Engineers (SAE) played a crucial role in standardizing diagnostic connectors and data parameters in the late 1980s. However, it wasn’t until the implementation of OBD-II in the mid-1990s that a comprehensive, standardized system was adopted across the automotive industry.
OBD-II, mandated in the United States for all cars and light trucks manufactured after 1996, provided a standardized diagnostic connector (SAE J1962), a uniform set of diagnostic trouble codes (DTCs), and standardized data parameters (PIDs). This standardization enabled technicians to diagnose and repair vehicles from different manufacturers using the same equipment and procedures.
According to a study by the Environmental Protection Agency (EPA), OBD-II systems have significantly contributed to reducing vehicle emissions by enabling early detection and repair of emission-related faults.
1.2. Key Components of the OBD2 System in the 2002 Dodge Ram 1500 SLT
The OBD2 system in your 2002 Dodge Ram 1500 SLT comprises several key components that work together to monitor and diagnose vehicle performance. These components include:
-
Diagnostic Connector (DLC): This is a standardized 16-pin connector, usually located under the dashboard, where diagnostic tools are connected to retrieve data and diagnostic trouble codes (DTCs).
-
Engine Control Module (ECM): The ECM is the central computer that monitors and controls the engine’s operation. It receives data from various sensors, makes adjustments to engine parameters, and stores diagnostic information.
-
Sensors: Various sensors throughout the engine and transmission provide data to the ECM. These sensors include:
- Oxygen Sensors: Monitor the oxygen content in the exhaust gases to ensure proper combustion and catalytic converter efficiency.
- Mass Airflow (MAF) Sensor: Measures the amount of air entering the engine.
- Throttle Position Sensor (TPS): Monitors the position of the throttle plate.
- Crankshaft Position Sensor (CKP): Tracks the position and speed of the crankshaft.
- Camshaft Position Sensor (CMP): Monitors the position of the camshaft.
- Coolant Temperature Sensor (CTS): Measures the temperature of the engine coolant.
- Manifold Absolute Pressure (MAP) Sensor: Measures the pressure in the intake manifold.
-
Actuators: These components are controlled by the ECM to make adjustments to engine operation. Examples include fuel injectors, ignition coils, and the electronic throttle control.
-
Malfunction Indicator Lamp (MIL): Commonly known as the “Check Engine” light, the MIL illuminates when the ECM detects a fault that exceeds predetermined thresholds.
1.3. How the OBD2 System Works in the 2002 Dodge Ram 1500 SLT
The OBD2 system in the 2002 Dodge Ram 1500 SLT operates through a continuous monitoring process. Here’s how it works:
-
Data Collection: The ECM continuously receives data from various sensors throughout the engine and transmission.
-
Data Analysis: The ECM compares the sensor data against predetermined values and thresholds stored in its memory. These values are based on the vehicle’s design and expected performance.
-
Fault Detection: If the ECM detects a discrepancy between the sensor data and the expected values, it identifies a fault.
-
Diagnostic Trouble Code (DTC) Storage: When a fault is detected, the ECM stores a corresponding DTC in its memory. The DTC provides information about the nature and location of the fault.
-
Malfunction Indicator Lamp (MIL) Activation: Depending on the severity and type of fault, the ECM may activate the MIL to alert the driver of the issue. Some faults require multiple occurrences before the MIL is activated.
-
Data Retrieval: Technicians can connect a diagnostic scan tool to the DLC to retrieve the stored DTCs and other diagnostic data. This data helps diagnose the problem and perform necessary repairs.
-
Readiness Monitors: The OBD2 system also includes readiness monitors, which are self-tests performed by the ECM to verify the functionality of emission-related components. These monitors must be completed before a vehicle can pass an emissions test.
1.4. Importance of OBD2 Compliance and Benefits
Compliance with OBD2 standards is essential for several reasons:
-
Emissions Control: OBD2 systems help ensure that vehicles meet strict emissions standards by monitoring and diagnosing emission-related faults. Early detection and repair of these faults can significantly reduce harmful emissions.
-
Diagnostic Accuracy: The standardized DTCs and data parameters provided by OBD2 enable technicians to accurately diagnose and repair vehicle problems. This reduces the likelihood of misdiagnosis and unnecessary repairs.
-
Improved Fuel Efficiency: By monitoring engine performance and detecting issues that could affect fuel efficiency, OBD2 systems help maintain optimal fuel economy.
-
Vehicle Longevity: Regular monitoring and maintenance based on OBD2 diagnostics can help extend the life of the vehicle by addressing potential problems before they cause significant damage.
-
Ease of Maintenance: The standardized diagnostic connector and data protocols make it easier for technicians to access and interpret vehicle data, simplifying maintenance and repair procedures.
-
Regulatory Compliance: In many regions, vehicles must pass an OBD2-based emissions test to be registered and legally operated on public roads. Compliance with OBD2 standards is therefore necessary for vehicle owners to maintain their vehicle’s legal status.
2. Common OBD2 Trouble Codes for 2002 Dodge Ram 1500 SLT
Understanding common OBD2 trouble codes is crucial for diagnosing issues in your 2002 Dodge Ram 1500 SLT. Here are some frequent codes and their typical causes:
2.1. P0300 – Random/Multiple Cylinder Misfire Detected
Symptoms: Rough idling, reduced power, and potential stalling.
Causes:
- Faulty spark plugs or ignition coils.
- Vacuum leaks.
- Clogged fuel injectors.
- Low fuel pressure.
- Defective crankshaft or camshaft sensor.
According to a study by the National Institute for Automotive Service Excellence (ASE), misfires are often caused by worn spark plugs or faulty ignition coils.
Troubleshooting Steps:
- Inspect spark plugs for wear or damage.
- Check ignition coils for proper function.
- Test fuel injectors for clogs or failures.
- Check for vacuum leaks using a smoke tester.
- Verify fuel pressure with a fuel pressure gauge.
2.2. P0171 and P0174 – System Too Lean (Bank 1 and Bank 2)
Symptoms: Decreased fuel economy, hesitation during acceleration, and a potential rough idle.
Causes:
- Vacuum leaks.
- Faulty oxygen sensors.
- Dirty or failing mass airflow (MAF) sensor.
- Low fuel pressure.
- Exhaust leaks before the oxygen sensors.
Troubleshooting Steps:
- Inspect for vacuum leaks around the intake manifold and vacuum lines.
- Clean or replace the MAF sensor.
- Check oxygen sensor readings with a scan tool.
- Verify fuel pressure and fuel pump performance.
- Examine the exhaust system for leaks before the oxygen sensors.
2.3. P0420 – Catalyst System Efficiency Below Threshold (Bank 1)
Symptoms: Illuminated Check Engine light, reduced fuel economy, and potential emissions test failure.
Causes:
- Defective catalytic converter.
- Faulty oxygen sensors.
- Exhaust leaks.
- Engine misfires.
Troubleshooting Steps:
- Check oxygen sensor performance using a scan tool.
- Inspect the catalytic converter for damage or blockage.
- Check for exhaust leaks.
- Address any engine misfires before replacing the catalytic converter.
2.4. P0442, P0455, P0456 – Evaporative Emission Control System Leak Detected (Small, Large, Very Small)
Symptoms: Illuminated Check Engine light, no noticeable driving issues, potential fuel odor.
Causes:
- Loose or defective fuel cap.
- Cracked or damaged EVAP hoses.
- Faulty purge valve or vent valve.
- Defective fuel tank pressure sensor.
Troubleshooting Steps:
- Check and tighten the fuel cap.
- Inspect EVAP hoses for cracks or damage.
- Test the purge valve and vent valve for proper operation.
- Check the fuel tank pressure sensor readings.
2.5. P0113 – Intake Air Temperature Sensor Circuit High Input
Symptoms: Poor engine performance, decreased fuel economy.
Causes:
- Faulty IAT sensor.
- Wiring issues in the IAT sensor circuit.
- Loose or corroded IAT sensor connector.
Troubleshooting Steps:
- Check the IAT sensor connector and wiring for damage.
- Test the IAT sensor’s resistance.
- Replace the IAT sensor if faulty.
2.6. P0700 – Transmission Control System Malfunction
Symptoms: Illuminated Check Engine light, transmission shifting problems.
Causes:
- Faulty transmission sensors or solenoids.
- Low transmission fluid.
- Contaminated transmission fluid.
- Internal transmission damage.
Troubleshooting Steps:
- Check transmission fluid level and condition.
- Scan for additional transmission-specific codes.
- Test transmission sensors and solenoids.
- Inspect wiring and connectors in the transmission control system.
2.7. Understanding Generic vs. Manufacturer-Specific Codes
When troubleshooting OBD2 codes, it’s essential to distinguish between generic and manufacturer-specific codes.
-
Generic Codes: These are standardized codes defined by SAE and are the same across all vehicle makes and models. They typically begin with P0 (powertrain), C0 (chassis), B0 (body), or U0 (network).
-
Manufacturer-Specific Codes: These codes are defined by the vehicle manufacturer and provide more detailed information about the fault. They typically begin with P1, C1, B1, or U1. For example, a generic code might indicate a misfire (P0300), while a manufacturer-specific code might specify which cylinder is misfiring (e.g., P0301 for cylinder 1).
When diagnosing issues in your 2002 Dodge Ram 1500 SLT, consult the vehicle’s service manual or a Dodge-specific diagnostic resource to interpret manufacturer-specific codes accurately. At MERCEDES-DIAGNOSTIC-TOOL.EDU.VN, we can provide specialized diagnostic support to help you understand and resolve these codes effectively.
3. Step-by-Step OBD2 Diagnostic Process for Your 2002 Dodge Ram 1500 SLT
Diagnosing OBD2 issues in your 2002 Dodge Ram 1500 SLT requires a systematic approach to accurately identify and resolve the problem. Here’s a detailed step-by-step guide:
3.1. Gather Necessary Tools and Equipment
Before starting the diagnostic process, ensure you have the following tools and equipment:
- OBD2 Scan Tool: This tool is essential for reading and clearing diagnostic trouble codes (DTCs). Consider purchasing a high-quality scan tool that provides live data and advanced diagnostic functions.
- Vehicle Service Manual: A service manual specific to your 2002 Dodge Ram 1500 SLT provides detailed information about the vehicle’s systems, wiring diagrams, and diagnostic procedures.
- Multimeter: A multimeter is needed to test electrical circuits, sensors, and components.
- Socket Set and Wrenches: Having a comprehensive set of sockets and wrenches is necessary for removing and installing components.
- Screwdrivers: Both flathead and Phillips head screwdrivers are required for various tasks.
- Vacuum Tester: Used to check for vacuum leaks in the engine.
- Fuel Pressure Tester: Necessary for measuring fuel pressure in the system.
- Personal Protective Equipment (PPE): Safety glasses and gloves to protect yourself during the diagnostic process.
3.2. Connect the OBD2 Scan Tool
- Locate the DLC: The Diagnostic Link Connector (DLC) is typically located under the dashboard, often near the steering column.
- Connect the Scan Tool: Plug the OBD2 scan tool into the DLC.
- Turn the Ignition On: Turn the ignition key to the “ON” position without starting the engine. This provides power to the scan tool and the vehicle’s computer.
3.3. Read and Record the Diagnostic Trouble Codes (DTCs)
- Navigate the Scan Tool Menu: Use the scan tool’s menu to select the “Read Codes” or “Diagnostic Codes” option.
- Record the Codes: Write down all the DTCs that appear on the scan tool’s screen. Note the order in which the codes appear, as some codes may be related to others.
- Freeze Frame Data: If available, record the freeze frame data associated with each DTC. Freeze frame data provides a snapshot of the engine’s operating conditions when the fault occurred, which can be helpful in diagnosing intermittent problems.
3.4. Research the DTCs
- Consult the Service Manual: Use the vehicle service manual to look up each DTC and understand its possible causes and diagnostic procedures.
- Online Resources: Utilize online resources such as automotive forums, technical service bulletins (TSBs), and diagnostic databases to gather additional information about the codes. Websites like ALLDATA and Identifix can be valuable resources.
3.5. Perform a Visual Inspection
A thorough visual inspection can often reveal obvious issues that may be causing the DTCs.
- Check Wiring and Connectors: Inspect wiring harnesses, connectors, and electrical components for damage, corrosion, or loose connections. Pay close attention to areas near the engine, exhaust system, and chassis where components are exposed to heat, vibration, and environmental elements.
- Inspect Vacuum Lines: Check vacuum lines for cracks, leaks, or disconnections. Vacuum leaks can cause a variety of engine performance issues, including lean conditions and misfires.
- Check Hoses and Belts: Inspect hoses for swelling, cracking, or leaks. Check belts for wear, cracks, or proper tension.
- Check Fluid Levels: Verify that engine oil, coolant, transmission fluid, and brake fluid levels are within the recommended ranges. Low fluid levels can indicate leaks or other issues that may trigger DTCs.
3.6. Perform Specific Diagnostic Tests
Based on the DTCs and the information gathered from the visual inspection, perform specific diagnostic tests to pinpoint the root cause of the problem.
- Oxygen Sensor Test: Use the scan tool to monitor oxygen sensor readings. Check for proper voltage, switching activity, and response time. Compare the readings to specifications in the service manual.
- MAF Sensor Test: Use the scan tool to monitor MAF sensor readings. Check for proper airflow readings at idle and during acceleration. Use a multimeter to test the sensor’s voltage and resistance.
- Fuel Pressure Test: Connect a fuel pressure tester to the fuel rail and measure fuel pressure at idle and during acceleration. Compare the readings to specifications in the service manual.
- Compression Test: Perform a compression test to check the mechanical condition of the engine. Low compression in one or more cylinders can indicate worn piston rings, damaged valves, or a blown head gasket.
- Leak-Down Test: A leak-down test can help identify the source of compression loss, such as leaking valves or piston rings.
- Ignition System Test: Use an ignition tester to check for proper spark at each spark plug. Check the condition of the spark plugs, ignition coils, and spark plug wires.
- EVAP System Test: Use a smoke tester to check for leaks in the EVAP system. Common leak points include the fuel cap, EVAP hoses, purge valve, and vent valve.
3.7. Interpret Test Results and Formulate a Diagnosis
Carefully analyze the test results and compare them to the specifications in the service manual. Based on the test results, formulate a diagnosis that identifies the root cause of the problem.
- Consider All Available Information: Consider all the information gathered during the diagnostic process, including DTCs, freeze frame data, visual inspection findings, and test results.
- Prioritize Possible Causes: Prioritize possible causes based on the likelihood of occurrence and the severity of the potential consequences.
- Consult Technical Resources: Consult technical resources such as TSBs, diagnostic databases, and online forums to validate your diagnosis and identify any common issues or recommended solutions.
3.8. Repair or Replace Faulty Components
Once you have identified the faulty component(s), proceed with the necessary repairs or replacements.
- Follow Service Manual Procedures: Follow the procedures outlined in the service manual for removing and installing components.
- Use Quality Parts: Use high-quality replacement parts that meet or exceed OEM specifications.
- Proper Installation: Ensure that all components are installed correctly and torqued to the proper specifications.
- Reconnect Electrical Connectors: Make sure all electrical connectors are securely reconnected and free of corrosion.
3.9. Clear the DTCs and Retest the System
After completing the repairs, clear the DTCs from the vehicle’s computer using the scan tool.
- Select the “Clear Codes” Option: Use the scan tool’s menu to select the “Clear Codes” or “Erase Codes” option.
- Confirm the Clearing Process: Follow the prompts on the scan tool to confirm the clearing process.
- Retest the System: Start the engine and allow it to run for a few minutes. Monitor the engine’s performance and check for any new DTCs.
- Perform a Test Drive: If possible, perform a test drive to verify that the problem has been resolved and that the vehicle is operating normally under various driving conditions.
3.10. Verify the Repair
After the test drive, recheck the system for any new DTCs. If no new codes appear and the vehicle is operating normally, the repair can be considered successful.
- Monitor Readiness Monitors: Check the status of the OBD2 readiness monitors using the scan tool. Ensure that all applicable monitors have completed and are in a “ready” state. This is essential for passing an emissions test.
- Long-Term Monitoring: Continue to monitor the vehicle’s performance over the next few days or weeks to ensure that the problem does not recur.
By following this step-by-step diagnostic process, you can effectively troubleshoot OBD2 issues in your 2002 Dodge Ram 1500 SLT and ensure that your vehicle operates reliably and efficiently.
4. Tools and Equipment for OBD2 Diagnostics
Having the right tools and equipment is essential for effective OBD2 diagnostics. Here’s a comprehensive list of recommended tools:
4.1. Essential OBD2 Scan Tools
- Basic OBD2 Scanner: Reads and clears DTCs, displays basic live data.
- Advanced OBD2 Scanner: Reads and clears DTCs, displays enhanced live data, performs advanced diagnostic tests (e.g., bidirectional control, component activation), and provides access to manufacturer-specific codes.
- Smartphone-Based OBD2 Adapter: Plugs into the DLC and communicates with a smartphone app via Bluetooth or Wi-Fi, offering a portable and cost-effective diagnostic solution.
4.2. Multimeters and Electrical Testing Tools
- Digital Multimeter (DMM): Measures voltage, current, resistance, and continuity.
- Test Leads and Probes: Used to connect the multimeter to electrical circuits and components.
- Circuit Tester: A simple tool for checking voltage in a circuit.
- Wiring Diagrams: Essential for understanding the vehicle’s electrical system and tracing circuits.
4.3. Diagnostic Software and Databases
- ALLDATA: Provides access to OEM service manuals, wiring diagrams, TSBs, and diagnostic procedures.
- Identifix: Offers a database of diagnostic information, including confirmed fixes and repair procedures submitted by technicians.
- Mitchell 1: A comprehensive resource for automotive repair information.
4.4. Specialized Diagnostic Tools
- Vacuum Tester: Checks for vacuum leaks in the engine.
- Fuel Pressure Tester: Measures fuel pressure in the system.
- Compression Tester: Checks the mechanical condition of the engine.
- Leak-Down Tester: Identifies the source of compression loss, such as leaking valves or piston rings.
- Smoke Tester: Detects leaks in the EVAP system, intake system, and exhaust system.
- Timing Light: Checks and adjusts ignition timing.
- Noid Light Set: Tests fuel injector pulse signals.
4.5. Safety Equipment
- Safety Glasses: Protect your eyes from debris and chemicals.
- Gloves: Protect your hands from dirt, oil, and chemicals.
- Jack Stands: Support the vehicle safely when working underneath.
- Wheel Chocks: Prevent the vehicle from rolling.
4.6. Other Useful Tools
- Mechanic’s Stethoscope: Helps locate noises in the engine and other components.
- Inspection Mirror: Allows you to see hard-to-reach areas.
- Flexible Grabber Tool: Retrieves dropped parts and tools.
- Penlight or Flashlight: Provides illumination in dark areas.
5. Tips for Accurate OBD2 Diagnosis
Accurate OBD2 diagnosis requires a combination of knowledge, skill, and attention to detail. Here are some tips to help you diagnose OBD2 issues effectively:
5.1. Start with the Basics
Before diving into complex diagnostic procedures, start with the basics:
- Visual Inspection: Perform a thorough visual inspection of wiring, connectors, hoses, and components. Look for obvious signs of damage, corrosion, or leaks.
- Check Fluid Levels: Verify that fluid levels are within the recommended ranges. Low fluid levels can indicate leaks or other issues that may trigger DTCs.
- Battery Condition: Ensure that the battery is fully charged and in good condition. A weak battery can cause a variety of electrical problems that may trigger DTCs.
5.2. Understand the System
Familiarize yourself with the vehicle’s systems and how they operate.
- Service Manual: Consult the vehicle service manual for detailed information about the vehicle’s systems, wiring diagrams, and diagnostic procedures.
- Technical Resources: Utilize online resources such as automotive forums, technical service bulletins (TSBs), and diagnostic databases to gather additional information about the codes.
5.3. Verify the Problem
Before performing any repairs, verify that the problem actually exists.
- Duplicate the Issue: Try to duplicate the conditions under which the DTC was set. This may involve driving the vehicle under specific conditions or performing certain tests.
- Monitor Live Data: Use the scan tool to monitor live data and observe how the system is operating in real-time.
5.4. Use the Right Tools
Using the right tools is essential for accurate diagnosis.
- Quality Scan Tool: Invest in a high-quality scan tool that provides live data, advanced diagnostic tests, and access to manufacturer-specific codes.
- Specialized Tools: Utilize specialized tools such as vacuum testers, fuel pressure testers, compression testers, and smoke testers to perform specific diagnostic tests.
5.5. Follow a Systematic Approach
A systematic approach is crucial for effective diagnosis.
- Step-by-Step Procedures: Follow the step-by-step diagnostic procedures outlined in the service manual.
- Test Components in Order: Test components in a logical order, starting with the most likely causes of the problem.
5.6. Interpret Test Results Carefully
Carefully analyze test results and compare them to the specifications in the service manual.
- Consider All Available Information: Consider all the information gathered during the diagnostic process, including DTCs, freeze frame data, visual inspection findings, and test results.
- Validate Your Diagnosis: Consult technical resources such as TSBs, diagnostic databases, and online forums to validate your diagnosis and identify any common issues or recommended solutions.
5.7. Be Aware of Intermittent Problems
Intermittent problems can be challenging to diagnose.
- Monitor System Over Time: Monitor the system over time to see if the problem recurs.
- Use a Data Logger: Use a data logger to record system data while driving the vehicle. This can help identify intermittent issues that may not be apparent during a static test.
5.8. Don’t Assume Anything
Avoid making assumptions based on limited information.
- Verify Each Component: Verify the operation of each component before replacing it.
- Consult Multiple Sources: Consult multiple sources of information to ensure that you have a complete understanding of the problem.
5.9. Seek Expert Advice
If you are unsure about any aspect of the diagnostic process, seek expert advice.
- Experienced Technicians: Consult with experienced technicians who have expertise in diagnosing OBD2 issues.
- Online Forums: Utilize online forums to ask questions and get advice from other technicians and vehicle owners.
5.10. Document Everything
Keep a detailed record of the diagnostic process.
- Record DTCs: Record all DTCs, freeze frame data, visual inspection findings, and test results.
- Document Repairs: Document all repairs that are performed, including the parts that were replaced and the procedures that were followed.
6. When to Seek Professional Help from MERCEDES-DIAGNOSTIC-TOOL.EDU.VN
While many OBD2 issues can be resolved with DIY diagnostics and repairs, certain situations warrant seeking professional help from MERCEDES-DIAGNOSTIC-TOOL.EDU.VN. Here are some scenarios where professional assistance is recommended:
6.1. Complex Diagnostic Issues
When the OBD2 system presents multiple DTCs or complex symptoms that are difficult to diagnose, professional technicians have the expertise and equipment to perform advanced diagnostics.
- Multiple DTCs: If your 2002 Dodge Ram 1500 SLT is displaying multiple DTCs, it can be challenging to determine the root cause of the problem. Professional technicians can use advanced diagnostic techniques to identify the underlying issue and address all related faults.
- Intermittent Problems: Intermittent problems can be particularly difficult to diagnose because they do not occur consistently. Professional technicians can use data loggers and other specialized equipment to monitor the system over time and identify the conditions that trigger the problem.
- Unusual Symptoms: If your vehicle is exhibiting unusual symptoms that are not directly related to the DTCs, professional technicians can perform a comprehensive diagnostic evaluation to identify the cause.
6.2. Advanced Repairs
Some repairs require specialized tools, equipment, and expertise.
- Engine Repairs: Major engine repairs, such as cylinder head replacement, piston ring replacement, or engine overhaul, require specialized tools and expertise.
- Transmission Repairs: Transmission repairs, such as valve body replacement, clutch replacement, or transmission overhaul, also require specialized tools and expertise.
- Electrical System Repairs: Complex electrical system repairs, such as wiring harness replacement or ECM reprogramming, require specialized diagnostic equipment and expertise.
6.3. Lack of Diagnostic Experience
If you lack the diagnostic experience or technical knowledge to effectively troubleshoot OBD2 issues, it is best to seek professional help.
- Limited Knowledge: If you are unfamiliar with the vehicle’s systems or diagnostic procedures, you may be unable to accurately diagnose the problem.
- No Diagnostic Equipment: If you do not have access to a scan tool or other diagnostic equipment, you may be unable to perform the necessary tests.
- Unsure of Procedures: If you are unsure of the proper procedures for diagnosing and repairing OBD2 issues, you may inadvertently damage the vehicle or cause further problems.
6.4. Time Constraints
Diagnosing and repairing OBD2 issues can be time-consuming, particularly for complex problems. If you have limited time or other commitments, seeking professional help can save you time and frustration.
- Busy Schedule: If you have a busy schedule, you may not have the time to dedicate to diagnosing and repairing OBD2 issues.
- Need Vehicle Quickly: If you need your vehicle back on the road quickly, seeking professional help can expedite the repair process.
6.5. Warranty Concerns
If your 2002 Dodge Ram 1500 SLT is still under warranty, it is important to seek professional help from an authorized service center to avoid voiding the warranty.
- Authorized Service: Having repairs performed by an unauthorized service center may void the warranty.
- Proper Documentation: An authorized service center will provide proper documentation of the repairs, which may be required for warranty claims.
7. The Role of MERCEDES-DIAGNOSTIC-TOOL.EDU.VN in OBD2 Diagnostics
MERCEDES-DIAGNOSTIC-TOOL.EDU.VN plays a crucial role in assisting vehicle owners and technicians with OBD2 diagnostics by providing expert guidance, specialized tools, and comprehensive support. Here’s how we can help:
7.1. Expert Consultation and Support
We offer expert consultation and support to help you troubleshoot OBD2 issues in your 2002 Dodge Ram 1500 SLT.
- Experienced Technicians: Our team of experienced technicians has extensive knowledge of OBD2 systems and diagnostic procedures.
- Diagnostic Assistance: We can assist you in interpreting DTCs, performing diagnostic tests, and formulating a diagnosis.
- Repair Recommendations: We can provide recommendations for repairing or replacing faulty components.
7.2. Access to Advanced Diagnostic Tools
We provide access to advanced diagnostic tools and equipment.
- High-Quality Scan Tools: We offer a range of high-quality scan tools that provide live data, advanced diagnostic tests, and access to manufacturer-specific codes.
- Specialized Equipment: We also offer specialized equipment such as vacuum testers, fuel pressure testers, compression testers, and smoke testers.
7.3. Training and Resources
We offer training and resources to help you improve your diagnostic skills.
- Online Tutorials: We provide online tutorials that cover various aspects of OBD2 diagnostics.
- Technical Articles: We publish technical articles that provide in-depth information about OBD2 systems and diagnostic procedures.
- Workshops and Seminars: We offer workshops and seminars that provide hands-on training in OBD2 diagnostics.
7.4. Remote Diagnostic Services
We offer remote diagnostic services to help you troubleshoot OBD2 issues from the comfort of your own home or shop.
- Remote Access: We can remotely access your vehicle’s computer using a scan tool and a remote diagnostic interface.
- Real-Time Diagnostics: We can perform real-time diagnostics and provide guidance on troubleshooting the problem.
- Repair Recommendations: We can provide recommendations for repairing or replacing faulty components.
7.5. On-Site Diagnostic and Repair Services
We offer on-site diagnostic and repair services for complex OBD2 issues.
- Experienced Technicians: Our team of experienced technicians can come to your home or shop to diagnose and repair complex OBD2 issues.
- Mobile Diagnostic Equipment: We use mobile diagnostic equipment to perform on-site diagnostics and repairs.
- Convenient Service: We offer convenient on-site service to save you time and hassle.
8. Preventing Future OBD2 Issues
Preventing future OBD2 issues involves regular maintenance, proactive monitoring, and addressing problems before they escalate. Here are some tips to help you keep your 2002 Dodge Ram 1500 SLT running smoothly and avoid costly repairs:
8.1. Regular Maintenance
Regular maintenance is essential for preventing OBD2 issues.
- Oil Changes: Change the engine oil and filter at the recommended intervals.
- Air Filter Replacement: Replace the air filter at the recommended intervals.
- Spark Plug Replacement: Replace the spark plugs at the recommended intervals.
- Fluid Checks: Check fluid levels regularly, including engine oil, coolant, transmission fluid, brake fluid, and power steering fluid.
- Tune-Ups: Perform regular tune-ups to ensure that the engine is running efficiently.
8.2. Proactive Monitoring
Proactive monitoring can help you identify potential problems before they trigger DTCs.
- Monitor Engine Performance: Pay attention to how the engine is running. Look for any unusual noises, vibrations, or changes in performance.
- Check Fuel Economy: Monitor fuel economy and look for any sudden drops.
- Inspect Components: Regularly inspect components such as hoses, belts, and wiring for wear or damage.
8.3. Address Problems Promptly
Addressing problems promptly can prevent them from escalating and triggering DTCs.
- Repair Minor Issues: Repair minor issues such as leaks, loose connections, or worn components as soon as they are detected.
- Investigate Unusual Symptoms: Investigate any unusual symptoms such as strange noises, vibrations, or changes in performance.
- Consult with a Technician: If you are unsure about any aspect of the vehicle’s performance, consult with a technician.
8.4. Use Quality Parts
Using quality parts can help prevent future OBD2 issues.
- OEM Parts: Use OEM (Original Equipment Manufacturer) parts whenever possible.
- Reputable Brands: If OEM parts are not available, use parts from reputable brands that meet or exceed OEM specifications.
8.5. Avoid Harsh Driving Conditions
Avoiding harsh driving conditions can help extend the life of the vehicle and prevent OBD2 issues.
- Smooth Acceleration: Avoid harsh acceleration and braking.
- Reduce Towing: Reduce towing or hauling heavy loads.
- Proper Tire Inflation: Maintain proper tire inflation.
8.6. Keep the Vehicle Clean
Keeping the vehicle clean can help prevent corrosion and other issues that may trigger DTCs.
- Wash Regularly: Wash the vehicle regularly to remove dirt, salt, and other contaminants.
- Undercoat: Apply an undercoating to protect the undercarriage from corrosion.
- Clean Electrical Connectors: Clean electrical connectors to prevent corrosion.
8.7. Store the Vehicle Properly
Storing the vehicle properly can help prevent OBD2 issues.
- Climate-Controlled Environment: Store the vehicle in a climate-controlled environment to prevent corrosion and other damage.
- Cover the Vehicle: Cover the vehicle to protect it from dust and dirt.
- Use a Battery Tender: Use a battery tender to keep the battery charged during long periods of storage.
8.8. Keep the Vehicle Updated
Keeping the vehicle updated can help prevent OBD2 issues.
- Software Updates: Keep the vehicle’s