Esp32 Obd2 interfaces offer an innovative approach to vehicle diagnostics, and at MERCEDES-DIAGNOSTIC-TOOL.EDU.VN, we help you explore how this technology can specifically benefit your Mercedes-Benz. This article provides a comprehensive overview, including setup and troubleshooting tips. Explore solutions for common issues and unlock advanced features to enhance your Mercedes-Benz ownership experience.
1. What is ESP32 OBD2 and Why Use It for Mercedes-Benz?
ESP32 OBD2 refers to a combination of the ESP32 microcontroller and the On-Board Diagnostics II (OBD2) protocol, creating a powerful, customizable interface for vehicle diagnostics and data logging. MERCEDES-DIAGNOSTIC-TOOL.EDU.VN understands that for Mercedes-Benz owners and technicians, this offers several advantages, including real-time data access, customizability, and cost-effectiveness compared to traditional diagnostic tools. This technology is especially appealing if you want to tap into your car’s hidden features.
- Real-time Data Monitoring: ESP32 OBD2 allows you to monitor various parameters of your Mercedes-Benz in real-time, such as engine temperature, RPM, vehicle speed, and fuel consumption.
- Customization: Unlike proprietary diagnostic tools, ESP32 OBD2 can be customized to display specific data or perform certain actions based on pre-defined conditions.
- Cost-Effectiveness: The components required for an ESP32 OBD2 interface are relatively inexpensive compared to professional diagnostic equipment.
- Open-Source Development: The open-source nature of ESP32 allows for community-driven development, leading to continuous improvement and expansion of its capabilities.
- Wireless Connectivity: ESP32’s built-in Wi-Fi and Bluetooth capabilities enable wireless data transmission to smartphones, tablets, or home automation systems.
 ESP32 chip connected to an OBD2 adapter
2. What Are the Key Components Needed for an ESP32 OBD2 Setup?
To build your ESP32 OBD2 setup for your Mercedes-Benz, MERCEDES-DIAGNOSTIC-TOOL.EDU.VN recommends gathering the following essential components. Understanding these parts and their functions is crucial for a successful project.
- ESP32 Development Board: The ESP32 is a low-cost, low-power system-on-a-chip (SoC) series with Wi-Fi and Bluetooth capabilities.
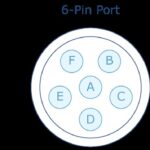
- OBD2 Adapter: An OBD2 adapter connects to your Mercedes-Benz’s OBD2 port and provides access to the vehicle’s diagnostic data.
- CAN Bus Transceiver: A CAN (Controller Area Network) bus transceiver facilitates communication between the ESP32 and the OBD2 adapter.
- Wiring and Connectors: These are necessary for physically connecting the ESP32, CAN transceiver, and OBD2 adapter.
- Power Supply: Typically, the ESP32 can be powered via USB or directly from the vehicle’s OBD2 port.
- Software Libraries: These libraries provide the necessary functions for reading and interpreting OBD2 data. Popular choices include the Arduino OBD2 library and the mcp_can library.
- Development Environment: You will need a development environment such as the Arduino IDE or PlatformIO to program the ESP32.
3. How Do You Set Up the ESP32 OBD2 Interface with Your Mercedes-Benz?
Setting up an ESP32 OBD2 interface for your Mercedes-Benz involves several steps, which MERCEDES-DIAGNOSTIC-TOOL.EDU.VN breaks down for clarity. Follow these instructions carefully to ensure a smooth process.
-
Hardware Connection:
- Connect the CAN transceiver to the ESP32, paying attention to the correct pins for TX (transmit), RX (receive), and interrupt.
- Connect the OBD2 adapter to the CAN transceiver.
- Ensure all connections are secure and properly grounded.
-
Software Setup:
- Install the Arduino IDE or PlatformIO on your computer.
- Install the necessary libraries, such as the Arduino OBD2 library and the mcp_can library.
- Write the code to initialize the CAN bus, read OBD2 data, and transmit it via Wi-Fi or Bluetooth.
-
Firmware Upload:
- Connect the ESP32 to your computer via USB.
- Upload the compiled code to the ESP32.
-
Testing and Configuration:
- Connect the OBD2 adapter to your Mercedes-Benz’s OBD2 port.
- Power on the ESP32 and verify that it is receiving data from the vehicle.
- Configure the ESP32 to transmit data to your desired platform, such as a smartphone app or a home automation system.
4. What Software and Libraries are Essential for ESP32 OBD2 on Mercedes-Benz?
MERCEDES-DIAGNOSTIC-TOOL.EDU.VN emphasizes the importance of using the correct software and libraries to ensure seamless operation of your ESP32 OBD2 interface with your Mercedes-Benz. Here are some essentials:
- Arduino IDE: A user-friendly integrated development environment (IDE) for writing and uploading code to the ESP32.
- PlatformIO: An alternative IDE that offers advanced features and better support for large projects.
- Arduino OBD2 Library: This library provides functions for sending OBD2 requests and receiving responses.
- mcp_can Library: A library for communicating with the MCP2515 CAN controller, which is commonly used with ESP32 OBD2 setups.
- WiFi Library: For enabling Wi-Fi connectivity and transmitting data wirelessly.
- Bluetooth Library: For enabling Bluetooth connectivity and transmitting data wirelessly.
5. How Can You Read and Interpret OBD2 Data from a Mercedes-Benz Using ESP32?
Reading and interpreting OBD2 data from your Mercedes-Benz using the ESP32 involves sending specific requests to the vehicle’s ECU (Engine Control Unit) and processing the responses. MERCEDES-DIAGNOSTIC-TOOL.EDU.VN provides these steps to help you understand the process:
-
OBD2 PIDs (Parameter IDs):
- OBD2 PIDs are codes used to request specific data from the vehicle’s ECU.
- Common PIDs include engine temperature (0x05), RPM (0x0C), vehicle speed (0x0D), and fuel level (0x2F).
-
Sending Requests:
- Use the Arduino OBD2 library to send requests to the ECU.
- Specify the PID you want to read and send the request via the CAN bus.
-
Receiving Responses:
- The ECU will respond with the requested data.
- The data is typically in hexadecimal format and needs to be converted to a human-readable format.
-
Data Interpretation:
- Refer to OBD2 documentation to understand the format and meaning of the data.
- Use formulas provided in the documentation to convert the raw data into meaningful units, such as Celsius for temperature or RPM for engine speed.
-
Example Code Snippet:
#include <OBD2.h>
#include <mcp_can.h>

// CAN controller pins
#define CAN0_INT 2
MCP_CAN CAN0(10);

void setup() {
  Serial.begin(115200);
  // Initialize CAN controller
  CAN0.begin(MCP_ANY, CAN_500KBPS, MCP_8MHZ);
  CAN0.setMode(MCP_NORMAL);
}

void loop() {
  // Request engine temperature (PID 0x05)
  byte pid = 0x05;
  byte data[8];
  CAN0.sendMsgBuf(0x7E0, 0, 3, {0x02, 0x01, pid});

  // Wait for response
  unsigned long startTime = millis();
  while (millis() - startTime < 100) {
    if (CAN0.checkReceive() == CAN_MSGAVAIL) {
      CAN0.readMsgBuf(&msgId, &len, data);
      if (msgId == 0x7E8 && data[0] == 0x03 && data[1] == 0x41 && data[2] == pid) {
        // Convert temperature from hexadecimal to Celsius
        float temperature = data[3] - 40;
        Serial.print("Engine Temperature: ");
        Serial.print(temperature);
        Serial.println(" °C");
        break;
      }
    }
  }
  delay(1000);
}
6. What Are Common Issues and Troubleshooting Tips for ESP32 OBD2 with Mercedes-Benz?
Even with careful setup, you may encounter issues. MERCEDES-DIAGNOSTIC-TOOL.EDU.VN offers these troubleshooting tips to address common problems with ESP32 OBD2 setups on Mercedes-Benz vehicles:
-
No Data Received:
- Check all wiring connections to ensure they are secure.
- Verify that the CAN transceiver is properly connected to the ESP32 and the OBD2 adapter.
- Ensure that the OBD2 adapter is compatible with your Mercedes-Benz model.
- Confirm that the CAN bus speed is correctly configured in your code (typically 500 kbps for Mercedes-Benz).
-
Incorrect Data:
- Double-check the OBD2 PIDs you are requesting to ensure they are supported by your vehicle.
- Verify that you are correctly interpreting the data received from the ECU.
- Refer to OBD2 documentation for accurate conversion formulas.
-
Connection Problems:
- If using Wi-Fi or Bluetooth, ensure that the ESP32 is properly connected to your network or device.
- Check the signal strength and stability of your wireless connection.
- Make sure that your code includes proper error handling and reconnection logic.
-
CAN Bus Errors:
- CAN bus errors can occur if there are conflicts or issues with the CAN bus communication.
- Check for any shorts or open circuits in the wiring.
- Ensure that the CAN transceiver is properly terminated with a 120-ohm resistor.
-
Power Issues:
- Ensure that the ESP32 is receiving a stable and sufficient power supply.
- If powering the ESP32 from the vehicle’s OBD2 port, check the voltage levels to ensure they are within the acceptable range.
7. How Can You Use ESP32 OBD2 to Unlock Hidden Features on Your Mercedes-Benz?
ESP32 OBD2 can be used to unlock hidden features on your Mercedes-Benz by sending specific commands to the ECU. MERCEDES-DIAGNOSTIC-TOOL.EDU.VN notes that this requires advanced knowledge and caution, as incorrect commands can potentially damage your vehicle’s electronic systems.
-
Research and Planning:
- Research the specific features you want to unlock and the corresponding commands required.
- Consult Mercedes-Benz forums and online communities for information and guidance.
- Make sure you have a clear understanding of the risks involved before proceeding.
-
ECU Programming:
- Use the ESP32 to send the required commands to the ECU via the CAN bus.
- This may involve writing custom code to send specific messages with the correct IDs and data.
- Be extremely careful when programming the ECU, as incorrect commands can cause serious issues.
-
Backup and Recovery:
- Before making any changes, create a backup of your vehicle’s ECU configuration.
- This will allow you to restore the original settings if something goes wrong.
- Have a recovery plan in place in case you encounter any issues.
-
Example Hidden Features:
- Activating Ambient Lighting: Control and customize the ambient lighting settings in your Mercedes-Benz.
- Enabling Sport Displays: Activate additional performance displays in the instrument cluster.
- Adjusting Suspension Settings: Modify the air suspension settings for improved ride comfort or handling.
- Activating Cornering Lights: Enable cornering lights for enhanced visibility during turns.
- Customizing Instrument Cluster: Change the appearance and functionality of the instrument cluster.
8. What Are the Safety Precautions When Working with ESP32 OBD2 on Mercedes-Benz?
Working with ESP32 OBD2 on your Mercedes-Benz requires careful attention to safety to prevent damage to your vehicle and ensure your personal safety. MERCEDES-DIAGNOSTIC-TOOL.EDU.VN advises following these precautions:
- Battery Safety:
- Always disconnect the negative terminal of the battery before working on the electrical system.
- Use insulated tools to prevent short circuits.
- Avoid wearing metallic jewelry that could conduct electricity.
- OBD2 Port Handling:
- Handle the OBD2 port and connector with care.
- Avoid pulling or yanking the connector, as this can damage the port.
- Ensure that the connector is properly seated before powering on the system.
- Software and Firmware:
- Use reliable and verified software and firmware for your ESP32 OBD2 setup.
- Avoid using untrusted or untested code, as it may contain malicious software.
- Always back up your vehicle’s ECU configuration before making any changes.
- Vehicle Operation:
- Never operate the vehicle while actively troubleshooting or modifying the ESP32 OBD2 setup.
- Perform all testing and modifications in a safe and controlled environment.
- Avoid distractions while working on the vehicle.
- Environmental Conditions:
- Work in a well-ventilated area to avoid exposure to harmful fumes or gases.
- Keep the work area clean and free of clutter.
- Use appropriate personal protective equipment, such as gloves and eye protection.
9. Can ESP32 OBD2 Be Integrated with Home Assistant for Mercedes-Benz Automation?
Yes, ESP32 OBD2 can be integrated with Home Assistant to create custom automation routines for your Mercedes-Benz. MERCEDES-DIAGNOSTIC-TOOL.EDU.VN explains how this integration can enhance your smart home experience:
-
MQTT Protocol:
- Use the MQTT (Message Queuing Telemetry Transport) protocol to transmit data from the ESP32 to Home Assistant.
- MQTT is a lightweight messaging protocol that is well-suited for IoT applications.
-
Home Assistant Configuration:
- Configure Home Assistant to subscribe to the MQTT topics where the ESP32 is publishing data.
- Create sensors in Home Assistant to display the data received from the ESP32.
-
Automation Examples:
- Automatic Garage Door Opening: Automatically open your garage door when your Mercedes-Benz approaches your home.
- Climate Control Adjustment: Adjust the temperature in your home based on the engine temperature of your Mercedes-Benz.
- Lighting Control: Turn on the lights in your driveway or garage when your Mercedes-Benz arrives.
- Security System Integration: Arm or disarm your home security system based on the location of your Mercedes-Benz.
-
Node-RED Integration:
- Use Node-RED, a visual programming tool, to create complex automation flows based on the data from your Mercedes-Benz.
- Node-RED allows you to easily connect different services and devices in your home automation system.
-
Example Configuration:
- MQTT Sensor Configuration in
configuration.yaml:
- MQTT Sensor Configuration in
mqtt:
  sensor:
    - name: "Mercedes Engine Temperature"
      state_topic: "mercedes/engine_temperature"
      unit_of_measurement: "°C"
      value_template: "{{ value_json.temperature }}"
    - name: "Mercedes Fuel Level"
      state_topic: "mercedes/fuel_level"
      unit_of_measurement: "%"
      value_template: "{{ value_json.fuel_level }}"
10. What Are the Benefits of Using a WiCAN with Home Assistant for Mercedes-Benz?
MERCEDES-DIAGNOSTIC-TOOL.EDU.VN highlights several benefits of using WiCAN (Wi-Fi Controller Area Network) with Home Assistant for your Mercedes-Benz:
- Wireless Connectivity: WiCAN provides a wireless interface between your Mercedes-Benz and Home Assistant, eliminating the need for physical cables.
- Real-Time Data: WiCAN allows you to monitor real-time data from your Mercedes-Benz, such as engine temperature, fuel level, and vehicle speed.
- Custom Automation: You can create custom automation routines in Home Assistant based on the data received from your Mercedes-Benz.
- Remote Monitoring: Monitor your vehicle’s performance and status remotely from anywhere in the world.
- Easy Integration: WiCAN integrates seamlessly with Home Assistant using the MQTT protocol.
- Cost-Effective Solution: WiCAN is a cost-effective solution for integrating your Mercedes-Benz with your smart home.
11. What is WiCAN and How Does It Work with ESP32 and Mercedes-Benz?
WiCAN is a device that bridges the Controller Area Network (CAN bus) of your Mercedes-Benz to your home Wi-Fi network, making it accessible to systems like Home Assistant. MERCEDES-DIAGNOSTIC-TOOL.EDU.VN explains how WiCAN functions with ESP32:
- Functionality: WiCAN allows you to read and write data to your car’s CAN bus wirelessly.
- Components: It typically includes an ESP32 microcontroller, a CAN transceiver, and a Wi-Fi module.
- Communication: WiCAN uses the MQTT protocol to send CAN bus data to Home Assistant.
- Configuration: You can configure WiCAN through a web interface to connect to your Wi-Fi network and set up MQTT parameters.
- Use Cases: Monitoring vehicle parameters, controlling car functions, and integrating with home automation systems.
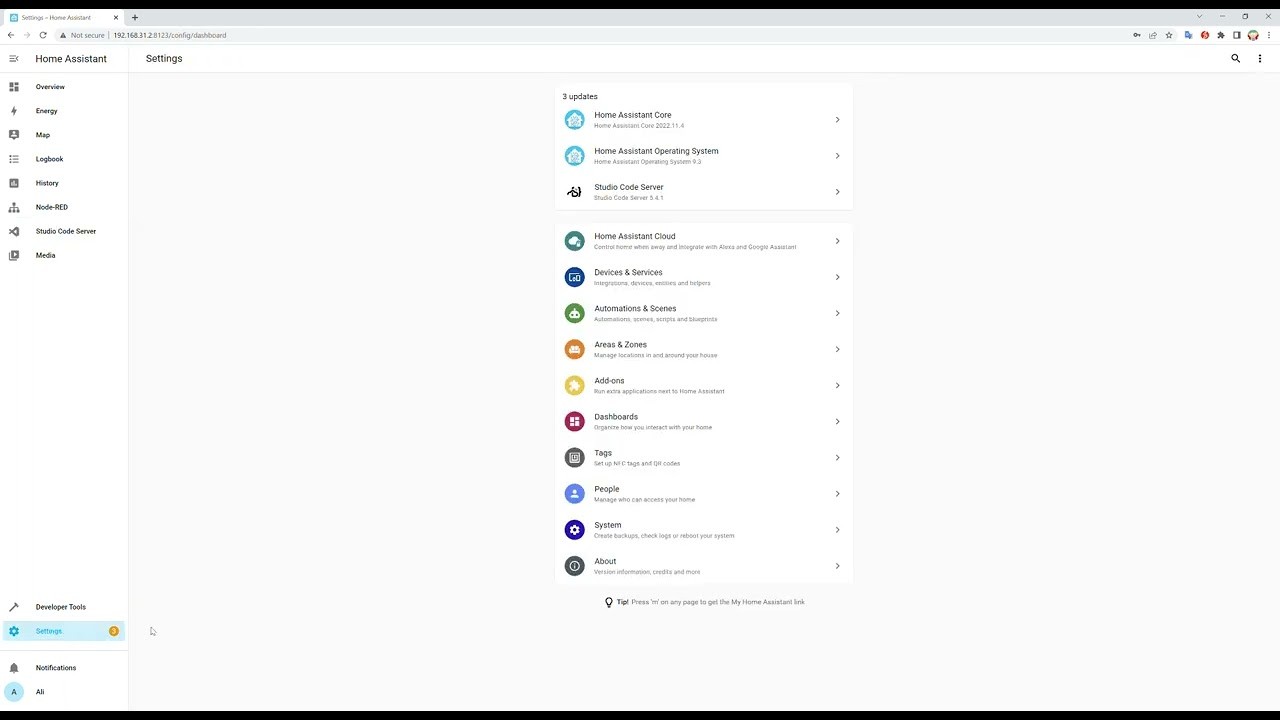
12. How Do You Install the Mosquitto Broker Add-on for Home Assistant?
Installing the Mosquitto Broker add-on is essential for enabling MQTT communication between your ESP32-based system and Home Assistant. MERCEDES-DIAGNOSTIC-TOOL.EDU.VN provides these detailed steps:
-
Access Home Assistant Add-on Store:
- Open your Home Assistant web interface.
- Navigate to “Supervisor” in the sidebar.
- Click on the “Add-on Store” tab.
-
Search for Mosquitto Broker:
- In the Add-on Store, use the search bar to find “Mosquitto Broker”.
-
Install the Add-on:
- Click on the “Mosquitto Broker” add-on.
- Click the “Install” button.
-
Configure the Add-on (Optional):
- After installation, go to the “Configuration” tab.
- You can set up users and passwords for MQTT authentication.
- Example configuration:
logins:
  - username: your_username
    password: your_password
anonymous: false
- Save the configuration.
-
Start the Add-on:
- Go to the “Info” tab.
- Click the “Start” button to start the Mosquitto Broker.
-
Verify the Installation:
- Check the “Log” tab for any error messages.
- Ensure that the Mosquitto Broker is running without any issues.
13. How Can You Create a New User Account for WiCAN in Home Assistant?
Creating a dedicated user account for WiCAN in Home Assistant enhances security and provides better control over access permissions. MERCEDES-DIAGNOSTIC-TOOL.EDU.VN outlines the steps to create a new user:
-
Navigate to User Management:
- Open your Home Assistant web interface.
- Click on your profile icon in the bottom left corner.
-
Create a New User:
- Click on “Create User”.
- Enter a username and password for the new user.
- Assign the necessary permissions to the user. For WiCAN, you may want to create a user with limited access to specific MQTT topics.
-
Save the User:
- Click the “Create” button to save the new user.
-
Use the Credentials:
- Use the newly created username and password in your WiCAN configuration to authenticate with the MQTT broker.
14. How Do You Configure WiCAN in Ap+Station Mode?
Configuring WiCAN in Ap+Station mode allows it to act as both a Wi-Fi access point and a client, enabling you to connect to it directly while also connecting to your home Wi-Fi network. MERCEDES-DIAGNOSTIC-TOOL.EDU.VN offers these instructions:
-
Connect to WiCAN Access Point:
- Power on your WiCAN device.
- Use a computer or smartphone to connect to the Wi-Fi network broadcast by WiCAN (e.g., WiCAN_xxxxxxxxxxxx).
-
Access WiCAN Web Interface:
- Open a web browser and navigate to
http://192.168.80.1/.
- Open a web browser and navigate to
-
Configure Ap+Station Mode:
- In the WiCAN web interface, find the “Mode” setting.
- Select “Ap+Station” from the dropdown menu.
-
Enter Wi-Fi Credentials:
- Fill in the SSID (name) and password of your home Wi-Fi network.
-
Enable MQTT:
- Enable the MQTT option in the WiCAN configuration.
- Enter the IP address of your Home Assistant MQTT broker (usually the same IP as your Home Assistant instance).
- Enter the username and password of the Home Assistant user you created for WiCAN.
-
Save and Restart:
- Save the configuration and restart the WiCAN device.
15. How Do You Install the Node-RED Add-on in Home Assistant?
Installing the Node-RED add-on in Home Assistant allows you to create visual automation flows based on data from your Mercedes-Benz. MERCEDES-DIAGNOSTIC-TOOL.EDU.VN provides a step-by-step guide:
-
Access Home Assistant Add-on Store:
- Open your Home Assistant web interface.
- Navigate to “Supervisor” in the sidebar.
- Click on the “Add-on Store” tab.
-
Search for Node-RED:
- In the Add-on Store, use the search bar to find “Node-RED”.
-
Install the Add-on:
- Click on the “Node-RED” add-on.
- Click the “Install” button.
-
Configure the Add-on (Optional):
- After installation, go to the “Configuration” tab.
- You can set up authentication and other settings.
-
Start the Add-on:
- Go to the “Info” tab.
- Click the “Start” button to start Node-RED.
-
Access Node-RED:
- Click the “Open Web UI” button to access the Node-RED interface.
16. How Can You Import and Configure the WiCAN Example Flow in Node-RED?
Importing and configuring the WiCAN example flow in Node-RED simplifies the process of setting up automation based on CAN bus data from your Mercedes-Benz. MERCEDES-DIAGNOSTIC-TOOL.EDU.VN details how to do this:
-
Download the Example Flow:
- Download the “wican_example_flow.json” file from the WiCAN GitHub repository or the provided link.
-
Open Node-RED:
- Access the Node-RED interface through your Home Assistant installation.
-
Import the Flow:
- Click the menu button (three horizontal lines) in the top right corner.
- Select “Import” from the dropdown menu.
- Choose the “wican_example_flow.json” file you downloaded.
-
Configure the MQTT Nodes:
- Double-click on the MQTT input node (usually labeled “MQTT in”).
- Edit the server field to point to your Home Assistant MQTT broker.
- Enter the username and password of the Home Assistant user you created for WiCAN.
- Update the topic field to match the MQTT topic your WiCAN device is publishing to.
-
Deploy the Flow:
- Click the “Deploy” button in the top right corner to deploy the flow.
17. How Do You Create a New MQTT Sensor in Home Assistant for Mercedes-Benz Data?
Creating MQTT sensors in Home Assistant allows you to display and use data from your Mercedes-Benz in your home automation routines. MERCEDES-DIAGNOSTIC-TOOL.EDU.VN provides a step-by-step guide:
-
Edit
configuration.yaml:- Open the
configuration.yamlfile in your Home Assistant configuration directory.
- Open the
-
Add MQTT Sensor Configuration:
- Add the following lines to define a new MQTT sensor:
mqtt:
  sensor:
    - name: "Mercedes Engine Temperature"
      state_topic: "mercedes/engine_temperature"
      unit_of_measurement: "°C"
      value_template: "{{ value_json.temperature }}"
    - name: "Mercedes Fuel Level"
      state_topic: "mercedes/fuel_level"
      unit_of_measurement: "%"
      value_template: "{{ value_json.fuel_level }}"
- Replace
"Mercedes Engine Temperature"and"Mercedes Fuel Level"with the desired names for your sensors. - Update
"mercedes/engine_temperature"and"mercedes/fuel_level"with the correct MQTT topics your WiCAN device is publishing to. - Adjust the
unit_of_measurementandvalue_templatefields to match the data format and units of your data.
-
Restart Home Assistant:
- Restart your Home Assistant instance for the changes to take effect.
18. How Do You Add a New Card Entity to the Home Assistant Dashboard?
Adding a new card entity to the Home Assistant dashboard allows you to visualize and interact with the data from your Mercedes-Benz. MERCEDES-DIAGNOSTIC-TOOL.EDU.VN explains the process:
-
Edit the Dashboard:
- Open your Home Assistant web interface.
- Navigate to the dashboard you want to edit.
- Click the menu button (three vertical dots) in the top right corner.
- Select “Edit Dashboard”.
-
Add a New Card:
- Click the “+” button to add a new card.
- Choose the “Entities” card type.
-
Configure the Card:
- Add the MQTT sensors you created to the card by selecting them from the list of available entities.
- Customize the appearance of the card as desired.
-
Save the Changes:
- Click the “Save” button to save the changes to your dashboard.
19. What are the Ethical Considerations When Unlocking Hidden Features on Your Mercedes-Benz?
Unlocking hidden features on your Mercedes-Benz can be tempting, but it’s crucial to consider the ethical implications. MERCEDES-DIAGNOSTIC-TOOL.EDU.VN urges you to consider the following:
- Warranty Issues: Unlocking hidden features may void your vehicle’s warranty.
- Safety Implications: Some features may be disabled for safety reasons, and enabling them could compromise your safety or the safety of others.
- Legal Compliance: Ensure that any modifications you make comply with local laws and regulations.
- Vehicle Performance: Incorrect modifications can negatively impact your vehicle’s performance and reliability.
- Respect for Intellectual Property: Avoid using unauthorized software or tools to unlock features, as this may infringe on the intellectual property rights of the vehicle manufacturer.
20. How Can MERCEDES-DIAGNOSTIC-TOOL.EDU.VN Assist You with ESP32 OBD2 and Mercedes-Benz Diagnostics?
At MERCEDES-DIAGNOSTIC-TOOL.EDU.VN, we are committed to providing you with the expertise and resources you need for successful Mercedes-Benz diagnostics and customization using ESP32 OBD2. We help you navigate the complexities of vehicle diagnostics and customization, ensuring you can make informed decisions and achieve optimal results with your Mercedes-Benz.
- Expert Guidance: Our team of experienced technicians can provide guidance and support throughout your ESP32 OBD2 project.
- Comprehensive Resources: We offer a wide range of resources, including tutorials, code examples, and documentation.
- Custom Solutions: We can develop custom solutions tailored to your specific needs and requirements.
- Technical Support: Our technical support team is available to answer your questions and troubleshoot any issues you may encounter.
- Community Forum: Join our community forum to connect with other Mercedes-Benz enthusiasts and share your experiences.
FAQ Section
Q1: Which ESP32 OBD2 Diagnostic Tool is the Best for Mercedes?
The best ESP32 OBD2 diagnostic tool for your Mercedes depends on your specific needs and technical expertise. Generally, look for tools with reliable CAN bus communication, good software support, and active community forums. Popular options include those based on the ESP32 chip combined with an MCP2515 CAN bus controller. For personalized recommendations, contact MERCEDES-DIAGNOSTIC-TOOL.EDU.VN.
Q2: How Do I Unlock Hidden Features on My Mercedes Using ESP32 OBD2?
Unlocking hidden features involves sending specific commands to your Mercedes’ ECU via the CAN bus. This requires detailed knowledge of your vehicle’s communication protocols and can be risky. Start by researching the features you want to unlock and consult reliable sources for accurate commands. MERCEDES-DIAGNOSTIC-TOOL.EDU.VN can provide guidance and resources for this process.
Q3: How Often Should I Perform Routine Maintenance on My Mercedes-Benz?
Mercedes-Benz recommends routine maintenance every 10,000 miles or once a year, whichever comes first. However, this can vary based on your driving conditions and vehicle model. Regular maintenance ensures optimal performance and longevity.
Q4: What Are the Benefits of Real-Time Data Monitoring on My Mercedes-Benz?
Real-time data monitoring allows you to track critical parameters such as engine temperature, RPM, and fuel consumption. This helps you identify potential issues early, optimize performance, and improve fuel efficiency.
Q5: Can ESP32 OBD2 Integration Void My Mercedes-Benz Warranty?
Yes, modifying your Mercedes-Benz with ESP32 OBD2 integration may void your warranty, especially if the modifications cause damage or malfunction. Consult your warranty terms and conditions before proceeding.
Q6: Is it Safe to Modify ECU Settings on My Mercedes-Benz with ESP32 OBD2?
Modifying ECU settings can be risky and should only be done by experienced individuals with a thorough understanding of vehicle systems. Incorrect modifications can lead to serious damage or safety issues.
Q7: How Can I Ensure a Stable Wireless Connection with My ESP32 OBD2 Setup?
To ensure a stable wireless connection, use a high-quality ESP32 module with a strong antenna, position the device for optimal signal strength, and avoid interference from other electronic devices.
Q8: What Are the Best Practices for Securing My ESP32 OBD2 Interface?
Secure your ESP32 OBD2 interface by using strong passwords, enabling encryption, and regularly updating firmware. Avoid using default credentials and monitor for any suspicious activity.
Q9: Where Can I Find Reliable OBD2 PIDs for My Specific Mercedes-Benz Model?
Reliable OBD2 PIDs can be found in official Mercedes-Benz documentation, online forums, and specialized databases. Verify the accuracy of the PIDs before using them to avoid incorrect data readings.
Q10: What Should I Do If I Encounter Errors While Setting Up My ESP32 OBD2 Interface?
If you encounter errors, start by checking all wiring connections, verifying your code, and consulting online resources for troubleshooting tips. If the issue persists, seek assistance from experienced technicians or community forums.
Call to Action
Ready to enhance your Mercedes-Benz ownership experience with advanced diagnostics and customization? Contact MERCEDES-DIAGNOSTIC-TOOL.EDU.VN today for expert guidance, comprehensive resources, and personalized solutions. Whether you’re seeking to unlock hidden features, monitor real-time data, or integrate your vehicle with your smart home, we’re here to help.
Reach out to us at:
- Address: 789 Oak Avenue, Miami, FL 33101, United States
- WhatsApp: +1 (641) 206-8880
- Website: MERCEDES-DIAGNOSTIC-TOOL.EDU.VN
Let MERCEDES-DIAGNOSTIC-TOOL.EDU.VN be your trusted partner in Mercedes-Benz diagnostics and customization.