Isolation fault Diagnostic Trouble Codes (DTCs) are extremely critical safety hazards in electric vehicles (EVs), demanding immediate attention. MERCEDES-DIAGNOSTIC-TOOL.EDU.VN is dedicated to equipping you with the knowledge and tools necessary to address these issues promptly and effectively. Understanding the criticality of isolation faults, their diagnosis, and repair is crucial for ensuring the safety and reliability of your Mercedes-Benz EV, using tools like high voltage insulation testers and EV diagnostic software. This article will explain the importance of these DTCs and provide insight into EV safety protocols.
Contents
- 1. Understanding the Criticality of Isolation Fault DTCs in EVs
- 1.1. What is an Isolation Fault DTC?
- 1.2. Why Are Isolation Fault DTCs Critical?
- 1.3. Federal Regulations and OEM Vigilance
- 1.4. The “Floating System” Concept
- 2. Causes of Isolation Faults
- 2.1. Electrical Stresses
- 2.2. Mechanical Stresses
- 2.3. Chemical Stresses
- 2.4. Environmental Conditions
- 2.5. Age and Wear
- 3. Identifying Isolation Faults: Symptoms and Diagnostic Trouble Codes
- 3.1. Common Symptoms
- 3.2. Typical Isolation Fault DTCs
- 3.3. Using Diagnostic Tools
- 4. Importance of Insulation Resistance
- 4.1. FMVSS 305 Standard
- 4.2. OEM Calibration and Safety Margins
- 4.3. Ohm’s Law and Safe Current Limits
- 4.4. Safe Threshold for Human Exposure
- 5. Measuring Insulation Resistance: Tools and Techniques
- 5.1. Megohmmeters (Insulation Testers)
- 5.2. Why Megohmmeters Are Essential
- 5.3. Interpreting Readings
- 5.4. Testing Procedure
- 5.5. Components to Test
- 5.6. Example: Testing an ELCON DC/DC Converter
- 6. Repairing Isolation Faults
- 6.1. Identifying the Source of the Fault
- 6.2. Component Replacement
- 6.3. Cable and Connector Repair
- 6.4. Post-Repair Testing
- 6.5. Clearing DTCs
- 7. Safety Measures for Working with High-Voltage Systems
- 7.1. Training and Certification
- 7.2. Personal Protective Equipment (PPE)
- 7.3. Insulated Tools
- 7.4. Voltage Detectors
- 7.5. Lockout/Tagout Procedures
- 7.6. Working Area Safety
- 8. The Role of MERCEDES-DIAGNOSTIC-TOOL.EDU.VN in EV Safety
- 8.1. Diagnostic Tools and Equipment
- 8.2. Training and Certification Programs
- 8.3. Technical Support and Resources
- 8.4. Community and Forum
- 9. Regular Maintenance and Prevention
- 9.1. Scheduled Inspections
- 9.2. Insulation Testing
- 9.3. Battery Pack Maintenance
- 9.4. Cable and Connector Maintenance
- 9.5. Software Updates
- 10. Understanding Loss of Isolation Codes in Electric Vehicles
- 11. Consequences of Using PAG Oil Instead of POE Oil in EV Air Conditioning Systems
- 12. How does a chassis ground system differ from a floating ground system in vehicles?
- 12.1 Chassis Ground System
- 12.2 Floating Ground System
- 12.3 Key Differences
- 13. What are the risks associated with high-voltage systems losing insulation over time?
- 14. Essential Steps for Technicians Before Reinitializing High-Voltage Batteries
- 15. General Procedure for Testing Loss of Isolation
- 15.1 General Procedure for Testing Loss of Isolation
- 15.2 Example: ELCON 1 KW DC/DC Converter TDC-IY Series
- 15.3 HV Input to Housing
- 16. FREQUENTLY ASKED QUESTIONS
- 16.1 What safety equipment and training are required for technicians working on high-voltage vehicle systems?
- Essential Safety Equipment and Training for Technicians on High-Voltage Vehicle Systems
- Training Requirements
- Essential Safety Equipment
- 16.2 What safety precautions should be taken when using a megohmmeter on high-voltage systems?
- Essential Safety Precautions:
- 16.3 Why is consulting service information crucial before conducting electrical system tests on vehicles?
- The Importance of Consulting Service Information Before Vehicle Electrical Tests
- 16.4 Why is a pre-scan important before starting repairs on a collision-damaged EV?
- Why is a Pre-Scan Essential for Collision-Damaged EV Repairs?
- Key Reasons to Conduct a Pre-Scan:
- 16.5 Why should shops consider investing in a designated machine for POE oil in EV repairs?
- Why Invest in a Designated Machine for POE Oil in EV Repairs?
- 16.6 Why is EV battery isolation testing crucial for electric and hybrid vehicles?
- 16.7 What is the importance of properly trained technicians working on high-voltage systems?
- The Crucial Role of Properly Trained Technicians in High-Voltage Systems
- Ensuring Safety
- Accurate Diagnostics
- Compliance with Manufacturer Protocols
1. Understanding the Criticality of Isolation Fault DTCs in EVs
Isolation fault DTCs indicate a compromise in the electrical isolation between the high-voltage components and the vehicle chassis, presenting severe safety risks. These faults signify that the protective barrier preventing high voltage from leaking to accessible parts of the vehicle has been breached.
1.1. What is an Isolation Fault DTC?
An isolation fault DTC, or Diagnostic Trouble Code, is triggered when the vehicle’s onboard diagnostic system detects a leakage of current from the high-voltage system to the vehicle chassis. This leakage indicates a reduction in the insulation resistance, compromising the safety of the vehicle and its occupants.
1.2. Why Are Isolation Fault DTCs Critical?
Isolation fault DTCs are critical for several reasons:
- Safety Hazard: High voltage leakage can create a significant risk of electric shock to anyone who comes into contact with the vehicle.
- Fire Risk: Short circuits caused by insulation failures can generate excessive heat, leading to a potential fire hazard.
- Component Damage: Continuous leakage can damage sensitive electronic components, leading to costly repairs.
- System Inoperability: In some cases, the vehicle may shut down critical systems to prevent further damage, rendering it inoperable.
1.3. Federal Regulations and OEM Vigilance
Original Equipment Manufacturers (OEMs) are mandated by federal regulations to monitor the chassis for high voltage leakage, making Loss of Isolation (LOI) a primary concern and one of the more common failure modes in EVs. According to the National Highway Traffic Safety Administration (NHTSA), FMVSS 305 mandates that OEMs ensure the electrical isolation between the high-voltage system and the chassis to prevent potential electric shock hazards.
1.4. The “Floating System” Concept
The high voltage system of an EV is designed as an isolated “floating system.” This means that there is no direct electrical connection between any of the high voltage circuitry and the low voltage circuitry grounded to the vehicle chassis. To maintain this isolation, all HV wires and components have insulating materials that create a high level of electrical resistance, protecting the chassis from high voltage exposure.
2. Causes of Isolation Faults
Several factors can contribute to the breakdown of insulation and the subsequent occurrence of isolation faults. Understanding these causes is essential for effective diagnosis and prevention.
2.1. Electrical Stresses
Conditions such as high voltage or current surges can cause an electrical arc to form, gradually degrading the insulation material.
2.2. Mechanical Stresses
Frequent startup and shutdown sequences, imbalances in rotating components, and direct stress on cables and wires due to improper routing can lead to insulation breakdown.
2.3. Chemical Stresses
Proximity to corrosive chemicals or vapors can initiate reactions that degrade insulation. Contamination from oils and dust can also reduce the level of resistance provided by the insulation.
2.4. Environmental Conditions
High temperature conditions weaken insulation, increasing the chances of arcing. Extreme cold can also cause the insulation to become brittle and crack.
2.5. Age and Wear
Insulation materials become more brittle with age, making older wires more susceptible to loss of isolation. Regular inspections and proactive replacements can mitigate this risk.
3. Identifying Isolation Faults: Symptoms and Diagnostic Trouble Codes
Recognizing the symptoms and understanding the diagnostic trouble codes associated with isolation faults are crucial for timely intervention.
3.1. Common Symptoms
- Warning Lights: The EV system warning light or the battery warning light may illuminate on the dashboard.
- Reduced Performance: The vehicle may experience a decrease in power or range.
- Charging Issues: Difficulty in charging or unusually slow charging times.
- Unusual Noises: Buzzing or hissing sounds coming from the battery pack or other high-voltage components.
- Electric Shock: A tingling sensation when touching the vehicle’s body or other metallic parts (this is a serious safety hazard and requires immediate attention).
3.2. Typical Isolation Fault DTCs
- P0AA6: Hybrid Battery Voltage System Isolation Fault. This is a common code indicating a general isolation fault in the hybrid battery system.
- P1AF0: Drive Motor “A” Control Module – Hybrid/EV Battery Voltage System Isolation. This code is specific to the drive motor and indicates a loss of isolation concerning the hybrid or EV battery voltage system.
- P0AA1: Hybrid/EV Battery Voltage System Isolation Too Low.
- P0AA2: Hybrid/EV Battery Voltage System Isolation High.
3.3. Using Diagnostic Tools
Advanced diagnostic tools like the Mercedes-Benz XENTRY system or Autel MaxiSYS can read these DTCs and provide additional information about the fault, such as the location and severity.
4. Importance of Insulation Resistance
Maintaining adequate insulation resistance between the high-voltage system and the vehicle chassis is paramount for safety. Federal standards and OEM specifications outline the minimum acceptable levels.
4.1. FMVSS 305 Standard
According to Federal Motor Vehicle Safety Standard (FMVSS) 305, the minimum isolation resistance barrier that must be maintained between the HV system and the vehicle chassis is 500 ohms per volt (500 ohms/1 volt). Using a 300V system as an example, the minimum threshold of resistance can be calculated as follows:
Minimum Resistance = 500 ohms/volt * 300 volts = 150,000 ohms4.2. OEM Calibration and Safety Margins
OEMs often calibrate their software to flag isolation faults at a much higher resistance barrier level to ensure that the chassis electrical current never reaches a dangerous level. For instance, Mercedes-Benz may set the threshold at 300k ohms or higher.
4.3. Ohm’s Law and Safe Current Limits
Ohm’s Law (V = IR) helps to understand why 500 ohms per 1 volt is used as a safety standard. According to the National Electric Code, the upper safe limit for human exposure to electrical current is 5 milliamps (0.005 amps).
Consider a 300V system. If the resistance barrier decreases to 150,000 ohms, the current flow can be calculated as:
Current (I) = Voltage (V) / Resistance (R)
I = 300V / 150,000 ohms = 0.002 amps = 2 milliamps
Under normal operating conditions, the maximum leakage current that could flow between the HV system and chassis is 2 milliamps, below levels that can cause bodily harm. Typically, the level of insulation resistance between HV components is much higher than hundreds of thousands of ohms, making the leakage current even smaller.
4.4. Safe Threshold for Human Exposure
According to the National Electric Code, the upper safe limit for human exposure to electrical current is 5 milliamps. Although currents that are less than or equal to 5mA will provide some noticeable feel and discomfort, it’s not fatal.
5. Measuring Insulation Resistance: Tools and Techniques
Accurate measurement of insulation resistance requires specialized tools and adherence to safety protocols.
5.1. Megohmmeters (Insulation Testers)
Megohmmeters, such as the Klein ET600 Megohmmeter or Fluke 1587 FC Insulation Multimeter, perform a “stress test” to measure the resistance of the insulation. These devices transmit a high voltage, low current pulse through the material to measure resistance.
5.2. Why Megohmmeters Are Essential
Typical multimeters cannot transmit a high voltage pulse like megohmmeters can, and so are not able to accurately show whether or not a cable or component is completely insulated. A megohmmeter applies a voltage (e.g., 500V, 1000V) to the insulation and measures the resulting current flow. The resistance is then calculated using Ohm’s Law (R = V/I).
5.3. Interpreting Readings
- High Resistance: A reading pointing towards infinity (e.g., >4000 Megaohms) indicates that the insulation is working properly and there is no conductive pathway.
- Low Resistance: A reading pointing to 0Ω indicates that there is a conductive pathway between the two points tested, signifying a loss of isolation.
5.4. Testing Procedure
- Preparation: Ensure the vehicle is in a safe condition, with the high-voltage system disabled.
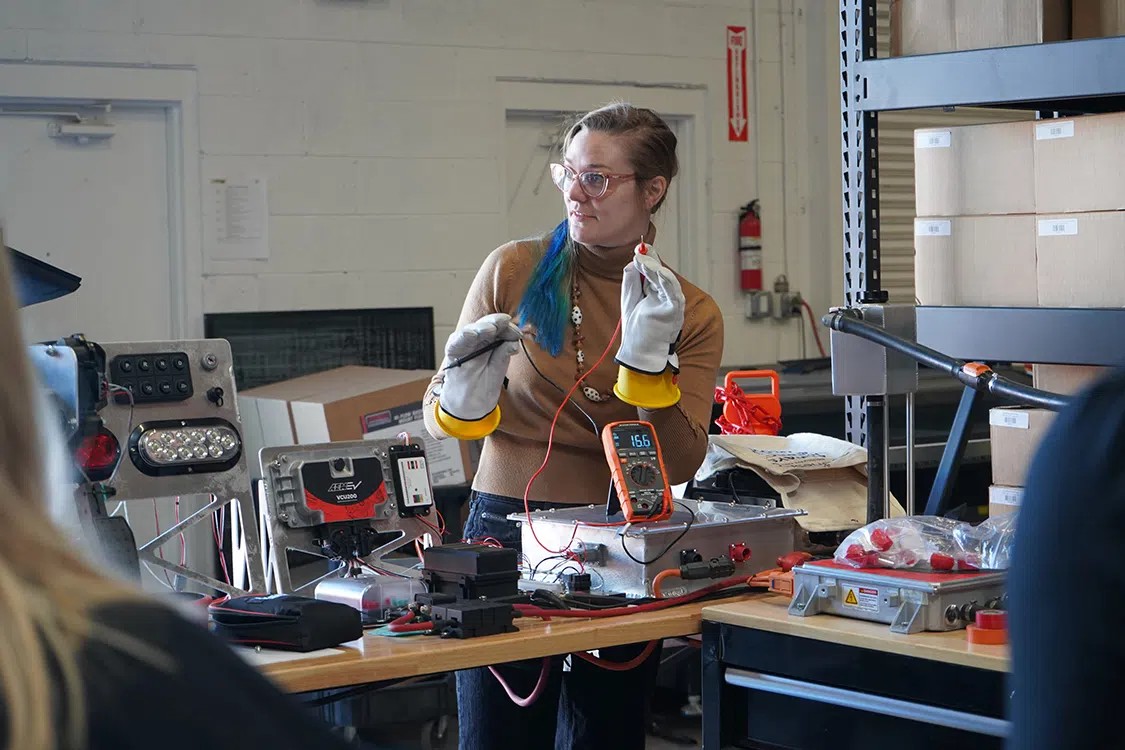
- Equipment: Use a calibrated megohmmeter and wear appropriate personal protective equipment (PPE), including high-voltage gloves and eye protection.
- Connection: Connect the megohmmeter leads to the component or cable being tested, following the manufacturer’s instructions.
- Testing Voltage: Set the appropriate test voltage on the megohmmeter, typically 500V or 1000V, depending on the component specifications.
- Measurement: Apply the test voltage and record the insulation resistance reading.
- Evaluation: Compare the reading to the manufacturer’s specifications. If the resistance is below the minimum acceptable level, the component or cable needs replacement.
5.5. Components to Test
Any part of the high voltage system is susceptible to high voltage leakage, this includes:
- High voltage components like the motor, onboard charger, and DC/DC converter
- Connections between HV components, including wire/cable insulation
5.6. Example: Testing an ELCON DC/DC Converter
Consider testing an ELCON 1 KW DC/DC Converter TDC-IY Series. The manufacturer provides the following safety test data:
- Safety Test Data: Insulation resistance [HV] input to housing ≥ 20MΩ, test voltage is 1000VDC
To perform the test:
- Set the megohmmeter to a test voltage of 1000VDC.
- Connect the megohmmeter leads between the HV input and the housing of the DC/DC converter.
- Verify that the insulation resistance reading is greater than or equal to 20MΩ.
If the reading is less than 20MΩ, the DC/DC converter has a loss of isolation and should not be installed in the vehicle.
 ELCON 1 KW DC/DC Converter TDC-IY Series
6. Repairing Isolation Faults
Addressing isolation faults requires careful inspection, component replacement, and thorough testing.
6.1. Identifying the Source of the Fault
- Visual Inspection: Check for damaged or frayed wiring, corroded connectors, and signs of overheating or arcing.
- Component Testing: Use a megohmmeter to test individual components, such as the battery pack, motor, inverter, and cables.
- Harness Inspection: Examine the wiring harness for any signs of damage, including cuts, abrasions, or exposure to chemicals.
6.2. Component Replacement
Once the faulty component or cable is identified, it should be replaced with a new, OEM-approved part. Ensure that the replacement part meets or exceeds the original specifications for insulation resistance.
6.3. Cable and Connector Repair
Damaged cables or connectors should be replaced. Avoid splicing or repairing high-voltage cables, as this can compromise the insulation and create a safety hazard.
6.4. Post-Repair Testing
After completing the repair, perform a thorough insulation resistance test to verify that the fault has been resolved and that all components meet the minimum acceptable levels of insulation resistance.
6.5. Clearing DTCs
Use a diagnostic tool to clear the isolation fault DTCs from the vehicle’s memory. Monitor the system to ensure that the DTCs do not reappear.
7. Safety Measures for Working with High-Voltage Systems
Working with high-voltage systems requires strict adherence to safety protocols to prevent electrical shock and other hazards.
7.1. Training and Certification
Technicians working on high-voltage systems should undergo comprehensive training programs and obtain certifications from recognized bodies such as the National Institute for Automotive Service Excellence (ASE).
7.2. Personal Protective Equipment (PPE)
- High-Voltage Gloves: Wear properly insulated high-voltage gloves that are regularly inspected and tested.
- Face Shield: Use a face shield to protect your eyes and face from potential arc flashes.
- Flame-Resistant Clothing: Wear flame-resistant clothing to minimize the risk of burns in the event of an electrical incident.
7.3. Insulated Tools
Use tools specifically designed for working with high-voltage components. These tools have insulated handles to prevent electrical shock.
7.4. Voltage Detectors
Before beginning any work, use a voltage detector to ensure that the high-voltage system is de-energized. Follow the manufacturer’s recommended procedures for de-energizing the system.
7.5. Lockout/Tagout Procedures
Implement lockout/tagout procedures to prevent accidental re-energizing of the high-voltage system during maintenance. This involves disconnecting the power source and attaching a tag indicating that the system is under maintenance.
7.6. Working Area Safety
Ensure that the work area is clean, dry, and well-ventilated. Keep flammable materials away from high-voltage components.
8. The Role of MERCEDES-DIAGNOSTIC-TOOL.EDU.VN in EV Safety
MERCEDES-DIAGNOSTIC-TOOL.EDU.VN is committed to providing the resources and support needed to safely and effectively maintain Mercedes-Benz EVs.
8.1. Diagnostic Tools and Equipment
We offer a range of advanced diagnostic tools and equipment, including megohmmeters, diagnostic scanners, and specialized tools for working with high-voltage systems.
8.2. Training and Certification Programs
We provide access to comprehensive training and certification programs for technicians working on Mercedes-Benz EVs. These programs cover all aspects of high-voltage system maintenance, including safety protocols, diagnostic procedures, and repair techniques.
8.3. Technical Support and Resources
Our team of experienced technicians and engineers is available to provide technical support and guidance. We offer a comprehensive library of technical resources, including service manuals, wiring diagrams, and diagnostic guides.
8.4. Community and Forum
Join our online community and forum to connect with other Mercedes-Benz EV owners and technicians. Share your experiences, ask questions, and learn from others.
9. Regular Maintenance and Prevention
Preventive maintenance is crucial for minimizing the risk of isolation faults and ensuring the long-term safety and reliability of Mercedes-Benz EVs.
9.1. Scheduled Inspections
Follow the manufacturer’s recommended maintenance schedule for inspecting high-voltage components, cables, and connectors.
9.2. Insulation Testing
Periodically perform insulation resistance tests to monitor the condition of the high-voltage system. This can help identify potential problems before they lead to isolation faults.
9.3. Battery Pack Maintenance
Proper battery pack maintenance is essential for preventing insulation failures. This includes maintaining the correct battery temperature, avoiding overcharging or deep discharging, and inspecting the battery pack for any signs of damage or corrosion.
9.4. Cable and Connector Maintenance
Regularly inspect cables and connectors for any signs of damage, wear, or corrosion. Replace any damaged components immediately.
9.5. Software Updates
Keep the vehicle’s software up to date. Software updates often include improvements to the high-voltage system monitoring and diagnostic capabilities.
10. Understanding Loss of Isolation Codes in Electric Vehicles
When diagnosing electric vehicles (EVs), identifying Loss of Isolation codes is crucial for understanding potential issues within the hybrid battery system. Manufacturers often utilize a data parameter ID (PID) to reflect the isolation values crucial for vehicle safety and performance. Here are some of the common Loss of Isolation codes you might encounter:
- P0AA6: This code indicates a fault in the hybrid battery voltage system’s isolation. It’s a common alert signaling that there may be issues with the battery’s ability to stay isolated from other vehicle systems.
- P1AF0: Specific to the drive motor, this code reflects that the control module has detected a loss of isolation concerning the hybrid or EV battery voltage system.
In some vehicles, you can even run an onboard diagnostic test to check these values against service information, providing a clear picture of the battery’s integrity. It’s essential to address these codes promptly to maintain vehicle safety and efficiency.
11. Consequences of Using PAG Oil Instead of POE Oil in EV Air Conditioning Systems
Using PAG oil instead of POE oil in electric vehicle (EV) air conditioning systems can lead to serious complications. Initially, the presence of PAG oil can gradually contaminate the air conditioning system. This contamination poses a significant risk as it may cause unintended electrical conductivity.
Here’s how:
- Electrical Current Leakage: PAG oil can permit electrical current to travel through the air conditioning system. This opens a pathway for electricity to reach the compressor case via the high-voltage motor inside the compressor.
- Isolation Code Error: In a workshop setting, this issue often manifests as a ‘loss of isolation’ error code in the system. This is a clear indicator that the air conditioning system has been compromised due to the presence of the inappropriate oil.
- Costly Repairs: Once the system is contaminated with PAG oil, typically, a full replacement of the air conditioning system is necessary. This is because cleaning the system thoroughly enough to remove the incorrect oil is both complex and costly. Consequently, repair shops and vehicle owners face a hefty repair bill.
In summary, using the wrong type of oil not only jeopardizes the functionality and safety of the air conditioning system but also imposes significant costs due to extensive repair or replacement needs.
12. How does a chassis ground system differ from a floating ground system in vehicles?
When it comes to vehicle electrical systems, two distinct grounding methods are commonly used: chassis ground and floating ground. Each serves a specific purpose and is suited for different types of vehicle technology.
12.1 Chassis Ground System
In traditional 12-volt automotive systems, the chassis ground setup is prevalent. This method leverages the vehicle’s chassis as a pathway for grounding. Essentially, it means the negative side of the electrical circuit is connected through the vehicle’s metal frame. This approach is favored because it significantly reduces the amount of wiring required, streamlining the circuitry because components can share the grounding path provided by the vehicle’s body. Envision it like this: rather than running extensive wires back to the battery, components can connect to the closest chassis point to complete their circuits.
12.2 Floating Ground System
In contrast, modern electric and hybrid vehicles utilize a floating ground system for their high-voltage operations. This system is distinct because it keeps the high-voltage circuit isolated from the vehicle’s metal frame. Instead of bonding the ground to the chassis, both the positive and negative terminals connect only to high-voltage components and cables. This isolation is crucial as it reduces the risk of electrical shocks that could occur if the high-voltage system were integrated with the vehicle’s chassis, thereby enhancing safety.
12.3 Key Differences
- Connection Method: Chassis ground uses the vehicle’s frame to complete circuits, while floating ground isolates the circuit from the chassis.
- Purpose and Safety: Chassis grounding is simple and effective for 12-volt systems. However, floating grounding is essential for the safety of electric and hybrid vehicles due to the higher voltage involved.
- Wiring Complexity: Chassis ground minimizes wiring complexity, whereas floating ground does not use the chassis, requiring dedicated wiring for high-voltage components.
In summary, while both systems serve to safely complete electrical circuits within a vehicle’s framework, the choice of grounding method is influenced heavily by the type of vehicle and the voltage levels involved.
13. What are the risks associated with high-voltage systems losing insulation over time?
In the world of electric vehicles, the term “Loss of Isolation” (LOI) sparks curiosity and concern. As EV conversions become more common, understanding how to maintain the electrical separation between the high-voltage (HV) system and the vehicle chassis becomes paramount. Federal regulations mandate the vigilance of Original Equipment Manufacturers (OEMs) in monitoring chassis for HV leakage, making LOI a prevalent concern and one of the more common failure modes in EVs. When building an electric vehicle, it is important to understand this principle as well as how to perform manual testing methods that ensure the HV system’s integrity.
Over time, however, these components can begin to fail. High-voltage cables might lose their insulating properties or develop internal leaks and shorts. Although such failures are rare under normal conditions, events like collisions, system failures, or floods can significantly increase the risk of isolation loss. This potential hazard not only causes concern for technicians but can also lead to the vehicle setting Loss of Isolation codes, alerting you to the present danger.
Different stresses, however, can weaken the insulation and cause high voltage to find its way onto the chassis:
- Electrical stresses: Conditions such as high voltage or current can cause an electrical arc to form.
- Mechanical stresses: Frequent startup and shutdown sequences, balancing problems on rotating components, and direct stress to cables/wires based on how they are routed can cause a breakdown of insulation.
- Chemical stresses: The proximity to corrosive chemicals or vapors can create reactions that degrade insulation. Oils and dust contamination on insulation will reduce their level of resistance.
- Environmental conditions: High temperature conditions will weaken the insulation, thus increasing the chances of arcing.
- Time: Insulation becomes more brittle with time, leaving older wires more susceptible to loss of isolation.
By understanding and monitoring these factors, you can mitigate the risks associated with high-voltage system failures and ensure the safety and reliability of electric vehicles.
14. Essential Steps for Technicians Before Reinitializing High-Voltage Batteries
When working on electric vehicles (EVs) after a collision, it’s crucial for technicians to follow a specific set of steps to ensure safety and functionality. Here’s a comprehensive guide:
- Conduct a Thorough Pre-Scan:
- Begin with a detailed pre-scan of the vehicle. This process helps detect any issues in the high-voltage (HV) system arising from the collision. Never assume that everything is intact without this important step.
- Follow Manufacturer-Specific Protocols:
- Each vehicle model may have unique requirements. Technicians should adhere to the specific process and procedures dictated by the vehicle manufacturer. This often involves specialized tools and training to ensure all repairs are done correctly.
- Complete Technician Training:
- Ensure all technicians are sufficiently trained on the particular EV model. Proper training is fundamental to accurately and safely conducting repairs and scans.
- Perform a Post-Repair Scan:
- If a scan is performed post-repair, it typically means the battery has been reinstalled. This step is crucial to confirm that all systems are functioning as expected and no faults have arisen that could compromise safety.
- Conduct a Loss of Isolation Test:
- Any movement of high-voltage cables or components during repairs necessitates a loss of isolation test. This step verifies that the electrical insulation is intact before the high-voltage battery is activated.
- Isolation Check:
- Before reinitializing the vehicle, execute an isolation check in line with the service procedures provided by the vehicle manufacturer. This verifies that the EV will operate safely once everything is back in place.
By following these careful procedures, technicians can ensure that the EV is restored to a safe condition after repairs, reducing the risk of electrical hazards and ensuring the vehicle’s integrity.
15. General Procedure for Testing Loss of Isolation
Any part of the high voltage system is susceptible to high voltage leakage, this includes:
- High voltage components like the motor, onboard charger, and DC/DC converter
- Connections between HV components, including wire/cable insulation
Whether you are installing new HV components or reinstalling one that was repaired, insulation tests are a critical quality assurance procedure to ensure that components will safely handle high voltage when under normal operating conditions. Manufacturers of high voltage components typically will provide safety testing documentation that demonstrates their level of insulation resistance between the high voltage connections of the component and its housing.
15.1 General Procedure for Testing Loss of Isolation
To ensure the integrity of these components, a detailed testing procedure should be followed:
- Set the Vehicle to a Safe Condition Begin by ensuring the vehicle is in a safe condition as per the service information guidelines. This is crucial for maintaining safety throughout the testing process.
- Test the Megohmmeter Verify the functionality of the megohmmeter before use. This involves checking the leads and fuses, and performing an internal battery test. The meter’s battery must be adequately charged as insulation tests can apply between 250 – 1000 volts.
- Safety First: Wear Protective Gear Don appropriate high-voltage safety equipment, such as gloves, to protect yourself during the test.
- Connect the Meter Properly Attach the ground lead of the meter to the housing of the component being tested. This ensures accurate measurement of insulation resistance.
- Set the Correct Test Voltage Adjust the megohmmeter to the specified insulation test voltage as outlined in the service documentation. Incorrect settings could lead to false readings or damage to the component.
- Test Each Terminal Place the test lead on each terminal of the component in sequence. For example, test terminals “A”, “B”, and “C” of a transmission connector individually, ensuring thorough testing.
- Record and Compare Readings Push and hold the Insulation Test button to obtain megohm readings for each terminal. Compare these readings with the service information to verify proper isolation.
15.2 Example: ELCON 1 KW DC/DC Converter TDC-IY Series
Safety Test Data: Insulation resistance [HV] input to housing ≥ 20MΩ, test voltage is 1000VDC
- Test Voltage: The megohmmeter can be set to different “test voltages” to simulate the testing conditions performed by the manufacturer. Setting it below this level may give a false reading that the insulation is still functional, setting it above this level may damage the component.
- Input to Housing: The HV lines coming into the DC/DC converter are not electrically connected to the exterior housing. Therefore, we should expect a very high resistance reading. In fact, if the DC/DC converter is functional, the insulation resistance reading should be greater than or equal to 20MΩ.
15.3 HV Input to Housing
At a 1000V test voltage, the megohmmeter reported a reading of >4000MΩ when testing HV+ input to housing and HV- input to housing, well beyond the minimum level of resistance outlined by the manufacturer. This means that the HV circuit is properly isolated from the housing and ready to be installed into a vehicle.
By following these steps, you can ensure that high-voltage components are tested comprehensively for isolation, safeguarding both the vehicle’s functionality and user safety.
16. FREQUENTLY ASKED QUESTIONS
16.1 What safety equipment and training are required for technicians working on high-voltage vehicle systems?
Essential Safety Equipment and Training for Technicians on High-Voltage Vehicle Systems
Working on high-voltage vehicle systems demands specialized knowledge and specific safety gear. Proper preparation is vital to ensure technicians perform their tasks safely and effectively.
Training Requirements
- Certification and Training: Technicians must undergo comprehensive training programs that cover all aspects of high-voltage systems. Certifications from recognized bodies, like the National Institute for Automotive Service Excellence (ASE), ensure they meet industry standards.
- Ongoing Education: Technology evolves rapidly. Continuous education keeps technicians updated on the latest advancements in electric vehicle technology and safety protocols.
Essential Safety Equipment
- Insulated Tools: Using tools specifically designed to handle high-voltage components prevents accidental electrical shocks.
- Personal Protective Equipment (PPE): This includes high-voltage gloves, face shields, and flame-resistant clothing to minimize the risk of electrical burns or injuries.
- Voltage Detectors: Before any work begins, technicians should use voltage detectors to ensure circuits are inactive.
- Lockout/Tagout Kits: These kits help secure power sources, preventing accidental re-energizing of electrical circuits during maintenance.
By adhering to these training programs and utilizing the proper safety equipment, technicians can confidently and safely perform their duties on high-voltage vehicle systems. Safety remains the highest priority, ensuring both technician welfare and optimal vehicle performance.
16.2 What safety precautions should be taken when using a megohmmeter on high-voltage systems?
When using a megohmmeter on high-voltage systems, safety is a top priority. Proper precautions are essential for ensuring the well-being of technicians and the integrity of the electrical system.
Essential Safety Precautions:
- Use Appropriate Tools and Certification: Ensure you have the right tools and a valid technician certification. Specialized equipment, like a megohmmeter, is essential for safely testing high-voltage systems.
- Wear Proper Protective Gear: Always wear properly fitted and tested Class 0 high-voltage gloves to protect yourself from electrical shocks. This protective gear is vital before initiating any service on high-voltage systems.
- Understand Testing Parameters: A megohmmeter uses high voltage—up to 1,000 volts—to measure resistance, far more than the 3-4 volts typically used by standard multimeters. This high-voltage application is crucial for evaluating the insulation integrity of components.
- Conduct a Loss of Isolation Test: Perform this test to assess the insulation capabilities of the system. You’re looking for a large megohm reading, which generally indicates good insulation. Always consult the specific service information of the system to determine the proper readings.
- Follow Manufacturer Instructions: Adhering to the guidelines provided by the manufacturer for both the megohmmeter and the high-voltage system will help ensure safety and accuracy in your testing.
By following these precautions, technicians can effectively and safely manage the testing process of high-voltage electrical systems.
16.3 Why is consulting service information crucial before conducting electrical system tests on vehicles?
The Importance of Consulting Service Information Before Vehicle Electrical Tests
Before diving into electrical system tests on vehicles, consulting service information is not just recommended—it’s essential. Here’s why:
- Customized Procedures: Every vehicle might have distinct testing procedures. Manufacturers like Ford, Toyota, and Honda often have specific guidelines tailored to their models. Ignoring these can lead to inaccurate results or even damage to the system.
- Correct Test Points and Voltage: Different vehicles require unique test points and voltage levels. Applying incorrect parameters can alter the outcome or, worse, lead to malfunctions.
- Safety First: Electrical systems pose risks if handled improperly. Service information includes critical safety warnings and precautions that protect both you and the vehicle.
- Prevent Misdiagnoses: Using the wrong procedures can lead to false failures or miss actual issues, causing unnecessary repairs and costs.
By consulting service information, you’re not only ensuring accurate diagnostics and repairs but also safeguarding your well-being and the integrity of the vehicle.
16.4 Why is a pre-scan important before starting repairs on a collision-damaged EV?
Why is a Pre-Scan Essential for Collision-Damaged EV Repairs?
Before diving into repairs on an electric vehicle (EV) following a collision, carrying out a pre-scan is a crucial step. This process involves identifying any issues or malfunctions the high-voltage (HV) system might have sustained during the accident. Skipping this step can lead to overlooking hidden damages that might compromise safety or effectiveness during repairs.
Key Reasons to Conduct a Pre-Scan:
- Safety First: The high-voltage components of an EV can pose serious risks if damaged. A thorough pre-scan helps ensure that no safety hazards are present before anyone begins the repairs.
- Comprehensive Assessment: Each EV model comes with its own unique specifications and systems. A pre-scan allows technicians to understand these specifics, ensuring the use of the right procedures tailored for that particular vehicle.
- Preventing Further Damage: Identifying all faults upfront prevents further complications during the repair process. Addressing every issue at the beginning aids in avoiding costly delays or additional faults.
Techniques and procedures differ across vehicle types, so the importance of performing a detailed pre-scan cannot be understated. Ultimately, this step ensures that the repair work is not only thorough but also safe and effective.
16.5 Why should shops consider investing in a designated machine for POE oil in EV repairs?
Why Invest in a Designated Machine for POE Oil in EV Repairs?
Investing in a designated machine for POE (Polyolester) oil is an essential consideration for shops dealing with high volumes of electric or hybrid vehicle repairs. Here’s why:
- Preserve Vehicle Efficiency: Using a machine that exclusively processes POE oil helps maintain the efficiency and performance of electric and hybrid vehicles. These specialized oils are crucial for their compressors, and ensuring their purity can prevent costly wear and tear.
- Prevent Cross-Contamination: With a dedicated machine, shops minimize the risk of cross-contamination between different oil types. This practice protects the integrity of electric vehicle systems, which require precise handling and maintenance.
- Long-Term Cost Savings: Although the initial investment may seem steep, owning a machine dedicated to POE oil can save money over time. It reduces the frequency of repairs and replacements by safeguarding the vehicle components.
- Enhance Customer Trust: By showcasing a commitment to specialized care, repair shops can boost customer confidence. Knowing their vehicle is being serviced with the correct tools instills trust and can lead to repeat business.
In conclusion, while the upfront cost of a designated POE oil machine may be significant, the advantages in terms of vehicle performance, maintenance efficiency, cost savings, and customer satisfaction make it a smart investment for repair shops focusing on electric and hybrid vehicles.
16.6 Why is EV battery isolation testing crucial for electric and hybrid vehicles?
Federal regulations mandate the vigilance of Original Equipment Manufacturers (OEMs) in monitoring chassis for HV leakage, making LOI a prevalent concern and one of the more common failure modes in EVs. When building an electric vehicle, it is important to understand this principle as well as how to perform manual testing methods that ensure the HV system’s integrity.
Isolation testing is crucial for maintaining safety in electric and hybrid vehicles. As high-voltage cables age or if components develop internal leaks or shorts, the insulation can degrade, posing serious risks. This degradation can trigger Loss of Isolation codes, alerting both technicians and drivers to potential hazards.
To ensure safety, it is vital that technicians receive thorough training and perform pre-scan checks before working on any EV. This preparation is especially important if any high-voltage cables or components are moved during repairs. Even slight adjustments can affect insulation integrity, necessitating a loss of isolation test before the high-voltage battery is reactivated.
A compromised cable or connector can allow moisture intrusion, further risking a loss of isolation. Such conditions can become dangerous if the high-voltage battery is powered without verifying isolation, underscoring the need for meticulous testing and maintenance procedures.
By integrating these practices, manufacturers and technicians can uphold the safety and reliability of electric vehicles, addressing federal requirements and ensuring public confidence in EV technology.
16.7 What is the importance of properly trained technicians working on high-voltage systems?
The Crucial Role of Properly Trained Technicians in High-Voltage Systems
When dealing with high-voltage systems in electric or hybrid vehicles, the expertise of properly trained technicians cannot be overstated. Here’s why:
Ensuring Safety
- Prevention of Accidents: High-voltage components carry significant electrical risks. Technicians with specialized training are adept at managing these dangers, reducing the likelihood of severe incidents.
- Loss of Isolation Testing: During repairs, even minor adjustments to high-voltage cables must be followed by a loss of isolation test. This critical procedure ensures the integrity of the system before the battery is powered up again.
Accurate Diagnostics
- Pre and Post Repair Scanning: Skilled technicians perform thorough scans both before and after repairs. This process is pivotal in identifying existing issues initially and ensuring that all repairs are correctly addressed without leaving new problems.
Compliance with Manufacturer Protocols
- Following Service Procedures: Each vehicle manufacturer stipulates specific service protocols for their models.