The 2007 F150 Obd2 Fuse Location is typically in the interior fuse panel, often located beneath the steering wheel or in the passenger footwell; consult your owner’s manual for the precise location. At MERCEDES-DIAGNOSTIC-TOOL.EDU.VN, we help you pinpoint its exact placement, understand its function, and troubleshoot related electrical issues, ensuring your F-150’s diagnostic system works flawlessly. Our comprehensive guides and expert advice provide peace of mind for your vehicle’s maintenance needs and unlock access to advanced diagnostic and repair knowledge, enhancing your ability to care for your Ford F-150.
Contents
- 1. Understanding the Importance of the OBD2 Fuse in Your 2007 F-150
- 1.1. What is the OBD2 Port and Why Does it Matter?
- 1.2. Why the OBD2 Fuse is Essential
- 1.3. Potential Problems from a Blown OBD2 Fuse
- 1.4. Diagnostic Tools and Their Reliance on the OBD2 Port
- 2. Locating the OBD2 Fuse in Your 2007 Ford F-150
- 2.1. Initial Steps Before Locating the Fuse
- 2.2. Primary Fuse Box Location
- 2.3. How to Identify the Correct Fuse Box
- 2.4. Detailed Steps to Access the Fuse Box
- 2.5. Deciphering the Fuse Diagram
- 2.6. Specific Fuse Number and Amperage
- 2.7. Auxiliary Fuse Box Locations (If Applicable)
- 2.8. Checking Auxiliary Fuse Boxes for OBD2 Fuses
- 3. Identifying a Blown Fuse
- 3.1. Visual Inspection Techniques
- 3.2. Using a Multimeter to Test Fuse Continuity
- 3.3. Common Indicators of a Blown OBD2 Fuse
- 4. Replacing the OBD2 Fuse
- 4.1. Selecting the Correct Replacement Fuse
- 4.2. Step-by-Step Replacement Procedure
- 4.3. What to Do if the New Fuse Blows Immediately
- 4.4. Identifying Potential Short Circuits or Electrical Issues
- 4.5. When to Consult a Professional
- 5. Common Issues That Can Cause the OBD2 Fuse to Blow
- 5.1. Overloading the OBD2 Port
- 5.2. Faulty OBD2 Scanners or Adapters
- 5.3. Wiring Issues Near the OBD2 Port
- 5.4. Water or Corrosion in the Connector
- 5.5. Internal Vehicle Electrical Problems
- 6. Preventing Future OBD2 Fuse Problems
- 6.1. Using High-Quality OBD2 Devices
- 6.2. Avoiding Overloading the Port
- 6.3. Regular Inspection of Wiring and Connectors
- 6.4. Protecting the OBD2 Port from the Elements
- 6.5. Professional Electrical System Maintenance
- 7. Advanced Diagnostics and Troubleshooting with MERCEDES-DIAGNOSTIC-TOOL.EDU.VN
- 7.1. In-Depth Guides on Ford F-150 Electrical Systems
- 7.2. Access to Professional Diagnostic Tools
- 7.3. How to Use Scan Tools for Accurate Diagnostics
- 7.4. Step-by-Step Repair Tutorials
- 7.5. Community Support and Expert Advice
- 8. Utilizing MERCEDES-DIAGNOSTIC-TOOL.EDU.VN for Comprehensive Vehicle Care
- 8.1. Benefits of Using Our Resources
- 8.2. Exploring Our Range of Diagnostic Services
- 8.3. Enhancing Your Vehicle’s Performance
- 8.4. Ensuring Vehicle Longevity
- 8.5. Staying Informed with the Latest Automotive Technology
- 9. Understanding OBD2 and Ford Specific Diagnostic Codes
- 9.1. Common OBD2 Codes for Ford Vehicles
- 9.2. Decoding Ford Specific Diagnostic Trouble Codes (DTCs)
- 9.3. Using Scan Tools to Read and Clear DTCs
- 9.4. Importance of Accurate Code Interpretation
- 9.5. Resources for Finding Ford DTC Definitions
- 10. Step-by-Step Guide to Performing a Basic OBD2 Scan on Your F-150
- 10.1. Preparing Your Vehicle and Scan Tool
- 10.2. Connecting the Scan Tool
- 10.3. Reading Diagnostic Trouble Codes
- 10.4. Interpreting the Codes
- 10.5. Clearing Codes and Monitoring Performance
- 11. Real-World Scenarios: Troubleshooting OBD2 Issues
- 11.1. Scenario 1: Intermittent Connection Issues
- 11.2. Scenario 2: No Power to the OBD2 Port
- 11.3. Scenario 3: Inaccurate Readings from the Scan Tool
- 11.4. Scenario 4: Check Engine Light Won’t Turn Off
- 11.5. Scenario 5: Communication Errors with the Vehicle’s Computer
- 12. Maintaining Your F-150’s Electrical System for Optimal Performance
- 12.1. Regular Battery Maintenance
- 12.2. Checking and Replacing Fuses Regularly
- 12.3. Inspecting Wiring and Connectors
- 12.4. Keeping the Electrical System Clean and Dry
- 12.5. Professional Electrical System Inspections
- 13. Safety Precautions When Working with Automotive Electrical Systems
- 13.1. Disconnecting the Battery
- 13.2. Using Proper Tools and Equipment
- 13.3. Avoiding Water and Moisture
- 13.4. Following Manufacturer’s Instructions
- 13.5. Seeking Professional Assistance When Needed
- 14. Frequently Asked Questions (FAQs) About the 2007 F150 OBD2 Fuse
- 14.1. Where is the OBD2 port located on a 2007 Ford F-150?
- 14.2. What amperage is the OBD2 fuse for a 2007 F-150?
- 14.3. How do I know if my OBD2 fuse is blown?
- 14.4. Can I use a higher amperage fuse to replace a blown OBD2 fuse?
- 14.5. What causes an OBD2 fuse to blow?
- 14.6. How can I prevent the OBD2 fuse from blowing again?
- 14.7. Do I need special tools to replace the OBD2 fuse?
- 14.8. Is it safe to drive with a blown OBD2 fuse?
- 14.9. Where can I find the fuse diagram for my 2007 F-150?
- 14.10. What should I do if the new fuse blows immediately after replacement?
- 15. Key Takeaways for Maintaining Your 2007 F-150’s OBD2 System
- 15.1. Importance of a Functioning OBD2 Port
- 15.2. Steps to Locate and Replace the OBD2 Fuse
- 15.3. Tips for Preventing Future Fuse Problems
- 15.4. Utilizing MERCEDES-DIAGNOSTIC-TOOL.EDU.VN Resources
- 15.5. Ensuring Vehicle Longevity and Performance
1. Understanding the Importance of the OBD2 Fuse in Your 2007 F-150
1.1. What is the OBD2 Port and Why Does it Matter?
The On-Board Diagnostics II (OBD2) port is a standardized interface in your 2007 Ford F-150 that allows technicians and vehicle owners to access the vehicle’s computer for diagnostic and monitoring purposes. This port is crucial for reading trouble codes, monitoring engine performance, and ensuring your vehicle meets emissions standards. Its functionality depends on a properly functioning fuse.
1.2. Why the OBD2 Fuse is Essential
The OBD2 fuse protects the OBD2 port and the systems it connects to from electrical overloads. Without a functioning fuse, you cannot:
- Read diagnostic trouble codes (DTCs).
- Perform emissions testing.
- Monitor real-time engine data.
- Use aftermarket tuning or diagnostic devices.
1.3. Potential Problems from a Blown OBD2 Fuse
A blown OBD2 fuse can lead to several issues:
- Inability to diagnose check engine lights.
- Failure to pass emissions tests.
- Loss of connectivity with diagnostic tools.
- Potential misdiagnosis of other vehicle problems due to lack of data.
1.4. Diagnostic Tools and Their Reliance on the OBD2 Port
Various diagnostic tools rely on the OBD2 port to function:
- Code Readers: Simple devices that read DTCs.
- Scan Tools: More advanced tools that offer live data, graphing, and bidirectional control.
- OBD2 Scanners: Professional-grade tools used by technicians for in-depth diagnostics.
- Smartphone Apps: Apps that connect to the OBD2 port via a Bluetooth adapter to provide vehicle data and diagnostics.
2. Locating the OBD2 Fuse in Your 2007 Ford F-150
2.1. Initial Steps Before Locating the Fuse
Before you start, gather these items:
- Owner’s Manual: The most reliable source for fuse location information.
- Flashlight: To help you see clearly in the fuse box area.
- Fuse Puller: A small tool designed to safely remove fuses. If you don’t have one, needle-nose pliers can work carefully.
2.2. Primary Fuse Box Location
The primary fuse box in a 2007 Ford F-150 is typically located inside the passenger compartment. Common locations include:
- Under the Dashboard: On the driver’s side, near the steering column.
- Passenger Footwell: Behind a panel in the passenger-side footwell.
2.3. How to Identify the Correct Fuse Box
- Consult the Owner’s Manual: It provides diagrams and descriptions of the fuse box locations.
- Visual Inspection: Look for a rectangular plastic box with a removable cover. The cover usually has a diagram indicating the fuses inside.
2.4. Detailed Steps to Access the Fuse Box
- Locate the Panel: Once you’ve found the fuse box location, identify the access panel.
- Open the Panel: Use a screwdriver or your fingers to gently pry open the panel. Some panels may have clips or screws.
- Examine the Diagram: Inside the cover, you’ll find a fuse diagram. This diagram is crucial for identifying the OBD2 fuse.
2.5. Deciphering the Fuse Diagram
The fuse diagram will list each fuse and its corresponding function. Look for labels such as:
- OBDII
- Data Link Connector (DLC)
- Diagnostic Connector
2.6. Specific Fuse Number and Amperage
According to Ford F-150 documentation, the OBD2 fuse is often a 15-amp or 20-amp fuse. Refer to your owner’s manual for the exact fuse number and amperage, as it can vary based on the vehicle’s specific configuration.
2.7. Auxiliary Fuse Box Locations (If Applicable)
Some F-150 models might have auxiliary fuse boxes:
- Under the Hood: Near the engine bay, housing fuses for critical engine components.
- Behind the Rear Seat: In some extended or crew cab models, providing additional electrical protection.
2.8. Checking Auxiliary Fuse Boxes for OBD2 Fuses
If you can’t find the OBD2 fuse in the primary fuse box, check the auxiliary fuse boxes. Consult your owner’s manual for their locations and diagrams.
3. Identifying a Blown Fuse
3.1. Visual Inspection Techniques
- Remove the Fuse: Use a fuse puller or needle-nose pliers to gently remove the fuse.
- Inspect the Fuse: Hold the fuse up to the light. Look for these signs of damage:
- Broken Filament: The thin wire inside the fuse is broken or melted.
- Darkened Glass: The glass or plastic casing is discolored or blackened.
3.2. Using a Multimeter to Test Fuse Continuity
A multimeter provides a more accurate way to test a fuse:
- Set Up the Multimeter: Turn on the multimeter and set it to the continuity setting (usually indicated by a sound wave symbol).
- Test the Fuse: Place one probe on each of the fuse’s metal contacts.
- Good Fuse: The multimeter will beep or display a value close to zero ohms, indicating continuity.
- Blown Fuse: The multimeter will not beep, and the display will show an open circuit (OL) or a very high resistance value.
3.3. Common Indicators of a Blown OBD2 Fuse
- Diagnostic tools fail to connect to the vehicle.
- The check engine light cannot be read.
- Emissions testing equipment cannot communicate with the vehicle.
4. Replacing the OBD2 Fuse
4.1. Selecting the Correct Replacement Fuse
- Amperage Rating: Ensure the replacement fuse has the same amperage rating as the original. Using a fuse with a higher amperage can damage the electrical system.
- Type: Use the same type of fuse (e.g., MINI, ATO) as the original.
4.2. Step-by-Step Replacement Procedure
- Turn Off the Ignition: Ensure the vehicle is turned off to prevent electrical surges.
- Remove the Blown Fuse: Use the fuse puller to remove the damaged fuse.
- Insert the New Fuse: Align the new fuse with the fuse holder and gently push it in until it is fully seated.
- Test the Connection: Turn on the ignition and try using your diagnostic tool to ensure the OBD2 port is now functional.
4.3. What to Do if the New Fuse Blows Immediately
If the new fuse blows immediately, it indicates a short circuit or another underlying electrical problem. Do not continue replacing fuses without diagnosing the root cause.
4.4. Identifying Potential Short Circuits or Electrical Issues
- Inspect Wiring: Look for frayed or damaged wires near the OBD2 port and related components.
- Check Connectors: Ensure the connectors are clean and properly seated.
- Test Components: Use a multimeter to test the components connected to the OBD2 circuit for shorts or excessive resistance.
4.5. When to Consult a Professional
If you are uncomfortable diagnosing electrical issues or cannot identify the cause of the blown fuse, consult a professional mechanic. They have the tools and expertise to safely diagnose and repair electrical problems.
5. Common Issues That Can Cause the OBD2 Fuse to Blow
5.1. Overloading the OBD2 Port
Connecting multiple devices or devices that draw too much power from the OBD2 port can overload the circuit and blow the fuse.
5.2. Faulty OBD2 Scanners or Adapters
Using low-quality or faulty OBD2 scanners and adapters can cause electrical shorts that blow the fuse.
5.3. Wiring Issues Near the OBD2 Port
Damaged or frayed wires near the OBD2 port can cause short circuits, leading to blown fuses.
5.4. Water or Corrosion in the Connector
Exposure to water or corrosion in the OBD2 connector can cause electrical issues and blown fuses.
5.5. Internal Vehicle Electrical Problems
Underlying electrical issues within the vehicle’s systems can sometimes manifest as a blown OBD2 fuse.
6. Preventing Future OBD2 Fuse Problems
6.1. Using High-Quality OBD2 Devices
Invest in reputable OBD2 scanners and adapters to ensure they meet quality standards and don’t cause electrical issues.
6.2. Avoiding Overloading the Port
Do not connect multiple devices to the OBD2 port simultaneously. If you need to use multiple devices, use a splitter that includes overcurrent protection.
6.3. Regular Inspection of Wiring and Connectors
Periodically inspect the wiring and connectors near the OBD2 port for damage, corrosion, or loose connections.
6.4. Protecting the OBD2 Port from the Elements
Use a protective cover or seal to prevent water and debris from entering the OBD2 connector.
6.5. Professional Electrical System Maintenance
Schedule regular electrical system maintenance with a qualified mechanic to identify and address potential issues before they cause problems.
7. Advanced Diagnostics and Troubleshooting with MERCEDES-DIAGNOSTIC-TOOL.EDU.VN
7.1. In-Depth Guides on Ford F-150 Electrical Systems
MERCEDES-DIAGNOSTIC-TOOL.EDU.VN offers detailed guides on the electrical systems of the 2007 Ford F-150, including troubleshooting tips and diagnostic procedures.
7.2. Access to Professional Diagnostic Tools
We provide information on professional-grade diagnostic tools that can help you pinpoint electrical issues and perform advanced troubleshooting.
7.3. How to Use Scan Tools for Accurate Diagnostics
Learn how to use scan tools to read live data, perform component tests, and diagnose electrical problems accurately.
7.4. Step-by-Step Repair Tutorials
Access step-by-step repair tutorials that guide you through common electrical repairs on your 2007 Ford F-150.
7.5. Community Support and Expert Advice
Join our community forum to connect with other Ford F-150 owners and access expert advice from experienced mechanics.
8. Utilizing MERCEDES-DIAGNOSTIC-TOOL.EDU.VN for Comprehensive Vehicle Care
8.1. Benefits of Using Our Resources
- Save Money: By diagnosing and fixing issues yourself, you can save on costly mechanic fees.
- Gain Knowledge: Learn about your vehicle’s systems and how they work.
- Maintain Your Vehicle: Keep your Ford F-150 running smoothly with regular maintenance and timely repairs.
8.2. Exploring Our Range of Diagnostic Services
MERCEDES-DIAGNOSTIC-TOOL.EDU.VN offers a variety of diagnostic services to meet your needs:
- Online Diagnostics: Get help diagnosing issues through our online diagnostic tools and resources.
- Remote Support: Connect with our experts for remote diagnostic support and guidance.
- In-Person Services: Visit our service center for professional diagnostics and repairs.
8.3. Enhancing Your Vehicle’s Performance
Learn how to enhance your vehicle’s performance through proper maintenance and timely repairs.
8.4. Ensuring Vehicle Longevity
Follow our maintenance tips and repair guides to extend the life of your 2007 Ford F-150.
8.5. Staying Informed with the Latest Automotive Technology
Stay up-to-date with the latest automotive technology and trends through our informative articles and resources.
9. Understanding OBD2 and Ford Specific Diagnostic Codes
9.1. Common OBD2 Codes for Ford Vehicles
Familiarize yourself with common OBD2 codes specific to Ford vehicles to better understand potential issues.
9.2. Decoding Ford Specific Diagnostic Trouble Codes (DTCs)
Learn how to decode Ford-specific DTCs to pinpoint the exact cause of your vehicle’s problems.
9.3. Using Scan Tools to Read and Clear DTCs
Understand how to use scan tools to read and clear DTCs, providing valuable insights into your vehicle’s health.
9.4. Importance of Accurate Code Interpretation
Accurate interpretation of diagnostic codes is crucial for effective troubleshooting and repairs.
9.5. Resources for Finding Ford DTC Definitions
Utilize online resources and databases to find accurate definitions for Ford DTCs.
10. Step-by-Step Guide to Performing a Basic OBD2 Scan on Your F-150
10.1. Preparing Your Vehicle and Scan Tool
Ensure your vehicle is turned off and locate the OBD2 port. Connect your scan tool to the port and turn on the ignition (but do not start the engine).
10.2. Connecting the Scan Tool
Follow the scan tool’s instructions to establish a connection with your vehicle’s computer.
10.3. Reading Diagnostic Trouble Codes
Use the scan tool’s menu to read any stored diagnostic trouble codes (DTCs).
10.4. Interpreting the Codes
Consult the scan tool’s manual or online resources to interpret the meaning of the DTCs.
10.5. Clearing Codes and Monitoring Performance
After addressing the issues, use the scan tool to clear the DTCs and monitor your vehicle’s performance to ensure the problem is resolved.
11. Real-World Scenarios: Troubleshooting OBD2 Issues
11.1. Scenario 1: Intermittent Connection Issues
Troubleshoot intermittent connection issues by checking the OBD2 port for damage and ensuring the connector is clean and secure.
11.2. Scenario 2: No Power to the OBD2 Port
If there’s no power to the OBD2 port, check the OBD2 fuse and related wiring for damage or shorts.
11.3. Scenario 3: Inaccurate Readings from the Scan Tool
Ensure your scan tool is compatible with your vehicle and that you have the latest software updates.
11.4. Scenario 4: Check Engine Light Won’t Turn Off
Address all underlying issues causing the check engine light to illuminate before attempting to clear the codes.
11.5. Scenario 5: Communication Errors with the Vehicle’s Computer
Check the wiring and connections between the OBD2 port and the vehicle’s computer for damage or loose connections.
12. Maintaining Your F-150’s Electrical System for Optimal Performance
12.1. Regular Battery Maintenance
Maintain your vehicle’s battery by cleaning the terminals and ensuring it is properly charged.
12.2. Checking and Replacing Fuses Regularly
Periodically check your vehicle’s fuses for damage and replace them as needed to prevent electrical issues.
12.3. Inspecting Wiring and Connectors
Regularly inspect your vehicle’s wiring and connectors for damage, corrosion, or loose connections.
12.4. Keeping the Electrical System Clean and Dry
Protect your vehicle’s electrical system from water and debris to prevent corrosion and electrical issues.
12.5. Professional Electrical System Inspections
Schedule regular electrical system inspections with a qualified mechanic to identify and address potential issues before they cause problems.
13. Safety Precautions When Working with Automotive Electrical Systems
13.1. Disconnecting the Battery
Always disconnect the battery before working on any automotive electrical system to prevent electrical shocks and damage.
13.2. Using Proper Tools and Equipment
Use proper tools and equipment when working on automotive electrical systems to avoid injury and damage.
13.3. Avoiding Water and Moisture
Avoid working on electrical systems in wet or damp conditions to prevent electrical shocks and damage.
13.4. Following Manufacturer’s Instructions
Always follow the manufacturer’s instructions when performing electrical repairs and maintenance.
13.5. Seeking Professional Assistance When Needed
If you are uncomfortable working on automotive electrical systems, seek professional assistance from a qualified mechanic.
14. Frequently Asked Questions (FAQs) About the 2007 F150 OBD2 Fuse
14.1. Where is the OBD2 port located on a 2007 Ford F-150?
The OBD2 port is typically located under the dashboard on the driver’s side.
14.2. What amperage is the OBD2 fuse for a 2007 F-150?
The OBD2 fuse is often a 15-amp or 20-amp fuse; refer to your owner’s manual for the exact rating.
14.3. How do I know if my OBD2 fuse is blown?
Your diagnostic tool will fail to connect to the vehicle, or the check engine light cannot be read.
14.4. Can I use a higher amperage fuse to replace a blown OBD2 fuse?
No, always use the same amperage rating as the original fuse to prevent electrical damage.
14.5. What causes an OBD2 fuse to blow?
Overloading the port, faulty devices, wiring issues, or water damage can cause the fuse to blow.
14.6. How can I prevent the OBD2 fuse from blowing again?
Use high-quality devices, avoid overloading the port, and regularly inspect wiring and connectors.
14.7. Do I need special tools to replace the OBD2 fuse?
A fuse puller is helpful, but needle-nose pliers can be used carefully.
14.8. Is it safe to drive with a blown OBD2 fuse?
Yes, but you won’t be able to diagnose any check engine lights or perform emissions testing.
14.9. Where can I find the fuse diagram for my 2007 F-150?
The fuse diagram is typically located on the inside of the fuse box cover or in your owner’s manual.
14.10. What should I do if the new fuse blows immediately after replacement?
It indicates a short circuit or another electrical problem; consult a professional mechanic.
15. Key Takeaways for Maintaining Your 2007 F-150’s OBD2 System
15.1. Importance of a Functioning OBD2 Port
A functioning OBD2 port is crucial for diagnosing and maintaining your vehicle.
15.2. Steps to Locate and Replace the OBD2 Fuse
Follow our guide to locate and replace the OBD2 fuse quickly and safely.
15.3. Tips for Preventing Future Fuse Problems
Use our tips to prevent future fuse problems and maintain your vehicle’s electrical system.
15.4. Utilizing MERCEDES-DIAGNOSTIC-TOOL.EDU.VN Resources
Leverage our comprehensive resources for all your Ford F-150 diagnostic and maintenance needs.
15.5. Ensuring Vehicle Longevity and Performance
Maintain your vehicle’s electrical system to ensure its longevity and optimal performance.
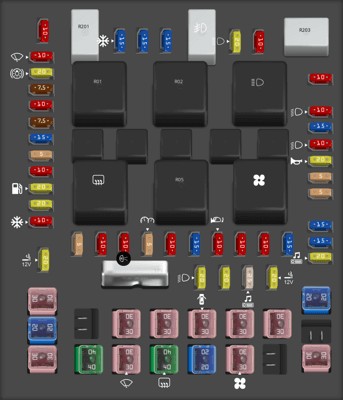 2007 Ford F-150 passenger compartment fuse panel diagram indicating fuse locations for various components, including potentially the OBD2 port
At MERCEDES-DIAGNOSTIC-TOOL.EDU.VN, we understand the critical role the OBD2 port plays in maintaining your 2007 Ford F-150. By providing you with detailed information and expert guidance, we empower you to keep your vehicle running smoothly and efficiently.
Need further assistance with your 2007 Ford F-150’s OBD2 system? Contact us today for expert advice and support. Visit our website at MERCEDES-DIAGNOSTIC-TOOL.EDU.VN or call us at +1 (641) 206-8880. You can also visit our location at 789 Oak Avenue, Miami, FL 33101, United States. Let MERCEDES-DIAGNOSTIC-TOOL.EDU.VN be your trusted partner in vehicle diagnostics and maintenance.
Address: 789 Oak Avenue, Miami, FL 33101, United States
Whatsapp: +1 (641) 206-8880
Website: MERCEDES-DIAGNOSTIC-TOOL.EDU.VN