Understanding the 2008 Cadillac Escalade Obd2 Fuse is crucial for diagnosing and resolving vehicle issues, and MERCEDES-DIAGNOSTIC-TOOL.EDU.VN offers comprehensive information to help you troubleshoot effectively. By exploring this guide, you’ll gain insights into fuse locations, troubleshooting steps, and the importance of proper fuse maintenance, ultimately enhancing your vehicle’s performance and reliability. Dive in to discover how to maintain your Cadillac Escalade using reliable diagnostic tools, fuse identification, and electrical system knowledge.
Contents
- 1. What are the Locations of the Fuses in a 2008 Cadillac Escalade?
- 1.1 Underhood Fuse Block
- 1.2 Instrument Panel Fuse Block
- 1.3 Center Instrument Panel Fuse Block
- 2. Detailed Fuse Listings for the 2008 Cadillac Escalade
- 2.1 Underhood Fuse Block Details
- 2.2 Instrument Panel Fuse Block Details
- 2.3 Center Instrument Panel Fuse Block Details
- 3. Understanding the OBD2 Port and Fuse
- 3.1 What is the OBD2 Port?
- 3.2 Location of the OBD2 Port in a 2008 Cadillac Escalade
- 3.3 Identifying the OBD2 Fuse
- 3.4 Importance of a Functional OBD2 Port
- 4. Step-by-Step Guide to Checking and Replacing Fuses
- 4.1 Gathering the Necessary Tools
- 4.2 How to Locate the Blown Fuse
- 4.3 Step-by-Step Fuse Replacement
- 4.4 Safety Precautions
- 5. Common Electrical Issues and Their Corresponding Fuses
- 5.1 Headlight Issues
- 5.2 Air Conditioning Problems
- 5.3 Fuel Pump Malfunctions
- 5.4 Power Door Lock Problems
- 5.5 Audio System Failures
- 6. Diagnostic Tools for Your 2008 Cadillac Escalade
- 6.1 OBD2 Scanners
- 6.2 Multimeters
- 6.3 Test Lights
- 6.4 Advanced Diagnostic Equipment
- 7. Benefits of Using MERCEDES-DIAGNOSTIC-TOOL.EDU.VN
- 7.1 Detailed Fuse Box Diagrams
- 7.2 Troubleshooting Guides
- 7.3 Expert Advice
- 7.4 Community Support
- 8. What Are The Common Causes of Fuse Failure in the 2008 Cadillac Escalade OBD2 System?
- 8.1 Short Circuits
- 8.2 Overloads
- 8.3 Component Failure
- 8.4 Wiring Issues
- 8.5 Environmental Factors
- 8.6 Improper Fuse Replacement
- 8.7 OBD2 Port Damage
- 9. How to Use an OBD2 Scanner to Diagnose Electrical Issues
- 9.1 Preparing for the Scan
- 9.2 Performing the Scan
- 9.3 Interpreting the Codes
- 9.4 Troubleshooting Based on Codes
- 9.5 Example: Diagnosing a U0100 Code
- 10. Maintaining Your 2008 Cadillac Escalade’s Electrical System
- 10.1 Regular Inspections
- 10.2 Cleaning and Protecting Connections
- 10.3 Battery Maintenance
- 10.4 Professional Servicing
- 10.5 Tips for Preventing Electrical Issues
- 11. Upgrading Your Diagnostic Capabilities
- 11.1 Investing in Advanced Scanners
- 11.2 Learning Advanced Diagnostic Techniques
- 11.3 Building a Home Diagnostic Lab
- 11.4 Utilizing Online Resources
- 12. How Does the 2008 Cadillac Escalade OBD2 Fuse Relate to Vehicle Performance?
- 12.1 Enabling Diagnostic Access
- 12.2 Monitoring Vehicle Health
- 12.3 Impact on Engine Performance
- 12.4 Transmission Functionality
- 12.5 Emission Control
- 12.6 Safety Systems
- 12.7 Fuel Efficiency
- 12.8 Diagnostic Process
- 12.9 Regular Maintenance
- 12.10 Functional OBD2 Port
- 13. What Are The Potential Problems if the 2008 Cadillac Escalade OBD2 Fuse Keeps Blowing?
- 13.1 Short Circuit in the OBD2 Port Wiring
- 13.2 Faulty OBD2 Port
- 13.3 Wiring Issues in the Diagnostic Circuit
- 13.4 Overload on the Circuit
- 13.5 Component Failure
- 13.6 Improper Fuse Replacement
- 13.7 Environmental Factors
- 13.8 Damaged Wiring Insulation
- 13.9 Scanner Compatibility Issues
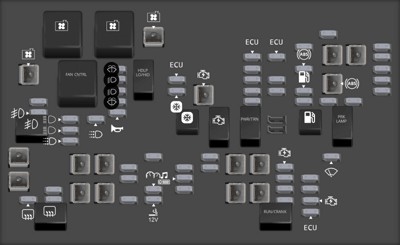
1. What are the Locations of the Fuses in a 2008 Cadillac Escalade?
The 2008 Cadillac Escalade incorporates three distinct fuse box locations to manage its various electrical circuits:
- Underhood Fuse Block
- Instrument Panel Fuse Block
- Center Instrument Panel Fuse Block
Knowing the precise location of each fuse box is essential for efficient troubleshooting and maintenance.
1.1 Underhood Fuse Block
The Underhood Fuse Block is located in the engine compartment. It houses fuses and relays critical to the engine’s operation and other essential vehicle systems.
1.2 Instrument Panel Fuse Block
The Instrument Panel Fuse Block is typically located inside the vehicle, often under the dashboard or behind a panel in the cabin. It protects circuits related to interior functions and accessories.
1.3 Center Instrument Panel Fuse Block
The Center Instrument Panel Fuse Block is situated in the center console area. It manages fuses linked to the audio system, climate control, and other central functions.
2. Detailed Fuse Listings for the 2008 Cadillac Escalade
Each fuse box in the 2008 Cadillac Escalade contains specific fuses assigned to different circuits. Below are detailed tables outlining the fuses in the Underhood Fuse Block and the Instrument Panel Fuse Block, highlighting their amperage and protected systems.
2.1 Underhood Fuse Block Details
The Underhood Fuse Block protects critical engine and vehicle systems.
| Fuse Number | Amperage | Description |
|---|---|---|
| 1 | MINI | Right Trailer Stop/Turn Lamp |
| 2 | MINI | Electronic Stability Suspension Control, Automatic Level Control Exhaust |
| 3 | MINI | Left Trailer Stop/Turn Lamp |
| 4 | MINI | Engine Controls |
| 5 | MINI | Engine Control Module, Throttle Control |
| 6 | MINI | Trailer Brake Controller |
| 7 | MINI | Front Washer |
| 8 | MINI | Oxygen Sensors |
| 9 | MINI | Antilock Brakes System 2 |
| 10 | MINI | Trailer Back-up Lamps |
| 11 | MINI | Driver Side Low-Beam Headlamp |
| 12 | MINI | Engine Control Module (Battery) |
| 13 | MINI | Fuel Injectors, Ignition Coils (Right Side) |
| 14 | MINI | Transmission Control Module (Battery) |
| 15 | MINI | Vehicle Back-up Lamps |
| 16 | MINI | Passenger Side Low-Beam Headlamp |
| 17 | MINI | Air Conditioning Compressor |
| 18 | MINI | Oxygen Sensors |
| 19 | MINI | Transmission Controls (Ignition) |
| 20 | MINI | Fuel Pump |
| 21 | MINI | Fuel System Control Module |
| 22 | MINI | Headlamp Washers |
| 23 | MINI | Rear Windshield Washer |
| 24 | MINI | Fuel Injectors, Ignition Coils (Left Side) |
| 25 | MINI | Trailer Park Lamps |
| 26 | MINI | Driver Side Park Lamps |
| 27 | MINI | Passenger Side Park Lamps |
| 28 | MINI | Fog Lamps |
| 29 | MINI | Horn |
| 30 | MINI | Passenger Side High-Beam Headlamp |
| 31 | MINI | Daytime Running Lamps |
| 32 | MINI | Driver Side High-Beam Headlamp |
| 33 | MINI | Daytime Running Lights 2 |
| 34 | MINI | Sunroof |
| 35 | MINI | Key Ignition System, Theft Deterrent System |
| 36 | MINI | Windshield Wiper |
| 37 | MINI | SEO B2 Upfitter Usage (Battery) |
| 38 | MINI | Electric Adjustable Pedals |
| 39 | MINI | Climate Controls (Battery) |
| 40 | MINI | Airbag System (Ignition) |
| 41 | MINI | Amplifier |
| 42 | MINI | Audio System |
| 43 | MINI | Miscellaneous (Ignition), Cruise Control |
| 44 | MINI | Liftgate Release |
| 45 | MINI | Airbag System (Battery) |
| 46 | MINI | Instrument Panel Cluster |
| 47 | MINI | Power Take-Off |
| 48 | MINI | Auxiliary Climate Control (Ignition), Compass-Temperature Mirror |
| 49 | MINI | Center High-Mounted Stoplamp (CHMSL) |
| 50 | MINI | Rear Defogger |
| 51 | MINI | Heated Mirror |
| 52 | MINI | SEO B1 Upfitter Usage (Battery) |
| 53 | MINI | Cigarette Lighter, Auxiliary Power Outlet |
| 54 | MINI | Automatic Level Control Compressor Relay, SEO Upfitter Usage |
| 55 | MINI | Climate Controls (Ignition) |
| 56 | MINI | Engine Control Module, Secondary Fuel Pump (Ignition) |
| 57 | FMX/JCase | Cooling Fan 1 |
| 58 | FMX/JCase | Automatic Level Control Compressor |
| 59 | FMX/JCase | Heavy Duty Antilock Brake System |
| 60 | FMX/JCase | Cooling Fan 2 |
| 61 | FMX/JCase | Antilock Brake System 1 |
| 62 | FMX/JCase | Starter |
| 63 | FMX/JCase | Stud 2 (Trailer Brakes) |
| 64 | FMX/JCase | Left Bussed Electrical Center 1 |
| 65 | FMX/JCase | Electric Running Boards |
| 66 | FMX/JCase | Heated Windshield Washer System |
| 67 | FMX/JCase | Four-Wheel Drive System |
| 68 | FMX/JCase | Stud 1 (Trailer Connector Battery Power) |
| 69 | FMX/JCase | Mid-Bussed Electrical Center 1 |
| 70 | FMX/JCase | Climate Control Blower |
| 71 | FMX/JCase | Power Liftgate Module |
| 72 | FMX/JCase | Left Bussed Electrical Center 2 |
| Relay | Description |
|---|---|
| FAN HI | Cooling Fan High Speed |
| FAN LO | Cooling Fan Low Speed |
| FAN CNTRL | Cooling Fan Control |
| HDLP LO/HID | Hi Intensity Discharge Headlamp |
| FOG LAMP | Front Fog Lamps |
| A/C CMPRSR | Air Conditioning Compressor |
| STRTR | Starter |
| PWR/TRN | Powertrain |
| FUEL PMP | Fuel Pump |
| PRK LAMP | Parking Lamps |
| REAR DEFOG | Rear Defogger |
| RUN/CRANK | Switched Power |
2.2 Instrument Panel Fuse Block Details
The Instrument Panel Fuse Block manages interior functions and accessories.
| Fuse Number | Amperage | Description |
|---|---|---|
| 1 | 20A | Rear Seats |
| 2 | 20A | Rear Accessory Power Outlet |
| 3 | 2A | Steering Wheel Controls Backlight |
| 4 | 15A | Driver Door Module |
| 5 | 15A | Dome Lamps, Driver Side Turn Signal |
| 6 | 15A | Driver Side Turn Signal, Stoplamp |
| 7 | 10A | Instrument Panel Back Lighting |
| 8 | 15A | Passenger Side Turn Signal, Stoplamp |
| 9 | 15A | Passenger Door Module, Universal Home Remote System |
| 10 | 15A | Power Door Lock 2 (Unlock Feature) |
| 11 | 15A | Power Door Lock 2 (Lock Feature) |
| 12 | 15A | Stoplamps, Center-High Mounted Stoplamp |
| 13 | 30A | Rear Climate Controls |
| 14 | 2A | Not Used |
| 15 | 10A | Body Control Module (BCM) |
| 16 | 20A | Accessory Power Outlets |
| 17 | 10A | Interior Lamps |
| 18 | 15A | Power Door Lock 1 (Unlock Feature) |
| 19 | 5A | Rear Seat Entertainment |
| 20 | 10A | Ultrasonic Rear Parking Assist, Power Liftgate |
| 21 | 15A | Power Door Lock 1 (Lock Feature) |
| 22 | 10A | Driver Information Center (DIC) |
| 23 | 25A | Rear Wiper |
| 24 | 30A | Not Used |
| 25 | 10A | Driver Seat Module, Remote Keyless Entry System |
| 26 | 15A | Not Used |
2.3 Center Instrument Panel Fuse Block Details
The Center Instrument Panel Fuse Block includes the following connections:
| Connector | Description |
|---|---|
| BODY 2 | Body Harness Connector 2 |
| BODY 1 | Body Harness Connector 1 |
| BODY 3 | Body Harness Connector 3 |
| HEADLINER 3 | Headliner Harness Connector 3 |
| HEADLINER 2 | Headliner Harness Connector 2 |
| HEADLINER 1 | Headliner Harness Connector 1 |
| SEO/UPFITTER | Special Equipment Option Upfitter Harness Connector |
| Circuit breaker ATO | Description |
|---|---|
| CB1 | Passenger Side Power Window Circuit Breaker |
| CB2 | Passenger Seat Circuit Breaker |
| CB3 | Driver Seat Circuit Breaker |
| CB4 | Rear Sliding Window |
3. Understanding the OBD2 Port and Fuse
The OBD2 (On-Board Diagnostics II) port is a standardized interface used to access vehicle diagnostic information. This port is essential for mechanics and vehicle owners to read error codes, monitor vehicle performance, and ensure proper maintenance.
3.1 What is the OBD2 Port?
The OBD2 port, mandated in the United States since 1996, provides access to a wealth of information about a vehicle’s health. It allows users to connect diagnostic tools, read trouble codes, and monitor various parameters.
3.2 Location of the OBD2 Port in a 2008 Cadillac Escalade
In a 2008 Cadillac Escalade, the OBD2 port is typically located under the dashboard on the driver’s side. It is usually near the steering column or in the vicinity of the pedals.
3.3 Identifying the OBD2 Fuse
The OBD2 fuse protects the diagnostic port and ensures it functions correctly. The exact fuse number and location can be found in the vehicle’s fuse box diagram.
3.4 Importance of a Functional OBD2 Port
A functional OBD2 port is crucial for diagnosing vehicle issues. Without a working port, mechanics cannot access vital information needed to troubleshoot problems, potentially leading to prolonged diagnostic times and increased repair costs.
4. Step-by-Step Guide to Checking and Replacing Fuses
Checking and replacing fuses is a straightforward process that can often resolve electrical issues in your 2008 Cadillac Escalade.
4.1 Gathering the Necessary Tools
- Fuse Puller: A small tool designed to safely remove fuses.
- Replacement Fuses: Ensure you have the correct amperage and type.
- Vehicle Manual: Consult the manual for fuse locations and diagrams.
- Test Light or Multimeter: To check if a fuse is blown.
4.2 How to Locate the Blown Fuse
- Consult the Fuse Diagram: Use the diagram to identify the fuse associated with the malfunctioning component.
- Visually Inspect the Fuse: Look for a broken wire inside the fuse.
- Use a Test Light or Multimeter: Test the fuse for continuity. If there is no continuity, the fuse is blown.
4.3 Step-by-Step Fuse Replacement
- Turn Off the Vehicle: Ensure the ignition is off to prevent electrical shorts.
- Open the Fuse Box: Locate and open the appropriate fuse box.
- Remove the Blown Fuse: Use the fuse puller to remove the fuse.
- Insert a New Fuse: Replace the blown fuse with a new fuse of the same amperage.
- Test the Circuit: Turn on the vehicle and test the component to ensure it is working.
 Underhood Fuse Block diagram
4.4 Safety Precautions
- Always use the correct amperage fuse to prevent damage to the electrical system.
- Never replace a fuse with a higher amperage fuse.
- If a fuse blows repeatedly, consult a professional mechanic to diagnose the underlying issue.
5. Common Electrical Issues and Their Corresponding Fuses
Several common electrical issues can occur in a 2008 Cadillac Escalade. Knowing which fuse corresponds to each system can simplify troubleshooting.
5.1 Headlight Issues
- Fuse Location: Underhood Fuse Block, fuses 11 and 16.
- Symptoms: Headlights not working or dim.
- Troubleshooting: Check the fuses and replace if necessary. Inspect the headlight bulbs and connectors.
5.2 Air Conditioning Problems
- Fuse Location: Underhood Fuse Block, fuse 17.
- Symptoms: Air conditioning not blowing cold air.
- Troubleshooting: Verify the fuse is intact. Check the compressor and refrigerant levels.
5.3 Fuel Pump Malfunctions
- Fuse Location: Underhood Fuse Block, fuse 20.
- Symptoms: Engine not starting or stalling.
- Troubleshooting: Check the fuel pump fuse. Inspect the fuel pump relay and fuel pump itself.
5.4 Power Door Lock Problems
- Fuse Location: Instrument Panel Fuse Block, fuses 10, 11, 18, and 21.
- Symptoms: Power door locks not working.
- Troubleshooting: Check the fuses. Inspect the door lock actuators and wiring.
5.5 Audio System Failures
- Fuse Location: Underhood Fuse Block, fuse 42.
- Symptoms: Radio or audio system not working.
- Troubleshooting: Verify the fuse is good. Check the radio connections and amplifier.
6. Diagnostic Tools for Your 2008 Cadillac Escalade
Using diagnostic tools can significantly streamline the process of identifying and resolving issues with your 2008 Cadillac Escalade.
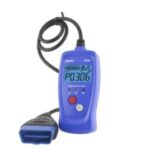
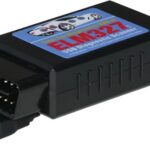
6.1 OBD2 Scanners
OBD2 scanners connect to the OBD2 port and read diagnostic trouble codes (DTCs) stored in the vehicle’s computer.
6.2 Multimeters
Multimeters are used to measure voltage, current, and resistance, helping diagnose electrical problems.
6.3 Test Lights
Test lights are simple tools used to check for the presence of voltage in a circuit.
6.4 Advanced Diagnostic Equipment
Advanced tools, such as professional-grade scanners, offer in-depth diagnostics and programming capabilities.
7. Benefits of Using MERCEDES-DIAGNOSTIC-TOOL.EDU.VN
MERCEDES-DIAGNOSTIC-TOOL.EDU.VN offers detailed guides, troubleshooting tips, and expert advice to help you maintain and repair your 2008 Cadillac Escalade.
7.1 Detailed Fuse Box Diagrams
Access comprehensive fuse box diagrams for accurate fuse identification.
7.2 Troubleshooting Guides
Find step-by-step troubleshooting guides for common electrical issues.
7.3 Expert Advice
Get expert advice and tips from experienced mechanics.
7.4 Community Support
Connect with other Cadillac Escalade owners for shared knowledge and support.
8. What Are The Common Causes of Fuse Failure in the 2008 Cadillac Escalade OBD2 System?
Fuse failures in the 2008 Cadillac Escalade’s OBD2 system can stem from several causes, all of which can disrupt the vehicle’s diagnostic capabilities. Here’s a breakdown of the common culprits:
8.1 Short Circuits
- Description: A short circuit occurs when there’s an unintended low-resistance path for current to flow. This causes a surge in amperage, leading the fuse to blow to protect the circuit.
- Causes: Damaged wiring, frayed insulation, or loose connections can create short circuits. These issues might arise from wear and tear, environmental factors, or accidental damage during repairs.
- Troubleshooting:
- Visually inspect wiring for damage.
- Use a multimeter to check for continuity between the wire and ground.
- Ensure connections are secure and free from corrosion.
8.2 Overloads
- Description: An overload happens when a circuit draws more current than it is designed to handle. This excess current heats up the fuse, causing it to melt and break the circuit.
- Causes: Adding too many devices to a single circuit, faulty components drawing excessive power, or using an incorrect fuse rating can lead to overloads.
- Troubleshooting:
- Identify and remove any recently added devices to the circuit.
- Check the amperage draw of individual components against the circuit’s rated capacity.
- Ensure the correct fuse rating is used as specified in the vehicle’s manual.
8.3 Component Failure
- Description: A failing component can draw excessive current or create a short circuit, leading to fuse failure.
- Causes: Components such as sensors, actuators, or the OBD2 port itself might develop internal faults due to age, wear, or manufacturing defects.
- Troubleshooting:
- Test individual components connected to the OBD2 circuit for proper function.
- Use diagnostic tools to identify error codes pointing to specific component failures.
- Inspect the OBD2 port for damage or corrosion.
8.4 Wiring Issues
- Description: Problems within the wiring harness can cause intermittent or consistent fuse failures.
- Causes: Damaged, corroded, or improperly connected wires can disrupt the circuit’s integrity. Vibration, heat, and exposure to moisture can accelerate these issues.
- Troubleshooting:
- Inspect the wiring harness for visible damage or corrosion.
- Check connections to ensure they are secure and free from corrosion.
- Use a multimeter to test the continuity and resistance of the wires.
8.5 Environmental Factors
- Description: Environmental conditions can contribute to fuse failures over time.
- Causes: Exposure to extreme temperatures, moisture, and contaminants can degrade wiring and components, leading to shorts or overloads.
- Troubleshooting:
- Protect the fuse box and wiring from moisture and contaminants.
- Regularly inspect the fuse box and surrounding areas for signs of corrosion or damage.
8.6 Improper Fuse Replacement
- Description: Using the wrong type or rating of fuse can lead to repeated failures or even damage the electrical system.
- Causes: Installing a fuse with a higher amperage rating than specified can allow excessive current flow, damaging components before the fuse blows.
- Troubleshooting:
- Always use the correct fuse rating as specified in the vehicle’s manual.
- Ensure the replacement fuse is of the same type and quality as the original.
8.7 OBD2 Port Damage
- Description: Physical damage to the OBD2 port can cause shorts or connection issues, leading to fuse failure.
- Causes: Repeated use, accidental impacts, or improper insertion of diagnostic tools can damage the port’s pins or internal components.
- Troubleshooting:
- Inspect the OBD2 port for bent or broken pins.
- Ensure diagnostic tools are inserted correctly and without excessive force.
- If the port is damaged, consider professional repair or replacement.
Understanding these common causes can help you effectively troubleshoot and resolve fuse failures in your 2008 Cadillac Escalade’s OBD2 system, ensuring accurate and reliable diagnostics.
9. How to Use an OBD2 Scanner to Diagnose Electrical Issues
Using an OBD2 scanner is a practical way to diagnose electrical issues in your 2008 Cadillac Escalade. Here’s a step-by-step guide:
9.1 Preparing for the Scan
- Turn off the Vehicle: Ensure the ignition is off before plugging in the scanner.
- Locate the OBD2 Port: Find the OBD2 port under the dashboard on the driver’s side.
- Plug in the Scanner: Connect the OBD2 scanner to the port.
9.2 Performing the Scan
- Turn on the Ignition: Turn the ignition to the “on” position without starting the engine.
- Power on the Scanner: The scanner should power on automatically. If not, check its power source.
- Navigate the Menu: Use the scanner’s menu to select “Read Codes” or “Diagnostic Codes.”
- Record the Codes: Write down any diagnostic trouble codes (DTCs) that appear. These codes provide clues about the electrical issues.
9.3 Interpreting the Codes
- Consult the Manual: Refer to your vehicle’s manual or a reliable online database to understand the meaning of each DTC.
- Common Codes: Look for codes related to electrical systems, such as P0600 (Serial Communication Link) or U codes (Network Communication).
9.4 Troubleshooting Based on Codes
- Research the Codes: Search online forums or repair databases for information about the specific codes you found.
- Check Related Components: Inspect the components and wiring associated with the codes.
- Clear the Codes: After addressing the issue, use the scanner to clear the DTCs and test the system again.
9.5 Example: Diagnosing a U0100 Code
- Code: U0100 (Lost Communication with ECM/PCM).
- Possible Causes:
- Faulty ECM/PCM.
- Wiring issues between the ECM/PCM and other modules.
- A blown fuse in the ECM/PCM circuit.
- Troubleshooting Steps:
- Check the ECM/PCM fuse in the Underhood Fuse Block.
- Inspect the wiring harness for damage or corrosion.
- Test the ECM/PCM for proper function.
By following these steps, you can effectively use an OBD2 scanner to diagnose electrical issues in your 2008 Cadillac Escalade, leading to more accurate and efficient repairs.
10. Maintaining Your 2008 Cadillac Escalade’s Electrical System
Proper maintenance of your 2008 Cadillac Escalade’s electrical system can prevent many common issues and extend the life of your vehicle.
10.1 Regular Inspections
- Check Fuses: Periodically inspect the fuses for signs of corrosion or damage.
- Inspect Wiring: Look for frayed, cracked, or damaged wiring.
- Test Battery: Ensure the battery is properly charged and free from corrosion.
10.2 Cleaning and Protecting Connections
- Clean Terminals: Clean battery terminals and other electrical connections with a wire brush and baking soda solution.
- Apply Dielectric Grease: Apply dielectric grease to connections to prevent corrosion.
10.3 Battery Maintenance
- Check Water Levels: For non-sealed batteries, check and maintain proper water levels.
- Ensure Secure Mounting: Make sure the battery is securely mounted to prevent vibration damage.
10.4 Professional Servicing
- Regular Check-ups: Schedule regular check-ups with a qualified mechanic to identify and address potential issues early.
- Diagnostic Scans: Have diagnostic scans performed to monitor the health of your electrical system.
10.5 Tips for Preventing Electrical Issues
- Avoid Overloading Circuits: Do not overload circuits by plugging too many devices into a single outlet.
- Use Quality Components: Use high-quality replacement parts and accessories.
- Protect Wiring: Protect wiring from physical damage and environmental exposure.
By following these maintenance tips, you can ensure the reliability and longevity of your 2008 Cadillac Escalade’s electrical system.
11. Upgrading Your Diagnostic Capabilities
Enhancing your diagnostic tools and knowledge can greatly improve your ability to maintain and repair your 2008 Cadillac Escalade.
11.1 Investing in Advanced Scanners
- Professional-Grade Scanners: Consider purchasing a professional-grade scanner for more in-depth diagnostics and programming capabilities.
- Software Updates: Keep your scanner’s software updated to access the latest features and vehicle coverage.
11.2 Learning Advanced Diagnostic Techniques
- Online Courses: Enroll in online courses to learn advanced diagnostic techniques and troubleshooting methods.
- Workshops and Seminars: Attend workshops and seminars to stay updated on the latest automotive technologies.
11.3 Building a Home Diagnostic Lab
- Essential Tools: Equip your garage with essential tools, such as multimeters, test lights, and specialized diagnostic equipment.
- Reference Materials: Gather reference materials, including wiring diagrams, service manuals, and technical bulletins.
11.4 Utilizing Online Resources
- Forums and Communities: Participate in online forums and communities to exchange knowledge and experiences with other Cadillac Escalade owners and mechanics.
- Technical Databases: Subscribe to technical databases for access to detailed repair information and diagnostic procedures.
By upgrading your diagnostic capabilities, you can confidently tackle complex electrical issues and keep your 2008 Cadillac Escalade running smoothly.
12. How Does the 2008 Cadillac Escalade OBD2 Fuse Relate to Vehicle Performance?
The OBD2 fuse in the 2008 Cadillac Escalade plays a vital role in vehicle performance by ensuring the functionality of the On-Board Diagnostics system. Here’s how it relates to overall performance:
12.1 Enabling Diagnostic Access
- Essential for Scanning: The OBD2 port, protected by the OBD2 fuse, is necessary to access the vehicle’s computer for diagnostic information.
- Reading Trouble Codes: When the OBD2 fuse is functional, you can use a scanner to read Diagnostic Trouble Codes (DTCs) that indicate issues with various systems.
12.2 Monitoring Vehicle Health
- Real-Time Data: A working OBD2 system allows mechanics and owners to monitor real-time data from sensors and systems, providing insights into the vehicle’s health.
- Identifying Problems: By accessing this data, you can identify potential problems early, before they lead to significant performance issues.
12.3 Impact on Engine Performance
- Engine Management: The OBD2 system monitors critical engine parameters, such as fuel delivery, ignition timing, and emissions.
- Optimizing Efficiency: Identifying and addressing issues through the OBD2 port helps optimize engine efficiency and performance.
12.4 Transmission Functionality
- Transmission Monitoring: The OBD2 system also monitors transmission parameters, such as gear selection and fluid temperature.
- Preventing Damage: Early detection of transmission issues can prevent costly damage and ensure smooth operation.
12.5 Emission Control
- Emission Monitoring: The OBD2 system is essential for monitoring emissions and ensuring compliance with environmental regulations.
- Reducing Pollution: Addressing emission-related issues through the OBD2 port helps reduce pollution and maintain air quality.
12.6 Safety Systems
- ABS and Airbags: The OBD2 system monitors safety systems such as ABS (Anti-lock Braking System) and airbags.
- Ensuring Safety: Detecting and resolving issues in these systems ensures that the vehicle’s safety features are functioning correctly.
12.7 Fuel Efficiency
- Optimizing Fuel Economy: The OBD2 system helps optimize fuel economy by monitoring and adjusting various engine parameters.
- Reducing Fuel Costs: Identifying and addressing issues through the OBD2 port can improve fuel efficiency and reduce fuel costs.
12.8 Diagnostic Process
- Initial Checks: When diagnosing performance issues, checking the OBD2 system and reading DTCs is often one of the first steps.
- Pinpointing Problems: The information obtained from the OBD2 port helps pinpoint the source of the problem, reducing diagnostic time and repair costs.
12.9 Regular Maintenance
- Routine Scans: Regularly scanning the OBD2 system can help identify potential issues before they become major problems.
- Preventive Measures: This proactive approach allows you to take preventive measures to maintain your vehicle’s performance and reliability.
12.10 Functional OBD2 Port
- Importance of Functionality: A functional OBD2 port is crucial for diagnosing vehicle issues.
- Troubleshooting: Without a working port, mechanics cannot access vital information needed to troubleshoot problems, potentially leading to prolonged diagnostic times and increased repair costs.
In summary, the 2008 Cadillac Escalade’s OBD2 fuse ensures the proper functioning of the diagnostic system, which is crucial for monitoring and optimizing vehicle performance, safety, and efficiency. Regular maintenance and prompt attention to any issues detected through the OBD2 port can help keep your vehicle running smoothly and reliably.
13. What Are The Potential Problems if the 2008 Cadillac Escalade OBD2 Fuse Keeps Blowing?
If the OBD2 fuse in your 2008 Cadillac Escalade keeps blowing, it indicates an underlying issue that needs to be addressed. Ignoring this problem can lead to more significant electrical damage and functional problems. Here are potential issues to consider:
13.1 Short Circuit in the OBD2 Port Wiring
- Description: A short circuit occurs when there is an unintended electrical connection between two points in the circuit, causing excessive current flow.
- Symptoms: The OBD2 fuse blows immediately or shortly after being replaced.
- Troubleshooting:
- Inspect the wiring connected to the OBD2 port for any signs of damage, such as frayed wires or melted insulation.
- Use a multimeter to check for continuity between the wires and ground. There should be no continuity between the power wire and ground.
13.2 Faulty OBD2 Port
- Description: The OBD2 port itself may have internal damage or corrosion that is causing a short circuit.
- Symptoms: The fuse blows even when no scanner is connected.
- Troubleshooting:
- Visually inspect the OBD2 port for bent or broken pins.
- Clean the port with an electrical contact cleaner to remove any corrosion.
- If damage is evident, consider replacing the OBD2 port.
13.3 Wiring Issues in the Diagnostic Circuit
- Description: Problems in the wiring harness that supports the diagnostic circuit can cause intermittent or consistent fuse failures.
- Symptoms: The fuse blows sporadically, especially when the vehicle is moving or when other electrical components are used.
- Troubleshooting:
- Check the wiring harness for visible damage or corrosion.
- Ensure that all connections are secure and free from corrosion.
- Use a multimeter to test the continuity and resistance of the wires.
13.4 Overload on the Circuit
- Description: An overload occurs when the circuit is drawing more current than it is designed to handle.
- Symptoms: The fuse blows when multiple devices are connected to the OBD2 port or when a specific diagnostic tool is used.
- Troubleshooting:
- Ensure that you are not using multiple high-powered devices simultaneously on the same circuit.
- Check the amperage draw of diagnostic tools to ensure they are within the circuit’s rated capacity.
- Use the correct fuse rating as specified in the vehicle’s manual.
13.5 Component Failure
- Description: A failing component connected to the OBD2 circuit can draw excessive current or create a short circuit, leading to fuse failure.
- Symptoms: The fuse blows when a specific function or system is activated.
- Troubleshooting:
- Identify and test individual components connected to the OBD2 circuit for proper function.
- Use diagnostic tools to identify error codes pointing to specific component failures.
13.6 Improper Fuse Replacement
- Description: Using the wrong type or rating of fuse can lead to repeated failures or even damage the electrical system.
- Symptoms: The fuse blows frequently, even without any apparent issues.
- Troubleshooting:
- Always use the correct fuse rating as specified in the vehicle’s manual.
- Ensure that the replacement fuse is of the same type and quality as the original.
13.7 Environmental Factors
- Description: Environmental conditions can contribute to fuse failures over time.
- Symptoms: The fuse blows more frequently in certain weather conditions, such as high humidity or extreme temperatures.
- Troubleshooting:
- Protect the fuse box and wiring from moisture and contaminants.
- Regularly inspect the fuse box and surrounding areas for signs of corrosion or damage.
13.8 Damaged Wiring Insulation
- Description: Worn or damaged insulation can expose wires, leading to shorts and blown fuses.
- Symptoms: The fuse blows intermittently, especially when the vehicle goes over bumps or rough roads.
- Troubleshooting:
- Visually inspect the wiring for any signs of damage to the insulation.
- Use electrical tape or heat shrink tubing to repair any damaged areas.
13.9 Scanner Compatibility Issues
- **Description