The Cp9690 Obd2 Scanner is a powerful tool for diagnosing and maintaining your vehicle, offering comprehensive diagnostic capabilities and user-friendly features. At MERCEDES-DIAGNOSTIC-TOOL.EDU.VN, we empower Mercedes-Benz owners and automotive technicians with the knowledge and resources needed for efficient vehicle maintenance. Consider this your premier resource for maximizing your diagnostic efficiency with advanced scan tools.
Contents
- 1. What is a CP9690 OBD2 Scanner?
- Understanding the CP9690 OBD2 Scanner
- Key Features and Capabilities
- Technical Specifications
- Benefits of Using a CP9690 OBD2 Scanner
- How to Use the CP9690 OBD2 Scanner
- Who Should Use a CP9690 OBD2 Scanner?
- Where to Buy a CP9690 OBD2 Scanner
- 2. What Vehicles Are Compatible with the CP9690 OBD2 Scanner?
- OBD II Compliance
- OBD I Support
- Specific Vehicle Functions
- Ensuring Compatibility
- Benefits of Wide Compatibility
- Limitations
- Why Wide Compatibility Matters
- 3. How Does CodeConnect® Enhance the CP9690 OBD2 Scanner’s Capabilities?
- What is CodeConnect®?
- Key Features of CodeConnect®
- How CodeConnect® Works with the CP9690 OBD2 Scanner
- Benefits of Using CodeConnect®
- Example of CodeConnect® in Action
- Limitations of CodeConnect®
- Who Benefits from CodeConnect®?
- Integrating CodeConnect® with Other Scanner Features
- 4. How Does the CP9690 OBD2 Scanner Help Reset Service Lights?
- Understanding Service Light Resets
- Oil Light Reset Function
- Battery Reset Function
- Benefits of Using the CP9690 for Service Light Resets
- Step-by-Step Guide: Oil Light Reset on a GM Vehicle
- Step-by-Step Guide: Battery Reset on a BMW
- Limitations of Service Light Reset Functions
- Integrating Service Light Resets with Other Maintenance Tasks
- 5. How Can the CP9690 OBD2 Scanner Read and Define Airbag and ABS Codes?
- Understanding Airbag and ABS Codes
- Key Features for Reading Airbag and ABS Codes
- Step-by-Step Guide to Reading Airbag Codes
- Step-by-Step Guide to Reading ABS Codes
- Benefits of Reading Airbag and ABS Codes with the CP9690
- Example Scenario
- Limitations
- Ensuring Accurate Readings
- 6. How Does the CP9690 OBD2 Scanner Display Live Data?
- Understanding Live Data
- Key Features for Displaying Live Data
- Accessing Live Data with the CP9690
- Interpreting Live Data
- Graphing Live Data
- Recording and Playback
- Benefits of Using Live Data
- Example Scenario
- Limitations
- 7. How Does the CP9690 OBD2 Scanner Perform Battery, Alternator, and Charging System Monitoring?
- Understanding Charging System Monitoring
- Key Monitoring Features of the CP9690
- Performing a Battery Voltage Test
- Performing an Alternator Test
- Interpreting the Results
- Benefits of Charging System Monitoring
- Example Scenario
- Limitations
- 8. How Does the CP9690 OBD2 Scanner Display I/M Monitors?
- Understanding I/M Monitors
- Key Features for Displaying I/M Monitors
- Accessing I/M Monitors with the CP9690
- Interpreting I/M Monitor Status
- Common I/M Monitors
- Benefits of Using I/M Monitors
- Troubleshooting I/M Monitor Issues
- Example Scenario
- Limitations
- 9. How to Use the CP9690 OBD2 Scanner to Read and Display Freeze Frame Data?
- Understanding Freeze Frame Data
- Key Features for Reading Freeze Frame Data
- Accessing Freeze Frame Data with the CP9690
- Interpreting Freeze Frame Data
- Benefits of Using Freeze Frame Data
- Example Scenario
- Limitations
- Combining Freeze Frame Data with Live Data
- 10. How Does the CP9690 OBD2 Scanner Help Display State OBD Check?
- Understanding State OBD Check
1. What is a CP9690 OBD2 Scanner?
A CP9690 OBD2 scanner is an automotive diagnostic tool designed to read and interpret data from a vehicle’s On-Board Diagnostic (OBD) system, offering insights into the vehicle’s health and performance. This advanced scan tool helps users identify issues, troubleshoot problems, and ensure optimal vehicle operation.
Understanding the CP9690 OBD2 Scanner
The CP9690 OBD2 scanner, often referred to as an enhanced OBD I and OBD II scan tool, stands out due to its extensive compatibility and feature set. It supports a wide range of vehicles, including those compliant with OBD II and CAN protocols from 1996 and newer, covering import, domestic, diesel, and hybrid models. Moreover, it offers OBD I cable support for older GM, Ford, Chrysler, and Toyota vehicles manufactured between 1984 and 1995, broadening its utility for diverse car owners and mechanics.
Key Features and Capabilities
- Broad Vehicle Compatibility: Works with both OBD I and OBD II vehicles, ensuring versatility.
- CodeConnect®: Provides access to a database of over 26 million verified fixes for diagnostic trouble codes (DTCs), helping users quickly resolve issues.
- Service Resets: Includes oil light reset for many BMW, GM, Ford, and Hyundai models, as well as battery reset for certain BMW, Mini Cooper, and Ford F-Series trucks.
- Comprehensive Code Support: Reads and defines airbag and ABS codes for various GM, Ford, Chrysler, Toyota, Honda, Nissan, and Hyundai vehicles.
- Real-Time Data: Displays live data with the ability to graph two PIDs (Parameter IDs) simultaneously.
- Data Recording: Allows recording and playback of live data for detailed analysis.
- Multilingual Support: Offers a trilingual menu and code definitions in English, Spanish, and French.
- Component Locator: Provides text-based descriptions for locating vehicle components.
Technical Specifications
The CP9690 scanner has a color display for easy viewing and comes with a variety of cables, including OBD II, GM ALDL OBD I, Ford MCU/EEC-IV OBD I, Chrysler SCI OBD I, and Toyota OBD I cables (round and rectangular). It also includes a cigarette lighter cable and a soft carrying case for portability. The tool can be updated via a USB port and has an optional battery backup for reviewing data off-vehicle.
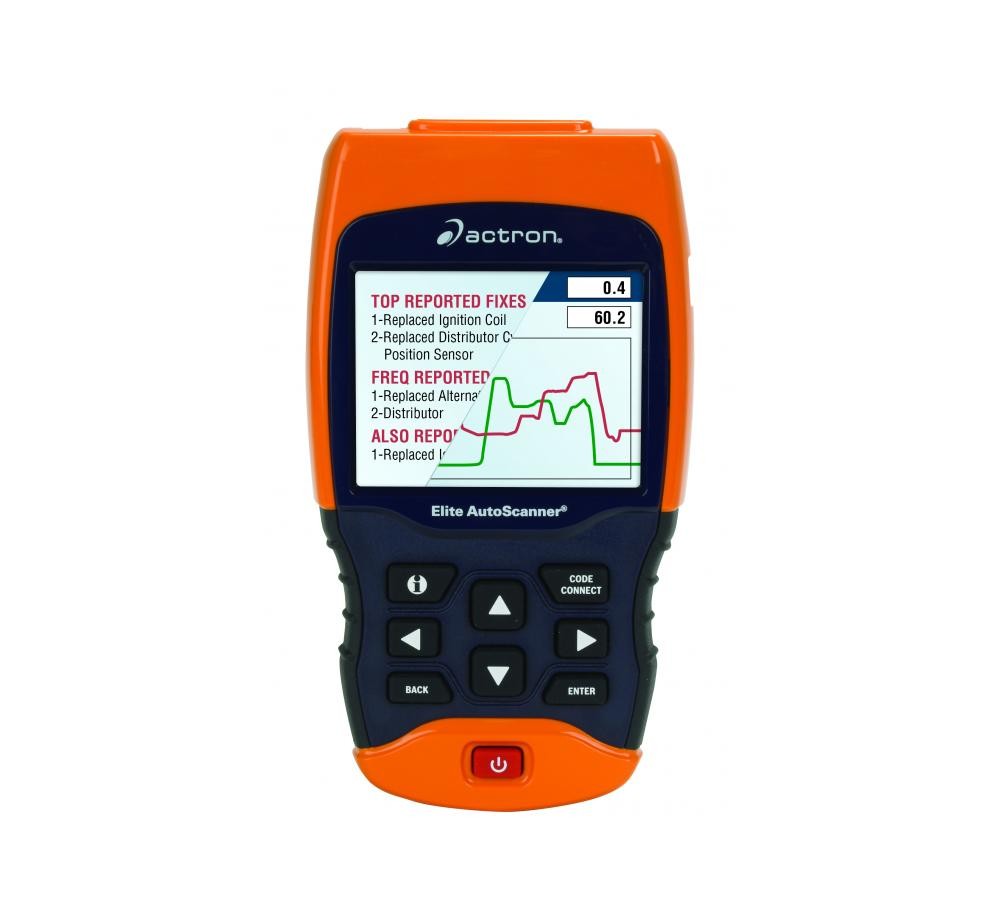 CP9690 Elite AutoScanner Screen
Benefits of Using a CP9690 OBD2 Scanner
- Accurate Diagnostics: Pinpoints issues quickly with comprehensive code definitions.
- Cost Savings: Enables DIY repairs and maintenance, reducing trips to the mechanic.
- Preventive Maintenance: Monitors vehicle health to prevent major issues.
- User-Friendly Interface: Easy-to-navigate menus and clear data displays simplify the diagnostic process.
How to Use the CP9690 OBD2 Scanner
- Connect: Plug the scanner into the vehicle’s OBD II port.
- Power On: The scanner powers on automatically when connected.
- Identify Vehicle: Use the AutoID™ feature for automatic vehicle identification.
- Read Codes: Select the appropriate function to read and display DTCs.
- Interpret Data: Use the CodeConnect® feature to find verified fixes.
- Clear Codes: After repairs, clear the DTCs and reset the MIL (Malfunction Indicator Lamp).
Who Should Use a CP9690 OBD2 Scanner?
- Car Owners: Those who want to perform basic diagnostics and maintenance.
- DIY Mechanics: Individuals who enjoy repairing their own vehicles.
- Professional Technicians: Mechanics who need a versatile and reliable scan tool.
Where to Buy a CP9690 OBD2 Scanner
The CP9690 OBD2 scanner is available through various automotive retailers, online marketplaces, and diagnostic tool suppliers. Ensure you purchase from a reputable source to guarantee authenticity and support.
2. What Vehicles Are Compatible with the CP9690 OBD2 Scanner?
The CP9690 OBD2 scanner is designed to work with a wide array of vehicles, enhancing its utility for both professional mechanics and car enthusiasts. Its compatibility spans across various makes, models, and years, making it a versatile tool for automotive diagnostics.
OBD II Compliance
The CP9690 OBD2 scanner is fully compatible with all 1996 and newer vehicles that adhere to the OBD II (On-Board Diagnostics II) standard. This includes:
- Domestic Vehicles: Models from manufacturers like GM, Ford, and Chrysler.
- Import Vehicles: Cars from brands such as Toyota, Honda, Nissan, Hyundai, and BMW.
- Diesel Vehicles: Trucks and cars powered by diesel engines.
- Hybrid Vehicles: Cars that combine gasoline and electric power.
OBD I Support
Beyond OBD II, the CP9690 extends its compatibility to older vehicles via OBD I support. It includes specific cables for:
- GM Vehicles (1984-1995): Utilizing the ALDL (Assembly Line Diagnostic Link) connector.
- Ford Vehicles (1984-1995): Employing the MCU/EEC-IV (Microcomputer Unit/Electronic Engine Control IV) system.
- Chrysler Vehicles (1989-1995): Using the SCI (Single Connector Interface).
- Toyota Vehicles (1989-1995): With both rectangular and round OBD I connectors.
Specific Vehicle Functions
The CP9690 OBD2 scanner also offers specific functions tailored to certain vehicle brands and models:
- BMW and Mini Cooper: Battery reset for late models.
- Ford F-Service Trucks: Battery reset functionality.
- GM Vehicles: DTC (Diagnostic Trouble Code) status information.
- Various Makes (GM, Ford, Chrysler, Toyota, Honda, Nissan, Hyundai): Airbag and ABS code reading and definitions for models from 1996-2013.
Ensuring Compatibility
To ensure the CP9690 OBD2 scanner works with your vehicle:
- Check Vehicle Year: Confirm if your vehicle is from 1996 or newer for OBD II compliance. For older vehicles, verify OBD I compatibility using the provided cables.
- Locate the OBD Port: Find the OBD II port, usually located under the dashboard on the driver’s side.
- Refer to Vehicle Manual: Consult your vehicle’s manual for specific diagnostic information.
Benefits of Wide Compatibility
- Versatility: Use the same tool for multiple vehicles, saving time and money.
- Comprehensive Diagnostics: Access a broad range of diagnostic information for different vehicle systems.
- Ease of Use: The AutoID™ feature automatically identifies most 2000 and newer vehicles, simplifying the process.
Limitations
While the CP9690 OBD2 scanner is highly versatile, it may not cover every single vehicle ever made. Certain proprietary systems or very old models might require specialized tools. Always verify compatibility before use.
Why Wide Compatibility Matters
Having a scan tool with broad compatibility ensures that you are prepared to diagnose a wide range of vehicles, whether you’re working in a professional garage or maintaining your personal fleet. This flexibility makes the CP9690 a valuable asset for any automotive enthusiast or technician.
3. How Does CodeConnect® Enhance the CP9690 OBD2 Scanner’s Capabilities?
CodeConnect® significantly enhances the CP9690 OBD2 scanner by providing a comprehensive database of over 26 million verified fixes for diagnostic trouble codes (DTCs). This feature helps users quickly diagnose and resolve vehicle issues by offering real-world solutions verified by ASE-certified technicians.
What is CodeConnect®?
CodeConnect® is a vast, experience-based database integrated into the CP9690 OBD2 scanner. It offers practical repair solutions for DTCs that trigger the check engine, ABS, and airbag warning lights. Unlike generic code definitions, CodeConnect® provides actual fixes that have been reported and verified by automotive service excellence (ASE) certified technicians.
Key Features of CodeConnect®
- Extensive Database: Access to over 26 million verified fixes.
- ASE Certified Technicians: Solutions are validated by experienced professionals.
- Real-World Fixes: Offers practical, proven solutions rather than just code definitions.
- Comprehensive Coverage: Includes fixes for engine, ABS, and airbag issues.
- User-Friendly Interface: Easy to navigate and find the right solution for your specific code.
How CodeConnect® Works with the CP9690 OBD2 Scanner
- Read DTCs: Use the CP9690 scanner to read the diagnostic trouble codes from your vehicle.
- Access CodeConnect®: Select the CodeConnect® option within the scanner’s menu.
- Enter the Code: Input the DTC you retrieved from your vehicle.
- View Verified Fixes: The scanner displays a list of verified fixes related to that specific code.
- Apply the Fix: Follow the provided steps to implement the recommended repair.
Benefits of Using CodeConnect®
- Accurate Diagnosis: Pinpoint the exact problem with confidence.
- Time Savings: Quickly find verified solutions, reducing diagnostic time.
- Cost-Effective: Avoid unnecessary repairs by addressing the root cause of the issue.
- Increased Confidence: Gain assurance in your repair decisions with expert-validated solutions.
Example of CodeConnect® in Action
Imagine your check engine light comes on, and the CP9690 scanner reads a DTC of P0171 (System Too Lean, Bank 1). Instead of just knowing the definition of the code, CodeConnect® provides a list of verified fixes, such as:
- Replace the Mass Air Flow (MAF) sensor.
- Check for vacuum leaks in the intake system.
- Inspect and replace faulty oxygen (O2) sensors.
Limitations of CodeConnect®
While CodeConnect® is a powerful tool, it is essential to note its limitations:
- Not a Substitute for Expertise: It provides guidance but doesn’t replace the need for skilled technicians.
- Vehicle-Specific Issues: Some issues may require further diagnosis beyond the database.
- Database Updates: The effectiveness depends on regular updates to the CodeConnect® database.
Who Benefits from CodeConnect®?
- DIY Mechanics: Helps in accurately diagnosing and fixing vehicle problems.
- Professional Technicians: Provides a quick reference for common fixes, saving time and improving efficiency.
- Car Owners: Empowers them to understand and address vehicle issues effectively.
Integrating CodeConnect® with Other Scanner Features
Combine CodeConnect® with other CP9690 features, such as live data streaming and graphing, for a comprehensive diagnostic approach. By analyzing real-time data along with verified fixes, you can make informed decisions and resolve issues efficiently.
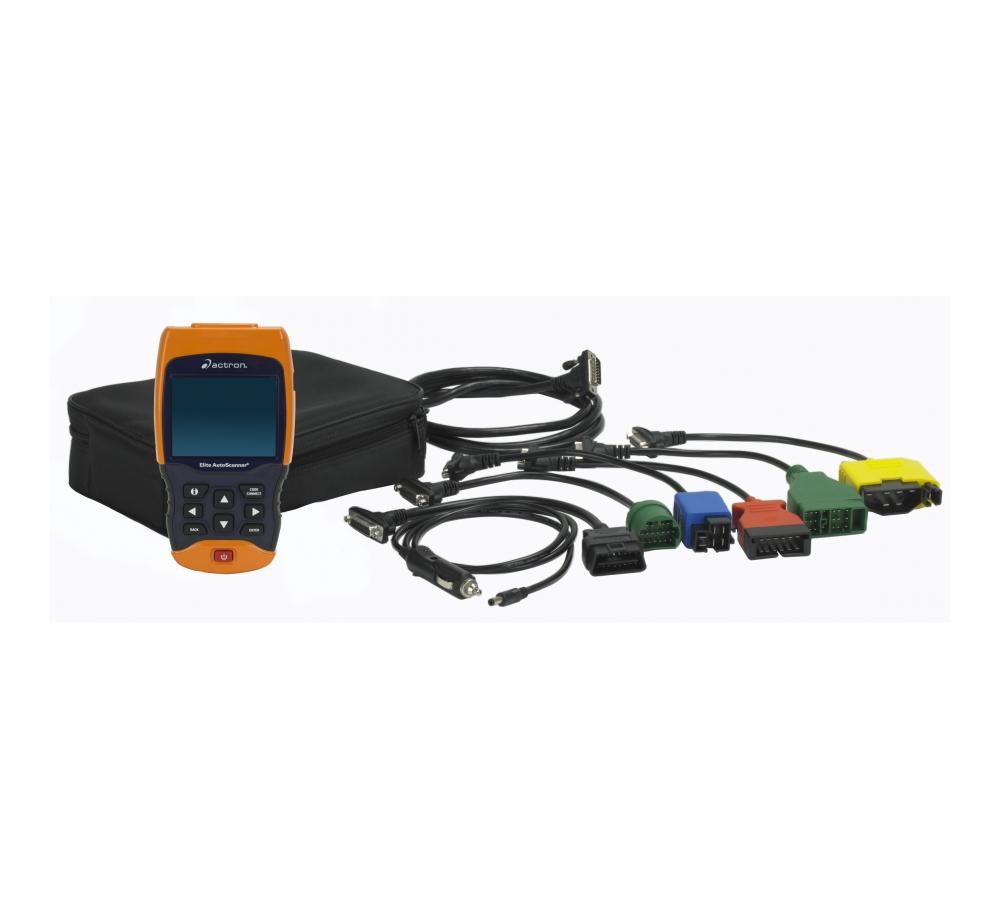 CP9690 Elite AutoScanner Kit
4. How Does the CP9690 OBD2 Scanner Help Reset Service Lights?
The CP9690 OBD2 scanner simplifies vehicle maintenance by offering service light reset functions for various makes and models, including oil light resets for BMW, GM, Ford, and Hyundai, and battery resets for BMW, Mini Cooper, and Ford F-Series trucks.
Understanding Service Light Resets
Service lights, such as the oil change light or battery maintenance light, illuminate to remind drivers of required maintenance. Resetting these lights after performing the service ensures accurate maintenance tracking and prevents unnecessary warnings.
Oil Light Reset Function
- Compatibility: The CP9690 OBD2 scanner supports oil light resets for most 1996-2013 BMW and GM vehicles, as well as limited Ford and Hyundai models.
- Procedure:
- Perform the oil change according to the vehicle manufacturer’s specifications.
- Connect the CP9690 scanner to the vehicle’s OBD II port.
- Navigate to the “Oil Light Reset” function in the scanner menu.
- Follow the on-screen prompts to reset the oil light.
Battery Reset Function
- Compatibility: The scanner offers battery reset functionality for late-model BMW, Mini Cooper, and Ford F-Series trucks.
- Procedure:
- Replace the vehicle’s battery, ensuring it meets the manufacturer’s specifications.
- Connect the CP9690 scanner to the OBD II port.
- Access the “Battery Reset” function in the scanner menu.
- Follow the prompts to register the new battery with the vehicle’s computer.
Benefits of Using the CP9690 for Service Light Resets
- Convenience: Reset service lights quickly and easily without special tools.
- Cost Savings: Avoid dealership visits for simple maintenance tasks.
- Accuracy: Ensure proper maintenance tracking and prevent false warnings.
- User-Friendly Interface: The scanner’s intuitive menu makes resetting service lights straightforward.
Step-by-Step Guide: Oil Light Reset on a GM Vehicle
- Perform Oil Change: Complete the oil change following GM’s recommended procedures.
- Connect Scanner: Plug the CP9690 into the OBD II port.
- Navigate Menu: Select “Service Reset” and then “Oil Life Reset.”
- Follow Prompts: The scanner will guide you through the reset process.
- Verify Reset: Confirm that the oil life monitor is reset to 100%.
Step-by-Step Guide: Battery Reset on a BMW
- Replace Battery: Install a new battery that matches BMW’s specifications.
- Connect Scanner: Plug the CP9690 into the OBD II port.
- Select Battery Reset: Choose “Service Reset” and then “Battery Registration.”
- Follow Prompts: Follow the scanner’s instructions to register the new battery.
- Verify Registration: Ensure the battery registration is successful.
Limitations of Service Light Reset Functions
- Vehicle Coverage: The reset functions are limited to specific makes and models.
- Software Updates: Ensure the scanner’s software is up-to-date for the best compatibility.
- Complex Issues: Some service lights may require further diagnostics if they reappear after resetting.
Integrating Service Light Resets with Other Maintenance Tasks
Combine service light resets with other maintenance tasks, such as reading and clearing diagnostic trouble codes, to keep your vehicle in optimal condition. Regular maintenance and accurate service light tracking contribute to the longevity and reliability of your vehicle.
5. How Can the CP9690 OBD2 Scanner Read and Define Airbag and ABS Codes?
The CP9690 OBD2 scanner is adept at reading and defining airbag and ABS (Anti-lock Braking System) codes for a variety of vehicles, including those from GM, Ford, Chrysler, Toyota, Honda, Nissan, and Hyundai, typically covering models from 1996 to 2013. This functionality is crucial for diagnosing and resolving safety-related issues.
Understanding Airbag and ABS Codes
Airbag and ABS systems are critical safety components in modern vehicles. When these systems detect a fault, they generate diagnostic trouble codes (DTCs) that can be read using a scan tool. Understanding these codes helps technicians and vehicle owners identify and fix the underlying issues.
Key Features for Reading Airbag and ABS Codes
- Extensive Coverage: Supports a wide range of vehicle makes and models.
- Code Definitions: Provides clear and detailed explanations of each code.
- User-Friendly Interface: Easy navigation to access and interpret codes.
- Quick Diagnostics: Quickly identifies potential issues with the airbag and ABS systems.
Step-by-Step Guide to Reading Airbag Codes
- Connect the Scanner: Plug the CP9690 scanner into the vehicle’s OBD II port.
- Power On: The scanner will power on automatically.
- Select Vehicle: Use the AutoID™ feature to automatically identify your vehicle or manually select the make, model, and year.
- Navigate to Airbag System: In the main menu, select “Airbag” or “SRS” (Supplemental Restraint System).
- Read Codes: Choose the option to read codes. The scanner will display any stored airbag codes.
- View Definitions: Select each code to view a detailed definition and possible causes.
Step-by-Step Guide to Reading ABS Codes
- Connect the Scanner: Plug the CP9690 scanner into the OBD II port.
- Power On: The scanner will automatically turn on.
- Identify Vehicle: Use AutoID™ or manually select your vehicle’s information.
- Select ABS System: In the main menu, choose “ABS.”
- Read Codes: Select the option to read codes. The scanner will display any stored ABS codes.
- View Definitions: Choose each code to see its definition and potential causes.
Benefits of Reading Airbag and ABS Codes with the CP9690
- Enhanced Safety: Quickly identify and address issues that could compromise safety.
- Cost Savings: Diagnose problems early to prevent more expensive repairs.
- DIY Repairs: For those comfortable with auto repair, the scanner provides the information needed to perform repairs themselves.
- Professional Diagnostics: Technicians can use the scanner to efficiently diagnose and repair airbag and ABS systems.
Example Scenario
Suppose the ABS warning light is on in a 2008 Honda Civic. Using the CP9690, you connect to the vehicle, select the ABS system, and read a code: C0031 (Left Front Wheel Speed Sensor Circuit Malfunction). The scanner provides a definition: “The ABS control unit has detected an issue with the left front wheel speed sensor circuit.”
With this information, you can:
- Inspect the Sensor: Check the sensor and its wiring for damage.
- Test the Sensor: Use a multimeter to test the sensor’s resistance and output.
- Replace the Sensor: If necessary, replace the faulty sensor and clear the code.
Limitations
- Coverage Years: The scanner primarily supports models up to 2013 for airbag and ABS codes. Newer vehicles may require updated software or a different scan tool.
- Complex Issues: Some airbag and ABS problems may require more advanced diagnostic procedures beyond simply reading codes.
- Software Updates: Keep the scanner updated to ensure compatibility with the latest vehicle models and code definitions.
Ensuring Accurate Readings
- Verify Compatibility: Always check the scanner’s compatibility list for your specific vehicle.
- Update Software: Keep the scanner updated with the latest software.
- Follow Instructions: Carefully follow the scanner’s on-screen instructions.
6. How Does the CP9690 OBD2 Scanner Display Live Data?
The CP9690 OBD2 scanner’s ability to display live data is a powerful feature that allows users to monitor real-time performance metrics of their vehicle, providing valuable insights into engine operation, sensor readings, and other critical parameters.
Understanding Live Data
Live data, also known as real-time data or parameter IDs (PIDs), refers to the dynamic information streamed from a vehicle’s sensors and control units while the engine is running. This data can help diagnose intermittent issues, verify sensor functionality, and assess overall engine health.
Key Features for Displaying Live Data
- Extensive PID Coverage: Supports over 300 possible data PIDs, depending on the vehicle.
- Graphing Capability: Allows graphing of two PIDs simultaneously for comparative analysis.
- Data Recording: Enables recording and playback of live data for detailed review.
- User-Friendly Interface: Clear and easy-to-read display of live data values.
Accessing Live Data with the CP9690
- Connect the Scanner: Plug the CP9690 scanner into the vehicle’s OBD II port.
- Power On: The scanner will power on automatically.
- Identify Vehicle: Use the AutoID™ feature or manually select your vehicle’s make, model, and year.
- Navigate to Live Data: In the main menu, select “Live Data” or “Data Stream.”
- Select PIDs: Choose the specific PIDs you want to monitor from the list of available parameters.
- View Data: The scanner will display the real-time values of the selected PIDs.
Interpreting Live Data
- Engine RPM: Shows the current speed of the engine in revolutions per minute.
- Coolant Temperature: Indicates the temperature of the engine coolant, helping to diagnose overheating issues.
- Oxygen Sensor Readings: Displays the voltage output of the oxygen sensors, essential for monitoring fuel mixture.
- Fuel Trim: Shows the adjustments made by the engine control unit (ECU) to the fuel mixture, indicating potential fuel system issues.
- Intake Air Temperature: Measures the temperature of the air entering the engine, affecting performance.
- Mass Air Flow (MAF): Indicates the amount of air entering the engine, crucial for diagnosing air intake problems.
Graphing Live Data
The CP9690 allows you to graph two PIDs simultaneously, making it easier to compare and analyze related data. For example, you can graph engine RPM and vehicle speed to diagnose transmission issues or monitor oxygen sensor voltage and fuel trim to identify fuel mixture problems.
Recording and Playback
The recording and playback feature is invaluable for diagnosing intermittent issues. You can record live data while driving, then play it back later to analyze the data at specific moments when a problem occurred.
Benefits of Using Live Data
- Accurate Diagnostics: Real-time monitoring helps pinpoint the root cause of issues.
- Performance Analysis: Assess engine performance and identify areas for improvement.
- Intermittent Issue Detection: Record and review data to catch fleeting problems.
- Sensor Verification: Check the functionality of sensors by monitoring their real-time outputs.
Example Scenario
Suppose you are experiencing rough idling in your car. Using the CP9690, you connect to the vehicle, select “Live Data,” and choose to monitor engine RPM and MAF sensor readings. By graphing these two PIDs, you notice that the engine RPM is fluctuating erratically, and the MAF sensor readings are inconsistent. This indicates a potential issue with the MAF sensor or a vacuum leak affecting the air intake.
Limitations
- PID Availability: The number of available PIDs varies depending on the vehicle make, model, and year.
- Data Interpretation: Interpreting live data requires a basic understanding of automotive systems.
- Software Updates: Keep the scanner updated to ensure compatibility with the latest vehicle models and PIDs.
7. How Does the CP9690 OBD2 Scanner Perform Battery, Alternator, and Charging System Monitoring?
The CP9690 OBD2 scanner offers robust monitoring capabilities for your vehicle’s battery, alternator, and entire charging system. This feature is invaluable for ensuring your vehicle starts reliably and runs smoothly.
Understanding Charging System Monitoring
The charging system in a vehicle comprises the battery, alternator, and voltage regulator. The battery provides the initial power to start the engine, the alternator recharges the battery and powers electrical components while the engine is running, and the voltage regulator maintains a consistent voltage level. Monitoring these components helps prevent breakdowns and ensures optimal performance.
Key Monitoring Features of the CP9690
- Battery Voltage Test: Measures the battery’s voltage to assess its charge level and overall health.
- Alternator Test: Checks the alternator’s output voltage and current to ensure it is charging the battery properly.
- Charging System Test: Evaluates the entire charging system under various conditions to identify potential issues.
Performing a Battery Voltage Test
- Connect the Scanner: Plug the CP9690 into the vehicle’s OBD II port.
- Power On: The scanner will power on automatically.
- Identify Vehicle: Use the AutoID™ feature or manually select your vehicle’s details.
- Navigate to Battery Test: In the main menu, select “Battery Test” or “Charging System Test.”
- Run Test: Follow the on-screen prompts to perform the battery voltage test.
- View Results: The scanner will display the battery voltage.
Performing an Alternator Test
- Connect the Scanner: Plug the CP9690 into the OBD II port.
- Power On: The scanner will automatically turn on.
- Identify Vehicle: Use AutoID™ or manually select your vehicle’s information.
- Navigate to Alternator Test: Choose “Charging System Test” and then “Alternator Test.”
- Run Test: Follow the prompts to start the alternator test. This usually involves running the engine at a specified RPM.
- View Results: The scanner will display the alternator’s output voltage and current.
Interpreting the Results
- Battery Voltage:
- 12.6V or higher: Battery is fully charged and in good condition.
- 12.4V to 12.6V: Battery is adequately charged but may need monitoring.
- 12.2V or lower: Battery is discharged and needs recharging or replacement.
- Alternator Output:
- 13.5V to 14.5V: Alternator is functioning correctly and charging the battery.
- Below 13.5V: Alternator may not be charging the battery efficiently.
- Above 14.5V: Voltage regulator may be faulty, leading to overcharging.
Benefits of Charging System Monitoring
- Preventive Maintenance: Detect potential issues before they lead to breakdowns.
- Battery Health: Ensure the battery is properly charged and maintained.
- Alternator Performance: Verify the alternator is functioning correctly.
- Cost Savings: Avoid costly repairs by addressing charging system problems early.
Example Scenario
Your car has been struggling to start, and you suspect a battery issue. Using the CP9690, you perform a battery voltage test and find that the battery voltage is 11.8V. This indicates that the battery is discharged and needs to be recharged or replaced. You can then perform an alternator test to ensure that the alternator is properly charging the new battery.
Limitations
- Test Accuracy: The accuracy of the tests depends on the condition of the vehicle and the proper connection of the scanner.
- Comprehensive Diagnostics: Some charging system problems may require further testing with specialized equipment.
8. How Does the CP9690 OBD2 Scanner Display I/M Monitors?
The CP9690 OBD2 scanner provides an essential function for vehicle owners and technicians: displaying I/M (Inspection and Maintenance) monitors. This feature helps ensure that a vehicle is ready for emissions testing, a requirement in many states and regions.
Understanding I/M Monitors
I/M monitors, also known as readiness monitors, are diagnostic tests performed by the vehicle’s onboard computer to verify that the emissions control systems are functioning correctly. These monitors check various components, such as the oxygen sensors, catalytic converter, evaporative system, and more. Before a vehicle can pass an emissions test, these monitors must be in a “ready” state.
Key Features for Displaying I/M Monitors
- Comprehensive Coverage: Supports all OBD II compliant vehicles (1996 and newer).
- Readiness Status: Displays the status of each I/M monitor (ready or not ready).
- Easy-to-Understand Format: Presents the monitor status in a clear and concise manner.
Accessing I/M Monitors with the CP9690
- Connect the Scanner: Plug the CP9690 scanner into the vehicle’s OBD II port.
- Power On: The scanner will power on automatically.
- Identify Vehicle: Use the AutoID™ feature or manually select your vehicle’s make, model, and year.
- Navigate to I/M Readiness: In the main menu, select “I/M Readiness” or “Emissions.”
- View Monitor Status: The scanner will display the status of each I/M monitor.
Interpreting I/M Monitor Status
- Ready: The monitor has completed its test and the system is functioning correctly.
- Not Ready: The monitor has not completed its test, indicating a potential issue or the need for further driving to complete the test cycle.
- Not Supported: The monitor is not supported by the vehicle.
Common I/M Monitors
- Misfire Monitor: Detects engine misfires that can increase emissions.
- Fuel System Monitor: Checks the fuel delivery system for proper operation.
- Comprehensive Components Monitor: Verifies the functionality of various engine components.
- Oxygen Sensor Monitor: Tests the oxygen sensors to ensure accurate fuel mixture control.
- Catalyst Monitor: Evaluates the efficiency of the catalytic converter.
- EVAP System Monitor: Checks the evaporative emissions control system for leaks.
Benefits of Using I/M Monitors
- Emissions Test Readiness: Ensure your vehicle is ready for emissions testing.
- Early Issue Detection: Identify potential problems before they cause significant damage.
- Cost Savings: Address emissions-related issues early to avoid costly repairs.
Troubleshooting I/M Monitor Issues
If one or more I/M monitors are not ready, you can take the following steps:
- Drive the Vehicle: Some monitors require specific driving conditions to complete their tests. Consult your vehicle’s service manual for the recommended drive cycle.
- Check for Diagnostic Trouble Codes (DTCs): Use the CP9690 to read DTCs. Address any stored codes, as they can prevent the I/M monitors from completing.
- Perform Necessary Repairs: If you identify any issues, perform the necessary repairs and then repeat the drive cycle.
- Clear Codes: After completing repairs, clear any stored DTCs and recheck the I/M monitor status.
Example Scenario
You need to get your car inspected, so you use the CP9690 to check the I/M monitor status. You find that the oxygen sensor monitor and the catalyst monitor are not ready. You check for DTCs and find a code related to a faulty oxygen sensor. You replace the oxygen sensor, clear the code, and then drive the vehicle through the recommended drive cycle. After driving, you recheck the I/M monitor status and find that all monitors are now ready.
Limitations
- Drive Cycle Requirements: Completing the I/M monitors may require specific driving conditions that can be difficult to replicate.
- Underlying Issues: If the monitors do not complete after multiple drive cycles, there may be underlying issues that need to be addressed.
9. How to Use the CP9690 OBD2 Scanner to Read and Display Freeze Frame Data?
The CP9690 OBD2 scanner’s ability to read and display freeze frame data is a valuable asset for diagnosing intermittent issues and understanding the conditions under which a diagnostic trouble code (DTC) was triggered.
Understanding Freeze Frame Data
Freeze frame data is a snapshot of the vehicle’s operating conditions at the moment a DTC is stored. This data can include parameters such as engine speed (RPM), engine load, coolant temperature, fuel trim, and vehicle speed. It provides crucial context for diagnosing the root cause of a problem.
Key Features for Reading Freeze Frame Data
- Comprehensive Data: Captures a wide range of parameters at the time of the fault.
- Easy Access: Quick and straightforward access to freeze frame information.
- Enhanced Diagnostics: Provides valuable context for diagnosing intermittent issues.
Accessing Freeze Frame Data with the CP9690
- Connect the Scanner: Plug the CP9690 scanner into the vehicle’s OBD II port.
- Power On: The scanner will power on automatically.
- Identify Vehicle: Use the AutoID™ feature or manually select your vehicle’s make, model, and year.
- Read DTCs: Select the option to read diagnostic trouble codes (DTCs).
- View Freeze Frame Data: If a DTC is stored, select the option to view freeze frame data associated with that code.
- Review Data: The scanner will display the captured parameters at the time the code was triggered.
Interpreting Freeze Frame Data
- Engine RPM: Indicates the engine speed when the fault occurred.
- Engine Load: Shows the percentage of maximum engine load.
- Coolant Temperature: Displays the engine coolant temperature.
- Fuel Trim: Shows the short-term and long-term fuel trim values.
- Vehicle Speed: Indicates the vehicle speed when the fault occurred.
- Intake Air Temperature: Measures the temperature of the air entering the engine.
Benefits of Using Freeze Frame Data
- Accurate Diagnostics: Provides context for understanding the conditions under which a fault occurred.
- Intermittent Issue Detection: Helps diagnose issues that are not always present.
- Efficient Troubleshooting: Reduces diagnostic time by providing a starting point for investigation.
Example Scenario
Your check engine light comes on intermittently, and you want to understand what is causing it. You connect the CP9690 scanner and read a DTC: P0171 (System Too Lean, Bank 1). You then view the freeze frame data associated with this code and see the following:
- Engine RPM: 2500 RPM
- Engine Load: 75%
- Vehicle Speed: 60 mph
- Short Term Fuel Trim: +25%
This data suggests that the lean condition occurred while the engine was under moderate load at highway speed. This information can help you focus your diagnostic efforts on components that are most likely to be affected under these conditions, such as the fuel pump, fuel injectors, or vacuum leaks.
Limitations
- Data Availability: Freeze frame data is only available for certain DTCs.
- Interpreting Data: Requires a basic understanding of automotive systems and sensor parameters.
- Snapshot in Time: Freeze frame data represents a single moment and may not capture the entire sequence of events leading to the fault.
Combining Freeze Frame Data with Live Data
For a more comprehensive diagnosis, combine freeze frame data with live data. Review the freeze frame data to understand the conditions when the fault occurred, then use live data to monitor the relevant parameters in real-time under similar conditions.
10. How Does the CP9690 OBD2 Scanner Help Display State OBD Check?
The CP9690 OBD2 scanner features a State OBD Check function, which is designed to quickly assess whether a vehicle is ready for state-mandated emissions inspections. This feature helps users avoid the inconvenience of failing an inspection due to incomplete or non-ready diagnostic monitors.
Understanding State OBD Check
Many states require vehicles to pass an On-Board Diagnostic (OBD) emissions test as