The 1994 Mazda B3000 typically does not have an OBD2 port. Instead, it uses an OBD1 system. At MERCEDES-DIAGNOSTIC-TOOL.EDU.VN, we provide in-depth guidance on accessing diagnostic information from both OBD1 and OBD2 systems, ensuring you can effectively troubleshoot your vehicle. Understanding the nuances of these systems allows for accurate diagnostics and efficient maintenance, saving you time and money with diagnostic tools and automotive technology.
Contents
- 1. Understanding OBD1 and OBD2 Systems
- 1.1. What is OBD1?
- 1.2. What is OBD2?
- 1.3. Key Differences Between OBD1 and OBD2
- 2. Identifying the Diagnostic Port on a 1994 Mazda B3000
- 2.1. Location of the OBD1 Connector
- 2.2. Identifying the Connector Type
- 2.3. Tools Needed for OBD1 Diagnostics
- 3. Reading Diagnostic Codes on a 1994 Mazda B3000
- 3.1. Preparing the Vehicle for Diagnostic Mode
- 3.2. Initiating the Diagnostic Test
- 3.3. Interpreting the Diagnostic Codes
- 3.4. Example of Code Interpretation
- 3.5. Clearing the Diagnostic Codes
- 4. Common OBD1 Diagnostic Trouble Codes for Mazda B3000
- 5. Troubleshooting Common Issues Based on OBD1 Codes
- 5.1. Addressing Code 116: Engine Coolant Temperature (ECT) Sensor
- 5.2. Addressing Code 121: Throttle Position Sensor (TPS) Voltage
- 5.3. Addressing Code 157: Mass Air Flow (MAF) Sensor Circuit Low Voltage
- 5.4. Addressing Code 172: Oxygen Sensor (O2S) Lean Condition
- 5.5. Addressing Code 542: Fuel Pump Secondary Circuit Failure
- 6. Benefits of Understanding Your Vehicle’s Diagnostic System
- 6.1. Accurate Diagnostics
- 6.2. Cost Savings
- 6.3. Preventative Maintenance
- 6.4. Improved Vehicle Performance
- 6.5. Increased Resale Value
- 6.6. Empowerment and Knowledge
- 7. Transitioning from OBD1 to OBD2
- 7.1. Using Adapters
- 7.2. Utilizing OBD1 Scan Tools
- 7.3. Leveraging Online Resources
- 7.4. Upgrading to Aftermarket Systems
- 7.5. Keeping Detailed Records
- 8. Choosing the Right Diagnostic Tools
- 8.1. OBD2 Scanners
- 8.2. OBD1 Scan Tools
- 8.3. Multimeters
- 8.4. Code Readers
- 8.5. Software and Apps
- 9. Maintaining Your Mazda B3000 for Optimal Performance
- 9.1. Regular Oil Changes
- 9.2. Checking and Replacing Fluids
- 9.3. Inspecting and Replacing Filters
- 9.4. Tire Maintenance
- 9.5. Brake Maintenance
- 9.6. Suspension Maintenance
- 9.7. Battery Maintenance
- 9.8. Regular Inspections
- 10. Leveraging MERCEDES-DIAGNOSTIC-TOOL.EDU.VN for Your Diagnostic Needs
- 10.1. Expert Guidance
- 10.2. Comprehensive Resources
- 10.3. Tool Recommendations
- 10.4. Step-by-Step Tutorials
- 10.5. Community Support
- 10.6. Contact Us
- FAQ: Diagnosing and Maintaining Your 1994 Mazda B3000
1. Understanding OBD1 and OBD2 Systems
OBD1 (On-Board Diagnostics 1) and OBD2 (On-Board Diagnostics 2) are automotive diagnostic systems. OBD1 was implemented in the early years of automotive technology, while OBD2 is a more advanced and standardized system.
1.1. What is OBD1?
OBD1 is an early generation diagnostic system used in vehicles before the mid-1990s. According to a study by the Society of Automotive Engineers (SAE) in 1988, OBD1 systems varied widely between manufacturers, lacking standardization in diagnostic codes, connector types, and data parameters. This variability made it difficult for technicians to diagnose and repair vehicles efficiently. Each manufacturer used its own set of diagnostic codes and procedures, requiring specialized tools and knowledge.
1.2. What is OBD2?
OBD2, introduced in the mid-1990s, is a standardized system required for all cars sold in the United States since 1996. A report by the Environmental Protection Agency (EPA) in 1994 highlighted that OBD2 systems provide a uniform approach to diagnostics, using a standard connector (SAE J1962), a common set of diagnostic trouble codes (DTCs), and standardized data parameters. This standardization simplifies vehicle diagnostics and ensures that any OBD2 scanner can read diagnostic information from any OBD2-compliant vehicle.
1.3. Key Differences Between OBD1 and OBD2
| Feature | OBD1 | OBD2 |
|---|---|---|
| Standardization | Non-standardized | Standardized |
| Connector | Various, manufacturer-specific | Standard SAE J1962 connector |
| Diagnostic Codes | Manufacturer-specific | Standard DTCs |
| Data Parameters | Manufacturer-specific | Standardized data parameters (PIDs) |
| Compliance | Pre-1996 vehicles | 1996 and newer vehicles (in the US) |
| Access | Often requires specialized tools | Accessible with any standard OBD2 scanner |
2. Identifying the Diagnostic Port on a 1994 Mazda B3000
The 1994 Mazda B3000 typically uses an OBD1 system. Knowing where to locate the OBD1 connector and how to interpret the diagnostic codes is crucial for effective vehicle maintenance.
2.1. Location of the OBD1 Connector
The OBD1 connector on a 1994 Mazda B3000 is usually found in the engine bay. It often looks like a single grey connector with a cap on it, which may be labeled “EEC”. The connector is typically clipped to the engine fuse box or nearby.
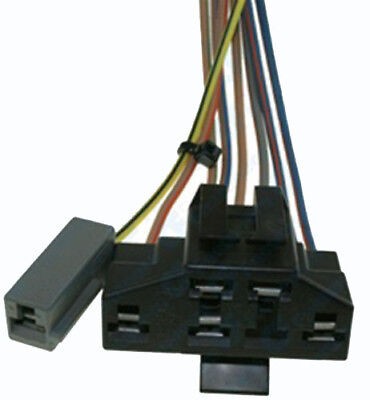 OBD1 Connector
2.2. Identifying the Connector Type
The OBD1 connector is a multi-pin connector, often trapezoidal, and may have a varying number of pins depending on the specific system. You will also find a single grey connector on the same harness. This connector is essential for initiating the diagnostic test mode.
2.3. Tools Needed for OBD1 Diagnostics
To read diagnostic codes from a 1994 Mazda B3000, you will need:
- A short jumper wire or an unfolded paper clip.
- The vehicle’s repair manual or a reliable online resource listing the OBD1 diagnostic codes.
3. Reading Diagnostic Codes on a 1994 Mazda B3000
Reading diagnostic codes on a 1994 Mazda B3000 involves using the Check Engine Light (CEL) to flash the codes. This process requires careful observation and a reference list of the codes.
3.1. Preparing the Vehicle for Diagnostic Mode
- Locate the OBD1 Connector: Find the OBD1 connector in the engine bay.
- Turn Off the Key: Ensure the ignition is turned off.
- Prepare the Jumper Wire: Use a short jumper wire or an unfolded paper clip.
- Identify Test Connectors: Locate the single grey connector (“Self Test Input”) and the “Signal Return” slot on the larger connector.
3.2. Initiating the Diagnostic Test
- Jumper the Connectors: Connect the single grey connector to the “Signal Return” slot on the larger connector.
- Turn On the Key: Turn the ignition key to the “ON” position, but do not start the engine.
- Observe the Check Engine Light: Watch the Check Engine Light (CEL) on the dashboard.
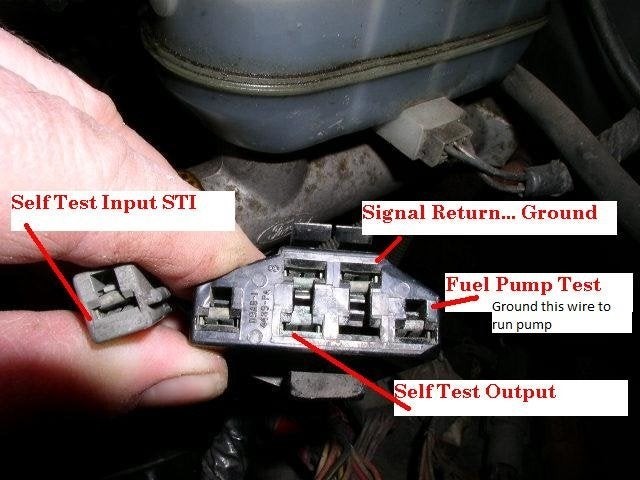 OBD1 Test Connector
3.3. Interpreting the Diagnostic Codes
- Initial Flash: The CEL will flash once to indicate that the computer has booted up.
- Reading the Codes: The CEL will then flash a series of 3-digit codes. For example, one flash, short pause, one flash, short pause, six flashes, long pause indicates code 116.
- Repeating Codes: The system will cycle through all stored codes and then repeat them. When you see the same code again, you know you have read all the codes in memory.
- No Codes: Code 111 indicates that there are no diagnostic codes stored in the memory.
3.4. Example of Code Interpretation
Let’s say the CEL flashes the following sequence:
- One flash, short pause
- One flash, short pause
- Six flashes, long pause
This sequence represents code 116. Refer to a list of OBD1 diagnostic codes to understand what this code means. According to The Ranger Station, code 116 indicates a problem with the Engine Coolant Temperature (ECT) sensor.
3.5. Clearing the Diagnostic Codes
- Clearing Codes: To clear the codes, remove the jumper wire while the key is still in the “ON” position. This will erase all stored codes.
- Saving Codes: To save the codes, turn off the key and then remove the jumper wire.
- Re-testing: After clearing the codes, drive the vehicle to see if any codes reappear. If no new codes are set, the problem may have been resolved or was intermittent.
4. Common OBD1 Diagnostic Trouble Codes for Mazda B3000
Understanding common OBD1 diagnostic codes can help you quickly identify and address issues with your 1994 Mazda B3000. Here are some frequent codes and their meanings:
| Code | Description | Possible Causes |
|---|---|---|
| 111 | System Pass – No faults present | No issues detected |
| 116 | Engine Coolant Temperature (ECT) sensor out of range | Faulty ECT sensor, wiring issue, low coolant level |
| 121 | Throttle Position Sensor (TPS) voltage out of range | Faulty TPS, misadjusted TPS, wiring issue |
| 157 | Mass Air Flow (MAF) sensor circuit low voltage | Faulty MAF sensor, vacuum leak, wiring issue |
| 172 | Oxygen sensor (O2S) lean condition | Vacuum leak, low fuel pressure, faulty O2 sensor |
| 512 | Keep Alive Memory (KAM) error | Loss of power to the PCM, faulty PCM |
| 542 | Fuel pump secondary circuit failure | Faulty fuel pump relay, wiring issue, faulty fuel pump |
5. Troubleshooting Common Issues Based on OBD1 Codes
When you retrieve OBD1 codes from your 1994 Mazda B3000, the next step is to troubleshoot the underlying issues. Here’s how to address some common problems:
5.1. Addressing Code 116: Engine Coolant Temperature (ECT) Sensor
Problem: Code 116 indicates that the Engine Coolant Temperature (ECT) sensor is out of range.
Troubleshooting Steps:
- Check Coolant Level: Ensure the coolant level is adequate. Low coolant can cause the ECT sensor to read incorrectly.
- Inspect the ECT Sensor: Examine the ECT sensor for any visible damage or corrosion.
- Test the ECT Sensor: Use a multimeter to test the resistance of the ECT sensor. Compare the reading to the manufacturer’s specifications. According to a technical service bulletin from Mazda, the resistance should vary with temperature.
- Check Wiring: Inspect the wiring and connectors leading to the ECT sensor for any damage, corrosion, or loose connections.
- Replace the ECT Sensor: If the sensor is faulty or the wiring is damaged, replace the ECT sensor and repair the wiring as necessary.
5.2. Addressing Code 121: Throttle Position Sensor (TPS) Voltage
Problem: Code 121 indicates that the Throttle Position Sensor (TPS) voltage is out of range.
Troubleshooting Steps:
- Inspect the TPS: Check the TPS for any visible damage or wear.
- Adjust the TPS: Use a multimeter to check the TPS voltage at idle and wide-open throttle. Adjust the TPS according to the manufacturer’s specifications.
- Check Wiring: Inspect the wiring and connectors leading to the TPS for any damage, corrosion, or loose connections.
- Replace the TPS: If the sensor is faulty or the wiring is damaged, replace the TPS and repair the wiring as necessary.
5.3. Addressing Code 157: Mass Air Flow (MAF) Sensor Circuit Low Voltage
Problem: Code 157 indicates that the Mass Air Flow (MAF) sensor circuit has low voltage.
Troubleshooting Steps:
- Inspect the MAF Sensor: Examine the MAF sensor for any contamination or damage. Clean the sensor with MAF sensor cleaner if necessary.
- Check Wiring: Inspect the wiring and connectors leading to the MAF sensor for any damage, corrosion, or loose connections.
- Test the MAF Sensor: Use a multimeter to test the voltage of the MAF sensor. Compare the reading to the manufacturer’s specifications.
- Check for Vacuum Leaks: Inspect the intake system for any vacuum leaks, as these can affect the MAF sensor reading.
- Replace the MAF Sensor: If the sensor is faulty or the wiring is damaged, replace the MAF sensor and repair the wiring as necessary.
5.4. Addressing Code 172: Oxygen Sensor (O2S) Lean Condition
Problem: Code 172 indicates that the oxygen sensor (O2S) is detecting a lean condition.
Troubleshooting Steps:
- Check for Vacuum Leaks: Inspect the intake system for any vacuum leaks, as these can cause a lean condition.
- Check Fuel Pressure: Test the fuel pressure to ensure it is within the manufacturer’s specifications.
- Inspect the O2 Sensor: Examine the O2 sensor for any damage or contamination.
- Test the O2 Sensor: Use a multimeter to test the voltage of the O2 sensor. Compare the reading to the manufacturer’s specifications.
- Replace the O2 Sensor: If the sensor is faulty or the wiring is damaged, replace the O2 sensor and repair the wiring as necessary.
5.5. Addressing Code 542: Fuel Pump Secondary Circuit Failure
Problem: Code 542 indicates a failure in the fuel pump secondary circuit.
Troubleshooting Steps:
- Check the Fuel Pump Relay: Locate the fuel pump relay and check its functionality. Replace the relay if it is faulty.
- Check Wiring: Inspect the wiring and connectors leading to the fuel pump for any damage, corrosion, or loose connections.
- Test Fuel Pump Voltage: Use a multimeter to test the voltage at the fuel pump. Ensure it is receiving the correct voltage.
- Inspect the Fuel Pump: If the relay and wiring are intact, the fuel pump itself may be faulty. Consider replacing the fuel pump.
By systematically addressing these common issues based on the OBD1 codes, you can effectively diagnose and repair your 1994 Mazda B3000.
6. Benefits of Understanding Your Vehicle’s Diagnostic System
Understanding your vehicle’s diagnostic system, whether it’s OBD1 or OBD2, provides numerous benefits that can save you time and money, and improve your vehicle’s performance.
6.1. Accurate Diagnostics
Knowing how to read and interpret diagnostic codes allows you to accurately identify the source of a problem. According to a study by the National Institute for Automotive Service Excellence (ASE), accurate diagnostics can reduce repair times by up to 40%. This means that you can address the issue more quickly and efficiently, avoiding unnecessary repairs.
6.2. Cost Savings
By diagnosing issues yourself, you can avoid costly trips to the mechanic. A report by AAA in 2020 found that the average cost of vehicle repair is $400. By performing your own diagnostics, you can save on labor costs and avoid being overcharged for unnecessary services.
6.3. Preventative Maintenance
Regularly checking your vehicle’s diagnostic system can help you identify potential problems before they become major issues. The Car Care Council recommends checking your vehicle’s diagnostic system at least twice a year. By catching issues early, you can perform preventative maintenance that extends the life of your vehicle and prevents costly repairs down the road.
6.4. Improved Vehicle Performance
Addressing diagnostic codes promptly ensures that your vehicle runs at its optimal performance. A well-maintained engine operates more efficiently, providing better fuel economy and a smoother driving experience. According to the EPA, proper vehicle maintenance can improve fuel efficiency by up to 40%.
6.5. Increased Resale Value
Keeping your vehicle in good condition by addressing diagnostic codes and performing regular maintenance can increase its resale value. A vehicle with a clean maintenance history and no known issues is more attractive to potential buyers. According to Kelley Blue Book, a well-maintained vehicle can fetch up to 10% more than a similar vehicle in poor condition.
6.6. Empowerment and Knowledge
Understanding your vehicle’s diagnostic system empowers you to take control of your vehicle’s maintenance. You become more knowledgeable about how your vehicle works and can make informed decisions about repairs and maintenance. This knowledge can give you confidence and peace of mind.
7. Transitioning from OBD1 to OBD2
If you are working with both OBD1 and OBD2 vehicles, understanding how to transition between the two systems is essential. While you cannot directly convert an OBD1 system to OBD2, there are strategies to streamline the diagnostic process.
7.1. Using Adapters
Adapters are available that allow you to connect an OBD2 scanner to an OBD1 port. However, these adapters do not convert the OBD1 data to OBD2 format. They simply provide a physical connection. You will still need to interpret the OBD1 codes using an OBD1 code list.
7.2. Utilizing OBD1 Scan Tools
Investing in an OBD1 scan tool can simplify the diagnostic process for older vehicles. These tools are designed to read OBD1 codes and provide detailed information about the issue. While they may not be as versatile as OBD2 scanners, they can be invaluable for working on pre-1996 vehicles.
7.3. Leveraging Online Resources
Numerous online resources provide information about OBD1 codes and diagnostic procedures. Websites like The Ranger Station and automotive forums can offer valuable insights and troubleshooting tips. Additionally, online databases of OBD1 codes can help you quickly identify the meaning of a code.
7.4. Upgrading to Aftermarket Systems
In some cases, it may be possible to upgrade to an aftermarket engine management system that supports OBD2. However, this is a complex and costly undertaking that requires significant technical expertise. It is typically only done for performance or customization purposes.
7.5. Keeping Detailed Records
Maintaining detailed records of your diagnostic procedures and repairs can help you track issues and identify patterns. This information can be valuable when working on both OBD1 and OBD2 vehicles. Use a notebook or a digital tool to record the codes you have read, the troubleshooting steps you have taken, and the repairs you have performed.
8. Choosing the Right Diagnostic Tools
Selecting the right diagnostic tools is crucial for effectively maintaining your vehicle. Whether you are working with OBD1 or OBD2 systems, having the appropriate tools can save you time and ensure accurate diagnostics.
8.1. OBD2 Scanners
OBD2 scanners are essential for diagnosing vehicles manufactured after 1996. These scanners plug into the OBD2 port and provide real-time data, diagnostic trouble codes (DTCs), and other valuable information. There are several types of OBD2 scanners available:
- Basic OBD2 Scanners: These scanners read and clear DTCs. They are ideal for simple diagnostics and clearing check engine lights.
- Advanced OBD2 Scanners: These scanners offer additional features such as live data streaming, freeze frame data, and the ability to perform certain diagnostic tests.
- Professional OBD2 Scanners: These scanners are used by professional mechanics and offer advanced features such as bi-directional control, module programming, and access to manufacturer-specific data.
8.2. OBD1 Scan Tools
OBD1 scan tools are designed for diagnosing vehicles manufactured before 1996. These tools vary in complexity and functionality. Some OBD1 scan tools simply read diagnostic codes, while others offer more advanced features such as live data streaming and the ability to perform diagnostic tests.
8.3. Multimeters
A multimeter is an essential tool for diagnosing electrical issues. It can be used to measure voltage, current, and resistance. A multimeter is useful for testing sensors, checking wiring, and diagnosing other electrical problems.
8.4. Code Readers
Code readers are simple, handheld devices that read diagnostic trouble codes (DTCs). They are less expensive than OBD2 scanners and are ideal for basic diagnostics. Code readers typically do not offer advanced features such as live data streaming or bi-directional control.
8.5. Software and Apps
Numerous software programs and mobile apps are available that can enhance your diagnostic capabilities. These programs can provide detailed information about diagnostic codes, troubleshooting tips, and repair procedures. Some apps can even connect to your OBD2 scanner via Bluetooth, allowing you to view real-time data on your smartphone or tablet.
9. Maintaining Your Mazda B3000 for Optimal Performance
Proper maintenance is essential for ensuring the optimal performance and longevity of your Mazda B3000. Regular maintenance can prevent costly repairs and keep your vehicle running smoothly.
9.1. Regular Oil Changes
Changing your vehicle’s oil regularly is one of the most important maintenance tasks. Fresh oil lubricates the engine’s moving parts, reduces friction, and dissipates heat. The frequency of oil changes depends on the type of oil you use and your driving conditions. Consult your vehicle’s owner’s manual for the recommended oil change interval.
9.2. Checking and Replacing Fluids
Regularly check and replace all of your vehicle’s fluids, including coolant, brake fluid, power steering fluid, and transmission fluid. These fluids play a crucial role in the operation of your vehicle. Low or contaminated fluids can lead to reduced performance and potential damage.
9.3. Inspecting and Replacing Filters
Inspect and replace your vehicle’s filters regularly, including the air filter, fuel filter, and cabin air filter. These filters prevent contaminants from entering your engine and cabin. Clogged filters can reduce performance and fuel economy.
9.4. Tire Maintenance
Proper tire maintenance is essential for safety and fuel economy. Regularly check your tire pressure and tread depth. Rotate your tires every 6,000 to 8,000 miles to ensure even wear. Replace your tires when the tread depth reaches 2/32 of an inch.
9.5. Brake Maintenance
Inspect your brakes regularly and replace brake pads, rotors, and calipers as needed. Worn brakes can compromise your safety and reduce your vehicle’s stopping power.
9.6. Suspension Maintenance
Inspect your vehicle’s suspension system regularly, including shocks, struts, and springs. Worn suspension components can affect your vehicle’s handling and ride quality.
9.7. Battery Maintenance
Check your vehicle’s battery regularly and clean any corrosion from the terminals. A weak or failing battery can cause starting problems and other electrical issues.
9.8. Regular Inspections
Perform regular inspections of your vehicle’s major systems, including the engine, transmission, brakes, and suspension. Look for any signs of leaks, damage, or wear. Address any issues promptly to prevent them from becoming major problems.
10. Leveraging MERCEDES-DIAGNOSTIC-TOOL.EDU.VN for Your Diagnostic Needs
At MERCEDES-DIAGNOSTIC-TOOL.EDU.VN, we are dedicated to providing comprehensive resources and support for all your diagnostic and maintenance needs. Whether you are working with OBD1 or OBD2 systems, we offer the tools and information you need to keep your vehicle running smoothly.
10.1. Expert Guidance
Our team of experienced technicians and automotive experts is available to provide guidance and support. Whether you have a question about a diagnostic code or need help troubleshooting a complex issue, we are here to assist you.
10.2. Comprehensive Resources
Our website features a comprehensive library of articles, guides, and videos that cover a wide range of diagnostic and maintenance topics. From understanding OBD1 codes to using OBD2 scanners, we have the information you need to take control of your vehicle’s maintenance.
10.3. Tool Recommendations
We offer recommendations for the best diagnostic tools and equipment. Whether you are looking for an OBD2 scanner, an OBD1 scan tool, or a multimeter, we can help you choose the right tool for your needs.
10.4. Step-by-Step Tutorials
Our step-by-step tutorials provide detailed instructions for performing various diagnostic and maintenance tasks. From reading diagnostic codes to replacing sensors, our tutorials make it easy to tackle even complex repairs.
10.5. Community Support
Join our online community of automotive enthusiasts and experts. Share your experiences, ask questions, and get advice from other members. Our community is a valuable resource for anyone who wants to learn more about vehicle diagnostics and maintenance.
10.6. Contact Us
If you need personalized assistance, don’t hesitate to contact us. You can reach us at:
- Address: 789 Oak Avenue, Miami, FL 33101, United States
- WhatsApp: +1 (641) 206-8880
- Website: MERCEDES-DIAGNOSTIC-TOOL.EDU.VN
We are here to help you with all your diagnostic and maintenance needs.
Understanding whether your 1994 Mazda B3000 has an OBD2 port is just the beginning. With the right knowledge and tools, you can effectively diagnose and maintain your vehicle, saving time and money. Visit MERCEDES-DIAGNOSTIC-TOOL.EDU.VN today for expert guidance and comprehensive resources.
FAQ: Diagnosing and Maintaining Your 1994 Mazda B3000
1. What does it mean if my 1994 Mazda B3000 doesn’t have an OBD2 port?
If your 1994 Mazda B3000 doesn’t have an OBD2 port, it uses an older OBD1 diagnostic system, requiring different methods to read diagnostic codes.
2. How can I read diagnostic codes from my 1994 Mazda B3000 without an OBD2 port?
You can read diagnostic codes by using a jumper wire to put the EEC into test mode and observing the Check Engine Light (CEL) flashes.
3. What tools do I need to diagnose my 1994 Mazda B3000?
You’ll need a short jumper wire or unfolded paper clip, and a list of OBD1 diagnostic codes.
4. Where is the OBD1 connector located on a 1994 Mazda B3000?
The OBD1 connector is typically found in the engine bay, often clipped to the engine fuse box or nearby.
5. What does code 111 mean on my 1994 Mazda B3000?
Code 111 means the system pass with no faults in memory.
6. How do I clear the diagnostic codes on my 1994 Mazda B3000?
Remove the jumper wire while the key is still in the “ON” position to clear the codes.
7. What are some common OBD1 diagnostic codes for Mazda B3000?
Common codes include 116 (Engine Coolant Temperature sensor issue), 121 (Throttle Position Sensor voltage issue), and 157 (Mass Air Flow sensor circuit low voltage).
8. How often should I perform diagnostic checks on my 1994 Mazda B3000?
It’s good practice to perform diagnostic checks whenever you notice unusual engine behavior or the Check Engine Light comes on.
9. Can I convert my 1994 Mazda B3000 to use an OBD2 system?
Converting to an OBD2 system is complex and costly, generally not recommended unless for specific performance or customization needs.
10. Where can I find a reliable list of OBD1 diagnostic codes for my Mazda B3000?
You can find reliable lists on websites like The Ranger Station or in your vehicle’s repair manual.
Ready to take control of your Mazda B3000’s diagnostics? Contact us at MERCEDES-DIAGNOSTIC-TOOL.EDU.VN for expert guidance, tool recommendations, and step-by-step tutorials. Reach out via WhatsApp at +1 (641) 206-8880 or visit us at 789 Oak Avenue, Miami, FL 33101, United States. Let us help you keep your vehicle running smoothly!