The Ediag Obd2 Scanner Ya-101 is an affordable entry point into the world of automotive diagnostics, and MERCEDES-DIAGNOSTIC-TOOL.EDU.VN can help you determine if it’s the right tool for your needs. This compact scanner offers essential features for basic troubleshooting and maintenance, making it a valuable addition to any car owner’s toolkit. Discover how it stacks up against other options and whether it aligns with your diagnostic requirements, plus explore alternative solutions if it falls short, all at MERCEDES-DIAGNOSTIC-TOOL.EDU.VN. Consider more advanced scan tools or professional diagnostic services.
Contents
- 1. What is the EDiag OBD2 Scanner YA-101?
- 1.1 Key Features and Specifications of the EDiag YA-101
- 1.2 Understanding OBD2 and its Importance
- 1.3 Who is the EDiag YA-101 Designed For?
- 2. Unboxing and First Impressions of the EDiag YA-101
- 2.1 What’s Included in the Box?
- 2.2 Design and Build Quality
- 2.3 Ease of Handling and Portability
- 2.4 Initial Setup and Navigation
- 3. Using the EDiag YA-101: A Step-by-Step Guide
- 3.1 Connecting the Scanner to Your Vehicle
- 3.2 Reading Diagnostic Trouble Codes (DTCs)
- 3.3 Understanding and Interpreting the Codes
- 3.4 Clearing Diagnostic Trouble Codes (DTCs)
- 3.5 Viewing Live Data Streams
- 3.6 Performing I/M Readiness Tests
- 4. EDiag YA-101: Advantages and Disadvantages
- 4.1 Pros: Affordability, Ease of Use, and Portability
- 4.2 Cons: Limited Features, Small Screen, and Build Quality
- 4.3 Who Should (and Shouldn’t) Buy the EDiag YA-101?
- 5. Alternatives to the EDiag YA-101
- 5.1 Comparison with Other Entry-Level Scanners
- 5.2 Mid-Range Scanners for More Advanced Diagnostics
- 5.3 High-End Professional Diagnostic Tools
- 5.4 Choosing the Right Scanner for Your Needs
- 6. Tips and Tricks for Using OBD2 Scanners Effectively
- 6.1 Understanding Freeze Frame Data
- 6.2 Using Live Data for Real-Time Monitoring
- 6.3 Regular Firmware Updates for Compatibility
- 6.4 Knowing When to Seek Professional Help
- 7. Maintaining Your EDiag YA-101 Scanner
- 7.1 Cleaning and Storage Tips
1. What is the EDiag OBD2 Scanner YA-101?
The EDiag OBD2 Scanner YA-101 is a handheld automotive diagnostic tool designed to read and clear diagnostic trouble codes (DTCs) from a vehicle’s onboard computer system. It’s an entry-level scanner known for its affordability and ease of use, providing basic diagnostic capabilities for car owners and DIY enthusiasts. The primary function of this device is to help identify potential issues within a vehicle by accessing its OBD2 system, making it a valuable tool for preliminary troubleshooting.
1.1 Key Features and Specifications of the EDiag YA-101
The EDiag YA-101 is a compact, user-friendly OBD2 scanner with a variety of features suitable for basic automotive diagnostics. Here’s a breakdown of its key specifications and functionalities:
- Size: 4.8 x 2.6 x 0.9 inches
- Weight: 6.1 ounces
- Display: 1.8-inch color screen
- Live Data: Yes, displays real-time vehicle data
- Number of Keys: 4
- Bluetooth: No
- Handheld: Yes
- Warranty: Lifetime (limited)
- Pricing: Typically around $25 – $30
Detailed Feature List:
- Read and Clear DTCs: Allows users to read diagnostic trouble codes (DTCs) stored in the vehicle’s computer and clear them after addressing the issue.
- Live Data Stream: Displays real-time data from various vehicle sensors, such as engine temperature, RPM, and vehicle speed.
- I/M Readiness Test: Checks the status of emission-related systems to determine if the vehicle is ready for a smog test.
- VIN Retrieval: Automatically retrieves the Vehicle Identification Number (VIN) for vehicle identification.
- Battery Test: Basic battery voltage test.
- O2 Sensor Test: Checks the functionality of the oxygen sensors.
- Display Freeze Frame Data: Allows viewing of data recorded when a fault occurred, providing valuable context for diagnosis.
- Language Support: Multiple languages are supported, including English, French, Spanish, and German.
- Firmware Updates: Free lifetime updates to keep the device compatible with newer vehicles and protocols.
1.2 Understanding OBD2 and its Importance
OBD2, or On-Board Diagnostics II, is a standardized system used in most vehicles since 1996 to monitor and diagnose engine and emission-related problems. It’s a crucial system for maintaining vehicle health and ensuring compliance with environmental regulations. The OBD2 system works by using sensors to monitor various parameters within the engine and other systems. When a sensor detects a problem, it triggers a Diagnostic Trouble Code (DTC), which is stored in the vehicle’s computer.
The importance of OBD2 lies in its ability to:
- Detect Issues Early: By continuously monitoring vehicle systems, OBD2 can detect potential problems before they become major issues.
- Provide Diagnostic Information: DTCs provide valuable information about the nature and location of the problem, helping mechanics and car owners diagnose issues more efficiently.
- Ensure Emission Compliance: OBD2 helps ensure that vehicles meet emission standards by monitoring emission-related components and systems.
- Standardize Diagnostic Procedures: The OBD2 standard ensures that all vehicles use the same diagnostic protocols, making it easier to diagnose and repair vehicles regardless of make or model.
By understanding the OBD2 system and its importance, car owners can use tools like the EDiag YA-101 to proactively monitor their vehicle’s health, address issues early, and potentially save money on costly repairs.
1.3 Who is the EDiag YA-101 Designed For?
The EDiag YA-101 is primarily designed for the following users:
- Car Owners: Individuals who want to perform basic diagnostics on their vehicles to identify potential issues before taking them to a mechanic.
- DIY Enthusiasts: Those who enjoy working on their cars and want a tool to help them diagnose and repair common problems.
- Entry-Level Technicians: Students or novice mechanics who need an affordable tool for basic diagnostics.
- Budget-Conscious Users: Individuals looking for an inexpensive OBD2 scanner that provides essential diagnostic features.
The EDiag YA-101 is not ideal for:
- Professional Mechanics: Experienced technicians who require advanced diagnostic capabilities, such as bidirectional control, advanced coding, and access to manufacturer-specific data.
- Users Needing Advanced Features: Those who need to perform complex diagnostics, such as ABS/SRS diagnostics, TPMS resets, or oil service resets.
- Users Requiring Wireless Connectivity: Individuals who prefer a scanner with Bluetooth or Wi-Fi connectivity for wireless data transfer and updates.
Ultimately, the EDiag YA-101 is a great tool for basic diagnostics and troubleshooting, but it may not meet the needs of users who require more advanced features or professional-grade capabilities. For Mercedes-Benz owners requiring comprehensive diagnostics and advanced features, MERCEDES-DIAGNOSTIC-TOOL.EDU.VN offers expert guidance and access to suitable diagnostic solutions. Contact us via Whatsapp at +1 (641) 206-8880 or visit our location at 789 Oak Avenue, Miami, FL 33101, United States, to explore our range of professional diagnostic tools.
2. Unboxing and First Impressions of the EDiag YA-101
The EDiag YA-101 comes in a compact package, reflecting its budget-friendly nature. The packaging typically includes the scanner itself, a user manual, and sometimes a mini-USB cable (though this may vary).
2.1 What’s Included in the Box?
Typically, the box contains:
- The EDiag YA-101 Scanner: The main unit, ready for immediate use.
- User Manual: Provides instructions on how to use the scanner and interpret the results.
- Mini-USB Cable: Used for firmware updates (sometimes not included).
2.2 Design and Build Quality
The EDiag YA-101 is a small, lightweight device, measuring approximately 4.8 x 2.6 x 0.9 inches and weighing around 6.1 ounces.
- Material: The scanner is made of black plastic with ribbed hand grips for better handling.
- Screen: It features a 1.8-inch color screen, which is adequate for displaying diagnostic information.
- Buttons: The device has four silicone keys: an OK key (green) and a “Go Back” button (red), along with up and down navigation keys.
- Port: There’s a mini-USB port at the bottom for firmware updates.
Build Quality:
The build quality is decent for the price. While it doesn’t feel as robust as more expensive scanners, it is still reasonably durable for occasional use.
2.3 Ease of Handling and Portability
The EDiag YA-101 is highly portable due to its small size and lightweight design. It can easily fit in a car’s center console, glove compartment, or toolbox.
- Handling: The ribbed hand grips provide a comfortable and secure grip.
- Portability: Its compact size makes it easy to carry around and use in various locations.
2.4 Initial Setup and Navigation
Setting up the EDiag YA-101 is straightforward:
- Plug it in: Connect the scanner to the OBD2 port in your vehicle. The port is usually located under the dashboard on the driver’s side.
- Turn on the ignition: Turn the ignition to the “on” position without starting the engine.
- Power up the scanner: The scanner should power on automatically.
Navigation:
The YA-101 uses a text-based navigation scheme, which may not be as intuitive as icon-based systems. However, the four-key interface is relatively simple to use:
- Up and Down Keys: Used to navigate through the menu options.
- OK Key: Used to select an option.
- Go Back Key: Used to return to the previous menu.
Navigating through the menus may require a few extra keystrokes compared to scanners with more keys, but it is generally easy to learn with a little practice.
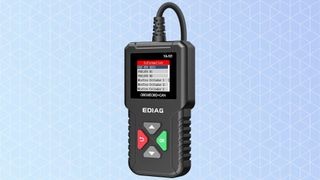 EDiag YA-101
Alt text: Close-up view of the EDiag YA-101 OBD2 scanner, highlighting its compact design and button layout.
3. Using the EDiag YA-101: A Step-by-Step Guide
The EDiag YA-101 is designed to be user-friendly, making it accessible for both beginners and experienced car owners. Here’s a comprehensive guide to help you get started and make the most of this OBD2 scanner.
3.1 Connecting the Scanner to Your Vehicle
-
Locate the OBD2 Port:
- The OBD2 port is typically located under the dashboard on the driver’s side of your vehicle. Common locations include:
- Under the steering wheel column
- Near the center console
- Inside the glove compartment (less common)
- Consult your vehicle’s owner manual if you’re unsure of the exact location.
- The OBD2 port is typically located under the dashboard on the driver’s side of your vehicle. Common locations include:
-
Prepare the Vehicle:
- Turn off the engine.
- Ensure the ignition is in the “off” position.
-
Connect the Scanner:
- Plug the EDiag YA-101’s OBD2 connector into the vehicle’s OBD2 port. Ensure it is securely connected.
-
Turn on the Ignition:
- Turn the ignition to the “on” position without starting the engine. This provides power to the vehicle’s computer system.
-
Power On the Scanner:
- The EDiag YA-101 should power on automatically once connected and the ignition is turned on. If it doesn’t, check the connection and ensure the vehicle’s electrical system is functioning correctly.
3.2 Reading Diagnostic Trouble Codes (DTCs)
-
Navigate to the “Read Codes” Option:
- Use the up and down arrow keys to navigate the main menu on the EDiag YA-101.
- Select the “Read Codes” or “Read Fault Codes” option and press the “OK” button.
-
Wait for the Scanner to Retrieve Codes:
- The scanner will communicate with the vehicle’s computer to retrieve any stored Diagnostic Trouble Codes (DTCs). This process may take a few seconds to a minute.
-
View the DTCs:
- Once the codes are retrieved, the scanner will display them on the screen.
- DTCs are typically displayed as a combination of letters and numbers (e.g., P0300).
-
Record the Codes:
- Write down each DTC for further research.
- Note the order in which the codes are displayed, as some codes may be more critical than others.
3.3 Understanding and Interpreting the Codes
-
Consult the User Manual:
- The EDiag YA-101’s user manual may provide a list of common DTCs and their meanings.
- Refer to the manual for initial guidance on interpreting the codes.
-
Use Online Resources:
- Websites like OBD-Codes.com and similar resources offer comprehensive databases of DTCs and their possible causes.
- Enter the DTC into the search bar to find detailed information about the code.
-
Understand the Code Structure:
- DTCs consist of five characters:
- The first character indicates the system:
- P: Powertrain (engine, transmission)
- B: Body (interior, exterior)
- C: Chassis (brakes, suspension)
- U: Network (communication)
- The second character indicates whether the code is generic or manufacturer-specific:
- 0: Generic (standardized across all vehicles)
- 1: Manufacturer-specific (unique to the vehicle make)
- The third character indicates the subsystem:
- 0: Emission control system
- 1: Fuel and air metering
- 2: Fuel and air metering (injector circuit)
- 3: Ignition system or misfire
- 4: Auxiliary emission controls
- 5: Vehicle speed controls and idle control system
- 6: Computer output system
- 7, 8, 9: Transmission
- The fourth and fifth characters provide specific information about the fault.
- The first character indicates the system:
- DTCs consist of five characters:
-
Identify Potential Causes:
- Based on the code definition, identify potential causes of the fault.
- Consider the symptoms your vehicle is exhibiting and how they relate to the code.
-
Prioritize Codes:
- Some codes may be more critical than others.
- Address the most critical codes first to prevent further damage to your vehicle.
3.4 Clearing Diagnostic Trouble Codes (DTCs)
-
Ensure the Issue is Resolved:
- Before clearing any codes, make sure you have addressed the underlying issue that caused the code to appear.
- Clearing codes without fixing the problem will only result in the code reappearing.
-
Navigate to the “Erase Codes” Option:
- Use the up and down arrow keys to navigate the main menu on the EDiag YA-101.
- Select the “Erase Codes” or “Clear Codes” option and press the “OK” button.
-
Confirm the Erase Command:
- The scanner will display a warning message asking you to confirm that you want to erase the codes.
- Read the message carefully and press the “OK” button to confirm.
-
Wait for the Scanner to Clear Codes:
- The scanner will communicate with the vehicle’s computer to clear the stored DTCs. This process may take a few seconds.
-
Verify the Codes are Cleared:
- After the codes have been cleared, the scanner will display a confirmation message.
- To verify that the codes have been successfully cleared, navigate back to the “Read Codes” option and check if any codes are still present.
-
Monitor Your Vehicle:
- After clearing the codes, monitor your vehicle for any recurring symptoms or new DTCs.
- If the same code reappears, it indicates that the underlying issue has not been resolved and requires further attention.
Example Scenario:
- Code: P0300 – Random Misfire Detected
- Possible Causes: Faulty spark plugs, ignition coils, fuel injectors, vacuum leaks, or a faulty engine control module (ECM).
- Troubleshooting Steps:
- Inspect and replace spark plugs if necessary.
- Check ignition coils for proper function.
- Inspect fuel injectors for clogs or leaks.
- Check for vacuum leaks in the intake manifold.
- If the problem persists, consult a professional mechanic for further diagnosis.
- Clearing the Code: After addressing the possible causes, clear the P0300 code using the EDiag YA-101.
By following these steps, you can effectively use the EDiag YA-101 to read and clear diagnostic trouble codes, understand their meanings, and take appropriate action to resolve issues with your vehicle.
3.5 Viewing Live Data Streams
- Navigate to the Live Data Option:
- Use the up and down arrow keys to navigate the main menu on the EDiag YA-101.
- Select the “Live Data” or “Data Stream” option and press the “OK” button.
- Select Data Parameters:
- The scanner will display a list of available data parameters.
- Use the up and down arrow keys to select the parameters you want to monitor, such as:
- Engine RPM
- Vehicle Speed
- Engine Coolant Temperature
- Intake Air Temperature
- Oxygen Sensor Voltage
- Fuel Trim
- Press the “OK” button to select each parameter.
- View Live Data:
- The scanner will display the selected data parameters in real-time.
- The data will update continuously as the engine is running.
- Analyze the Data:
- Monitor the data for any abnormal readings or fluctuations.
- Compare the data to the vehicle’s specifications to identify potential issues.
- Record the Data:
- Write down any abnormal readings for further analysis.
- Note the conditions under which the readings were taken (e.g., idle, acceleration, cruising).
3.6 Performing I/M Readiness Tests
- Navigate to the I/M Readiness Option:
- Use the up and down arrow keys to navigate the main menu on the EDiag YA-101.
- Select the “I/M Readiness” or “Smog Check” option and press the “OK” button.
- Initiate the Test:
- The scanner will communicate with the vehicle’s computer to check the status of emission-related systems.
- This process may take a few seconds to a minute.
- View the Results:
- The scanner will display the status of each emission-related system.
- Common systems include:
- Misfire Monitor
- Fuel System Monitor
- Comprehensive Components Monitor
- Oxygen Sensor Monitor
- Catalyst Monitor
- EVAP System Monitor
- Each system will be marked as either:
- “OK”: The system is functioning correctly.
- “INC”: The system is incomplete or not ready.
- “N/A”: The system is not applicable to the vehicle.
- Interpret the Results:
- If all systems are marked as “OK” or “N/A,” the vehicle should pass a smog check.
- If any systems are marked as “INC,” the vehicle may not pass a smog check.
- Take Corrective Action:
- If any systems are marked as “INC,” identify the cause of the issue and take corrective action.
- This may involve repairing or replacing faulty components, such as oxygen sensors, catalytic converters, or EVAP system components.
- After taking corrective action, repeat the I/M Readiness test to ensure that all systems are now marked as “OK.”
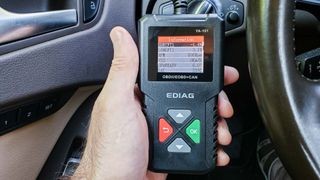 EDiag YA-101 displaying car information
Alt text: The EDiag YA-101 screen displaying vehicle diagnostic information, including codes and system status.
4. EDiag YA-101: Advantages and Disadvantages
Like any tool, the EDiag YA-101 has its strengths and weaknesses. Understanding these pros and cons will help you determine if it’s the right scanner for your needs.
4.1 Pros: Affordability, Ease of Use, and Portability
- Affordability: The EDiag YA-101 is one of the most budget-friendly OBD2 scanners on the market, typically priced between $25 and $30. This makes it an accessible option for car owners who want to perform basic diagnostics without breaking the bank.
- Ease of Use: The scanner is designed with simplicity in mind, featuring a straightforward interface and intuitive navigation. It’s easy to set up and use, even for those with limited experience in automotive diagnostics. The four-button design and clear text-based display make it easy to navigate the menus and access the desired functions.
- Portability: The EDiag YA-101 is small and lightweight, making it easy to carry around and store in your vehicle. Its compact size allows it to fit easily in a glove compartment, center console, or toolbox, ensuring it’s always readily available when needed.
- Basic Functionality: Despite its low price, the EDiag YA-101 offers essential OBD2 functions, including reading and clearing diagnostic trouble codes (DTCs), viewing live data streams, and performing I/M readiness tests. These functions are sufficient for diagnosing many common vehicle issues.
- Lifetime Warranty and Updates: The EDiag YA-101 comes with a lifetime warranty, which provides peace of mind and ensures that the scanner will be supported for the long term. Additionally, the scanner receives free lifetime firmware updates, which keep it compatible with newer vehicles and diagnostic protocols.
- Battery Test Function: It offers a basic battery test, which can be useful for identifying potential battery issues.
- Multilingual Support: Supports multiple languages, including English, French, Spanish, and German.
4.2 Cons: Limited Features, Small Screen, and Build Quality
- Limited Features: The EDiag YA-101 lacks many advanced features found in more expensive scanners. It does not support bidirectional control, advanced coding, or access to manufacturer-specific data. It also does not offer features such as ABS/SRS diagnostics, TPMS resets, or oil service resets.
- Small Screen: The scanner features a small 1.8-inch color screen, which can be difficult to read for some users. The screen resolution is also limited, which can make it challenging to view detailed data streams.
- Build Quality: The EDiag YA-101 is made of inexpensive plastic and may not be as durable as more expensive scanners. Some users have reported that the scanner feels flimsy and may not withstand rough handling.
- Navigation: The four-button interface can be cumbersome to use, requiring multiple keystrokes to navigate the menus. The text-based navigation scheme is not as intuitive as icon-based systems.
- No Wireless Connectivity: The EDiag YA-101 does not offer Bluetooth or Wi-Fi connectivity, which means it cannot be used with mobile apps or wirelessly update its firmware.
- Short Cable: The scanner’s OBD2 cable is relatively short, which may make it difficult to use in some vehicles.
- Lack of Code Definitions: The EDiag YA-101 does not provide detailed code definitions, which means users must rely on external resources to interpret the codes.
- No Graphing Capability: The scanner cannot graph live data streams, which can make it more difficult to analyze data. The YA-301, a slightly more expensive model, does offer graphing capability.
- No Enhanced Diagnostics: Lacks enhanced diagnostic capabilities such as O2 sensor testing, misfire detection, and EVAP system testing.
4.3 Who Should (and Shouldn’t) Buy the EDiag YA-101?
Who Should Buy the EDiag YA-101:
- Budget-conscious car owners: Those who want a basic OBD2 scanner at an affordable price.
- DIY enthusiasts: Individuals who enjoy performing basic maintenance and repairs on their vehicles.
- Users who need basic functionality: Those who only need to read and clear codes, view live data streams, and perform I/M readiness tests.
- Owners of older vehicles: The EDiag YA-101 is compatible with most OBD2-compliant vehicles, which includes vehicles manufactured after 1996.
- People who need a portable scanner: The small size and lightweight design make it easy to carry around and store in a vehicle.
Who Shouldn’t Buy the EDiag YA-101:
- Professional mechanics: Those who require advanced diagnostic capabilities, such as bidirectional control, advanced coding, and access to manufacturer-specific data.
- Users who need advanced features: Those who need to perform complex diagnostics, such as ABS/SRS diagnostics, TPMS resets, or oil service resets.
- Users who require wireless connectivity: Those who prefer a scanner with Bluetooth or Wi-Fi connectivity for wireless data transfer and updates.
- Owners of newer vehicles: While the EDiag YA-101 is compatible with most OBD2-compliant vehicles, it may not support all of the latest diagnostic protocols and features found in newer vehicles.
- People who need a durable scanner: The EDiag YA-101 is made of inexpensive plastic and may not be as durable as more expensive scanners.
Ultimately, the EDiag YA-101 is a great tool for basic diagnostics and troubleshooting, but it may not meet the needs of users who require more advanced features or professional-grade capabilities. For Mercedes-Benz owners requiring comprehensive diagnostics and advanced features, MERCEDES-DIAGNOSTIC-TOOL.EDU.VN offers expert guidance and access to suitable diagnostic solutions. Contact us via Whatsapp at +1 (641) 206-8880 or visit our location at 789 Oak Avenue, Miami, FL 33101, United States, to explore our range of professional diagnostic tools.
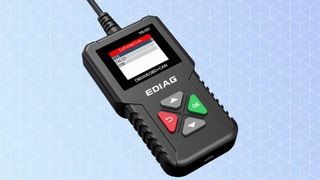 EDiag YA-101
Alt text: A close-up shot of the EDiag YA-101 in use, illustrating its compact size and ease of handling.
5. Alternatives to the EDiag YA-101
If the EDiag YA-101 doesn’t quite meet your needs, several alternative OBD2 scanners offer enhanced features, improved performance, or better value. Here’s a comparison of some popular options:
5.1 Comparison with Other Entry-Level Scanners
-
Autel AL319:
- Price: Around $50
- Features: Reads and clears DTCs, displays live data, performs I/M readiness tests, and offers code definitions.
- Pros: More features than the EDiag YA-101, including code definitions and a larger screen.
- Cons: More expensive than the EDiag YA-101.
-
Innova 3020RS:
- Price: Around $60
- Features: Reads and clears DTCs, displays live data, performs I/M readiness tests, and offers code definitions.
- Pros: Easy to use, reliable, and offers code definitions.
- Cons: More expensive than the EDiag YA-101.
-
FOXWELL NT301:
- Price: Around $70
- Features: Reads and clears DTCs, displays live data, performs I/M readiness tests, offers code definitions, and supports multiple languages.
- Pros: Offers more features than the EDiag YA-101, including code definitions and multilingual support.
- Cons: More expensive than the EDiag YA-101.
5.2 Mid-Range Scanners for More Advanced Diagnostics
-
Autel MD808 Pro:
- Price: Around $200
- Features: Reads and clears DTCs, displays live data, performs I/M readiness tests, offers code definitions, supports ABS/SRS diagnostics, oil service reset, and battery registration.
- Pros: Offers advanced features for comprehensive diagnostics.
- Cons: More expensive than entry-level scanners.
-
Innova 5610:
- Price: Around $250
- Features: Reads and clears DTCs, displays live data, performs I/M readiness tests, offers code definitions, supports ABS/SRS diagnostics, oil service reset, and battery registration.
- Pros: Easy to use, reliable, and offers advanced features for comprehensive diagnostics.
- Cons: More expensive than entry-level scanners.
5.3 High-End Professional Diagnostic Tools
-
Autel MaxiSYS MS906BT:
- Price: Around $1,500
- Features: Reads and clears DTCs, displays live data, performs I/M readiness tests, offers code definitions, supports ABS/SRS diagnostics, oil service reset, battery registration, bidirectional control, advanced coding, and access to manufacturer-specific data.
- Pros: Offers comprehensive diagnostic capabilities for professional mechanics.
- Cons: Very expensive.
-
Snap-on Zeus:
- Price: Around $10,000
- Features: Reads and clears DTCs, displays live data, performs I/M readiness tests, offers code definitions, supports ABS/SRS diagnostics, oil service reset, battery registration, bidirectional control, advanced coding, access to manufacturer-specific data, and integrated scope and multimeter.
- Pros: Offers the most comprehensive diagnostic capabilities for professional mechanics.
- Cons: Extremely expensive.
5.4 Choosing the Right Scanner for Your Needs
When choosing an OBD2 scanner, consider the following factors:
- Budget: How much are you willing to spend on a scanner?
- Features: What features do you need? Do you need advanced features such as ABS/SRS diagnostics, bidirectional control, or coding?
- Ease of Use: How easy is the scanner to use? Is the interface intuitive and user-friendly?
- Compatibility: Is the scanner compatible with your vehicle?
- Updates: Does the scanner receive regular updates to support newer vehicles and diagnostic protocols?
By considering these factors, you can choose the right OBD2 scanner for your needs and budget. For Mercedes-Benz owners seeking tailored diagnostic solutions, MERCEDES-DIAGNOSTIC-TOOL.EDU.VN offers expert consultation to guide you toward the most suitable tools and services. Contact us via Whatsapp at +1 (641) 206-8880 or visit our location at 789 Oak Avenue, Miami, FL 33101, United States, to explore our specialized diagnostic tools and receive professional guidance.
6. Tips and Tricks for Using OBD2 Scanners Effectively
To maximize the benefits of your OBD2 scanner, consider these helpful tips and tricks for accurate diagnostics and efficient troubleshooting.
6.1 Understanding Freeze Frame Data
Freeze frame data is a snapshot of the vehicle’s operating conditions at the moment a diagnostic trouble code (DTC) was triggered. This data can provide valuable insights into the circumstances surrounding the fault, helping you diagnose the problem more effectively.
-
What Data is Included: Freeze frame data typically includes parameters such as:
- Engine RPM
- Vehicle Speed
- Engine Load
- Coolant Temperature
- Fuel Trim
- Intake Air Temperature
- Oxygen Sensor Readings
-
How to Access Freeze Frame Data:
- Most OBD2 scanners, including the EDiag YA-101, have a dedicated option to view freeze frame data.
- Navigate to the “Freeze Frame” or “View Freeze Frame Data” option in the scanner’s menu.
- Select the DTC for which you want to view the freeze frame data.
-
How to Interpret Freeze Frame Data:
- Analyze the data to identify any abnormal readings or patterns.
- Consider the context of the data in relation to the DTC.
- For example, if the DTC indicates a misfire, check the engine RPM, load, and fuel trim values in the freeze frame data to see if they are within normal ranges.
-
Example Scenario:
- DTC: P0171 – System Too Lean (Bank 1)
- Freeze Frame Data:
- Engine RPM: 2000
- Vehicle Speed: 60 mph
- Engine Load: 75%
- Fuel Trim: +20%
- Interpretation: The freeze frame data indicates that the engine was running at 2000 RPM with a 75% load when the P0171 code was triggered. The positive fuel trim value of 20% suggests that the engine control unit (ECU) was adding extra fuel to compensate for a lean condition. This could be caused by a vacuum leak, a faulty oxygen sensor, or a clogged fuel filter.
6.2 Using Live Data for Real-Time Monitoring
Live data allows you to monitor the vehicle’s operating parameters in real-time, providing valuable insights into its performance and potential issues.
-
Selecting Relevant Parameters:
- Choose the parameters that are most relevant to the issue you are troubleshooting.
- Common parameters to monitor include:
- Engine RPM
- Vehicle Speed
- Engine Coolant Temperature
- Intake Air Temperature
- Oxygen Sensor Voltage
- Fuel Trim
-
Interpreting Live Data:
- Monitor the data for any abnormal readings or fluctuations.
- Compare the data to the vehicle’s specifications to identify potential issues.
-
Example Scenario:
- Symptom: Engine overheating
- Live Data Parameters to Monitor:
- Engine Coolant Temperature
- Thermostat Position
- Coolant Fan Status
- Interpretation: If the engine coolant temperature is rising above the normal range and the coolant fan is not turning on, it could indicate a faulty coolant fan, a faulty coolant temperature sensor, or a faulty thermostat.
6.3 Regular Firmware Updates for Compatibility
Keeping your OBD2 scanner’s firmware up-to-date is essential for ensuring compatibility with newer vehicles and diagnostic protocols.
-
How to Check for Updates:
- Refer to the scanner’s user manual for instructions on how to check for and install firmware updates.
- Most scanners require you to connect the device to a computer and use a software application to download and install the updates.
-
Benefits of Updating:
- Improved compatibility with newer vehicles
- Access to new features and diagnostic capabilities
- Bug fixes and performance improvements
6.4 Knowing When to Seek Professional Help
While OBD2 scanners are valuable tools for diagnosing and troubleshooting vehicle issues, it’s important to know when to seek professional help.
-
Complex Issues:
- If you are unable to diagnose the issue using the scanner, or if the issue is complex and requires specialized knowledge or equipment, it’s best to consult a professional mechanic.
-
Safety Concerns:
- If the issue poses a safety risk, such as a brake problem or a steering issue, it’s essential to seek professional help immediately.
-
Lack of Experience:
- If you lack the experience or expertise to perform the necessary repairs, it’s best to leave it to a professional.
By following these tips and tricks, you can use your OBD2 scanner effectively and accurately diagnose and troubleshoot vehicle issues. However, it’s important to remember that OBD2 scanners are not a substitute for professional diagnostic equipment and expertise. When in doubt, always seek professional help. For Mercedes-Benz owners needing specialized diagnostics or assistance, MERCEDES-DIAGNOSTIC-TOOL.EDU.VN offers expert guidance and professional services. Contact us via Whatsapp at +1 (641) 206-8880 or visit our location at 789 Oak Avenue, Miami, FL 33101, United States, for personalized support.
7. Maintaining Your EDiag YA-101 Scanner
Proper maintenance ensures your EDiag YA-101 scanner remains in good working condition, providing accurate and reliable diagnostic information whenever you need it.
7.1 Cleaning and Storage Tips
- Cleaning: