Crafting a Homemade Obd2 To Usb Cable for your Mercedes can be a rewarding project, allowing you to access valuable diagnostic data and potentially unlock hidden features. This guide will provide a comprehensive overview of the process, components, and considerations for creating your own cable and how MERCEDES-DIAGNOSTIC-TOOL.EDU.VN can help you along the way.
Contents
- 1. Understanding the Purpose of a Homemade OBD2 to USB Cable
- 2. Is Building a Homemade OBD2 to USB Cable Feasible?
- 3. Essential Components for Your DIY OBD2 Cable
- 4. Tools Required for the Build
- 5. Step-by-Step Guide to Building Your Homemade OBD2 to USB Cable
- 6. Understanding CAN Bus Communication
- 7. Software Options for Diagnosing Your Mercedes
- 8. Unlocking Hidden Features: Proceed with Caution
- 9. Troubleshooting Common Issues
- 10. Safety Precautions
- 11. Alternatives to Building Your Own Cable
- 12. Maintaining Your Mercedes: The Importance of Regular Diagnostics
- 13. Understanding Mercedes-Specific Diagnostic Codes
- 14. Advanced Diagnostic Procedures
- 15. Common Mercedes-Benz Problems and Their Diagnostic Codes
- 16. Resources for Further Learning
- 17. The Future of Automotive Diagnostics
- 18. Disclaimer: Proceed at Your Own Risk
- 19. Why Choose MERCEDES-DIAGNOSTIC-TOOL.EDU.VN for Your Mercedes Diagnostic Needs?
- 20. Contact Us Today
- FAQ: Homemade OBD2 to USB Cable for Mercedes
- 1. What are the benefits of building a homemade OBD2 to USB cable?
- 2. Is it difficult to build a homemade OBD2 to USB cable?
- 3. What tools do I need to build an OBD2 to USB cable?
- 4. What components are required for a DIY OBD2 cable?
- 5. What is CAN bus and why is it important?
- 6. What software can I use with my homemade OBD2 to USB cable?
- 7. Can I unlock hidden features on my Mercedes with an OBD2 cable?
- 8. What are the risks of building a homemade OBD2 to USB cable?
- 9. How do I troubleshoot a homemade OBD2 to USB cable that’s not working?
- 10. Where can I get help if I’m having trouble building my OBD2 cable?
1. Understanding the Purpose of a Homemade OBD2 to USB Cable
An OBD2 (On-Board Diagnostics II) to USB cable acts as a bridge between your Mercedes’ diagnostic port and your computer. This connection allows you to:
- Read Diagnostic Trouble Codes (DTCs): Identify the source of problems triggering the check engine light.
- Access Live Data: Monitor real-time engine parameters like RPM, temperature, and sensor readings.
- Perform Diagnostic Tests: Run specific tests on various vehicle systems.
- Potentially Unlock Hidden Features: Some software allows customization of vehicle settings.
According to the Environmental Protection Agency (EPA), all cars and light trucks built and sold in the United States after January 1, 1996, are OBD2 compliant. This standardization allows a single cable and software interface to work across a wide range of vehicles.
2. Is Building a Homemade OBD2 to USB Cable Feasible?
Yes, building a homemade OBD2 to USB cable is feasible, but it requires a basic understanding of electronics, soldering skills (recommended), and careful attention to wiring. While it can save money compared to purchasing a pre-made cable, it’s crucial to prioritize safety and accuracy to avoid damaging your vehicle’s electronic systems. MERCEDES-DIAGNOSTIC-TOOL.EDU.VN recommends only attempting this if you are comfortable with basic electrical work.
3. Essential Components for Your DIY OBD2 Cable
Here’s a detailed breakdown of the parts you’ll need:
- OBD2 Connector (Female): This connects to the OBD2 port in your Mercedes. Look for a high-quality connector with sturdy pins. Corsa-Technic is a reliable supplier for such connectors.
- USB Connector (Type A or B): This connects to your computer. Choose the type that matches your computer’s available ports.
- Wires: Four wires are typically sufficient: power, ground, and two CAN bus wires (High and Low). 22-16AWG wire is generally suitable.
- 4-Pin Connector (Optional but Recommended): This simplifies connecting the wires between the OBD2 connector and the USB connector. A 4-pin connector from Corsa-Technic is a good option.
- Resistors (120 Ohms): These are crucial for proper CAN bus communication. You’ll need two resistors. According to Bosch, a 120-ohm resistor is standard for terminating CAN bus networks to minimize signal reflections and ensure data integrity.
- Enclosure (Optional): A small plastic enclosure can protect the components and make the cable more durable.
4. Tools Required for the Build
- Wire Strippers/Cutters: For preparing the wires.
- Needle-Nose Pliers: For manipulating small components.
- Soldering Iron and Solder (Recommended): To create secure and reliable connections.
- Multimeter: To test continuity and voltage.
- Molex Crimping Tool (Optional): If you’re using crimp-style connectors.
- Heat Shrink Tubing (Optional): For insulating connections.
5. Step-by-Step Guide to Building Your Homemade OBD2 to USB Cable
Here’s a detailed guide to constructing your cable. Remember to exercise caution and double-check all connections before plugging it into your vehicle.
Step 1: Prepare the OBD2 Connector
- Identify the necessary pins on the OBD2 connector:
- Pin 4: Chassis Ground
- Pin 6: CAN High (J-2284)
- Pin 14: CAN Low (J-2284)
- Pin 16: Battery Power
- If using an OBD2 cable with multiple wires, carefully separate the four wires you’ll need from the rest. Secure the unused wires to keep them out of the way.
- Strip the ends of the four wires, exposing about 3/8″ of the conductor.
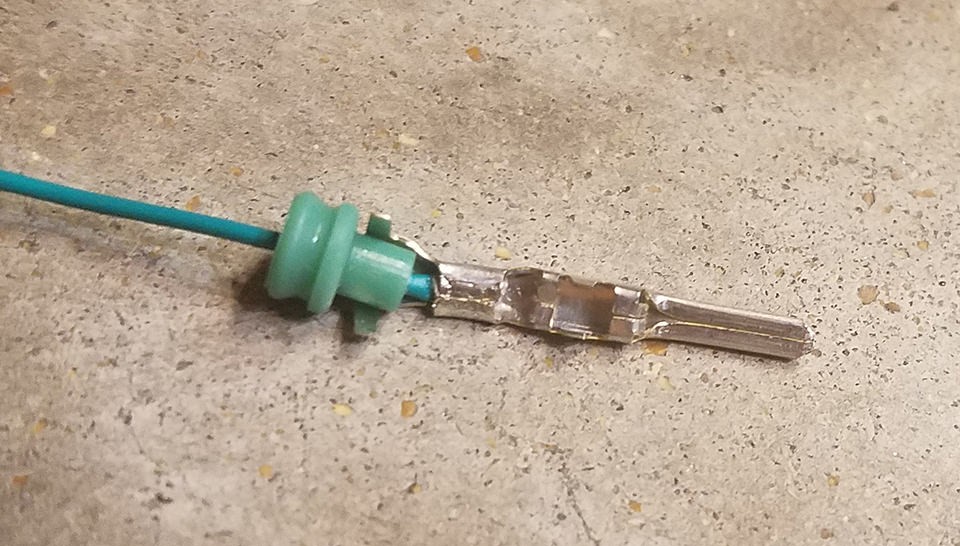
Step 2: Prepare the 4-Pin Connector (If Using)
- Slide a rubber seal onto each of the four wires.
- If the wire gauge is smaller than the pin size of the 4-pin connector (as might be the case with 26AWG wire), fold the exposed wire over itself to increase its thickness. This will ensure a better connection.
- Insert the exposed wire into the pin connector.
Step 3: Soldering (Recommended) or Crimping
- Soldering: Solder the wire to the pin connector for a solid connection. Ensure the solder flows smoothly and creates a strong bond. Watch online tutorials for soldering tips.
- Crimping: If you have a Molex crimping tool, use it to crimp the connector over the wire. If not, use needle-nose pliers to carefully fold the prongs of the connector over the wire. Ensure a tight and secure connection.
Step 4: Secure the Rubber Seals
- Slide the rubber seal up to the back of the pin connector.
- Use the crimping tool or pliers to fold the prongs over the seal, securing it in place.
Step 5: Pair and Twist the Wires
- Pair the wires as follows:
- Pin 4 (Ground) with Pin 16 (Power)
- Pin 6 (CAN High) with Pin 14 (CAN Low)
- Twist each pair of wires together. This helps reduce electromagnetic interference and improves signal quality. According to research published in the journal “IEEE Transactions on Electromagnetic Compatibility,” twisting wire pairs can significantly reduce electromagnetic radiation and susceptibility.
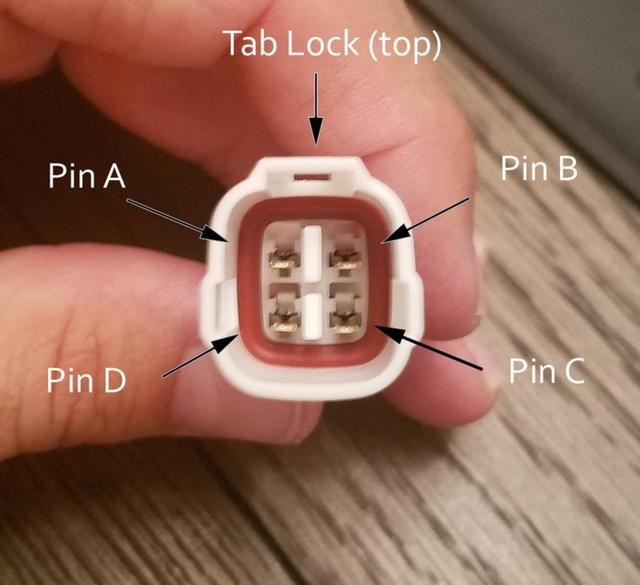
Step 6: Insert Pins into the 4-Pin Connector
- Insert the pins into the 4-pin connector in the following orientation:
- Pin 14 (CAN Low) > Connector Slot A
- Pin 6 (CAN High) > Connector Slot B
- Pin 16 (Power) > Connector Slot C
- Pin 4 (Ground) > Connector Slot D
- Push the pins in until you hear an audible click, indicating they are locked in place.
Step 7: Prepare the USB Connector
- Identify the four necessary wires on the USB connector:
- Power (VCC) – Typically Red
- Data + – Typically Green
- Data – – Typically White
- Ground – Typically Black
- Strip the ends of the four wires.
Step 8: Connect the 4-Pin Connector to the USB Connector
- This is where you’ll need to incorporate the 120-ohm resistors for the CAN High and CAN Low lines.
- Solder (or crimp) the wires from the 4-pin connector to the corresponding wires on the USB connector, incorporating the resistors into the CAN High and CAN Low lines. The resistor should be placed in series with each CAN line.
- CAN High (from 4-pin connector) -> Resistor -> Data + (USB)
- CAN Low (from 4-pin connector) -> Resistor -> Data – (USB)
- Power (from 4-pin connector) -> Power (USB)
- Ground (from 4-pin connector) -> Ground (USB)
- Insulate all connections with heat shrink tubing or electrical tape to prevent shorts.
Step 9: Testing and Verification
- Before plugging the cable into your Mercedes, use a multimeter to check for continuity and shorts.
- Verify that the voltage between the power and ground wires is approximately 5V.
- Once you’re confident in the wiring, plug the cable into your Mercedes and your computer.
- Use a compatible diagnostic software to test the connection and read data from your vehicle.
Important Considerations:
- Wiring Diagrams: Always consult reliable wiring diagrams specific to your Mercedes model to ensure correct connections.
- CAN Bus Termination: The 120-ohm resistors are essential for proper CAN bus communication. Omitting them can lead to errors and unreliable data.
- Software Compatibility: Ensure the diagnostic software you plan to use is compatible with your Mercedes model and the cable you’ve built.
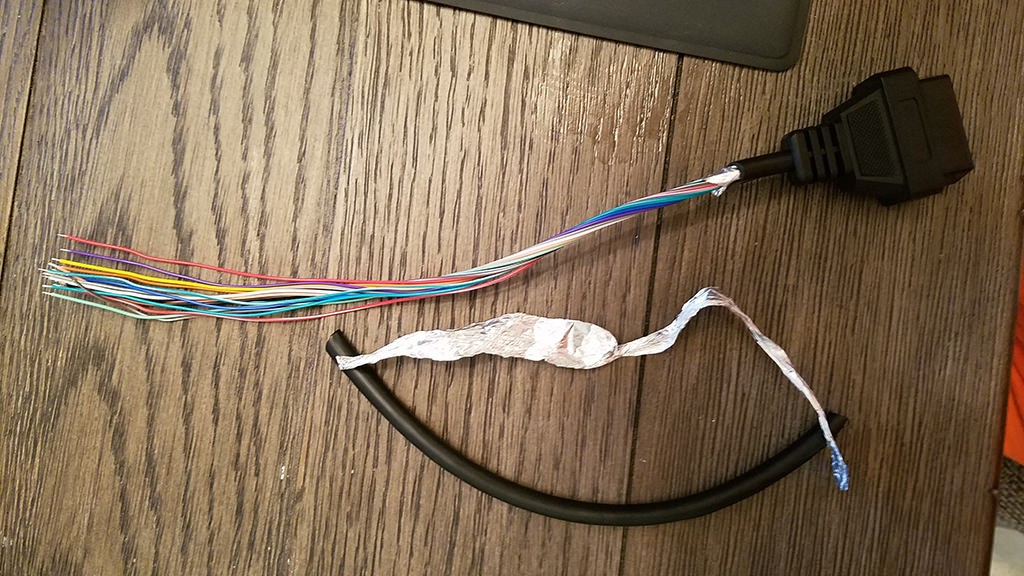 Stripped sheath and shielding
6. Understanding CAN Bus Communication
The Controller Area Network (CAN) bus is a robust communication protocol widely used in automotive applications. It allows various electronic control units (ECUs) within the vehicle to communicate with each other. Understanding the basics of CAN bus communication is crucial for building a reliable OBD2 to USB cable.
- Differential Signaling: CAN bus uses differential signaling, meaning data is transmitted over two wires (CAN High and CAN Low). The difference in voltage between these two wires represents the data. This method is highly resistant to noise and interference.
- Termination Resistors: As mentioned earlier, 120-ohm resistors are used to terminate the CAN bus network at each end. These resistors prevent signal reflections, which can cause data corruption.
- Data Frames: CAN bus communication is based on data frames, which contain information such as the message ID, data length, and the actual data being transmitted.
7. Software Options for Diagnosing Your Mercedes
Once you have your homemade OBD2 to USB cable, you’ll need software to interface with your Mercedes’ diagnostic system. Here are a few popular options:
- XENTRY/DAS: This is the official Mercedes-Benz diagnostic software. It offers the most comprehensive functionality but can be expensive and complex to set up.
- Vediamo: This is a more user-friendly alternative to XENTRY/DAS, offering a wide range of diagnostic and programming capabilities.
- Autel MaxiSYS: A professional-grade scan tool with extensive Mercedes-Benz coverage.
- OBD Fusion (for iOS and Android): A mobile app that can read DTCs and display live data.
- Torque Pro (for Android): Another popular mobile app with a wide range of plugins and customization options.
MERCEDES-DIAGNOSTIC-TOOL.EDU.VN can advise you on the best software for your specific needs and budget.
8. Unlocking Hidden Features: Proceed with Caution
One of the appealing aspects of OBD2 connectivity is the potential to unlock hidden features in your Mercedes. These features can include:
- Cornering Lights Activation: Activating fog lights when turning.
- Seatbelt Warning Deactivation: Disabling the seatbelt warning chime.
- AMG Menu Activation: Accessing AMG-specific menus in the instrument cluster (if applicable).
- Video in Motion: Enabling video playback while driving (use with caution and in accordance with local laws).
However, it’s crucial to proceed with caution when unlocking hidden features. Incorrect modifications can lead to:
- Malfunctions: Unexpected behavior of vehicle systems.
- Warranty Voidance: Modifications may void your vehicle’s warranty.
- Safety Issues: Some features may be disabled for safety reasons.
MERCEDES-DIAGNOSTIC-TOOL.EDU.VN strongly recommends researching thoroughly and understanding the potential consequences before attempting to unlock any hidden features. We can also provide guidance and support to ensure you make informed decisions.
9. Troubleshooting Common Issues
If you encounter problems with your homemade OBD2 to USB cable, here are a few troubleshooting tips:
- No Connection:
- Check all wiring connections for continuity and shorts.
- Verify that the OBD2 port in your vehicle is receiving power.
- Try a different USB port on your computer.
- Ensure that the diagnostic software is properly configured to connect to the cable.
- Data Errors:
- Check the CAN bus termination resistors (120 ohms).
- Ensure that the CAN High and CAN Low wires are properly connected.
- Try a different diagnostic software.
- Software Not Recognizing Cable:
- Install the necessary USB drivers for the cable.
- Check the software settings to ensure the correct COM port is selected.
10. Safety Precautions
- Disconnect the Battery: Before working on your vehicle’s electrical system, disconnect the negative terminal of the battery to prevent accidental shorts.
- Double-Check Wiring: Always double-check your wiring connections before plugging the cable into your vehicle.
- Use a Multimeter: Use a multimeter to verify continuity and voltage levels before connecting the cable to your Mercedes.
- Research Thoroughly: Before attempting any modifications or diagnostic tests, research thoroughly and understand the potential consequences.
- Seek Professional Help: If you’re not comfortable with any of these steps, seek professional help from a qualified mechanic or automotive electrician.
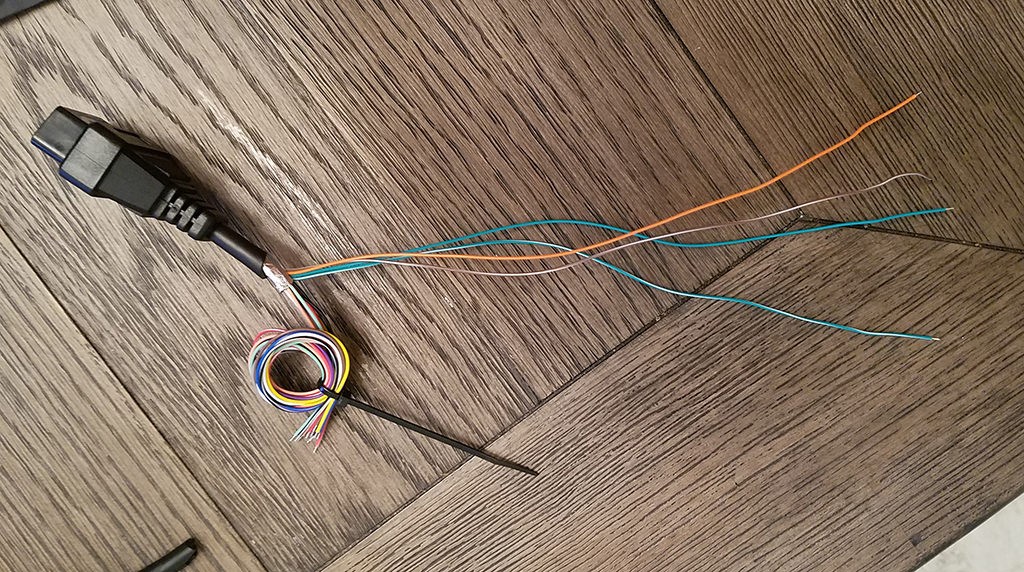 Separated 4 wires being used
11. Alternatives to Building Your Own Cable
If building your own OBD2 to USB cable seems too daunting, there are several commercially available options:
- Pre-Made OBD2 to USB Cables: These are readily available online and offer a plug-and-play solution. Brands like OBDLink and Veepeak are known for their quality.
- Bluetooth OBD2 Scanners: These wireless scanners connect to your smartphone or tablet via Bluetooth and offer a convenient way to read diagnostic data.
- Professional Scan Tools: These are more expensive but offer a wider range of features and capabilities.
MERCEDES-DIAGNOSTIC-TOOL.EDU.VN can help you choose the best option based on your needs and budget.
12. Maintaining Your Mercedes: The Importance of Regular Diagnostics
Regular diagnostics are crucial for maintaining the health and performance of your Mercedes. By regularly scanning your vehicle for DTCs and monitoring live data, you can identify potential problems early on and prevent costly repairs.
- Early Detection: Identifying problems early can prevent them from escalating into more serious issues.
- Performance Optimization: Monitoring live data can help you optimize your vehicle’s performance and fuel efficiency.
- Preventive Maintenance: Regular diagnostics can help you identify maintenance needs before they become critical.
13. Understanding Mercedes-Specific Diagnostic Codes
Mercedes-Benz uses a specific set of diagnostic trouble codes (DTCs) that may differ slightly from generic OBD2 codes. Understanding these codes is essential for accurate diagnosis and repair.
- Mercedes-Specific Codes: These codes provide more detailed information about the specific problem affecting your vehicle.
- Online Resources: Several online resources provide information about Mercedes-specific DTCs.
- Diagnostic Software: Professional diagnostic software like XENTRY/DAS and Vediamo can provide detailed descriptions and troubleshooting steps for Mercedes-specific DTCs.
14. Advanced Diagnostic Procedures
Beyond reading DTCs and monitoring live data, advanced diagnostic procedures can help you pinpoint the root cause of complex problems. These procedures may include:
- Actuator Tests: Activating specific components to verify their functionality.
- Sensor Simulations: Simulating sensor signals to test the response of the ECU.
- Component Testing: Testing individual components with a multimeter or oscilloscope.
These advanced procedures often require specialized knowledge and equipment. MERCEDES-DIAGNOSTIC-TOOL.EDU.VN can connect you with experienced technicians who can perform these tests.
15. Common Mercedes-Benz Problems and Their Diagnostic Codes
Here are some common Mercedes-Benz problems and the diagnostic codes that may be associated with them:
| Problem | Possible DTCs |
|---|---|
| Misfires | P0300, P0301, P0302, P0303, P0304, etc. |
| Oxygen Sensor Issues | P0130, P0131, P0132, P0133, P0134, etc. |
| Mass Airflow (MAF) Sensor Problems | P0100, P0101, P0102, P0103, P0104 |
| Catalytic Converter Efficiency | P0420, P0430 |
| Transmission Problems | P0700, P0715, P0720, P0730, P0740, etc. |
| ABS/ESP Issues | C Codes (e.g., C1000, C1100, C1200 series) |
| Airbag System Problems | B Codes (e.g., B1000, B1100, B1200 series) |
Note: This is not an exhaustive list, and the specific DTCs may vary depending on the Mercedes-Benz model and year.
 Stripped sheath and shielding
16. Resources for Further Learning
- Mercedes-Benz Service Manuals: These manuals provide detailed information about your vehicle’s systems and components.
- Online Forums: Online forums dedicated to Mercedes-Benz vehicles can be a valuable resource for troubleshooting and sharing information.
- YouTube Channels: Many YouTube channels offer tutorials and diagnostic tips for Mercedes-Benz vehicles.
- MERCEDES-DIAGNOSTIC-TOOL.EDU.VN: We provide a wealth of information and resources to help you diagnose and maintain your Mercedes-Benz.
17. The Future of Automotive Diagnostics
Automotive diagnostics are constantly evolving with the advent of new technologies. Some trends to watch include:
- Remote Diagnostics: The ability to diagnose and repair vehicles remotely using telematics data.
- Artificial Intelligence (AI): AI-powered diagnostic tools that can analyze data and provide insights.
- Augmented Reality (AR): AR applications that can overlay diagnostic information onto the real world.
These advancements will make automotive diagnostics more efficient and accessible in the future.
18. Disclaimer: Proceed at Your Own Risk
Building a homemade OBD2 to USB cable involves working with electrical components and your vehicle’s sensitive electronic systems. While this guide provides detailed instructions, it’s essential to understand that you are proceeding at your own risk.
MERCEDES-DIAGNOSTIC-TOOL.EDU.VN is not responsible for any damage or injury that may result from building or using a homemade OBD2 to USB cable. If you’re not comfortable with any of these steps, seek professional help from a qualified mechanic or automotive electrician.
19. Why Choose MERCEDES-DIAGNOSTIC-TOOL.EDU.VN for Your Mercedes Diagnostic Needs?
At MERCEDES-DIAGNOSTIC-TOOL.EDU.VN, we are dedicated to providing comprehensive information and resources for Mercedes-Benz owners and enthusiasts. Whether you’re looking to build your own OBD2 cable, diagnose a problem, unlock hidden features, or simply learn more about your vehicle, we’re here to help.
- Expert Guidance: We offer expert guidance and support to help you navigate the complexities of Mercedes-Benz diagnostics.
- Comprehensive Resources: Our website provides a wealth of information, including articles, tutorials, and wiring diagrams.
- Community Forum: Connect with other Mercedes-Benz owners and enthusiasts in our online forum.
- Professional Services: We can connect you with experienced technicians who can perform advanced diagnostic procedures and repairs.
20. Contact Us Today
Ready to take control of your Mercedes-Benz diagnostics? Contact MERCEDES-DIAGNOSTIC-TOOL.EDU.VN today for expert guidance and support.
- Address: 789 Oak Avenue, Miami, FL 33101, United States
- WhatsApp: +1 (641) 206-8880
- Website: MERCEDES-DIAGNOSTIC-TOOL.EDU.VN
Let us help you unlock the full potential of your Mercedes-Benz.
 Stripped sheath and shielding
FAQ: Homemade OBD2 to USB Cable for Mercedes
1. What are the benefits of building a homemade OBD2 to USB cable?
Building your own cable can save money compared to buying a pre-made one and gives you a better understanding of how the system works. It also allows for customization to suit your specific needs.
2. Is it difficult to build a homemade OBD2 to USB cable?
It requires some basic electronics knowledge, soldering skills (recommended), and careful attention to detail. If you’re comfortable with these, it’s a manageable project.
3. What tools do I need to build an OBD2 to USB cable?
You’ll need wire strippers/cutters, needle-nose pliers, a soldering iron (recommended), a multimeter, and optionally a Molex crimping tool.
4. What components are required for a DIY OBD2 cable?
You’ll need an OBD2 connector, a USB connector, four wires, two 120-ohm resistors, and optionally a 4-pin connector and an enclosure.
5. What is CAN bus and why is it important?
CAN (Controller Area Network) bus is a communication protocol used in vehicles. It allows different electronic control units (ECUs) to communicate with each other. The 120-ohm resistors are crucial for proper CAN bus communication.
6. What software can I use with my homemade OBD2 to USB cable?
Popular options include XENTRY/DAS, Vediamo, Autel MaxiSYS, OBD Fusion, and Torque Pro. Ensure the software is compatible with your Mercedes model.
7. Can I unlock hidden features on my Mercedes with an OBD2 cable?
Yes, some software allows you to unlock hidden features, but proceed with caution as incorrect modifications can cause malfunctions or void your warranty.
8. What are the risks of building a homemade OBD2 to USB cable?
Incorrect wiring can damage your vehicle’s electronic systems. Always double-check your connections and proceed at your own risk.
9. How do I troubleshoot a homemade OBD2 to USB cable that’s not working?
Check all wiring connections, verify power to the OBD2 port, try a different USB port, and ensure the diagnostic software is properly configured.
10. Where can I get help if I’m having trouble building my OBD2 cable?
MERCEDES-DIAGNOSTIC-TOOL.EDU.VN offers expert guidance and support. You can also consult online forums and YouTube channels dedicated to Mercedes-Benz vehicles.
Contact MERCEDES-DIAGNOSTIC-TOOL.EDU.VN today for expert guidance and support! Address: 789 Oak Avenue, Miami, FL 33101, United States. WhatsApp: +1 (641) 206-8880. Website: MERCEDES-DIAGNOSTIC-TOOL.EDU.VN
