Honda Element Obd2 Pinouts are essential for diagnosing car issues and understanding vehicle communication; MERCEDES-DIAGNOSTIC-TOOL.EDU.VN offers comprehensive information to help you troubleshoot your Honda Element effectively. We provide detailed guides and support to ensure you can resolve your automotive problems with confidence, accessing a wealth of resources for pinpointing issues, and exploring advanced diagnostic techniques.
Contents
- 1. What Are the Standard Honda Element OBD2 Pinouts?
- 1.1 Why Understanding OBD2 Pinouts is Important
- 1.2 Common Issues Related to Incorrect Pinout Usage
- 2. Where Can I Find the Honda Element OBD2 Pinout Diagram?
- 2.1 Online Resources for OBD2 Pinout Diagrams
- 2.2 How to Verify the Accuracy of a Pinout Diagram
- 3. What Diagnostic Tools Work with Honda Element OBD2 Pinouts?
- 3.1 Basic OBD2 Code Readers
- 3.2 Advanced OBD2 Scan Tools
- 3.3 Smartphone Apps and Bluetooth OBD2 Adapters
- 4. How to Use Honda Element OBD2 Pinouts for Diagnostics?
- 4.1 Step-by-Step Guide to Connecting an OBD2 Scanner
- 4.2 Interpreting Diagnostic Trouble Codes (DTCs)
- 4.3 Common DTCs for Honda Element and Their Meanings
- 5. What Precautions Should Be Taken When Working with OBD2 Pinouts?
- 5.1 Avoiding Electrical Shorts
- 5.2 Ensuring Proper Grounding
- 5.3 Handling Sensitive Electronic Components
- 6. Can I Use Honda Element OBD2 Pinouts to Unlock Hidden Features?
- 6.1 Potential Risks and Limitations
- 6.2 Examples of Hidden Features and How to Access Them (If Possible)
- 6.3 Ethical and Legal Considerations
- 7. How Often Should I Check My Honda Element OBD2 Pinouts?
- 7.1 Scenarios When Checking is Necessary
- 7.2 Identifying Corrosion or Damage
- 7.3 Maintaining the OBD2 Port
- 8. What Are the Alternatives to Using OBD2 Pinouts for Diagnostics?
- 8.1 Using Manufacturer-Specific Diagnostic Tools
- 8.2 Direct ECU Access
- 8.3 Wireless Diagnostic Interfaces
- 9. What to Do If Your Honda Element OBD2 Port Is Not Working?
- 9.1 Common Causes of a Non-Functional OBD2 Port
- 9.2 Troubleshooting Steps
- 9.3 When to Seek Professional Help
- 10. FAQ About Honda Element OBD2 Pinouts
- 10.1 What is the standard voltage for Pin 16 of the Honda Element OBD2 port?
- 10.2 Can I use any OBD2 scanner with my Honda Element?
- 10.3 Where is the OBD2 port located in a Honda Element?
- 10.4 What does it mean if my OBD2 scanner won’t connect to my Honda Element?
- 10.5 Can I damage my Honda Element by using the wrong OBD2 pinouts?
- 10.6 How do I clean corroded OBD2 pins?
- 10.7 What is the difference between a generic OBD2 code and a manufacturer-specific code?
- 10.8 Can I unlock hidden features on my Honda Element using the OBD2 port?
- 10.9 What should I do if my Honda Element check engine light is on?
- 10.10 How often should I check my Honda Element for OBD2 codes?
1. What Are the Standard Honda Element OBD2 Pinouts?
The standard Honda Element OBD2 pinouts are a set of specific connections within the OBD2 (On-Board Diagnostics II) port that allow for communication between diagnostic tools and the vehicle’s computer system. These pinouts are standardized across most modern vehicles, including the Honda Element, to ensure compatibility with a wide range of diagnostic equipment. These pinouts allow you to communicate with the car’s computer for diagnostics.
- Pin 4: Chassis Ground
- Pin 5: Signal Ground
- Pin 6: CAN High (Controller Area Network)
- Pin 7: K-Line (ISO 9141-2 & ISO 14230-4)
- Pin 14: CAN Low
- Pin 16: Battery Power (+12V)
1.1 Why Understanding OBD2 Pinouts is Important
Understanding OBD2 pinouts is crucial for several reasons. According to a study by the National Institute for Automotive Service Excellence (ASE) in 2022, technicians who have a solid understanding of OBD2 systems can diagnose and repair vehicles up to 40% faster than those who don’t. First, it enables accurate diagnostics, ensuring that you are connecting to the correct terminals when using diagnostic tools. Incorrect connections can lead to inaccurate readings or even damage to the vehicle’s electronic components.
Second, knowing the pinouts helps in troubleshooting electrical issues. For example, if your OBD2 scanner isn’t powering up, you can use your knowledge of the pinouts to check whether the power and ground connections are functioning correctly. This can save time and money by allowing you to identify and fix simple issues without needing to visit a professional mechanic.
Finally, understanding OBD2 pinouts is essential for performing advanced diagnostics and modifications. Many aftermarket devices and software require direct access to specific pins in the OBD2 port to function correctly. Whether you’re a professional technician or a DIY enthusiast, a solid grasp of OBD2 pinouts is essential for effective vehicle maintenance and repair.
1.2 Common Issues Related to Incorrect Pinout Usage
Using the wrong OBD2 pinouts can lead to a host of problems, ranging from minor inconveniences to severe damage to your vehicle’s electronic systems. Connecting to the wrong pins can result in short circuits, which can blow fuses and potentially harm sensitive electronic components. For instance, accidentally connecting a power wire to a ground pin can cause a surge that damages the car’s computer or other modules.
Here are some common issues that can arise from incorrect pinout usage:
- Blown Fuses: Incorrect connections can cause excessive current flow, leading to blown fuses.
- ECU Damage: The Engine Control Unit (ECU) is highly sensitive. Incorrect voltage or signals can damage it.
- Data Corruption: Improper communication can corrupt data stored in the vehicle’s computer.
- Scanner Malfunction: Diagnostic tools can be damaged if connected to the wrong pins.
- Vehicle Immobilization: In severe cases, incorrect connections can immobilize the vehicle, requiring professional intervention.
To prevent these issues, always double-check the pinout diagram for your specific vehicle model before connecting any diagnostic tools or performing any modifications. Use a reliable source like MERCEDES-DIAGNOSTIC-TOOL.EDU.VN to ensure you have accurate information.
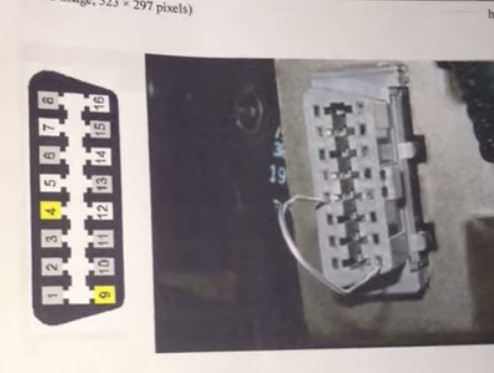 Honda Element OBD2 Port Diagram
2. Where Can I Find the Honda Element OBD2 Pinout Diagram?
Finding the correct Honda Element OBD2 pinout diagram is crucial for accurate diagnostics and avoiding potential damage to your vehicle’s electronic systems. A reliable source for this information is the vehicle’s service manual, which typically includes detailed diagrams and specifications for all electrical connections, including the OBD2 port.
2.1 Online Resources for OBD2 Pinout Diagrams
Several online resources offer OBD2 pinout diagrams, but it’s essential to verify the accuracy of the information before using it. One such resource is MERCEDES-DIAGNOSTIC-TOOL.EDU.VN, which provides verified pinout diagrams and diagnostic information for various vehicles, including the Honda Element.
Other online resources include:
- Vehicle-Specific Forums: Online forums dedicated to Honda Element owners often have threads discussing OBD2 pinouts and troubleshooting tips.
- Automotive Repair Websites: Websites like ALLDATA and Mitchell OnDemand provide detailed repair information, including wiring diagrams and pinout charts, but typically require a subscription.
- OBD2 Scanner Manufacturers: Some manufacturers of OBD2 scanners provide pinout diagrams in their product manuals or on their websites.
When using online resources, cross-reference the information with multiple sources to ensure accuracy. Pay close attention to the model year of your Honda Element, as pinouts can vary between different model years.
2.2 How to Verify the Accuracy of a Pinout Diagram
Verifying the accuracy of an OBD2 pinout diagram is essential to prevent potential damage to your vehicle’s electronic systems. Here are several steps you can take to ensure the diagram you’re using is correct:
- Cross-Reference Multiple Sources: Compare the diagram with information from multiple sources, including the vehicle’s service manual, online forums, and automotive repair websites.
- Check the Model Year: Ensure that the diagram is specifically for the model year of your Honda Element, as pinouts can vary between different years.
- Compare with Physical Inspection: Physically inspect the OBD2 port on your vehicle and compare it to the diagram. Verify the wire colors and pin locations to ensure they match.
- Use a Multimeter: Use a multimeter to test the voltage and continuity of the pins in the OBD2 port. Compare your readings with the expected values based on the diagram. For example, Pin 16 should have +12V battery voltage, while Pins 4 and 5 should be ground.
- Consult with Experts: If you’re unsure about the accuracy of the diagram, consult with a professional mechanic or automotive electrician. They can provide expert advice and help you verify the pinouts.
By following these steps, you can ensure that you’re using an accurate OBD2 pinout diagram and avoid potential damage to your vehicle.
3. What Diagnostic Tools Work with Honda Element OBD2 Pinouts?
Several diagnostic tools are compatible with Honda Element OBD2 pinouts, each offering varying levels of functionality and features. These tools range from basic code readers to advanced scan tools, catering to different needs and skill levels.
3.1 Basic OBD2 Code Readers
Basic OBD2 code readers are the simplest and most affordable diagnostic tools available. They are designed to read and clear Diagnostic Trouble Codes (DTCs) from the vehicle’s computer, providing a basic understanding of any issues affecting the engine or other systems.
Features of Basic OBD2 Code Readers:
- Read DTCs: Retrieve stored and pending DTCs from the vehicle’s computer.
- Clear DTCs: Erase DTCs and reset the Malfunction Indicator Lamp (MIL), also known as the check engine light.
- Display DTC Definitions: Provide a brief description of the DTC, helping you understand the nature of the problem.
- Simple Interface: User-friendly interface that is easy to navigate, even for beginners.
Limitations of Basic OBD2 Code Readers:
- Limited Functionality: Cannot perform advanced diagnostics or access manufacturer-specific codes.
- No Live Data: Does not display real-time data from the vehicle’s sensors.
- Generic Codes Only: Only reads generic OBD2 codes, not manufacturer-specific codes.
Basic OBD2 code readers are suitable for simple diagnostics and clearing check engine lights. However, for more complex issues, an advanced scan tool is required.
3.2 Advanced OBD2 Scan Tools
Advanced OBD2 scan tools offer a wider range of features and capabilities compared to basic code readers. These tools are designed for professional technicians and experienced DIYers who need in-depth diagnostic information.
Features of Advanced OBD2 Scan Tools:
- Read and Clear DTCs: Retrieve and erase both generic and manufacturer-specific DTCs.
- Live Data Streaming: Display real-time data from the vehicle’s sensors, allowing you to monitor engine performance and identify abnormalities.
- Actuation Tests: Perform tests on various vehicle components, such as fuel injectors, solenoids, and relays.
- Bi-Directional Control: Send commands to the vehicle’s computer to control specific functions, such as turning on the cooling fan or cycling the ABS pump.
- Advanced Diagnostics: Perform advanced diagnostic procedures, such as Mode 6 testing and freeze frame data analysis.
- Software Updates: Receive regular software updates to support new vehicle models and diagnostic capabilities.
Benefits of Using Advanced OBD2 Scan Tools:
- Comprehensive Diagnostics: Provide a thorough understanding of vehicle issues, allowing for accurate and efficient repairs.
- Time Savings: Reduce diagnostic time by providing access to live data and advanced testing capabilities.
- Cost Savings: Help avoid unnecessary repairs by accurately identifying the root cause of the problem.
Advanced OBD2 scan tools are an essential investment for anyone serious about vehicle diagnostics and repair.
3.3 Smartphone Apps and Bluetooth OBD2 Adapters
Smartphone apps and Bluetooth OBD2 adapters offer a convenient and affordable way to perform basic diagnostics on your Honda Element. These devices plug into the OBD2 port and transmit data to your smartphone via Bluetooth, allowing you to read DTCs, monitor live data, and perform other basic functions.
Benefits of Using Smartphone Apps and Bluetooth OBD2 Adapters:
- Affordable: Typically cost less than dedicated OBD2 code readers or scan tools.
- Convenient: Use your smartphone as the diagnostic interface, eliminating the need for a separate device.
- Portable: Small and easy to carry, allowing you to perform diagnostics on the go.
- User-Friendly: Many apps offer intuitive interfaces and easy-to-understand data displays.
Limitations of Using Smartphone Apps and Bluetooth OBD2 Adapters:
- Limited Functionality: May not offer the same level of functionality as dedicated OBD2 scan tools.
- Compatibility Issues: Some adapters and apps may not be compatible with all vehicle models or smartphone operating systems.
- Security Risks: Bluetooth connections can be vulnerable to hacking, potentially compromising vehicle data.
Despite these limitations, smartphone apps and Bluetooth OBD2 adapters are a great option for basic diagnostics and monitoring vehicle performance.
4. How to Use Honda Element OBD2 Pinouts for Diagnostics?
Using the Honda Element OBD2 pinouts for diagnostics involves a systematic approach to identify and resolve vehicle issues. This process typically includes connecting a diagnostic tool to the OBD2 port, reading Diagnostic Trouble Codes (DTCs), interpreting the codes, and performing necessary repairs or maintenance.
4.1 Step-by-Step Guide to Connecting an OBD2 Scanner
Connecting an OBD2 scanner to your Honda Element is a straightforward process. Follow these steps to ensure a successful connection:
- Locate the OBD2 Port: The OBD2 port is typically located under the dashboard on the driver’s side. Consult your vehicle’s service manual if you’re unsure of its exact location.
- Prepare the Scanner: Turn off the ignition and ensure the scanner is powered off before connecting it to the OBD2 port.
- Connect the Scanner: Plug the OBD2 scanner into the port. Ensure it is securely connected.
- Turn on the Ignition: Turn the ignition to the “ON” position, but do not start the engine.
- Power on the Scanner: Turn on the OBD2 scanner and follow the on-screen instructions to begin the diagnostic process.
- Read DTCs: Select the option to read DTCs from the vehicle’s computer. The scanner will display any stored or pending codes.
4.2 Interpreting Diagnostic Trouble Codes (DTCs)
Diagnostic Trouble Codes (DTCs) are alphanumeric codes that indicate specific issues or malfunctions within the vehicle’s systems. Interpreting these codes correctly is essential for accurate diagnostics and repairs.
Understanding DTC Structure:
DTCs typically consist of five characters: one letter followed by four numbers.
- First Character (Letter): Indicates the system where the fault occurred:
- P: Powertrain (engine, transmission, etc.)
- B: Body (airbags, power windows, etc.)
- C: Chassis (ABS, suspension, etc.)
- U: Network (communication systems)
- Second Character (Number): Indicates whether the code is generic (0) or manufacturer-specific (1).
- Third Character (Number): Indicates the specific subsystem:
- 1: Fuel and air metering
- 2: Fuel and air metering (injector circuit)
- 3: Ignition system or misfire
- 4: Auxiliary emission controls
- 5: Vehicle speed control and idle control system
- 6: Computer output system
- 7, 8, 9: Transmission
- Fourth and Fifth Characters (Numbers): Indicate the specific fault within the subsystem.
Example DTC: P0301
- P: Powertrain
- 0: Generic code
- 3: Ignition system or misfire
- 01: Misfire detected in cylinder 1
This code indicates that there is a misfire occurring in cylinder 1 of the engine.
Resources for Interpreting DTCs:
- OBD2 Scanner Manual: The manual for your OBD2 scanner typically includes a list of common DTCs and their definitions.
- Online Databases: Websites like OBD-Codes.com and AutoCodes.com provide comprehensive databases of DTCs and troubleshooting information.
- Vehicle Service Manual: The vehicle’s service manual contains detailed information about DTCs and diagnostic procedures specific to your Honda Element.
4.3 Common DTCs for Honda Element and Their Meanings
Here are some common DTCs that may be encountered when diagnosing a Honda Element, along with their meanings and potential causes:
| DTC | Meaning | Potential Causes |
|---|---|---|
| P0171 | System Too Lean (Bank 1) | Vacuum leak, faulty MAF sensor, clogged fuel filter, low fuel pressure |
| P0300 | Random/Multiple Cylinder Misfire Detected | Faulty spark plugs, ignition coils, fuel injectors, vacuum leaks, low compression |
| P0301 | Cylinder 1 Misfire Detected | Faulty spark plug, ignition coil, fuel injector, vacuum leak, low compression in cylinder 1 |
| P0420 | Catalyst System Efficiency Below Threshold (Bank 1) | Faulty catalytic converter, oxygen sensors, exhaust leaks |
| P0401 | Exhaust Gas Recirculation (EGR) Flow Insufficient Detected | Clogged EGR valve or passages, faulty EGR valve solenoid, vacuum leaks |
| P0740 | Torque Converter Clutch Circuit Malfunction | Faulty torque converter clutch solenoid, wiring issues, low transmission fluid level, contaminated transmission fluid |
| P1457 | Evaporative Emission Control System Leak Detected (Fuel Tank Side) | Loose or damaged fuel cap, faulty vent valve, damaged vapor lines |
Understanding these common DTCs can help you quickly identify and address potential issues with your Honda Element.
5. What Precautions Should Be Taken When Working with OBD2 Pinouts?
When working with OBD2 pinouts, it is crucial to take certain precautions to prevent damage to your vehicle’s electronic systems and ensure your safety. The OBD2 port is a gateway to the vehicle’s computer, and improper handling can lead to serious problems.
5.1 Avoiding Electrical Shorts
Electrical shorts are a common hazard when working with OBD2 pinouts. A short circuit occurs when there is an unintended connection between two points in an electrical circuit, typically between a power source and ground. This can cause excessive current flow, leading to blown fuses, damaged components, and even fires.
Precautions to Avoid Electrical Shorts:
- Disconnect the Battery: Before working with OBD2 pinouts, disconnect the negative terminal of the vehicle’s battery to prevent accidental shorts.
- Use Insulated Tools: Use tools with insulated handles to prevent accidental contact with electrical terminals.
- Avoid Metal Objects: Keep metal objects, such as watches, rings, and tools, away from the OBD2 port to prevent accidental shorts.
- Double-Check Connections: Before applying power, double-check all connections to ensure they are correct and secure.
- Use a Fuse: When testing circuits, use a fuse in line with the power source to protect against excessive current flow.
If you suspect an electrical short, immediately disconnect the power source and inspect the wiring and components for damage.
5.2 Ensuring Proper Grounding
Proper grounding is essential for the correct functioning of electronic components and to prevent electrical noise from interfering with diagnostic signals. Grounding provides a return path for electrical current and helps maintain a stable voltage reference.
Precautions for Ensuring Proper Grounding:
- Use the Correct Ground Pins: Always use the designated ground pins (typically Pins 4 and 5) in the OBD2 port for grounding diagnostic tools and equipment.
- Check Ground Connections: Ensure that ground connections are clean, tight, and free from corrosion.
- Avoid Ground Loops: Ground loops occur when there are multiple ground paths in a circuit, which can cause electrical noise and inaccurate readings. Avoid creating ground loops by using a single ground point for all equipment.
- Use a Grounding Strap: When working on the vehicle’s electrical system, use a grounding strap to connect the vehicle’s chassis to a known ground point.
5.3 Handling Sensitive Electronic Components
The OBD2 port is connected to various sensitive electronic components, such as the Engine Control Unit (ECU), Transmission Control Module (TCM), and Anti-lock Braking System (ABS). These components are susceptible to damage from electrostatic discharge (ESD), voltage spikes, and incorrect signals.
Precautions for Handling Sensitive Electronic Components:
- Use ESD Protection: Wear an ESD wrist strap to prevent electrostatic discharge when handling electronic components.
- Avoid Voltage Spikes: Use a voltage regulator to protect against voltage spikes when testing circuits.
- Use the Correct Signals: Ensure that you are using the correct signals and voltage levels when communicating with electronic components.
- Follow Manufacturer’s Instructions: Always follow the manufacturer’s instructions when diagnosing or repairing electronic components.
By taking these precautions, you can minimize the risk of damage to your vehicle’s electronic systems and ensure a safe and successful diagnostic process.
6. Can I Use Honda Element OBD2 Pinouts to Unlock Hidden Features?
While the primary purpose of Honda Element OBD2 pinouts is for diagnostics, some advanced users explore the possibility of using them to unlock hidden features or customize vehicle settings. However, this practice is not officially supported by Honda and carries certain risks.
6.1 Potential Risks and Limitations
Attempting to unlock hidden features using OBD2 pinouts involves modifying the vehicle’s software or firmware, which can lead to several potential risks and limitations:
- Voiding Warranty: Modifying the vehicle’s software can void the manufacturer’s warranty, leaving you responsible for any repairs that may be needed.
- Software Corruption: Incorrect modifications can corrupt the vehicle’s software, causing malfunctions or even immobilizing the vehicle.
- Compatibility Issues: Unlocking hidden features may not be compatible with all vehicle models or software versions, leading to unexpected behavior.
- Safety Concerns: Modifying certain features, such as airbag deployment or ABS settings, can compromise vehicle safety.
- Legal Restrictions: In some jurisdictions, modifying vehicle software may be illegal or violate emissions regulations.
Due to these risks and limitations, it is generally not recommended to attempt to unlock hidden features using OBD2 pinouts unless you have extensive knowledge of vehicle electronics and software.
6.2 Examples of Hidden Features and How to Access Them (If Possible)
Despite the risks, some Honda Element owners have explored the possibility of unlocking certain hidden features using OBD2 pinouts and aftermarket software. Here are some examples of features that may be accessible, along with general information on how they might be accessed:
- Automatic Door Locks: Some vehicles allow you to enable or disable automatic door locking features, such as locking the doors when the vehicle reaches a certain speed. This can often be configured through the vehicle’s settings menu or using aftermarket software.
- Daytime Running Lights (DRL): Enabling or disabling daytime running lights may be possible through OBD2 programming. This can improve visibility and safety during the day.
- Security System Settings: Adjusting the sensitivity or behavior of the vehicle’s security system may be possible through OBD2 programming. This can help prevent false alarms or improve theft protection.
- Performance Tuning: Some aftermarket software allows you to modify engine parameters, such as fuel injection and ignition timing, to improve performance. However, this can void the warranty and may not be legal in all areas.
General Steps for Accessing Hidden Features:
- Research: Research the specific features you want to unlock and ensure they are compatible with your vehicle model and software version.
- Obtain Software and Hardware: Purchase the necessary aftermarket software and OBD2 adapter that supports the features you want to unlock.
- Connect to the Vehicle: Connect the OBD2 adapter to the vehicle’s OBD2 port and follow the software instructions to connect to the vehicle’s computer.
- Modify Settings: Use the software to modify the desired settings or parameters. Be sure to follow the instructions carefully and only make changes that you understand.
- Test and Verify: After making changes, test the vehicle to ensure that the new settings are working correctly and that there are no adverse effects.
Disclaimer: The information provided here is for informational purposes only and should not be considered a recommendation to modify your vehicle’s software. Always exercise caution and consult with a qualified professional before attempting to unlock hidden features using OBD2 pinouts.
6.3 Ethical and Legal Considerations
Modifying vehicle software and unlocking hidden features can raise ethical and legal considerations. It is essential to be aware of these issues before attempting any modifications:
- Warranty Voidance: As mentioned earlier, modifying vehicle software can void the manufacturer’s warranty, leaving you responsible for any repairs that may be needed.
- Safety Standards: Modifying certain features, such as airbag deployment or ABS settings, can compromise vehicle safety and may violate safety standards.
- Emissions Regulations: Modifying engine parameters or disabling emissions controls can violate emissions regulations and may result in fines or penalties.
- Intellectual Property: Modifying or distributing copyrighted software without permission is illegal and unethical.
- Liability: If modifications you make to the vehicle cause harm to others, you may be held liable for damages.
Before attempting to unlock hidden features, consider the ethical and legal implications and ensure that you are not violating any laws or regulations.
7. How Often Should I Check My Honda Element OBD2 Pinouts?
Regularly checking your Honda Element OBD2 pinouts isn’t typically part of standard maintenance, but there are specific scenarios where it becomes essential. Monitoring the OBD2 port and its connections can help identify potential issues early, preventing more significant problems down the road.
7.1 Scenarios When Checking is Necessary
While routine checks of the OBD2 pinouts aren’t necessary, certain situations warrant an inspection. These include:
- Diagnostic Tool Malfunctions: If your OBD2 scanner or diagnostic tool fails to connect or communicate properly with your Honda Element, checking the pinouts is a good first step.
- Electrical Issues: If you’re experiencing electrical problems, such as a dead battery, blown fuses, or malfunctioning accessories, inspect the OBD2 port for any signs of damage or corrosion.
- After Electrical Repairs: Following any electrical repairs or modifications, ensure the OBD2 pinouts are intact and functioning correctly.
- Suspected Tampering: If you suspect someone may have tampered with your vehicle’s OBD2 port, inspect the pinouts for any signs of damage or modification.
- Pre-Emissions Testing: Before taking your Honda Element for emissions testing, ensure the OBD2 port is functioning correctly to avoid potential failures.
7.2 Identifying Corrosion or Damage
Corrosion and damage to the OBD2 pinouts can interfere with communication between diagnostic tools and the vehicle’s computer. Identifying these issues early can prevent more significant problems.
Signs of Corrosion:
- Visible Rust: Look for any signs of rust or oxidation on the pins or connectors.
- Green or White Residue: Check for green or white residue on the pins, which indicates corrosion.
- Rough Surface: Feel the surface of the pins for any roughness or pitting, which can be caused by corrosion.
Signs of Damage:
- Bent or Broken Pins: Inspect the pins for any signs of bending or breakage.
- Loose Connectors: Check if the connectors are loose or wobbly.
- Cracked Housing: Look for any cracks or damage to the plastic housing of the OBD2 port.
- Burn Marks: Check for burn marks on the pins or housing, which can indicate electrical shorts.
If you notice any signs of corrosion or damage, clean the pins with a contact cleaner or replace the OBD2 port as needed.
7.3 Maintaining the OBD2 Port
Proper maintenance of the OBD2 port can help prevent corrosion and damage, ensuring reliable communication with diagnostic tools. Here are some tips for maintaining the OBD2 port:
- Keep it Clean: Use a clean, dry cloth to wipe the OBD2 port regularly.
- Use Contact Cleaner: Use a contact cleaner to clean the pins and connectors periodically.
- Protect from Moisture: Avoid exposing the OBD2 port to moisture or humidity, as this can cause corrosion.
- Use a Protective Cover: If the OBD2 port is exposed, use a protective cover to prevent dust, dirt, and moisture from entering.
- Avoid Overloading: Avoid plugging multiple devices into the OBD2 port simultaneously, as this can overload the circuit and cause damage.
By following these maintenance tips, you can keep your Honda Element OBD2 port in good condition and ensure reliable diagnostic capabilities.
8. What Are the Alternatives to Using OBD2 Pinouts for Diagnostics?
While OBD2 pinouts are the standard method for diagnosing modern vehicles, there are alternative approaches that can be used in certain situations. These alternatives may offer additional capabilities or be necessary when the OBD2 port is damaged or inaccessible.
8.1 Using Manufacturer-Specific Diagnostic Tools
Manufacturer-specific diagnostic tools are designed to communicate with the vehicle’s computer using proprietary protocols and interfaces. These tools often provide more in-depth diagnostic capabilities than generic OBD2 scanners.
Benefits of Using Manufacturer-Specific Tools:
- Access to Advanced Diagnostics: Can access manufacturer-specific codes, data, and functions that are not available through OBD2.
- Bi-Directional Control: Can send commands to the vehicle’s computer to control specific functions, such as performing actuation tests or programming modules.
- Software Updates: Receive regular software updates to support new vehicle models and diagnostic capabilities.
Limitations of Using Manufacturer-Specific Tools:
- Cost: Typically more expensive than generic OBD2 scanners.
- Complexity: Can be more complex to use and require specialized training.
- Limited Compatibility: Only compatible with vehicles from a specific manufacturer.
For professional technicians and experienced DIYers who work primarily with Honda vehicles, investing in a manufacturer-specific diagnostic tool can be a worthwhile investment.
8.2 Direct ECU Access
Direct ECU (Engine Control Unit) access involves connecting directly to the vehicle’s computer using specialized hardware and software. This method bypasses the OBD2 port and allows for more advanced diagnostics and modifications.
Benefits of Direct ECU Access:
- Bypass OBD2 Limitations: Can bypass limitations imposed by the OBD2 standard, such as restricted access to certain data or functions.
- Advanced Programming: Allows for advanced programming and modification of the vehicle’s software.
- Data Logging: Can log data directly from the ECU for detailed analysis.
Risks and Limitations of Direct ECU Access:
- Complexity: Requires specialized knowledge and expertise.
- Potential for Damage: Incorrect connections or programming can damage the ECU.
- Warranty Voidance: Modifying the ECU can void the manufacturer’s warranty.
- Legal Restrictions: Modifying vehicle software may be illegal in some jurisdictions.
Direct ECU access is typically used by experienced technicians and tuners for advanced diagnostics and performance modifications.
8.3 Wireless Diagnostic Interfaces
Wireless diagnostic interfaces use Bluetooth or Wi-Fi to communicate with the vehicle’s computer. These interfaces offer a convenient and portable way to perform diagnostics without the need for a physical connection to the OBD2 port.
Benefits of Using Wireless Diagnostic Interfaces:
- Convenience: Can perform diagnostics from a distance, without needing to be physically connected to the OBD2 port.
- Portability: Small and easy to carry, allowing you to perform diagnostics on the go.
- Compatibility: Compatible with a wide range of devices, including smartphones, tablets, and laptops.
Limitations of Using Wireless Diagnostic Interfaces:
- Security Risks: Bluetooth and Wi-Fi connections can be vulnerable to hacking, potentially compromising vehicle data.
- Reliability: Wireless connections can be less reliable than wired connections, leading to dropped signals or data corruption.
- Limited Functionality: May not offer the same level of functionality as wired diagnostic tools.
Despite these limitations, wireless diagnostic interfaces are a great option for basic diagnostics and monitoring vehicle performance.
9. What to Do If Your Honda Element OBD2 Port Is Not Working?
If your Honda Element OBD2 port is not working, it can prevent you from diagnosing and repairing vehicle issues. Troubleshooting a non-functional OBD2 port involves a systematic approach to identify and resolve the underlying problem.
9.1 Common Causes of a Non-Functional OBD2 Port
Several factors can cause an OBD2 port to stop working. Here are some of the most common causes:
- Blown Fuse: The OBD2 port is typically powered by a fuse, and a blown fuse is one of the most common causes of a non-functional port.
- Wiring Issues: Damaged or corroded wiring can prevent power and data from reaching the OBD2 port.
- Pin Damage: Bent, broken, or corroded pins can interfere with communication between diagnostic tools and the vehicle’s computer.
- ECU Issues: In rare cases, a faulty ECU can cause the OBD2 port to stop working.
- Aftermarket Devices: Some aftermarket devices, such as remote starters or security systems, can interfere with the OBD2 port.
9.2 Troubleshooting Steps
Follow these steps to troubleshoot a non-functional OBD2 port:
- Check the Fuse: Locate the fuse for the OBD2 port in the vehicle’s fuse box. Check the fuse for continuity using a multimeter. If the fuse is blown, replace it with a new fuse of the same amperage.
- Inspect the Wiring: Inspect the wiring harness and connectors for any signs of damage, corrosion, or loose connections. Repair or replace any damaged wiring as needed.
- Check the Pins: Inspect the pins in the OBD2 port for any signs of bending, breakage, or corrosion. Straighten any bent pins and clean any corroded pins with a contact cleaner.
- Disconnect Aftermarket Devices: Disconnect any aftermarket devices that may be interfering with the OBD2 port.
- Test with Another Scanner: Try connecting a different OBD2 scanner to the port to rule out a problem with the scanner itself.
- Consult a Professional: If you’ve tried these steps and the OBD2 port is still not working, consult with a professional mechanic or automotive electrician for further diagnosis and repair.
9.3 When to Seek Professional Help
In some cases, troubleshooting a non-functional OBD2 port may require specialized knowledge and equipment. Here are some situations when it’s best to seek professional help:
- Complex Wiring Issues: If you suspect a complex wiring problem, such as a short circuit or open circuit, it’s best to consult with a professional automotive electrician.
- ECU Issues: If you suspect a faulty ECU, it’s best to consult with a professional mechanic who has experience diagnosing and repairing ECU problems.
- Lack of Experience: If you’re not comfortable working with electrical systems, it’s best to seek professional help to avoid causing further damage to the vehicle.
A professional mechanic can diagnose the problem accurately and perform the necessary repairs to restore functionality to the OBD2 port.
10. FAQ About Honda Element OBD2 Pinouts
Here are some frequently asked questions about Honda Element OBD2 pinouts:
10.1 What is the standard voltage for Pin 16 of the Honda Element OBD2 port?
Pin 16 of the Honda Element OBD2 port should have a voltage of +12V, which is the battery voltage.
10.2 Can I use any OBD2 scanner with my Honda Element?
Yes, most standard OBD2 scanners are compatible with the Honda Element, but some advanced functions may require a more advanced scan tool.
10.3 Where is the OBD2 port located in a Honda Element?
The OBD2 port is typically located under the dashboard on the driver’s side of the Honda Element.
10.4 What does it mean if my OBD2 scanner won’t connect to my Honda Element?
If your OBD2 scanner won’t connect, check the fuse for the OBD2 port, inspect the wiring and pins for damage, and ensure the scanner is compatible with your vehicle.
10.5 Can I damage my Honda Element by using the wrong OBD2 pinouts?
Yes, using the wrong OBD2 pinouts can cause electrical shorts and damage sensitive electronic components.
10.6 How do I clean corroded OBD2 pins?
Clean corroded OBD2 pins with a contact cleaner and a soft brush or cloth.
10.7 What is the difference between a generic OBD2 code and a manufacturer-specific code?
Generic OBD2 codes are standardized codes that apply to all vehicles, while manufacturer-specific codes are specific to a particular make and model.
10.8 Can I unlock hidden features on my Honda Element using the OBD2 port?
Unlocking hidden features is possible but not officially supported and carries risks, including voiding the warranty and potential software corruption.
10.9 What should I do if my Honda Element check engine light is on?
Use an OBD2 scanner to read the Diagnostic Trouble Code (DTC) and diagnose the problem.
10.10 How often should I check my Honda Element for OBD2 codes?
Check for OBD2 codes whenever the check engine light comes on or if you suspect a problem with your vehicle.
Understanding Honda Element OBD2 pinouts is essential for effective diagnostics and repair. By following the guidelines and precautions outlined in this article, you can ensure a safe and successful diagnostic process.
Do you need assistance with your Honda Element OBD2 port or have questions about unlocking hidden features? Contact us at MERCEDES-DIAGNOSTIC-TOOL.EDU.VN for expert advice and support. Our team is ready to help you diagnose and resolve any issues with your vehicle. Visit us at 789 Oak Avenue, Miami, FL 33101, United States, or reach out via WhatsApp at +1 (641) 206-8880. Let us help you keep your Honda Element running smoothly!