Diagnosing a vehicle without an OBD2 port can seem daunting, but it’s entirely achievable with the right methods, and at MERCEDES-DIAGNOSTIC-TOOL.EDU.VN, we provide the resources and guidance you need to confidently troubleshoot your Mercedes. By understanding alternative diagnostic techniques, you can save time and money while ensuring your vehicle receives the proper care; explore alternative vehicle diagnostics, automotive troubleshooting, and engine diagnostics for classic cars. Let’s look at some key areas:
Contents
- 1. Understanding the Need for Alternative Diagnostic Methods
- Why OBD2 Ports Are Not Always Available
- Common Challenges in Diagnosing Older Vehicles
- 2. Identifying Your Vehicle’s Diagnostic System
- Early Diagnostic Systems
- Key Indicators of Non-OBD2 Vehicles
- Using Vehicle Documentation and Resources
- 3. Methods for Diagnosing Vehicles Without OBD2 Ports
- Manual Diagnostic Techniques
- Using Scan Tools for Older Systems
- Utilizing the Odometer Reset Method
- Employing the Ignition Key Method
- Accessing Diagnostic Trouble Codes with a Paperclip
- Understanding Pulse Patterns
- 4. Interpreting Diagnostic Codes Manually
- Finding Code Definitions
- Understanding Common Diagnostic Trouble Codes (DTCs)
- Using Reference Materials
- 5. Safety Precautions and Best Practices
- Disconnecting the Battery
- Using Protective Gear
- Working in a Well-Ventilated Area
- Avoiding Open Flames
- 6. Advanced Diagnostic Tools and Techniques
- Using Multimeters and Oscilloscopes
- Performing Compression Tests
- Conducting Leak-Down Tests
- 7. When to Consult a Professional
- Complex Diagnostic Issues
- Lack of Experience
- Specialized Tools
- 8. The Role of MERCEDES-DIAGNOSTIC-TOOL.EDU.VN in Vehicle Diagnostics
- Providing Diagnostic Tools
- Offering Expert Guidance
- Supplying Repair Information
- 9. Maximizing Vehicle Performance and Longevity
- Regular Maintenance
- Addressing Issues Promptly
- Using Quality Parts
- Maintaining Accurate Records
- 10. Frequently Asked Questions (FAQs)
- What are the most common reasons a check engine light comes on in older vehicles?
- Can I diagnose my car without any tools?
- How accurate are manual diagnostic methods compared to using a scan tool?
- Is it safe to drive with the check engine light on?
- How often should I have my older vehicle diagnosed?
- What should I do if I can’t find the diagnostic port on my older vehicle?
- Can I use a generic OBD2 scanner on my older vehicle?
- What are the benefits of using a professional mechanic for diagnostics?
- How can I prepare my vehicle for a diagnostic test?
- Where can I find reliable diagnostic and repair information for my older Mercedes-Benz?
1. Understanding the Need for Alternative Diagnostic Methods
2. Identifying Your Vehicle’s Diagnostic System
3. Methods for Diagnosing Vehicles Without OBD2 Ports
4. Interpreting Diagnostic Codes Manually
5. Safety Precautions and Best Practices
6. Advanced Diagnostic Tools and Techniques
7. When to Consult a Professional
8. The Role of MERCEDES-DIAGNOSTIC-TOOL.EDU.VN in Vehicle Diagnostics
9. Maximizing Vehicle Performance and Longevity
10. Frequently Asked Questions (FAQs)
1. Understanding the Need for Alternative Diagnostic Methods
Why is it crucial to understand how to diagnose a vehicle lacking an OBD2 port? Many classic and older vehicles predate the introduction of the standardized OBD2 system, meaning they lack the convenient diagnostic port found in modern cars. According to a study by the National Automotive History Society, vehicles manufactured before 1996 typically use proprietary diagnostic systems or no electronic diagnostics at all. In these cases, mechanics and car enthusiasts must rely on alternative methods to identify and address mechanical and electrical issues. Understanding these methods is essential for maintaining and repairing these vehicles.
Why OBD2 Ports Are Not Always Available
Several reasons why a vehicle might not have an OBD2 port exist:
- Vehicle Age: As mentioned, cars made before 1996 often used earlier, non-standardized diagnostic systems.
- Vehicle Type: Some specialized vehicles or industrial equipment might not be equipped with OBD2 ports.
- Modifications: In rare cases, an OBD2 port might have been removed or damaged during vehicle modifications.
Common Challenges in Diagnosing Older Vehicles
Diagnosing older vehicles can present unique challenges:
- Lack of Standardization: Older systems often used manufacturer-specific diagnostic procedures and tools.
- Limited Documentation: Service manuals and technical information might be scarce or difficult to find.
- Wear and Tear: Components in older vehicles are more prone to wear and failure, making diagnosis more complex.
2. Identifying Your Vehicle’s Diagnostic System
How can you determine what type of diagnostic system your vehicle uses? The first step in diagnosing a vehicle without an OBD2 port is to identify what type of diagnostic system, if any, is present. This identification is key to understanding how to approach the diagnostic process and what tools or methods will be most effective.
Early Diagnostic Systems
Early diagnostic systems varied widely by manufacturer. Some common examples include:
- OBD-I: An early attempt at standardization, OBD-I systems were primarily used in the 1980s and early 1990s. However, OBD-I was not fully standardized, leading to significant differences between manufacturers.
- EEC-IV (Ford): Ford’s Electronic Engine Control IV system was used in many of their vehicles from the 1980s through the mid-1990s.
- ALDL (GM): General Motors’ Assembly Line Diagnostic Link was a proprietary system used in their vehicles during the same period.
Key Indicators of Non-OBD2 Vehicles
Several indicators can help you determine if your vehicle lacks an OBD2 port:
- Manufacturing Year: Vehicles made before 1996 are unlikely to have an OBD2 port.
- Port Location: Check under the dashboard on the driver’s side. If there’s no 16-pin diagnostic port, the vehicle likely uses a different system.
- Vehicle Manual: Consult the vehicle’s service manual for information about its diagnostic system.
Alternative text: Locating the OBD2 port underneath the dashboard for vehicle diagnostics
Using Vehicle Documentation and Resources
Vehicle documentation and resources are invaluable for identifying the diagnostic system:
- Service Manuals: These manuals provide detailed information about the vehicle’s systems and diagnostic procedures.
- Online Forums: Online forums dedicated to specific vehicle makes and models can offer insights from experienced owners and mechanics.
- Manufacturer Websites: Some manufacturers provide online resources for older vehicles, including technical specifications and diagnostic information.
3. Methods for Diagnosing Vehicles Without OBD2 Ports
What are the primary methods for diagnosing vehicles that do not have OBD2 ports? Several effective methods for diagnosing vehicles lacking OBD2 ports exist, ranging from manual techniques to using specialized tools. These methods often require a deeper understanding of automotive systems and a more hands-on approach than modern OBD2-based diagnostics.
Manual Diagnostic Techniques
Manual diagnostic techniques involve physically inspecting and testing various components. Key manual techniques include:
- Visual Inspection: Look for obvious signs of damage, such as frayed wires, leaking fluids, and broken parts.
- Mechanical Testing: Use tools like multimeters, pressure gauges, and timing lights to test the functionality of mechanical and electrical components.
- Listening for Unusual Noises: Pay attention to any unusual noises, such as knocking, hissing, or grinding, which can indicate specific problems.
Using Scan Tools for Older Systems
Although OBD2 scan tools won’t work on vehicles without an OBD2 port, scan tools designed for older systems are available:
- OBD-I Scanners: These scanners are designed to interface with older OBD-I systems and can retrieve diagnostic codes.
- Proprietary Scanners: Some manufacturers offer proprietary scanners for their older vehicles, providing more detailed diagnostic information.
- Code Readers: These tools can read basic diagnostic codes from older systems but may not offer the advanced features of a full-fledged scanner.
Utilizing the Odometer Reset Method
Can you use the odometer reset method to retrieve diagnostic codes? The odometer reset method, also known as the key cycling method, involves using the ignition key and odometer to display diagnostic trouble codes. This method works on some vehicles with early electronic control systems.
Here’s how to use the odometer reset method:
- Turn the Ignition On and Off: Turn the ignition key from the “off” position to the “on” position (without starting the engine) several times in quick succession.
- Observe the Check Engine Light: Watch the check engine light on the dashboard. It will blink in a specific pattern.
- Count the Blinks: Count the number of blinks and pauses. The blinks represent the diagnostic trouble code. For example, two blinks, a pause, and then three blinks indicate code 23.
Alternative text: The check engine light illuminating on the dashboard, signaling a potential issue requiring diagnostics.
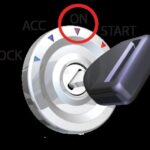
Employing the Ignition Key Method
How does the ignition key method work? The ignition key method is another technique for retrieving diagnostic codes without a scanner. This method involves turning the ignition key in a specific sequence to trigger the display of diagnostic codes.
Here’s how to use the ignition key method:
- Turn the Key On and Off: Turn the ignition key from the “off” position to the “on” position (without starting the engine) three to five times, ending in the “on” position.
- Observe the Dashboard Lights: Watch the dashboard lights, particularly the check engine light.
- Count the Pulses: The check engine light will flash a series of pulses and pauses. Count the pulses to determine the diagnostic code. Each pulse represents a digit, and a pause separates the digits.
Accessing Diagnostic Trouble Codes with a Paperclip
Is it possible to use a paperclip to access diagnostic trouble codes? Yes, a paperclip can be used to access diagnostic trouble codes on some older vehicles, particularly those with OBD-I systems. This method involves using a paperclip to create a closed circuit in the diagnostic port, which then causes the check engine light to flash the diagnostic codes.
Here’s how to use a paperclip to access diagnostic trouble codes:
- Locate the Diagnostic Port: Find the diagnostic port, typically located under the dashboard or in the engine compartment.
- Identify the Terminals: Identify the two terminals in the diagnostic port that need to be connected. Consult the vehicle’s service manual for the correct terminals.
- Insert the Paperclip: Bend a paperclip into a U-shape and insert the ends into the identified terminals.
- Turn the Ignition On: Turn the ignition key to the “on” position without starting the engine.
- Count the Blinks: Watch the check engine light and count the blinks to determine the diagnostic code.
Understanding Pulse Patterns
How can you accurately interpret pulse patterns to identify diagnostic codes? Interpreting pulse patterns requires careful observation and a good understanding of the coding system used by the vehicle’s diagnostic system. Each pulse represents a digit, and pauses separate the digits.
For example, if the check engine light flashes twice, pauses, and then flashes three times, the code is 23. It’s crucial to have a reference list of codes for the specific vehicle make and model to accurately interpret the pulse patterns.
4. Interpreting Diagnostic Codes Manually
How do you interpret diagnostic codes when you don’t have a scanner? Interpreting diagnostic codes manually involves understanding the meaning of the codes displayed through methods like the odometer reset, ignition key, or paperclip techniques. Since you won’t have the benefit of a scanner that provides a text description of the code, you’ll need to consult vehicle-specific resources to decipher the codes.
Finding Code Definitions
Where can you find code definitions for older vehicles? Finding code definitions is crucial for accurately diagnosing issues in older vehicles. Here are some resources to consult:
- Service Manuals: The vehicle’s service manual is the best source for code definitions and diagnostic procedures.
- Online Forums: Online forums dedicated to specific vehicle makes and models often have threads or databases of diagnostic codes.
- Manufacturer Websites: Some manufacturers provide online resources for older vehicles, including code definitions.
Understanding Common Diagnostic Trouble Codes (DTCs)
What are some common diagnostic trouble codes in older vehicles? Several common diagnostic trouble codes can appear in older vehicles. Understanding these codes can help you quickly identify and address common issues.
Examples of common DTCs include:
- Code 12: System OK (often displayed at the beginning of a diagnostic sequence)
- Code 41: Ignition Control Module (ICM) issue
- Code 42: Electronic Spark Timing (EST) issue
- Code 43: Electronic Spark Control (ESC) issue
- Code 44: Lean exhaust indication
Using Reference Materials
Why are reference materials essential for interpreting codes? Reference materials are essential because they provide the definitions and context needed to understand diagnostic codes. Without these materials, interpreting codes can be challenging and lead to incorrect diagnoses.
Reference materials include:
- Code Lists: Comprehensive lists of diagnostic codes and their meanings.
- Wiring Diagrams: Diagrams that show the electrical connections in the vehicle, helping you trace circuits and identify potential issues.
- Diagnostic Charts: Charts that provide step-by-step procedures for diagnosing specific problems.
5. Safety Precautions and Best Practices
What safety precautions should you take when diagnosing a vehicle manually? When diagnosing a vehicle manually, it’s crucial to follow safety precautions to protect yourself and prevent damage to the vehicle. These precautions include:
Disconnecting the Battery
Why is it important to disconnect the battery? Disconnecting the battery is essential to prevent electrical shocks and avoid damaging sensitive electronic components. Before working on any electrical system, disconnect the negative terminal of the battery.
Here’s how to disconnect the battery safely:
- Locate the Battery: Find the battery, usually located in the engine compartment or trunk.
- Loosen the Nut: Use a wrench to loosen the nut on the negative terminal (usually marked with a “-” sign).
- Remove the Cable: Carefully remove the cable from the negative terminal.
- Secure the Cable: Tuck the cable away from the terminal to prevent accidental contact.
Using Protective Gear
What protective gear should you wear when diagnosing a vehicle? Wearing protective gear is essential to protect yourself from potential hazards, such as sharp objects, hot surfaces, and hazardous chemicals.
Protective gear includes:
- Safety Glasses: To protect your eyes from debris and chemicals.
- Gloves: To protect your hands from cuts, abrasions, and chemical exposure.
- Work Boots: To protect your feet from falling objects and slippery surfaces.
Working in a Well-Ventilated Area
Why is working in a well-ventilated area important? Working in a well-ventilated area is crucial to avoid inhaling harmful fumes and gases. Many automotive fluids and chemicals can be toxic, and prolonged exposure can lead to health problems.
Ensure the work area has adequate ventilation by:
- Opening Doors and Windows: To allow fresh air to circulate.
- Using a Fan: To blow away fumes and gases.
- Wearing a Respirator: If working with particularly hazardous chemicals.
Avoiding Open Flames
Why should you avoid open flames when working on a vehicle? Avoiding open flames is essential to prevent fires and explosions. Automotive fluids, such as gasoline and oil, are highly flammable, and even a small spark can ignite them.
Follow these guidelines to avoid open flames:
- No Smoking: Do not smoke while working on the vehicle.
- Use Proper Lighting: Use LED or fluorescent work lights that do not produce heat.
- Keep Flammable Materials Away: Store flammable materials, such as gasoline and solvents, in a safe place away from the work area.
6. Advanced Diagnostic Tools and Techniques
What advanced diagnostic tools and techniques can you use for older vehicles? While manual methods and basic scan tools can be helpful, advanced diagnostic tools and techniques can provide more detailed and accurate information for diagnosing older vehicles.
Using Multimeters and Oscilloscopes
How can multimeters and oscilloscopes aid in diagnostics? Multimeters and oscilloscopes are powerful tools for diagnosing electrical issues in older vehicles.
- Multimeters: Measure voltage, current, and resistance, helping you identify shorts, opens, and other electrical problems.
- Oscilloscopes: Display electrical signals over time, allowing you to analyze waveform patterns and identify intermittent issues.
Performing Compression Tests
What does a compression test reveal about engine health? A compression test measures the pressure inside each cylinder, providing valuable information about the condition of the pistons, rings, and valves. Low compression can indicate wear or damage to these components.
Here’s how to perform a compression test:
- Warm-Up the Engine: Run the engine until it reaches operating temperature.
- Disable Ignition and Fuel: Disconnect the ignition and fuel systems to prevent the engine from starting.
- Remove Spark Plugs: Remove all the spark plugs from the cylinders.
- Insert Compression Tester: Insert the compression tester into each cylinder, one at a time.
- Crank the Engine: Crank the engine several times and record the compression reading.
- Analyze Results: Compare the compression readings for each cylinder. Significant differences can indicate engine problems.
Conducting Leak-Down Tests
What does a leak-down test identify? A leak-down test helps identify the source of compression loss in an engine by injecting compressed air into each cylinder and listening for leaks.
Here’s how to conduct a leak-down test:
- Position the Piston: Position the piston in the cylinder to be tested at top dead center (TDC) on the compression stroke.
- Apply Compressed Air: Inject compressed air into the cylinder through the spark plug hole.
- Listen for Leaks: Listen for air escaping from the exhaust pipe, intake manifold, or coolant reservoir.
- Interpret Results: The location of the leak indicates the source of the problem. Air escaping from the exhaust pipe suggests a leaking exhaust valve, while air escaping from the intake manifold suggests a leaking intake valve.
7. When to Consult a Professional
When is it necessary to consult a professional mechanic? While many diagnostic and repair tasks can be performed by knowledgeable enthusiasts, there are times when it’s best to consult a professional mechanic.
Complex Diagnostic Issues
When should you seek professional help for complex issues? Complex diagnostic issues that require specialized knowledge, tools, or experience should be handled by a professional mechanic. These issues might include:
- Intermittent Problems: Problems that occur sporadically and are difficult to reproduce.
- Multiple Fault Codes: Situations where multiple diagnostic codes are present, making it difficult to pinpoint the root cause.
- Engine or Transmission Problems: Major engine or transmission issues that require specialized tools and expertise.
Lack of Experience
Why is experience important in vehicle diagnostics? Lack of experience can lead to misdiagnosis and potentially cause further damage to the vehicle. If you’re unsure about any aspect of the diagnostic or repair process, it’s best to seek professional help.
Specialized Tools
When are specialized tools necessary for diagnostics? Some diagnostic and repair tasks require specialized tools that most enthusiasts don’t have access to. These tools might include:
- Advanced Scan Tools: Scan tools that can perform advanced functions, such as module programming and data logging.
- Engine Analyzers: Tools that analyze engine performance and identify problems with the ignition, fuel, and exhaust systems.
- Hydraulic Lifts: Lifts that raise the vehicle off the ground, providing better access to the underside.
8. The Role of MERCEDES-DIAGNOSTIC-TOOL.EDU.VN in Vehicle Diagnostics
How can MERCEDES-DIAGNOSTIC-TOOL.EDU.VN assist in diagnosing your Mercedes? At MERCEDES-DIAGNOSTIC-TOOL.EDU.VN, we are dedicated to providing Mercedes-Benz owners and enthusiasts with the resources, tools, and expertise needed to diagnose and maintain their vehicles effectively. We offer a range of services and products designed to support your diagnostic efforts.
Providing Diagnostic Tools
What diagnostic tools does MERCEDES-DIAGNOSTIC-TOOL.EDU.VN offer? We offer a variety of diagnostic tools suitable for different Mercedes-Benz models, including:
- OBD2 Scanners: For newer Mercedes-Benz vehicles equipped with OBD2 ports.
- Proprietary Scanners: For older Mercedes-Benz vehicles with proprietary diagnostic systems.
- Multimeters and Oscilloscopes: For advanced electrical diagnostics.
Offering Expert Guidance
How does MERCEDES-DIAGNOSTIC-TOOL.EDU.VN provide expert guidance? Our team of experienced Mercedes-Benz technicians and diagnostic specialists are available to provide expert guidance and support. We can assist you with:
- Diagnostic Troubleshooting: Helping you identify and resolve diagnostic issues.
- Code Interpretation: Providing definitions and explanations of diagnostic codes.
- Repair Procedures: Offering step-by-step instructions for common repairs.
Supplying Repair Information
What repair information does MERCEDES-DIAGNOSTIC-TOOL.EDU.VN provide? We provide a comprehensive range of repair information to help you maintain and repair your Mercedes-Benz, including:
- Service Manuals: Detailed manuals covering all aspects of vehicle maintenance and repair.
- Wiring Diagrams: Diagrams showing the electrical connections in the vehicle.
- Technical Bulletins: Information about common issues and recommended solutions.
Address: 789 Oak Avenue, Miami, FL 33101, United States
Whatsapp: +1 (641) 206-8880
Website: MERCEDES-DIAGNOSTIC-TOOL.EDU.VN
9. Maximizing Vehicle Performance and Longevity
How can you maximize your vehicle’s performance and longevity? Proper diagnostics and maintenance are essential for maximizing your vehicle’s performance and longevity. By addressing issues promptly and following recommended maintenance schedules, you can keep your vehicle running smoothly for years to come.
Regular Maintenance
Why is regular maintenance crucial? Regular maintenance is crucial for preventing problems and ensuring optimal performance. Maintenance tasks include:
- Oil Changes: Changing the engine oil and filter at recommended intervals.
- Fluid Checks: Checking and topping off fluid levels, such as coolant, brake fluid, and power steering fluid.
- Filter Replacements: Replacing air filters, fuel filters, and cabin air filters.
- Spark Plug Replacement: Replacing spark plugs at recommended intervals.
- Belt and Hose Inspection: Inspecting belts and hoses for wear and damage.
Addressing Issues Promptly
Why should you address issues promptly? Addressing issues promptly can prevent them from escalating into more significant problems. Ignoring warning signs or delaying repairs can lead to further damage and more costly repairs down the road.
Using Quality Parts
Why is it important to use quality parts? Using quality parts ensures reliability and longevity. Cheap or inferior parts may fail prematurely, leading to further problems and potential damage to the vehicle.
Maintaining Accurate Records
Why should you maintain accurate records of vehicle maintenance? Keeping accurate records of vehicle maintenance can help you track when maintenance tasks were performed and when they are due again. These records can also be helpful when selling the vehicle.
10. Frequently Asked Questions (FAQs)
What are the most common reasons a check engine light comes on in older vehicles?
The check engine light in older vehicles can illuminate due to various reasons, including faulty oxygen sensors, loose gas caps, catalytic converter issues, or problems with the ignition system.
Can I diagnose my car without any tools?
While some basic visual inspections can be done without tools, effectively diagnosing a car typically requires tools like a multimeter, compression tester, or a scan tool.
How accurate are manual diagnostic methods compared to using a scan tool?
Manual diagnostic methods can be helpful for identifying certain issues, but they are generally less accurate and comprehensive than using a scan tool, especially for vehicles with electronic control systems.
Is it safe to drive with the check engine light on?
Driving with the check engine light on is generally not recommended, as it could indicate a serious problem that could lead to further damage. It’s best to have the vehicle diagnosed and repaired as soon as possible.
How often should I have my older vehicle diagnosed?
Older vehicles should be diagnosed at least once a year, or more frequently if you notice any unusual symptoms or warning signs.
What should I do if I can’t find the diagnostic port on my older vehicle?
Consult the vehicle’s service manual or an experienced mechanic for assistance in locating the diagnostic port. Some older vehicles may not have a standardized diagnostic port.
Can I use a generic OBD2 scanner on my older vehicle?
Generic OBD2 scanners are not compatible with vehicles that do not have an OBD2 port. You’ll need to use a scanner designed for the specific diagnostic system used by your vehicle.
What are the benefits of using a professional mechanic for diagnostics?
Professional mechanics have the knowledge, experience, and tools needed to accurately diagnose and repair complex vehicle issues. They can also provide valuable insights and recommendations for maintaining your vehicle.
How can I prepare my vehicle for a diagnostic test?
Before taking your vehicle in for a diagnostic test, gather any relevant information about the symptoms you’ve noticed and any recent repairs or maintenance work that has been performed.
Where can I find reliable diagnostic and repair information for my older Mercedes-Benz?
MERCEDES-DIAGNOSTIC-TOOL.EDU.VN offers a wealth of diagnostic and repair information for older Mercedes-Benz vehicles, including service manuals, wiring diagrams, and technical bulletins.
Navigating vehicle diagnostics without an OBD2 port requires a blend of knowledge, skill, and the right resources. At MERCEDES-DIAGNOSTIC-TOOL.EDU.VN, we’re committed to empowering you with the tools and guidance needed to confidently diagnose and maintain your Mercedes-Benz.
Ready to take control of your Mercedes-Benz diagnostics? Contact us today at +1 (641) 206-8880 or visit our website MERCEDES-DIAGNOSTIC-TOOL.EDU.VN for expert assistance, diagnostic tools, and comprehensive repair information. Let MERCEDES-DIAGNOSTIC-TOOL.EDU.VN be your trusted partner in keeping your Mercedes-Benz running at its best.