Making an OBD2 USB cable involves connecting the OBD2 connector to a USB interface for vehicle diagnostics, and MERCEDES-DIAGNOSTIC-TOOL.EDU.VN offers comprehensive solutions and guidance. This article outlines the steps to create your own OBD2 USB cable and explore the benefits of using such a setup for Mercedes-Benz diagnostics. Let’s delve into the process of creating this cable and how it can enhance your diagnostic capabilities and give you a better understanding of Mercedes scan tools, enhanced diagnostic capabilities, and potential cost savings.
Contents
- 1. Understanding the OBD2 USB Cable
- 1.1. What is an OBD2 Port?
- 1.2. Why Use an OBD2 USB Cable?
- 1.3. Applications in Mercedes-Benz Diagnostics
- 2. Essential Tools and Components
- 2.1. Required Tools
- 2.2. Necessary Components
- 2.3. Component Sourcing
- 3. Step-by-Step Guide to Making an OBD2 USB Cable
- 3.1. Preparing the OBD2 Connector
- 3.2. Preparing the 4-Pin Connector
- 3.3. Connecting Wires to the 4-Pin Connector
- 3.4. Pairing and Twisting the Wires
- 3.5. Inserting Pins into the 4-Pin Connector
- 3.6. Connecting to the USB Interface
- 3.7. Finalizing the Cable
- 4. Selecting Diagnostic Software
- 4.1. Popular Diagnostic Software Options
- 4.2. Features to Look For
- 4.3. Setting Up the Software
- 5. Using the OBD2 USB Cable for Diagnostics
- 5.1. Reading Diagnostic Trouble Codes (DTCs)
- 5.2. Monitoring Live Data
- 5.3. Clearing Diagnostic Trouble Codes (DTCs)
- 6. Safety Precautions
- 6.1. General Safety Tips
- 6.2. Vehicle-Specific Precautions
- 7. Troubleshooting Common Issues
- 7.1. Cable Not Recognized by Computer
- 7.2. Software Cannot Connect to Vehicle
- 7.3. Inaccurate Data or Error Codes
- 8. Advantages of Using MERCEDES-DIAGNOSTIC-TOOL.EDU.VN
- 8.1. Expert Guidance and Support
- 8.2. Access to Professional-Grade Tools
- 8.3. Cost Savings and Convenience
- 9. Unlocking Hidden Features on Your Mercedes-Benz
- 9.1. What are Hidden Features?
- 9.2. How to Unlock Hidden Features
- 9.3. Risks and Precautions
- 10. Regular Maintenance and Care with OBD2 USB Cable
- 10.1. Monitoring Vehicle Health
- 10.2. Performing Routine Maintenance
- 10.3. Long-Term Benefits
- FAQ: Making and Using an OBD2 USB Cable
- What is an OBD2 USB cable used for?
- Is it difficult to make an OBD2 USB cable?
- What tools do I need to make an OBD2 USB cable?
- What diagnostic software is recommended for Mercedes-Benz vehicles?
- Can I unlock hidden features on my Mercedes-Benz with an OBD2 USB cable?
- What are the risks of modifying my vehicle’s computer settings?
- How often should I check my vehicle’s health using an OBD2 USB cable?
- Can an OBD2 USB cable help with routine maintenance tasks?
- What safety precautions should I take when working with electrical components?
- Where can I get professional guidance for diagnosing issues with my Mercedes-Benz?
- Take Action Now
1. Understanding the OBD2 USB Cable
An OBD2 USB cable is a specialized cable that allows you to connect your car’s On-Board Diagnostics II (OBD2) port to a computer via USB. This connection enables you to read diagnostic information from your vehicle, monitor performance, and troubleshoot issues using diagnostic software.
1.1. What is an OBD2 Port?
The OBD2 port is a standardized interface found in most modern vehicles. It provides access to various vehicle systems, allowing you to retrieve diagnostic trouble codes (DTCs), monitor sensor data, and perform other diagnostic functions. According to the Environmental Protection Agency (EPA), OBD2 was standardized in 1996 for all cars sold in the United States to monitor emissions-related components.
1.2. Why Use an OBD2 USB Cable?
Using an OBD2 USB cable offers several advantages:
- Cost-Effective Diagnostics: Avoid costly trips to the mechanic by performing your own diagnostics.
- Real-Time Data: Access live sensor data to monitor your vehicle’s performance.
- Troubleshooting: Identify and clear diagnostic trouble codes (DTCs).
- Customization: Some software allows you to customize vehicle settings and parameters.
1.3. Applications in Mercedes-Benz Diagnostics
For Mercedes-Benz owners, an OBD2 USB cable can be particularly useful. It allows you to:
- Read Mercedes-Specific Codes: Access proprietary Mercedes-Benz diagnostic codes for more in-depth troubleshooting.
- Perform Advanced Diagnostics: Use advanced diagnostic software to monitor engine performance, transmission health, and other critical systems.
- Unlock Hidden Features: Depending on the software, you may be able to unlock hidden features or customize vehicle settings.
2. Essential Tools and Components
Before you begin, gather the necessary tools and components to ensure a smooth cable-making process.
2.1. Required Tools
- Wire Strippers/Cutters: For stripping insulation from wires.
- Needle-Nose Pliers: For handling small components and making precise connections.
- Soldering Iron (Recommended): For creating a solid and reliable connection.
- Multimeter: For testing continuity and voltage.
- Molex Crimping Tool (Optional): For crimping connectors securely.
2.2. Necessary Components
- OBD2 Connector: The male connector that plugs into your vehicle’s OBD2 port.
- USB Connector: The connector that plugs into your computer’s USB port.
- 4-Pin Connector: A connector to link the OBD-II wires to the USB interface.
- Wires: Four wires to connect the OBD2 connector to the USB interface.
- Heat Shrink Tubing: To insulate and protect the soldered connections.
- Solder: For creating strong electrical connections.
- USB to TTL Serial Adapter (If Needed): Converts USB to TTL serial for direct connection.
2.3. Component Sourcing
You can source these components from various online retailers or electronic supply stores. Here are a few options:
- Amazon: Offers a wide variety of OBD2 connectors, USB connectors, and wiring supplies.
- eBay: A good source for individual components and DIY kits.
- Corsa-Technic: Specializes in automotive connectors and wiring components.
- Local Electronics Stores: Check your local electronics stores for basic components like wires, solder, and heat shrink tubing.
3. Step-by-Step Guide to Making an OBD2 USB Cable
Follow these detailed steps to create your own OBD2 USB cable.
3.1. Preparing the OBD2 Connector
-
Identify the Necessary Wires:
- Pin 4: Chassis Ground
- Pin 6: CAN High (J-2234)
- Pin 14: CAN Low (J-2234)
- Pin 16: Battery Power
-
Expose the Wires: Carefully remove the sheath and shielding from the OBD2 cable to expose the four necessary wires.
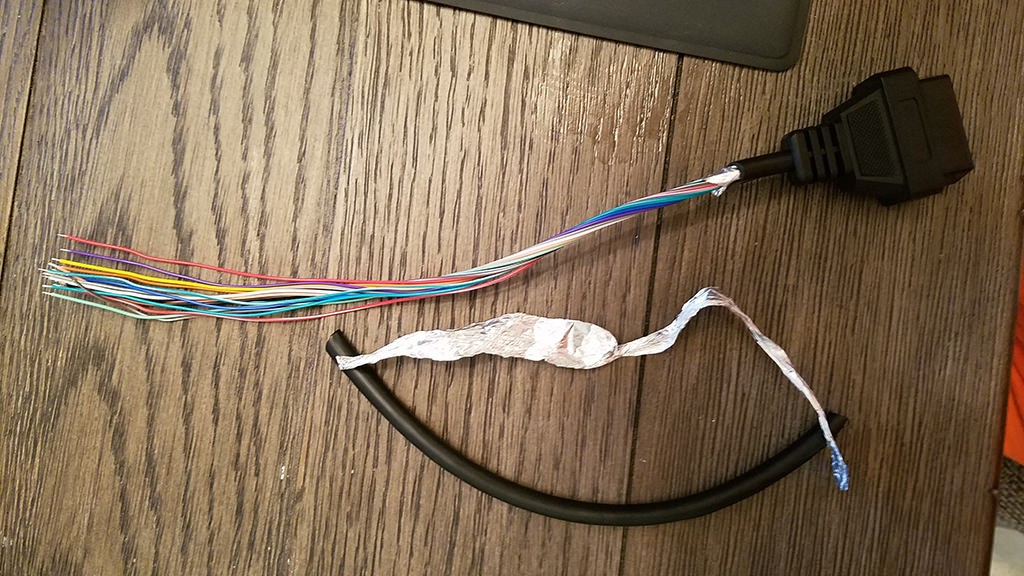 Stripped sheath and shielding
 -
Separate the Wires: Separate the four wires from the rest of the cable and tidy up the remaining wires with a zip tie to keep them out of the way.
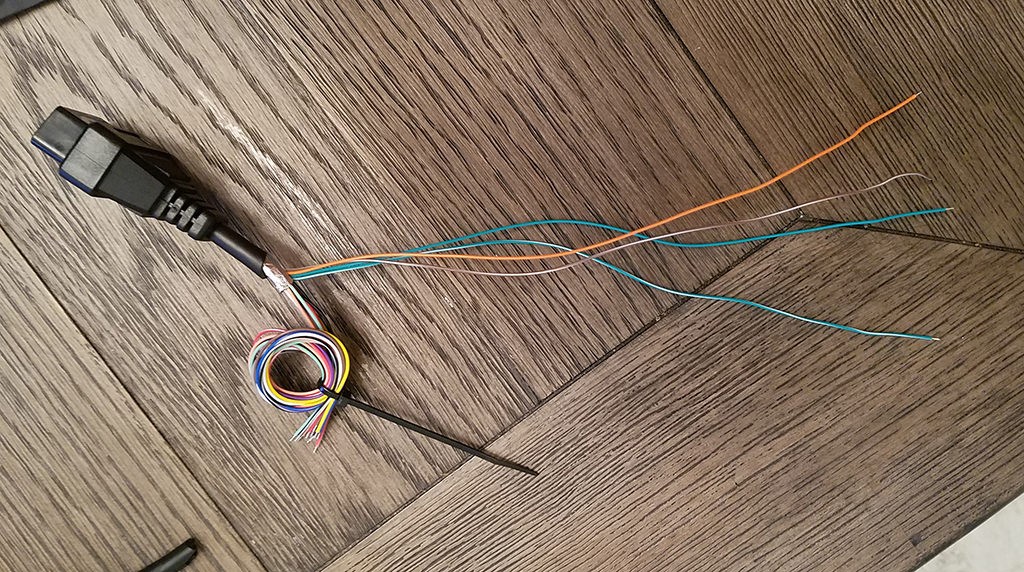 Separated 4 wires being used
3.2. Preparing the 4-Pin Connector
-
Strip the Wires: Strip about 3/8″ of insulation from the end of each wire.
-
Tin the Wires (Recommended): Apply a small amount of solder to the exposed wire to create a more secure connection.
-
Attach Rubber Seals: Slide a rubber seal over each wire to protect the connection from environmental factors.
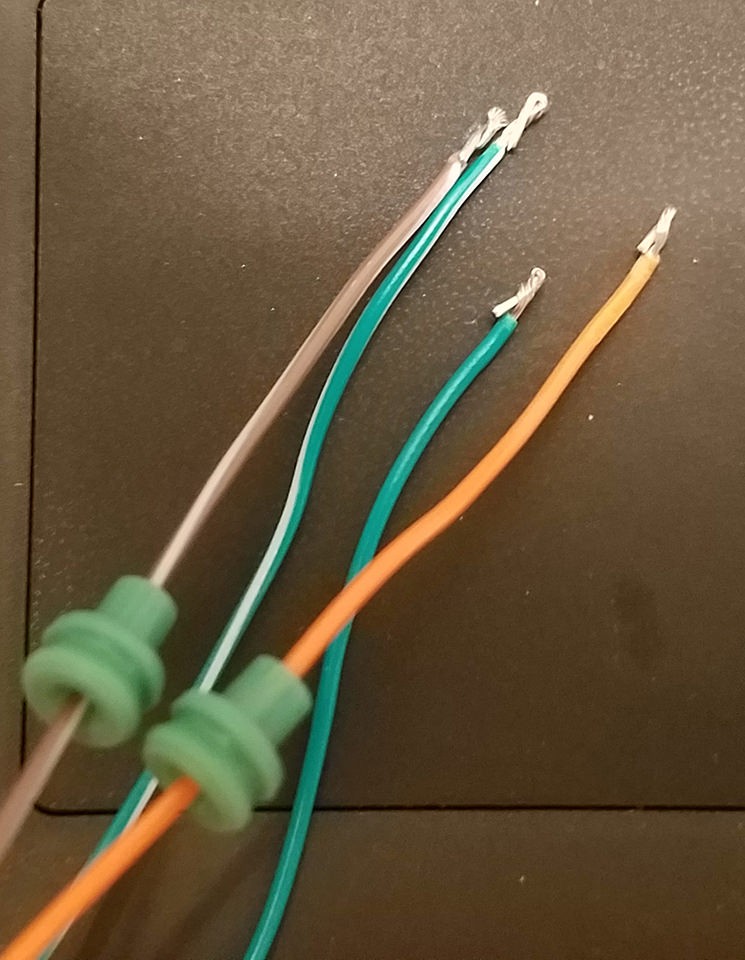 Attaching rubber seals to wires
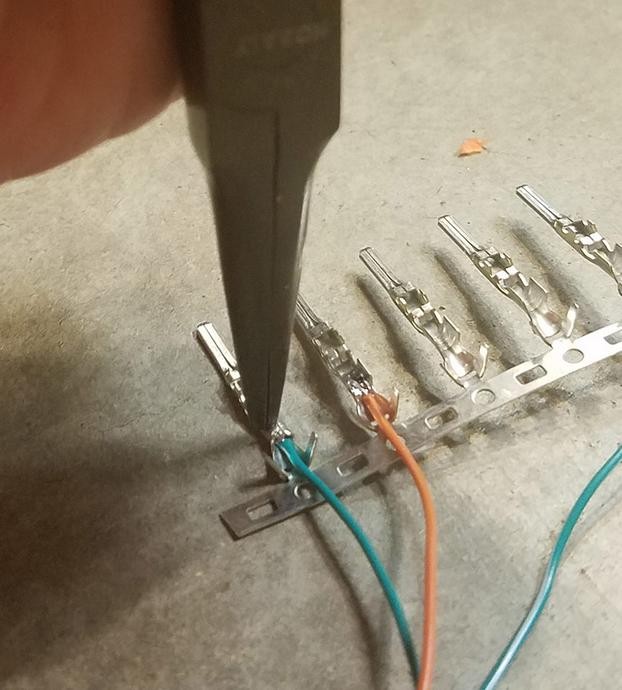
3.3. Connecting Wires to the 4-Pin Connector
-
Insert Wire into Pin: Insert the exposed wire into the pin connector. Ensure the wire is properly aligned for a secure connection.
 Inserting wire into pin connector
 -
Solder the Connection (Recommended): Solder the wire to the pin connector to ensure a strong and reliable connection.
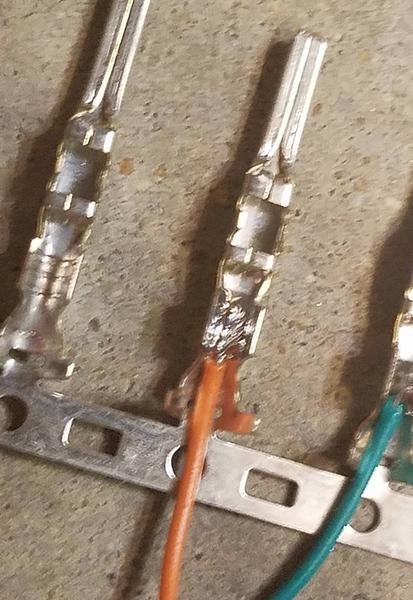 Soldering wire to pin connector
 -
Crimp the Connector (Alternative): If you don’t have a soldering iron, use a Molex crimping tool to crimp the connector over the wire.
-
Fold the Prongs: Use needle-nose pliers to fold the prongs over the wire, securing it in place.
 Folding prongs over the wire
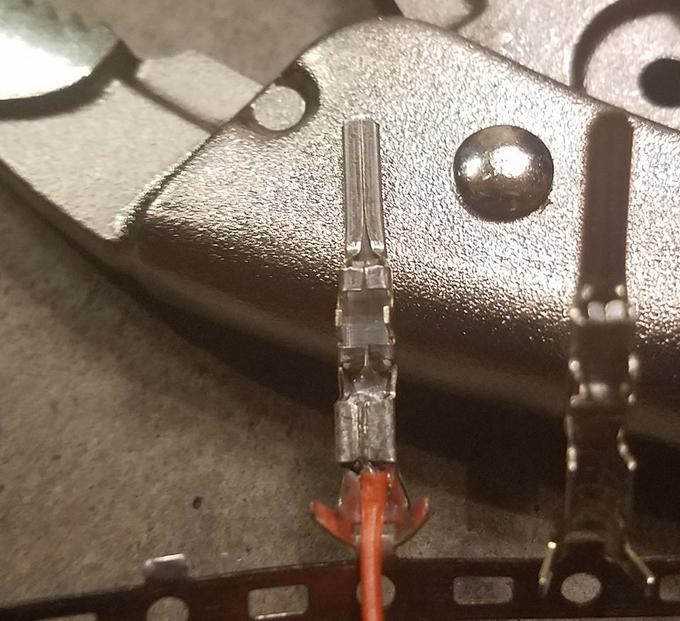 Crimped connector
 -
Secure the Seal: Slide the rubber seal up to fit between the back prongs and fold the prongs over the seal to secure it.
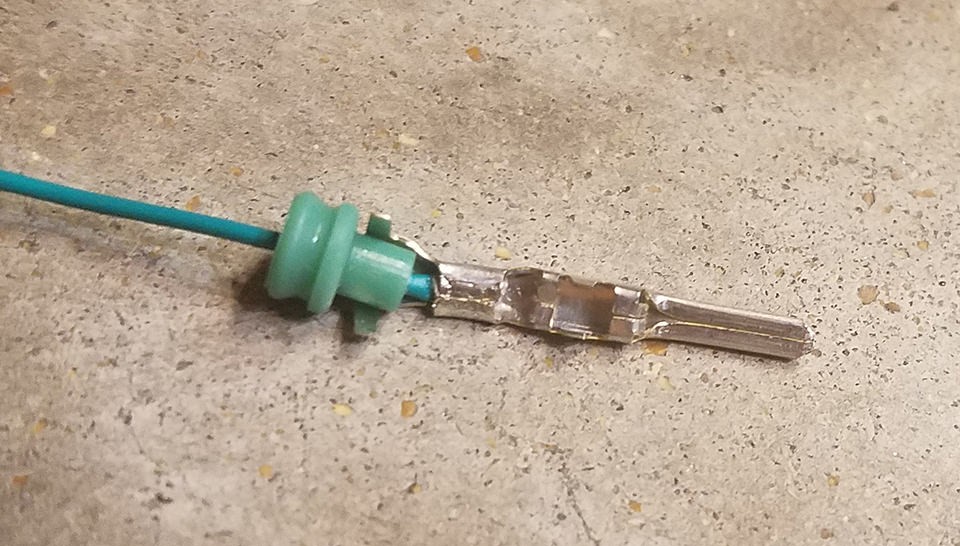 Securing the seal
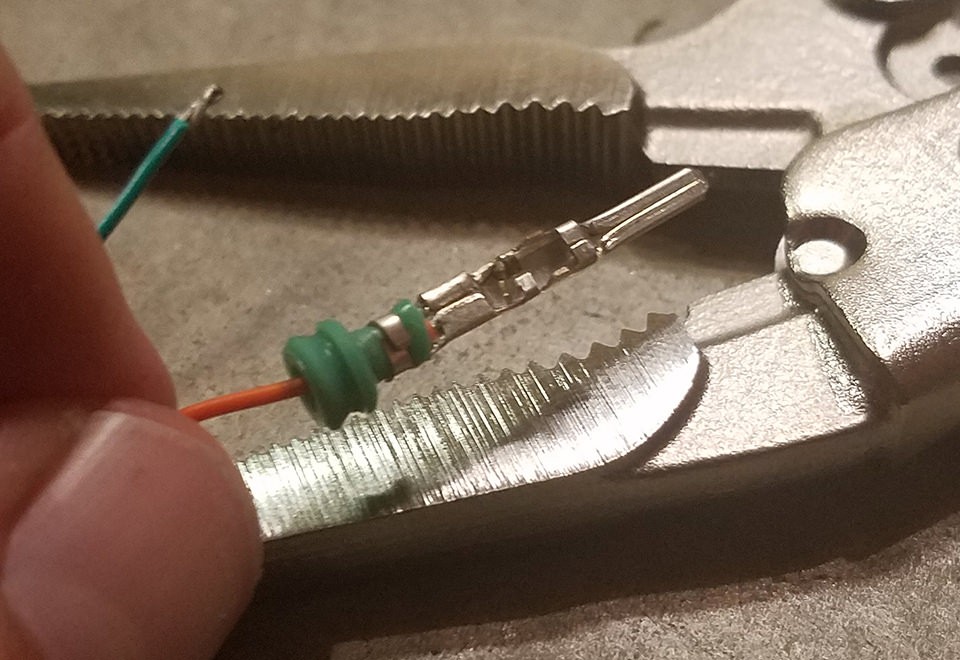 Seal in place
 Final seal
3.4. Pairing and Twisting the Wires
- Pair the Wires: Pair off the wires in the following manner:
- Pin 4 (Chassis Ground) with Pin 16 (Battery Power)
- Pin 6 (CAN High) with Pin 14 (CAN Low)
- Twist the Pairs: Twist each pair of wires together to reduce interference and improve signal quality.
3.5. Inserting Pins into the 4-Pin Connector
-
Insert Pins: Insert the pins into the 4-pin connector in the correct orientation:
- Pin 14 (CAN Low) > Connector Slot A
- Pin 6 (CAN High) > Connector Slot B
- Pin 16 (Battery Power) > Connector Slot C
- Pin 4 (Chassis Ground) > Connector Slot D
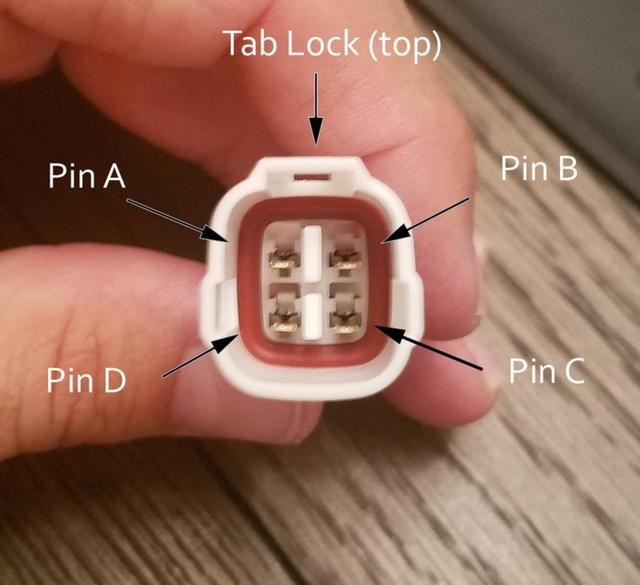 Inserting pins into connector
 -
Lock the Pins: Ensure each pin locks into place by pushing it in until you hear an audible click.
3.6. Connecting to the USB Interface
- USB to TTL Serial Adapter (If Needed):
- If your USB connector requires a TTL serial connection, use a USB to TTL serial adapter.
- Connect the wires from the 4-pin connector to the appropriate pins on the adapter (usually labeled RX, TX, VCC, and GND).
- Direct USB Connection:
- If your USB connector allows for a direct connection, solder or crimp the wires from the 4-pin connector to the corresponding pins on the USB connector.
3.7. Finalizing the Cable
- Insulate Connections: Use heat shrink tubing to insulate all soldered or crimped connections.
- Test the Cable: Use a multimeter to test the continuity and ensure there are no shorts between the wires.
- Connect to Vehicle and Computer: Plug the OBD2 connector into your vehicle’s OBD2 port and the USB connector into your computer.
4. Selecting Diagnostic Software
Choosing the right diagnostic software is crucial for utilizing your OBD2 USB cable effectively.
4.1. Popular Diagnostic Software Options
- Xentry/DAS: Mercedes-Benz’s official diagnostic software, offering comprehensive diagnostic and programming capabilities. It is primarily used by dealerships and professional mechanics.
- Autel MaxiSys: A popular aftermarket diagnostic tool that supports a wide range of vehicles, including Mercedes-Benz. It offers advanced diagnostic functions and user-friendly interface.
- iCarsoft MB II: A more affordable option that provides basic diagnostic functions and is specifically designed for Mercedes-Benz vehicles.
- Torque Pro (Android): A mobile app that connects to your vehicle via an OBD2 adapter and provides real-time data and diagnostic information.
- OBD Auto Doctor: A software solution that supports multiple platforms and offers basic to advanced diagnostic features.
4.2. Features to Look For
- Compatibility: Ensure the software is compatible with your Mercedes-Benz model and year.
- Diagnostic Functions: Look for software that offers comprehensive diagnostic functions, including reading and clearing DTCs, live data monitoring, and advanced diagnostics.
- User Interface: Choose software with a user-friendly interface that is easy to navigate.
- Updates: Ensure the software is regularly updated to support the latest vehicle models and diagnostic protocols.
- Customization: Some software allows you to customize vehicle settings and parameters.
4.3. Setting Up the Software
- Install the Software: Download and install the diagnostic software on your computer.
- Install Drivers: Install any necessary USB drivers to ensure your computer recognizes the OBD2 USB cable.
- Configure Settings: Configure the software settings to match your vehicle’s make, model, and year.
- Connect to Vehicle: Connect the OBD2 USB cable to your vehicle and computer, and follow the software instructions to establish a connection.
5. Using the OBD2 USB Cable for Diagnostics
Once you have created your OBD2 USB cable and set up the diagnostic software, you can begin using it to diagnose and troubleshoot your Mercedes-Benz.
5.1. Reading Diagnostic Trouble Codes (DTCs)
- Connect the Cable: Connect the OBD2 USB cable to your vehicle and computer.
- Launch the Software: Launch the diagnostic software and establish a connection with your vehicle.
- Read DTCs: Select the option to read diagnostic trouble codes (DTCs). The software will retrieve any stored DTCs from your vehicle’s computer.
- Interpret the Codes: Use the software or a reference guide to interpret the DTCs and identify the potential issues.
5.2. Monitoring Live Data
- Connect the Cable: Connect the OBD2 USB cable to your vehicle and computer.
- Launch the Software: Launch the diagnostic software and establish a connection with your vehicle.
- Select Live Data: Select the option to monitor live data. The software will display real-time data from various sensors and systems in your vehicle.
- Analyze the Data: Monitor the data for any abnormalities or out-of-range values that may indicate a problem.
5.3. Clearing Diagnostic Trouble Codes (DTCs)
- Connect the Cable: Connect the OBD2 USB cable to your vehicle and computer.
- Launch the Software: Launch the diagnostic software and establish a connection with your vehicle.
- Clear DTCs: Select the option to clear diagnostic trouble codes (DTCs). The software will clear the stored DTCs from your vehicle’s computer.
- Verify the Clear: Verify that the DTCs have been cleared by re-reading them. Note that some DTCs may reappear if the underlying issue has not been resolved.
6. Safety Precautions
When working with electrical components and vehicle systems, it is important to take necessary safety precautions.
6.1. General Safety Tips
- Disconnect the Battery: Before working on any electrical components, disconnect the negative terminal of your vehicle’s battery to prevent electrical shock.
- Use Proper Tools: Use the correct tools for the job to avoid damaging components or causing injury.
- Work in a Well-Ventilated Area: When soldering or working with chemicals, work in a well-ventilated area to avoid inhaling harmful fumes.
- Wear Safety Glasses: Wear safety glasses to protect your eyes from debris or sparks.
- Follow Instructions: Follow the instructions provided by the diagnostic software and any reference materials.
6.2. Vehicle-Specific Precautions
- Consult the Service Manual: Refer to your vehicle’s service manual for specific safety precautions and procedures.
- Be Aware of Airbag Systems: Be aware of the location of airbag systems and avoid working near them to prevent accidental deployment.
- Handle Fuel Systems with Care: Handle fuel systems with care to avoid fuel leaks or explosions.
- Avoid Working on High-Voltage Systems: Avoid working on high-voltage systems, such as those found in hybrid or electric vehicles, unless you are properly trained and equipped.
7. Troubleshooting Common Issues
Even with careful assembly, issues can arise. Here’s how to troubleshoot common problems.
7.1. Cable Not Recognized by Computer
- Check USB Connection: Ensure the USB cable is securely connected to both the computer and the OBD2 adapter.
- Install Drivers: Make sure the necessary USB drivers are installed on your computer.
- Try a Different USB Port: Try using a different USB port on your computer.
- Test on Another Computer: Test the cable on another computer to rule out any issues with your computer’s USB ports or drivers.
7.2. Software Cannot Connect to Vehicle
- Verify Compatibility: Ensure the diagnostic software is compatible with your vehicle’s make, model, and year.
- Check OBD2 Connection: Make sure the OBD2 connector is securely plugged into your vehicle’s OBD2 port.
- Turn Ignition On: Ensure your vehicle’s ignition is turned on.
- Check Cable Continuity: Use a multimeter to check the continuity of the wires in the OBD2 USB cable.
7.3. Inaccurate Data or Error Codes
- Check Wiring: Verify that the wires are connected correctly to the OBD2 connector and the USB interface.
- Update Software: Ensure your diagnostic software is up to date.
- Consult Service Manual: Consult your vehicle’s service manual for accurate diagnostic information and troubleshooting procedures.
- Professional Assistance: If you are unable to resolve the issue, seek professional assistance from a qualified mechanic or diagnostic specialist.
8. Advantages of Using MERCEDES-DIAGNOSTIC-TOOL.EDU.VN
While creating your own OBD2 USB cable can be a rewarding project, relying on professional tools and services from MERCEDES-DIAGNOSTIC-TOOL.EDU.VN offers significant advantages.
8.1. Expert Guidance and Support
MERCEDES-DIAGNOSTIC-TOOL.EDU.VN provides expert guidance and support to help you diagnose and troubleshoot your Mercedes-Benz effectively. Our team of experienced technicians can provide assistance with:
- Selecting the Right Diagnostic Tools: We can help you choose the right diagnostic tools and software for your specific needs and vehicle model.
- Interpreting Diagnostic Trouble Codes (DTCs): We can help you interpret DTCs and identify the underlying issues.
- Troubleshooting Complex Problems: We can provide guidance on troubleshooting complex problems and performing advanced diagnostics.
8.2. Access to Professional-Grade Tools
MERCEDES-DIAGNOSTIC-TOOL.EDU.VN offers access to professional-grade diagnostic tools that are not typically available to the general public. These tools provide advanced diagnostic capabilities, including:
- Mercedes-Specific Diagnostics: Our tools support Mercedes-specific diagnostic protocols, allowing you to access proprietary diagnostic codes and perform advanced functions.
- Real-Time Data Monitoring: Our tools provide real-time data monitoring, allowing you to monitor your vehicle’s performance and identify potential issues.
- Programming and Coding: Some of our tools support programming and coding functions, allowing you to customize vehicle settings and parameters.
8.3. Cost Savings and Convenience
While creating your own OBD2 USB cable can save you money in the short term, relying on professional tools and services from MERCEDES-DIAGNOSTIC-TOOL.EDU.VN can save you money and time in the long run.
- Avoid Costly Mistakes: Our expert guidance can help you avoid costly mistakes and ensure that you are performing the correct diagnostic procedures.
- Save Time: Our professional-grade tools and expertise can help you diagnose and troubleshoot problems more quickly and efficiently.
- Reduce Repair Costs: By accurately diagnosing and resolving issues, you can reduce the risk of unnecessary repairs and save money on labor costs.
9. Unlocking Hidden Features on Your Mercedes-Benz
One of the exciting possibilities with an OBD2 USB cable and the right software is unlocking hidden features on your Mercedes-Benz.
9.1. What are Hidden Features?
Hidden features are functions or settings that are built into your vehicle’s computer but are not enabled by default. These features can include:
- Ambient Lighting Customization: Adjusting the color and intensity of the ambient lighting in your vehicle.
- Seatbelt Chime Deactivation: Disabling the seatbelt chime for added convenience.
- Gauge Cluster Customization: Changing the appearance of the gauge cluster.
- Video in Motion: Enabling video playback on the infotainment screen while the vehicle is in motion (note: this may be illegal in some jurisdictions).
- Performance Monitoring: Accessing additional performance data, such as horsepower, torque, and acceleration.
9.2. How to Unlock Hidden Features
Unlocking hidden features typically involves using diagnostic software to access and modify your vehicle’s computer settings. The exact process varies depending on the software and vehicle model, but it generally involves:
- Connecting the Cable: Connect the OBD2 USB cable to your vehicle and computer.
- Launching the Software: Launch the diagnostic software and establish a connection with your vehicle.
- Accessing Coding Functions: Navigate to the coding or programming section of the software.
- Modifying Settings: Identify the setting for the desired hidden feature and modify it to the desired value.
- Saving Changes: Save the changes to your vehicle’s computer.
- Testing the Feature: Test the newly enabled feature to ensure it is working correctly.
9.3. Risks and Precautions
Unlocking hidden features can be a fun and rewarding experience, but it is important to be aware of the risks and take necessary precautions.
- Warranty Issues: Modifying your vehicle’s computer settings may void your warranty.
- Software Compatibility: Ensure the diagnostic software is compatible with your vehicle model and year.
- Incorrect Settings: Modifying the wrong settings can cause problems with your vehicle’s performance or functionality.
- Backup Your Settings: Before making any changes, create a backup of your vehicle’s computer settings.
10. Regular Maintenance and Care with OBD2 USB Cable
Using an OBD2 USB cable isn’t just for diagnosing problems; it’s also a valuable tool for regular maintenance and care.
10.1. Monitoring Vehicle Health
Regularly monitoring your vehicle’s health can help you identify potential problems before they become serious. Using an OBD2 USB cable, you can:
- Check for DTCs: Regularly check for diagnostic trouble codes (DTCs) to identify any stored issues.
- Monitor Live Data: Monitor live data to ensure that all sensors and systems are functioning correctly.
- Track Fuel Efficiency: Monitor fuel efficiency to identify potential issues with your engine or fuel system.
- Check Battery Health: Monitor your battery’s voltage and charging status to ensure it is in good condition.
10.2. Performing Routine Maintenance
An OBD2 USB cable can also assist with routine maintenance tasks, such as:
- Resetting Service Reminders: Reset service reminders after performing routine maintenance tasks, such as oil changes or tire rotations.
- Calibrating Sensors: Calibrate sensors, such as the throttle position sensor or mass airflow sensor, to ensure accurate readings.
- Adjusting Idle Speed: Adjust the idle speed of your engine to ensure smooth operation.
- Programming Keys: Program new keys or key fobs for your vehicle.
10.3. Long-Term Benefits
Regular maintenance and care using an OBD2 USB cable can provide numerous long-term benefits, including:
- Improved Reliability: Regular monitoring and maintenance can help you identify and resolve potential issues before they cause major problems.
- Extended Lifespan: By keeping your vehicle in good condition, you can extend its lifespan and avoid costly repairs.
- Increased Fuel Efficiency: Proper maintenance can help improve fuel efficiency and save money on gas.
- Higher Resale Value: A well-maintained vehicle will have a higher resale value than one that has been neglected.
FAQ: Making and Using an OBD2 USB Cable
What is an OBD2 USB cable used for?
An OBD2 USB cable connects your car’s OBD2 port to a computer, allowing you to read diagnostic information, monitor performance, and troubleshoot issues.
Is it difficult to make an OBD2 USB cable?
With the right tools and instructions, making an OBD2 USB cable is manageable. However, it requires precision and attention to detail.
What tools do I need to make an OBD2 USB cable?
You’ll need wire strippers, needle-nose pliers, a soldering iron (recommended), a multimeter, and optionally a Molex crimping tool.
What diagnostic software is recommended for Mercedes-Benz vehicles?
Popular options include Xentry/DAS, Autel MaxiSys, iCarsoft MB II, Torque Pro (Android), and OBD Auto Doctor.
Can I unlock hidden features on my Mercedes-Benz with an OBD2 USB cable?
Yes, with the right software, you can unlock hidden features like ambient lighting customization, seatbelt chime deactivation, and more.
What are the risks of modifying my vehicle’s computer settings?
Risks include voiding your warranty, software incompatibility, and causing problems with your vehicle’s performance if incorrect settings are modified.
How often should I check my vehicle’s health using an OBD2 USB cable?
Regularly monitoring your vehicle’s health can help identify potential problems early, so checking at least once a month is recommended.
Can an OBD2 USB cable help with routine maintenance tasks?
Yes, it can assist with tasks like resetting service reminders, calibrating sensors, and adjusting idle speed.
What safety precautions should I take when working with electrical components?
Disconnect the battery, use proper tools, work in a well-ventilated area, wear safety glasses, and follow instructions carefully.
Where can I get professional guidance for diagnosing issues with my Mercedes-Benz?
MERCEDES-DIAGNOSTIC-TOOL.EDU.VN provides expert guidance and support for diagnosing and troubleshooting your Mercedes-Benz effectively.
Take Action Now
Ready to enhance your Mercedes-Benz diagnostic capabilities? Contact MERCEDES-DIAGNOSTIC-TOOL.EDU.VN today for expert guidance on selecting the right diagnostic tools, unlocking hidden features, and troubleshooting complex problems.
Reach out to us at:
- Address: 789 Oak Avenue, Miami, FL 33101, United States
- WhatsApp: +1 (641) 206-8880
- Website: MERCEDES-DIAGNOSTIC-TOOL.EDU.VN
Let MERCEDES-DIAGNOSTIC-TOOL.EDU.VN be your trusted partner in maintaining and optimizing your Mercedes-Benz.