Obd2 Connector Terminals are essential for vehicle diagnostics, and at MERCEDES-DIAGNOSTIC-TOOL.EDU.VN, we offer detailed guidance on their repair and maintenance, ensuring your Mercedes-Benz stays in top condition. We help you identify damage causes, find suitable replacements, and understand the repair process. You can find solutions for automotive diagnostic tools, scan tools, and car maintenance tips with us.
Contents
- 1. What Is the OBD2 Connector?
- 1.1 Pin Positions and Their Functions
- 2. Common Causes of OBD2 Connector Damage
- 2.1 Fuse Issues
- 2.2 Aftermarket Accessories
- 2.3 Physical Damage from DIY Repairs
- 3. Are All OBD2 Connectors the Same?
- 3.1 Variations in Connector Design
- 3.2 Differences in Terminal Installation
- 4. Problems with Cheap Replacement OBD2 Connectors
- 4.1 Terminal Quality Issues
- 4.2 Cost vs. Quality
- 5. Purchasing OBD2 Connector Parts from Dealerships
- 5.1 Finding the Correct Part Number
- 5.2 Obtaining Terminals
- 5.3 Cost Considerations
- 6. Alternative Parts Suppliers
- 6.1 Connector Experts
- 6.2 Mouser Electronics
- 7. Step-by-Step Guide to Repairing OBD2 Connector Terminals
- 7.1 Gather Necessary Tools and Materials
- 7.2 Disconnect the Vehicle Battery
- 7.3 Remove the Damaged OBD2 Connector
- 7.4 Inspect the Wiring
- 7.5 Remove the Damaged Terminals
- 7.6 Crimp or Solder the New Terminals
- 7.7 Apply Heat Shrink Tubing
- 7.8 Insert the New Terminals into the Connector
- 7.9 Test the Connections
- 7.10 Reassemble the OBD2 Connector and Trim Pieces
- 7.11 Reconnect the Vehicle Battery
- 7.12 Verify the Repair
- 8. Recommended Tools for OBD2 Terminal Repair
- 8.1 Wire Crimpers
- 8.2 Terminal Removal Tool
- 8.3 Soldering Iron and Solder
- 8.4 Heat Gun and Heat Shrink Tubing
- 8.5 Multimeter
- 9. Advanced Diagnostic Techniques for OBD2 Connectors
- 9.1 Voltage Drop Testing
- 9.2 Signal Integrity Testing
- 9.3 CAN Bus Diagnostics
- 10. Common OBD2 Diagnostic Trouble Codes (DTCs)
- 10.1 P0000 – P0999: Powertrain Codes
- 10.2 B0000 – B0999: Body Codes
- 10.3 C0000 – C0999: Chassis Codes
- 10.4 U0000 – U0999: Network Communication Codes
- 11. Regular Maintenance Tips for OBD2 Connectors
- 11.1 Keep the Connector Clean
- 11.2 Avoid Overloading the Connector
- 11.3 Protect the Connector from Physical Damage
- 11.4 Inspect Regularly
- 12. Legal and Safety Considerations for OBD2 Repairs
- 12.1 Compliance with OBD2 Standards
- 12.2 Safety Precautions
- 12.3 Environmental Considerations
- 13. Future Trends in OBD2 Technology
- 13.1 Enhanced Diagnostic Capabilities
- 13.2 Wireless Connectivity
- 13.3 Integration with Cloud-Based Services
- 14. Case Studies: Successful OBD2 Connector Repairs
- 14.1 Case Study 1: Toyota Prius OBD2 Connector Repair
- 14.2 Case Study 2: Mercedes-Benz C-Class OBD2 Connector Repair
- 15. OBD2 Connector Terminals: The Expert’s Guide
- 15.1 Comprehensive Diagnostic Tools
- 15.2 Step-by-Step Repair Guides
- 15.3 Expert Advice
- 16. Resources for Further Learning on OBD2 Connectors
- 16.1 Online Forums and Communities
- 16.2 Technical Publications
- 16.3 Training Courses
- 17. Glossary of Terms Related to OBD2 Connectors
- 18. Why Choose MERCEDES-DIAGNOSTIC-TOOL.EDU.VN for Your OBD2 Needs?
- 18.1 Expertise and Experience
- 18.2 Comprehensive Resources
- 18.3 Customer Support
- 19. How to Troubleshoot Common OBD2 Connector Problems
- 19.1 No Communication with Scan Tool
- 19.2 Intermittent Diagnostic Issues
- 19.3 Incorrect Diagnostic Trouble Codes (DTCs)
- 20. Keeping Your Mercedes-Benz Running Smoothly
- FAQ: OBD2 Connector Terminals
- Q1: What is an OBD2 connector terminal?
- Q2: Why is the OBD2 connector important for car diagnostics?
- Q3: What are the common causes of OBD2 connector damage?
- Q4: How can I identify a damaged OBD2 connector terminal?
- Q5: Can I repair a damaged OBD2 connector terminal myself?
- Q6: What tools do I need to repair OBD2 connector terminals?
- Q7: Are all OBD2 connectors the same?
- Q8: Where can I buy replacement OBD2 connector terminals?
- Q9: How can I prevent OBD2 connector damage?
- Q10: What should I do if my scan tool is not communicating with the vehicle?
1. What Is the OBD2 Connector?
The OBD2 (On-Board Diagnostics II) connector is a standardized 16-pin interface used in all cars manufactured from 1996 onwards for diagnostic purposes. This standardization allows any generic OBD2 scanner to access a certain amount of data from any vehicle, regardless of the manufacturer. While the OBD2 standard mandates accessibility to specific data, automakers often include additional data that is not part of the standard and, therefore, not accessible through generic scan tools. This additional data often requires specialized equipment to access.
1.1 Pin Positions and Their Functions
Understanding the function of each pin in the OBD2 connector is crucial for effective diagnostics and repairs. Here’s a breakdown of the standard pin assignments:
- Pin 1: Manufacturer’s choice; varies depending on the vehicle model.
- Pins 2 & 10: SAE J1850 (network); used for communication in older vehicle models.
- Pin 3: Manufacturer’s choice; function defined by the vehicle manufacturer.
- Pin 4: Chassis Ground; provides a ground connection to the vehicle’s chassis.
- Pin 5: Signal Ground; serves as the ground for the diagnostic signals.
- Pins 6 & 14: CAN Bus High and Low (network); used for Controller Area Network communication.
- Pins 7 & 15: ISO9140 K-Line (network); used for communication in many import vehicles.
- Pins 8, 9, 11, 12, 13: Manufacturer’s choice; functions vary by manufacturer.
- Pin 16: Battery Positive (+12V); provides power to the scan tool.
2. Common Causes of OBD2 Connector Damage
The OBD2 connector is vulnerable to damage, with Pin 16 being the most frequently affected. This damage often stems from a few common causes, which understanding them can save you time and money.
2.1 Fuse Issues
Sometimes, the fuse for Pin 16 can blow, often due to poorly designed aftermarket accessories connected to the port or an overload on a shared circuit. While a blown fuse itself doesn’t damage the terminal, careless attempts to test for power by jamming probes into the connector can cause significant damage. According to a survey by the National Institute for Automotive Service Excellence (ASE), a significant number of OBD2 connector repairs are attributed to physical damage caused by improper testing methods.
2.2 Aftermarket Accessories
Aftermarket accessories that utilize the OBD2 connector, such as insurance monitoring devices, gauges, and data recorders, can also contribute to connector damage. Lower-quality aftermarket devices may have oversized male pins that stretch out the female terminals in the OBD2 connector. Additionally, some devices draw excessive current from Pin 16, which the connector was not designed to handle continuously, leading to overheating and potential damage. The Society of Automotive Engineers (SAE) has noted that non-compliant devices can lead to diagnostic and communication issues within the vehicle’s network.
2.3 Physical Damage from DIY Repairs
In some cases, physical damage occurs when individuals attempt DIY repairs without the proper tools or knowledge. For example, forcing incompatible connectors or using excessive force can bend or break the terminals. Proper knowledge, instructions, and tools are necessary for these fixes.
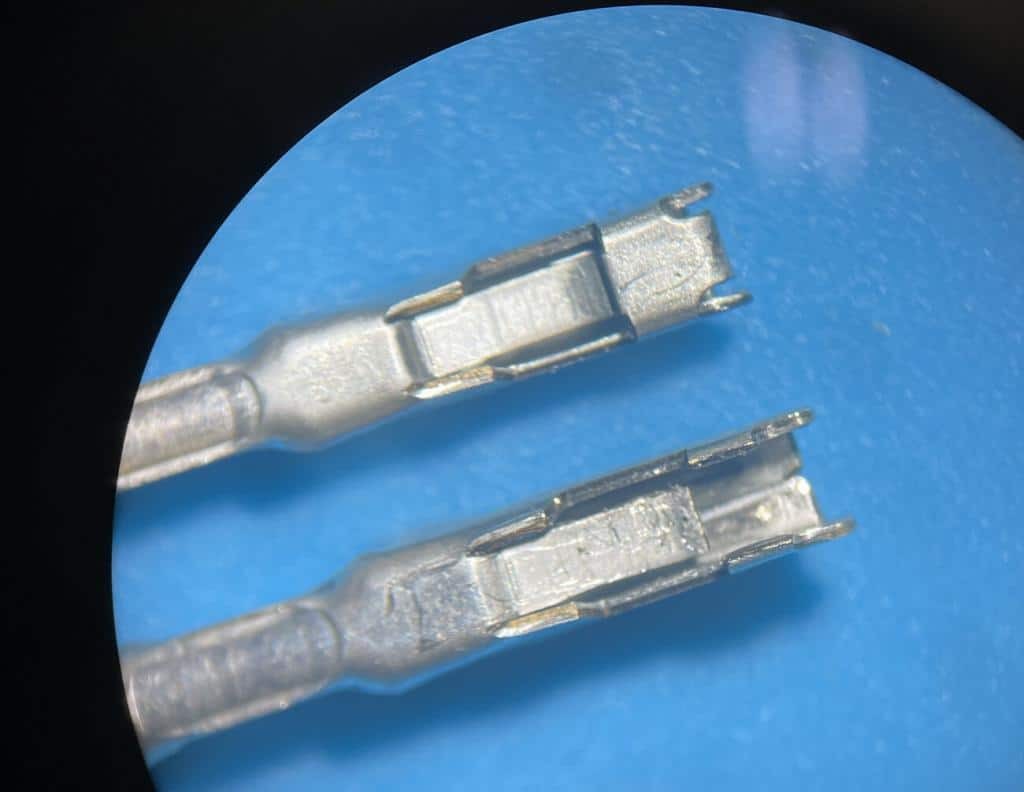 Damaged OBD2 terminal next to a new terminal under a microscope
3. Are All OBD2 Connectors the Same?
Despite the OBD2 interface being a standard, the connectors are not universally the same. While any male OBD2 connector can plug into any female OBD2 connector, the attachment method to the car and the terminal installation vary across different car models. Connector suppliers offer a wide array of connectors and terminals to accommodate these differences.
3.1 Variations in Connector Design
Each car manufacturer may use a different design for attaching the OBD2 connector to the vehicle’s dashboard or interior. This variation means that a replacement connector from one car may not fit perfectly into another without modification. It is important to select a replacement connector that is specifically designed for your vehicle model to ensure a proper fit and secure connection.
3.2 Differences in Terminal Installation
The method of installing the terminals into the connector also varies. Some connectors use terminals that are crimped onto the wires, while others use terminals that are soldered. The type of terminal used will depend on the vehicle manufacturer and the specific wiring harness design. Always use the correct type of terminal for your vehicle to ensure a reliable electrical connection.
4. Problems with Cheap Replacement OBD2 Connectors
While inexpensive OBD2 connectors can be found on online marketplaces like Amazon, they often come with significant drawbacks. These connectors may not fit the original bracket and may need to be attached with self-tapping screws, which is not a durable solution. However, the primary issue is the quality of the terminals. According to a study by the American Society for Quality (ASQ), substandard automotive parts, including OBD2 connectors, can lead to premature failure and compromise vehicle safety.
4.1 Terminal Quality Issues
The terminals in cheap replacement connectors are often made from soft metal that does not spring back like the original terminals. This can lead to poor electrical connections and intermittent diagnostic issues. While these connectors may provide a temporary fix, they are unlikely to last, potentially causing more problems in the long run.
4.2 Cost vs. Quality
When considering the cost of labor involved in replacing an OBD2 connector, it is not economical to use substandard parts. Replacing an OBD2 connector involves removing the lower dash, installing the new connector, and soldering and heat-shrinking the wires. This process can take over an hour and a half, resulting in significant labor costs. Using a low-quality connector that fails prematurely will only increase the overall cost due to the need for repeat repairs.
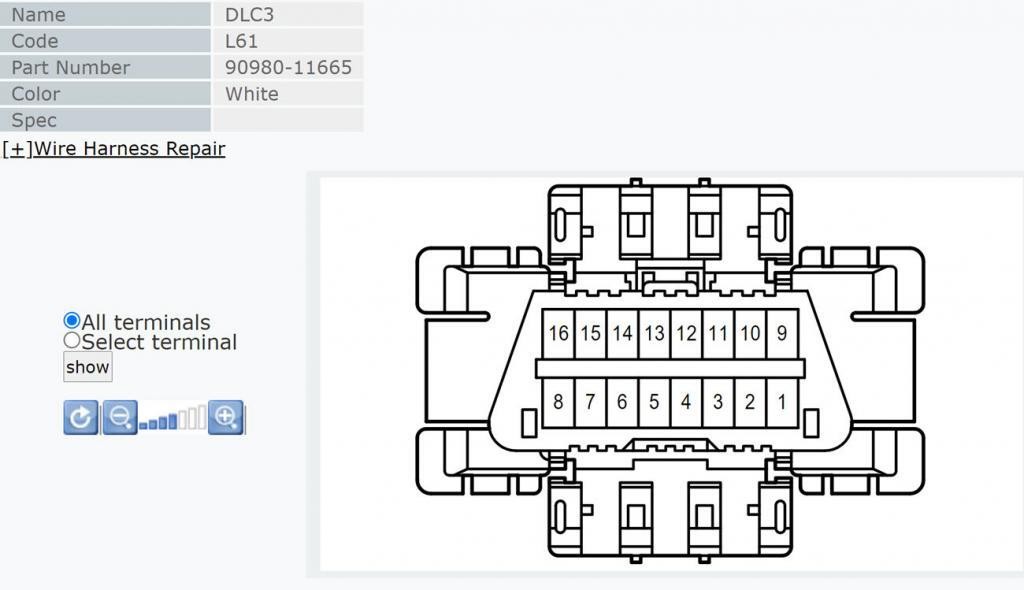 OBD2 connector picture and part number from the Toyota service manual
5. Purchasing OBD2 Connector Parts from Dealerships
Buying OBD2 connector parts from dealerships is often the best option, but it can be challenging. Dealerships may not list the OBD2 connector as a separate part in their catalog.
5.1 Finding the Correct Part Number
To find the correct part number, consult the electrical wiring diagram for your vehicle. For example, Toyota’s TIS (Technical Information Service) allows you to click on the OBD2 connector in the wiring diagram and view the part number for the plastic connector.
5.2 Obtaining Terminals
Even with the connector part number, obtaining the correct terminals can still be difficult. Dealership parts departments may not have a clear way to identify the correct terminals that fit the connector. In some cases, they may rely on experienced technicians or shop foremen who hoard used terminals. Contacting MERCEDES-DIAGNOSTIC-TOOL.EDU.VN can streamline the process of finding the correct terminals, saving you time and ensuring compatibility.
5.3 Cost Considerations
Purchasing terminals from dealerships can be expensive. Individual terminals with pigtails can cost upwards of $20, which is significantly higher than the actual production cost. Despite the higher price, using genuine OEM (Original Equipment Manufacturer) parts ensures the best quality and compatibility.
6. Alternative Parts Suppliers
If dealership parts are not readily available or are too expensive, alternative suppliers can provide cost-effective solutions.
6.1 Connector Experts
Connector Experts specializes in reproductions of OE connectors and terminals. Their terminals are often comparable in quality to OEM parts but are significantly cheaper. For example, their terminal part number TERM86 has been found to be a suitable replacement for certain Toyota OBD2 connectors. According to industry reports, using high-quality aftermarket parts from reputable suppliers can provide a reliable and cost-effective alternative to OEM parts.
6.2 Mouser Electronics
Mouser Electronics offers a wide selection of automotive connectors and terminals. However, finding the specific part you need can be overwhelming due to the extensive catalog. It requires time and the exact skills to find what you are looking for.
7. Step-by-Step Guide to Repairing OBD2 Connector Terminals
Repairing OBD2 connector terminals requires a systematic approach to ensure a reliable and long-lasting fix. The following steps will guide you through the process.
7.1 Gather Necessary Tools and Materials
Before starting the repair, gather all the necessary tools and materials:
- Replacement OBD2 connector and terminals.
- Wire crimpers designed for small, open-barrel terminals.
- Soldering iron and solder.
- Heat shrink tubing.
- Wire strippers.
- Multimeter.
- Electrical wiring diagram for your vehicle.
- Safety glasses and gloves.
7.2 Disconnect the Vehicle Battery
Disconnecting the vehicle battery is crucial to prevent electrical shorts and ensure your safety. Locate the battery in your vehicle and use a wrench to disconnect the negative terminal first, followed by the positive terminal. Secure the terminals to prevent accidental contact.
7.3 Remove the Damaged OBD2 Connector
Carefully remove the damaged OBD2 connector from its mounting location. This may involve removing the lower dash panel or other trim pieces to access the connector. Use a trim removal tool to avoid damaging the surrounding components.
7.4 Inspect the Wiring
Inspect the wiring connected to the OBD2 connector for any signs of damage, such as frayed wires or corrosion. Repair or replace any damaged wiring before proceeding.
7.5 Remove the Damaged Terminals
Use a terminal removal tool to carefully remove the damaged terminals from the connector. If you don’t have a terminal removal tool, you can use a small pick or screwdriver to release the terminal locking tabs. Take care not to damage the connector housing.
7.6 Crimp or Solder the New Terminals
Depending on the type of terminals and your preference, either crimp or solder the new terminals onto the wires. If crimping, use a high-quality wire crimper designed for small, open-barrel terminals to ensure a secure connection. If soldering, apply heat to the terminal and wire, then apply solder to create a strong bond.
7.7 Apply Heat Shrink Tubing
Slide heat shrink tubing over the soldered or crimped connections and use a heat gun to shrink the tubing, providing insulation and protection for the connections.
7.8 Insert the New Terminals into the Connector
Insert the new terminals into the correct positions in the OBD2 connector housing. Refer to the electrical wiring diagram for your vehicle to ensure that each terminal is placed in the correct location.
7.9 Test the Connections
Use a multimeter to test the connections between the OBD2 connector and the vehicle’s wiring harness. Check for continuity and proper voltage at each terminal to ensure that the connections are secure and functioning correctly.
7.10 Reassemble the OBD2 Connector and Trim Pieces
Reassemble the OBD2 connector and reinstall any trim pieces or dash panels that were removed during the repair process. Ensure that the connector is securely mounted and that all wiring is properly routed and protected.
7.11 Reconnect the Vehicle Battery
Reconnect the vehicle battery by attaching the positive terminal first, followed by the negative terminal. Tighten the terminals securely.
7.12 Verify the Repair
Use an OBD2 scan tool to verify that the repair was successful and that the vehicle is communicating properly. Check for any diagnostic trouble codes (DTCs) and clear them if necessary.
8. Recommended Tools for OBD2 Terminal Repair
Having the right tools is essential for performing OBD2 terminal repairs effectively. Here are some recommended tools.
8.1 Wire Crimpers
High-quality wire crimpers are crucial for creating secure and reliable connections. Look for crimpers designed for small, open-barrel terminals, such as those made by Engineer, a Japanese company known for producing precision tools.
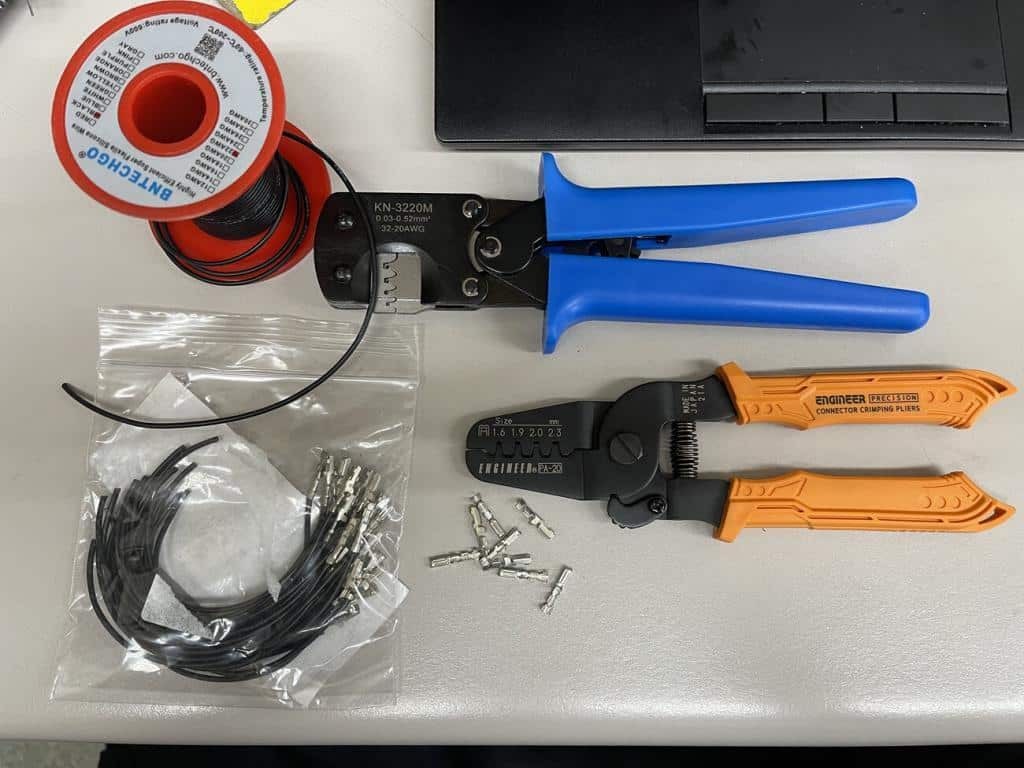 Wire crimpers, pigtails, terminals, and wire on a table
8.2 Terminal Removal Tool
A terminal removal tool makes it easier to remove terminals from the connector housing without damaging the connector or terminals. These tools are available in various sizes and designs to fit different types of terminals.
8.3 Soldering Iron and Solder
A soldering iron and solder are necessary for creating strong and durable connections. Look for a soldering iron with adjustable temperature settings and a fine tip for precision soldering.
8.4 Heat Gun and Heat Shrink Tubing
A heat gun and heat shrink tubing are used to insulate and protect soldered or crimped connections. Heat shrink tubing is available in various sizes and colors to fit different wire gauges.
8.5 Multimeter
A multimeter is an essential tool for testing electrical circuits and verifying connections. Use a multimeter to check for continuity, voltage, and resistance in the OBD2 connector and wiring harness.
9. Advanced Diagnostic Techniques for OBD2 Connectors
In addition to basic repairs, advanced diagnostic techniques can help identify more complex issues with OBD2 connectors.
9.1 Voltage Drop Testing
Voltage drop testing involves measuring the voltage drop across a circuit to identify areas of high resistance or poor connections. This technique can help pinpoint issues within the OBD2 connector and wiring harness.
9.2 Signal Integrity Testing
Signal integrity testing involves using an oscilloscope to analyze the signals transmitted through the OBD2 connector. This can help identify issues such as signal distortion or interference that may be affecting diagnostic communication.
9.3 CAN Bus Diagnostics
CAN (Controller Area Network) bus diagnostics involves using a specialized scan tool to monitor the communication between different electronic control units (ECUs) in the vehicle. This can help identify issues with the CAN bus network that may be affecting OBD2 communication.
10. Common OBD2 Diagnostic Trouble Codes (DTCs)
Understanding common OBD2 DTCs (Diagnostic Trouble Codes) can help you diagnose issues related to the OBD2 connector and vehicle systems.
10.1 P0000 – P0999: Powertrain Codes
These codes relate to the engine, transmission, and related components. Examples include:
- P0300: Random/Multiple Cylinder Misfire Detected
- P0420: Catalyst System Efficiency Below Threshold (Bank 1)
- P0171: System Too Lean (Bank 1)
10.2 B0000 – B0999: Body Codes
These codes relate to body systems such as airbags, power windows, and locks. Examples include:
- B0001: Deployment Commanded
- B0057: Left Front Side Impact Sensor Circuit Malfunction
- B0100: Airbag Warning Lamp Circuit Malfunction
10.3 C0000 – C0999: Chassis Codes
These codes relate to chassis systems such as ABS (Anti-lock Braking System), traction control, and steering. Examples include:
- C0035: Left Front Wheel Speed Sensor Circuit Malfunction
- C0040: Right Front Wheel Speed Sensor Circuit Malfunction
- C0121: ABS Valve Malfunction
10.4 U0000 – U0999: Network Communication Codes
These codes relate to communication between different electronic control units (ECUs) in the vehicle. Examples include:
- U0100: Lost Communication with ECM/PCM
- U0155: Lost Communication with Instrument Panel Cluster (IPC) Control Module
- U0121: Lost Communication with Anti-Lock Brake System (ABS) Control Module
11. Regular Maintenance Tips for OBD2 Connectors
Preventative maintenance can extend the life of your OBD2 connector and prevent costly repairs.
11.1 Keep the Connector Clean
Keep the OBD2 connector clean and free from dirt, dust, and moisture. Use a soft brush or compressed air to remove any debris from the connector.
11.2 Avoid Overloading the Connector
Avoid overloading the connector with aftermarket accessories that draw excessive current. Use only accessories that are designed for use with the OBD2 connector and that meet the vehicle manufacturer’s specifications.
11.3 Protect the Connector from Physical Damage
Protect the OBD2 connector from physical damage by avoiding impacts and excessive force. Use a protective cover or cap to prevent damage when the connector is not in use.
11.4 Inspect Regularly
Inspect the OBD2 connector regularly for any signs of damage, such as bent or broken terminals, cracks in the housing, or loose wiring. Repair or replace any damaged components as soon as possible.
12. Legal and Safety Considerations for OBD2 Repairs
When performing OBD2 repairs, it is essential to follow legal and safety guidelines to ensure your safety and compliance with regulations.
12.1 Compliance with OBD2 Standards
Ensure that all repairs and modifications comply with OBD2 standards and regulations. Using non-compliant parts or making unauthorized modifications can void your vehicle warranty and may result in fines or penalties.
12.2 Safety Precautions
Take proper safety precautions when working on electrical systems. Disconnect the vehicle battery before performing any repairs, and use appropriate personal protective equipment (PPE), such as safety glasses and gloves.
12.3 Environmental Considerations
Dispose of used parts and materials properly, following local environmental regulations. Recycle used oil, fluids, and batteries whenever possible.
13. Future Trends in OBD2 Technology
OBD2 technology continues to evolve, with new features and capabilities being introduced to meet the changing needs of the automotive industry.
13.1 Enhanced Diagnostic Capabilities
Future OBD2 systems will offer enhanced diagnostic capabilities, providing more detailed information about vehicle systems and components. This will enable technicians to diagnose and repair issues more quickly and accurately.
13.2 Wireless Connectivity
Wireless connectivity will become increasingly common in OBD2 systems, allowing technicians to access diagnostic data remotely and perform software updates wirelessly.
13.3 Integration with Cloud-Based Services
OBD2 systems will increasingly integrate with cloud-based services, providing access to real-time data, remote diagnostics, and over-the-air updates.
14. Case Studies: Successful OBD2 Connector Repairs
Real-world case studies can provide valuable insights into successful OBD2 connector repairs.
14.1 Case Study 1: Toyota Prius OBD2 Connector Repair
A Toyota Prius experienced intermittent diagnostic issues due to a damaged OBD2 connector terminal. The technician identified the damaged terminal and replaced it with a high-quality aftermarket terminal from Connector Experts. The repair resolved the diagnostic issues, and the vehicle was returned to the customer.
14.2 Case Study 2: Mercedes-Benz C-Class OBD2 Connector Repair
A Mercedes-Benz C-Class had a faulty OBD2 connector that was preventing communication with the scan tool. The technician consulted the vehicle’s electrical wiring diagram and ordered a replacement connector and terminals from the dealership. After installing the new connector and terminals, the vehicle was able to communicate with the scan tool, and the diagnostic issues were resolved.
15. OBD2 Connector Terminals: The Expert’s Guide
For expert guidance on OBD2 connector terminals and vehicle diagnostics, turn to MERCEDES-DIAGNOSTIC-TOOL.EDU.VN. We offer a wealth of resources, including detailed guides, step-by-step instructions, and expert advice to help you keep your vehicle running smoothly.
15.1 Comprehensive Diagnostic Tools
Access a comprehensive selection of diagnostic tools tailored for Mercedes-Benz vehicles. Our tools enable you to accurately identify and address issues, ensuring optimal performance and safety.
15.2 Step-by-Step Repair Guides
Follow our step-by-step repair guides for detailed instructions on diagnosing and repairing OBD2 connector terminals. Our guides provide clear and concise directions, making even complex repairs manageable.
15.3 Expert Advice
Benefit from expert advice and support from our team of experienced technicians. We’re here to answer your questions and provide guidance every step of the way.
16. Resources for Further Learning on OBD2 Connectors
Expand your knowledge of OBD2 connectors with these additional resources.
16.1 Online Forums and Communities
Join online forums and communities dedicated to automotive diagnostics and repair. These forums provide a platform for sharing knowledge, asking questions, and connecting with other enthusiasts and professionals.
16.2 Technical Publications
Consult technical publications such as service manuals, wiring diagrams, and diagnostic guides. These resources provide detailed information about vehicle systems and components, including OBD2 connectors.
16.3 Training Courses
Attend training courses and workshops on automotive diagnostics and repair. These courses offer hands-on experience and instruction from industry experts, providing valuable skills and knowledge.
17. Glossary of Terms Related to OBD2 Connectors
Understanding the terminology associated with OBD2 connectors is essential for effective diagnostics and repair.
- OBD2 (On-Board Diagnostics II): A standardized system for monitoring and diagnosing vehicle systems.
- DTC (Diagnostic Trouble Code): A code generated by the vehicle’s computer when a problem is detected.
- Terminal: The metal contact inside the OBD2 connector that makes an electrical connection with the scan tool.
- Connector Housing: The plastic part of the OBD2 connector that holds the terminals in place.
- CAN Bus (Controller Area Network): A communication network used by electronic control units (ECUs) in the vehicle.
- Scan Tool: A device used to read diagnostic trouble codes and access vehicle data.
- Pigtail: A short length of wire attached to a terminal for easy connection.
- Continuity: The presence of a complete electrical path between two points.
- Voltage Drop: The decrease in voltage across a component or circuit due to resistance.
- OEM (Original Equipment Manufacturer): Parts made by the original manufacturer of the vehicle.
- SAE (Society of Automotive Engineers): A professional organization that develops standards and specifications for the automotive industry.
18. Why Choose MERCEDES-DIAGNOSTIC-TOOL.EDU.VN for Your OBD2 Needs?
At MERCEDES-DIAGNOSTIC-TOOL.EDU.VN, we are committed to providing the highest quality resources and support for OBD2 diagnostics and repair.
18.1 Expertise and Experience
Our team of experienced technicians has extensive knowledge of OBD2 systems and vehicle diagnostics. We stay up-to-date with the latest technologies and techniques to provide you with the best possible service.
18.2 Comprehensive Resources
We offer a comprehensive range of resources, including detailed guides, step-by-step instructions, and expert advice. Our resources are designed to help you diagnose and repair OBD2 issues quickly and effectively.
18.3 Customer Support
We are dedicated to providing exceptional customer support. Our team is available to answer your questions and provide guidance every step of the way.
19. How to Troubleshoot Common OBD2 Connector Problems
Troubleshooting OBD2 connector problems involves a systematic approach to identify and resolve issues.
19.1 No Communication with Scan Tool
If your scan tool is not communicating with the vehicle, check the following:
- Ensure that the scan tool is properly connected to the OBD2 connector.
- Verify that the vehicle’s ignition is turned on.
- Check the OBD2 connector for any signs of damage or corrosion.
- Test the OBD2 connector’s power and ground circuits with a multimeter.
- Consult the vehicle’s wiring diagram to verify the correct pin assignments.
19.2 Intermittent Diagnostic Issues
If you are experiencing intermittent diagnostic issues, check the following:
- Inspect the OBD2 connector terminals for any signs of looseness or corrosion.
- Check the wiring harness for any frayed or damaged wires.
- Use a voltage drop test to identify areas of high resistance in the circuit.
- Monitor the CAN bus signals with an oscilloscope to identify any signal distortion or interference.
19.3 Incorrect Diagnostic Trouble Codes (DTCs)
If you are receiving incorrect diagnostic trouble codes (DTCs), check the following:
- Verify that the scan tool is compatible with your vehicle.
- Ensure that the scan tool software is up to date.
- Consult the vehicle’s service manual to verify the correct DTC definitions.
- Perform a thorough diagnostic inspection of the affected systems.
20. Keeping Your Mercedes-Benz Running Smoothly
By following these guidelines and tips, you can keep your Mercedes-Benz running smoothly and avoid costly repairs. At MERCEDES-DIAGNOSTIC-TOOL.EDU.VN, we are committed to providing you with the resources and support you need to maintain your vehicle’s optimal performance. We understand that addressing issues with your Mercedes-Benz can be daunting, especially when it comes to complex systems like the OBD2 connector. Our goal is to simplify the process, offering clear guidance and reliable solutions tailored to your specific needs.
From identifying the root cause of a problem to providing step-by-step repair instructions, we empower you to take control of your vehicle’s maintenance. Whether you’re a seasoned technician or a car enthusiast, our resources are designed to enhance your understanding and skills. With our comprehensive diagnostic tools, you can accurately pinpoint issues and implement effective solutions, saving time and money. Our expert advice ensures that you’re equipped with the knowledge to make informed decisions about your vehicle’s care.
Don’t let OBD2 connector problems keep you off the road. Contact us today via WhatsApp at +1 (641) 206-8880 or visit our website at MERCEDES-DIAGNOSTIC-TOOL.EDU.VN for expert assistance and guidance. Our address is 789 Oak Avenue, Miami, FL 33101, United States. Let us help you keep your Mercedes-Benz running smoothly for years to come with our detailed knowledge of scan tools, diagnostic tools, and car maintenance.
FAQ: OBD2 Connector Terminals
Q1: What is an OBD2 connector terminal?
An OBD2 connector terminal is a metal contact inside the OBD2 connector that makes an electrical connection with the scan tool, enabling communication between the vehicle’s computer and diagnostic equipment.
Q2: Why is the OBD2 connector important for car diagnostics?
The OBD2 connector provides standardized access to a vehicle’s diagnostic data, allowing technicians to identify and address issues with various systems, such as the engine, transmission, and emissions controls.
Q3: What are the common causes of OBD2 connector damage?
Common causes of OBD2 connector damage include blown fuses, aftermarket accessories that draw excessive current, physical damage from improper testing, and corrosion.
Q4: How can I identify a damaged OBD2 connector terminal?
Signs of a damaged OBD2 connector terminal include bent or broken contacts, corrosion, looseness, and intermittent diagnostic issues.
Q5: Can I repair a damaged OBD2 connector terminal myself?
Yes, you can repair a damaged OBD2 connector terminal yourself with the proper tools and materials, such as replacement terminals, wire crimpers, a soldering iron, and a multimeter.
Q6: What tools do I need to repair OBD2 connector terminals?
Essential tools for repairing OBD2 connector terminals include wire crimpers, a terminal removal tool, a soldering iron, heat shrink tubing, a multimeter, and an electrical wiring diagram for your vehicle.
Q7: Are all OBD2 connectors the same?
No, while all OBD2 connectors have the same 16-pin interface, the way they are attached to the car and the terminal installation can vary across different car models.
Q8: Where can I buy replacement OBD2 connector terminals?
You can buy replacement OBD2 connector terminals from dealerships, aftermarket parts suppliers like Connector Experts, and online retailers like Mouser Electronics.
Q9: How can I prevent OBD2 connector damage?
To prevent OBD2 connector damage, keep the connector clean, avoid overloading it with aftermarket accessories, protect it from physical damage, and inspect it regularly for any signs of wear or corrosion.
Q10: What should I do if my scan tool is not communicating with the vehicle?
If your scan tool is not communicating with the vehicle, check the OBD2 connector for damage, verify that the ignition is turned on, test the connector’s power and ground circuits, and consult the vehicle’s wiring diagram.