Obd2 Replacement Plugs are indeed a potential solution for damaged or faulty connectors, and at MERCEDES-DIAGNOSTIC-TOOL.EDU.VN, we can guide you through selecting the right plug and ensuring a proper repair, especially for Mercedes-Benz vehicles. A faulty OBD2 port can disrupt diagnostics and prevent access to vital vehicle data, but choosing the correct replacement and performing the repair correctly is critical. Let’s explore how to make sure it’s an effective and lasting fix, incorporating data security, repair quality, and diagnostic accuracy, enhancing your overall vehicle maintenance practices.
Contents
- 1. What is the OBD2 Connector?
- 1.1 The OBD2 Standard
- 1.2 Limitations of Generic Scanners
- 1.3 OBD2 Pinout and Function
- 2. Common Causes of OBD2 Plug Damage
- 2.1 Blown Fuses
- 2.2 Aftermarket Accessories
- 2.3 Physical Damage
- 3. Identifying the Need for an OBD2 Replacement Plug
- 3.1 Symptoms of a Faulty OBD2 Connector
- 3.2 Diagnostic Steps
- 3.3 Using a Multimeter for Diagnosis
- 4. Navigating OBD2 Connector Standards and Variations
- 4.1 Connector Types
- 4.2 Terminal Types
- 4.3 Finding the Right Connector
- 5. The Pitfalls of Low-Cost OBD2 Replacement Plugs
- 5.1 Quality Concerns
- 5.2 Fitment Issues
- 5.3 Long-Term Reliability
- 5.4 Cost Analysis
- 6. Sourcing High-Quality OBD2 Replacement Plugs
- 6.1 OEM Parts
- 6.2 Reputable Suppliers
- 6.3 Verifying Quality
- 6.4 Working with MERCEDES-DIAGNOSTIC-TOOL.EDU.VN
- 7. Step-by-Step Guide to Replacing an OBD2 Plug
- 7.1 Preparation
- 7.2 Removing the Old Connector
- 7.3 Installing the New Connector
- 7.4 Detailed Wiring Instructions
- 8. Essential Tools for OBD2 Plug Replacement
- 8.1 Wire Strippers
- 8.2 Crimpers
- 8.3 Soldering Iron
- 8.4 Heat Shrink Tubing
- 8.5 Multimeter
- 8.6 Recommended Crimping Tools
- 9. Ensuring a Secure and Reliable Connection
- 9.1 Proper Crimping and Soldering Techniques
- 9.2 Terminal Insertion
- 9.3 Testing the Connection
- 9.4 Preventing Corrosion
- 10. Advanced Diagnostics After OBD2 Plug Replacement
- 10.1 Reading Trouble Codes
- 10.2 Live Data Monitoring
- 10.3 Functional Tests
- 10.4 Importance of Professional-Grade Diagnostic Tools
- 11. Preventative Measures to Protect Your OBD2 Plug
- 11.1 Secure Mounting
- 11.2 Avoiding Aftermarket Accessories
- 11.3 Regular Inspection
- 11.4 Protective Covers
- 12. When to Seek Professional Help
- 12.1 Complex Wiring Issues
- 12.2 Advanced Diagnostics
- 12.3 Mercedes-Benz Specific Issues
- 12.4 Benefits of Consulting MERCEDES-DIAGNOSTIC-TOOL.EDU.VN
- 13. Exploring Alternative Repair Solutions
- 13.1 Terminal Replacement
- 13.2 Wire Repair
- 13.3 Connector Repair Kits
- 13.4 Evaluating Repair Options
- 14. The Future of OBD2 Technology
- 14.1 Enhanced Diagnostics
- 14.2 Wireless Connectivity
- 14.3 Cybersecurity
- 14.4 OBD-III and Beyond
- 15. Frequently Asked Questions (FAQs) about OBD2 Replacement Plugs
- 15.1 What is an OBD2 replacement plug?
- 15.2 Why would I need to replace my OBD2 plug?
- 15.3 Can I replace the OBD2 plug myself?
- 15.4 Where can I buy a replacement OBD2 plug?
- 15.5 How much does an OBD2 replacement plug cost?
- 15.6 What tools do I need to replace an OBD2 plug?
- 15.7 How do I know which OBD2 plug is compatible with my car?
- 15.8 Can a faulty OBD2 plug affect my car’s performance?
- 15.9 How can I prevent damage to my OBD2 plug?
- 15.10 Is it safe to use a wireless OBD2 adapter?
Table of Contents
- Understanding the OBD2 Connector
- Common Causes of OBD2 Plug Damage
- Identifying the Need for an OBD2 Replacement Plug
- Navigating OBD2 Connector Standards and Variations
- The Pitfalls of Low-Cost OBD2 Replacement Plugs
- Sourcing High-Quality OBD2 Replacement Plugs
- Step-by-Step Guide to Replacing an OBD2 Plug
- Essential Tools for OBD2 Plug Replacement
- Ensuring a Secure and Reliable Connection
- Advanced Diagnostics After OBD2 Plug Replacement
- Preventative Measures to Protect Your OBD2 Plug
- When to Seek Professional Help
- Exploring Alternative Repair Solutions
- The Future of OBD2 Technology
- Frequently Asked Questions (FAQs) about OBD2 Replacement Plugs
1. What is the OBD2 Connector?
The OBD2 (On-Board Diagnostics II) connector is a standardized 16-pin interface present in all cars manufactured in 1996 or later. It facilitates access to essential vehicle data for diagnostics and monitoring. The OBD2 connector is a gateway, not only for reading trouble codes but also for accessing a wealth of data related to engine performance, emissions, and other critical systems.
1.1 The OBD2 Standard
The OBD2 standard ensures that any generic OBD2 scanner can retrieve basic information from any compliant vehicle, regardless of the manufacturer. This standardization is crucial for mechanics and vehicle owners to diagnose issues effectively. Mandated data includes emission-related parameters, allowing for consistent monitoring and compliance checks.
1.2 Limitations of Generic Scanners
While the OBD2 standard provides a baseline, automakers often include proprietary data beyond the standard’s scope. This data, accessible only through specialized scan tools, provides deeper insights into specific vehicle systems. Generic scanners can read basic trouble codes and emission data, but they often miss manufacturer-specific codes and advanced parameters, limiting their diagnostic capabilities.
1.3 OBD2 Pinout and Function
Understanding the function of each pin in the OBD2 connector is vital for troubleshooting and repair. Here’s a breakdown:
| Pin Number | Function | Description |
|---|---|---|
| 1 | Manufacturer’s Choice | Varies by manufacturer; may be used for proprietary communication |
| 2 & 10 | SAE J1850 (Network) | Used for communication in older Ford and Chrysler vehicles |
| 3 | Manufacturer’s Choice | Varies by manufacturer; may be used for proprietary communication |
| 4 | Chassis Ground | Ground connection for the vehicle’s chassis |
| 5 | Signal Ground | Ground connection for the diagnostic tool |
| 6 & 14 | CAN Bus High and Low | Controller Area Network; primary communication protocol in modern vehicles |
| 7 & 15 | ISO9140 K-Line (Network) | Used in older vehicles for communication |
| 8, 9, 11, 12, 13 | Manufacturer’s Choice | Varies by manufacturer; may be used for proprietary communication |
| 16 | Battery Positive | Provides power to the diagnostic tool |
Understanding this pinout is essential for diagnosing issues such as power loss, communication errors, or short circuits within the OBD2 system.
2. Common Causes of OBD2 Plug Damage
Pin 16, which provides power to the diagnostic tool, is frequently damaged. The causes range from blown fuses to poorly designed aftermarket accessories. It is necessary to protect your OBD2 replacement plug.
2.1 Blown Fuses
A blown fuse on pin 16 can result from poorly designed aftermarket accessories or an overload on a shared circuit. While a blown fuse itself doesn’t damage the terminal, attempts to test for power using inappropriate probes can cause significant damage to both the terminal and the connector. Careless probing can bend or break the terminal, rendering it unable to make proper contact.
2.2 Aftermarket Accessories
Accessories such as insurance dongles, aftermarket gauges, and data recorders that connect to the OBD2 port can cause damage due to poor engineering and quality control. These devices may have oversized male pins that stretch the female terminals in the OBD2 connector, leading to poor contact. Some devices may also draw excessive current from pin 16, which the connector was not designed to handle continuously.
2.3 Physical Damage
The OBD2 connector is often located in a position where it is susceptible to physical damage. Accidental kicks, impacts from objects, or even regular wear and tear can lead to cracks, breaks, or dislodged pins. Additionally, exposure to moisture and corrosion can degrade the connector’s integrity over time, affecting its ability to establish a reliable connection.
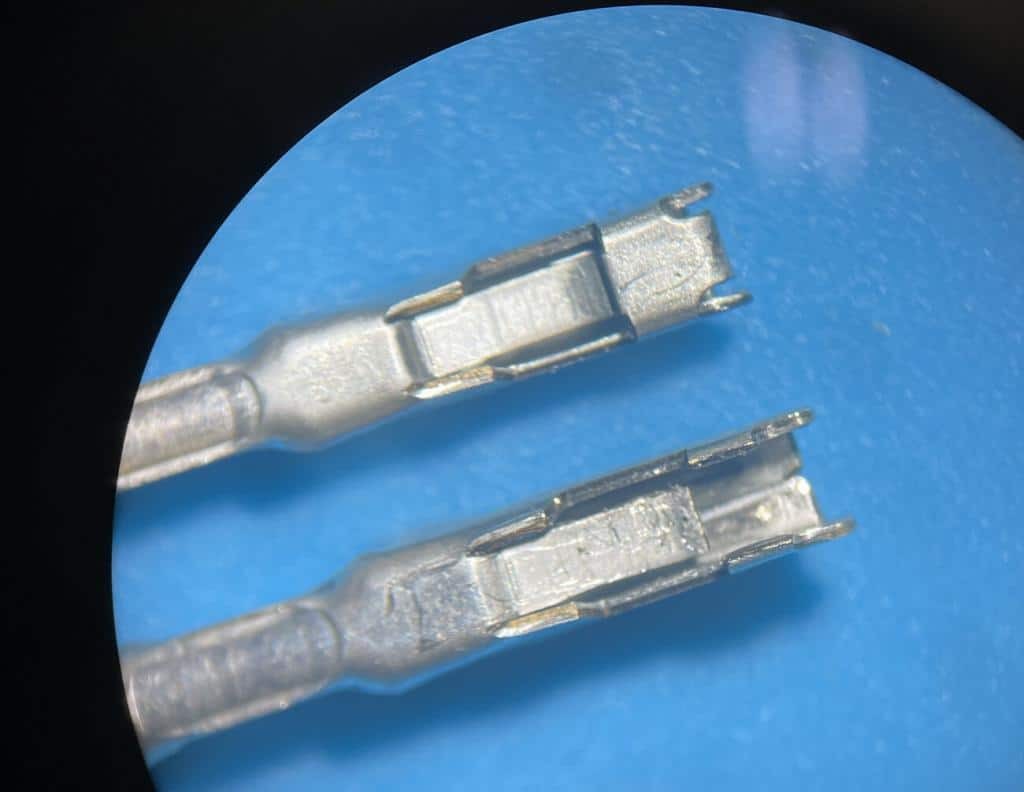 Damaged OBD2 Terminal
3. Identifying the Need for an OBD2 Replacement Plug
Recognizing the signs of a damaged OBD2 plug is essential for timely repair and maintaining your vehicle’s diagnostic capabilities. If you have a Mercedes-Benz, prompt identification will save you money.
3.1 Symptoms of a Faulty OBD2 Connector
- Inability to Connect: A primary indicator is the inability to establish a connection between the diagnostic tool and the vehicle’s computer.
- Intermittent Connection: If the connection is unstable and frequently drops, it could be due to loose or damaged terminals.
- Visible Damage: Physical damage, such as cracks, broken plastic, or bent pins, is a clear sign of a problem.
- Error Codes: Diagnostic tools may display error codes related to communication errors or power supply issues.
3.2 Diagnostic Steps
- Visual Inspection: Carefully inspect the OBD2 connector for any signs of physical damage or corrosion.
- Terminal Check: Use a small tool to gently check the terminals for looseness or damage.
- Power Test: Use a multimeter to check if pin 16 is receiving power. A reading of 12V should be present with the ignition on.
- Continuity Test: Perform a continuity test on the ground pins (4 and 5) to ensure they are properly grounded.
3.3 Using a Multimeter for Diagnosis
A multimeter is an invaluable tool for diagnosing OBD2 connector issues. Here’s how to use it effectively:
- Voltage Check (Pin 16):
- Set the multimeter to DC voltage mode.
- Connect the black lead to a known good ground (e.g., the vehicle’s chassis).
- Probe pin 16 with the red lead.
- Verify a reading of approximately 12V with the ignition on.
- Continuity Check (Ground Pins 4 & 5):
- Set the multimeter to continuity mode.
- Connect one lead to the pin being tested (4 or 5).
- Connect the other lead to a known good ground.
- The multimeter should beep, indicating continuity.
- Checking for Shorts:
- Disconnect the battery to prevent damage.
- Set the multimeter to resistance mode.
- Check the resistance between pin 16 and ground.
- A low resistance reading indicates a short circuit.
4. Navigating OBD2 Connector Standards and Variations
Despite the OBD2 standard, connectors are not universally identical. The way the connector is attached to the vehicle and the terminal installation varies across different car models.
4.1 Connector Types
OBD2 connectors come in various shapes and sizes, designed to fit specific vehicle models. The mounting brackets and attachment methods differ, making it essential to choose a replacement connector that matches the original.
4.2 Terminal Types
Terminals, the metal parts inside the connector, also vary significantly. Different manufacturers use different terminal designs, requiring specific tools and techniques for installation. Identifying the correct terminal type is crucial for a reliable and secure connection.
4.3 Finding the Right Connector
- Vehicle-Specific Parts: The best approach is to find a replacement connector designed specifically for your vehicle model.
- Connector Suppliers: Suppliers like Connector Experts and Mouser offer a wide range of connectors and terminals.
- Electrical Wiring Diagrams: Consult your vehicle’s electrical wiring diagram for the part number of the connector.
5. The Pitfalls of Low-Cost OBD2 Replacement Plugs
Inexpensive OBD2 replacement plugs, often found on online marketplaces, may seem like an attractive solution. However, they often come with significant drawbacks.
5.1 Quality Concerns
The primary issue with low-cost connectors is the quality of the terminals. The metal used is often soft and lacks the springiness of the original terminals. This can lead to poor contact and unreliable connections.
5.2 Fitment Issues
Low-cost connectors may not fit properly in the original bracket, requiring makeshift attachment methods like self-tapping screws. These methods are unreliable and may not last.
5.3 Long-Term Reliability
While a cheap connector may initially “repair” the car, the substandard quality of the materials and construction often leads to premature failure. This can result in repeated repairs and additional costs.
5.4 Cost Analysis
Consider the labor costs involved in replacing an OBD2 connector. Even if the part is inexpensive, the time required to remove the lower dash, solder wires, and install the new connector can add up. Using substandard parts doesn’t make economic sense, as the risk of premature failure outweighs the initial savings.
6. Sourcing High-Quality OBD2 Replacement Plugs
To ensure a reliable and long-lasting repair, it’s essential to source high-quality OBD2 replacement plugs from reputable suppliers. Here’s how:
6.1 OEM Parts
Purchasing the OBD2 connector from the original equipment manufacturer (OEM) is often the best option. While it may require some research and effort, the quality and fitment are guaranteed.
6.2 Reputable Suppliers
Suppliers specializing in automotive connectors and terminals, such as Connector Experts and Mouser, offer high-quality alternatives to OEM parts. These suppliers often provide detailed specifications and compatibility information, ensuring you select the correct part for your vehicle.
6.3 Verifying Quality
- Material: Ensure the terminals are made from high-quality metal with good springiness.
- Fitment: Verify that the connector matches the original in terms of shape, size, and mounting method.
- Certifications: Look for connectors that meet or exceed industry standards and certifications.
6.4 Working with MERCEDES-DIAGNOSTIC-TOOL.EDU.VN
At MERCEDES-DIAGNOSTIC-TOOL.EDU.VN, we understand the importance of using high-quality components for Mercedes-Benz vehicles. We offer expert guidance in selecting the correct OBD2 replacement plug for your specific model, ensuring a perfect fit and reliable performance. Our team can help you navigate the complexities of connector standards and variations, providing peace of mind that you are making the right choice.
7. Step-by-Step Guide to Replacing an OBD2 Plug
Replacing an OBD2 plug requires careful attention to detail to ensure a secure and reliable connection. These steps are intended for trained and experienced technicians.
7.1 Preparation
- Gather Tools and Materials: Collect all necessary tools, including wire strippers, crimpers, solder, heat shrink tubing, and a multimeter.
- Disconnect Battery: Disconnect the vehicle’s battery to prevent electrical shorts and potential damage.
- Access the Connector: Remove any trim panels or components necessary to access the OBD2 connector.
7.2 Removing the Old Connector
- Identify Wires: Carefully label each wire connected to the old connector to ensure correct reconnection to the new connector.
- Cut Wires: Cut the wires close to the old connector, leaving enough length for splicing.
- Remove Connector: Remove the old connector from its mounting bracket.
7.3 Installing the New Connector
- Strip Wires: Strip the insulation from the ends of the wires.
- Crimp or Solder: Crimp or solder the wires to the new terminals, ensuring a secure connection.
- Insert Terminals: Insert the terminals into the new connector housing, following the wiring diagram.
- Secure Connector: Mount the new connector in its original bracket.
- Test Connection: Reconnect the battery and test the connection with a diagnostic tool.
7.4 Detailed Wiring Instructions
- Labeling Wires:
- Use masking tape and a permanent marker to label each wire before cutting.
- Note the color and pin number of each wire for accurate reconnection.
- Crimping Techniques:
- Use a high-quality crimping tool designed for small, open-barrel terminals.
- Ensure the crimp is tight and secure, providing a reliable electrical connection.
- Soldering Techniques:
- Use a soldering iron with a fine tip and high-quality solder.
- Apply heat to the wire and terminal, then apply solder to create a strong bond.
- Use heat shrink tubing to insulate the soldered connection.
- Wiring Diagram Reference:
- Consult the vehicle’s wiring diagram to ensure correct wiring.
- Double-check each connection to prevent errors.
8. Essential Tools for OBD2 Plug Replacement
Having the right tools is essential for a successful OBD2 plug replacement.
8.1 Wire Strippers
High-quality wire strippers are necessary to remove insulation without damaging the wires.
8.2 Crimpers
Specialized crimpers designed for small, open-barrel terminals ensure a secure and reliable connection.
8.3 Soldering Iron
A soldering iron with a fine tip is needed for soldering wires to the terminals.
8.4 Heat Shrink Tubing
Heat shrink tubing insulates soldered connections, protecting them from moisture and corrosion.
8.5 Multimeter
A multimeter is essential for testing the connection and ensuring proper voltage and continuity.
8.6 Recommended Crimping Tools
- Engineer PA-09: This Japanese-made crimper is designed for small, open-barrel terminals and produces factory-quality crimps.
- IWISS IWS-1424B: A versatile crimping tool suitable for various terminal sizes, providing reliable and secure crimps.
- Sargent 1027CT: A high-quality crimping tool with adjustable settings, allowing for precise crimping of different terminal types.
These crimping tools ensure that the terminals are securely attached to the wires, providing a reliable and long-lasting electrical connection. Investing in quality crimping tools is essential for professional and DIY repairs alike.
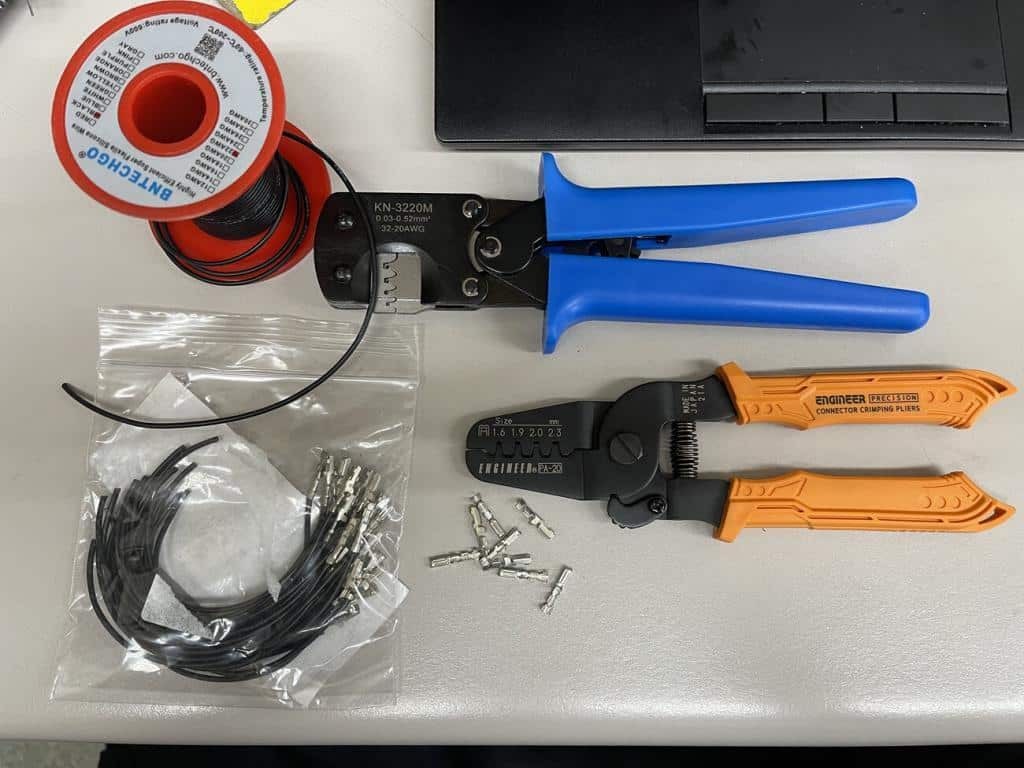 Wire Crimpers and Terminals
9. Ensuring a Secure and Reliable Connection
A secure and reliable connection is crucial for proper OBD2 functionality. This is especially important for Mercedes-Benz models, where advanced diagnostics and programming rely on a stable connection.
9.1 Proper Crimping and Soldering Techniques
Using proper crimping and soldering techniques ensures a solid electrical connection. A loose connection can lead to intermittent communication and inaccurate data.
9.2 Terminal Insertion
Ensure the terminals are fully inserted into the connector housing and securely locked in place. Loose terminals can cause connection problems.
9.3 Testing the Connection
Use a multimeter to test the connection and ensure proper voltage and continuity. A diagnostic tool can also be used to verify communication with the vehicle’s computer.
9.4 Preventing Corrosion
- Use Dielectric Grease: Apply dielectric grease to the terminals to prevent moisture and corrosion.
- Seal Connections: Use heat shrink tubing or electrical tape to seal connections and protect them from the elements.
- Inspect Regularly: Regularly inspect the OBD2 connector for signs of corrosion and address any issues promptly.
10. Advanced Diagnostics After OBD2 Plug Replacement
After replacing the OBD2 plug, it’s essential to perform advanced diagnostics to ensure the repair was successful and that all systems are functioning correctly.
10.1 Reading Trouble Codes
Use a diagnostic tool to read any trouble codes stored in the vehicle’s computer. Clear any codes related to the OBD2 connection and monitor for their return.
10.2 Live Data Monitoring
Monitor live data from various sensors and systems to ensure they are functioning within正常 parameters. This can help identify any underlying issues that may have been masked by the faulty OBD2 connector.
10.3 Functional Tests
Perform functional tests on various components and systems to verify their operation. This may include testing the ABS, airbags, and other critical systems.
10.4 Importance of Professional-Grade Diagnostic Tools
While basic OBD2 scanners can read generic trouble codes, professional-grade diagnostic tools offer advanced capabilities such as:
- Manufacturer-Specific Codes: Access to manufacturer-specific trouble codes for more accurate diagnosis.
- Bi-Directional Control: Ability to control and test individual components and systems.
- Programming and Coding: Ability to program and code new modules and components.
- Data Logging: Ability to log and analyze live data for in-depth diagnostics.
Investing in a professional-grade diagnostic tool or seeking the assistance of a qualified technician with access to such tools is essential for comprehensive diagnostics after OBD2 plug replacement.
11. Preventative Measures to Protect Your OBD2 Plug
Taking preventative measures can help protect your OBD2 plug from damage and ensure its longevity.
11.1 Secure Mounting
Ensure the OBD2 connector is securely mounted in its bracket to prevent accidental damage.
11.2 Avoiding Aftermarket Accessories
Avoid using poorly designed aftermarket accessories that can damage the connector or draw excessive current.
11.3 Regular Inspection
Regularly inspect the connector for signs of damage or corrosion and address any issues promptly.
11.4 Protective Covers
- OBD2 Port Covers: Use a protective cover to shield the OBD2 port from dust, moisture, and physical damage.
- Terminal Protectors: Install terminal protectors to prevent bending or damage to the pins.
- Cable Organizers: Use cable organizers to keep diagnostic tool cables from putting stress on the connector.
These preventative measures can significantly extend the life of your OBD2 connector and prevent costly repairs.
12. When to Seek Professional Help
While replacing an OBD2 plug may seem straightforward, certain situations warrant professional assistance.
12.1 Complex Wiring Issues
If the wiring is complex or you are unsure about the correct connections, seek professional help to avoid further damage.
12.2 Advanced Diagnostics
If you lack the tools or expertise to perform advanced diagnostics, a professional technician can ensure the repair was successful and that all systems are functioning correctly.
12.3 Mercedes-Benz Specific Issues
Mercedes-Benz vehicles often require specialized diagnostic tools and expertise. If you are working on a Mercedes-Benz, it’s best to seek the help of a qualified Mercedes-Benz technician.
12.4 Benefits of Consulting MERCEDES-DIAGNOSTIC-TOOL.EDU.VN
At MERCEDES-DIAGNOSTIC-TOOL.EDU.VN, we specialize in Mercedes-Benz diagnostics and repairs. Our expert technicians can provide:
- Accurate Diagnosis: Pinpoint the exact cause of your OBD2 connector issues.
- Professional Repair: Perform a reliable and long-lasting repair using high-quality parts.
- Advanced Diagnostics: Ensure all systems are functioning correctly after the repair.
- Peace of Mind: Guarantee the quality and reliability of our work.
Contact us at +1 (641) 206-8880 or visit us at 789 Oak Avenue, Miami, FL 33101, United States for expert assistance with your Mercedes-Benz OBD2 connector issues.
13. Exploring Alternative Repair Solutions
While replacing the entire OBD2 plug is a common solution, alternative repair options may be viable in certain situations.
13.1 Terminal Replacement
If only one or two terminals are damaged, replacing the individual terminals may be a more cost-effective solution. This requires specialized tools and techniques but can save time and money.
13.2 Wire Repair
If the wires connected to the OBD2 connector are damaged, repairing the wires may be sufficient. This involves splicing new sections of wire and ensuring a secure connection.
13.3 Connector Repair Kits
Some manufacturers offer connector repair kits that include replacement terminals, wires, and connectors. These kits can simplify the repair process and ensure compatibility.
13.4 Evaluating Repair Options
- Severity of Damage: Assess the extent of the damage to determine the most appropriate repair option.
- Availability of Parts: Check the availability of replacement terminals, wires, or connectors for your specific vehicle model.
- Skill Level: Consider your skill level and comfort level with performing the repair.
14. The Future of OBD2 Technology
OBD2 technology continues to evolve, with new features and capabilities being added to meet the demands of modern vehicles.
14.1 Enhanced Diagnostics
Future OBD2 systems will offer enhanced diagnostic capabilities, providing more detailed information about vehicle systems and performance.
14.2 Wireless Connectivity
Wireless OBD2 adapters are becoming increasingly popular, allowing for remote diagnostics and monitoring.
14.3 Cybersecurity
As vehicles become more connected, cybersecurity is becoming a major concern. Future OBD2 systems will incorporate advanced security features to protect against hacking and data breaches.
14.4 OBD-III and Beyond
- OBD-III Concept:
- The concept of OBD-III involves real-time monitoring of vehicle emissions and reporting violations directly to regulatory agencies.
- This would enable faster detection and correction of emission-related issues, improving air quality.
- Challenges and Considerations:
- Data Security: Ensuring the security and privacy of vehicle data is a major concern.
- Standardization: Developing a standardized system for data reporting and communication is essential.
- Infrastructure: Building the necessary infrastructure to support real-time monitoring and reporting will require significant investment.
15. Frequently Asked Questions (FAQs) about OBD2 Replacement Plugs
15.1 What is an OBD2 replacement plug?
An OBD2 replacement plug is a new connector used to replace a damaged or faulty OBD2 (On-Board Diagnostics II) port in a vehicle. The OBD2 port is a standardized 16-pin interface that allows diagnostic tools to communicate with the vehicle’s computer.
15.2 Why would I need to replace my OBD2 plug?
You might need to replace your OBD2 plug if it is physically damaged, has corroded or bent pins, or is no longer providing a reliable connection to diagnostic tools. Common causes of damage include accidental impacts, use of incompatible accessories, and wear and tear over time.
15.3 Can I replace the OBD2 plug myself?
Yes, you can replace the OBD2 plug yourself if you have the necessary tools and experience with automotive electrical repairs. However, it is essential to follow the correct procedures and take precautions to avoid damaging the vehicle’s electrical system. If you are not comfortable performing the repair yourself, it is best to seek professional help.
15.4 Where can I buy a replacement OBD2 plug?
You can purchase replacement OBD2 plugs from various sources, including:
- Automotive Parts Stores: Local auto parts stores often stock a range of OBD2 connectors and terminals.
- Online Retailers: Online marketplaces like Amazon and eBay offer a wide selection of OBD2 replacement plugs at competitive prices.
- Specialty Suppliers: Suppliers like Connector Experts and Mouser specialize in automotive connectors and terminals.
- OEM Dealers: Purchasing the OBD2 connector from the original equipment manufacturer (OEM) is often the best option for guaranteed quality and fitment.
15.5 How much does an OBD2 replacement plug cost?
The cost of an OBD2 replacement plug can vary depending on the quality, brand, and source. Inexpensive plugs from online marketplaces may cost as little as $10-$20, while OEM plugs from dealerships can cost upwards of $50 or more. High-quality aftermarket plugs from reputable suppliers typically fall in the $20-$40 range.
15.6 What tools do I need to replace an OBD2 plug?
To replace an OBD2 plug, you will typically need the following tools:
- Wire strippers
- Crimpers (for small, open-barrel terminals)
- Soldering iron (optional, for soldering connections)
- Heat shrink tubing (for insulating connections)
- Multimeter (for testing connections)
- Screwdrivers and pliers (for removing trim panels and securing the connector)
15.7 How do I know which OBD2 plug is compatible with my car?
To ensure compatibility, it is essential to select an OBD2 replacement plug that matches the original in terms of shape, size, and wiring configuration. Consult your vehicle’s service manual or electrical wiring diagram for the part number of the connector. You can also use online compatibility checkers or consult with a parts specialist at an auto parts store.
15.8 Can a faulty OBD2 plug affect my car’s performance?
Yes, a faulty OBD2 plug can affect your car’s performance by preventing diagnostic tools from communicating with the vehicle’s computer. This can make it difficult to diagnose and repair issues, leading to reduced fuel efficiency, increased emissions, and potential damage to the engine or other systems.
15.9 How can I prevent damage to my OBD2 plug?
To prevent damage to your OBD2 plug, take the following precautions:
- Avoid using excessive force when plugging in or unplugging diagnostic tools.
- Use only compatible accessories and avoid those with oversized or poorly designed connectors.
- Protect the OBD2 port from moisture, dust, and debris by using a protective cover.
- Regularly inspect the connector for signs of damage or corrosion and address any issues promptly.
15.10 Is it safe to use a wireless OBD2 adapter?
Yes, it is generally safe to use a wireless OBD2 adapter, but it is essential to choose a reputable brand and take precautions to protect your vehicle’s data. Look for adapters that use secure communication protocols and avoid those that request unnecessary permissions or access to sensitive information.
By following these guidelines and seeking professional help when needed, you can ensure a successful OBD2 plug replacement and maintain the diagnostic capabilities of your vehicle.
Contact MERCEDES-DIAGNOSTIC-TOOL.EDU.VN today for assistance with your Mercedes-Benz diagnostic needs. Our address is 789 Oak Avenue, Miami, FL 33101, United States, and you can reach us via Whatsapp at +1 (641) 206-8880. Visit our website at MERCEDES-DIAGNOSTIC-TOOL.EDU.VN.