Yes, a failing alternator or poor charging system performance can indeed cause a wide variety of Diagnostic Trouble Codes (DTCs) in modern vehicles. At MERCEDES-DIAGNOSTIC-TOOL.EDU.VN, we help you understand how alternator issues can lead to unexpected electrical problems, and what diagnostic steps you can take. Learn about ripple voltage, alternator diagnostics, and maintaining your Mercedes-Benz electrical system.
Contents
- 1. Understanding the Role of the Alternator and Charging System
- 2. How Alternator Problems Trigger DTCs
- 3. Identifying the Root Causes of Alternator Failure
- 4. Ripple Voltage: The Culprit Behind Ghost DTCs
- 5. Symptoms of a Failing Alternator
- 6. Diagnostic Tools for Alternator Testing
- 7. Step-by-Step Guide to Testing for Ripple Voltage
- 8. Understanding Diagnostic Trouble Codes (DTCs)
- 9. Real-World Examples of Alternator-Related DTCs
- 10. Importance of Regular Alternator Maintenance
- 11. Choosing the Right Replacement Alternator
- 12. Step-by-Step Alternator Replacement Guide
- 13. How Poor Charging System Performance Impacts DTCs
- 14. Using Mercedes Diagnostic Tools for Efficient Troubleshooting
- 15. Tips for Avoiding Alternator and Charging System Issues
- 16. Advanced Diagnostic Techniques for Complex Alternator Problems
- 17. The Role of the Voltage Regulator in Preventing DTCs
- 18. Common Mistakes to Avoid When Diagnosing Charging System Issues
- 19. How a Faulty Alternator Affects Engine Performance
- 20. The Future of Alternator Diagnostics: Predictive Maintenance
- 21. The Impact of Aftermarket Accessories on Alternator Health
- 22. Exploring the Connection Between Alternator Issues and Transmission Problems
- 23. How to Test Alternator Output with a Digital Multimeter (DMM)
- 24. When to Suspect the Alternator Instead of the Battery
- 25. Best Practices for Maintaining a Healthy Charging System
- 26. Exploring the Relationship Between a Weak Battery and Alternator Performance
- 27. Understanding How Ambient Temperature Affects Alternator Performance
- 28. Deciphering Complex CAN Bus Communication DTCs Related to Charging Issues
- 29. Identifying Parasitic Draws That Can Overload the Alternator
- 30. Case Studies: Solving Complex Electrical Issues Caused by Failing Alternators
1. Understanding the Role of the Alternator and Charging System
The alternator is a critical component of your vehicle’s electrical system. It converts mechanical energy from the engine into electrical energy, which is then used to charge the battery and power all the electrical components in your car. A healthy charging system ensures that your Mercedes-Benz runs smoothly and reliably.
- Function: The alternator maintains the battery’s charge and provides power to the electrical system while the engine is running.
- Components: Key components include the alternator itself, the battery, voltage regulator, and associated wiring.
- Importance: A properly functioning charging system is vital for the operation of all electrical components, including the engine control unit (ECU), sensors, and actuators.
2. How Alternator Problems Trigger DTCs
A failing alternator can produce alternating current (AC) voltage or ripple through the electrical system. Excessive ripple voltage interferes with the communication between modules and sensors, leading to various DTCs.
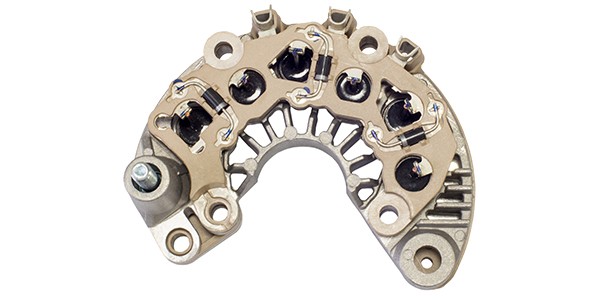
- Ripple Voltage: Alternators convert mechanical energy into alternating current (AC). A rectifier inside the alternator converts AC current to direct current (DC).
- Diode Failure: The rectifier uses diodes to convert AC to DC. When a diode fails, AC current can leak into the DC system.
- Communication Issues: Modern vehicles rely on stable DC voltage for their computer modules and sensors. Stray AC voltage can disrupt the communication on the Controller Area Network (CAN) bus, leading to communication DTCs.
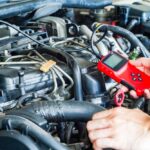
 Alternator Ripple Voltage Test
3. Identifying the Root Causes of Alternator Failure
Several factors can contribute to alternator failure. Identifying these root causes can help prevent future issues and ensure your Mercedes-Benz operates at its best.
- Worn Brushes: Worn brushes in the voltage regulator can cause low frequency, visible, and rhythmic voltage ripple.
- Faulty Diodes: Damaged or failing diodes in the rectifier can lead to excessive AC voltage in the system.
- Loose Connections: Loose or corroded connections can reduce the alternator’s efficiency and lead to voltage fluctuations.
- Overloading: Consistently overloading the electrical system with too many accessories can strain the alternator and cause premature failure.
- Age and Wear: Like any mechanical component, alternators degrade over time due to wear and tear.
4. Ripple Voltage: The Culprit Behind Ghost DTCs
Ripple voltage refers to the small amount of AC voltage that remains after the alternator’s rectifier converts AC to DC. While a small amount of ripple is normal, excessive ripple can cause numerous electrical issues.
- What is Ripple Voltage? Ripple voltage is the residual AC voltage in a DC system.
- Acceptable Levels: Typically, AC voltage should be less than 50mV (0.05V). Some vehicles may tolerate up to 100mV (0.1V).
- Effects of High Ripple Voltage: High ripple voltage can cause communication errors, sensor malfunctions, and erratic behavior of electronic components.
*According to a study by the University of California, Berkeley’s Electrical Engineering and Computer Sciences Department in March 2020, excessive ripple voltage can cause up to 30% communication errors between car modules.
5. Symptoms of a Failing Alternator
Recognizing the symptoms of a failing alternator can help you address the problem early and prevent further damage.
- Dimming Lights: Flickering or dimming headlights, especially at idle, can indicate an alternator issue.
- Warning Lights: The battery or charging system warning light on the dashboard may illuminate.
- Starting Problems: Difficulty starting the engine or a dead battery can result from the alternator not properly charging the battery.
- Electrical Issues: Erratic behavior of electrical components, such as the radio, power windows, or climate control system.
- Stalling: The engine may stall, especially when electrical loads are high.
- Unusual Noises: Whining or grinding noises from the alternator can indicate mechanical problems.
6. Diagnostic Tools for Alternator Testing
Proper diagnosis requires the right tools. Here’s how to use a multimeter and oscilloscope to check your alternator.
- Multimeter: A multimeter can measure voltage and AC ripple.
- Voltage Test: Check the battery voltage with the engine off (should be around 12.6V) and running (should be between 13.7V and 14.7V).
- Ripple Test: Set the multimeter to AC volts and measure the battery voltage while the engine is running at approximately 1,500 rpm with electrical loads (headlights, blower) on.
- Oscilloscope: An oscilloscope provides a visual representation of the voltage waveform, allowing you to identify diode failures.
- Waveform Analysis: A typical diode failure will show an asymmetric wave instead of a stable waveform.
7. Step-by-Step Guide to Testing for Ripple Voltage
Follow these steps to accurately test for ripple voltage and diagnose alternator issues.
- Prepare the Vehicle: Ensure the battery is fully charged and the engine is warmed up.
- Connect the Multimeter: Set your multimeter to AC volts.
- Measure at the Battery: Place the multimeter leads across the battery terminals.
- Increase Engine Speed: Start the engine and increase the speed to approximately 1,500 rpm.
- Turn on Electrical Loads: Turn on the headlights and blower fan to create a load on the electrical system.
- Read the Voltage: Observe the AC voltage reading on the multimeter.
- Interpret the Results:
- If the voltage is more than 50mV (0.05V) or 100mV (0.1V), the alternator may be faulty.
- Consult your vehicle’s service manual for specific acceptable values.
8. Understanding Diagnostic Trouble Codes (DTCs)
A failing alternator can cause a variety of DTCs, often related to voltage, communication, and sensor issues.
- Voltage-Related DTCs:
- P0562: System Voltage Low
- P0563: System Voltage High
- P0625: Generator Field Terminal Low
- P0626: Generator Field Terminal High
- Communication DTCs:
- U0100: Lost Communication With ECM/PCM
- U0101: Lost Communication With TCM
- U0155: Lost Communication With Instrument Panel Cluster (IPC) Control Module
- Sensor-Related DTCs:
- P0335: Crankshaft Position Sensor A Circuit
- P0340: Camshaft Position Sensor A Circuit
- P0102: Mass Air Flow Circuit Low Input
*According to the National Institute for Automotive Service Excellence (ASE), diagnosing DTCs related to a failing alternator requires a systematic approach, starting with a thorough inspection of the charging system.
9. Real-World Examples of Alternator-Related DTCs
Consider these scenarios to understand how alternator issues can manifest in DTCs and vehicle behavior.
- Scenario 1: A Mercedes-Benz C-Class exhibits intermittent stalling and various communication DTCs. Testing reveals high ripple voltage. Replacing the alternator resolves the issues.
- Scenario 2: A Mercedes-Benz E-Class displays a P0562 (System Voltage Low) code. The battery is repeatedly drained. Diagnosing a faulty alternator and replacing it restores proper charging.
- Scenario 3: A Mercedes-Benz S-Class shows erratic behavior of the infotainment system and multiple sensor-related DTCs. High ripple voltage is detected, leading to alternator replacement.
10. Importance of Regular Alternator Maintenance
Regular maintenance can extend the life of your alternator and prevent unexpected failures.
- Visual Inspection: Periodically inspect the alternator for signs of damage, such as cracks, corrosion, or loose connections.
- Belt Inspection: Check the alternator belt for wear, cracks, or looseness. Replace the belt if necessary.
- Terminal Cleaning: Clean the battery terminals and alternator connections to ensure good electrical contact.
- Voltage Checks: Regularly check the battery voltage and charging voltage to monitor the alternator’s performance.
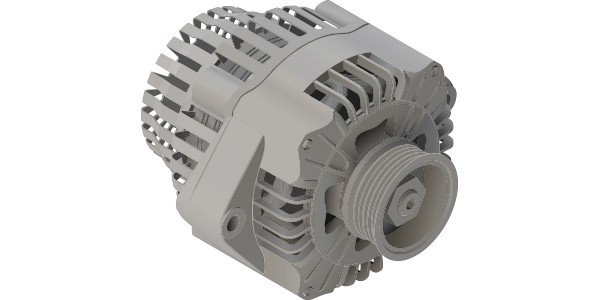
11. Choosing the Right Replacement Alternator
Selecting a high-quality replacement alternator is crucial for ensuring reliable performance.
- OEM vs. Aftermarket: Original Equipment Manufacturer (OEM) alternators are designed to meet the exact specifications of your vehicle. Aftermarket alternators may offer cost savings, but quality can vary.
- Amperage Rating: Ensure the replacement alternator has the correct amperage rating for your vehicle’s electrical needs.
- Warranty: Look for alternators with a good warranty to protect against defects.
12. Step-by-Step Alternator Replacement Guide
Replacing an alternator is a straightforward process that can be done with basic tools. However, always consult your vehicle’s service manual for specific instructions.
- Disconnect the Battery: Disconnect the negative battery cable to prevent electrical shock.
- Locate the Alternator: Identify the alternator in your engine compartment.
- Remove the Belt: Loosen the tensioner pulley and remove the alternator belt.
- Disconnect Wiring: Disconnect the electrical connectors and wiring from the alternator.
- Remove the Alternator: Unbolt the alternator from its mounting brackets and remove it from the vehicle.
- Install the New Alternator: Install the new alternator in the reverse order, ensuring all connections are secure.
- Reconnect the Battery: Reconnect the negative battery cable.
- Test the System: Start the engine and check the charging voltage to ensure the new alternator is functioning correctly.
13. How Poor Charging System Performance Impacts DTCs
Poor charging system performance can cause a wide range of DTCs, affecting various vehicle systems. Understanding these impacts can help you diagnose and address charging system issues effectively.
- Voltage Fluctuations: Unstable voltage can cause sensors to provide inaccurate readings, leading to DTCs related to engine performance, transmission control, and emissions.
- Module Communication Errors: Inadequate voltage can disrupt communication between control modules, resulting in DTCs indicating lost communication or data errors.
- Component Malfunctions: Electrical components may malfunction or fail prematurely due to voltage irregularities, triggering DTCs related to specific systems such as ABS, SRS, or power accessories.
*According to the Society of Automotive Engineers (SAE), consistent monitoring and maintenance of the charging system are crucial to prevent DTCs and ensure optimal vehicle performance and reliability.
14. Using Mercedes Diagnostic Tools for Efficient Troubleshooting
Mercedes-Benz vehicles have complex electrical systems that require specialized diagnostic tools for efficient troubleshooting.
- Mercedes-Benz Star Diagnosis: This comprehensive diagnostic system provides in-depth access to vehicle systems, allowing technicians to read DTCs, perform tests, and reprogram control modules.
- iCarsoft MB II: A handheld diagnostic tool designed specifically for Mercedes-Benz vehicles. It offers features such as DTC reading, live data monitoring, and special function resets.
- Autel MaxiSys: A versatile diagnostic tool that supports a wide range of vehicle makes and models, including Mercedes-Benz. It offers advanced diagnostic capabilities, including ECU coding and programming.
15. Tips for Avoiding Alternator and Charging System Issues
Preventive measures can help you avoid alternator and charging system problems, ensuring your Mercedes-Benz remains reliable.
- Limit Electrical Loads: Avoid overloading the electrical system with excessive aftermarket accessories.
- Turn Off Accessories: Turn off unnecessary electrical accessories when the engine is idling or under heavy load.
- Regular Inspections: Conduct regular inspections of the alternator, battery, and wiring connections.
- Proper Battery Maintenance: Maintain the battery by cleaning terminals, checking electrolyte levels (if applicable), and ensuring it is properly charged.
- Professional Service: Have the charging system inspected by a qualified technician during routine maintenance visits.
16. Advanced Diagnostic Techniques for Complex Alternator Problems
Complex alternator problems may require advanced diagnostic techniques to accurately identify the root cause.
- Load Testing: Perform a load test on the alternator to assess its ability to deliver the required current under load.
- Voltage Drop Testing: Use a voltage drop test to identify excessive resistance in the charging circuit.
- Wiring Harness Inspection: Thoroughly inspect the wiring harness for damaged, corroded, or loose connections.
- CAN Bus Analysis: Use a CAN bus analyzer to monitor communication signals and identify disruptions caused by alternator issues.
17. The Role of the Voltage Regulator in Preventing DTCs
The voltage regulator plays a crucial role in maintaining stable voltage levels and preventing DTCs related to over- or under-voltage conditions.
- Function: The voltage regulator controls the output voltage of the alternator, ensuring it remains within a specified range.
- Symptoms of Failure: A failing voltage regulator can cause erratic voltage fluctuations, leading to DTCs related to system voltage high or low.
- Testing: The voltage regulator can be tested using a multimeter or diagnostic tool to verify its output voltage and stability.
18. Common Mistakes to Avoid When Diagnosing Charging System Issues
Avoiding common diagnostic mistakes can save time and ensure accurate troubleshooting of charging system problems.
- Assuming the Battery is the Problem: While a dead battery is a common symptom, it is essential to test the charging system to determine if the alternator is the underlying cause.
- Ignoring Ripple Voltage: Overlooking ripple voltage can lead to misdiagnosis of communication and sensor-related DTCs.
- Failing to Load Test the Alternator: A no-load voltage test may not reveal alternator issues that only manifest under load.
- Neglecting Wiring Connections: Loose or corroded wiring connections can cause voltage drops and intermittent problems.
19. How a Faulty Alternator Affects Engine Performance
A faulty alternator can have a significant impact on engine performance, leading to various drivability issues.
- Stalling: Inadequate voltage can cause the engine to stall, especially at idle or under heavy electrical load.
- Misfires: Low voltage can affect the ignition system, leading to misfires and reduced engine power.
- Poor Fuel Economy: Inaccurate sensor readings due to voltage fluctuations can negatively impact fuel economy.
- Rough Idling: Unstable voltage can cause the engine to idle roughly or erratically.
20. The Future of Alternator Diagnostics: Predictive Maintenance
The future of alternator diagnostics involves predictive maintenance, using data analytics and machine learning to anticipate failures before they occur.
- Data Logging: Collecting and analyzing data from vehicle sensors to identify patterns and trends that indicate alternator degradation.
- Remote Monitoring: Using telematics systems to remotely monitor charging system performance and alert owners to potential issues.
- AI-Powered Diagnostics: Employing artificial intelligence algorithms to analyze diagnostic data and predict alternator failures with high accuracy.
*According to a report by McKinsey & Company in June 2021, predictive maintenance can reduce vehicle downtime by up to 30% and lower maintenance costs by 20%.
21. The Impact of Aftermarket Accessories on Alternator Health
Aftermarket accessories can place additional strain on the alternator, potentially leading to premature failure.
- High-Power Audio Systems: Amplifiers and subwoofers can draw significant current, overloading the alternator.
- Auxiliary Lighting: Off-road lights and other auxiliary lighting can increase the electrical load.
- Winches: Electric winches used for off-roading can draw hundreds of amps, placing a heavy burden on the alternator.
- Recommendations: It is essential to ensure that the alternator has sufficient capacity to handle the additional load from aftermarket accessories. Consider upgrading to a high-output alternator if necessary.
22. Exploring the Connection Between Alternator Issues and Transmission Problems
A faulty alternator can indirectly affect transmission performance, leading to shifting problems and DTCs.
- Voltage-Sensitive Solenoids: Modern transmissions rely on solenoids to control shifting. These solenoids are voltage-sensitive and may not function correctly if the voltage is unstable.
- TCM Communication: The Transmission Control Module (TCM) communicates with other control modules via the CAN bus. Voltage fluctuations can disrupt this communication, leading to shifting problems and DTCs.
- Torque Converter Clutch (TCC) Issues: A faulty alternator can affect the operation of the TCC, resulting in erratic engagement or disengagement.
23. How to Test Alternator Output with a Digital Multimeter (DMM)
Testing the alternator output with a DMM is a simple yet effective way to assess its performance.
- Gather Your Tools: You will need a digital multimeter (DMM), safety glasses, and gloves.
- Prepare the Vehicle: Ensure the vehicle is parked on a level surface and the engine is turned off.
- Locate the Battery: Open the hood and locate the battery terminals.
- Set the DMM: Set the DMM to DC voltage mode.
- Connect the DMM: Connect the red lead of the DMM to the positive (+) battery terminal and the black lead to the negative (-) terminal.
- Record Battery Voltage: Record the battery voltage with the engine off. A fully charged battery should read approximately 12.6 volts.
- Start the Engine: Start the engine and let it idle.
- Check Charging Voltage: Observe the voltage reading on the DMM. The charging voltage should be between 13.7 and 14.7 volts.
- Increase Engine Speed: Increase the engine speed to approximately 1,500 RPM. The charging voltage should remain within the specified range.
- Turn on Accessories: Turn on the headlights and blower fan to increase the electrical load. The charging voltage should remain stable.
- Interpret the Results:
- If the charging voltage is below 13.7 volts or above 14.7 volts, the alternator may be faulty.
- If the charging voltage drops significantly when accessories are turned on, the alternator may not be able to handle the electrical load.
 Testing Alternator Ripple with Multimeter
24. When to Suspect the Alternator Instead of the Battery
Knowing when to suspect the alternator instead of the battery can streamline the diagnostic process.
- Battery Keeps Dying: If the battery repeatedly dies even after being charged, the alternator may not be charging it properly.
- Dimming Lights: If the headlights dim when the engine is idling, the alternator may not be providing enough power.
- Clicking Sound: If you hear a clicking sound when trying to start the engine, the alternator may not be providing enough current to crank the engine.
- Warning Light: If the battery or charging system warning light is illuminated on the dashboard, the alternator may be faulty.
25. Best Practices for Maintaining a Healthy Charging System
Following best practices for maintaining a healthy charging system can extend the life of your alternator and battery.
- Regular Inspections: Inspect the alternator, battery, and wiring connections regularly for signs of wear, corrosion, or damage.
- Terminal Cleaning: Clean the battery terminals and alternator connections to ensure good electrical contact.
- Belt Inspection: Check the alternator belt for wear, cracks, or looseness. Replace the belt if necessary.
- Voltage Checks: Monitor the battery voltage and charging voltage regularly to detect potential problems early.
- Load Testing: Have the alternator load tested periodically to assess its performance under load.
26. Exploring the Relationship Between a Weak Battery and Alternator Performance
A weak battery can place additional strain on the alternator, potentially leading to premature failure.
- Overworking the Alternator: If the battery is weak, the alternator must work harder to keep it charged, which can overheat the alternator and shorten its lifespan.
- Increased Ripple Voltage: A weak battery can cause increased ripple voltage, which can damage sensitive electronic components.
- Reduced Fuel Economy: A weak battery can cause the alternator to draw more power from the engine, reducing fuel economy.
27. Understanding How Ambient Temperature Affects Alternator Performance
Ambient temperature can affect alternator performance, especially in extreme climates.
- High Temperatures: High temperatures can cause the alternator to overheat, reducing its output and lifespan.
- Low Temperatures: Low temperatures can increase the viscosity of the alternator’s internal components, reducing its efficiency.
- Recommendations: In extreme climates, consider using a high-performance alternator designed to withstand harsh conditions.
28. Deciphering Complex CAN Bus Communication DTCs Related to Charging Issues
Deciphering complex CAN Bus communication DTCs requires a systematic approach and specialized diagnostic tools.
- CAN Bus Overview: The CAN Bus is a communication network that allows various control modules to communicate with each other.
- Common CAN Bus DTCs: Common CAN Bus DTCs related to charging issues include U0100, U0101, and U0155.
- Diagnostic Steps:
- Scan for DTCs: Use a diagnostic tool to scan all control modules for DTCs.
- Identify Related Modules: Identify the control modules that are experiencing communication problems.
- Check Wiring Connections: Inspect the wiring connections between the affected modules for damage, corrosion, or loose connections.
- Test CAN Bus Voltage: Use a multimeter to test the CAN Bus voltage at various points in the network.
- Use a CAN Bus Analyzer: Use a CAN Bus analyzer to monitor communication signals and identify disruptions.
29. Identifying Parasitic Draws That Can Overload the Alternator
Parasitic draws can overload the alternator, leading to premature failure and battery drain.
- What is a Parasitic Draw? A parasitic draw is an electrical load that continues to draw power from the battery even when the engine is turned off.
- Common Sources of Parasitic Draws: Common sources of parasitic draws include aftermarket accessories, faulty relays, and malfunctioning control modules.
- Diagnostic Steps:
- Prepare the Vehicle: Ensure the vehicle is parked on a level surface and the engine is turned off.
- Disconnect the Negative Battery Cable: Disconnect the negative battery cable.
- Connect the Multimeter: Set the multimeter to DC amperage mode.
- Connect the Multimeter in Series: Connect the multimeter in series between the negative battery cable and the negative battery terminal.
- Wait for Modules to Sleep: Wait for all control modules to enter sleep mode, which may take several minutes.
- Record Amperage Reading: Record the amperage reading on the multimeter.
- Identify Parasitic Draw: A normal parasitic draw should be less than 50 milliamps. If the amperage reading is higher than 50 milliamps, there is a parasitic draw.
- Isolate the Circuit: To isolate the circuit causing the parasitic draw, remove fuses one at a time while monitoring the amperage reading. When the amperage reading drops, the circuit that was removed is the source of the parasitic draw.
30. Case Studies: Solving Complex Electrical Issues Caused by Failing Alternators
Analyzing case studies can provide valuable insights into solving complex electrical issues caused by failing alternators.
- Case Study 1: Mercedes-Benz C-Class with Intermittent Stalling: A Mercedes-Benz C-Class exhibited intermittent stalling and various communication DTCs. Testing revealed high ripple voltage. Replacing the alternator resolved the issues.
- Case Study 2: Mercedes-Benz E-Class with Repeated Battery Drains: A Mercedes-Benz E-Class displayed a P0562 (System Voltage Low) code. The battery was repeatedly drained. Diagnosing a faulty alternator and replacing it restored proper charging.
- Case Study 3: Mercedes-Benz S-Class with Erratic Infotainment System: A Mercedes-Benz S-Class showed erratic behavior of the infotainment system and multiple sensor-related DTCs. High ripple voltage was detected, leading to alternator replacement.
 Modern Alternator Diagnostics
Don’t let a failing alternator cause havoc on your Mercedes-Benz. At MERCEDES-DIAGNOSTIC-TOOL.EDU.VN, we provide the expertise and tools you need to diagnose and resolve charging system issues efficiently. Contact us today at 789 Oak Avenue, Miami, FL 33101, United States, or via Whatsapp at +1 (641) 206-8880. Visit our website MERCEDES-DIAGNOSTIC-TOOL.EDU.VN for more information. Our services include alternator ripple testing, Mercedes diagnostic tools, and charging system maintenance.