Enabling or disabling features using DTS Monaco coding involves modifying control unit parameters, similar to adjusting settings on a computer. With the right tools and guidance from MERCEDES-DIAGNOSTIC-TOOL.EDU.VN, you can unlock hidden functionalities and customize your Mercedes-Benz. This article will provide a comprehensive guide on utilizing DTS Monaco for feature customization, covering necessary tools, installation procedures, and step-by-step instructions.
Contents
- 1. Understanding DTS Monaco Coding
- 1.1. What is ECU Coding?
- 1.2. Why Use DTS Monaco?
- 2. Essential Tools and Software
- 2.1. Required Hardware
- 2.2. Required Software
- 2.3. Software Acquisition
- 2.4. Laptop Specifications
- 3. Selecting a J2534 Pass-Thru Adapter
- 3.1. Compatibility
- 3.2. Recommended Adapters
- 3.3. Avoiding Overkill
- 4. Installation Procedure
- 4.1. Software Installation
- 4.2. Configuring Vediamo (Alternative)
- 4.3. Locating Adapter Name
- 5. Preparing for Coding
- 5.1. Vehicle Connection
- 5.2. Xentry Quick Test
- 5.3. Power Supply
- 5.4. Battery Management
- 6. Finding the Control Unit Name
- 6.1. Identifying the Target ECU
- 6.2. Using Xentry for Identification
- 7. Step-by-Step Coding Process with DTS Monaco
- 7.1. Launching DTS Monaco
- 7.2. ECU Selection
- 7.3. Choosing the CBF File
- 7.4. ECU Properties
- 7.5. Establishing ECU Contact
- 7.6. Variant Coding
- 7.7. Modifying Parameters
- 7.8. Saving Changes
- 7.9. Security Access (Seed Key)
- 7.10. Applying Changes (Again)
- 7.11. Hard Reset
- 7.12. Disconnecting
- 8. Example: Disabling Start/Stop ECO
- 8.1. Locating the Parameter
- 8.2. Changing the Value
- 8.3. Applying the Changes
- 9. Common Coding Parameters
- 10. Potential Risks and Precautions
- 10.1. Data Corruption
- 10.2. Warranty Issues
- 10.3. Safety Implications
- 10.4. Expert Guidance
- 11. Best Practices
- 11.1. Documentation
- 11.2. Incremental Changes
- 11.3. Verification
- 11.4. Battery Maintenance
- 12. Addressing Customer Challenges
- 12.1. Finding the Right Diagnostic Tools
- 12.2. Understanding Hidden Features
- 12.3. Simplifying Repairs and Maintenance
- 12.4. Cost-Effective Solutions
- 13. Why Choose MERCEDES-DIAGNOSTIC-TOOL.EDU.VN?
- 13.1. Comprehensive Information
- 13.2. Step-by-Step Guidance
- 13.3. Expert Support
- 13.4. Cost Savings
- 14. Frequently Asked Questions (FAQ)
- 14.1. What is the best diagnostic tool for Mercedes-Benz?
- 14.2. How do I unlock hidden features on my Mercedes-Benz?
- 14.3. How often should I service my Mercedes-Benz?
- 14.4. Can I damage my car by coding it myself?
- 14.5. Is it legal to modify my car’s ECU?
- 14.6. Where can I find the CBF files for my Mercedes-Benz?
- 14.7. What is a seed key, and how do I obtain one?
- 14.8. What is the difference between Vediamo and DTS Monaco?
- 14.9. Can I use a generic OBD2 scanner for Mercedes-Benz?
- 14.10. Where can I find reliable information about Mercedes-Benz coding and diagnostics?
- 15. Latest Updates in Mercedes-Benz Diagnostics and Coding
- 16. Conclusion
1. Understanding DTS Monaco Coding
DTS Monaco (Diagnostic Tool Solution Monaco) is a powerful software used for diagnosing and coding electronic control units (ECUs) in Mercedes-Benz vehicles. While it’s used by developers, it has also found its way into the hands of car enthusiasts and home mechanics.
1.1. What is ECU Coding?
ECU coding involves changing parameters within a control unit to enable or disable specific features.
For example, according to a study by Bosch, variant coding allows technicians to adjust vehicle settings to match specific regional requirements or customer preferences.
1.2. Why Use DTS Monaco?
DTS Monaco offers extensive control over vehicle settings, allowing users to:
- Activate or deactivate features.
- Customize vehicle behavior.
- Adapt ECUs to different hardware configurations.
- Troubleshoot and diagnose complex issues.
2. Essential Tools and Software
To perform DTS Monaco coding, you’ll need several key components.
2.1. Required Hardware
-
Mercedes-Benz Vehicle (2005 – Present): The vehicle you intend to modify.
-
J2534 Pass-Thru Adapter: This device acts as an interface between your computer and the vehicle’s OBD port.
- Examples include Tactrix Openport 2.0, CarDAQ-Plus 2, and DrewTech MongoosePro. According to a study by the SAE, J2534 devices must comply with specific standards to ensure compatibility and reliable communication with vehicle ECUs.
-
Laptop: A Windows-based laptop with sufficient processing power and storage.
2.2. Required Software
-
Xentry Pass-Thru: Mercedes-Benz’s official diagnostic software for mechanics.
-
DTS Monaco 8.16: The coding software itself.
-
Seed Key Calculator: Used to unlock protected functions within the ECUs.
- MBSeedKey is a free, open-source option available on GitHub.
2.3. Software Acquisition
- Xentry Pass-Thru: Can be purchased from Mercedes-Benz, but is often acquired through other sources by independent mechanics.
- DTS Monaco 8.16: Typically obtained from online sources.
- Seed Key Calculator: Download MBSeedKey from GitHub. Note that it requires DLL files, which must be sourced separately.
2.4. Laptop Specifications
- Operating System: Windows 10 or 11 (64-bit)
- Processor: Intel/AMD CPU (x64 architecture)
- RAM: 8+ GB
- Storage: 100+ GB free SSD space
3. Selecting a J2534 Pass-Thru Adapter
3.1. Compatibility
Ensure the adapter has Windows 10 x64 device drivers and a Pass-Thru library.
3.2. Recommended Adapters
Tactrix Openport 2.0 is a reliable choice.
3.3. Avoiding Overkill
DoIP adapters offer advanced capabilities but aren’t necessary for basic coding tasks.
4. Installation Procedure
4.1. Software Installation
- Install and activate Xentry Pass-Thru.
- Install the J2534 driver and Pass-Thru library (provided by the adapter manufacturer).
- Install and activate DTS Monaco 8.16.
- Install the Seed Key Calculator.
4.2. Configuring Vediamo (Alternative)
If using Vediamo 4.2.2 instead of DTS Monaco:
- Edit the “slave.ini” file located in the Vediamo installation directory (e.g., “C:Program Files (x86)VediamoCaesardriverslave.ini”).
- In the “[PartJ]” section, replace “DeviceName” with your Pass-Thru adapter’s name.
- Update the “Part J” component in Vediamo.
4.3. Locating Adapter Name
The adapter name can be found in the Windows Registry or within the Xentry diagnostic software.
5. Preparing for Coding
5.1. Vehicle Connection
- Connect your laptop to the vehicle’s OBD port using the J2534 adapter.
- Turn on the vehicle’s ignition without starting the engine (key position “ON”).
5.2. Xentry Quick Test
Run a quick test in Xentry to ensure proper communication with the vehicle.
5.3. Power Supply
- Keep the car “ON” (without running the engine).
- Do not press the brake pedal.
- Press the start button twice or turn the key two clicks (Off -> ACC -> On -> Run).
- Consider using a battery charger (12V) if coding will take a long time.
5.4. Battery Management
Turn off headlights, interior lights, and HVAC to conserve battery power.
6. Finding the Control Unit Name
6.1. Identifying the Target ECU
To modify a specific feature, you must locate the corresponding control unit.
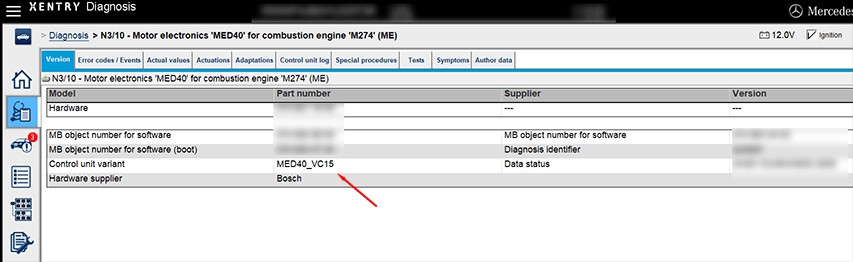
6.2. Using Xentry for Identification
- Run Xentry and select “Diagnosis”.
- Search for the relevant ECU (e.g., “Motor electronics … for combustion engine …”).
- Look for “Control unit variant” to identify the ECU’s name (e.g., MED40).
7. Step-by-Step Coding Process with DTS Monaco
7.1. Launching DTS Monaco
- Run DTS Monaco.
- Create a new workspace or open an existing one.
7.2. ECU Selection
- Click on “ECU” in the main window.
- Select “Select ECU” from the dropdown menu.
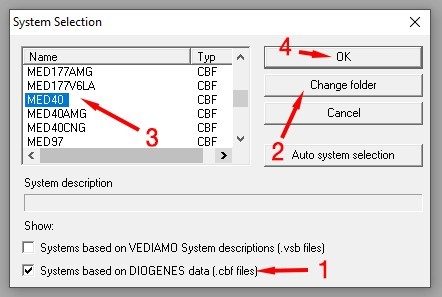
7.3. Choosing the CBF File
- Browse to the directory containing the CBF (Control unit description file) files. These files are typically located in the Xentry installation directory (e.g., C:Program Files (x86)Mercedes-BenzXentryMB_PKWCaesarcbf).
- Select the CBF file corresponding to the ECU you want to code (e.g., MED40.cbf).
7.4. ECU Properties
- In the DTS Monaco workspace, right-click on the selected ECU and choose “Properties.”
- In the “Communication” tab, select the appropriate connection type (e.g., “xxxxxxx…… HSCAN_UDS_500”). Always choose “500”.
- Click “OK” to save the settings.
7.5. Establishing ECU Contact
- Click the “Connect” button (or the equivalent icon) to initiate communication with the ECU.
- Wait for DTS Monaco to establish a connection.
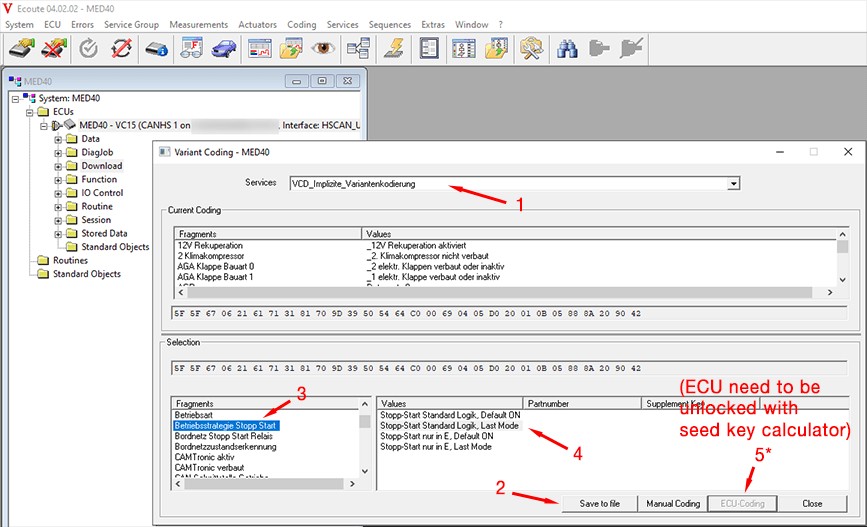
7.6. Variant Coding
- Once connected, navigate to the “Variant Coding” or “Coding” section within DTS Monaco.
- Select “VCD_Implizite_Variantenkodierung” (or the relevant coding option) from the available functions.
7.7. Modifying Parameters
- Locate the parameter you want to change (e.g., “Betriebsstrategie Stopp Start” for disabling Start/Stop ECO).
- Select the new value for the parameter (e.g., “Stopp Start Standard Logik, Last Mode”).
7.8. Saving Changes
- Before applying any changes, click “Save to Files” to create a backup of the current ECU parameters. This backup can be used to restore the ECU to its original state if something goes wrong.
- Click the “ECU-Coding” or “Write” button to apply the changes to the ECU.
7.9. Security Access (Seed Key)
- If the coding process fails due to insufficient access rights, you’ll need to unlock the ECU using a seed key.
- Open the “ECU” menu and select “Manual Command Input…”.
- Type “27 0B” (request seed for access level 0B) and click “Send.”
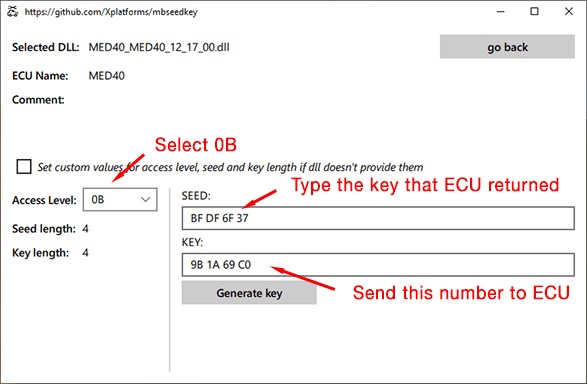
- The ECU will respond with a seed value (e.g., “67 0B BF DF 6F 37”).
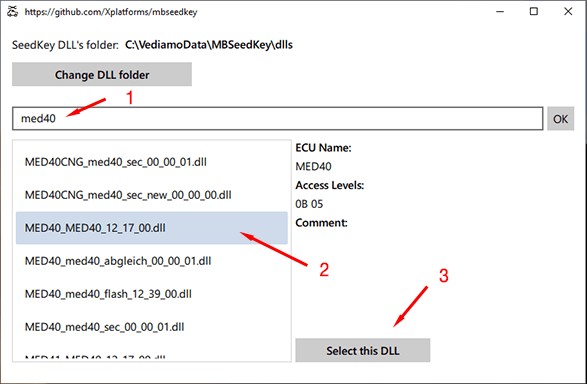
- Open the MBSeedKey calculator.
- Select the appropriate DLL file for your ECU (e.g., “MED40_MED40_…….dll”).
- Enter the seed value from the ECU into the MBSeedKey calculator.
- Select “0B” as the access level and click “Generate Key.”
- The calculator will generate a key (e.g., “9B 1A 69 C0”).
- Go back to DTS Monaco and enter “27 0C [generated key]” (e.g., “27 0C 9B 1A 69 C0”) in the “Manual Command Input…” dialog and click “Send.”
- The ECU should respond with “67 0C,” indicating that access has been granted.
7.10. Applying Changes (Again)
- Repeat steps 7.6 and 7.7 to modify the parameter.
- Click the “ECU-Coding” or “Write” button to apply the changes to the ECU.
7.11. Hard Reset
- After successfully coding the ECU, perform a hard reset to ensure the changes take effect.
- In the DTS Monaco workspace, navigate to the “Function” section of the ECU.
- Look for “FN_HardReset” and double-click it to execute the reset function.
7.12. Disconnecting
- Click the “Disconnect” button (or the equivalent icon) to terminate communication with the ECU.
- Close DTS Monaco.
8. Example: Disabling Start/Stop ECO
8.1. Locating the Parameter
- In DTS Monaco, navigate to the MED40 ECU.
- Find the “VCD_Implizite_Variantenkodierung” function.
- Locate the “Betriebsstrategie Stopp Start” parameter.
8.2. Changing the Value
- Change the value from “Stopp Start Standard Logik, Default ON” to “Stopp Start Standard Logik, Last Mode.”
8.3. Applying the Changes
Follow the steps outlined in sections 7.8 to 7.11 to save and apply the changes.
9. Common Coding Parameters
| Feature | Parameter | Possible Values | Description |
|---|---|---|---|
| Start/Stop ECO | Betriebsstrategie Stopp Start | Default ON, Last Mode, Default OFF | Configures the behavior of the Start/Stop ECO function. |
| Ambient Lighting Colors | Farbverlauf Ambientebeleuchtung | Various color options | Adjusts the color settings for the ambient lighting system. |
| Seat Comfort Settings | Sitzkomfort Einstellungen | Various comfort levels | Modifies the seat comfort settings, such as massage intensity and lumbar support. |
| Instrument Cluster Display | Kombiinstrument Anzeige | Various display options | Customizes the information displayed on the instrument cluster. |
| Headlight Behavior | Scheinwerfer Verhalten | Various modes (e.g., ECE, SAE) | Adjusts the behavior of the headlights, such as daytime running lights and automatic high beams. |
| Steering Wheel Heating Level | Lenkradheizung Stufe | Various heating levels | Modifies the heating intensity of the steering wheel heater. |
| Sound System Settings | Soundsystem Einstellungen | Various sound profiles | Customizes the sound system settings, such as equalizer presets and surround sound options. |
| Keyless Entry Behavior | Keyless Go Verhalten | Enable/Disable specific functions | Adjusts the behavior of the keyless entry system, such as unlocking all doors with a single touch. |
| Speed Limit Display | Geschwindigkeitslimit Anzeige | Enable/Disable, adjust display settings | Configures the speed limit display function, including enabling/disabling the feature and adjusting how the speed limits are displayed. |
| Automatic Door Locking | Automatische Türverriegelung | Enable/Disable, set time delay | Adjusts the automatic door locking behavior, such as enabling/disabling the feature and setting the time delay before the doors lock. |
| Rain Sensor Sensitivity | Regensensor Empfindlichkeit | Various sensitivity levels | Modifies the sensitivity of the rain sensor, affecting how quickly the windshield wipers activate in response to rain. |
| Automatic Wipers | Automatische Scheibenwischer | Enable/Disable | Allows you to turn off or on the automatic windshield wipers. |
| Folding Mirrors | Spiegel Anklappen | Adjust settings to set at certain times/conditions | Modifies when the side mirrors fold in |
| Adaptive Cruise Control | Adaptiver Tempomat | Various settings for distance | Configures the functionality and responsiveness of the adaptive cruise control system. |
| Interior Lighting Zones | Innenraumbeleuchtung Zonen | Adjust settings to make it brighter | Set interior lighting zones to be brighter or dimmer depending on preference |
10. Potential Risks and Precautions
10.1. Data Corruption
Incorrect coding can lead to data corruption or ECU malfunction. Always back up the original ECU data before making any changes.
10.2. Warranty Issues
Modifying ECU settings may void the vehicle’s warranty.
10.3. Safety Implications
Incorrectly configured settings can compromise vehicle safety systems.
10.4. Expert Guidance
Seek guidance from experienced professionals before attempting complex coding tasks.
11. Best Practices
11.1. Documentation
Keep detailed records of all coding changes made to the vehicle.
11.2. Incremental Changes
Make small, incremental changes and test them thoroughly before proceeding.
11.3. Verification
Verify the functionality of modified features after coding to ensure they work as expected.
11.4. Battery Maintenance
Ensure you have proper battery maintenance during the coding process.
12. Addressing Customer Challenges
12.1. Finding the Right Diagnostic Tools
MERCEDES-DIAGNOSTIC-TOOL.EDU.VN provides detailed information on suitable diagnostic tools for Mercedes-Benz vehicles, including their features and usage.
12.2. Understanding Hidden Features
We offer step-by-step guides on unlocking hidden features on specific Mercedes-Benz models, simplifying the customization process.
12.3. Simplifying Repairs and Maintenance
Our website provides easy-to-understand repair guides and maintenance tips, empowering you to handle minor issues and routine servicing.
12.4. Cost-Effective Solutions
By offering expert guidance and resources, MERCEDES-DIAGNOSTIC-TOOL.EDU.VN helps you save on expensive dealership repairs.
13. Why Choose MERCEDES-DIAGNOSTIC-TOOL.EDU.VN?
13.1. Comprehensive Information
We provide detailed information on diagnostic tools, feature unlocking, and maintenance procedures.
13.2. Step-by-Step Guidance
Our guides offer clear, easy-to-follow instructions for various Mercedes-Benz models.
13.3. Expert Support
We offer expert advice and troubleshooting assistance to ensure successful coding and repairs.
13.4. Cost Savings
Our resources help you save money on dealership services and maintenance.
14. Frequently Asked Questions (FAQ)
14.1. What is the best diagnostic tool for Mercedes-Benz?
The best diagnostic tool depends on your needs. Xentry is the official software, while iCarsoft MB V3.0 is a good option for DIYers. MERCEDES-DIAGNOSTIC-TOOL.EDU.VN offers detailed comparisons to help you choose.
14.2. How do I unlock hidden features on my Mercedes-Benz?
DTS Monaco coding allows you to unlock hidden features. Follow our step-by-step guides for specific models.
14.3. How often should I service my Mercedes-Benz?
Mercedes-Benz recommends servicing every 10,000 miles or once a year, whichever comes first.
14.4. Can I damage my car by coding it myself?
Yes, incorrect coding can damage your car. Always back up data and follow instructions carefully.
14.5. Is it legal to modify my car’s ECU?
Modifying your car’s ECU may not be legal in all areas. Check local regulations before making any changes.
14.6. Where can I find the CBF files for my Mercedes-Benz?
CBF files are typically located in the Xentry installation directory.
14.7. What is a seed key, and how do I obtain one?
A seed key is a security code required to unlock protected functions in the ECU. Use the MBSeedKey calculator to generate one.
14.8. What is the difference between Vediamo and DTS Monaco?
DTS Monaco is a more advanced tool than Vediamo, offering greater control over ECU coding.
14.9. Can I use a generic OBD2 scanner for Mercedes-Benz?
Generic OBD2 scanners can read basic fault codes, but they lack the advanced functionality of specialized tools like Xentry or iCarsoft MB V3.0.
14.10. Where can I find reliable information about Mercedes-Benz coding and diagnostics?
MERCEDES-DIAGNOSTIC-TOOL.EDU.VN provides reliable, up-to-date information on Mercedes-Benz coding and diagnostics.
15. Latest Updates in Mercedes-Benz Diagnostics and Coding
| Update | Description | Impact |
|---|---|---|
| New Diagnostic Protocols | Introduction of new communication protocols for newer Mercedes-Benz models. | Requires updated diagnostic tools and software to ensure compatibility. |
| Advanced Security Measures | Enhanced security protocols to prevent unauthorized access to vehicle ECUs. | Makes coding and modifications more challenging without proper authorization. |
| Over-the-Air Updates | Mercedes-Benz now offers over-the-air (OTA) updates for certain vehicle functions. | Reduces the need for manual coding for some features but also potentially overwrites custom settings. |
| New Hidden Features | Discovery of new customizable parameters and hidden features in the latest Mercedes-Benz models. | Provides new opportunities for personalization and optimization. |
| Updated Diagnostic Tools | Release of updated versions of Xentry, DTS Monaco, and other diagnostic tools with enhanced functionality. | Improves diagnostic accuracy, coding efficiency, and compatibility with the latest Mercedes-Benz vehicles. |
| New Repair Procedures | Introduction of new repair procedures and techniques for addressing common issues in Mercedes-Benz vehicles. | Requires technicians to stay updated with the latest service information and training. |
| Electric Vehicle Diagnostics | Specialized diagnostic procedures and tools for electric and hybrid Mercedes-Benz models. | Addresses the unique challenges of diagnosing and repairing electric vehicle systems. |
| Cybersecurity Enhancements | Implementation of cybersecurity measures to protect vehicle systems from hacking and unauthorized access. | Ensures the security and integrity of vehicle data and functions. |
| Remote Diagnostics | Capability to perform remote diagnostics and software updates on Mercedes-Benz vehicles. | Enables faster and more convenient service, reducing the need for physical visits to the dealership. |
| Integration with Mobile Apps | Diagnostic and coding tools integrated with mobile apps for enhanced accessibility and user experience. | Allows users to perform basic diagnostics and coding tasks from their smartphones or tablets. |
16. Conclusion
DTS Monaco coding offers powerful customization options for your Mercedes-Benz. By following this guide and using the resources at MERCEDES-DIAGNOSTIC-TOOL.EDU.VN, you can confidently enable or disable features to tailor your vehicle to your preferences. Remember to proceed with caution, back up your data, and seek expert guidance when needed.
Ready to unlock the full potential of your Mercedes-Benz? Contact MERCEDES-DIAGNOSTIC-TOOL.EDU.VN today for expert advice on diagnostic tools, feature unlocking services, and repair guidance. Reach us at 789 Oak Avenue, Miami, FL 33101, United States, or via Whatsapp at +1 (641) 206-8880. Visit our website at MERCEDES-DIAGNOSTIC-TOOL.EDU.VN for more information.
 Mercedes-Benz Xentry Diagnostic Software
 DTS Monaco Directory Change Screen
 DTS Monaco Coding Screen
 DTS Monaco ECU Unlock
 MBSeedKey Main Screen
 MBSeedKey DLL Selection