The 04 Tl Obd2 Port, also known as the Diagnostic Link Connector (DLC), is your gateway to understanding your car’s health; if you have issues connecting to it, MERCEDES-DIAGNOSTIC-TOOL.EDU.VN can help you troubleshoot the problem and get you back on track. Our comprehensive diagnostic tools and expert guidance ensure that you can effectively read and interpret your vehicle’s data, leading to accurate diagnoses and efficient repairs. Learn about vehicle diagnostics, car computer, and auto repair.
Contents
- 1. What is the 04 TL OBD2 Port and its Function?
- 1.1 Understanding the OBD2 System
- 1.2 Location of the OBD2 Port in a 2004 Acura TL
- 1.3 Common Uses of the OBD2 Port
- 1.4 Why the 04 TL OBD2 Port is Important
- 2. Identifying Potential Issues with Your 04 TL OBD2 Port
- 2.1 Common Symptoms of a Faulty OBD2 Port
- 2.2 Physical Damage to the OBD2 Port
- 2.3 Electrical Issues Affecting the OBD2 Port
- 2.4 How to Check for Power at the OBD2 Port
- 2.5 Using a Multimeter to Diagnose OBD2 Port Issues
- 3. Step-by-Step Guide to Testing Your 04 TL OBD2 Port
- 3.1 Preliminary Checks Before Testing
- 3.2 Tools and Materials You Will Need
- 3.3 Detailed Steps for Testing the OBD2 Port
- 3.4 Interpreting Your Test Results
- 3.5 Common Mistakes to Avoid
- 4. Troubleshooting Common Issues with the 04 TL OBD2 Port
- 4.1 Addressing a Blown Fuse
- 4.2 Repairing Bent or Broken Pins
- 4.3 Fixing Wiring Problems
- 4.4 Resolving Grounding Issues
- 4.5 When to Seek Professional Help
- 5. Advanced Diagnostic Techniques for the 04 TL OBD2 Port
- 5.1 Using an Oscilloscope for Signal Analysis
- 5.2 Checking the CAN Bus System
- 5.3 Diagnosing Communication Errors
- 5.4 Using Scan Tools for Advanced Diagnostics
- 5.5 Importance of Wiring Diagrams
- 6. Maintaining Your 04 TL OBD2 Port for Optimal Performance
- 6.1 Keeping the Port Clean and Free of Debris
- 6.2 Protecting the Port from Physical Damage
- 6.3 Preventing Corrosion
- 6.4 Regular Inspections
- 6.5 Using Quality Diagnostic Tools
- 7. Benefits of Using MERCEDES-DIAGNOSTIC-TOOL.EDU.VN for OBD2 Diagnostics
- 7.1 Access to Expert Advice and Support
- 7.2 Comprehensive Diagnostic Guides
- 7.3 Latest Information on OBD2 Technology
- 7.4 Community Forum and Knowledge Sharing
- 7.5 Cost-Effective Solutions
- 8. Common OBD2 Codes and Their Meanings for Your 04 TL
- 8.1 P0300: Random/Multiple Cylinder Misfire Detected
- 8.2 P0171: System Too Lean (Bank 1)
- 8.3 P0420: Catalyst System Efficiency Below Threshold (Bank 1)
- 8.4 P0113: Intake Air Temperature Sensor Circuit High Input
- 8.5 P0505: Idle Air Control System Malfunction
- 8.6 How to Use OBD2 Codes for Diagnosis
- 9. OBD2 Scanner Recommendations for Mercedes-Benz Vehicles
- 9.1 Types of OBD2 Scanners
- 9.2 Recommended Scanners
- 9.3 Comparison Table of OBD2 Scanners
- 9.4 Factors to Consider When Choosing a Scanner
- 10. Frequently Asked Questions (FAQ) About the 04 TL OBD2 Port
- 10.1 What is the OBD2 port used for?
- 10.2 Where is the OBD2 port located in a 2004 Acura TL?
- 10.3 How do I check if my OBD2 port is working?
- 10.4 What does it mean when my OBD2 scanner won’t connect?
- 10.5 Can I use any OBD2 scanner on my 2004 Acura TL?
- 10.6 How do I fix a damaged OBD2 port?
- 10.7 What is the CAN bus, and how does it relate to the OBD2 port?
- 10.8 How do I prevent corrosion on my OBD2 port?
- 10.9 When should I seek professional help for OBD2 port issues?
- 10.10 Where can I find more information about OBD2 diagnostics?
1. What is the 04 TL OBD2 Port and its Function?
The 04 TL OBD2 port, or On-Board Diagnostics II port, is a standardized interface located in your 2004 Acura TL that allows technicians and car owners to access the vehicle’s computer system for diagnostics and monitoring. This port’s primary function is to provide access to various data parameters related to the engine, transmission, emissions, and other critical systems.
1.1 Understanding the OBD2 System
The OBD2 system is a standardized system implemented in all cars sold in the United States after 1996. It ensures that vehicles can be easily diagnosed using standard diagnostic tools. According to the Environmental Protection Agency (EPA), the OBD2 system monitors the performance of the engine, transmission, and other components to ensure they meet emission standards. This standardization simplifies the diagnostic process, allowing any mechanic to read the data and diagnose problems, as noted in a study by the Society of Automotive Engineers (SAE).
1.2 Location of the OBD2 Port in a 2004 Acura TL
In a 2004 Acura TL, the OBD2 port is typically located under the dashboard on the driver’s side. You’ll usually find it near the steering column or the center console. The exact location may vary slightly, so consulting your vehicle’s owner’s manual is always a good idea. The port is designed to be easily accessible, making it convenient to plug in diagnostic tools.
1.3 Common Uses of the OBD2 Port
The OBD2 port serves several critical functions:
- Reading Diagnostic Trouble Codes (DTCs): When your car’s check engine light comes on, the OBD2 port can be used to read the DTCs, which indicate the source of the problem.
- Monitoring Vehicle Performance: You can use the OBD2 port to monitor real-time data such as engine speed (RPM), coolant temperature, and oxygen sensor readings.
- Clearing Diagnostic Trouble Codes: After repairing a problem, you can use the OBD2 port to clear the DTCs and reset the check engine light.
- Performing Emission Tests: Many states use the OBD2 port to conduct emission tests, ensuring your vehicle meets environmental standards.
1.4 Why the 04 TL OBD2 Port is Important
The 04 TL OBD2 port is essential for maintaining your vehicle’s health and performance. Regular diagnostics can help you identify minor issues before they turn into major, costly repairs. Additionally, understanding the data from the OBD2 port can help you optimize your driving habits for better fuel efficiency and reduced emissions.
2. Identifying Potential Issues with Your 04 TL OBD2 Port
Several symptoms can indicate that your 04 TL OBD2 port is experiencing issues. Recognizing these signs early can help you address the problem before it leads to more significant complications.
2.1 Common Symptoms of a Faulty OBD2 Port
- Inability to Connect Diagnostic Tools: If you plug in a diagnostic tool and it fails to connect or communicate with the vehicle’s computer, there may be an issue with the OBD2 port.
- Intermittent Connection: Sometimes, the connection may be unstable, causing the diagnostic tool to disconnect and reconnect repeatedly.
- No Power to the OBD2 Port: Diagnostic tools require power from the OBD2 port to function. If the tool doesn’t power on when plugged in, it indicates a potential power issue.
- Check Engine Light Issues: A malfunctioning OBD2 port can sometimes trigger false check engine lights or prevent you from clearing legitimate ones.
2.2 Physical Damage to the OBD2 Port
Inspect the OBD2 port for any visible signs of physical damage. This includes:
- Bent or Broken Pins: The pins inside the port can become bent or broken, preventing proper contact with the diagnostic tool.
- Loose Port: The entire port might be loose or detached from its mounting, which can disrupt the connection.
- Corrosion: Corrosion can build up on the pins, especially in humid environments, leading to poor electrical contact.
2.3 Electrical Issues Affecting the OBD2 Port
Electrical problems are a common cause of OBD2 port malfunctions. Here are some key electrical issues to consider:
- Blown Fuses: The OBD2 port is typically protected by a fuse. A blown fuse can cut off power to the port.
- Wiring Problems: Damaged, frayed, or disconnected wires can disrupt the electrical signals to and from the OBD2 port.
- Grounding Issues: A poor ground connection can prevent the OBD2 port from functioning correctly.
2.4 How to Check for Power at the OBD2 Port
Checking for power at the OBD2 port is a straightforward process that can help you identify electrical issues. Here’s how to do it:
- Gather Your Tools: You’ll need a multimeter and your vehicle’s owner’s manual (to identify the correct fuse).
- Check the Fuse: Consult your owner’s manual to locate the fuse for the OBD2 port. Use the multimeter to test the fuse for continuity. If the fuse is blown, replace it with a new one of the same rating.
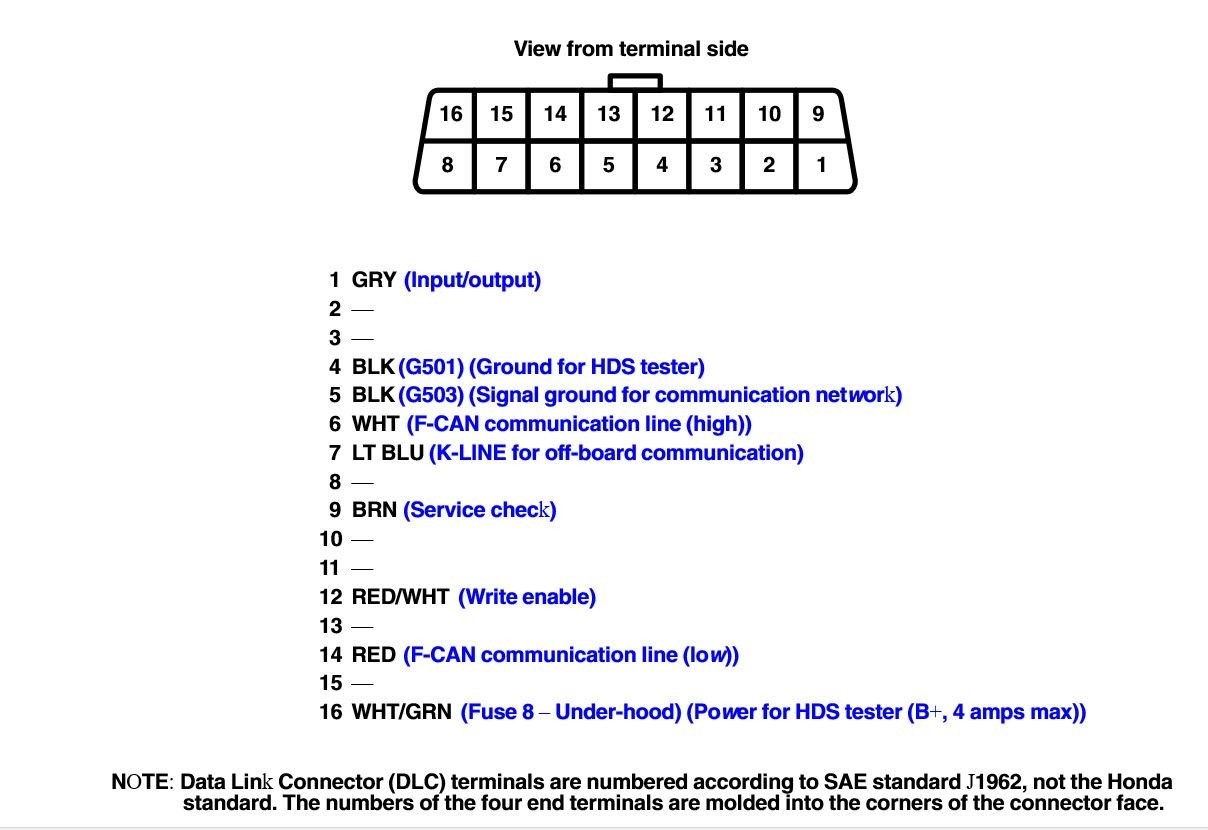
- Test the Voltage: Set your multimeter to measure DC voltage. Connect the black lead to a known good ground (such as a metal part of the vehicle’s chassis) and the red lead to pin 16 on the OBD2 port. You should see a reading of approximately 12 volts.
- Check Ground Pins: Use the multimeter to check continuity between pins 4 and 5 (ground pins) and a known good ground. There should be a solid connection (low resistance).
2.5 Using a Multimeter to Diagnose OBD2 Port Issues
A multimeter is an invaluable tool for diagnosing OBD2 port issues. Here are some additional checks you can perform:
- Continuity Checks: Use the multimeter to check the continuity of the wiring between the OBD2 port and the vehicle’s computer. This can help identify any breaks or shorts in the wiring.
- Voltage Drop Tests: Perform voltage drop tests on the power and ground circuits to identify any excessive resistance that could be causing problems.
 Checking Continuity Between Pin 4 and Vehicle Ground
3. Step-by-Step Guide to Testing Your 04 TL OBD2 Port
Testing your 04 TL OBD2 port involves a systematic approach to identify and resolve potential issues. Here’s a detailed guide to help you through the process.
3.1 Preliminary Checks Before Testing
Before you start testing the OBD2 port, perform these preliminary checks:
- Visual Inspection: Inspect the OBD2 port for any visible damage, such as bent pins, cracks, or corrosion.
- Check the Fuses: Locate the fuse associated with the OBD2 port (refer to your owner’s manual) and check if it’s blown. Replace it if necessary.
- Ensure Key is in the “On” Position: The vehicle’s ignition should be in the “on” position (but the engine doesn’t need to be running) for the OBD2 port to be active.
3.2 Tools and Materials You Will Need
- Multimeter: For testing voltage and continuity.
- OBD2 Scanner: To attempt to read diagnostic codes.
- Wiring Diagram: For your 2004 Acura TL (available online or in a repair manual).
- Fuse Puller: To safely remove and inspect fuses.
- Replacement Fuses: In case you find a blown fuse.
- Basic Hand Tools: Screwdrivers, pliers, etc.
3.3 Detailed Steps for Testing the OBD2 Port
- Check for Power (Pin 16):
- Set your multimeter to DC voltage mode.
- Connect the black lead to a known good ground (e.g., a metal part of the chassis).
- Probe pin 16 of the OBD2 port with the red lead.
- You should read approximately 12 volts. If not, there’s a power supply issue.
- Check the Ground Connections (Pins 4 and 5):
- Set your multimeter to continuity mode.
- Connect one lead to pin 4 or 5 and the other lead to a known good ground.
- You should hear a beep or see a low resistance reading, indicating a good ground connection.
- Attempt to Connect an OBD2 Scanner:
- Plug your OBD2 scanner into the port.
- Turn on the ignition (engine off).
- Follow the scanner’s instructions to attempt to read diagnostic codes.
- If the scanner fails to connect, it could indicate a communication issue with the OBD2 port.
- Check the CAN Bus Wires (Pins 6 and 14):
- The CAN (Controller Area Network) bus is used for communication between the vehicle’s computer and the OBD2 port.
- With the ignition on, use the multimeter to check the voltage between pin 6 and ground, and between pin 14 and ground.
- You should see approximately 2.5 volts on both pins. Significant deviations indicate a problem with the CAN bus.
- Inspect the Wiring:
- Refer to your wiring diagram to trace the wires connected to the OBD2 port.
- Look for any signs of damage, such as cuts, frays, or corrosion.
- Check the connectors for loose or corroded terminals.
3.4 Interpreting Your Test Results
- No Power on Pin 16: Indicates a blown fuse, wiring issue, or problem with the power supply to the OBD2 port.
- No Ground Connection on Pins 4 and 5: Suggests a grounding issue, which could be due to a broken wire or corroded connection.
- OBD2 Scanner Fails to Connect: Could be due to a communication issue, wiring problem, or a faulty OBD2 port.
- Incorrect Voltage on CAN Bus Wires: Points to a problem with the CAN bus system, which requires further diagnosis.
3.5 Common Mistakes to Avoid
- Not Checking the Fuses First: Always start by checking the fuses, as a blown fuse is a common cause of OBD2 port issues.
- Skipping the Visual Inspection: A thorough visual inspection can often reveal obvious damage that would otherwise be overlooked.
- Using the Wrong Wiring Diagram: Ensure you’re using the correct wiring diagram for your 2004 Acura TL to avoid misinterpreting the wiring.
- Not Grounding the Multimeter Correctly: Always use a known good ground when testing with a multimeter to ensure accurate readings.
4. Troubleshooting Common Issues with the 04 TL OBD2 Port
After testing your 04 TL OBD2 port, you may encounter specific issues that require troubleshooting. Here’s a guide to addressing some common problems.
4.1 Addressing a Blown Fuse
A blown fuse is one of the simplest issues to resolve. Here’s how:
- Locate the Fuse Box: Refer to your owner’s manual to find the location of the fuse box. It’s usually under the dashboard or in the engine compartment.
- Identify the OBD2 Port Fuse: Consult the fuse box diagram to identify the fuse associated with the OBD2 port.
- Remove the Blown Fuse: Use a fuse puller to remove the blown fuse.
- Inspect the Fuse: Check the fuse to see if the filament inside is broken.
- Replace the Fuse: Replace the blown fuse with a new fuse of the same rating.
- Test the OBD2 Port: Plug in your OBD2 scanner to see if it now connects and functions properly.
4.2 Repairing Bent or Broken Pins
Bent or broken pins can prevent proper contact between the OBD2 port and the diagnostic tool. Here’s how to address this issue:
- Straighten Bent Pins: Use a small, fine tool (such as a needle-nose plier or a pin) to carefully straighten any bent pins. Be gentle to avoid breaking them.
- Replace Broken Pins: If a pin is broken, you may need to replace the entire OBD2 port. You can purchase a replacement port online or from an auto parts store.
- Clean Corroded Pins: Use a contact cleaner to remove any corrosion from the pins. A small brush can also help to clean the pins.
4.3 Fixing Wiring Problems
Wiring problems can range from simple disconnections to more complex breaks or shorts. Here’s how to troubleshoot and fix wiring issues:
- Inspect the Wiring: Visually inspect the wiring connected to the OBD2 port. Look for any signs of damage, such as cuts, frays, or melted insulation.
- Check the Connectors: Ensure that the connectors are securely attached to the OBD2 port and the vehicle’s computer. Clean any corroded terminals with contact cleaner.
- Repair Damaged Wires: If you find a damaged wire, you can repair it by splicing in a new section of wire. Use crimp connectors or solder to make a secure connection.
- Use a Wiring Diagram: Refer to the wiring diagram for your 2004 Acura TL to ensure you’re connecting the wires correctly.
4.4 Resolving Grounding Issues
A poor ground connection can prevent the OBD2 port from functioning correctly. Here’s how to resolve grounding issues:
- Locate Ground Points: Identify the ground points associated with the OBD2 port. These are typically located on the vehicle’s chassis.
- Inspect Ground Connections: Check the ground connections for corrosion or looseness. Clean any corroded connections with a wire brush and contact cleaner.
- Tighten Ground Connections: Ensure that the ground connections are tight and secure.
- Add Additional Ground Wire: If necessary, you can add an additional ground wire to improve the connection.
4.5 When to Seek Professional Help
While many OBD2 port issues can be resolved with DIY troubleshooting, some problems may require professional assistance. Consider seeking help from a qualified mechanic if:
- You’re not comfortable working with electrical systems.
- You’ve tried the troubleshooting steps and are still unable to resolve the issue.
- The problem appears to be related to the vehicle’s computer or CAN bus system.
5. Advanced Diagnostic Techniques for the 04 TL OBD2 Port
For more complex issues with your 04 TL OBD2 port, advanced diagnostic techniques may be necessary. These techniques often require specialized tools and a deeper understanding of automotive electrical systems.
5.1 Using an Oscilloscope for Signal Analysis
An oscilloscope is a powerful tool that allows you to visualize electrical signals. It can be used to analyze the signals on the CAN bus and other circuits connected to the OBD2 port. Here’s how to use an oscilloscope:
- Connect the Oscilloscope: Connect the oscilloscope probes to the CAN bus wires (pins 6 and 14) on the OBD2 port.
- Set the Time and Voltage Scales: Adjust the time and voltage scales on the oscilloscope to display the CAN bus signals clearly.
- Analyze the Waveforms: Look for any abnormalities in the waveforms, such as missing signals, distorted signals, or excessive noise.
- Interpret the Results: Use the oscilloscope’s analysis tools to measure the voltage levels, frequency, and pulse width of the signals. Compare these measurements to the specifications in the vehicle’s service manual.
According to a study by the National Automotive Service Task Force (NASTF), oscilloscopes are essential for diagnosing complex electrical issues in modern vehicles. They allow technicians to see the electrical signals in real-time, making it easier to identify problems that would be difficult to detect with a multimeter alone.
5.2 Checking the CAN Bus System
The CAN bus system is a critical part of the OBD2 system, as it allows the vehicle’s computer to communicate with the diagnostic tool. Here’s how to check the CAN bus system:
- Check the CAN Bus Resistors: The CAN bus system uses resistors to terminate the bus and prevent signal reflections. Use a multimeter to check the resistance between pins 6 and 14 on the OBD2 port. You should see a reading of approximately 60 ohms.
- Inspect the CAN Bus Wiring: Look for any signs of damage to the CAN bus wiring, such as cuts, frays, or corrosion.
- Use a CAN Bus Analyzer: A CAN bus analyzer is a specialized tool that allows you to monitor the data traffic on the CAN bus. It can be used to identify any errors or communication problems.
5.3 Diagnosing Communication Errors
Communication errors can occur when the vehicle’s computer is unable to communicate with the diagnostic tool. Here’s how to diagnose communication errors:
- Check the Diagnostic Tool: Ensure that the diagnostic tool is compatible with your 2004 Acura TL and that it is properly configured.
- Check the OBD2 Port Wiring: Inspect the wiring connected to the OBD2 port for any signs of damage or corrosion.
- Check the Vehicle’s Computer: If the problem persists, there may be an issue with the vehicle’s computer. This may require professional diagnosis and repair.
5.4 Using Scan Tools for Advanced Diagnostics
Advanced scan tools offer features beyond basic code reading and clearing. These tools can perform a variety of advanced diagnostic functions, such as:
- Actuator Testing: Allows you to activate and test various components, such as fuel injectors, solenoids, and relays.
- Data Logging: Records real-time data from the vehicle’s sensors, allowing you to analyze performance over time.
- Module Programming: Allows you to reprogram or update the software in the vehicle’s computer modules.
5.5 Importance of Wiring Diagrams
Wiring diagrams are essential for advanced diagnostics. They provide detailed information about the wiring and connections in the vehicle’s electrical system. Here’s how to use wiring diagrams effectively:
- Obtain the Correct Wiring Diagram: Ensure that you have the correct wiring diagram for your 2004 Acura TL.
- Understand the Symbols: Familiarize yourself with the symbols used in the wiring diagram.
- Trace the Wiring: Use the wiring diagram to trace the wiring connected to the OBD2 port and other components.
- Identify Components: Use the wiring diagram to identify the location of various components, such as fuses, relays, and sensors.
6. Maintaining Your 04 TL OBD2 Port for Optimal Performance
Proper maintenance of your 04 TL OBD2 port is crucial for ensuring its longevity and reliability. Here are some tips for maintaining your OBD2 port.
6.1 Keeping the Port Clean and Free of Debris
Dirt, dust, and debris can accumulate in the OBD2 port, leading to poor connections and communication issues. Here’s how to keep the port clean:
- Use a Dust Cover: When not in use, cover the OBD2 port with a dust cover to prevent debris from entering.
- Clean the Port Regularly: Use a small brush or a can of compressed air to clean the port regularly.
- Avoid Spilling Liquids: Be careful not to spill any liquids near the OBD2 port, as this can cause corrosion and damage.
6.2 Protecting the Port from Physical Damage
Physical damage to the OBD2 port can result in bent pins, broken connectors, and other issues. Here’s how to protect the port from physical damage:
- Handle Diagnostic Tools Carefully: When plugging in or unplugging diagnostic tools, handle them carefully to avoid bending the pins.
- Avoid Kicking or Bumping the Port: Be mindful of the location of the OBD2 port and avoid kicking or bumping it.
- Secure Loose Wires: If there are any loose wires near the OBD2 port, secure them to prevent them from being pulled or damaged.
6.3 Preventing Corrosion
Corrosion can build up on the pins of the OBD2 port, leading to poor electrical contact. Here’s how to prevent corrosion:
- Use a Contact Cleaner: Apply a contact cleaner to the pins of the OBD2 port to remove any corrosion.
- Apply Dielectric Grease: Apply a small amount of dielectric grease to the pins to protect them from corrosion.
- Store the Vehicle Properly: If you’re storing your vehicle for an extended period, store it in a dry, well-ventilated area to prevent corrosion.
6.4 Regular Inspections
Regularly inspect the OBD2 port for any signs of damage or corrosion. This will allow you to identify and address any issues before they become more serious.
6.5 Using Quality Diagnostic Tools
Using high-quality diagnostic tools can help prevent damage to the OBD2 port. Low-quality tools may have poorly designed connectors that can damage the pins or cause other issues.
7. Benefits of Using MERCEDES-DIAGNOSTIC-TOOL.EDU.VN for OBD2 Diagnostics
MERCEDES-DIAGNOSTIC-TOOL.EDU.VN offers a range of benefits for diagnosing issues with your 04 TL OBD2 port and beyond. Our comprehensive resources and expert support ensure you can maintain your Mercedes-Benz with confidence.
7.1 Access to Expert Advice and Support
At MERCEDES-DIAGNOSTIC-TOOL.EDU.VN, we provide access to expert advice and support from experienced technicians. Whether you have a specific question about your OBD2 port or need help diagnosing a complex issue, our team is here to assist you.
7.2 Comprehensive Diagnostic Guides
Our website features comprehensive diagnostic guides that cover a wide range of OBD2-related issues. These guides provide step-by-step instructions, troubleshooting tips, and helpful diagrams to assist you in diagnosing and resolving problems.
7.3 Latest Information on OBD2 Technology
We stay up-to-date with the latest advancements in OBD2 technology, ensuring that our resources are accurate and relevant. From new diagnostic tools to updated protocols, we provide the information you need to stay ahead of the curve.
7.4 Community Forum and Knowledge Sharing
Join our community forum to connect with other Mercedes-Benz owners and share your experiences. Our forum is a great place to ask questions, exchange tips, and learn from others.
7.5 Cost-Effective Solutions
Diagnosing and resolving OBD2 issues yourself can save you money on costly repairs. Our resources and support empower you to take control of your vehicle’s maintenance and avoid unnecessary expenses.
8. Common OBD2 Codes and Their Meanings for Your 04 TL
Understanding common OBD2 codes can help you quickly identify and address issues with your 04 TL. Here are some of the most frequent codes and their meanings.
8.1 P0300: Random/Multiple Cylinder Misfire Detected
This code indicates that the engine is experiencing misfires in one or more cylinders. Possible causes include faulty spark plugs, ignition coils, fuel injectors, or vacuum leaks.
8.2 P0171: System Too Lean (Bank 1)
This code suggests that the engine is running lean, meaning there is too much air and not enough fuel in the air-fuel mixture. This can be caused by vacuum leaks, a faulty oxygen sensor, or a clogged fuel filter.
8.3 P0420: Catalyst System Efficiency Below Threshold (Bank 1)
This code indicates that the catalytic converter is not functioning efficiently. It may be caused by a faulty catalytic converter, oxygen sensor, or exhaust leak.
8.4 P0113: Intake Air Temperature Sensor Circuit High Input
This code suggests that the intake air temperature (IAT) sensor is sending a high voltage signal to the computer. This can be caused by a faulty IAT sensor or wiring issue.
8.5 P0505: Idle Air Control System Malfunction
This code indicates that there is a problem with the idle air control (IAC) system. This can be caused by a faulty IAC valve, vacuum leak, or throttle body issue.
8.6 How to Use OBD2 Codes for Diagnosis
- Read the Codes: Use an OBD2 scanner to read the diagnostic trouble codes stored in the vehicle’s computer.
- Research the Codes: Research the codes to understand their meanings and potential causes.
- Troubleshoot the System: Use the codes as a starting point for troubleshooting the system. Check the components and wiring associated with the codes.
- Repair the Problem: Repair the problem based on your troubleshooting findings.
- Clear the Codes: After repairing the problem, clear the codes and test the system to ensure that the problem is resolved.
9. OBD2 Scanner Recommendations for Mercedes-Benz Vehicles
Choosing the right OBD2 scanner is essential for effective diagnostics. Here are some recommended scanners for Mercedes-Benz vehicles, along with a comparison table.
9.1 Types of OBD2 Scanners
- Basic Code Readers: These scanners can read and clear basic diagnostic trouble codes.
- Enhanced Scanners: These scanners offer additional features, such as live data streaming, actuator testing, and advanced diagnostics.
- Professional Scanners: These scanners are designed for professional technicians and offer the most comprehensive features and capabilities.
9.2 Recommended Scanners
- Autel MaxiCOM MK906BT: A professional-grade scanner with advanced features and capabilities.
- Launch X431 V+: A versatile scanner that supports a wide range of vehicles and diagnostic functions.
- iCarsoft MB II: A scanner specifically designed for Mercedes-Benz vehicles, offering comprehensive diagnostics and special functions.
9.3 Comparison Table of OBD2 Scanners
| Feature | Autel MaxiCOM MK906BT | Launch X431 V+ | iCarsoft MB II |
|---|---|---|---|
| Code Reading | Yes | Yes | Yes |
| Code Clearing | Yes | Yes | Yes |
| Live Data | Yes | Yes | Yes |
| Actuator Testing | Yes | Yes | Yes |
| Special Functions | Yes | Yes | Yes |
| Vehicle Support | Wide | Wide | Mercedes-Benz |
| Price Range | $$$ | $$$ | $$ |
9.4 Factors to Consider When Choosing a Scanner
- Vehicle Compatibility: Ensure that the scanner is compatible with your Mercedes-Benz model and year.
- Features: Consider the features that are important to you, such as live data streaming, actuator testing, and special functions.
- Price: Set a budget and choose a scanner that offers the best value for your money.
- Ease of Use: Look for a scanner that is easy to use and has a user-friendly interface.
10. Frequently Asked Questions (FAQ) About the 04 TL OBD2 Port
Here are some frequently asked questions about the 04 TL OBD2 port, along with detailed answers.
10.1 What is the OBD2 port used for?
The OBD2 port is used to access the vehicle’s computer system for diagnostics and monitoring. It allows technicians and car owners to read diagnostic trouble codes, monitor real-time data, and perform emission tests.
10.2 Where is the OBD2 port located in a 2004 Acura TL?
The OBD2 port in a 2004 Acura TL is typically located under the dashboard on the driver’s side, near the steering column or center console.
10.3 How do I check if my OBD2 port is working?
You can check if your OBD2 port is working by plugging in a diagnostic tool and seeing if it connects and communicates with the vehicle’s computer. You can also use a multimeter to check for power and ground at the port.
10.4 What does it mean when my OBD2 scanner won’t connect?
If your OBD2 scanner won’t connect, it could be due to a blown fuse, wiring issue, faulty OBD2 port, or communication problem with the vehicle’s computer.
10.5 Can I use any OBD2 scanner on my 2004 Acura TL?
While most OBD2 scanners are compatible with the 2004 Acura TL, it’s essential to ensure that the scanner supports the OBD2 protocols used by your vehicle.
10.6 How do I fix a damaged OBD2 port?
You can fix a damaged OBD2 port by straightening bent pins, replacing broken pins, cleaning corroded pins, and repairing wiring issues.
10.7 What is the CAN bus, and how does it relate to the OBD2 port?
The CAN (Controller Area Network) bus is a communication system that allows the vehicle’s computer to communicate with the diagnostic tool through the OBD2 port.
10.8 How do I prevent corrosion on my OBD2 port?
You can prevent corrosion on your OBD2 port by using a contact cleaner, applying dielectric grease, and storing the vehicle properly.
10.9 When should I seek professional help for OBD2 port issues?
You should seek professional help for OBD2 port issues if you’re not comfortable working with electrical systems, you’ve tried the troubleshooting steps and are still unable to resolve the issue, or the problem appears to be related to the vehicle’s computer or CAN bus system.
10.10 Where can I find more information about OBD2 diagnostics?
You can find more information about OBD2 diagnostics on websites like MERCEDES-DIAGNOSTIC-TOOL.EDU.VN, which offers comprehensive diagnostic guides and expert support.
Understanding and maintaining your 04 TL OBD2 port is essential for keeping your vehicle running smoothly. By following the tips and techniques outlined in this guide, you can diagnose and resolve common issues, saving time and money on costly repairs.
Ready to take control of your Mercedes-Benz diagnostics? Contact us at MERCEDES-DIAGNOSTIC-TOOL.EDU.VN for expert guidance and support. Our team is here to help you with all your OBD2-related needs. Reach us at 789 Oak Avenue, Miami, FL 33101, United States, or via Whatsapp at +1 (641) 206-8880. Visit our website at MERCEDES-DIAGNOSTIC-TOOL.EDU.VN for more information.