Determining whether your 1999 Civic Hatch is OBD1 or OBD2 is crucial for diagnostics and modifications; it’s generally OBD2 but can vary based on engine swaps. At MERCEDES-DIAGNOSTIC-TOOL.EDU.VN, we provide expert insights and solutions to ensure you have the correct information for your vehicle’s needs. Understanding these standards will help you diagnose issues effectively and choose the right components for your Honda Civic.
Contents
- 2. Understanding OBD1 and OBD2 Systems
- 2.1 What is OBD1?
- 2.2 What is OBD2?
- 2.3 Key Differences Between OBD1 and OBD2
- 2.4 Why the Change from OBD1 to OBD2?
- 3. Determining If Your 1999 Civic Hatch is OBD1 or OBD2
- 3.1 Check the Vehicle’s Manufacturing Date
- 3.2 Inspect the Diagnostic Connector
- 3.3 Check the ECU (Engine Control Unit)
- 3.4 Use a Scan Tool
- 3.5 Look for an Under-Hood Emissions Sticker
- 3.6 Verify Engine Swap History
- 3.7 Consult a Mechanic
- 4. Common Scenarios: OBD1 vs. OBD2 in 1999 Civic Hatch
- 4.1 Stock 1999 Civic Hatch (OBD2)
- 4.2 Engine Swaps
- 4.3 ECU Modifications or Swaps
- 4.4 Wiring Harness Issues
- 4.5 Aftermarket Parts
- 4.6 Identifying OBD Status After Modifications
- 4.7 Addressing Common Issues
- 5. Step-by-Step Guide to Checking OBD Compatibility
- 5.1 Visual Inspection of the Diagnostic Connector
- 5.2 Using an OBD2 Scan Tool
- 5.3 Checking the ECU Code
- 5.4 Inspecting the Under-Hood Emissions Sticker
- 5.5 Verifying Engine Swap History
- 5.6 Consulting a Professional Mechanic
- 5.7 Troubleshooting Common Issues
- 6. OBD2 Scan Tools: Choosing the Right One
- 6.1 Basic OBD2 Scan Tools
- 6.2 Mid-Range OBD2 Scan Tools
- 6.3 Advanced OBD2 Scan Tools
- 6.4 Wireless OBD2 Adapters
- 6.5 Key Features to Look For
- 6.6 Popular OBD2 Scan Tool Brands
- 6.7 Tips for Using an OBD2 Scan Tool
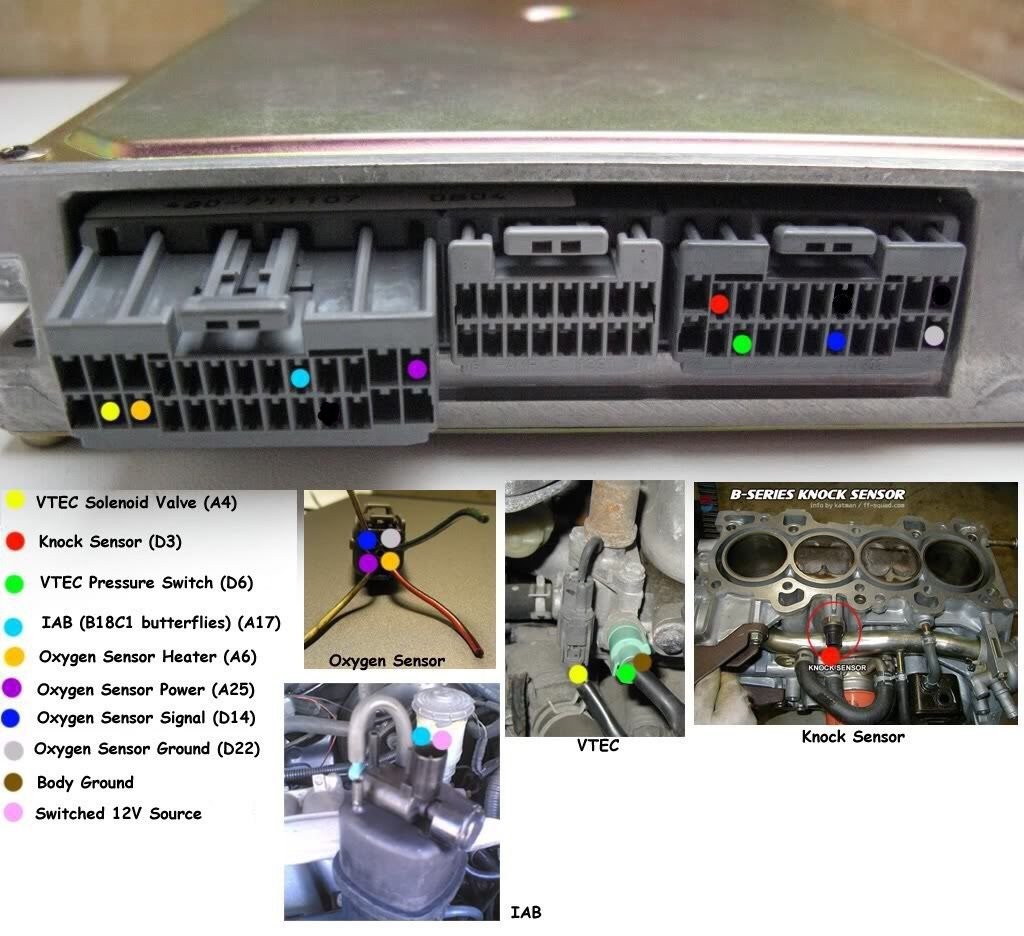
- 7. Wiring Diagrams and Pinouts for OBD1 and OBD2
- 7.1 OBD1 Wiring Diagrams
- 7.2 OBD2 Wiring Diagrams
- 7.3 Common OBD1 Pinouts
- 7.4 Common OBD2 Pinouts
- 7.5 Using Wiring Diagrams for Diagnostics
- 7.6 Tips for Working with Wiring Diagrams
- 8. Troubleshooting Common OBD Issues in 1999 Civic Hatch
- 8.1 Check Engine Light On
- 8.2 Inability to Connect with Scan Tool
- 8.3 Inaccurate Sensor Readings
- 8.4 Emission Failures
- 8.5 Common DTCs and Their Solutions
- 8.6 Tips for Effective Troubleshooting
- 9. Upgrading from OBD1 to OBD2: Is It Possible?
- 9.1 Factors to Consider
- 9.2 Steps Involved in the Upgrade
- 9.3 Required Components
- 9.4 Potential Challenges
- 9.5 Alternatives to Upgrading
- 9.6 When Upgrading Might Be Considered
- 10. OBD and Engine Swaps: What You Need to Know
- 10.1 Matching OBD Systems
- 10.2 Wiring Considerations
- 10.3 Sensor Compatibility
- 10.4 ECU Compatibility
- 10.5 Emission Compliance
- 10.6 Legal Considerations
- 10.7 Common Engine Swap Scenarios
- 10.8 Tips for a Successful Engine Swap
- 11. Benefits of Using MERCEDES-DIAGNOSTIC-TOOL.EDU.VN
- 11.1 Expert Guidance
- 11.2 Comprehensive Solutions
- 11.3 Reliable Support
- 11.4 Cost-Effective Solutions
- 11.5 Time-Saving Resources
- 11.6 Enhanced Vehicle Performance
- 11.7 Commitment to Quality
- 12. Frequently Asked Questions (FAQ)
- 12.1 How Can I Tell if My 1999 Civic Hatch Is OBD1 or OBD2?
- 12.2 What Does OBD Stand For?
- 12.3 Can I Use an OBD1 Scan Tool on an OBD2 Car?
- 12.4 What Is the Difference Between OBD2A and OBD2B?
- 12.5 What Is a DTC?
- 12.6 How Do I Clear a DTC?
Want to dive deeper into the specifics of your Civic’s diagnostic system? Connect with us via Whatsapp at +1 (641) 206-8880 or visit our website at MERCEDES-DIAGNOSTIC-TOOL.EDU.VN for personalized assistance. We’re here to help you navigate the complexities of your vehicle’s technology, offering solutions tailored to your specific needs.
2. Understanding OBD1 and OBD2 Systems
On-Board Diagnostics (OBD) systems are crucial for modern vehicles, helping to monitor and regulate engine performance. There are significant differences between OBD1 and OBD2, especially concerning their diagnostic capabilities.
2.1 What is OBD1?
OBD1 (On-Board Diagnostics 1) was an early automotive diagnostic system used before the mid-1990s. According to a report by the Society of Automotive Engineers (SAE), OBD1 systems varied significantly between manufacturers, lacking standardization. Key characteristics include:
- Manufacturer-Specific: Each car manufacturer had its own diagnostic connector, trouble codes, and communication protocols.
- Limited Parameters: Monitored fewer engine parameters compared to OBD2.
- Basic Functionality: Provided basic diagnostic information but was less comprehensive.
- No Standardization: The absence of uniform standards made it difficult for technicians to diagnose issues across different car brands.
2.2 What is OBD2?
OBD2 (On-Board Diagnostics 2) is a standardized system introduced in the mid-1990s to provide comprehensive vehicle diagnostics. According to the EPA, OBD2 was mandated in the United States for all cars manufactured from 1996 onward to reduce emissions. Key features include:
- Standardized Connector: Uses a standard 16-pin Data Link Connector (DLC).
- Comprehensive Monitoring: Monitors a wide range of engine and emissions-related parameters.
- Standardized Trouble Codes: Uses a set of standardized Diagnostic Trouble Codes (DTCs).
- Enhanced Diagnostics: Provides more detailed and accurate diagnostic information.
- Improved Emission Control: Helps in identifying and addressing emission-related issues more effectively.
2.3 Key Differences Between OBD1 and OBD2
The transition from OBD1 to OBD2 brought significant improvements in vehicle diagnostics. Here’s a comparison:
| Feature | OBD1 | OBD2 |
|---|---|---|
| Standardization | Non-standardized | Standardized |
| Connector | Manufacturer-specific | Standard 16-pin DLC |
| Trouble Codes | Manufacturer-specific | Standardized DTCs |
| Parameters Monitored | Limited | Comprehensive |
| Data Access | Varied, often requiring specific tools | Standardized access using scan tools |
| Emission Focus | Basic | Enhanced, with a focus on emission-related issues |
| Year Introduced | Before mid-1990s | 1996 onwards (in the US) |
| Diagnostic Depth | Limited | More detailed and accurate |
| Compatibility | Incompatible between manufacturers | Compatible across different car brands with standard tools |
2.4 Why the Change from OBD1 to OBD2?
The shift from OBD1 to OBD2 was driven by the need for more effective emission control and improved diagnostic capabilities. According to research from the California Air Resources Board (CARB), the standardized OBD2 system made it easier to monitor vehicle emissions and identify problems that could lead to increased pollution. The key reasons include:
- Emission Standards: Stricter emission standards required more comprehensive monitoring.
- Diagnostic Accuracy: The need for more accurate and reliable diagnostic information.
- Ease of Use: Standardized systems made it easier for technicians to diagnose and repair vehicles.
- Environmental Protection: Enhanced emission control helped in protecting the environment.
- Consumer Benefits: Improved diagnostics led to better vehicle performance and longevity.
3. Determining If Your 1999 Civic Hatch is OBD1 or OBD2
Identifying whether your 1999 Civic Hatch is OBD1 or OBD2 is essential for accurate diagnostics and repairs. The 1999 model year falls squarely within the OBD2 era, but engine swaps or modifications can sometimes create confusion. Here’s how to determine your car’s OBD status:
3.1 Check the Vehicle’s Manufacturing Date
- Location: Look for a sticker on the driver’s side doorjamb.
- Date: If the manufacturing date is 1996 or later, it is likely an OBD2 system.
- Exceptions: Some early 1996 models might have OBD1, but this is rare.
3.2 Inspect the Diagnostic Connector
- Location: Typically found under the dashboard on the driver’s side.
- OBD2 Connector: A standard 16-pin connector.
- OBD1 Connector: Varies by manufacturer and is not a standard 16-pin.
 OBD2 Connector Location
3.3 Check the ECU (Engine Control Unit)
- Location: Usually under the passenger seat or in the engine bay.
- ECU Code: Look for a code on the ECU label. OBD1 ECUs have different codes than OBD2 ECUs.
- Reference Materials: Consult online resources or a trusted mechanic for ECU code identification.
3.4 Use a Scan Tool
- OBD2 Scan Tool: Plug an OBD2 scan tool into the diagnostic connector.
- Communication: If the scan tool communicates with the car’s computer, it is OBD2.
- No Communication: If the scan tool cannot connect, it might be an OBD1 system or have a wiring issue.
3.5 Look for an Under-Hood Emissions Sticker
- Location: Found under the hood.
- Compliance: Indicates whether the vehicle is OBD2 compliant.
- Information: Provides details on the car’s emission control systems.
3.6 Verify Engine Swap History
- Previous Owners: Check with previous owners about any engine swaps or modifications.
- Documentation: Review any available service records.
- Visual Inspection: Look for signs of engine modifications that might affect the OBD system.
3.7 Consult a Mechanic
- Expertise: A professional mechanic can quickly identify the OBD system.
- Diagnostic Services: They can perform a thorough diagnostic check.
- Reliable Information: Provides accurate and reliable information.
4. Common Scenarios: OBD1 vs. OBD2 in 1999 Civic Hatch
While the 1999 Civic Hatch is typically OBD2, several scenarios might lead to uncertainty. Understanding these common situations can help you accurately identify your vehicle’s OBD status.
4.1 Stock 1999 Civic Hatch (OBD2)
- Factory Configuration: Most 1999 Civic Hatches come standard with an OBD2 system.
- Standard Features: Includes a 16-pin DLC, standardized DTCs, and comprehensive emission monitoring.
- Troubleshooting: If your Civic has all these features and no modifications, it is almost certainly OBD2.
4.2 Engine Swaps
- OBD1 Engine into 1999 Civic: If a previous owner swapped in an older OBD1 engine, the car might still retain the OBD2 connector but lack full OBD2 functionality.
- Symptoms: Diagnostic trouble codes might be inaccurate or missing.
- Solutions: Requires careful inspection and possibly rewiring to ensure proper OBD2 compatibility.
4.3 ECU Modifications or Swaps
- Chipped ECU: Using a chipped OBD1 ECU in a 1999 Civic can disable certain OBD2 functions.
- ECU Replacement: Swapping the stock ECU with an aftermarket or different model ECU can affect OBD compliance.
- Verification: Check the ECU code and consult with a professional to ensure compatibility.
4.4 Wiring Harness Issues
- Damaged Harness: A damaged or improperly installed wiring harness can cause OBD2 issues.
- Symptoms: Inability to connect with a scan tool, inaccurate sensor readings.
- Inspection: Thoroughly inspect the wiring harness for damage or incorrect connections.
4.5 Aftermarket Parts
- Non-Compliant Parts: Some aftermarket parts, such as headers or catalytic converters, might not be OBD2 compliant.
- Emission Problems: Can trigger check engine lights and emission failures.
- Compatibility: Ensure all aftermarket parts are OBD2 compliant for your specific vehicle.
4.6 Identifying OBD Status After Modifications
- Visual Inspection: Check for any visible signs of modifications, such as different connectors or wiring.
- Scan Tool Test: Use an OBD2 scan tool to read diagnostic codes and check sensor data.
- Professional Review: Consult with a trusted mechanic who specializes in Honda vehicles.
4.7 Addressing Common Issues
- Wiring Problems: Repair or replace damaged wiring to ensure proper OBD2 functionality.
- ECU Compatibility: Ensure the ECU is correctly programmed and compatible with the car’s engine and sensors.
- Aftermarket Parts: Replace any non-compliant parts with OBD2-approved components.
5. Step-by-Step Guide to Checking OBD Compatibility
Verifying OBD compatibility is a straightforward process. Follow these steps to determine whether your 1999 Civic Hatch is OBD1 or OBD2.
5.1 Visual Inspection of the Diagnostic Connector
- Locate the Connector: Find the diagnostic connector, usually under the dashboard on the driver’s side.
- Identify the Connector Type:
- OBD2: A standard 16-pin connector.
- OBD1: A non-standard connector that varies by manufacturer.
- Note the Pin Configuration: Check if all 16 pins are present, which is typical for OBD2.
5.2 Using an OBD2 Scan Tool
- Purchase/Borrow a Scan Tool: Acquire an OBD2 scan tool from an auto parts store or borrow one.
- Connect the Scan Tool: Plug the scan tool into the diagnostic connector.
- Turn on the Ignition: Turn the ignition key to the “ON” position without starting the engine.
- Initiate Communication: Follow the scan tool’s instructions to initiate communication with the car’s computer.
- Read Diagnostic Codes: If the scan tool connects and reads diagnostic codes, your car is likely OBD2 compliant.
- Troubleshoot Connection Issues: If the scan tool fails to connect, check the connector, wiring, and scan tool compatibility.
5.3 Checking the ECU Code
- Locate the ECU: Find the ECU, usually under the passenger seat or in the engine bay.
- Identify the ECU Code: Look for a code on the ECU label (e.g., P28, P72).
- Reference the Code: Consult online resources or a trusted mechanic to identify the ECU type.
- Verify Compatibility: Ensure the ECU is compatible with your car’s engine and OBD system.
5.4 Inspecting the Under-Hood Emissions Sticker
- Locate the Sticker: Find the emissions sticker under the hood.
- Read the Information: Check if the sticker indicates OBD2 compliance.
- Verify Compliance: Ensure the sticker matches your car’s model year and engine type.
5.5 Verifying Engine Swap History
- Gather Information: Talk to previous owners about any engine swaps or modifications.
- Review Documentation: Check service records for engine-related work.
- Visual Inspection: Look for signs of engine modifications, such as different engine parts or wiring.
5.6 Consulting a Professional Mechanic
- Schedule an Appointment: Take your car to a trusted mechanic who specializes in Honda vehicles.
- Request a Diagnostic Check: Ask the mechanic to perform a thorough diagnostic check to identify the OBD system.
- Discuss Findings: Review the mechanic’s findings and ask any questions you may have.
5.7 Troubleshooting Common Issues
- Wiring Problems: Repair or replace damaged wiring to ensure proper OBD2 functionality.
- ECU Compatibility: Ensure the ECU is correctly programmed and compatible with the car’s engine and sensors.
- Aftermarket Parts: Replace any non-compliant parts with OBD2-approved components.
6. OBD2 Scan Tools: Choosing the Right One
Selecting the right OBD2 scan tool is crucial for diagnosing and maintaining your 1999 Civic Hatch. Different scan tools offer varying features and capabilities, so choosing the right one depends on your needs and budget.
6.1 Basic OBD2 Scan Tools
- Functionality: Reads and clears diagnostic trouble codes (DTCs).
- Cost: Generally inexpensive, ranging from $20 to $50.
- Suitable For: Simple diagnostics, such as checking and clearing check engine lights.
- Limitations: Limited functionality, may not provide detailed information.
6.2 Mid-Range OBD2 Scan Tools
- Functionality: Reads and clears DTCs, displays live sensor data, performs basic tests.
- Cost: Moderate price range, typically between $50 and $200.
- Suitable For: Intermediate diagnostics, such as monitoring engine performance and diagnosing common issues.
- Features: Includes features like freeze frame data, O2 sensor testing, and enhanced code definitions.
 Mid-Range OBD2 Scan Tool
6.3 Advanced OBD2 Scan Tools
- Functionality: Reads and clears DTCs, displays live sensor data, performs advanced tests, provides bi-directional control.
- Cost: Higher price range, usually from $200 to $1000+.
- Suitable For: Professional mechanics and advanced DIYers, capable of performing in-depth diagnostics.
- Features: Includes features like ABS diagnostics, SRS diagnostics, module programming, and advanced graphing capabilities.
6.4 Wireless OBD2 Adapters
- Functionality: Connects to your smartphone or tablet via Bluetooth or Wi-Fi, using a dedicated app to read and clear DTCs, display live data.
- Cost: Varies, typically between $30 and $200.
- Suitable For: Convenient diagnostics using your mobile device, suitable for both basic and advanced users depending on the app.
- Features: Can offer a wide range of functions depending on the app, including data logging, custom dashboards, and advanced diagnostics.
6.5 Key Features to Look For
- Code Definitions: Provides clear and accurate descriptions of DTCs.
- Live Data: Displays real-time sensor data for monitoring engine performance.
- Freeze Frame Data: Captures sensor data at the moment a DTC is triggered.
- O2 Sensor Testing: Allows you to test the functionality of O2 sensors.
- Bi-Directional Control: Enables you to control certain vehicle functions for testing purposes.
- ABS/SRS Diagnostics: Provides diagnostic capabilities for ABS and SRS systems.
- Software Updates: Ensures the scan tool is up-to-date with the latest vehicle models and diagnostic information.
- User Interface: Easy-to-use interface for navigating menus and accessing data.
- Compatibility: Compatible with your car’s make and model.
6.6 Popular OBD2 Scan Tool Brands
- Autel: Known for high-quality, professional-grade scan tools.
- Launch: Offers a wide range of scan tools for both DIYers and professionals.
- Innova: Popular for affordable and reliable scan tools.
- BlueDriver: Known for its wireless OBD2 adapters and user-friendly app.
- Actron: Offers a variety of scan tools for different needs and budgets.
6.7 Tips for Using an OBD2 Scan Tool
- Read the Manual: Familiarize yourself with the scan tool’s functions and features.
- Connect Properly: Ensure the scan tool is securely connected to the diagnostic connector.
- Turn on the Ignition: Turn the ignition key to the “ON” position without starting the engine.
- Follow Instructions: Follow the scan tool’s instructions for reading diagnostic codes and performing tests.
- Research Codes: Research diagnostic codes to understand the underlying issues.
- Clear Codes Carefully: Only clear codes after addressing the underlying issues.
- Monitor Data: Use live data to monitor engine performance and identify potential problems.
7. Wiring Diagrams and Pinouts for OBD1 and OBD2
Understanding wiring diagrams and pinouts is essential for diagnosing and repairing OBD1 and OBD2 systems. These diagrams provide detailed information on the connections between the ECU, sensors, and other components.
7.1 OBD1 Wiring Diagrams
- Availability: OBD1 wiring diagrams can be found in factory service manuals and online resources.
- Complexity: Varies depending on the specific car model and year.
- Key Components: Includes ECU pinouts, sensor locations, and wiring routes.
- Resources: Websites like Honda-Tech and FF-Squad offer valuable OBD1 wiring diagrams.
7.2 OBD2 Wiring Diagrams
- Availability: OBD2 wiring diagrams are also available in factory service manuals and online databases.
- Standardization: OBD2 systems are more standardized, but wiring can still vary between models.
- Key Components: Includes DLC pinouts, sensor wiring, and ECU connections.
- Resources: Websites like AllData and Mitchell OnDemand provide comprehensive OBD2 wiring diagrams.
7.3 Common OBD1 Pinouts
- ECU Pinouts: Detailed diagrams showing the function of each pin on the ECU connector.
- Sensor Pinouts: Information on the wiring and connections for various sensors, such as O2 sensors, TPS, and MAP sensors.
- Diagnostic Connector Pinouts: Diagrams showing the function of each pin on the OBD1 diagnostic connector.
7.4 Common OBD2 Pinouts
- DLC Pinouts: Standard 16-pin DLC pinout with descriptions of each pin’s function.
- ECU Pinouts: Detailed diagrams showing the function of each pin on the ECU connector for OBD2 systems.
- Sensor Pinouts: Information on the wiring and connections for OBD2-specific sensors, such as the CKF sensor and secondary O2 sensor.
7.5 Using Wiring Diagrams for Diagnostics
- Identify the Problem: Determine the specific issue you are trying to diagnose.
- Locate the Diagram: Find the appropriate wiring diagram for your car’s model and year.
- Trace the Circuit: Use the diagram to trace the circuit related to the problem.
- Check Connections: Inspect connections for damage, corrosion, or loose wires.
- Test Components: Use a multimeter to test the voltage, resistance, and continuity of components.
- Repair or Replace: Repair or replace any faulty wiring or components.
- Verify the Repair: Use a scan tool to verify that the issue has been resolved.
7.6 Tips for Working with Wiring Diagrams
- Use a Multimeter: A multimeter is essential for testing wiring and components.
- Inspect Carefully: Thoroughly inspect wiring and connections for damage.
- Label Wires: Label wires before disconnecting them to avoid confusion.
- Take Pictures: Take pictures of wiring and connections before disassembly.
- Consult Resources: Use online resources and service manuals for additional information.
- Seek Professional Help: If you are unsure about any aspect of the repair, seek professional help.
8. Troubleshooting Common OBD Issues in 1999 Civic Hatch
Addressing common OBD issues in your 1999 Civic Hatch requires a systematic approach. Here are some common problems and how to troubleshoot them:
8.1 Check Engine Light On
- Symptoms: The check engine light (CEL) is illuminated on the dashboard.
- Causes: Can be triggered by various issues, such as faulty sensors, emission problems, or engine malfunctions.
- Troubleshooting:
- Read Diagnostic Codes: Use an OBD2 scan tool to read diagnostic trouble codes (DTCs).
- Research Codes: Research the codes to understand the underlying issues.
- Inspect Components: Inspect the related components for damage or malfunction.
- Repair or Replace: Repair or replace any faulty components.
- Clear Codes: Clear the codes after addressing the issues.
- Monitor: Monitor the car to ensure the CEL does not return.
8.2 Inability to Connect with Scan Tool
- Symptoms: The OBD2 scan tool cannot connect with the car’s computer.
- Causes: Can be due to a faulty diagnostic connector, wiring issues, or ECU problems.
- Troubleshooting:
- Check Connector: Inspect the diagnostic connector for damage or corrosion.
- Verify Power: Ensure the connector is receiving power.
- Inspect Wiring: Check the wiring between the connector and the ECU.
- Test Scan Tool: Test the scan tool on another car to ensure it is working properly.
- Check ECU: Verify that the ECU is functioning correctly.
8.3 Inaccurate Sensor Readings
- Symptoms: Sensor readings are inaccurate or inconsistent.
- Causes: Can be due to faulty sensors, wiring issues, or ECU problems.
- Troubleshooting:
- Identify Sensor: Determine which sensor is providing inaccurate readings.
- Inspect Wiring: Check the wiring between the sensor and the ECU.
- Test Sensor: Use a multimeter to test the sensor’s voltage, resistance, and continuity.
- Replace Sensor: Replace the sensor if it is faulty.
- Verify Readings: Verify that the sensor readings are accurate after replacement.
8.4 Emission Failures
- Symptoms: The car fails an emission test.
- Causes: Can be due to various issues, such as a faulty catalytic converter, O2 sensors, or EVAP system.
- Troubleshooting:
- Read Diagnostic Codes: Use an OBD2 scan tool to read diagnostic codes.
- Inspect Components: Inspect the emission-related components for damage or malfunction.
- Test Components: Test the components using a multimeter or scan tool.
- Repair or Replace: Repair or replace any faulty components.
- Retest: Retest the car to ensure it passes the emission test.
8.5 Common DTCs and Their Solutions
- P0420 (Catalyst System Efficiency Below Threshold):
- Cause: Faulty catalytic converter or O2 sensors.
- Solution: Replace the catalytic converter or O2 sensors.
- P0171 (System Too Lean Bank 1):
- Cause: Vacuum leak, faulty O2 sensor, or fuel delivery issue.
- Solution: Check for vacuum leaks, replace the O2 sensor, or inspect the fuel system.
- P0300 (Random Misfire Detected):
- Cause: Faulty spark plugs, ignition coils, or fuel injectors.
- Solution: Replace the spark plugs, ignition coils, or fuel injectors.
- P0135 (O2 Sensor Heater Circuit Malfunction):
- Cause: Faulty O2 sensor or wiring issue.
- Solution: Replace the O2 sensor or repair the wiring.
8.6 Tips for Effective Troubleshooting
- Be Systematic: Follow a systematic approach to diagnose and repair OBD issues.
- Gather Information: Gather as much information as possible about the problem.
- Consult Resources: Use online resources, service manuals, and wiring diagrams.
- Test Components: Test components using a multimeter or scan tool.
- Verify Repairs: Verify that the repairs have resolved the issues.
- Seek Professional Help: If you are unsure about any aspect of the repair, seek professional help.
9. Upgrading from OBD1 to OBD2: Is It Possible?
Upgrading from OBD1 to OBD2 in a 1999 Civic Hatch is technically possible but often impractical. The complexity and cost involved usually outweigh the benefits, especially considering the 1999 model year typically comes with OBD2.
9.1 Factors to Consider
- Cost: The cost of upgrading can be significant, including parts, labor, and potential modifications.
- Complexity: Requires extensive rewiring and modifications to the car’s electrical system.
- Compatibility: Ensuring compatibility between the new OBD2 system and the car’s components can be challenging.
- Benefits: The benefits may not justify the cost and effort, especially if the car is already running well.
9.2 Steps Involved in the Upgrade
- Replace ECU: Replace the OBD1 ECU with an OBD2 ECU.
- Rewire Harness: Rewire the engine and chassis wiring harness to match the OBD2 system.
- Install Sensors: Install any additional sensors required for OBD2 compliance.
- Replace Diagnostic Connector: Replace the OBD1 diagnostic connector with a standard 16-pin DLC.
- Calibrate System: Calibrate the new OBD2 system to ensure proper functionality.
9.3 Required Components
- OBD2 ECU: An OBD2-compliant engine control unit.
- Wiring Harness: An OBD2-compatible wiring harness.
- OBD2 Sensors: Any additional sensors required for OBD2, such as a CKF sensor or secondary O2 sensor.
- DLC Connector: A standard 16-pin Data Link Connector.
9.4 Potential Challenges
- Wiring Complexity: Rewiring the car’s electrical system can be complex and time-consuming.
- Sensor Compatibility: Ensuring compatibility between the new sensors and the car’s components can be challenging.
- ECU Programming: The new ECU may need to be programmed to match the car’s engine and specifications.
- Emission Compliance: Ensuring the upgraded system meets emission standards can be difficult.
9.5 Alternatives to Upgrading
- Keep OBD1 System: If the car is running well and you are comfortable with the OBD1 system, you may choose to keep it.
- Address Specific Issues: Focus on addressing any specific issues with the OBD1 system, such as faulty sensors or wiring problems.
- Consider Engine Swap: If you are looking for improved performance, consider an engine swap with a newer, OBD2-compliant engine.
9.6 When Upgrading Might Be Considered
- Engine Swap: If you are performing an engine swap with a newer engine, upgrading to OBD2 might be necessary.
- Emission Requirements: If you need to meet stricter emission requirements, upgrading to OBD2 might be required.
- Improved Diagnostics: If you want to take advantage of the enhanced diagnostic capabilities of OBD2.
10. OBD and Engine Swaps: What You Need to Know
When performing an engine swap in a 1999 Civic Hatch, understanding the implications for the OBD system is crucial. Ensuring that the new engine and OBD system are compatible is essential for proper functionality and emission compliance.
10.1 Matching OBD Systems
- OBD1 Engine into OBD2 Car: If you are installing an OBD1 engine into an OBD2 car, you may need to make modifications to ensure compatibility.
- OBD2 Engine into OBD1 Car: If you are installing an OBD2 engine into an OBD1 car, you will need to upgrade the car’s electrical system to support OBD2.
- Best Practice: Ideally, the engine and OBD system should match the car’s original configuration.
10.2 Wiring Considerations
- Harness Modifications: Engine swaps often require modifications to the wiring harness to ensure proper connections.
- Pinout Diagrams: Use wiring diagrams to identify and connect the correct wires.
- Professional Installation: Consider hiring a professional to handle the wiring modifications.
10.3 Sensor Compatibility
- OBD2 Sensors: Ensure that all necessary OBD2 sensors are installed and functioning properly.
- Sensor Locations: Verify that the sensor locations are compatible with the new engine.
- Sensor Wiring: Check the sensor wiring to ensure proper connections.
10.4 ECU Compatibility
- ECU Selection: Choose an ECU that is compatible with the new engine and OBD system.
- ECU Programming: The ECU may need to be programmed to match the engine’s specifications.
- Aftermarket ECUs: Consider using an aftermarket ECU for greater flexibility and control.
10.5 Emission Compliance
- Emission Standards: Ensure that the engine swap meets all applicable emission standards.
- Catalytic Converter: Use a catalytic converter that is compatible with the new engine and OBD system.
- O2 Sensors: Verify that the O2 sensors are functioning properly.
10.6 Legal Considerations
- Local Laws: Check local laws and regulations regarding engine swaps and emission requirements.
- Inspection Requirements: Be aware of any inspection requirements for engine swaps.
- Documentation: Keep detailed records of the engine swap, including all modifications and parts used.
10.7 Common Engine Swap Scenarios
- B-Series Engine Swap: A popular engine swap for the 1999 Civic Hatch is the B-series engine. Ensure that the B-series engine and OBD system are compatible with your car’s electrical system.
- K-Series Engine Swap: Another popular option is the K-series engine. This swap typically requires more extensive modifications to the car’s chassis and electrical system.
10.8 Tips for a Successful Engine Swap
- Plan Ahead: Plan the engine swap carefully, considering all aspects of the project.
- Research: Research the engine and OBD system thoroughly.
- Gather Parts: Gather all necessary parts before starting the project.
- Seek Professional Help: Consider hiring a professional to assist with the engine swap.
- Test Thoroughly: Test the new engine and OBD system thoroughly after the swap is complete.
11. Benefits of Using MERCEDES-DIAGNOSTIC-TOOL.EDU.VN
At MERCEDES-DIAGNOSTIC-TOOL.EDU.VN, we provide comprehensive solutions tailored to meet your diagnostic and modification needs. We offer detailed information, expert guidance, and reliable support to ensure your 1999 Civic Hatch performs at its best.
11.1 Expert Guidance
- Knowledgeable Staff: Our team comprises experienced technicians and automotive experts.
- Accurate Information: We provide accurate and up-to-date information on OBD systems, engine swaps, and diagnostics.
- Personalized Advice: We offer personalized advice to help you make informed decisions.
11.2 Comprehensive Solutions
- Diagnostic Tools: We offer a wide range of diagnostic tools to help you troubleshoot OBD issues.
- Wiring Diagrams: We provide detailed wiring diagrams for OBD1 and OBD2 systems.
- Technical Support: We offer technical support to assist you with your diagnostic and modification projects.
11.3 Reliable Support
- Customer Service: Our customer service team is available to answer your questions and provide assistance.
- Online Resources: We offer a variety of online resources, including articles, videos, and forums.
- Community Support: Join our community to connect with other car enthusiasts and share your experiences.
11.4 Cost-Effective Solutions
- Affordable Tools: We offer a range of affordable diagnostic tools to fit your budget.
- DIY Guides: Our DIY guides help you save money by performing your own repairs and modifications.
- Expert Advice: Our expert advice helps you avoid costly mistakes.
11.5 Time-Saving Resources
- Quick Diagnostics: Our diagnostic tools help you quickly identify OBD issues.
- Easy-to-Follow Guides: Our easy-to-follow guides save you time by providing clear and concise instructions.
- Expert Assistance: Our expert assistance helps you resolve issues quickly and efficiently.
11.6 Enhanced Vehicle Performance
- Improved Diagnostics: Our diagnostic tools help you identify and resolve performance issues.
- Optimized Modifications: Our expert advice helps you optimize your modifications for improved performance.
- Reliable Performance: Our comprehensive solutions help you ensure reliable vehicle performance.
11.7 Commitment to Quality
- High-Quality Products: We offer high-quality diagnostic tools and resources.
- Accurate Information: We are committed to providing accurate and reliable information.
- Customer Satisfaction: We are dedicated to customer satisfaction.
12. Frequently Asked Questions (FAQ)
12.1 How Can I Tell if My 1999 Civic Hatch Is OBD1 or OBD2?
Check the diagnostic connector: OBD2 is a standard 16-pin connector, while OBD1 varies. Also, check the ECU code and the under-hood emissions sticker.
12.2 What Does OBD Stand For?
OBD stands for On-Board Diagnostics. It is a system used in vehicles to monitor and diagnose engine and emission-related issues.
12.3 Can I Use an OBD1 Scan Tool on an OBD2 Car?
No, OBD1 and OBD2 scan tools are not interchangeable. You must use an OBD2 scan tool on an OBD2 car.
12.4 What Is the Difference Between OBD2A and OBD2B?
OBD2A and OBD2B are different versions of the OBD2 system used in Honda vehicles. OBD2A was used from 1996-1998, while OBD2B was used from 1999-2001. They have different ECU connectors and wiring configurations.
12.5 What Is a DTC?
DTC stands for Diagnostic Trouble Code. It is a code stored in the car’s computer that indicates a specific issue or malfunction.
12.6 How Do I Clear a DTC?
You can clear a DTC using an OBD2 scan tool. Connect the scan tool to the diagnostic connector, read the codes, and then select the option to clear them.