The 2005 Ford E150 Obd2 Fuse is located in the interior fuse panel, typically under the dashboard on the driver’s side. Having a clear understanding of your vehicle’s fuse layout is crucial for diagnosing and resolving electrical issues. MERCEDES-DIAGNOSTIC-TOOL.EDU.VN provides comprehensive guides and resources, empowering you to troubleshoot your vehicle efficiently. Our website offers detailed information and support for maintaining and repairing your vehicle.
Contents
- 1. Understanding the 2005 Ford E150 Fuse Box Layout
- 1.1 Passenger Compartment Fuse Panel
- 1.2 Power Distribution Box
- 1.3 Relay Modules
- 1.4 Why Knowing the Fuse Box Location Matters
- 2. Identifying the OBD2 Fuse
- 2.1 What is the OBD2 Port?
- 2.2 Location of the OBD2 Fuse in the 2005 Ford E150
- 2.3 Symptoms of a Blown OBD2 Fuse
- 2.4 How to Check the OBD2 Fuse
- 2.5 Tools Needed for Fuse Inspection
- 3. Replacing a Blown Fuse in Your Ford E150
- 3.1 Steps to Replace a Blown Fuse
- 3.2 Selecting the Correct Replacement Fuse
- 3.3 What to Do If the Fuse Blows Again
- 4. Common Electrical Issues in the 2005 Ford E150
- 4.1 Headlight Fuse Problems
- 4.2 Radio Fuse Problems
- 4.3 Cigar Lighter Fuse Problems
- 4.4 Fuel Pump Fuse Problems
- 4.5 Air Conditioning Fuse Problems
- 5. Using Diagnostic Tools for Advanced Troubleshooting
- 5.1 Importance of OBD2 Scanners
- 5.2 Types of OBD2 Scanners
- 5.3 How to Use an OBD2 Scanner
- 5.4 Choosing the Right OBD2 Scanner for Your Needs
- 6. Maintenance Tips to Prevent Fuse Problems
- 6.1 Regular Electrical System Checks
- 6.2 Avoiding Overloading Circuits
- 6.3 Keeping the Battery in Good Condition
- 6.4 Checking and Cleaning Fuses Regularly
- 6.5 Professional Maintenance Services
- 7. Understanding Fuse Diagrams and Symbols
- 7.1 Common Fuse Symbols
- 7.2 How to Read a Fuse Diagram
- 7.3 Importance of Keeping a Fuse Diagram Handy
- 8. Safety Precautions When Working with Fuses
- 8.1 Disconnecting the Battery
- 8.2 Using Insulated Tools
- 8.3 Avoiding Water and Moisture
- 8.4 Proper Disposal of Blown Fuses
- 9. Advanced Electrical Troubleshooting Techniques
- 9.1 Using a Multimeter for Circuit Testing
- 9.2 Checking for Short Circuits
- 9.3 Diagnosing Open Circuits
- 9.4 Wire Tracing Techniques
- 10. When to Seek Professional Help
- 10.1 Complex Electrical Problems
- 10.2 Recurring Fuse Problems
- 10.3 Safety Concerns
- 11. Utilizing Online Resources and Communities
- 11.1 Online Forums and Communities
- 11.2 Online Repair Manuals and Guides
- 11.3 Video Tutorials
- 11.4 Official Ford Resources
- 12. Frequently Asked Questions (FAQ) About 2005 Ford E150 Fuses
- 12.1 What does the OBD2 fuse protect in my 2005 Ford E150?
- 12.2 Where is the fuse box located in a 2005 Ford E150?
- 12.3 How do I know if my OBD2 fuse is blown?
- 12.4 Can I use a higher amperage fuse if I don’t have the exact one?
- 12.5 What tools do I need to check a fuse?
- 12.6 What does it mean if a fuse keeps blowing?
- 12.7 Is it safe to replace a fuse myself?
- 12.8 What should I do if I can’t find the fuse diagram?
- 12.9 How often should I check my car’s fuses?
- 12.10 Where can I buy replacement fuses for my 2005 Ford E150?
1. Understanding the 2005 Ford E150 Fuse Box Layout
The 2005 Ford E-150 has multiple fuse boxes, each protecting different electrical circuits. Knowing their locations and functions is essential for effective troubleshooting.
1.1 Passenger Compartment Fuse Panel
This fuse panel is usually located beneath the dashboard on the driver’s side. It houses fuses that protect interior circuits and some critical engine-related components.
Fuse Location and Function
| Fuse Number | Amperage | Circuit Protected |
|—|—|—|
| 1 | 5A | 4-Wheel Anti-lock Brake System (4WABS) module |
| 2 | 10A | Remote Keyless Entry (RKE), O/D cancel |
| 3 | 15A | Trip computer, Radio, Video Cassette Player (VCP) |
| 4 | 15A | Courtesy lamps |
| 5 | 30A | Power lock switches, Power locks without RKE |
| 6 | 10A | Brake-shift interlock, Daytime Running Lamps (DRL) module |
| 7 | 10A | Multi-function switch, Turn signals |
| 8 | 30A | Radio capacitor(s) Ignition coil, Powertrain Control Module (PCM) diode, PCM power relay |
| 9 | 5A | Wiper control module |
| 10 | 20A | Main light switch, Park lamps, License lamp (external lamps), Multi-function switch (flash-to-pass) |
| 11 | 15A | Multi-function switch (hazards), Brake lamp switch, Brake lamps |
| 12 | 15A | Back-up lamps, Auxiliary battery relay [gasoline engine only], Trailer tow relay |
| 13 | 15A | Blend door actuator, Function selector switch |
| 14 | 5A | Instrument cluster |
| 15 | 5A | Trailer battery charge relay, Cluster |
| 16 | 30A | Power seats |
| 17 | 5A | Power mirrors |
| 20 | 10A | Restraints |
| 22 | 15A | Memory power radio, Rear seat video control unit, Battery saver relay, Instrument cluster, Courtesy lamp relay, Accessory delay relay |
| 23 | 20A | Power locks w/RKE |
| 25 | 10A | Left headlamp (low beam) |
| 26 | 20A | Cigar lighter, Diagnostics |
| 27 | 5A | Radio |
| 30 | 15A | Headlamps (high beam indicator) |
| 31 | 10A | Right headlamp (low beam) |
| 32 | 20A | Power point #1 (instrument panel) |
| 33 | 10A | Start relay |
| 36 | 5A | Instrument illumination |
| 39 | 10A | Trailer tow electric brake, Center High-Mounted Stop Lamp (CHMSL), Brake lamps |
| 40 | 20A | Power point #2 (2nd row seating position – driver side) |
| 41 | 30A | Modified vehicle |
| 42 | Circuit breaker ATO | Power windows |
| 44 | Circuit breaker ATO | Wiper/washer |
1.2 Power Distribution Box
The power distribution box is located in the engine compartment. It contains high-amperage fuses and relays that manage the vehicle’s primary electrical systems.
Fuse Location and Function
| Fuse Number | Amperage | Circuit Protected |
|---|---|---|
| 1 | Diode ATO | Powertrain Control Module (PCM) diode |
| 3 | 10A | Daytime Running Lamps (DRL) module, A/C clutch |
| 5 | 15A | Horn relay |
| 6 | 2A | Brake pressure switch |
| 7 | 60A | Ignition switch, Fuse panel, Accessory delay |
| 8 | 40A | Trailer battery charge relay |
| 9 | 50A | Modified vehicle power |
| 10 | 30A | Electric brake controller |
| 11 | 60A | 4-Wheel Anti-lock Brake System (4WABS) |
| 12 | 60A | I/P fuses 29, 34, 35, 40 and 41 |
| 13 | 20A | Fuel pump relay |
| 14 | 50A | Auxiliary blower relay |
| 15 | 30A | Main light switch |
| 17 | 50A | Blower motor relay (blower motor) |
| 18 | 60A | Engine compartment fuses 3, 5, 23 and 26, Instrument panel fuses 26 and 32, Start relay |
| 19 | 50A | IDM relay [Diesel engine only] |
| 20 | 60A | Auxiliary battery relay [gasoline engine only], PDB fuses 8 and 24 |
| 21 | 30A | PCM power relay, PDB fuse 27 |
| 22 | 60A | I/P fuses 4, 5, 10, 11, 16, 17, 22 and 23, Circuit breaker 44 |
| 24 | 20A | Trailer tow running lamps and back-up lamp relays |
| 26 | 20A | Trailer tow turn signals |
| 27 | 10A | PCM |
| A | Relay | Fuel pump relay |
| B | Relay | Horn relay |
| C | Relay | Trailer back-up lamps relay |
| D | Relay | Trailer running lamps relay |
| E | Relay | Trailer battery charge relay |
| F | Relay | IDM relay [Diesel only] |
| G | Relay | PCM relay |
| H | Relay | Blower motor relay |
| J | Relay | Accessory delay relay |
| K | Relay | Start relay |
1.3 Relay Modules
The 2005 Ford E-150 also includes relay modules, one located in the instrument panel and another in the engine compartment. These modules control various electrical functions by switching circuits on and off.
Instrument Panel Relay Module
| Relay Number | Description |
|---|---|
| 1 | Interior lamps |
| 2 | Open |
| 3 | Open |
| 4 | Battery saver |
Engine Compartment Relay Module
| Relay Number | Description |
|---|---|
| 1 | PCM back-up lamp |
| 2 | A/C control |
| 3 | Trailer tow right turn |
| 4 | Trailer tow left turn |
Understanding these layouts will help you quickly identify and address fuse-related issues.
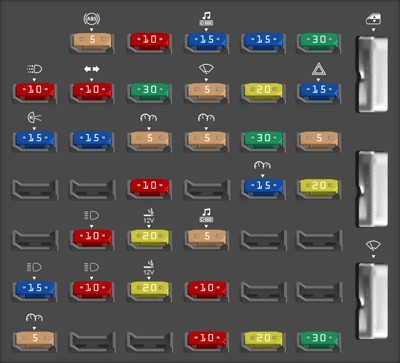 2005 Ford E-150 passenger compartment fuse panel
1.4 Why Knowing the Fuse Box Location Matters
Knowing the exact location of each fuse box can save you time and prevent unnecessary repairs. Consulting your owner’s manual for specific diagrams is always a good practice.
2. Identifying the OBD2 Fuse
The OBD2 (On-Board Diagnostics II) port is crucial for diagnosing vehicle issues. The fuse protecting this port is vital for ensuring proper communication with diagnostic tools.
2.1 What is the OBD2 Port?
The OBD2 port allows mechanics and vehicle owners to access the vehicle’s computer to diagnose problems. It is typically located under the dashboard on the driver’s side.
2.2 Location of the OBD2 Fuse in the 2005 Ford E150
The OBD2 fuse in the 2005 Ford E-150 is usually located in the passenger compartment fuse panel. Refer to your vehicle’s fuse diagram to identify the specific fuse number, which is often labeled for diagnostics or cigar lighter.
2.3 Symptoms of a Blown OBD2 Fuse
A blown OBD2 fuse can prevent your diagnostic scanner from connecting to the vehicle’s computer. Common symptoms include:
- Diagnostic scanner not powering on when connected to the OBD2 port.
- Inability to read diagnostic trouble codes (DTCs).
- Communication errors between the scanner and the vehicle’s computer.
2.4 How to Check the OBD2 Fuse
- Locate the Fuse Panel: Find the passenger compartment fuse panel, typically under the dashboard on the driver’s side.
- Identify the Fuse: Use the fuse box diagram to locate the OBD2 fuse. It may be labeled “Diagnostics” or “Cigar Lighter”.
- Inspect the Fuse: Remove the fuse and visually inspect it. If the wire inside is broken or the fuse appears burnt, it needs to be replaced.
- Use a Multimeter: For a more accurate check, use a multimeter to test the fuse for continuity. If there is no continuity, the fuse is blown.
2.5 Tools Needed for Fuse Inspection
- Fuse Puller: A fuse puller makes it easier to remove fuses without damaging them.
- Multimeter: A multimeter is used to check the continuity of the fuse.
- Flashlight: A flashlight helps you see inside the fuse panel.
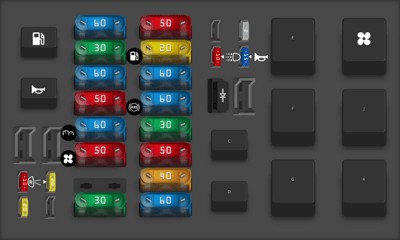 Ford E-150 power distribution box diagram
3. Replacing a Blown Fuse in Your Ford E150
Replacing a blown fuse is a straightforward process. Here’s how to do it safely and effectively.
3.1 Steps to Replace a Blown Fuse
- Turn Off the Ignition: Before replacing any fuse, turn off the vehicle’s ignition to prevent electrical shorts.
- Locate the Fuse Panel: Find the appropriate fuse panel using your owner’s manual or the diagrams mentioned earlier.
- Identify the Blown Fuse: Use the fuse diagram to locate the blown fuse.
- Remove the Fuse: Use a fuse puller to gently remove the blown fuse.
- Install a New Fuse: Replace the blown fuse with a new fuse of the same amperage. Using a higher amperage fuse can damage the electrical system.
- Test the Circuit: After replacing the fuse, turn on the ignition and test the circuit to ensure it is working correctly.
3.2 Selecting the Correct Replacement Fuse
- Amperage Rating: Always use a replacement fuse with the same amperage rating as the original.
- Fuse Type: Ensure the replacement fuse is the correct type (e.g., MINI, ATO, MAXI).
- Brand Quality: Opt for reputable brands to ensure the fuse’s reliability and performance.
3.3 What to Do If the Fuse Blows Again
If the new fuse blows immediately after replacement, it indicates a more significant electrical problem in the circuit. Consult a qualified mechanic to diagnose and repair the underlying issue. Continuing to replace fuses without addressing the root cause can lead to further damage.
4. Common Electrical Issues in the 2005 Ford E150
The 2005 Ford E-150 can experience several common electrical issues that may require fuse replacement or further diagnostics.
4.1 Headlight Fuse Problems
Headlight issues are common and can be caused by a blown fuse. If your headlights are not working, check fuses 25 and 31 in the passenger compartment fuse panel, which are responsible for the left and right low beams, respectively. A blown fuse may indicate a short circuit or an overloaded circuit due to faulty wiring or a failing headlight bulb.
4.2 Radio Fuse Problems
If your radio is not working, check fuse 3 in the passenger compartment fuse panel. Radio issues can be caused by a blown fuse, which may be due to wiring problems, a faulty radio unit, or an overloaded circuit.
4.3 Cigar Lighter Fuse Problems
The cigar lighter and diagnostic port often share the same fuse, which is fuse 26 in the passenger compartment fuse panel. If neither the cigar lighter nor the OBD2 port is working, check this fuse first. Common causes include overloading the circuit with too many devices or a short circuit in the cigar lighter socket.
4.4 Fuel Pump Fuse Problems
A blown fuel pump fuse can cause the engine to stall or not start. Check fuse 13 in the power distribution box. A faulty fuel pump, a clogged fuel filter, or wiring issues can cause this fuse to blow.
4.5 Air Conditioning Fuse Problems
If your air conditioning is not working, check fuse 3 in the power distribution box. This fuse also protects the Daytime Running Lamps (DRL) module. A blown fuse can be caused by a faulty A/C compressor, a clogged condenser, or wiring problems.
 2005 Ford E-150 instrument panel relay module diagram
5. Using Diagnostic Tools for Advanced Troubleshooting
While checking and replacing fuses can resolve many electrical issues, more complex problems may require advanced diagnostic tools.
5.1 Importance of OBD2 Scanners
OBD2 scanners are essential tools for diagnosing a wide range of vehicle issues. They allow you to read diagnostic trouble codes (DTCs), monitor engine performance, and troubleshoot electrical problems.
5.2 Types of OBD2 Scanners
- Basic Scanners: These scanners read and clear DTCs.
- Advanced Scanners: These scanners offer additional features such as live data streaming, bidirectional control, and advanced diagnostic capabilities.
- Professional Scanners: These high-end scanners are used by mechanics and offer comprehensive diagnostic functions.
5.3 How to Use an OBD2 Scanner
- Connect the Scanner: Plug the OBD2 scanner into the OBD2 port, usually located under the dashboard on the driver’s side.
- Turn On the Ignition: Turn the ignition to the “on” position without starting the engine.
- Follow the Scanner Instructions: Follow the scanner’s instructions to read DTCs and perform diagnostic tests.
- Interpret the Codes: Use the DTCs to identify the source of the problem and take appropriate action.
5.4 Choosing the Right OBD2 Scanner for Your Needs
Consider your budget and diagnostic needs when choosing an OBD2 scanner. Basic scanners are suitable for simple tasks, while advanced scanners are better for more complex troubleshooting. Ensure the scanner is compatible with your 2005 Ford E-150.
6. Maintenance Tips to Prevent Fuse Problems
Preventing fuse problems through regular maintenance can save you time and money.
6.1 Regular Electrical System Checks
Perform regular checks of your vehicle’s electrical system to identify potential problems early. This includes inspecting wiring, connectors, and electrical components for damage or corrosion.
6.2 Avoiding Overloading Circuits
Avoid overloading circuits by using accessories that draw excessive power. This is particularly important for the cigar lighter circuit, which is often used to power multiple devices.
6.3 Keeping the Battery in Good Condition
A weak or failing battery can cause electrical problems and blown fuses. Ensure your battery is properly maintained and replaced when necessary.
6.4 Checking and Cleaning Fuses Regularly
Inspect your vehicle’s fuses periodically for signs of corrosion or damage. Clean the fuse contacts with a wire brush or electrical contact cleaner to ensure good electrical connections.
6.5 Professional Maintenance Services
Consider having your vehicle’s electrical system professionally inspected and maintained. Mechanics can identify potential problems and perform preventative maintenance to keep your vehicle running smoothly.
 2005 Ford E-150 engine compartment relay module diagram
7. Understanding Fuse Diagrams and Symbols
Fuse diagrams and symbols provide valuable information about the function and location of each fuse.
7.1 Common Fuse Symbols
- Headlight: Indicates a fuse that protects the headlight circuit.
- Radio: Indicates a fuse that protects the radio circuit.
- Cigar Lighter: Indicates a fuse that protects the cigar lighter circuit.
- OBD2: Indicates a fuse that protects the diagnostic port circuit.
7.2 How to Read a Fuse Diagram
Fuse diagrams typically show the location of each fuse and its corresponding amperage rating. They may also include symbols indicating the function of each fuse. Refer to your vehicle’s owner’s manual for specific fuse diagrams.
7.3 Importance of Keeping a Fuse Diagram Handy
Keeping a fuse diagram in your vehicle can save you time and frustration when troubleshooting electrical problems. Store a copy in your glove compartment or download a digital version to your smartphone.
8. Safety Precautions When Working with Fuses
Working with fuses involves some risks, so it’s essential to take appropriate safety precautions.
8.1 Disconnecting the Battery
Before working on any electrical components, disconnect the negative terminal of the battery to prevent electrical shocks and short circuits.
8.2 Using Insulated Tools
Use insulated tools when working with fuses and electrical components to protect yourself from electrical shocks.
8.3 Avoiding Water and Moisture
Avoid working with fuses and electrical components in wet or damp conditions to prevent electrical shocks and corrosion.
8.4 Proper Disposal of Blown Fuses
Dispose of blown fuses properly to prevent environmental contamination. Check with your local waste management authorities for guidance on proper disposal methods.
9. Advanced Electrical Troubleshooting Techniques
For complex electrical issues, advanced troubleshooting techniques may be necessary.
9.1 Using a Multimeter for Circuit Testing
A multimeter is a versatile tool for testing electrical circuits. It can be used to measure voltage, current, and resistance to identify faults and diagnose problems.
9.2 Checking for Short Circuits
A short circuit occurs when electricity flows along an unintended path, often due to damaged wiring or faulty components. Use a multimeter to check for short circuits by measuring the resistance between a circuit and ground.
9.3 Diagnosing Open Circuits
An open circuit occurs when there is a break in the electrical path, preventing current from flowing. Use a multimeter to check for open circuits by measuring the voltage at different points in the circuit.
9.4 Wire Tracing Techniques
Wire tracing involves following wires to identify their connections and locate faults. Use a wire tracer tool to send a signal through the wire and trace its path.
10. When to Seek Professional Help
While many fuse-related issues can be resolved with basic troubleshooting, some problems require professional expertise.
10.1 Complex Electrical Problems
If you are unable to diagnose or resolve an electrical problem on your own, it’s best to seek professional help from a qualified mechanic.
10.2 Recurring Fuse Problems
If you experience recurring fuse problems despite replacing the fuses, it indicates a more significant electrical issue that requires professional attention.
10.3 Safety Concerns
If you are uncomfortable working with electrical components or have safety concerns, it’s best to leave the repairs to a qualified mechanic.
11. Utilizing Online Resources and Communities
Online resources and communities can provide valuable information and support for troubleshooting fuse and electrical problems.
11.1 Online Forums and Communities
Join online forums and communities dedicated to the 2005 Ford E-150 to share experiences, ask questions, and get advice from other owners and mechanics.
11.2 Online Repair Manuals and Guides
Access online repair manuals and guides for detailed information on troubleshooting and repairing electrical problems in your 2005 Ford E-150.
11.3 Video Tutorials
Watch video tutorials on YouTube and other platforms for step-by-step instructions on troubleshooting fuse and electrical problems.
11.4 Official Ford Resources
Refer to the official Ford website for technical service bulletins (TSBs), recall information, and other resources related to your 2005 Ford E-150.
12. Frequently Asked Questions (FAQ) About 2005 Ford E150 Fuses
12.1 What does the OBD2 fuse protect in my 2005 Ford E150?
The OBD2 fuse protects the diagnostic port, ensuring it can communicate with diagnostic tools.
12.2 Where is the fuse box located in a 2005 Ford E150?
The fuse box is typically located under the dashboard on the driver’s side.
12.3 How do I know if my OBD2 fuse is blown?
If your diagnostic scanner won’t power on or connect when plugged into the OBD2 port, the fuse may be blown.
12.4 Can I use a higher amperage fuse if I don’t have the exact one?
No, always use the same amperage rating to prevent electrical damage.
12.5 What tools do I need to check a fuse?
A fuse puller, multimeter, and flashlight are useful for checking fuses.
12.6 What does it mean if a fuse keeps blowing?
A frequently blowing fuse indicates a more serious electrical problem that needs professional diagnosis.
12.7 Is it safe to replace a fuse myself?
Yes, if you follow safety precautions like disconnecting the battery and using insulated tools.
12.8 What should I do if I can’t find the fuse diagram?
Check your owner’s manual or search online for a diagram specific to your vehicle.
12.9 How often should I check my car’s fuses?
Check your fuses regularly, especially if you notice any electrical issues.
12.10 Where can I buy replacement fuses for my 2005 Ford E150?
Replacement fuses are available at most auto parts stores.
Understanding and addressing fuse-related issues in your 2005 Ford E-150 can enhance your vehicle’s reliability and performance. Regular maintenance and careful troubleshooting are key to preventing electrical problems.
At MERCEDES-DIAGNOSTIC-TOOL.EDU.VN, we understand the importance of maintaining your vehicle’s performance. For expert guidance on diagnosing and resolving complex electrical issues, and for the latest information on diagnostic tools, services, and maintenance tips, contact us today. Our team is ready to assist you with all your vehicle diagnostic needs.
Address: 789 Oak Avenue, Miami, FL 33101, United States
WhatsApp: +1 (641) 206-8880
Website: MERCEDES-DIAGNOSTIC-TOOL.EDU.VN