The 2006 Ford E-250 4.6 Obd2 Fuse Location is typically found in the interior fuse panel, often located beneath the dashboard on the driver’s side or in the engine compartment; consulting your vehicle’s manual is crucial for the accurate fuse location to ensure proper diagnostics. Should you need more detailed fuse box diagrams or diagnostic assistance, MERCEDES-DIAGNOSTIC-TOOL.EDU.VN can provide you with the necessary information. Benefit from our in-depth resources for OBD2 system maintenance, and harness our expertise to properly troubleshoot your vehicle’s issues ensuring it is operating at its peak.
Contents
- 1. Understanding the Importance of the OBD2 Fuse Location in Your 2006 Ford E-250
- 1.1. Why Knowing the OBD2 Fuse Location Matters
- 1.2. Common Issues Related to the OBD2 Fuse
- 1.3. How This Knowledge Benefits You
- 2. Step-by-Step Guide to Locating the OBD2 Fuse in Your 2006 Ford E-250 4.6
- 2.1. Preparing to Locate the Fuse
- 2.2. Identifying the Fuse Box Locations
- 2.3. Detailed Steps for Finding the OBD2 Fuse
- 2.4. What to Do If You Can’t Find the Fuse
- 3. Detailed Fuse Box Locations and Diagrams for the 2006 Ford E-250 4.6
- 3.1. Passenger Compartment Fuse Panel
- 3.2. Power Distribution Box
- 3.3. Instrument Panel Relay Module
- 3.4. Engine Compartment Relay Module
- 4. Common Issues and Troubleshooting Tips
- 4.1. Diagnosing a Blown Fuse
- 4.2. Symptoms of a Bad OBD2 Fuse
- 4.3. Troubleshooting Steps
- 4.4. When to Seek Professional Help
- 5. Maintaining Your 2006 Ford E-250 4.6 OBD2 System
- 5.1. Regular Inspections
- 5.2. Preventative Measures
- 5.3. Choosing the Right Fuses
- 5.4. When to Replace Fuses
- 6. Understanding OBD2 Systems and Their Importance
- 6.1. What is an OBD2 System?
- 6.2. Benefits of an OBD2 System
- 6.3. Components of an OBD2 System
- 6.4. How to Use an OBD2 Scanner
- 7. Advanced Diagnostic Techniques for Your Ford E-250
- 7.1. Using Advanced Diagnostic Tools
- 7.2. Interpreting Live Data
- 7.3. Performing Component Testing
- 7.4. Understanding Freeze Frame Data
- 8. Common Ford E-250 4.6 Problems and Solutions
- 8.1. Engine Issues
- 8.2. Transmission Issues
- 8.3. Electrical Issues
- 8.4. Brake System Issues
- 9. Tips for Improving Your Vehicle’s Performance and Longevity
- 9.1. Regular Maintenance Schedule
- 9.2. Using Quality Parts
- 9.3. Driving Habits
- 9.4. Addressing Issues Promptly
- 10. Why Choose MERCEDES-DIAGNOSTIC-TOOL.EDU.VN for Your Diagnostic Needs
- 10.1. Expert Diagnostic Services
- 10.2. Genuine Mercedes-Benz Parts
- 10.3. Maintenance and Repair Services
- 10.4. Customer Satisfaction
- FAQ: 2006 Ford E-250 4.6 OBD2 Fuse Location
- 1. Where is the OBD2 port located on a 2006 Ford E-250?
- 2. What does the OBD2 fuse protect in my 2006 Ford E-250?
- 3. What size fuse does the OBD2 port use in a 2006 Ford E-250?
- 4. Can I use a higher amperage fuse if the recommended one keeps blowing?
- 5. What are the symptoms of a blown OBD2 fuse in my 2006 Ford E-250?
- 6. How do I check if the OBD2 fuse is blown in my 2006 Ford E-250?
- 7. What tools do I need to replace the OBD2 fuse in my 2006 Ford E-250?
- 8. Can I replace the OBD2 fuse myself, or do I need a professional?
- 9. What if the new OBD2 fuse blows immediately after I replace it in my 2006 Ford E-250?
- 10. Where can I find replacement fuses for my 2006 Ford E-250?
1. Understanding the Importance of the OBD2 Fuse Location in Your 2006 Ford E-250
1.1. Why Knowing the OBD2 Fuse Location Matters
Knowing the OBD2 fuse location in your 2006 Ford E-250 is crucial for troubleshooting electrical issues and ensuring accurate diagnostics. It helps maintain the reliability and longevity of your vehicle, which aligns with your goals as a Mercedes-Benz owner, technician, or enthusiast.
- Quick Troubleshooting: Quickly identify and replace a blown fuse to restore functionality to your OBD2 port, minimizing downtime.
- Preventing Further Damage: Addressing fuse issues promptly prevents potential damage to the vehicle’s electrical system.
- Accurate Diagnostics: A functioning OBD2 port is essential for diagnosing and resolving vehicle issues, ensuring accurate readings and effective repairs.
1.2. Common Issues Related to the OBD2 Fuse
Several issues can arise if the OBD2 fuse in your 2006 Ford E-250 is faulty, including the inability to read diagnostic codes or perform necessary maintenance tasks. Addressing these issues promptly is vital for vehicle health.
- OBD2 Scanner Not Powering On: The most common symptom is that your OBD2 scanner won’t power on when connected to the port.
- Inaccurate Diagnostic Readings: A blown fuse can lead to inaccurate or incomplete diagnostic readings, hindering effective troubleshooting.
- Communication Errors: You may experience communication errors between the scanner and the vehicle’s computer.
1.3. How This Knowledge Benefits You
As someone interested in vehicle maintenance, whether you’re a Mercedes-Benz owner, an independent technician, or an automotive enthusiast, understanding the OBD2 fuse location can save time and money on repairs. It also empowers you to take a proactive approach to vehicle maintenance.
- Cost Savings: Avoid unnecessary trips to the mechanic by addressing simple fuse issues yourself.
- Time Efficiency: Quickly locate and resolve the problem, getting your vehicle back on the road faster.
- Peace of Mind: Knowing you can handle basic troubleshooting tasks provides confidence in your vehicle maintenance capabilities.
2. Step-by-Step Guide to Locating the OBD2 Fuse in Your 2006 Ford E-250 4.6
2.1. Preparing to Locate the Fuse
Before you begin, gather the necessary tools and information to ensure a smooth and safe process. This includes your vehicle’s manual, a fuse puller, and replacement fuses.
- Vehicle’s Manual: Consult your 2006 Ford E-250 owner’s manual for the exact fuse location and specifications.
- Fuse Puller: Use a fuse puller to safely remove and replace fuses without damaging them or the fuse box.
- Replacement Fuses: Keep a set of replacement fuses of the correct amperage on hand.
2.2. Identifying the Fuse Box Locations
The 2006 Ford E-250 typically has multiple fuse boxes, but the OBD2 fuse is commonly located in one of two places: under the dashboard or in the engine compartment. Knowing both locations helps you narrow your search.
- Interior Fuse Panel: This is often located under the dashboard on the driver’s side. Look for a panel cover that you can easily remove.
- Engine Compartment Fuse Box: This box is usually under the hood, near the battery or on the fender wall.
2.3. Detailed Steps for Finding the OBD2 Fuse
Follow these steps to locate the OBD2 fuse in your 2006 Ford E-250, whether it’s in the interior fuse panel or the engine compartment fuse box.
-
Consult the Fuse Diagram:
- Interior Fuse Panel: Once you’ve located the interior fuse panel, remove the cover and consult the fuse diagram, which is usually printed on the inside of the cover or in your owner’s manual.
- Engine Compartment Fuse Box: Similarly, open the engine compartment fuse box and refer to the fuse diagram.
-
Identify the OBD2 Fuse:
- Look for a fuse labeled “OBD,” “Diagnostic,” or similar. The amperage rating is also usually indicated on the diagram.
-
Visually Inspect the Fuse:
- Once you’ve identified the fuse, visually inspect it. A blown fuse will have a broken filament or a dark, burnt appearance.
-
Use a Fuse Puller to Remove the Fuse:
- If the fuse appears blown, use a fuse puller to gently remove it from the fuse box.
-
Replace the Fuse:
- Insert a new fuse with the correct amperage rating into the slot. Ensure it fits snugly.
-
Test the OBD2 Port:
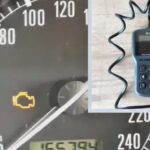
- After replacing the fuse, test the OBD2 port with a diagnostic scanner to ensure it’s working correctly.
2.4. What to Do If You Can’t Find the Fuse
If you’re unable to locate the OBD2 fuse using the steps above, consider these alternative solutions.
- Check the Owner’s Manual: The owner’s manual is your best resource for accurate fuse locations and diagrams.
- Consult Online Forums: Online automotive forums and communities can provide valuable insights and assistance from other Ford E-250 owners.
- Seek Professional Help: If you’re still unable to find the fuse, consult a professional mechanic or technician.
3. Detailed Fuse Box Locations and Diagrams for the 2006 Ford E-250 4.6
3.1. Passenger Compartment Fuse Panel
The passenger compartment fuse panel is commonly located beneath the dashboard on the driver’s side of your 2006 Ford E-250.
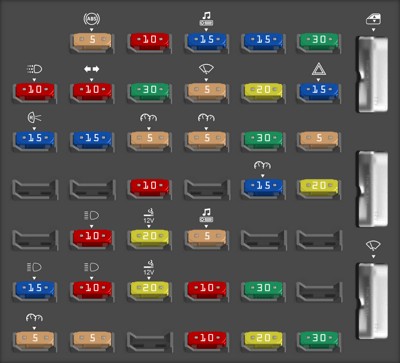 2006 Ford E-250 passenger compartment fuse panel diagram
Detailed Fuse List:
| Fuse No. | Amperage | Description |
|---|---|---|
| 1 | 5A | 4-Wheel Anti-lock Brake System (4WABS) module |
| 2 | 10A | Remote Keyless Entry (RKE), O/D cancel, IVD module |
| 3 | 15A | Trip computer, Radio, Overhead console |
| 4 | 15A | Courtesy lamps |
| 5 | 30A | Power lock switches, Power locks without RKE |
| 6 | 10A | Brake-shift interlock, Daytime Running Lamps (DRL) module |
| 7 | 10A | Multi-function switch, Turn signals |
| 8 | 30A | Radio capacitor(s), Ignition coil, Powertrain Control Module (PCM) diode, PCM power relay |
| 9 | 5A | Wiper control module |
| 10 | 20A | Main light switch, Park lamps, License lamp (external lamps), Multi-function switch (flash-to-pass) |
| 11 | 15A | Multi-function switch (hazards), Brake lamp switch, Brake lamps |
| 12 | 15A | Back-up lamps, Auxiliary battery relay [gasoline engine only] |
| 13 | 15A | Blend door actuator, Function selector switch |
| 14 | 5A | Instrument cluster |
| 15 | 5A | Trailer battery charge relay, Cluster |
| 16 | 30A | Power seats |
| 17 | 5A | Power mirrors |
| 20 | 10A | Restraints |
| 22 | 15A | Memory power radio, Battery saver relay, Instrument cluster, Courtesy lamp relay, Accessory delay relay |
| 23 | 20A | Power locks w/RKE |
| 25 | 10A | Left headlamp (low beam) |
| 26 | 20A | Cigar lighter, Diagnostics |
| 27 | 5A | Radio |
| 30 | 15A | Headlamps (high beam indicator) |
| 31 | 10A | Right headlamp (low beam) |
| 32 | 20A | Power point 1 (instrument panel) |
| 33 | 10A | Start relay |
| 34 | 30A | IP Body builder connector 3 |
| 36 | 5A | Instrument illumination |
| 37 | 5A | Airbag deactivation switch |
| 39 | 10A | Trailer tow electric brake, Center High-Mounted Stop Lamp (CHMSL), Brake lamps |
| 40 | 20A | Power point 2 (2nd row seating position – driver side) |
| 41 | 30A | Modified vehicle |
| 42 | Circuit breaker | Power windows |
| 44 | Circuit breaker | Wiper/washer |
3.2. Power Distribution Box
The power distribution box is located in the engine compartment of your 2006 Ford E-250, typically near the battery.
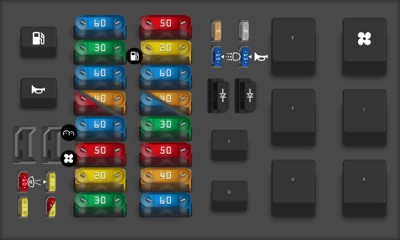 2006 Ford E-250 power distribution box diagram
Detailed Fuse and Relay List:
| Fuse/Relay No. | Type | Amperage | Description |
|---|---|---|---|
| 1 | Diode ATO | – | Powertrain Control Module (PCM) diode |
| 2 | Diode ATO | – | Auxiliary battery diode |
| 3 | Fuse MINI | 15A | Daytime Running Lamps (DRL) module, A/C clutch |
| 4 | Fuse MINI | 5A | Heated PCV [4.6L and 6.8L gasoline engines] |
| 5 | Fuse MINI | 15A | Horn relay |
| 6 | Fuse MINI | 2A | Brake pressure switch |
| 7 | Fuse MAXI | 60A | Ignition switch, Accessory delay |
| 8 | Fuse MAXI | 40A | Trailer battery charge relay |
| 9 | Fuse MAXI | 50A | Modified vehicle power |
| 10 | Fuse MAXI | 30A | Electric brake controller |
| 11 | Fuse MAXI | 60A | 4-Wheel Anti-lock Brake System (4WABS) or 40A [AdvanceTrac with RSC] |
| 12 | Fuse MAXI | 60A | I/P fuses 29, 34, 35, 40 and 41 |
| 13 | Fuse MAXI | 20A | Fuel pump relay |
| 14 | Fuse MAXI | 50A | Auxiliary blower relay |
| 15 | Fuse MAXI | 30A | Main light switch |
| 16 | Fuse MAXI | 20A | Injectors [gasoline engines] |
| 17 | Fuse MAXI | 50A | Blower motor relay (blower motor) |
| 18 | Fuse MAXI | 60A | Engine compartment fuses 3, 5 and 26, Instrument panel fuses 26 and 32, Start relay |
| 19 | Fuse MAXI | 50A/40A | IDM relay [diesel engine only] or AdvanceTrac with RSC [gasoline engines only] |
| 20 | Fuse MAXI | 60A | Auxiliary battery relay [gasoline engine only], PDB fuses 8 and 24 |
| 21 | Fuse MAXI | 30A | PCM power relay, PDB fuse 27 |
| 22 | Fuse MAXI | 60A | I/P fuses 4, 5, 10, 11, 16, 17, 22 and 23, Circuit breaker 44 |
| 23 | Fuse MINI | 10A/20A | Alternator field [diesel engine only] or CMS, HEGOS, MAF, EGR, A/C clutch relay [gasoline engine only] |
| 24 | Fuse MINI | 20A | Trailer tow running lamps and back-up lamp relays |
| 26 | Fuse MINI | 20A | Trailer tow turn signals |
| 27 | Fuse MINI | 10A | PCM |
| A | Relay | – | Fuel pump relay |
| B | Relay | – | Horn relay |
| C | Relay | – | Trailer back-up lamps relay |
| D | Relay | – | Trailer running lamps relay |
| E | Relay | – | Trailer battery charge relay |
| F | Relay | – | IDM relay [diesel only], IVD [gasoline only] |
| G | Relay | – | PCM relay |
| H | Relay | – | Blower motor relay |
| J | Relay | – | Accessory delay relay |
| K | Relay | – | Start relay |
3.3. Instrument Panel Relay Module
The instrument panel relay module in your 2006 Ford E-250 is typically located behind the dashboard.
 2006 Ford E-250 instrument panel relay module diagram
Detailed Relay List:
| Relay No. | Description |
|---|---|
| 1 | Interior lamps |
| 2 | Open |
| 3 | Open |
| 4 | Battery saver |
3.4. Engine Compartment Relay Module
The engine compartment relay module is situated within the engine bay of your 2006 Ford E-250.
 2006 Ford E-250 engine compartment relay module diagram
Detailed Relay List:
| Relay No. | Description |
|---|---|
| 1 | PCM back-up lamp |
| 2 | A/C control |
| 3 | Trailer tow right turn |
| 4 | Trailer tow left turn |
4. Common Issues and Troubleshooting Tips
4.1. Diagnosing a Blown Fuse
A blown fuse is a common issue in vehicles, and understanding how to diagnose it can save you time and money. Here’s what to look for:
- Visual Inspection: Check the fuse for a broken filament or a dark, burnt appearance.
- Continuity Tester: Use a continuity tester to check if the fuse is conducting electricity. If there’s no continuity, the fuse is blown.
4.2. Symptoms of a Bad OBD2 Fuse
Recognizing the symptoms of a bad OBD2 fuse can help you quickly identify and resolve the issue, ensuring your vehicle’s diagnostic systems function correctly.
- OBD2 Scanner Not Powering On: The scanner doesn’t turn on when plugged into the OBD2 port.
- Inability to Read Diagnostic Codes: The scanner powers on but cannot retrieve data from the vehicle’s computer.
- Communication Errors: Error messages appear on the scanner indicating a communication failure.
4.3. Troubleshooting Steps
If you suspect a blown OBD2 fuse, follow these troubleshooting steps to diagnose and resolve the issue.
-
Check the Fuse Location:
- Consult your vehicle’s manual to locate the OBD2 fuse.
-
Inspect the Fuse:
- Visually inspect the fuse for signs of damage.
-
Replace the Fuse:
- Replace the blown fuse with a new one of the correct amperage.
-
Test the OBD2 Port:
- Test the OBD2 port with a diagnostic scanner to ensure it is functioning correctly.
-
If the Problem Persists:
- If the new fuse blows immediately or the OBD2 port still doesn’t work, there may be an underlying electrical issue that requires professional attention.
4.4. When to Seek Professional Help
While replacing a fuse is a straightforward task, certain situations warrant seeking professional help to avoid causing further damage to your vehicle.
- Repeatedly Blown Fuses: If the fuse blows immediately after replacement, it indicates a short circuit or other electrical problem.
- Unidentified Fuse Location: If you can’t locate the OBD2 fuse despite consulting your vehicle’s manual and other resources.
- Complex Electrical Issues: If you suspect a more complex electrical problem, such as a wiring issue or a faulty component.
5. Maintaining Your 2006 Ford E-250 4.6 OBD2 System
5.1. Regular Inspections
Regular inspections of your 2006 Ford E-250’s OBD2 system are essential for maintaining its functionality and preventing potential issues. Make it a part of your routine vehicle maintenance.
- Monthly Checks: Perform a quick visual inspection of the fuse box and OBD2 port each month.
- Diagnostic Scans: Periodically use an OBD2 scanner to check for any stored diagnostic codes, even if there are no apparent issues.
- Professional Inspections: Include an OBD2 system inspection as part of your regular servicing at MERCEDES-DIAGNOSTIC-TOOL.EDU.VN.
5.2. Preventative Measures
Taking preventative measures can help you avoid common OBD2 system problems and extend the life of your vehicle’s diagnostic capabilities.
- Use Quality Fuses: Always use high-quality replacement fuses with the correct amperage rating.
- Protect the OBD2 Port: Keep the OBD2 port clean and free of debris. Use a protective cover if necessary.
- Avoid Overloading Circuits: Be mindful of the electrical load on your vehicle’s circuits to prevent blown fuses.
5.3. Choosing the Right Fuses
Selecting the correct fuses for your 2006 Ford E-250 is crucial for the safety and proper functioning of its electrical system. Here’s what to consider:
- Amperage Rating: Always use fuses with the amperage rating specified in your vehicle’s manual.
- Fuse Type: Ensure you’re using the correct type of fuse (e.g., MINI, MAXI, ATO) as specified for your vehicle.
- Quality Brands: Opt for fuses from reputable brands to ensure reliability and performance.
5.4. When to Replace Fuses
Knowing when to replace fuses can prevent potential electrical issues and maintain the overall health of your vehicle.
- Blown Fuse: Replace a fuse immediately if it is blown.
- Corrosion: Replace fuses that show signs of corrosion or damage, even if they are still functional.
- Regular Intervals: Consider replacing all fuses at regular intervals (e.g., every 5 years) as a preventative measure.
6. Understanding OBD2 Systems and Their Importance
6.1. What is an OBD2 System?
An OBD2 (On-Board Diagnostics II) system is a standardized system used in vehicles to monitor and diagnose various components and systems, providing valuable information for maintenance and repairs.
- Standardization: OBD2 is a standardized system mandated in the United States since 1996, ensuring compatibility across different vehicle makes and models.
- Monitoring Capabilities: It monitors a wide range of vehicle parameters, including engine performance, emissions, and fuel efficiency.
- Diagnostic Codes: The system generates diagnostic trouble codes (DTCs) that can be read with an OBD2 scanner to identify issues.
6.2. Benefits of an OBD2 System
Having a functioning OBD2 system offers numerous benefits for vehicle owners, technicians, and enthusiasts.
- Early Issue Detection: Detect potential problems early, preventing costly repairs down the road.
- Accurate Diagnostics: Provides accurate and reliable diagnostic information, helping technicians pinpoint the root cause of issues.
- Emissions Monitoring: Ensures your vehicle meets emissions standards, contributing to environmental protection.
- Performance Optimization: Helps optimize vehicle performance and fuel efficiency.
6.3. Components of an OBD2 System
An OBD2 system consists of several key components that work together to monitor and diagnose vehicle issues.
- Sensors: Various sensors throughout the vehicle monitor parameters such as oxygen levels, engine temperature, and throttle position.
- Engine Control Unit (ECU): The ECU processes data from the sensors and controls various engine functions.
- Diagnostic Port: The diagnostic port (OBD2 port) is where you connect an OBD2 scanner to retrieve diagnostic information.
- Diagnostic Trouble Codes (DTCs): These codes are generated by the ECU when it detects an issue, providing valuable information for troubleshooting.
6.4. How to Use an OBD2 Scanner
Using an OBD2 scanner is a straightforward process that can provide valuable insights into your vehicle’s health.
-
Connect the Scanner:
- Plug the OBD2 scanner into the diagnostic port in your vehicle.
-
Turn On the Ignition:
- Turn the ignition key to the “ON” position without starting the engine.
-
Power On the Scanner:
- Turn on the OBD2 scanner and follow the on-screen instructions.
-
Read Diagnostic Codes:
- Select the option to read diagnostic codes. The scanner will display any stored DTCs.
-
Interpret the Codes:
- Use the scanner’s manual or online resources to interpret the meaning of the DTCs.
-
Clear the Codes (Optional):
- After addressing the issues, you can clear the diagnostic codes using the scanner.
7. Advanced Diagnostic Techniques for Your Ford E-250
7.1. Using Advanced Diagnostic Tools
For more in-depth diagnostics, consider using advanced diagnostic tools that offer enhanced capabilities beyond basic OBD2 scanners.
- Professional-Grade Scanners: These scanners provide access to advanced features such as live data streaming, bidirectional controls, and component testing.
- Software-Based Diagnostics: Use software-based diagnostic tools on a laptop or tablet for comprehensive vehicle analysis.
7.2. Interpreting Live Data
Live data streaming allows you to monitor various vehicle parameters in real-time, providing valuable insights into engine performance and system behavior.
- Engine Performance: Monitor parameters such as engine RPM, coolant temperature, and air intake temperature.
- Sensor Readings: Observe sensor readings in real-time to identify faulty sensors or components.
- Fuel System Analysis: Analyze fuel trim values to diagnose fuel system issues.
7.3. Performing Component Testing
Component testing involves using diagnostic tools to activate and test individual components, helping you identify faulty parts.
- Actuator Tests: Perform actuator tests to verify the functionality of components such as fuel injectors, solenoids, and relays.
- Sensor Simulations: Simulate sensor signals to test the response of the ECU and other components.
7.4. Understanding Freeze Frame Data
Freeze frame data captures a snapshot of vehicle parameters at the moment a diagnostic trouble code is triggered, providing valuable context for troubleshooting.
- Engine Conditions: Analyze engine RPM, load, and coolant temperature at the time of the fault.
- Sensor Values: Review sensor values to identify potential causes of the issue.
8. Common Ford E-250 4.6 Problems and Solutions
8.1. Engine Issues
Several engine-related problems are common in the 2006 Ford E-250 4.6, and understanding these issues can help you address them effectively.
- Misfires: Misfires can be caused by faulty spark plugs, ignition coils, or fuel injectors.
- Rough Idling: Rough idling can result from vacuum leaks, dirty throttle bodies, or faulty sensors.
- Lack of Power: A lack of power can be due to a clogged fuel filter, a failing fuel pump, or a restricted exhaust system.
8.2. Transmission Issues
Transmission problems can affect the performance and reliability of your Ford E-250.
- Slipping Gears: Slipping gears can indicate low transmission fluid, worn clutches, or a faulty torque converter.
- Rough Shifting: Rough shifting can be caused by a malfunctioning shift solenoid or valve body.
- Transmission Leaks: Transmission leaks should be addressed promptly to prevent damage to the transmission.
8.3. Electrical Issues
Electrical problems are common in older vehicles like the 2006 Ford E-250.
- Battery Drain: A parasitic battery drain can be caused by a faulty component or wiring issue.
- Alternator Problems: A failing alternator can result in a dead battery or electrical system malfunctions.
- Wiring Issues: Corroded or damaged wiring can cause a variety of electrical problems.
8.4. Brake System Issues
Maintaining the brake system is crucial for the safety of your Ford E-250.
- Brake Pad Wear: Regularly inspect and replace worn brake pads.
- Brake Rotor Problems: Warped or damaged brake rotors can cause vibrations and reduced braking performance.
- Brake Line Leaks: Brake line leaks should be addressed immediately to ensure proper braking function.
9. Tips for Improving Your Vehicle’s Performance and Longevity
9.1. Regular Maintenance Schedule
Adhering to a regular maintenance schedule is essential for keeping your 2006 Ford E-250 running smoothly and extending its lifespan.
- Oil Changes: Change the engine oil and filter every 3,000 to 5,000 miles.
- Fluid Checks: Regularly check and top off all fluids, including coolant, brake fluid, power steering fluid, and transmission fluid.
- Filter Replacements: Replace air filters, fuel filters, and cabin air filters as recommended in your vehicle’s manual.
9.2. Using Quality Parts
Using high-quality replacement parts can improve your vehicle’s performance and reliability.
- OEM Parts: Consider using Original Equipment Manufacturer (OEM) parts for critical components.
- Reputable Brands: Opt for parts from reputable brands known for their quality and durability.
9.3. Driving Habits
Your driving habits can significantly impact your vehicle’s performance and longevity.
- Smooth Acceleration: Avoid aggressive acceleration and braking.
- Proper Warm-Up: Allow the engine to warm up before driving aggressively.
- Avoid Overloading: Avoid overloading your vehicle beyond its specified weight capacity.
9.4. Addressing Issues Promptly
Addressing issues promptly can prevent minor problems from escalating into major repairs.
- Listen for Unusual Noises: Pay attention to any unusual noises or vibrations.
- Monitor Warning Lights: Never ignore warning lights on the dashboard.
- Regular Inspections: Perform regular visual inspections to identify potential problems early.
10. Why Choose MERCEDES-DIAGNOSTIC-TOOL.EDU.VN for Your Diagnostic Needs
10.1. Expert Diagnostic Services
MERCEDES-DIAGNOSTIC-TOOL.EDU.VN offers expert diagnostic services to help you keep your Mercedes-Benz in top condition. Our team of experienced technicians uses state-of-the-art diagnostic tools to accurately identify and resolve any issues your vehicle may be experiencing.
- Comprehensive Diagnostics: We offer comprehensive diagnostic services for all Mercedes-Benz models.
- Experienced Technicians: Our technicians have extensive experience working with Mercedes-Benz vehicles.
- State-of-the-Art Tools: We use the latest diagnostic tools and equipment to ensure accurate and reliable results.
10.2. Genuine Mercedes-Benz Parts
We use only genuine Mercedes-Benz parts to ensure the highest quality and performance. Genuine parts are designed to fit perfectly and function optimally with your vehicle.
- High-Quality Parts: We use only genuine Mercedes-Benz parts.
- Optimal Performance: Genuine parts ensure optimal performance and reliability.
10.3. Maintenance and Repair Services
In addition to diagnostic services, we offer a full range of maintenance and repair services to keep your Mercedes-Benz running smoothly.
- Routine Maintenance: We provide routine maintenance services such as oil changes, fluid checks, and filter replacements.
- Major Repairs: We handle major repairs, including engine and transmission work.
- Preventative Maintenance: We offer preventative maintenance services to help you avoid costly repairs down the road.
10.4. Customer Satisfaction
At MERCEDES-DIAGNOSTIC-TOOL.EDU.VN, customer satisfaction is our top priority. We strive to provide exceptional service and ensure that our customers are completely satisfied with our work.
- Exceptional Service: We provide exceptional service and attention to detail.
- Customer Support: Our friendly and knowledgeable staff is always available to answer your questions and address your concerns.
Ready to take control of your 2006 Ford E-250’s diagnostics and maintenance? Contact us at MERCEDES-DIAGNOSTIC-TOOL.EDU.VN today for expert advice, top-quality diagnostic tools, and unparalleled support. Our team is ready to help you understand your vehicle better and keep it running smoothly.
Contact Information:
- Address: 789 Oak Avenue, Miami, FL 33101, United States
- WhatsApp: +1 (641) 206-8880
- Website: MERCEDES-DIAGNOSTIC-TOOL.EDU.VN
FAQ: 2006 Ford E-250 4.6 OBD2 Fuse Location
1. Where is the OBD2 port located on a 2006 Ford E-250?
The OBD2 port on a 2006 Ford E-250 is typically located under the dashboard on the driver’s side.
2. What does the OBD2 fuse protect in my 2006 Ford E-250?
The OBD2 fuse protects the diagnostic port and related systems, ensuring that the diagnostic scanner can properly communicate with the vehicle’s computer.
3. What size fuse does the OBD2 port use in a 2006 Ford E-250?
The fuse size for the OBD2 port in a 2006 Ford E-250 is typically a 20A fuse, but it’s essential to verify this in your vehicle’s manual.
4. Can I use a higher amperage fuse if the recommended one keeps blowing?
No, never use a fuse with a higher amperage rating than recommended. Doing so can cause significant damage to the electrical system and potentially start a fire.
5. What are the symptoms of a blown OBD2 fuse in my 2006 Ford E-250?
Symptoms include the OBD2 scanner not powering on when connected, an inability to read diagnostic codes, and communication errors between the scanner and the vehicle’s computer.
6. How do I check if the OBD2 fuse is blown in my 2006 Ford E-250?
Visually inspect the fuse for a broken filament or a dark, burnt appearance. You can also use a continuity tester to check if the fuse is conducting electricity.
7. What tools do I need to replace the OBD2 fuse in my 2006 Ford E-250?
You’ll need a fuse puller, replacement fuses with the correct amperage rating, and your vehicle’s owner’s manual.
8. Can I replace the OBD2 fuse myself, or do I need a professional?
Replacing the OBD2 fuse is a simple task that most vehicle owners can do themselves. However, if you’re uncomfortable working with electrical systems or if the fuse blows repeatedly, it’s best to seek professional help.
9. What if the new OBD2 fuse blows immediately after I replace it in my 2006 Ford E-250?
If the new fuse blows immediately, it indicates a short circuit or other electrical problem that needs professional attention.
10. Where can I find replacement fuses for my 2006 Ford E-250?
You can find replacement fuses at most auto parts stores, as well as online retailers. Ensure you purchase fuses with the correct amperage rating and type for your vehicle.