The 2007 Ford F150 Obd2 Fuse Location is crucial for diagnosing and resolving electrical issues, and at MERCEDES-DIAGNOSTIC-TOOL.EDU.VN, we provide you with the information you need to locate and troubleshoot your vehicle’s fuses efficiently. Understanding the fuse layout and function can help owners and technicians address problems quickly, ensuring your Ford F150 remains in optimal condition. With detailed guides and expert support, MERCEDES-DIAGNOSTIC-TOOL.EDU.VN empowers you to take control of your vehicle’s maintenance, and electrical diagnostics.
Contents
- 1. What is the Location of the OBD2 Fuse in a 2007 Ford F150?
- 1.1. Identifying the OBD2 Fuse
- 1.2. Exact Location and Fuse Number
- 1.3. Why is the OBD2 Fuse Important?
- 1.4. Troubleshooting a Blown OBD2 Fuse
- 1.5. Common Causes of a Blown OBD2 Fuse
- 1.6. Using a Multimeter to Check Fuses
- 1.7. Importance of Correct Fuse Amperage
- 1.8. Additional Resources at MERCEDES-DIAGNOSTIC-TOOL.EDU.VN
- 2. What Does the OBD2 Fuse Control in the 2007 Ford F150?
- 2.1. Primary Function: Powering the OBD2 Port
- 2.2. Components Powered by the OBD2 Fuse
- 2.3. Importance of a Functional OBD2 Port
- 2.4. Symptoms of a Blown OBD2 Fuse
- 2.5. Checking the OBD2 Port for Power
- 2.6. Common Issues Related to the OBD2 Fuse and Port
- 2.7. Advanced Diagnostic Tools and Their Reliance on the OBD2 Port
- 2.8. Resources at MERCEDES-DIAGNOSTIC-TOOL.EDU.VN for OBD2 Diagnostics
- 3. How to Check and Replace the 2007 Ford F150 OBD2 Fuse?
- 3.1. Gather Necessary Tools and Materials
- 3.2. Locate the Fuse Box
- 3.3. Identify the OBD2 Fuse
- 3.4. Remove the Fuse
- 3.5. Inspect the Fuse
- 3.6. Replace the Fuse
- 3.7. Test the OBD2 Port
- 3.8. What to Do If the Fuse Continues to Blow
- 3.9. Importance of Using the Correct Amperage Fuse
- 3.10. Resources at MERCEDES-DIAGNOSTIC-TOOL.EDU.VN for Fuse Replacement
- 4. Common Problems Related to the 2007 Ford F150 OBD2 Fuse
- 4.1. Blown OBD2 Fuse
- 4.2. No Power to the OBD2 Port
- 4.3. Intermittent Communication Issues
- 4.4. Corrosion at the OBD2 Port
- 4.5. Faulty Wiring
- 4.6. Scan Tool Compatibility Issues
- 4.7. Grounding Issues
- 4.8. Resources at MERCEDES-DIAGNOSTIC-TOOL.EDU.VN for Troubleshooting
- 5. How to Prevent the 2007 Ford F150 OBD2 Fuse from Blowing?
- 5.1. Use High-Quality Scan Tools
- 5.2. Avoid Overloading the OBD2 Port
- 5.3. Inspect and Maintain Wiring
- 5.4. Ensure Proper Grounding
- 5.5. Use a Fuse with the Correct Amperage
- 5.6. Protect the OBD2 Port from Moisture
- 5.7. Avoid DIY Wiring Modifications
- 5.8. Regularly Check for Diagnostic Trouble Codes
- 5.9. Resources at MERCEDES-DIAGNOSTIC-TOOL.EDU.VN for Preventative Maintenance
- 6. Benefits of Knowing the 2007 Ford F150 OBD2 Fuse Location
- 6.1. Quick Diagnosis of OBD2 Port Issues
- 6.2. Cost Savings on Repairs
- 6.3. Avoid Unnecessary Downtime
- 6.4. Ensure Accurate Emissions Testing
- 6.5. Maintain Vehicle Performance
- 6.6. Enable Use of Advanced Diagnostic Tools
- 6.7. Facilitate DIY Repairs and Maintenance
- 6.8. Prevent Further Electrical Damage
- 6.9. Resources at MERCEDES-DIAGNOSTIC-TOOL.EDU.VN for Vehicle Maintenance
- 7. Comprehensive Guide to 2007 Ford F150 Fuse Box Diagrams
- 7.1. Locations of Fuse Boxes
- 7.2. Interior Fuse Box Diagram
- 7.3. Engine Compartment Fuse Box Diagram
- 7.4. Auxiliary Relay Box Diagram
- 7.5. How to Read a Fuse Box Diagram
- 7.6. Common Fuse Types
- 7.7. Importance of Using the Correct Fuse
- 7.8. Resources at MERCEDES-DIAGNOSTIC-TOOL.EDU.VN for Fuse Box Diagrams
- 8. Frequently Asked Questions (FAQs) About the 2007 Ford F150 OBD2 Fuse
1. What is the Location of the OBD2 Fuse in a 2007 Ford F150?
The OBD2 fuse in a 2007 Ford F150 is typically located in the interior fuse panel, often situated beneath the dashboard on the driver’s side or in the passenger compartment fuse panel. The exact fuse number can vary, but it is commonly identified in the owner’s manual or on the fuse box diagram as the fuse protecting the diagnostic port.
Understanding the specific location of the OBD2 fuse is crucial for diagnosing issues related to vehicle diagnostics. Below, we will elaborate further on the exact placement and identification to ensure accurate troubleshooting.
1.1. Identifying the OBD2 Fuse
To accurately identify the OBD2 fuse in your 2007 Ford F150, follow these steps:
- Consult the Owner’s Manual: The owner’s manual is the primary resource for identifying the exact fuse number and location. Look for a section detailing the fuse box diagram.
- Check the Fuse Box Diagram: The fuse box itself usually has a diagram either printed on the inside of the cover or on a separate label. This diagram indicates the function of each fuse.
- Look for Diagnostic Port or DLC: The fuse you are looking for may be labeled as “Diagnostic Port”, “DLC (Data Link Connector)”, or something similar.
1.2. Exact Location and Fuse Number
While the specific fuse number can vary based on the exact configuration of your 2007 Ford F150, the OBD2 fuse is often found in the interior fuse panel. Common fuse numbers include:
- Fuse number 20
- Fuse number 41
These fuses are typically MINI fuses with a rating between 10A and 20A. It is essential to verify the exact fuse number using your vehicle’s documentation to ensure accurate identification.
1.3. Why is the OBD2 Fuse Important?
The OBD2 fuse protects the diagnostic port, which is used to connect scan tools and diagnostic equipment. If this fuse is blown, you will not be able to:
- Read diagnostic trouble codes (DTCs)
- Monitor vehicle parameters in real-time
- Perform emissions testing
- Reset the check engine light
Without a functioning OBD2 port, diagnosing and resolving many vehicle issues becomes significantly more challenging. Therefore, knowing the location of this fuse and ensuring its integrity is critical for vehicle maintenance and repair.
1.4. Troubleshooting a Blown OBD2 Fuse
If you suspect that the OBD2 fuse is blown, follow these steps to troubleshoot:
- Turn Off the Ignition: Ensure the vehicle’s ignition is turned off to prevent further electrical issues.
- Locate the Fuse: Use the methods described above to locate the OBD2 fuse in the interior fuse panel.
- Inspect the Fuse: Remove the fuse and visually inspect it. A blown fuse will typically have a broken filament inside.
- Replace the Fuse: Replace the blown fuse with a new fuse of the same amperage rating.
- Test the OBD2 Port: After replacing the fuse, use a scan tool to test the OBD2 port and ensure it is functioning correctly.
1.5. Common Causes of a Blown OBD2 Fuse
Several factors can cause the OBD2 fuse to blow:
- Faulty Scan Tool: A malfunctioning scan tool can draw excessive current, causing the fuse to blow.
- Short Circuit in Wiring: A short circuit in the wiring connected to the OBD2 port can also cause the fuse to blow.
- Overload: Connecting multiple devices to the OBD2 port simultaneously can overload the circuit.
By understanding these potential causes, you can take steps to prevent the OBD2 fuse from blowing in the future.
1.6. Using a Multimeter to Check Fuses
A multimeter is a valuable tool for checking the integrity of fuses. Here’s how to use it:
- Set the Multimeter: Set the multimeter to the continuity setting (usually indicated by a sound wave symbol).
- Test the Fuse: Place the probes of the multimeter on each of the fuse’s terminals.
- Check for Continuity: If the multimeter beeps or shows a value close to zero ohms, the fuse is good. If there is no beep or the resistance is very high, the fuse is blown.
This method provides a more precise way to determine if a fuse is functioning correctly compared to visual inspection alone.
1.7. Importance of Correct Fuse Amperage
When replacing a fuse, it is crucial to use a fuse with the correct amperage rating. Using a fuse with a higher amperage rating can allow too much current to flow through the circuit, potentially damaging components and creating a fire hazard. Using a fuse with a lower amperage rating may cause the fuse to blow prematurely.
Always refer to the owner’s manual or fuse box diagram to determine the correct amperage rating for the OBD2 fuse.
1.8. Additional Resources at MERCEDES-DIAGNOSTIC-TOOL.EDU.VN
At MERCEDES-DIAGNOSTIC-TOOL.EDU.VN, we provide a wealth of resources to help you diagnose and resolve electrical issues in your vehicle. These resources include:
- Detailed Fuse Box Diagrams: Accurate and comprehensive diagrams for various Ford F150 models.
- Troubleshooting Guides: Step-by-step guides for diagnosing and repairing electrical problems.
- Expert Support: Access to experienced technicians who can provide assistance and advice.
By leveraging these resources, you can confidently address electrical issues in your 2007 Ford F150 and ensure its continued reliability. For personalized assistance, contact us at +1 (641) 206-8880 or visit our location at 789 Oak Avenue, Miami, FL 33101, United States.
2. What Does the OBD2 Fuse Control in the 2007 Ford F150?
The OBD2 fuse in the 2007 Ford F150 primarily controls the power supply to the On-Board Diagnostics II (OBD2) port, also known as the Data Link Connector (DLC). This port is essential for connecting diagnostic tools and scanners to read vehicle data, trouble codes, and perform various diagnostic tests.
Understanding the specific functions and components powered by the OBD2 fuse will help you diagnose related issues more effectively. Below, we explore the critical roles and connections associated with this fuse.
2.1. Primary Function: Powering the OBD2 Port
The main function of the OBD2 fuse is to provide a stable and protected power supply to the OBD2 port. This port is the gateway for accessing the vehicle’s computer systems, allowing technicians and owners to:
- Retrieve Diagnostic Trouble Codes (DTCs)
- Monitor real-time sensor data
- Perform system tests
- Reprogram certain vehicle functions
Without a functioning OBD2 port, it becomes nearly impossible to diagnose complex issues or ensure the vehicle is running optimally.
2.2. Components Powered by the OBD2 Fuse
In addition to the OBD2 port itself, the fuse may also power other related components. These can include:
- Diagnostic Scan Tools: The power supply for the scan tool when it’s connected to the OBD2 port.
- Wiring and Connectors: The integrity of the wiring that links the OBD2 port to the vehicle’s computer.
- Communication Modules: Some communication modules that rely on the diagnostic interface.
2.3. Importance of a Functional OBD2 Port
A properly functioning OBD2 port is crucial for several reasons:
- Emissions Testing: Many states require vehicles to pass emissions tests, which rely on the OBD2 port to communicate with testing equipment.
- Diagnostic Accuracy: Accurate diagnostics are essential for identifying and resolving vehicle issues promptly.
- Preventive Maintenance: Regular diagnostics can help identify potential problems before they become major repairs.
2.4. Symptoms of a Blown OBD2 Fuse
If the OBD2 fuse is blown, you may experience the following symptoms:
- Scan Tool Won’t Power On: When connected to the OBD2 port, the scan tool fails to power on.
- Inability to Read DTCs: The scan tool cannot retrieve diagnostic trouble codes from the vehicle’s computer.
- Communication Errors: The scan tool displays error messages indicating a communication failure with the vehicle.
2.5. Checking the OBD2 Port for Power
To verify if the OBD2 port is receiving power, you can use a multimeter. Here’s how:
- Set the Multimeter: Set the multimeter to the DC voltage setting.
- Locate Power and Ground Pins: Identify the power (pin 16) and ground (pins 4 and 5) on the OBD2 port.
- Test Voltage: Place the positive probe on pin 16 and the negative probe on either pin 4 or pin 5.
- Verify Voltage: You should read approximately 12 volts. If the voltage is significantly lower or absent, the OBD2 fuse may be blown, or there could be an issue with the wiring.
2.6. Common Issues Related to the OBD2 Fuse and Port
Several common issues can arise concerning the OBD2 fuse and port:
- Blown Fuse: The fuse may blow due to a short circuit, overload, or faulty scan tool.
- Corroded Terminals: Corrosion on the OBD2 port terminals can prevent proper communication.
- Damaged Wiring: Damaged or frayed wiring can cause intermittent connection issues.
2.7. Advanced Diagnostic Tools and Their Reliance on the OBD2 Port
Modern diagnostic tools offer advanced capabilities that heavily rely on a functioning OBD2 port. These include:
- Live Data Streaming: Monitoring real-time data from various sensors.
- Actuator Testing: Activating and testing individual components to verify their functionality.
- Module Programming: Reprogramming or updating vehicle modules.
These advanced features are invaluable for diagnosing and resolving complex vehicle issues, making the OBD2 port an indispensable part of modern automotive repair.
2.8. Resources at MERCEDES-DIAGNOSTIC-TOOL.EDU.VN for OBD2 Diagnostics
At MERCEDES-DIAGNOSTIC-TOOL.EDU.VN, we offer comprehensive resources to help you with OBD2 diagnostics:
- Detailed Guides: Step-by-step guides on using scan tools and interpreting diagnostic data.
- Troubleshooting Tips: Practical tips for diagnosing and resolving common OBD2 port issues.
- Expert Advice: Access to experienced technicians who can provide personalized assistance.
Leverage our resources to ensure you can effectively diagnose and maintain your 2007 Ford F150. For expert support, contact us at +1 (641) 206-8880 or visit our location at 789 Oak Avenue, Miami, FL 33101, United States.
3. How to Check and Replace the 2007 Ford F150 OBD2 Fuse?
Checking and replacing the OBD2 fuse in your 2007 Ford F150 is a straightforward process that can often be done without professional assistance. This task involves locating the fuse, inspecting its condition, and replacing it if necessary.
Below, we provide a detailed step-by-step guide to help you through the process, ensuring you can quickly restore functionality to your OBD2 port.
3.1. Gather Necessary Tools and Materials
Before you begin, gather the following tools and materials:
- New Fuse: Ensure you have a replacement fuse with the correct amperage rating as specified in your owner’s manual.
- Fuse Puller: A fuse puller tool (often found in the fuse box) makes it easier to remove fuses without damaging them.
- Multimeter (Optional): A multimeter can be used to test the fuse for continuity if a visual inspection is not conclusive.
- Owner’s Manual: Consult your owner’s manual for the exact location and amperage of the OBD2 fuse.
- Flashlight: A flashlight can help you see clearly inside the fuse box.
3.2. Locate the Fuse Box
The fuse box containing the OBD2 fuse is typically located inside the cabin of your 2007 Ford F150. Common locations include:
- Under the Dashboard (Driver’s Side): This is the most common location. You may need to kneel down and look up to find it.
- Passenger Compartment: Sometimes, the fuse box is located in the passenger compartment, often behind a panel or in the glove box.
Consult your owner’s manual for the precise location of the fuse box in your vehicle.
3.3. Identify the OBD2 Fuse
Once you have located the fuse box, use the fuse box diagram to identify the OBD2 fuse. The diagram may be printed on the inside of the fuse box cover or on a separate label. Look for labels such as:
- “OBDII”
- “DLC (Data Link Connector)”
- “Diagnostic Port”
The fuse number and amperage rating will be indicated on the diagram. Make a note of this information for when you need to replace the fuse.
3.4. Remove the Fuse
Using the fuse puller tool, carefully remove the fuse from the fuse box. If you don’t have a fuse puller, you can use a pair of small pliers, but be extra cautious not to damage the fuse or surrounding components.
3.5. Inspect the Fuse
Visually inspect the fuse to determine if it is blown. A blown fuse will typically have a broken filament inside the clear plastic housing. If the filament is intact, the fuse is likely still good.
If you are unsure whether the fuse is blown, you can use a multimeter to test it for continuity:
- Set the Multimeter: Set the multimeter to the continuity setting (usually indicated by a sound wave symbol).
- Test the Fuse: Place the probes of the multimeter on each of the fuse’s terminals.
- Check for Continuity: If the multimeter beeps or shows a value close to zero ohms, the fuse is good. If there is no beep or the resistance is very high, the fuse is blown.
3.6. Replace the Fuse
If the fuse is blown, replace it with a new fuse of the same amperage rating. Ensure the new fuse is fully seated in the fuse box.
3.7. Test the OBD2 Port
After replacing the fuse, test the OBD2 port to ensure it is functioning correctly. You can do this by:
- Connecting a Scan Tool: Plug a scan tool into the OBD2 port.
- Power On: Turn on the scan tool and verify that it powers on and can communicate with the vehicle’s computer.
- Read DTCs: Attempt to read diagnostic trouble codes (DTCs) to confirm that the OBD2 port is functioning properly.
If the scan tool still does not power on or cannot communicate with the vehicle, there may be another issue, such as a wiring problem or a faulty OBD2 port.
3.8. What to Do If the Fuse Continues to Blow
If the OBD2 fuse continues to blow after replacement, it indicates an underlying electrical problem. Common causes include:
- Short Circuit: A short circuit in the wiring connected to the OBD2 port.
- Faulty Scan Tool: A malfunctioning scan tool that draws excessive current.
- Overload: Too many devices connected to the OBD2 port simultaneously.
In such cases, it is recommended to consult a professional mechanic or electrician to diagnose and repair the underlying issue.
3.9. Importance of Using the Correct Amperage Fuse
Always use a replacement fuse with the correct amperage rating as specified in your owner’s manual. Using a fuse with a higher amperage rating can allow too much current to flow through the circuit, potentially damaging components and creating a fire hazard. Using a fuse with a lower amperage rating may cause the fuse to blow prematurely.
3.10. Resources at MERCEDES-DIAGNOSTIC-TOOL.EDU.VN for Fuse Replacement
At MERCEDES-DIAGNOSTIC-TOOL.EDU.VN, we provide a range of resources to assist you with fuse replacement and other vehicle maintenance tasks:
- Detailed Fuse Box Diagrams: Accurate and easy-to-understand diagrams for various Ford F150 models.
- Troubleshooting Guides: Step-by-step guides for diagnosing and resolving electrical issues.
- Expert Support: Access to experienced technicians who can provide personalized assistance and advice.
Take advantage of our resources to ensure you can safely and effectively maintain your 2007 Ford F150. For expert support, contact us at +1 (641) 206-8880 or visit our location at 789 Oak Avenue, Miami, FL 33101, United States.
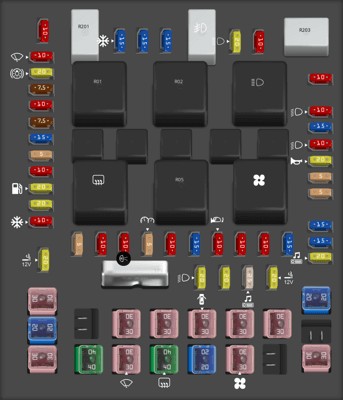 2007 Ford F-150 Fuse Box Diagram Indicating Power Distribution
4. Common Problems Related to the 2007 Ford F150 OBD2 Fuse
Several common problems can arise in connection with the 2007 Ford F150 OBD2 fuse, often leading to diagnostic and communication issues. Understanding these problems and their potential causes can help you troubleshoot effectively and prevent future occurrences.
Below, we outline some of the most frequent issues related to the OBD2 fuse and provide insights into their causes and solutions.
4.1. Blown OBD2 Fuse
The most common problem is a blown OBD2 fuse. This occurs when the fuse’s internal filament breaks, interrupting the electrical circuit. Common causes include:
- Short Circuit: A short circuit in the wiring connected to the OBD2 port can cause excessive current flow, blowing the fuse.
- Faulty Scan Tool: A malfunctioning scan tool can draw too much current, overloading the circuit.
- Overload: Connecting multiple devices to the OBD2 port simultaneously can exceed the fuse’s amperage rating.
- Wiring Issues: Damaged or frayed wiring can create intermittent shorts, leading to a blown fuse.
4.2. No Power to the OBD2 Port
If the OBD2 fuse is blown or there is another issue in the circuit, the OBD2 port may not receive power. This can manifest as:
- Scan Tool Won’t Power On: When a scan tool is connected to the OBD2 port, it fails to power on.
- Communication Errors: The scan tool displays error messages indicating a communication failure with the vehicle.
To diagnose this issue, check the OBD2 fuse and verify that the wiring and connections to the OBD2 port are intact.
4.3. Intermittent Communication Issues
Sometimes, the OBD2 port may work intermittently, with communication dropping in and out. This can be caused by:
- Loose Connections: Loose or corroded connections at the OBD2 port or fuse box can disrupt the electrical flow.
- Damaged Wiring: Damaged or frayed wiring can cause intermittent shorts, leading to communication issues.
- Faulty OBD2 Port: The OBD2 port itself may be damaged or malfunctioning.
4.4. Corrosion at the OBD2 Port
Corrosion on the terminals of the OBD2 port can prevent proper communication. This is more common in vehicles exposed to moisture or harsh environments. Symptoms include:
- Scan Tool Won’t Connect: The scan tool cannot establish a connection with the vehicle’s computer.
- Error Messages: The scan tool displays error messages indicating a communication failure.
To resolve this issue, clean the terminals of the OBD2 port using a contact cleaner and a small brush.
4.5. Faulty Wiring
Damaged or frayed wiring connected to the OBD2 port can cause a variety of issues, including blown fuses, no power to the port, and intermittent communication problems. Common causes of wiring damage include:
- Wear and Tear: Over time, wiring can become brittle and crack, leading to shorts.
- Rodent Damage: Rodents can chew on wiring, causing damage.
- Improper Installation: Incorrectly installed aftermarket accessories can damage the wiring.
Inspect the wiring connected to the OBD2 port for any signs of damage and repair or replace as necessary.
4.6. Scan Tool Compatibility Issues
In some cases, the issue may not be with the OBD2 fuse or port but with the scan tool itself. Compatibility issues can arise if the scan tool is not designed to work with the 2007 Ford F150. Symptoms include:
- Inability to Read DTCs: The scan tool cannot retrieve diagnostic trouble codes from the vehicle’s computer.
- Communication Errors: The scan tool displays error messages indicating a communication failure.
Ensure that the scan tool you are using is compatible with your vehicle. Consult the scan tool’s documentation or contact the manufacturer for more information.
4.7. Grounding Issues
A poor or missing ground connection can cause various electrical problems, including issues with the OBD2 port. Symptoms include:
- Intermittent Communication: The scan tool may connect intermittently or not at all.
- Erratic Readings: The scan tool may display erratic or inaccurate readings.
Check the ground connections for the OBD2 port and ensure they are clean, tight, and free of corrosion.
4.8. Resources at MERCEDES-DIAGNOSTIC-TOOL.EDU.VN for Troubleshooting
At MERCEDES-DIAGNOSTIC-TOOL.EDU.VN, we offer comprehensive resources to help you troubleshoot and resolve common OBD2 port issues:
- Detailed Guides: Step-by-step guides for diagnosing and repairing electrical problems.
- Troubleshooting Tips: Practical tips for identifying and resolving common OBD2 port issues.
- Expert Advice: Access to experienced technicians who can provide personalized assistance.
Take advantage of our resources to ensure you can effectively diagnose and maintain your 2007 Ford F150. For expert support, contact us at +1 (641) 206-8880 or visit our location at 789 Oak Avenue, Miami, FL 33101, United States.
5. How to Prevent the 2007 Ford F150 OBD2 Fuse from Blowing?
Preventing the OBD2 fuse in your 2007 Ford F150 from blowing is crucial for maintaining consistent diagnostic capabilities and avoiding unnecessary troubleshooting. By understanding the common causes of blown fuses and implementing preventative measures, you can ensure the reliability of your vehicle’s diagnostic port.
Below, we provide several strategies to help you prevent the OBD2 fuse from blowing, ensuring your Ford F150 remains in optimal condition.
5.1. Use High-Quality Scan Tools
Using high-quality, reliable scan tools can significantly reduce the risk of blowing the OBD2 fuse. Lower-quality tools may draw excessive current or have internal faults that can overload the circuit. Consider the following:
- Reputable Brands: Opt for scan tools from reputable brands known for their quality and reliability.
- Proper Certification: Ensure the scan tool is certified and compliant with industry standards.
- Regular Maintenance: Keep your scan tool in good condition by following the manufacturer’s maintenance guidelines.
5.2. Avoid Overloading the OBD2 Port
Connecting multiple devices to the OBD2 port simultaneously can overload the circuit and cause the fuse to blow. Avoid using multiple devices at the same time. If you need to use multiple devices, consider using a dedicated OBD2 splitter that includes overcurrent protection.
5.3. Inspect and Maintain Wiring
Regularly inspect the wiring connected to the OBD2 port for any signs of damage, such as fraying, cracking, or corrosion. Address any issues promptly to prevent short circuits and blown fuses. Consider the following:
- Visual Inspection: Conduct a visual inspection of the wiring at least once a year.
- Protective Sleeving: Use protective sleeving to protect the wiring from abrasion and damage.
- Professional Inspection: Have a professional mechanic inspect the wiring during routine maintenance.
5.4. Ensure Proper Grounding
A poor or missing ground connection can cause electrical imbalances and increase the risk of blown fuses. Ensure that the ground connections for the OBD2 port are clean, tight, and free of corrosion. Consider the following:
- Clean Ground Connections: Clean the ground connections with a wire brush and apply a corrosion inhibitor.
- Tighten Connections: Ensure all ground connections are securely tightened.
- Verify Ground Continuity: Use a multimeter to verify that the ground connections have good continuity.
5.5. Use a Fuse with the Correct Amperage
Always use a replacement fuse with the correct amperage rating as specified in your owner’s manual. Using a fuse with a higher amperage rating can allow too much current to flow through the circuit, potentially damaging components and creating a fire hazard. Using a fuse with a lower amperage rating may cause the fuse to blow prematurely.
5.6. Protect the OBD2 Port from Moisture
Moisture can cause corrosion on the OBD2 port terminals, leading to electrical issues and blown fuses. Protect the OBD2 port from moisture by:
- Using a Protective Cap: When not in use, cover the OBD2 port with a protective cap.
- Avoiding Exposure to Water: Avoid exposing the OBD2 port to water or other liquids.
- Applying Dielectric Grease: Apply a small amount of dielectric grease to the terminals to prevent corrosion.
5.7. Avoid DIY Wiring Modifications
Avoid making DIY wiring modifications to the OBD2 port or its associated circuitry. Improper wiring modifications can introduce short circuits and increase the risk of blown fuses. If you need to make any modifications, consult a professional mechanic or electrician.
5.8. Regularly Check for Diagnostic Trouble Codes
Regularly checking for diagnostic trouble codes (DTCs) can help identify potential issues before they lead to electrical problems and blown fuses. Use a scan tool to check for DTCs at least once a month. Address any DTCs promptly to prevent them from escalating into more serious issues.
5.9. Resources at MERCEDES-DIAGNOSTIC-TOOL.EDU.VN for Preventative Maintenance
At MERCEDES-DIAGNOSTIC-TOOL.EDU.VN, we offer a range of resources to help you with preventative maintenance and ensure the reliability of your 2007 Ford F150:
- Detailed Guides: Step-by-step guides for performing routine maintenance tasks.
- Troubleshooting Tips: Practical tips for identifying and resolving potential issues before they become major problems.
- Expert Advice: Access to experienced technicians who can provide personalized assistance and advice.
Take advantage of our resources to ensure you can effectively maintain your 2007 Ford F150 and prevent the OBD2 fuse from blowing. For expert support, contact us at +1 (641) 206-8880 or visit our location at 789 Oak Avenue, Miami, FL 33101, United States.
6. Benefits of Knowing the 2007 Ford F150 OBD2 Fuse Location
Knowing the 2007 Ford F150 OBD2 fuse location offers numerous benefits for vehicle owners and technicians alike. This knowledge empowers you to quickly diagnose and resolve issues related to the diagnostic port, ensuring your vehicle remains in optimal condition and reducing the need for costly professional repairs.
Below, we outline the key benefits of knowing the OBD2 fuse location in your 2007 Ford F150.
6.1. Quick Diagnosis of OBD2 Port Issues
Knowing the exact location of the OBD2 fuse allows you to quickly diagnose issues related to the diagnostic port. If your scan tool fails to power on or cannot communicate with the vehicle’s computer, you can immediately check the fuse to determine if it is blown. This can save you time and effort compared to searching through the entire fuse box or consulting a professional mechanic.
6.2. Cost Savings on Repairs
By being able to diagnose and replace a blown OBD2 fuse yourself, you can save money on professional repair costs. Replacing a fuse is a simple and inexpensive task that can often be done without any special tools or expertise. This can be particularly beneficial for vehicle owners who prefer to perform their own maintenance and repairs.
6.3. Avoid Unnecessary Downtime
A blown OBD2 fuse can prevent you from performing necessary diagnostic tests, potentially leading to unnecessary downtime. By knowing the fuse location and being able to quickly replace it, you can minimize downtime and get back on the road sooner.
6.4. Ensure Accurate Emissions Testing
Many states require vehicles to pass emissions tests, which rely on the OBD2 port to communicate with testing equipment. If the OBD2 fuse is blown, your vehicle may fail the emissions test. Knowing the fuse location and ensuring it is in good condition can help you avoid this issue and pass the emissions test successfully.
6.5. Maintain Vehicle Performance
The OBD2 port is essential for monitoring and maintaining vehicle performance. By being able to quickly diagnose and resolve issues related to the diagnostic port, you can ensure that your vehicle is running optimally and prevent potential problems from escalating into more serious repairs.
6.6. Enable Use of Advanced Diagnostic Tools
Modern diagnostic tools offer advanced capabilities that heavily rely on a functioning OBD2 port. By knowing the fuse location and ensuring the diagnostic port is working correctly, you can take full advantage of these advanced features, such as live data streaming, actuator testing, and module programming.
6.7. Facilitate DIY Repairs and Maintenance
Knowing the OBD2 fuse location can facilitate DIY repairs and maintenance. By being able to quickly diagnose and resolve issues related to the diagnostic port, you can perform a wider range of repairs and maintenance tasks yourself, saving money and gaining a better understanding of your vehicle.
6.8. Prevent Further Electrical Damage
Addressing issues related to the OBD2 port promptly can help prevent further electrical damage. A blown fuse may be a symptom of an underlying electrical problem, such as a short circuit or faulty wiring. By identifying and resolving these issues, you can prevent them from causing more serious damage to your vehicle’s electrical system.
6.9. Resources at MERCEDES-DIAGNOSTIC-TOOL.EDU.VN for Vehicle Maintenance
At MERCEDES-DIAGNOSTIC-TOOL.EDU.VN, we offer a range of resources to help you with vehicle maintenance and ensure the reliability of your 2007 Ford F150:
- Detailed Guides: Step-by-step guides for performing routine maintenance tasks.
- Troubleshooting Tips: Practical tips for identifying and resolving potential issues before they become major problems.
- Expert Advice: Access to experienced technicians who can provide personalized assistance and advice.
Take advantage of our resources to ensure you can effectively maintain your 2007 Ford F150 and enjoy all the benefits of knowing the OBD2 fuse location. For expert support, contact us at +1 (641) 206-8880 or visit our location at 789 Oak Avenue, Miami, FL 33101, United States.
7. Comprehensive Guide to 2007 Ford F150 Fuse Box Diagrams
Understanding the fuse box diagrams for your 2007 Ford F150 is essential for diagnosing and resolving electrical issues efficiently. A fuse box diagram provides a detailed layout of all the fuses and relays in your vehicle, indicating their specific functions and amperage ratings.
Below, we provide a comprehensive guide to the fuse box diagrams for your 2007 Ford F150, helping you navigate your vehicle’s electrical system with confidence.
7.1. Locations of Fuse Boxes
The 2007 Ford F150 typically has three fuse box locations:
- Interior Fuse Box: Located inside the cabin, usually under the dashboard on the driver’s side or in the passenger compartment.
- Engine Compartment Fuse Box: Located in the engine compartment, near the battery.
- Auxiliary Relay Box: Located in the engine compartment, often near the main fuse box.
Each fuse box serves a different purpose, housing fuses and relays that protect various electrical circuits in your vehicle.
7.2. Interior Fuse Box Diagram
The interior fuse box diagram provides a layout of the fuses and relays that protect the circuits inside the cabin of your 2007 Ford F150. These circuits include:
- Power windows and locks
- Interior lighting
- Radio and entertainment system
- OBD2 port
- Instrument cluster
The diagram typically indicates the fuse number, amperage rating, and function of each fuse.
7.3. Engine Compartment Fuse Box Diagram
The engine compartment fuse box diagram provides a layout of the fuses and relays that protect the circuits in the engine compartment of your 2007 Ford F150. These circuits include:
- Engine control module (ECM)
- Fuel pump
- Ignition system
- Cooling fan
- Headlights and taillights
The diagram typically indicates the fuse number, amperage rating, and function of each fuse.
7.4. Auxiliary Relay Box Diagram
The auxiliary relay box diagram provides a layout of the relays that control various electrical functions in your 2007 Ford F150. These relays include:
- Starter relay
- Fuel pump relay
- Headlight relay
- Air conditioning relay
The diagram typically indicates the relay number and function of each relay.
7.5. How to Read a Fuse Box Diagram
To effectively use a fuse box diagram, follow these steps:
- Locate the Diagram: The fuse box diagram is typically located on the inside of the fuse box cover or on a separate label.
- Identify the Fuse Number: Locate the fuse number for the circuit you are troubleshooting.
- Check the Amperage Rating: Verify the amperage rating of the fuse to ensure you are using the correct replacement.
- Determine the Function: Identify the function of the fuse to understand which circuit it protects.
7.6. Common Fuse Types
The 2007 Ford F150 uses several different types of fuses, including:
- MINI Fuses: Small, rectangular fuses with a blade-type terminal.
- ATO Fuses: Standard-size fuses with a blade-type terminal.
- MAXI Fuses: Larger fuses with a blade-type terminal.
- JCase Fuses: Cartridge-style fuses with a rectangular housing.
Ensure you use the correct type of fuse when replacing a blown fuse.
7.7. Importance of Using the Correct Fuse
Using the correct fuse is crucial for the safety and reliability of your vehicle’s electrical system. Using a fuse with a higher amperage rating can allow too much current to flow through the circuit, potentially damaging components and creating a fire hazard. Using a fuse with a lower amperage rating may cause the fuse to blow prematurely.
7.8. Resources at MERCEDES-DIAGNOSTIC-TOOL.EDU.VN for Fuse Box Diagrams
At MERCEDES-DIAGNOSTIC-TOOL.EDU.VN, we offer comprehensive resources to help you understand and use the fuse box diagrams for your 2007 Ford F150:
- Detailed Diagrams: Accurate and easy-to-understand diagrams for all fuse box locations.
- Troubleshooting Guides: Step-by-step guides for diagnosing and resolving electrical issues.
- Expert Advice: Access to experienced technicians who can provide personalized assistance and advice.
Take advantage of our resources to ensure you can effectively navigate your vehicle’s electrical system and resolve any issues that may arise. For expert support, contact us at +1 (641) 206-8880 or visit our location at 789 Oak Avenue, Miami, FL 33101, United States.
8. Frequently Asked Questions (FAQs) About the 2007 Ford F150 OBD2 Fuse
Here are some frequently asked questions about the 2007 Ford F150 OBD2 fuse, providing quick answers to common concerns:
**Q1: Where is the OBD