The 2008 Ford F-150 OBD2 fuse location is usually in the interior fuse panel, often found beneath the dashboard on the driver’s side; however, you should always consult your vehicle’s repair manual for the specific OBD II fuse for accurate diagnostics and repairs, and MERCEDES-DIAGNOSTIC-TOOL.EDU.VN offers comprehensive resources to guide you through the process. Understanding fuse box diagrams and electrical troubleshooting can resolve issues quickly, utilizing available scanning tools and diagnostic information for your Ford F-150. This article covers the significance of identifying the correct OBD II fuse and how it relates to your vehicle’s overall diagnostic system, along with information on electrical components and troubleshooting techniques.
Contents
- 1. Understanding the Importance of the OBD2 Fuse in Your 2008 Ford F-150
- 1.1 What is the OBD2 System?
- 1.2 Why is the OBD2 Fuse Important?
- 1.3 Common Symptoms of a Blown OBD2 Fuse
- 1.4 Potential Causes of a Blown OBD2 Fuse
- 2. Locating the OBD2 Fuse in Your 2008 Ford F-150
- 2.1 Where to Find the Fuse Box
- 2.2 How to Identify the OBD2 Fuse
- 2.3 Using Fuse Diagrams
- 2.4 Tools Needed
- 3. Step-by-Step Guide to Checking and Replacing the OBD2 Fuse
- 3.1 Visual Inspection
- 3.2 Using a Multimeter to Test the Fuse
- 3.3 Replacing a Blown Fuse
- 3.4 Safety Precautions
- 4. Common Issues and Troubleshooting Tips
- 4.1 Fuse Blows Repeatedly
- 4.2 OBD2 Scanner Not Connecting
- 4.3 Check Engine Light Stays On
- 4.4 Additional Resources for Troubleshooting
- 5. Understanding Fuse Types and Ratings
- 5.1 Common Fuse Types
- 5.2 Amperage Ratings
- 5.3 Color Coding
- 5.4 Fuse Materials
- 6. OBD2 Port: Functionality and Common Issues
- 6.1 Location of the OBD2 Port
- 6.2 Functionality of the OBD2 Port
- 6.3 Common Issues with the OBD2 Port
- 6.4 Testing the OBD2 Port
- 6.5 Cleaning the OBD2 Port
- 7. Advanced Diagnostic Tools and Techniques
- 7.1 Professional-Grade Scanners
- 7.2 Using Wiring Diagrams
- 7.3 Oscilloscopes
- 7.4 Smoke Machines
- 8. Preventive Maintenance for Your 2008 Ford F-150 Electrical System
- 8.1 Regular Inspections
- 8.2 Battery Maintenance
- 8.3 Protecting Wiring
- 8.4 Addressing Issues Promptly
- 9. Why Choose MERCEDES-DIAGNOSTIC-TOOL.EDU.VN for Your Diagnostic Needs?
- 9.1 Expert Guidance
- 9.2 Comprehensive Resources
- 9.3 High-Quality Products
- 9.4 Community Support
- 9.5 Contact Us Today
- 10. Frequently Asked Questions (FAQs)
- 10.1 What Does the OBD2 Fuse Control?
- 10.2 Where Can I Find the Fuse Diagram for My 2008 Ford F-150?
- 10.3 What Should I Do If My OBD2 Scanner Won’t Power On?
- 10.4 Can I Use a Higher Amperage Fuse If I Don’t Have the Correct One?
- 10.5 What Does It Mean If My OBD2 Fuse Keeps Blowing?
- 10.6 How Do I Test the OBD2 Port for Proper Functionality?
- 10.7 Where Is the OBD2 Port Located in My 2008 Ford F-150?
- 10.8 Can a Blown OBD2 Fuse Affect Other Systems in My Vehicle?
- 10.9 What Are Some Common Causes of a Blown OBD2 Fuse?
- 10.10 Is It Safe to Diagnose and Repair Electrical Issues on My Own?
1. Understanding the Importance of the OBD2 Fuse in Your 2008 Ford F-150
The OBD2 fuse in your 2008 Ford F-150 is crucial for vehicle diagnostics. It supplies power to the On-Board Diagnostics system, which monitors various systems in your truck to ensure they are functioning correctly. When this fuse fails, it can prevent you from reading diagnostic codes, which are vital for diagnosing and repairing issues.
1.1 What is the OBD2 System?
The On-Board Diagnostics II (OBD2) system is a standardized system used in most vehicles since the mid-1990s. Its primary function is to monitor the performance of the engine, transmission, and other critical components. When a problem is detected, the OBD2 system generates a diagnostic trouble code (DTC) and illuminates the check engine light on the dashboard.
- Monitoring: The OBD2 system monitors sensors and actuators to detect malfunctions.
- Diagnostic Trouble Codes (DTCs): These codes help identify the source of the problem.
- Check Engine Light: Illuminates to alert the driver of a potential issue.
1.2 Why is the OBD2 Fuse Important?
The OBD2 fuse protects the OBD2 system from electrical overloads. If this fuse blows, the OBD2 scanner won’t be able to communicate with the vehicle’s computer, making it impossible to retrieve diagnostic codes. Without these codes, diagnosing and fixing issues becomes significantly more challenging.
- Power Supply: The fuse provides necessary power to the OBD2 port.
- Diagnostic Communication: Enables communication between the scanner and the vehicle’s computer.
- Preventing Overloads: Protects the OBD2 system from electrical damage.
1.3 Common Symptoms of a Blown OBD2 Fuse
Several symptoms can indicate a blown OBD2 fuse in your 2008 Ford F-150:
- OBD2 Scanner Not Powering On: The scanner shows no signs of power when connected to the OBD2 port.
- Inability to Read Diagnostic Codes: The scanner powers on but cannot retrieve any diagnostic codes from the vehicle.
- Check Engine Light Issues: The check engine light may behave erratically or not illuminate at all.
- Other Electrical Issues: In some cases, a blown OBD2 fuse can be linked to other electrical malfunctions in the vehicle.
1.4 Potential Causes of a Blown OBD2 Fuse
Understanding the causes of a blown OBD2 fuse can help prevent future issues. Here are some common causes:
- Electrical Overload: Excessive current draw can cause the fuse to blow.
- Short Circuit: A short in the wiring connected to the OBD2 port can cause the fuse to fail.
- Faulty OBD2 Scanner: A malfunctioning scanner can sometimes cause the fuse to blow.
- Wiring Issues: Damaged or corroded wiring can lead to shorts and blown fuses.
2. Locating the OBD2 Fuse in Your 2008 Ford F-150
Finding the OBD2 fuse is the first step in troubleshooting any diagnostic issues. In the 2008 Ford F-150, the fuse location can vary, so consulting your owner’s manual or a reliable fuse diagram is essential.
2.1 Where to Find the Fuse Box
The primary fuse box in the 2008 Ford F-150 is usually located inside the cabin. It’s typically found:
- Under the Dashboard: On the driver’s side, near the steering column.
- Behind a Panel: The fuse box is often concealed behind a plastic panel that can be easily removed.
2.2 How to Identify the OBD2 Fuse
Once you’ve located the fuse box, the next step is to identify the OBD2 fuse. Here’s how:
- Consult the Owner’s Manual: The owner’s manual contains a detailed fuse diagram showing the location and function of each fuse.
- Check the Fuse Box Diagram: Many fuse boxes have a diagram printed on the inside of the cover. This diagram indicates the purpose of each fuse.
- Look for Labels: The OBD2 fuse may be labeled as “Data Link Connector,” “OBD,” or “Diagnostic Connector.”
- Fuse Amperage: The OBD2 fuse is typically a low-amperage fuse, often 5A to 15A.
2.3 Using Fuse Diagrams
A fuse diagram is an invaluable tool for locating the OBD2 fuse. Here are some tips for using fuse diagrams effectively:
- Accuracy: Ensure the diagram matches your vehicle’s year and model.
- Orientation: Orient the diagram correctly to match the physical layout of the fuse box.
- Legend: Understand the symbols and abbreviations used in the diagram.
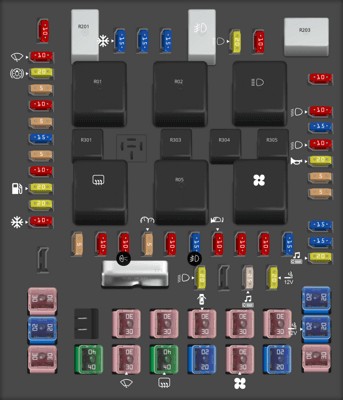 2008 Ford F-150 fuse box diagram Passenger Compartment Fuse Panel
2.4 Tools Needed
Before you start inspecting the fuses, gather the necessary tools:
- Fuse Puller: A fuse puller makes it easier to remove fuses without damaging them.
- Flashlight: A flashlight is essential for seeing inside the fuse box, especially in dimly lit areas.
- Multimeter: A multimeter can be used to test the continuity of the fuse and confirm whether it’s blown.
3. Step-by-Step Guide to Checking and Replacing the OBD2 Fuse
Once you’ve located the OBD2 fuse, the next step is to check its condition and replace it if necessary.
3.1 Visual Inspection
The first step is to visually inspect the fuse for any signs of damage:
- Broken Filament: Look for a break in the thin wire (filament) inside the fuse. If the filament is broken, the fuse is blown.
- Discoloration: Check for any discoloration or melting on the fuse body, which can indicate overheating.
3.2 Using a Multimeter to Test the Fuse
A multimeter provides a more accurate way to check the fuse:
- Set the Multimeter: Set the multimeter to the continuity setting (usually indicated by a diode symbol or an audible beep).
- Test the Fuse: Place the multimeter probes on each of the fuse’s metal contacts.
- Check for Continuity: If the multimeter beeps or shows a reading close to zero ohms, the fuse is good. If there is no beep or the reading is very high (infinite resistance), the fuse is blown.
3.3 Replacing a Blown Fuse
If the OBD2 fuse is blown, follow these steps to replace it:
- Turn Off the Ignition: Ensure the vehicle’s ignition is turned off to prevent electrical surges.
- Remove the Blown Fuse: Use a fuse puller to gently remove the blown fuse from the fuse box.
- Install a New Fuse: Replace the blown fuse with a new fuse of the same amperage rating. Using a fuse with a higher amperage rating can cause damage to the electrical system.
- Test the System: After replacing the fuse, test the OBD2 system by connecting an OBD2 scanner and verifying that it powers on and can read diagnostic codes.
3.4 Safety Precautions
When working with electrical components, always take the following safety precautions:
- Disconnect the Battery: For added safety, disconnect the negative terminal of the battery before working on the electrical system.
- Use Proper Tools: Use insulated tools to prevent electrical shock.
- Avoid Water: Do not work on the electrical system in wet or damp conditions.
4. Common Issues and Troubleshooting Tips
Even after replacing the OBD2 fuse, you may still encounter issues. Here are some common problems and troubleshooting tips to help you resolve them.
4.1 Fuse Blows Repeatedly
If the OBD2 fuse blows repeatedly after replacement, it indicates an underlying electrical problem:
- Short Circuit: Check for a short circuit in the wiring connected to the OBD2 port. Look for damaged or frayed wires that may be touching metal surfaces.
- Faulty Components: A faulty component connected to the OBD2 system, such as a sensor or module, may be drawing excessive current.
- Professional Inspection: If you cannot identify the cause of the repeated fuse failures, consult a qualified mechanic for further diagnosis and repair.
4.2 OBD2 Scanner Not Connecting
If the OBD2 scanner is not connecting to the vehicle’s computer, consider the following:
- Scanner Compatibility: Ensure the scanner is compatible with the 2008 Ford F-150.
- Connection Issues: Check the connection between the scanner and the OBD2 port. Make sure the connector is fully inserted and that the pins are not bent or damaged.
- Software Updates: Ensure the scanner’s software is up to date.
- Vehicle’s Computer: The vehicle’s computer may have issues. In this case, professional diagnostic services may be needed.
4.3 Check Engine Light Stays On
If the check engine light remains on after addressing the initial problem, follow these steps:
- Clear Diagnostic Codes: Use the OBD2 scanner to clear any stored diagnostic codes.
- Drive Cycle: Perform a drive cycle to allow the OBD2 system to re-evaluate the vehicle’s performance. A drive cycle involves specific driving conditions that help the system run its diagnostic tests.
- Further Inspection: If the check engine light returns, further diagnostic testing may be required to identify and resolve the underlying issue.
4.4 Additional Resources for Troubleshooting
When troubleshooting electrical issues, consider the following resources:
- Online Forums: Online forums dedicated to the Ford F-150 can provide valuable insights and troubleshooting tips from other owners.
- Repair Manuals: A detailed repair manual for your vehicle can offer specific diagnostic procedures and wiring diagrams.
- Professional Mechanics: If you are uncomfortable working on the electrical system, consult a professional mechanic for assistance.
5. Understanding Fuse Types and Ratings
Fuses come in various types and amperage ratings. Using the correct fuse type and rating is crucial for the safe and reliable operation of your vehicle’s electrical system.
5.1 Common Fuse Types
- Blade Fuses: Also known as spade fuses, these are the most common type of fuse used in automotive applications. They come in various sizes, including mini, standard, and maxi.
- Glass Tube Fuses: Older vehicles often use glass tube fuses. These fuses have a glass body with a visible filament.
- Cartridge Fuses: These fuses are typically used for high-current applications, such as the main power supply to the fuse box.
5.2 Amperage Ratings
Each fuse is marked with an amperage rating, which indicates the maximum current it can handle before blowing. It is crucial to use a fuse with the correct amperage rating:
- Too Low: A fuse with too low an amperage rating will blow prematurely, causing the circuit to fail.
- Too High: A fuse with too high an amperage rating may not blow in the event of an overload, potentially damaging the electrical system.
5.3 Color Coding
Blade fuses are color-coded to indicate their amperage rating. Here are some common color codes:
- 5A: Orange
- 7.5A: Brown
- 10A: Red
- 15A: Blue
- 20A: Yellow
- 25A: Clear
- 30A: Green
5.4 Fuse Materials
Fuses are made from materials that melt easily when overheated. The most common materials are:
- Zinc: Zinc fuses are inexpensive and commonly used for lower amperage ratings.
- Aluminum: Aluminum fuses are used for medium amperage ratings.
- Silver: Silver fuses are used for high amperage ratings and offer better performance and reliability.
6. OBD2 Port: Functionality and Common Issues
The OBD2 port, also known as the Data Link Connector (DLC), is a standardized interface used to access the vehicle’s diagnostic information. Understanding its functionality and common issues can help you troubleshoot problems more effectively.
6.1 Location of the OBD2 Port
The OBD2 port is typically located within reach of the driver, often:
- Under the Dashboard: Near the steering column.
- In the Center Console: Inside the center console compartment.
6.2 Functionality of the OBD2 Port
The OBD2 port provides access to various diagnostic data, including:
- Diagnostic Trouble Codes (DTCs): Codes that indicate specific malfunctions.
- Live Data: Real-time data from sensors and actuators.
- Freeze Frame Data: Data recorded at the moment a DTC was triggered.
- Vehicle Identification Number (VIN): Unique identifier for the vehicle.
6.3 Common Issues with the OBD2 Port
- Damaged Connector: The OBD2 port can be damaged by physical force or corrosion, leading to poor connections.
- Bent or Broken Pins: The pins inside the OBD2 port can be bent or broken, preventing the scanner from making proper contact.
- Wiring Problems: The wiring connected to the OBD2 port can be damaged or disconnected, causing communication issues.
6.4 Testing the OBD2 Port
You can test the OBD2 port using a multimeter to check for proper voltage and ground connections:
- Voltage Check: With the ignition on, check for voltage between pin 16 (battery power) and pin 4 or 5 (ground). You should see approximately 12 volts.
- Continuity Check: With the ignition off, check for continuity between pin 4 or 5 and a known good ground on the vehicle.
6.5 Cleaning the OBD2 Port
If the OBD2 port is dirty or corroded, you can clean it using:
- Electrical Contact Cleaner: Spray electrical contact cleaner into the port to remove dirt and corrosion.
- Small Brush: Use a small brush to gently scrub the pins and remove any stubborn debris.
7. Advanced Diagnostic Tools and Techniques
For more complex diagnostic issues, advanced tools and techniques may be required.
7.1 Professional-Grade Scanners
Professional-grade scanners offer advanced features and capabilities compared to basic OBD2 scanners:
- Enhanced Diagnostics: Access to manufacturer-specific diagnostic codes and data.
- Bi-Directional Control: Ability to control and test various vehicle systems and components.
- Programming and Calibration: Ability to program and calibrate certain modules and sensors.
7.2 Using Wiring Diagrams
Wiring diagrams are essential for troubleshooting electrical issues. They provide detailed information about the wiring circuits, component locations, and connector pinouts:
- Circuit Tracing: Use wiring diagrams to trace the flow of electricity through a circuit and identify potential points of failure.
- Component Location: Wiring diagrams show the physical location of components, making it easier to access and test them.
- Pinout Information: Wiring diagrams provide detailed pinout information for connectors, allowing you to test the voltage and continuity of individual wires.
7.3 Oscilloscopes
An oscilloscope is a powerful tool for analyzing electrical signals:
- Waveform Analysis: An oscilloscope can display the waveform of an electrical signal, allowing you to identify abnormalities such as voltage drops, signal noise, and intermittent connections.
- Sensor Testing: Use an oscilloscope to test the output signals from sensors and verify that they are within the specified range.
7.4 Smoke Machines
Smoke machines are used to detect leaks in the intake and exhaust systems:
- Leak Detection: Introduce smoke into the system and look for areas where the smoke escapes, indicating a leak.
- Vacuum Leaks: Smoke machines can help identify vacuum leaks, which can cause a variety of engine performance issues.
8. Preventive Maintenance for Your 2008 Ford F-150 Electrical System
Preventive maintenance is key to ensuring the long-term reliability of your 2008 Ford F-150’s electrical system.
8.1 Regular Inspections
Perform regular inspections of the electrical system to identify potential issues before they cause problems:
- Wiring: Check for damaged, frayed, or corroded wiring.
- Connectors: Inspect connectors for corrosion and ensure they are securely connected.
- Fuses and Relays: Verify that all fuses and relays are in good condition and properly seated.
8.2 Battery Maintenance
The battery is a critical component of the electrical system. Proper battery maintenance can help prevent issues:
- Clean Terminals: Clean the battery terminals regularly to remove corrosion.
- Check Voltage: Check the battery voltage to ensure it is within the specified range.
- Secure Connections: Ensure the battery cables are securely connected to the terminals.
8.3 Protecting Wiring
Protecting the wiring from damage is essential:
- Use Conduits: Use wiring conduits to protect wires from abrasion and heat.
- Secure Wiring: Secure wiring harnesses to prevent them from rubbing against sharp edges.
- Avoid Overloading Circuits: Avoid overloading electrical circuits by adding too many accessories.
8.4 Addressing Issues Promptly
Address any electrical issues promptly to prevent them from escalating:
- Troubleshoot Issues: Troubleshoot any electrical problems as soon as they are detected.
- Repair Damage: Repair any damaged wiring or components promptly.
- Seek Professional Help: If you are uncomfortable working on the electrical system, seek professional help.
9. Why Choose MERCEDES-DIAGNOSTIC-TOOL.EDU.VN for Your Diagnostic Needs?
MERCEDES-DIAGNOSTIC-TOOL.EDU.VN is your trusted partner for all your vehicle diagnostic and repair needs. With expert guidance and comprehensive resources, we empower you to keep your vehicle running smoothly and efficiently.
9.1 Expert Guidance
Our team of experienced technicians and automotive experts is dedicated to providing you with the knowledge and support you need:
- Accurate Information: Access reliable and up-to-date information on vehicle diagnostics and repairs.
- Troubleshooting Assistance: Get personalized assistance with troubleshooting complex issues.
- Step-by-Step Guides: Follow our easy-to-understand step-by-step guides to perform various diagnostic and repair tasks.
9.2 Comprehensive Resources
We offer a wide range of resources to help you diagnose and repair your vehicle:
- Fuse Diagrams: Access detailed fuse diagrams for various vehicle makes and models.
- Wiring Diagrams: Explore comprehensive wiring diagrams to trace electrical circuits.
- Diagnostic Trouble Codes (DTCs): Look up diagnostic trouble codes and learn about their potential causes and solutions.
9.3 High-Quality Products
We offer a selection of high-quality diagnostic tools and equipment to meet your needs:
- OBD2 Scanners: Browse our selection of OBD2 scanners from leading brands.
- Professional-Grade Tools: Find professional-grade tools for advanced diagnostic and repair tasks.
- Reliable Components: Purchase reliable replacement parts and components for your vehicle.
9.4 Community Support
Join our community of vehicle enthusiasts and experts to share knowledge and get support:
- Online Forums: Participate in online forums to discuss diagnostic and repair issues.
- Expert Advice: Get advice from experienced technicians and automotive experts.
- Peer Support: Connect with other vehicle owners and share your experiences.
9.5 Contact Us Today
Don’t let vehicle problems keep you off the road. Contact MERCEDES-DIAGNOSTIC-TOOL.EDU.VN today for expert guidance, comprehensive resources, and high-quality products. Visit us at MERCEDES-DIAGNOSTIC-TOOL.EDU.VN or contact our experts via WhatsApp at +1 (641) 206-8880. Our office is located at 789 Oak Avenue, Miami, FL 33101, United States.
10. Frequently Asked Questions (FAQs)
10.1 What Does the OBD2 Fuse Control?
The OBD2 fuse primarily powers the On-Board Diagnostics II (OBD2) system in your vehicle. This system is responsible for monitoring various components and systems, including the engine, transmission, and emissions controls.
10.2 Where Can I Find the Fuse Diagram for My 2008 Ford F-150?
You can find the fuse diagram in your vehicle’s owner’s manual. Alternatively, you can often find a fuse diagram printed on the inside of the fuse box cover.
10.3 What Should I Do If My OBD2 Scanner Won’t Power On?
First, check the OBD2 fuse in your vehicle’s fuse box. If the fuse is blown, replace it with a new fuse of the same amperage rating. If the scanner still won’t power on, there may be an issue with the scanner itself or the OBD2 port.
10.4 Can I Use a Higher Amperage Fuse If I Don’t Have the Correct One?
No, you should never use a fuse with a higher amperage rating than specified. Using a higher amperage fuse can cause damage to the electrical system and may even lead to a fire.
10.5 What Does It Mean If My OBD2 Fuse Keeps Blowing?
If your OBD2 fuse keeps blowing, it indicates an underlying electrical problem, such as a short circuit or a faulty component. You should inspect the wiring and components connected to the OBD2 system and consult a qualified mechanic if necessary.
10.6 How Do I Test the OBD2 Port for Proper Functionality?
You can test the OBD2 port using a multimeter to check for proper voltage and ground connections. With the ignition on, you should see approximately 12 volts between pin 16 (battery power) and pin 4 or 5 (ground).
10.7 Where Is the OBD2 Port Located in My 2008 Ford F-150?
The OBD2 port is typically located under the dashboard on the driver’s side, near the steering column.
10.8 Can a Blown OBD2 Fuse Affect Other Systems in My Vehicle?
While the OBD2 fuse primarily powers the OBD2 system, a blown fuse can sometimes affect other systems that share the same circuit. It is essential to address the issue promptly to prevent further complications.
10.9 What Are Some Common Causes of a Blown OBD2 Fuse?
Common causes of a blown OBD2 fuse include electrical overloads, short circuits, faulty OBD2 scanners, and wiring issues.
10.10 Is It Safe to Diagnose and Repair Electrical Issues on My Own?
Diagnosing and repairing electrical issues can be complex and potentially dangerous. If you are not comfortable working on the electrical system, it is best to consult a qualified mechanic. MERCEDES-DIAGNOSTIC-TOOL.EDU.VN offers expert guidance and resources to help you, but always prioritize safety.
By following this comprehensive guide and utilizing the resources available at MERCEDES-DIAGNOSTIC-TOOL.EDU.VN, you can effectively locate, check, and replace the OBD2 fuse in your 2008 Ford F-150. Remember, preventive maintenance and prompt attention to electrical issues are key to keeping your vehicle running smoothly. For further assistance, don’t hesitate to reach out to our experts at +1 (641) 206-8880 or visit our website. We are here to help you every step of the way.