The 2010 Malibu Obd2 system provides valuable insights into your vehicle’s health, allowing you to diagnose and address potential issues effectively. At MERCEDES-DIAGNOSTIC-TOOL.EDU.VN, we help you understand how to leverage this system for optimal car maintenance. Utilizing OBD2 scanner and diagnostic tools can help you enhance vehicle performance.
Contents
- 1. Understanding the 2010 Malibu OBD2 System
- 1.1 What is OBD2?
- 1.2 Key Components Monitored by OBD2 in a 2010 Malibu
- 1.3 How to Access OBD2 Data
- 2. Common OBD2 Codes for the 2010 Malibu
- 2.1 P0300 – Random/Multiple Cylinder Misfire Detected
- 2.2 P0171 – System Too Lean (Bank 1)
- 2.3 P0420 – Catalyst System Efficiency Below Threshold (Bank 1)
- 2.4 P0700 – Transmission Control System Malfunction
- 2.5 B0081 – Driver Frontal Stage 1 Deployment Control
- 2.6 C0035 – Left Front Wheel Speed Sensor Circuit
- 2.7 U0100 – Lost Communication With ECM/PCM
- 2.8 B1000 – ECU Malfunction
- 2.9 P0442 – Evaporative Emission Control System Leak Detected (Small Leak)
- 2.10 P0102 – Mass Air Flow (MAF) Circuit Low Input
- 3. Choosing the Right OBD2 Scanner for Your 2010 Malibu
- 3.1 Basic OBD2 Scanners
- 3.2 Mid-Range OBD2 Scanners
- 3.3 Professional-Grade OBD2 Scanners
- 3.4 Recommended OBD2 Scanners for the 2010 Malibu
- 3.5 Considerations When Choosing a Scanner
- 4. Performing a Diagnostic Scan on Your 2010 Malibu
- 4.1 Step-by-Step Guide to Scanning Your Malibu
- 4.2 Interpreting the Results
- 4.3 Using Live Data
- 5. Advanced Diagnostic Techniques for the 2010 Malibu
- 5.1 Bi-Directional Control
- 5.2 Smoke Testing
- 5.3 Using a Multimeter
- 5.4 Oscilloscope Diagnostics
- 6. Maintaining Your 2010 Malibu’s OBD2 System
- 6.1 Regular Check-Ups
- 6.2 Keeping Your Vehicle in Good Condition
- 6.3 Addressing Issues Promptly
- 6.4 Proper Storage and Handling of OBD2 Scanners
- 7. Benefits of Understanding Your 2010 Malibu OBD2 System
- 7.1 Cost Savings
- 7.2 Improved Vehicle Performance
- 7.3 Increased Vehicle Lifespan
- 7.4 Greater Peace of Mind
- 8. Common Mistakes to Avoid When Using OBD2 Scanners
- 8.1 Ignoring Codes
- 8.2 Clearing Codes Without Repairing the Issue
- 8.3 Using Incompatible Scanners
- 8.4 Misinterpreting Data
- 8.5 Overlooking Basic Maintenance
- 9. Real-World Examples of OBD2 Use in 2010 Malibu Diagnostics
- 9.1 Diagnosing a Misfire
- 9.2 Identifying a Fuel Mixture Issue
- 9.3 Detecting a Catalytic Converter Problem
- 10. Staying Updated with OBD2 Technology
- 10.1 Subscribing to Automotive Publications
- 10.2 Attending Workshops and Seminars
- 10.3 Joining Online Forums and Communities
- 10.4 Monitoring Industry News
- 11. Connecting with MERCEDES-DIAGNOSTIC-TOOL.EDU.VN for Expert Assistance
- 12. Mercedes Hidden Features
- 13. How to Use Diagnostic Tools for Mercedes
- 14. Maintenance Tips for Mercedes-Benz
- 15. Step-by-Step Repair Guides
- How to Replace Spark Plugs
- 16. Safety Precautions
- 17. Common Issues with the 2010 Malibu
- 18. OBD2 Apps
- 18.1 Popular OBD2 Apps
- 18.2 Advantages of Using OBD2 Apps
- 18.3 How to Use OBD2 Apps
- 19. Controller Area Network (CAN) Bus Systems
- 19.1 How CAN Bus Works
- 19.2 Diagnosing CAN Bus Issues
- 19.3 Common CAN Bus Codes
- 19.4 Troubleshooting CAN Bus Issues
- 20. Frequently Asked Questions (FAQ)
- 20.1 What is the OBD2 port location in a 2010 Malibu?
- 20.2 Which OBD2 scanner is best for a 2010 Malibu?
- 20.3 How do I clear OBD2 codes on my 2010 Malibu?
1. Understanding the 2010 Malibu OBD2 System
The On-Board Diagnostics II (OBD2) system in your 2010 Malibu is a standardized system that monitors various components of your car to ensure they are functioning correctly. When a problem is detected, the system generates a Diagnostic Trouble Code (DTC), which can be read using an OBD2 scanner.
1.1 What is OBD2?
OBD2, or On-Board Diagnostics II, is a standardized system used in most vehicles since 1996 to monitor engine performance, emissions, and other critical systems. It provides a way to access the health information of your car. According to the Environmental Protection Agency (EPA), OBD2 was implemented to ensure vehicles meet emissions standards and to provide technicians with a standardized way to diagnose issues.
1.2 Key Components Monitored by OBD2 in a 2010 Malibu
The OBD2 system in a 2010 Malibu monitors several key components, including:
- Engine: Checks for misfires, fuel efficiency, and overall performance.
- Transmission: Monitors gear shifts and transmission fluid temperature.
- Emissions System: Ensures that the catalytic converter, oxygen sensors, and other emission-related components are working properly.
- ABS (Anti-lock Braking System): Detects issues with wheel speed sensors and brake functionality.
- SRS (Supplemental Restraint System): Monitors airbags and seatbelt pretensioners.
1.3 How to Access OBD2 Data
To access OBD2 data on your 2010 Malibu, you’ll need an OBD2 scanner. Here’s how:
- Locate the OBD2 Port: This is usually found under the dashboard on the driver’s side.
- Plug in the Scanner: Connect the scanner to the OBD2 port.
- Turn on the Ignition: Turn the key to the “on” position without starting the engine.
- Read the Codes: Follow the scanner’s instructions to read any stored Diagnostic Trouble Codes (DTCs).
- Interpret the Codes: Use the scanner’s manual or an online resource to understand what the codes mean.
2. Common OBD2 Codes for the 2010 Malibu
Understanding common OBD2 codes can help you diagnose and fix issues more efficiently. Here are some frequent codes you might encounter with your 2010 Malibu:
2.1 P0300 – Random/Multiple Cylinder Misfire Detected
This code indicates that the engine is experiencing misfires in one or more cylinders. Misfires can lead to reduced fuel efficiency, poor performance, and potential damage to the catalytic converter.
Causes:
- Faulty spark plugs
- Defective ignition coils
- Vacuum leaks
- Clogged fuel injectors
- Low fuel pressure
Troubleshooting Steps:
- Check Spark Plugs: Inspect and replace any worn or damaged spark plugs.
- Inspect Ignition Coils: Test the ignition coils and replace any that are not functioning correctly.
- Check for Vacuum Leaks: Use a vacuum gauge to identify and repair any leaks.
- Clean Fuel Injectors: Use a fuel injector cleaner or have them professionally cleaned.
- Check Fuel Pressure: Ensure that the fuel pump is delivering the correct pressure.
2.2 P0171 – System Too Lean (Bank 1)
This code means that the engine is running lean, indicating there is too much air and not enough fuel in the air-fuel mixture.
Causes:
- Vacuum leaks
- Faulty oxygen sensor
- Dirty mass airflow sensor (MAF)
- Low fuel pressure
- Clogged fuel filter
Troubleshooting Steps:
- Check for Vacuum Leaks: Inspect all vacuum lines and intake manifold gaskets for leaks.
- Test Oxygen Sensor: Use a multimeter to check the voltage output of the oxygen sensor. Replace if necessary.
- Clean MAF Sensor: Use a MAF sensor cleaner to remove any dirt or debris.
- Check Fuel Pressure: Ensure that the fuel pump is delivering the correct pressure.
- Replace Fuel Filter: Replace the fuel filter if it is clogged or dirty.
2.3 P0420 – Catalyst System Efficiency Below Threshold (Bank 1)
This code indicates that the catalytic converter is not functioning efficiently, leading to increased emissions.
Causes:
- Faulty catalytic converter
- Exhaust leaks
- Faulty oxygen sensors
- Engine misfires
Troubleshooting Steps:
- Inspect Catalytic Converter: Check for physical damage and ensure it is not clogged.
- Check for Exhaust Leaks: Inspect the exhaust system for any leaks.
- Test Oxygen Sensors: Ensure the oxygen sensors before and after the catalytic converter are functioning correctly.
- Address Engine Misfires: Fix any engine misfires that may be damaging the catalytic converter.
2.4 P0700 – Transmission Control System Malfunction
This code indicates a problem with the transmission control system, which could affect shifting and overall performance.
Causes:
- Low transmission fluid
- Faulty shift solenoids
- Defective transmission control module (TCM)
- Damaged wiring
Troubleshooting Steps:
- Check Transmission Fluid: Ensure the transmission fluid is at the correct level and in good condition.
- Test Shift Solenoids: Use a multimeter to check the resistance of the shift solenoids.
- Inspect Wiring: Check the wiring and connectors for any damage or corrosion.
- Check TCM: Have the TCM diagnosed by a professional.
2.5 B0081 – Driver Frontal Stage 1 Deployment Control
This code signifies an issue within the Supplemental Restraint System (SRS), specifically concerning the driver’s frontal airbag deployment.
Causes:
- Faulty airbag module
- Damaged clock spring
- Wiring harness issues
- Connector problems
Troubleshooting Steps:
- Inspect the Airbag Module: Check for any visible damage or corrosion.
- Check the Clock Spring: Ensure the clock spring is functioning correctly and not damaged.
- Examine Wiring Harness: Look for any cuts, abrasions, or loose connections in the wiring harness.
- Test Connectors: Verify that all connectors are properly seated and free of corrosion.
- Reset the SRS Light: After addressing the issue, reset the SRS light using a diagnostic tool.
2.6 C0035 – Left Front Wheel Speed Sensor Circuit
This code signals a problem with the left front wheel speed sensor, which is critical for ABS and traction control systems.
Causes:
- Defective wheel speed sensor
- Damaged wiring
- Connector issues
- ABS module malfunction
Troubleshooting Steps:
- Inspect the Wheel Speed Sensor: Check the sensor for any physical damage or debris.
- Check Wiring: Look for any cuts, abrasions, or loose connections in the wiring.
- Test Connectors: Ensure all connectors are properly seated and free of corrosion.
- Test Sensor Output: Use a multimeter to check the sensor’s output signal while rotating the wheel.
- Check ABS Module: If the sensor and wiring appear to be in good condition, the ABS module may be faulty.
2.7 U0100 – Lost Communication With ECM/PCM
This code means that there is a communication failure between the Engine Control Module (ECM) or Powertrain Control Module (PCM) and other modules in the vehicle.
Causes:
- Faulty ECM/PCM
- Damaged wiring
- Connector issues
- CAN bus problems
Troubleshooting Steps:
- Check Wiring and Connectors: Look for any damage or corrosion in the wiring and connectors related to the ECM/PCM.
- Inspect ECM/PCM: Check the ECM/PCM for any signs of physical damage.
- Test CAN Bus: Use a diagnostic tool to test the Controller Area Network (CAN) bus for communication issues.
- Check Power and Ground: Ensure the ECM/PCM is receiving proper power and ground.
2.8 B1000 – ECU Malfunction
This code signifies that the Electronic Control Unit (ECU) has detected an internal fault, affecting its ability to control various vehicle systems.
Causes:
- Internal ECU failure
- Software corruption
- Voltage issues
- Environmental factors (e.g., extreme temperatures)
Troubleshooting Steps:
- Check Power Supply: Ensure the ECU is receiving stable and correct voltage.
- Inspect Wiring: Look for any damage or corrosion in the wiring and connectors related to the ECU.
- Check for Updates: Verify if there are any available software updates for the ECU.
- Professional Diagnosis: If the above steps do not resolve the issue, a professional diagnosis and possible ECU replacement may be necessary.
2.9 P0442 – Evaporative Emission Control System Leak Detected (Small Leak)
This code signifies a small leak in the evaporative emission control system, which prevents fuel vapors from escaping into the atmosphere.
Causes:
- Loose or faulty gas cap
- Cracked or damaged vapor lines
- Faulty purge valve
- Defective vent valve
Troubleshooting Steps:
- Check Gas Cap: Ensure the gas cap is properly tightened and not damaged.
- Inspect Vapor Lines: Look for any cracks or damage in the vapor lines.
- Test Purge Valve: Use a diagnostic tool to activate the purge valve and check if it is functioning correctly.
- Test Vent Valve: Ensure the vent valve is opening and closing properly.
- Smoke Test: Perform a smoke test to locate small leaks in the system.
2.10 P0102 – Mass Air Flow (MAF) Circuit Low Input
This code indicates that the Mass Air Flow (MAF) sensor is sending a low voltage signal to the engine control unit, suggesting a problem with the sensor or its circuit.
Causes:
- Dirty or faulty MAF sensor
- Wiring issues
- Vacuum leaks
- Restricted air intake
Troubleshooting Steps:
- Clean MAF Sensor: Use a MAF sensor cleaner to remove any dirt or debris from the sensor.
- Inspect Wiring: Check the wiring and connectors for any damage or corrosion.
- Check for Vacuum Leaks: Inspect all vacuum lines and intake manifold gaskets for leaks.
- Inspect Air Intake: Ensure the air filter is clean and the air intake is not restricted.
- Test MAF Sensor: Use a multimeter to check the sensor’s voltage output.
Understanding these common codes and their potential solutions can save you time and money on unnecessary repairs. If you are unsure about any diagnostic or repair steps, consulting a professional at MERCEDES-DIAGNOSTIC-TOOL.EDU.VN is always a good idea.
3. Choosing the Right OBD2 Scanner for Your 2010 Malibu
Selecting the appropriate OBD2 scanner is essential for accurate diagnostics. Different scanners offer varying levels of functionality and features.
3.1 Basic OBD2 Scanners
These scanners are typically inexpensive and provide basic functionality, such as reading and clearing DTCs. They are suitable for simple diagnostics.
Features:
- Read and clear DTCs
- Display basic live data
- Suitable for beginners
3.2 Mid-Range OBD2 Scanners
Mid-range scanners offer more advanced features, such as enhanced live data, freeze frame data, and the ability to perform some system tests.
Features:
- Enhanced live data
- Freeze frame data
- System tests (e.g., O2 sensor test)
- Suitable for DIY enthusiasts and intermediate users
3.3 Professional-Grade OBD2 Scanners
Professional-grade scanners provide the most comprehensive functionality, including advanced diagnostics, bi-directional controls, and access to manufacturer-specific codes.
Features:
- Advanced diagnostics
- Bi-directional controls
- Manufacturer-specific codes
- Suitable for professional technicians
3.4 Recommended OBD2 Scanners for the 2010 Malibu
Here are a few recommended OBD2 scanners that work well with the 2010 Malibu:
| Scanner | Features | Price Range |
|---|---|---|
| Autel MaxiCOM MK808 | Reads and clears codes, live data, bi-directional control, and advanced functions. | $200-300 |
| BlueDriver Bluetooth Pro | Reads and clears codes, live data, vehicle-specific repair reports via smartphone app. | $100-120 |
| Innova 3100i | Reads and clears codes, ABS/SRS diagnostics, battery and alternator check, freeze frame data. | $80-100 |
| Launch X431 V+ | Comprehensive diagnostics, bi-directional controls, ECU coding, and supports a wide range of vehicle makes and models. | $800-1200 |
| Bosch ADS 625 | Professional-grade diagnostics, bi-directional controls, ECU programming, and comprehensive vehicle coverage. | $2000-3000 |
| Snap-on Zeus | Advanced diagnostics, guided component tests, integrated scan tool and lab scope, and comprehensive vehicle coverage. | $8000-9000 |
| Thinkcar Thinkdiag | Affordable option for basic diagnostics, reads and clears codes, live data, and supports various special functions. | $120-150 |
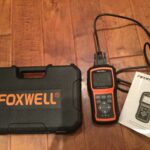
| Foxwell NT510 Elite | Reads and clears codes, bi-directional tests, supports various service functions, and is vehicle-specific. | $180-220 |
| Ancel AD310 | Basic code reader for quick diagnostics, reads and clears codes, displays DTC definitions. | $30-40 |
| Carly Universal Adapter Gen 2 | Reads and clears codes, live data, customization options, and supports a wide range of vehicle makes and models. | $80-100 |
3.5 Considerations When Choosing a Scanner
When selecting an OBD2 scanner, consider the following factors:
- Compatibility: Ensure the scanner is compatible with the 2010 Malibu.
- Features: Determine which features are necessary for your diagnostic needs.
- Ease of Use: Choose a scanner with an intuitive interface.
- Price: Set a budget and find a scanner that offers the best value for your money.
- Updates: Ensure the scanner supports software updates to stay current with new vehicle models and diagnostic procedures.
4. Performing a Diagnostic Scan on Your 2010 Malibu
Once you have an OBD2 scanner, you can perform a diagnostic scan to identify any issues with your 2010 Malibu.
4.1 Step-by-Step Guide to Scanning Your Malibu
- Prepare Your Scanner: Ensure the scanner is fully charged or has fresh batteries.
- Locate the OBD2 Port: Find the OBD2 port under the dashboard on the driver’s side.
- Connect the Scanner: Plug the scanner into the OBD2 port.
- Turn on the Ignition: Turn the key to the “on” position without starting the engine.
- Power on the Scanner: Turn on the scanner and wait for it to initialize.
- Select the Vehicle: If prompted, enter the vehicle’s make, model, and year.
- Read Codes: Select the “Read Codes” or “Diagnostic Codes” option.
- Record the Codes: Write down any Diagnostic Trouble Codes (DTCs) that appear.
- Clear Codes (Optional): If you want to clear the codes after addressing the issue, select the “Clear Codes” option. Be cautious when clearing codes, as it may erase important diagnostic data.
- Review Data: Analyze the freeze frame data and live sensor readings for further insights.
- Disconnect the Scanner: Once you have completed the scan, disconnect the scanner and turn off the ignition.
4.2 Interpreting the Results
After performing the scan, you’ll need to interpret the results. Each DTC corresponds to a specific issue, and understanding these codes is crucial for effective troubleshooting.
- Use a Code Reader: Use the scanner’s manual or an online database to look up the meaning of each code.
- Prioritize Codes: Address the most critical codes first, as they may be causing other issues.
- Research Solutions: Research potential causes and solutions for each code.
- Consult Professionals: If you are unsure about any diagnostic or repair steps, consult a professional mechanic at MERCEDES-DIAGNOSTIC-TOOL.EDU.VN for assistance.
4.3 Using Live Data
Live data provides real-time information about various sensors and systems in your 2010 Malibu. This can be incredibly useful for diagnosing intermittent issues or monitoring the performance of specific components.
- Monitor Sensor Readings: Observe the readings from oxygen sensors, MAF sensors, and other critical sensors.
- Check Fuel Trims: Monitor short-term and long-term fuel trims to identify fuel mixture issues.
- Observe Engine Parameters: Keep an eye on engine temperature, RPM, and load.
- Analyze Data: Look for any unusual or out-of-range values that may indicate a problem.
5. Advanced Diagnostic Techniques for the 2010 Malibu
For more complex issues, advanced diagnostic techniques may be necessary. These techniques require a deeper understanding of automotive systems and specialized equipment.
5.1 Bi-Directional Control
Bi-directional control allows you to send commands to the vehicle’s computer and activate specific components for testing purposes.
- Activating Solenoids: Test solenoids in the transmission or EVAP system.
- Running Injector Tests: Check the performance of individual fuel injectors.
- Performing ABS Tests: Activate the ABS system to check its functionality.
5.2 Smoke Testing
Smoke testing involves injecting smoke into the vehicle’s intake or exhaust system to identify leaks.
- Locating Vacuum Leaks: Find vacuum leaks in the intake manifold or vacuum lines.
- Identifying Exhaust Leaks: Detect exhaust leaks in the exhaust manifold or exhaust pipes.
- Finding EVAP Leaks: Locate leaks in the EVAP system.
5.3 Using a Multimeter
A multimeter is an essential tool for electrical diagnostics. It can be used to measure voltage, resistance, and current.
- Testing Sensors: Check the voltage output of various sensors.
- Checking Wiring: Test for continuity in wiring harnesses.
- Measuring Resistance: Measure the resistance of components like ignition coils.
5.4 Oscilloscope Diagnostics
An oscilloscope can display electrical signals over time, allowing you to analyze the waveform of various components.
- Analyzing Sensor Signals: Check the waveform of oxygen sensors or crankshaft position sensors.
- Diagnosing Ignition Issues: Analyze the ignition waveform to identify misfires.
- Testing Communication Signals: Monitor CAN bus signals to diagnose communication issues.
6. Maintaining Your 2010 Malibu’s OBD2 System
Proper maintenance of your 2010 Malibu’s OBD2 system is crucial for ensuring accurate diagnostics and preventing future issues.
6.1 Regular Check-Ups
Regularly scanning your vehicle for DTCs can help identify potential problems early on.
- Monthly Scans: Perform a scan at least once a month to check for any new codes.
- Post-Repair Scans: Always scan your vehicle after performing any repairs to ensure the issue has been resolved and no new problems have arisen.
- Pre-Trip Scans: Before embarking on long trips, scan your vehicle to identify any potential issues that could cause problems on the road.
6.2 Keeping Your Vehicle in Good Condition
Maintaining your vehicle in good condition can help prevent many of the issues that trigger OBD2 codes.
- Regular Oil Changes: Change your oil according to the manufacturer’s recommendations.
- Proper Tire Inflation: Maintain proper tire inflation to improve fuel efficiency and handling.
- Scheduled Maintenance: Follow the recommended maintenance schedule in your owner’s manual.
- Quality Fuel: Use high-quality fuel to prevent fuel system issues.
6.3 Addressing Issues Promptly
Addressing OBD2 codes promptly can prevent minor issues from turning into major problems.
- Investigate Codes: As soon as you find a DTC, investigate the potential causes and solutions.
- Repair Issues: Repair any issues as soon as possible to prevent further damage.
- Clear Codes: After repairing an issue, clear the codes and monitor your vehicle to ensure the problem has been resolved.
6.4 Proper Storage and Handling of OBD2 Scanners
Proper storage and handling of your OBD2 scanner can extend its lifespan and ensure it functions correctly.
- Keep It Clean: Keep your scanner clean and free of dirt and debris.
- Store It Properly: Store your scanner in a dry, secure location.
- Handle with Care: Avoid dropping or mishandling your scanner.
- Update Regularly: Ensure your scanner’s software is up to date to maintain compatibility with new vehicles and diagnostic procedures.
7. Benefits of Understanding Your 2010 Malibu OBD2 System
Understanding your 2010 Malibu’s OBD2 system offers several significant benefits.
7.1 Cost Savings
By diagnosing and repairing issues yourself, you can save money on expensive mechanic fees.
7.2 Improved Vehicle Performance
Addressing OBD2 codes promptly can improve your vehicle’s performance and fuel efficiency.
7.3 Increased Vehicle Lifespan
Regular maintenance and timely repairs can extend the lifespan of your vehicle.
7.4 Greater Peace of Mind
Knowing that your vehicle is running smoothly and efficiently can provide greater peace of mind on the road.
8. Common Mistakes to Avoid When Using OBD2 Scanners
To ensure accurate diagnostics and prevent damage to your vehicle, avoid these common mistakes when using OBD2 scanners:
8.1 Ignoring Codes
Ignoring DTCs can lead to more significant problems and costly repairs down the road.
8.2 Clearing Codes Without Repairing the Issue
Clearing codes without addressing the underlying problem will only result in the codes reappearing.
8.3 Using Incompatible Scanners
Using a scanner that is not compatible with your vehicle can lead to inaccurate readings or even damage to the vehicle’s computer system.
8.4 Misinterpreting Data
Misinterpreting live data or freeze frame data can lead to incorrect diagnoses and unnecessary repairs.
8.5 Overlooking Basic Maintenance
Overlooking basic maintenance items like oil changes, tire rotations, and tune-ups can lead to many of the issues that trigger OBD2 codes.
9. Real-World Examples of OBD2 Use in 2010 Malibu Diagnostics
To illustrate the practical application of OBD2 diagnostics, here are a few real-world examples:
9.1 Diagnosing a Misfire
A 2010 Malibu owner experienced a rough idle and reduced power. They used an OBD2 scanner and found a P0300 code, indicating a random misfire. After inspecting the spark plugs and ignition coils, they found a faulty ignition coil. Replacing the coil resolved the misfire and restored the engine’s performance.
9.2 Identifying a Fuel Mixture Issue
Another 2010 Malibu owner noticed a decrease in fuel efficiency. They used an OBD2 scanner and found a P0171 code, indicating a lean fuel mixture. After checking for vacuum leaks and cleaning the MAF sensor, they found a clogged fuel filter. Replacing the fuel filter corrected the fuel mixture and improved fuel efficiency.
9.3 Detecting a Catalytic Converter Problem
A 2010 Malibu owner received an emissions test failure. They used an OBD2 scanner and found a P0420 code, indicating a catalytic converter problem. After inspecting the catalytic converter and oxygen sensors, they found a faulty catalytic converter. Replacing the catalytic converter allowed the vehicle to pass the emissions test.
10. Staying Updated with OBD2 Technology
OBD2 technology is constantly evolving, so it’s important to stay updated with the latest advancements.
10.1 Subscribing to Automotive Publications
Subscribing to automotive publications and online resources can help you stay informed about new OBD2 technologies and diagnostic techniques.
10.2 Attending Workshops and Seminars
Attending workshops and seminars can provide hands-on training and valuable insights into OBD2 diagnostics.
10.3 Joining Online Forums and Communities
Joining online forums and communities can connect you with other enthusiasts and professionals who can share their knowledge and experience.
10.4 Monitoring Industry News
Keeping an eye on industry news and announcements can help you stay current with the latest OBD2 developments.
11. Connecting with MERCEDES-DIAGNOSTIC-TOOL.EDU.VN for Expert Assistance
At MERCEDES-DIAGNOSTIC-TOOL.EDU.VN, we offer expert assistance for all your Mercedes diagnostic and repair needs. Whether you’re looking for the right diagnostic tools, guidance on unlocking hidden features, or step-by-step repair instructions, our team is here to help.
- Diagnostic Tools: We provide detailed information on a variety of diagnostic tools suitable for Mercedes vehicles.
- Feature Unlocking: Learn how to unlock hidden features on your Mercedes to enhance its functionality and personalize your driving experience.
- Repair Guides: Access our comprehensive repair guides for both minor and major issues, ensuring you can confidently maintain your Mercedes.
- Expert Support: Our knowledgeable team is available to answer your questions and provide expert advice.
12. Mercedes Hidden Features
Unlocking hidden features in your Mercedes can enhance your driving experience and customize your vehicle to your preferences. Here are some popular features you can explore:
- AMG Menu: Access the AMG menu to view real-time performance data, such as horsepower, torque, and lap times.
- Sport+ Mode: Unlock Sport+ mode for more aggressive throttle response and tighter suspension settings.
- Cornering Lights: Activate cornering lights to improve visibility when turning.
- Seat Adjustment: Customize seat settings to achieve optimal comfort.
- Sound Options: Adjust exhaust sound options to enhance the auditory experience.
To unlock these features, you will typically need a diagnostic tool capable of coding and programming. Be sure to follow our guides carefully or consult with a professional at MERCEDES-DIAGNOSTIC-TOOL.EDU.VN to avoid any issues.
13. How to Use Diagnostic Tools for Mercedes
Diagnostic tools are essential for identifying and resolving issues with your Mercedes. Here’s a step-by-step guide on how to use them effectively:
- Connect the Diagnostic Tool: Plug the tool into the OBD2 port, usually located under the dashboard.
- Turn on the Ignition: Turn the ignition to the “on” position without starting the engine.
- Select Your Vehicle: Choose your Mercedes model and year from the tool’s menu.
- Run a Scan: Initiate a full system scan to identify any stored diagnostic trouble codes (DTCs).
- Interpret the Codes: Use the tool’s database or online resources to understand the meaning of each code.
- Clear the Codes (Optional): After addressing the issues, clear the codes to reset the system.
- Perform Live Data Analysis: Monitor real-time data from various sensors to diagnose intermittent issues.
- Run Component Tests: Use the tool to activate specific components and verify their functionality.
Remember to consult the tool’s manual for detailed instructions and safety precautions.
14. Maintenance Tips for Mercedes-Benz
Regular maintenance is crucial for keeping your Mercedes-Benz in top condition. Here are some essential tips:
- Regular Oil Changes: Follow the recommended oil change intervals to maintain engine health.
- Check Fluid Levels: Regularly check and top up coolant, brake fluid, power steering fluid, and transmission fluid.
- Inspect Brakes: Inspect brake pads, rotors, and lines for wear and damage.
- Check Tire Pressure: Maintain proper tire pressure to ensure optimal handling and fuel efficiency.
- Inspect Belts and Hoses: Check belts and hoses for cracks, wear, and leaks.
- Replace Filters: Regularly replace air filters, fuel filters, and cabin filters.
- Scheduled Maintenance: Adhere to the scheduled maintenance outlined in your owner’s manual.
By following these tips, you can prolong the life of your Mercedes and prevent costly repairs.
15. Step-by-Step Repair Guides
At MERCEDES-DIAGNOSTIC-TOOL.EDU.VN, we provide step-by-step repair guides to help you tackle common Mercedes issues. Here’s an example of a simple repair guide:
How to Replace Spark Plugs
- Gather Your Tools: You’ll need new spark plugs, a spark plug socket, a ratchet, an extension, and a torque wrench.
- Disconnect the Battery: Disconnect the negative terminal of the battery to prevent electrical accidents.
- Remove the Engine Cover: Remove the engine cover to access the spark plugs.
- Remove the Ignition Coils: Disconnect and remove the ignition coils from the spark plugs.
- Remove the Old Spark Plugs: Use the spark plug socket and ratchet to remove the old spark plugs.
- Install the New Spark Plugs: Install the new spark plugs by hand, then tighten them to the specified torque using the torque wrench.
- Reinstall the Ignition Coils: Reconnect and reinstall the ignition coils.
- Reinstall the Engine Cover: Reinstall the engine cover.
- Reconnect the Battery: Reconnect the negative terminal of the battery.
- Start the Engine: Start the engine to ensure it runs smoothly.
Always consult your vehicle’s repair manual for specific instructions and torque specifications.
16. Safety Precautions
When working on your Mercedes, always take the following safety precautions:
- Wear Safety Glasses: Protect your eyes from debris and chemicals.
- Wear Gloves: Protect your hands from cuts, burns, and chemicals.
- Work in a Well-Ventilated Area: Avoid breathing harmful fumes.
- Use Jack Stands: When lifting your vehicle, always use jack stands to support it.
- Disconnect the Battery: Disconnect the negative terminal of the battery before working on electrical components.
- Follow Instructions: Always follow the instructions in your vehicle’s repair manual.
By following these precautions, you can ensure a safe and successful repair experience.
17. Common Issues with the 2010 Malibu
While the 2010 Malibu is generally a reliable vehicle, it can experience certain common issues:
- Engine Misfires: Spark plugs, ignition coils, or fuel injectors can cause engine misfires.
- Transmission Problems: Shift solenoids, valve body issues, or low fluid levels can cause transmission problems.
- Electrical Issues: Wiring problems, sensor failures, or computer malfunctions can cause electrical issues.
- Rust: Older Malibus can be susceptible to rust, especially in areas with harsh weather.
- Steering Problems: Power steering pumps or racks can fail, leading to steering problems.
Regular maintenance and prompt repairs can help prevent these issues from becoming major problems.
18. OBD2 Apps
In addition to dedicated OBD2 scanners, there are also numerous OBD2 apps available for smartphones and tablets. These apps can turn your mobile device into a diagnostic tool.
18.1 Popular OBD2 Apps
- Torque Pro: Offers real-time data, code reading, and performance monitoring.
- OBD Fusion: Provides comprehensive diagnostics and customization options.
- Car Scanner ELM OBD2: Features advanced diagnostics and coding capabilities.
- DashCommand: Allows you to create custom dashboards and monitor vehicle performance.
18.2 Advantages of Using OBD2 Apps
- Convenience: Use your smartphone or tablet as a diagnostic tool.
- Portability: Easily carry your diagnostic tool with you.
- Cost-Effective: Many OBD2 apps are more affordable than dedicated scanners.
18.3 How to Use OBD2 Apps
- Purchase an OBD2 Adapter: Buy a Bluetooth or Wi-Fi OBD2 adapter that is compatible with your vehicle and mobile device.
- Connect the Adapter: Plug the adapter into the OBD2 port.
- Pair with Your Device: Pair the adapter with your smartphone or tablet via Bluetooth or Wi-Fi.
- Download and Install the App: Download and install your chosen OBD2 app.
- Launch the App: Launch the app and follow the on-screen instructions to connect to the adapter.
- Run Diagnostics: Use the app to read codes, view live data, and perform other diagnostic functions.
19. Controller Area Network (CAN) Bus Systems
The Controller Area Network (CAN) bus is a communication system used in modern vehicles to allow different electronic control units (ECUs) to communicate with each other. Understanding the CAN bus system is crucial for advanced diagnostics.
19.1 How CAN Bus Works
The CAN bus uses a two-wire system to transmit data between ECUs. Each ECU can send and receive data over the bus. The data is transmitted in the form of messages, which include an identifier and a data payload.
19.2 Diagnosing CAN Bus Issues
CAN bus issues can cause a variety of problems, such as communication errors, sensor failures, and module malfunctions. To diagnose CAN bus issues, you will need a diagnostic tool that can monitor CAN bus traffic.
19.3 Common CAN Bus Codes
- U0001: High-Speed CAN Communication Bus
- U0100: Lost Communication with ECM/PCM
- U0121: Lost Communication with ABS Control Module
- U0140: Lost Communication with Body Control Module
19.4 Troubleshooting CAN Bus Issues
- Check Wiring: Inspect the CAN bus wiring for damage or corrosion.
- Check Connectors: Ensure that all connectors are properly seated and free of corrosion.
- Test Voltage: Use a multimeter to check the voltage on the CAN bus wires.
- Use a Diagnostic Tool: Use a diagnostic tool to monitor CAN bus traffic and identify communication errors.
20. Frequently Asked Questions (FAQ)
Here are some frequently asked questions about the 2010 Malibu OBD2 system:
20.1 What is the OBD2 port location in a 2010 Malibu?
The OBD2 port in a 2010 Malibu is typically located under the dashboard on the driver’s side.
20.2 Which OBD2 scanner is best for a 2010 Malibu?
The best OBD2 scanner depends on your needs and budget. Basic scanners like the Ancel AD310 are suitable for simple code reading, while professional-grade scanners like the Autel MaxiCOM MK808 offer more advanced features.
20.3 How do I clear OBD2 codes on my 2010 Malibu?
To clear OBD2 codes, connect an OBD2 scanner to the OBD2 port, turn on the ignition, and select the “Clear Codes” option on the scanner.