The 2013 Chevy Silverado 2500 Obd2 Fuse is essential for diagnostics and repair, and knowing its location is key to troubleshooting. Understanding the fuse box locations, fuse functions, and how to handle fuse issues can save you time and money. At MERCEDES-DIAGNOSTIC-TOOL.EDU.VN, we provide comprehensive resources for vehicle diagnostics and maintenance. Whether you are a seasoned technician or a DIY enthusiast, our platform offers the tools and knowledge you need, ensuring you can keep your vehicle running smoothly with advanced diagnostics, electrical troubleshooting, and automotive repair solutions.
Contents
- 1. Understanding the Importance of the OBD2 Fuse in Your 2013 Chevy Silverado 2500
- 1.1. What is the OBD2 Port and Why is It Important?
- 1.2. Why Does the OBD2 Port Need a Fuse?
- 1.3. Common Symptoms of a Blown OBD2 Fuse
- 1.4. Potential Causes of a Blown OBD2 Fuse
- 2. Locating the OBD2 Fuse in Your 2013 Chevy Silverado 2500
- 2.1. Overview of Fuse Box Locations
- 2.2. Step-by-Step Guide to Finding the Correct Fuse Box
- 2.3. Identifying the OBD2 Fuse
- 2.4. Diagram of the Instrument Panel Fuse Box
- 2.5. Diagram of the Engine Compartment Fuse Box
- 3. How to Check and Replace the OBD2 Fuse
- 3.1. Tools You Will Need
- 3.2. Step-by-Step Instructions to Check the Fuse
- 3.3. Step-by-Step Instructions to Replace the Fuse
- 3.4. What to Do if the Fuse Blows Again
- 4. Diagnosing Underlying Electrical Issues
- 4.1. Common Electrical Problems That Cause Fuses to Blow
- 4.2. How to Identify a Short Circuit
- 4.3. Using a Multimeter to Find Electrical Faults
- 4.4. When to Seek Professional Help
- 5. Maintaining Your 2013 Chevy Silverado 2500’s Electrical System
- 5.1. Regular Inspection of Fuses and Wiring
- 5.2. Keeping the OBD2 Port Clean and Protected
- 5.3. Avoiding Overloads on the Electrical System
- 5.4. The Importance of Using the Correct Fuses
- 6. Advanced Diagnostic Tools and Techniques
- 6.1. Overview of Advanced Diagnostic Tools
- 6.2. Using Scan Tools to Read Diagnostic Trouble Codes (DTCs)
- 6.3. Live Data Streaming and Analysis
- 6.4. Bi-Directional Controls for Component Testing
- 7. OBD2 Fuse and Aftermarket Accessories
- 7.1. Potential Conflicts Between Aftermarket Accessories and the OBD2 System
- 7.2. How to Properly Install Aftermarket Accessories to Avoid Electrical Issues
- 7.3. Using a Dedicated Fuse for Aftermarket Accessories
- 8. Case Studies: Troubleshooting OBD2 Fuse Issues on Chevy Silverado 2500
- 8.1. Case Study 1: Intermittent OBD2 Communication Failure
- 8.2. Case Study 2: Blown OBD2 Fuse After Installing a New Radio
- 8.3. Case Study 3: Check Engine Light and No OBD2 Communication
- 9. Resources and Further Reading
- 9.1. Recommended Repair Manuals and Guides
- 9.2. Online Forums and Communities for Chevy Silverado Owners
- 9.3. Official Chevrolet Resources and Websites
- 9.4. How MERCEDES-DIAGNOSTIC-TOOL.EDU.VN Can Help
- 10. Frequently Asked Questions (FAQs) About the 2013 Chevy Silverado 2500 OBD2 Fuse
- 10.1. What Does the OBD2 Fuse Protect?
- 10.2. Where is the OBD2 Fuse Located on a 2013 Chevy Silverado 2500?
- 10.3. What is the Amperage of the OBD2 Fuse?
- 10.4. How Can I Check if the OBD2 Fuse is Blown?
- 10.5. Can I Use a Higher Amperage Fuse if the Original Keeps Blowing?
- 10.6. What Causes the OBD2 Fuse to Blow?
- 10.7. What Should I Do if the OBD2 Fuse Keeps Blowing?
- 10.8. Can Aftermarket Accessories Affect the OBD2 Fuse?
- 10.9. Is it Safe to Drive with a Blown OBD2 Fuse?
- 10.10. Where Can I Find More Information About Troubleshooting Electrical Issues on My Chevy Silverado 2500?
- 11. Conclusion: Keeping Your 2013 Chevy Silverado 2500 Running Smoothly
1. Understanding the Importance of the OBD2 Fuse in Your 2013 Chevy Silverado 2500
The OBD2 fuse in your 2013 Chevy Silverado 2500 plays a vital role in the vehicle’s diagnostic system. It safeguards the On-Board Diagnostics II (OBD2) port, which is crucial for connecting diagnostic tools that read vehicle data and identify potential issues. A blown OBD2 fuse can prevent you from accessing this critical information, hindering troubleshooting and repairs.
1.1. What is the OBD2 Port and Why is It Important?
The OBD2 port, mandated in most vehicles since 1996, allows technicians and vehicle owners to access data from the vehicle’s computer. This data includes diagnostic trouble codes (DTCs), sensor readings, and other performance metrics. Accessing this information is crucial for diagnosing issues, performing maintenance, and ensuring the vehicle operates efficiently. According to the Environmental Protection Agency (EPA), OBD2 systems help reduce emissions by monitoring engine performance and alerting drivers to potential problems.
1.2. Why Does the OBD2 Port Need a Fuse?
The OBD2 port requires a fuse to protect it from electrical surges and short circuits. Like any electronic component, the OBD2 system is susceptible to damage from voltage spikes or faulty connections. The fuse acts as a protective barrier, preventing damage to the vehicle’s computer and diagnostic equipment.
1.3. Common Symptoms of a Blown OBD2 Fuse
When the OBD2 fuse blows, several symptoms may arise:
- No Communication with Diagnostic Tools: The most common symptom is the inability to connect a diagnostic scanner to the OBD2 port.
- Check Engine Light Issues: In some cases, a blown fuse can affect the check engine light, causing it to remain on or not function at all.
- Emission Testing Failure: Because the OBD2 port is essential for emission testing, a blown fuse can lead to a failed test.
1.4. Potential Causes of a Blown OBD2 Fuse
Several factors can cause the OBD2 fuse to blow:
- Short Circuit in Diagnostic Tool: A faulty diagnostic scanner or adapter can cause a short circuit, blowing the fuse.
- Wiring Issues: Damaged or frayed wiring around the OBD2 port can lead to a short.
- Overloading the Circuit: Connecting multiple devices to the OBD2 port simultaneously can overload the circuit.
- Loose Connections: Loose or corroded connections can cause intermittent shorts.
2. Locating the OBD2 Fuse in Your 2013 Chevy Silverado 2500
Finding the OBD2 fuse in your 2013 Chevy Silverado 2500 is the first step to resolving any diagnostic issues. The fuse is typically located in one of the vehicle’s fuse boxes.
2.1. Overview of Fuse Box Locations
The 2013 Chevy Silverado 2500 has multiple fuse boxes, each housing fuses for different systems:
- Instrument Panel Fuse Box: Located inside the cabin, typically on the driver’s side, behind a panel.
- Engine Compartment Fuse Box: Located under the hood, usually near the battery or engine.
2.2. Step-by-Step Guide to Finding the Correct Fuse Box
- Consult Your Owner’s Manual: The owner’s manual provides the most accurate information on fuse box locations and fuse assignments.
- Check the Instrument Panel Fuse Box: This is the most likely location for the OBD2 fuse. Look for a panel on the driver’s side, usually near the steering wheel or under the dashboard.
- Inspect the Engine Compartment Fuse Box: If the fuse is not in the instrument panel fuse box, check the engine compartment fuse box.
2.3. Identifying the OBD2 Fuse
Once you’ve located the fuse box, you’ll need to identify the OBD2 fuse.
- Refer to the Fuse Box Diagram: Each fuse box has a diagram, usually printed on the inside of the cover. This diagram labels each fuse and its function.
- Look for Labels: Common labels for the OBD2 fuse include “Data Link Connector (DLC),” “OBD II,” or “Diagnostic Connector.”
- Fuse Amperage: The OBD2 fuse typically has a low amperage, such as 10A or 15A.
2.4. Diagram of the Instrument Panel Fuse Box
The instrument panel fuse box is located on the driver’s side of the instrument panel, behind a cover. Here’s a simplified diagram to help you locate the OBD2 fuse:
| Fuse Number | Name | Usage |
|---|---|---|
| 1 | Rear Seats | Power supply for rear seats |
| 2 | Rear Accessory Power Outlet | Power outlet for rear passengers |
| 16 | Accessory Power Outlets | Power outlets for accessories like chargers and other electronic devices |
2.5. Diagram of the Engine Compartment Fuse Box
The engine compartment fuse box is located under the hood, usually near the battery. Here’s a simplified diagram:
| Fuse Number | Name | Usage |
|---|---|---|
| 4 | Engine Controls | Power supply for various engine control systems |
| 5 | Engine Control Module | Power supply for the engine control module itself |
| 35 | Key Ignition System | Power supply for the key ignition and theft deterrent |
3. How to Check and Replace the OBD2 Fuse
Once you’ve located the OBD2 fuse, you’ll need to check if it’s blown and replace it if necessary.
3.1. Tools You Will Need
- Fuse Puller: A small plastic tool designed to remove fuses without damaging them.
- Replacement Fuse: Ensure the replacement fuse has the same amperage as the original.
- Multimeter (Optional): For testing the fuse’s continuity.
- Flashlight: To help see inside the fuse box.
3.2. Step-by-Step Instructions to Check the Fuse
- Turn Off the Ignition: Ensure the vehicle is turned off to prevent electrical shorts.
- Locate the Fuse Box: Find the correct fuse box as described in Section 2.
- Remove the Fuse Box Cover: Gently pry off the fuse box cover.
- Identify the OBD2 Fuse: Use the fuse box diagram to locate the OBD2 fuse.
- Remove the Fuse: Use the fuse puller to gently remove the fuse.
- Inspect the Fuse: Hold the fuse up to the light and look for a break in the metal filament inside. If the filament is broken, the fuse is blown.
- Test with a Multimeter (Optional): If you have a multimeter, set it to the continuity setting. Touch the probes to each end of the fuse. If the multimeter doesn’t beep or show continuity, the fuse is blown.
3.3. Step-by-Step Instructions to Replace the Fuse
- Obtain a Replacement Fuse: Purchase a new fuse with the same amperage rating as the original. Using a fuse with a higher amperage can damage the vehicle’s electrical system.
- Insert the New Fuse: Align the new fuse with the fuse slot and gently push it in until it is fully seated.
- Replace the Fuse Box Cover: Snap the fuse box cover back into place.
- Test the OBD2 Port: Connect a diagnostic scanner to the OBD2 port to ensure it is functioning correctly.
- Start the Vehicle: Turn on the ignition and check if the check engine light is behaving normally.
3.4. What to Do if the Fuse Blows Again
If the new fuse blows immediately or shortly after replacement, there is likely an underlying electrical issue. Continuing to replace the fuse without addressing the root cause can lead to further damage.
4. Diagnosing Underlying Electrical Issues
If the OBD2 fuse continues to blow, it indicates a more significant electrical problem. Diagnosing the root cause requires a systematic approach and, in some cases, professional assistance.
4.1. Common Electrical Problems That Cause Fuses to Blow
- Short Circuits: A short circuit occurs when a wire’s insulation is damaged, allowing it to contact metal or another wire.
- Ground Faults: A ground fault happens when a wire comes into contact with a grounded metal surface.
- Overloads: An overload occurs when too much current flows through a circuit, often due to connecting too many devices or a faulty component.
4.2. How to Identify a Short Circuit
Identifying a short circuit involves tracing the wiring connected to the OBD2 port and looking for signs of damage.
- Visual Inspection: Check the wiring for frayed insulation, corrosion, or signs of burning.
- Wiring Harness Inspection: Inspect the wiring harness for any points where the wires may be pinched or damaged.
- Component Testing: Test the components connected to the OBD2 circuit, such as the diagnostic port itself and any related sensors or modules.
4.3. Using a Multimeter to Find Electrical Faults
A multimeter is an invaluable tool for diagnosing electrical faults.
- Continuity Test: Use the continuity test to check for shorts between a wire and ground. A reading of zero ohms indicates a short circuit.
- Voltage Test: Use the voltage test to check for voltage drops along a circuit, which can indicate a high-resistance connection.
4.4. When to Seek Professional Help
If you are uncomfortable working with electrical systems or cannot identify the source of the problem, it’s best to seek professional help. A qualified technician has the tools, knowledge, and experience to diagnose and repair complex electrical issues safely and effectively. At MERCEDES-DIAGNOSTIC-TOOL.EDU.VN, we can connect you with trusted professionals who specialize in vehicle diagnostics and electrical repairs. Contact us at 789 Oak Avenue, Miami, FL 33101, United States, or via Whatsapp at +1 (641) 206-8880, or visit our website at MERCEDES-DIAGNOSTIC-TOOL.EDU.VN.
5. Maintaining Your 2013 Chevy Silverado 2500’s Electrical System
Preventive maintenance is key to avoiding electrical issues and ensuring your 2013 Chevy Silverado 2500 operates reliably.
5.1. Regular Inspection of Fuses and Wiring
Regularly inspect the fuses and wiring in your vehicle to identify potential problems early.
- Check Fuses: Periodically check the fuses in the fuse boxes to ensure they are in good condition. Look for signs of corrosion or damage.
- Inspect Wiring: Examine the wiring harnesses for any signs of wear, tear, or damage. Pay close attention to areas where the wires may be exposed to heat, friction, or moisture.
5.2. Keeping the OBD2 Port Clean and Protected
The OBD2 port can accumulate dust, dirt, and debris, which can interfere with the connection of diagnostic tools.
- Clean the Port: Use a clean, dry cloth to wipe the OBD2 port regularly. Avoid using excessive moisture or harsh chemicals.
- Use a Protective Cover: Consider using a protective cover to shield the OBD2 port from dust and debris.
5.3. Avoiding Overloads on the Electrical System
Avoid overloading the vehicle’s electrical system by connecting too many devices or using accessories that draw excessive current.
- Limit Accessory Use: Use accessories sparingly, especially those that draw significant power.
- Use Quality Accessories: Use high-quality accessories that are designed to operate within the vehicle’s electrical system’s specifications.
5.4. The Importance of Using the Correct Fuses
Using the correct fuses is crucial for protecting the vehicle’s electrical system.
- Check Amperage: Always use fuses with the correct amperage rating. Using a fuse with a higher amperage can allow too much current to flow through the circuit, potentially damaging components.
- Replace Blown Fuses Immediately: Replace blown fuses as soon as possible to prevent further damage to the electrical system.
6. Advanced Diagnostic Tools and Techniques
For more in-depth diagnostics, advanced tools and techniques can help pinpoint electrical issues and ensure accurate repairs.
6.1. Overview of Advanced Diagnostic Tools
- Professional-Grade Scanners: These scanners offer advanced features such as live data streaming, bi-directional controls, and advanced diagnostics.
- Oscilloscopes: Oscilloscopes can visualize electrical signals, allowing technicians to identify intermittent faults and signal anomalies.
- Circuit Testers: Circuit testers can quickly check for voltage and continuity in circuits, helping to isolate electrical problems.
6.2. Using Scan Tools to Read Diagnostic Trouble Codes (DTCs)
Scan tools can read diagnostic trouble codes (DTCs) stored in the vehicle’s computer. These codes provide valuable information about the nature and location of electrical faults.
- Connect the Scanner: Connect the scan tool to the OBD2 port.
- Read DTCs: Follow the scanner’s instructions to read the stored DTCs.
- Interpret the Codes: Use a repair manual or online resource to interpret the DTCs and identify the affected components or circuits.
6.3. Live Data Streaming and Analysis
Live data streaming allows you to monitor the real-time performance of sensors and components.
- Access Live Data: Use the scan tool to access live data streams.
- Monitor Sensor Readings: Monitor the readings of sensors related to the OBD2 circuit, such as voltage, current, and resistance.
- Analyze Data: Analyze the data to identify any anomalies or inconsistencies that may indicate an electrical fault.
6.4. Bi-Directional Controls for Component Testing
Bi-directional controls allow you to activate and deactivate components using the scan tool.
- Access Bi-Directional Controls: Use the scan tool to access bi-directional control functions.
- Activate Components: Activate components related to the OBD2 circuit, such as relays, solenoids, and actuators.
- Monitor Response: Monitor the component’s response to identify any faults or malfunctions.
7. OBD2 Fuse and Aftermarket Accessories
Adding aftermarket accessories to your 2013 Chevy Silverado 2500 can sometimes affect the OBD2 fuse and the vehicle’s electrical system.
7.1. Potential Conflicts Between Aftermarket Accessories and the OBD2 System
Some aftermarket accessories can interfere with the OBD2 system, leading to blown fuses and other electrical issues.
- Power Draw: Accessories that draw excessive power can overload the electrical system, causing fuses to blow.
- Wiring Issues: Improperly installed accessories can cause short circuits or ground faults, leading to electrical problems.
- Communication Conflicts: Some accessories may interfere with the communication between the vehicle’s computer and the OBD2 port.
7.2. How to Properly Install Aftermarket Accessories to Avoid Electrical Issues
To avoid electrical issues when installing aftermarket accessories:
- Follow Installation Instructions: Carefully follow the installation instructions provided with the accessory.
- Use Quality Wiring: Use high-quality wiring and connectors to ensure reliable connections.
- Avoid Overloading Circuits: Avoid overloading circuits by tapping into existing wiring. Use a dedicated power source for the accessory if necessary.
- Protect Wiring: Protect wiring from damage by routing it away from sharp edges, heat sources, and moving parts.
7.3. Using a Dedicated Fuse for Aftermarket Accessories
Using a dedicated fuse for aftermarket accessories can help prevent electrical issues.
- Install a Fuse Block: Install a separate fuse block for aftermarket accessories.
- Use Correct Amperage: Use fuses with the correct amperage rating for each accessory.
- Protect the Vehicle’s Electrical System: Using a dedicated fuse block can protect the vehicle’s electrical system from overloads and short circuits caused by aftermarket accessories.
8. Case Studies: Troubleshooting OBD2 Fuse Issues on Chevy Silverado 2500
Real-world examples can provide valuable insights into troubleshooting OBD2 fuse issues on the Chevy Silverado 2500.
8.1. Case Study 1: Intermittent OBD2 Communication Failure
A 2013 Chevy Silverado 2500 experienced intermittent OBD2 communication failures. The diagnostic scanner would sometimes connect to the vehicle, but other times it would not.
- Initial Inspection: The technician checked the OBD2 fuse and found it to be intact.
- Wiring Inspection: A thorough inspection of the wiring revealed a loose connection at the OBD2 port.
- Repair: The technician tightened the connection and applied dielectric grease to prevent corrosion.
- Outcome: The OBD2 communication failures were resolved, and the diagnostic scanner could connect reliably.
8.2. Case Study 2: Blown OBD2 Fuse After Installing a New Radio
A 2013 Chevy Silverado 2500 had its OBD2 fuse blow after installing a new aftermarket radio.
- Initial Inspection: The technician found the OBD2 fuse to be blown.
- Wiring Inspection: A wiring inspection revealed that the radio’s wiring was interfering with the OBD2 circuit.
- Repair: The technician re-routed the radio’s wiring and installed a dedicated fuse for the radio.
- Outcome: The OBD2 fuse no longer blew, and the radio functioned correctly without interfering with the OBD2 system.
8.3. Case Study 3: Check Engine Light and No OBD2 Communication
A 2013 Chevy Silverado 2500 had the check engine light illuminated and no OBD2 communication.
- Initial Inspection: The technician found the OBD2 fuse to be blown.
- DTC Scan: After replacing the fuse, the technician connected a scan tool and read DTCs related to the engine control module (ECM).
- Component Testing: The technician performed component testing on the ECM and related sensors.
- Repair: The technician replaced a faulty oxygen sensor that was causing the ECM to malfunction.
- Outcome: The check engine light was extinguished, and the OBD2 communication was restored.
9. Resources and Further Reading
For more information on troubleshooting and maintaining your 2013 Chevy Silverado 2500, several resources are available.
9.1. Recommended Repair Manuals and Guides
- Chilton Repair Manuals: Chilton repair manuals provide detailed information on vehicle maintenance and repair procedures.
- Haynes Repair Manuals: Haynes repair manuals offer step-by-step instructions and diagrams for various repair tasks.
- GM Service Manuals: GM service manuals provide comprehensive information on vehicle diagnostics and repair procedures.
9.2. Online Forums and Communities for Chevy Silverado Owners
Online forums and communities can provide valuable insights and support from other Chevy Silverado owners.
- SilveradoSierra.com: A popular forum for Chevy Silverado and GMC Sierra owners.
- GM-Trucks.com: A forum dedicated to GM trucks, including the Chevy Silverado.
- ChevyTrucks.org: A forum for Chevy truck enthusiasts.
9.3. Official Chevrolet Resources and Websites
Official Chevrolet resources and websites can provide valuable information on vehicle maintenance and repair.
- Chevrolet Owner Center: The Chevrolet Owner Center provides access to owner’s manuals, maintenance schedules, and other resources.
- Chevrolet Support: Chevrolet Support offers assistance with vehicle-related questions and issues.
9.4. How MERCEDES-DIAGNOSTIC-TOOL.EDU.VN Can Help
At MERCEDES-DIAGNOSTIC-TOOL.EDU.VN, we offer a wide range of resources to help you diagnose and repair your vehicle. Contact us at 789 Oak Avenue, Miami, FL 33101, United States, or via Whatsapp at +1 (641) 206-8880, or visit our website at MERCEDES-DIAGNOSTIC-TOOL.EDU.VN. We provide:
- Diagnostic Tools: We offer a variety of diagnostic tools to help you read DTCs, monitor live data, and perform component testing.
- Repair Information: We provide detailed repair information and guides to help you troubleshoot and repair electrical issues.
- Technical Support: Our team of experienced technicians can provide technical support and assistance with your diagnostic and repair efforts.
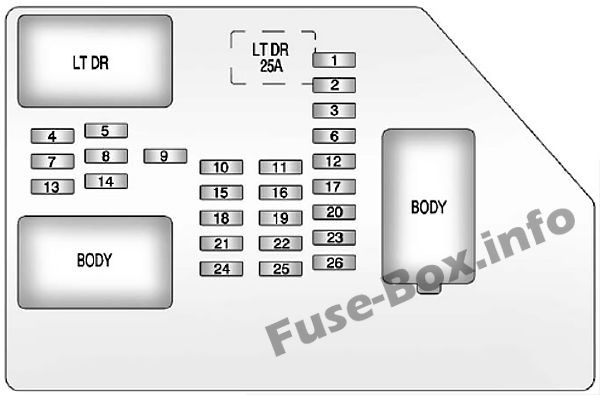 Instrument panel fuse box diagram: Chevrolet Silverado (2007, 2008, 2009, 2010, 2011, 2012, 2013)
10. Frequently Asked Questions (FAQs) About the 2013 Chevy Silverado 2500 OBD2 Fuse
10.1. What Does the OBD2 Fuse Protect?
The OBD2 fuse protects the On-Board Diagnostics II (OBD2) port and the vehicle’s computer from electrical surges and short circuits.
10.2. Where is the OBD2 Fuse Located on a 2013 Chevy Silverado 2500?
The OBD2 fuse is typically located in the instrument panel fuse box, inside the cabin on the driver’s side.
10.3. What is the Amperage of the OBD2 Fuse?
The OBD2 fuse typically has a low amperage, such as 10A or 15A.
10.4. How Can I Check if the OBD2 Fuse is Blown?
You can check if the OBD2 fuse is blown by visually inspecting the fuse for a break in the metal filament or by testing it with a multimeter.
10.5. Can I Use a Higher Amperage Fuse if the Original Keeps Blowing?
No, you should never use a higher amperage fuse than the original. Using a higher amperage fuse can allow too much current to flow through the circuit, potentially damaging components.
10.6. What Causes the OBD2 Fuse to Blow?
The OBD2 fuse can blow due to short circuits, ground faults, overloads, or faulty components.
10.7. What Should I Do if the OBD2 Fuse Keeps Blowing?
If the OBD2 fuse keeps blowing, you should diagnose the underlying electrical issue and repair it before replacing the fuse again.
10.8. Can Aftermarket Accessories Affect the OBD2 Fuse?
Yes, aftermarket accessories that draw excessive power or are improperly installed can interfere with the OBD2 system and cause the fuse to blow.
10.9. Is it Safe to Drive with a Blown OBD2 Fuse?
While it may be safe to drive with a blown OBD2 fuse, you will not be able to access diagnostic information, which can hinder troubleshooting and repairs.
10.10. Where Can I Find More Information About Troubleshooting Electrical Issues on My Chevy Silverado 2500?
You can find more information about troubleshooting electrical issues in repair manuals, online forums, and official Chevrolet resources.
11. Conclusion: Keeping Your 2013 Chevy Silverado 2500 Running Smoothly
Understanding the location and function of the OBD2 fuse in your 2013 Chevy Silverado 2500 is essential for maintaining your vehicle’s health. By following the steps outlined in this guide, you can troubleshoot and resolve common OBD2 fuse issues, ensuring your vehicle operates reliably and efficiently. Remember, preventive maintenance and regular inspections are key to avoiding electrical problems and keeping your Chevy Silverado 2500 running smoothly for years to come.
For more in-depth assistance and professional diagnostic services, don’t hesitate to reach out to us at MERCEDES-DIAGNOSTIC-TOOL.EDU.VN. Our team is ready to provide you with the expertise and support you need. Contact us today at 789 Oak Avenue, Miami, FL 33101, United States, or via Whatsapp at +1 (641) 206-8880, or visit our website at MERCEDES-DIAGNOSTIC-TOOL.EDU.VN to explore our wide range of diagnostic tools and repair resources. Let us help you keep your vehicle in top condition.