The 97 Honda Cr V Obd2 Port Location is typically found under the dashboard on the driver’s side; locating it allows for efficient vehicle diagnostics using an OBD2 scanner, which MERCEDES-DIAGNOSTIC-TOOL.EDU.VN supports with detailed information and guidance. This is essential for diagnosing car problems. If you need further assistance or want to explore advanced diagnostic tools and services, feel free to contact us via Whatsapp at +1 (641) 206-8880 or visit our website.
Contents
- 1. Understanding the OBD2 Port in Your 97 Honda CR-V
- 1.1. What is an OBD2 Port?
- 1.2. Why is the OBD2 Port Important?
- 1.3. Common Uses of the OBD2 Port
- 1.4. Standardized Location of OBD2 Ports
- 1.5. Tools Needed to Access the OBD2 Port
- 2. Step-by-Step Guide to Locate the OBD2 Port in a 97 Honda CR-V
- 2.1. Preparing to Search
- 2.2. Initial Location Check
- 2.3. Using a Flashlight for Better Visibility
- 2.4. Identifying the Port
- 2.5. Common Hiding Spots
- 2.6. Feeling Around
- 2.7. Consulting the Owner’s Manual
- 3. Common Issues and Troubleshooting
- 3.1. Port is Obstructed
- 3.2. Damaged Port
- 3.3. Loose Connection
- 3.4. No Power to the Port
- 3.5. Scanner Compatibility
- 3.6. Software or Firmware Issues
- 3.7. Seeking Professional Help
- 4. What to Do After Finding the OBD2 Port
- 4.1. Connecting the OBD2 Scanner
- 4.2. Powering On the Scanner
- 4.3. Reading Diagnostic Trouble Codes (DTCs)
- 4.4. Interpreting the Codes
- 4.5. Clearing the Codes
- 4.6. Monitoring Live Data
- 4.7. Regular Checks
- 5. Benefits of Using an OBD2 Scanner
- 5.1. Early Problem Detection
- 5.2. Cost Savings
- 5.3. Improved Fuel Efficiency
- 5.4. Enhanced Performance
- 5.5. Informed Decision-Making
- 5.6. Preventing Major Breakdowns
- 5.7. Environmental Benefits
- 6. Choosing the Right OBD2 Scanner for Your Needs
- 6.1. Basic Scanners
- 6.2. Mid-Range Scanners
- 6.3. Advanced Scanners
- 6.4. Smartphone-Based Scanners
- 6.5. Professional-Grade Scanners
- 6.6. Key Features to Consider
- 6.7. Top OBD2 Scanner Brands
- 7. Maintaining Your 97 Honda CR-V
- 7.1. Regular Oil Changes
- 7.2. Checking Fluid Levels
- 7.3. Tire Maintenance
- 7.4. Brake Inspections
- 7.5. Battery Maintenance
- 7.6. Air Filter Replacement
- 7.7. Spark Plug Replacement
- 8. Advanced Diagnostic Procedures
- 8.1. Compression Testing
- 8.2. Leak Down Testing
- 8.3. Fuel System Testing
- 8.4. Electrical System Testing
- 8.5. Sensor Testing
- 8.6. ECU Diagnostics
- 8.7. Using a Multimeter
- 9. Benefits of Professional Diagnostic Services
- 9.1. Expertise and Experience
- 9.2. Advanced Tools
- 9.3. Accurate Diagnosis
- 9.4. Comprehensive Service
- 9.5. Warranty Protection
- 9.6. Time Savings
- 9.7. Preventing Further Damage
- 10. How MERCEDES-DIAGNOSTIC-TOOL.EDU.VN Can Help
- 10.1. Detailed Guides and Tutorials
- 10.2. Expert Advice
- 10.3. Product Recommendations
- 10.4. Community Forum
- 10.5. Remote Diagnostic Services
- 10.6. On-Site Diagnostic Services
- 10.7. Comprehensive Support
- FAQ: Frequently Asked Questions about the 97 Honda CR V OBD2 Port
- Where is the OBD2 port located on a 1997 Honda CR-V?
- What does an OBD2 port do?
- Why can’t I find the OBD2 port in my CR-V?
- What tools do I need to use the OBD2 port?
- Can I damage my car by using an OBD2 scanner?
- What should I do after reading DTCs from the OBD2 port?
- How often should I check my OBD2 port for diagnostic codes?
- Can MERCEDES-DIAGNOSTIC-TOOL.EDU.VN help me diagnose issues using the OBD2 port?
- Is it better to diagnose my car myself or take it to a professional mechanic?
- How can I contact MERCEDES-DIAGNOSTIC-TOOL.EDU.VN for diagnostic support?
1. Understanding the OBD2 Port in Your 97 Honda CR-V
Want to know where to find the OBD2 port in your 97 Honda CR-V? The OBD2 port, essential for modern vehicle diagnostics, allows mechanics and vehicle owners to access vital information about the car’s health. Typically, in a 1997 Honda CR-V, this port is located beneath the dashboard on the driver’s side.
1.1. What is an OBD2 Port?
The On-Board Diagnostics II (OBD2) port is a standardized interface used to access the vehicle’s computer system. It’s the gateway to retrieving diagnostic trouble codes (DTCs), live sensor data, and other critical information. According to the Environmental Protection Agency (EPA), OBD2 systems have been mandatory in all cars sold in the United States since 1996, ensuring standardized diagnostic capabilities.
1.2. Why is the OBD2 Port Important?
The OBD2 port is crucial for several reasons:
- Diagnostics: It allows mechanics and vehicle owners to quickly diagnose issues by reading DTCs.
- Maintenance: Regular checks via the OBD2 port can help identify potential problems before they become severe.
- Emissions Testing: It is used during emissions testing to ensure the vehicle complies with environmental standards.
1.3. Common Uses of the OBD2 Port
Here are a few common uses for the OBD2 port:
- Reading and clearing diagnostic trouble codes (DTCs)
- Monitoring real-time sensor data
- Performing emissions testing
- Programming and reprogramming vehicle control modules
1.4. Standardized Location of OBD2 Ports
While the OBD2 port is usually under the dashboard on the driver’s side, its exact placement can vary. Manufacturers are required to keep it within a specific area, as defined by the Society of Automotive Engineers (SAE).
1.5. Tools Needed to Access the OBD2 Port
To access and utilize the data from the OBD2 port, you will need:
- OBD2 Scanner: A handheld device or software used to read and interpret the data.
- OBD2 Adapter: This connects your vehicle’s OBD2 port to your scanning device, like a smartphone or laptop.
2. Step-by-Step Guide to Locate the OBD2 Port in a 97 Honda CR-V
Finding the OBD2 port in your 1997 Honda CR-V is straightforward. Follow these simple steps to locate it quickly and easily.
2.1. Preparing to Search
Before you start looking for the OBD2 port, make sure you have a flashlight and a comfortable position to inspect under the dashboard.
2.2. Initial Location Check
Begin by looking under the dashboard on the driver’s side. The port is commonly found near the steering column or around the center console area.
2.3. Using a Flashlight for Better Visibility
Use a flashlight to illuminate the area under the dashboard. This will help you spot the OBD2 port, which may be hidden in a dark corner.
2.4. Identifying the Port
The OBD2 port is a 16-pin connector, trapezoidal in shape. It’s usually black or gray.
2.5. Common Hiding Spots
If you don’t see it immediately, check these common hiding spots:
- Behind a small panel or cover
- Tucked up near the firewall
- Mounted on a bracket near the fuse box
2.6. Feeling Around
If you still can’t see it, carefully feel around the area. The port might be obscured by wires or other components.
2.7. Consulting the Owner’s Manual
If all else fails, consult your 1997 Honda CR-V owner’s manual. The manual should indicate the exact location of the OBD2 port.
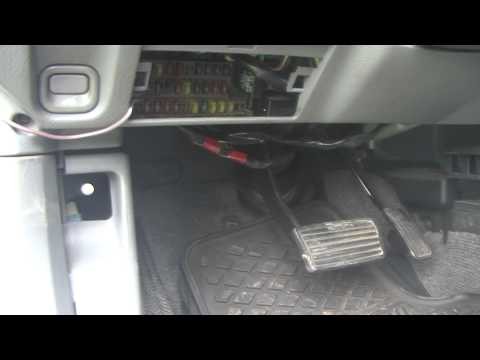 97 Honda CR V OBD2 Port Location Alt: The OBD2 port is commonly found near the steering column or around the center console area in a 1997 Honda CR-V
3. Common Issues and Troubleshooting
Sometimes, you might encounter issues with the OBD2 port. Here are some common problems and how to troubleshoot them.
3.1. Port is Obstructed
The port might be physically blocked by debris or aftermarket accessories. Carefully remove any obstructions.
3.2. Damaged Port
Inspect the port for any physical damage, such as bent pins or cracks. A damaged port may require replacement.
3.3. Loose Connection
Ensure the connector is securely attached. A loose connection can prevent the scanner from reading data correctly.
3.4. No Power to the Port
If the scanner doesn’t power on when connected, check the vehicle’s fuses. A blown fuse can cut power to the OBD2 port.
3.5. Scanner Compatibility
Ensure your OBD2 scanner is compatible with the 1997 Honda CR-V. Some older scanners may not support all vehicle models.
3.6. Software or Firmware Issues
Keep your OBD2 scanner’s software or firmware up to date. Outdated software can cause communication issues.
3.7. Seeking Professional Help
If you are unable to resolve the issue, consult a professional mechanic. They have specialized tools and knowledge to diagnose and repair OBD2 port problems.
4. What to Do After Finding the OBD2 Port
Once you’ve located the OBD2 port, you can begin using it for diagnostics and maintenance.
4.1. Connecting the OBD2 Scanner
Plug your OBD2 scanner into the port. Ensure it’s securely connected.
4.2. Powering On the Scanner
Turn on the scanner and follow the instructions to connect to the vehicle’s computer.
4.3. Reading Diagnostic Trouble Codes (DTCs)
Use the scanner to read any stored diagnostic trouble codes (DTCs). These codes can provide valuable information about potential issues.
4.4. Interpreting the Codes
Look up the DTCs in a database or online resource to understand what they mean. Websites like OBD-Codes.com offer detailed explanations of various codes.
4.5. Clearing the Codes
If you’ve addressed the underlying issue, you can use the scanner to clear the DTCs.
4.6. Monitoring Live Data
Use the scanner to monitor live data, such as engine temperature, RPM, and sensor readings. This can help you identify intermittent problems.
4.7. Regular Checks
Make it a habit to regularly check your vehicle’s OBD2 port for any stored codes. This can help you catch minor issues before they become major problems.
5. Benefits of Using an OBD2 Scanner
Using an OBD2 scanner offers numerous benefits for vehicle owners and mechanics alike.
5.1. Early Problem Detection
OBD2 scanners allow you to detect potential issues early on, preventing costly repairs down the road.
5.2. Cost Savings
By diagnosing and fixing problems yourself, you can save money on mechanic fees.
5.3. Improved Fuel Efficiency
Addressing issues detected by the OBD2 scanner can improve your vehicle’s fuel efficiency.
5.4. Enhanced Performance
Keeping your vehicle in good condition through regular OBD2 checks can enhance its overall performance.
5.5. Informed Decision-Making
With access to real-time data, you can make informed decisions about vehicle maintenance and repairs.
5.6. Preventing Major Breakdowns
Regular OBD2 checks can help prevent major breakdowns by identifying and addressing problems early on.
5.7. Environmental Benefits
Ensuring your vehicle is running efficiently through OBD2 checks can reduce emissions and contribute to a cleaner environment.
6. Choosing the Right OBD2 Scanner for Your Needs
Selecting the right OBD2 scanner depends on your specific needs and budget.
6.1. Basic Scanners
Basic scanners are affordable and easy to use. They can read and clear DTCs.
6.2. Mid-Range Scanners
Mid-range scanners offer more features, such as live data monitoring and freeze frame data.
6.3. Advanced Scanners
Advanced scanners provide comprehensive diagnostic capabilities, including bi-directional control and advanced coding.
6.4. Smartphone-Based Scanners
Smartphone-based scanners use a Bluetooth or Wi-Fi adapter to connect to your smartphone. They offer a wide range of features through mobile apps.
6.5. Professional-Grade Scanners
Professional-grade scanners are designed for mechanics and offer the most advanced features and capabilities.
6.6. Key Features to Consider
When choosing an OBD2 scanner, consider these key features:
- Compatibility with your vehicle
- Ease of use
- Features and capabilities
- Price
- Customer reviews
6.7. Top OBD2 Scanner Brands
Some of the top OBD2 scanner brands include:
- Autel
- Launch
- BlueDriver
- Actron
- Innova
7. Maintaining Your 97 Honda CR-V
Regular maintenance is essential to keep your 1997 Honda CR-V running smoothly.
7.1. Regular Oil Changes
Change the oil and filter every 3,000 to 5,000 miles.
7.2. Checking Fluid Levels
Regularly check and top off fluid levels, including coolant, brake fluid, power steering fluid, and transmission fluid.
7.3. Tire Maintenance
Maintain proper tire pressure and rotate tires every 6,000 to 8,000 miles.
7.4. Brake Inspections
Inspect the brakes regularly and replace pads and rotors as needed.
7.5. Battery Maintenance
Keep the battery terminals clean and check the battery’s voltage regularly.
7.6. Air Filter Replacement
Replace the air filter every 12,000 to 15,000 miles.
7.7. Spark Plug Replacement
Replace the spark plugs every 30,000 miles.
8. Advanced Diagnostic Procedures
For more complex issues, you might need to perform advanced diagnostic procedures.
8.1. Compression Testing
Perform a compression test to check the health of the engine cylinders.
8.2. Leak Down Testing
Perform a leak down test to identify any leaks in the cylinders.
8.3. Fuel System Testing
Test the fuel system to ensure proper fuel pressure and injector performance.
8.4. Electrical System Testing
Test the electrical system to identify any shorts, opens, or voltage drops.
8.5. Sensor Testing
Test individual sensors to ensure they are functioning correctly.
8.6. ECU Diagnostics
Perform ECU diagnostics to identify any issues with the engine control unit.
8.7. Using a Multimeter
Use a multimeter to measure voltage, current, and resistance in the electrical system.
9. Benefits of Professional Diagnostic Services
While DIY diagnostics can be helpful, professional diagnostic services offer several advantages.
9.1. Expertise and Experience
Professional mechanics have the expertise and experience to accurately diagnose complex issues.
9.2. Advanced Tools
Professional mechanics have access to advanced diagnostic tools and equipment.
9.3. Accurate Diagnosis
Professional mechanics can provide an accurate diagnosis, saving you time and money in the long run.
9.4. Comprehensive Service
Professional mechanics can provide a comprehensive service, including repairs, maintenance, and advice.
9.5. Warranty Protection
Professional repairs often come with a warranty, providing peace of mind.
9.6. Time Savings
Hiring a professional mechanic can save you time and effort.
9.7. Preventing Further Damage
Professional mechanics can prevent further damage to your vehicle by addressing issues promptly and correctly.
10. How MERCEDES-DIAGNOSTIC-TOOL.EDU.VN Can Help
MERCEDES-DIAGNOSTIC-TOOL.EDU.VN offers a range of resources and services to help you diagnose and maintain your vehicle.
10.1. Detailed Guides and Tutorials
We provide detailed guides and tutorials on how to use OBD2 scanners and perform diagnostic procedures.
10.2. Expert Advice
Our team of experienced mechanics can provide expert advice and support.
10.3. Product Recommendations
We offer product recommendations for OBD2 scanners and other diagnostic tools.
10.4. Community Forum
Join our community forum to connect with other vehicle owners and share tips and advice.
10.5. Remote Diagnostic Services
We offer remote diagnostic services to help you diagnose issues from the comfort of your own home.
10.6. On-Site Diagnostic Services
We also offer on-site diagnostic services at our facility located at 789 Oak Avenue, Miami, FL 33101, United States.
10.7. Comprehensive Support
We provide comprehensive support to help you keep your vehicle running smoothly.
By understanding the 97 Honda CR V OBD2 port location and utilizing the right tools and resources, you can keep your vehicle in top condition. At MERCEDES-DIAGNOSTIC-TOOL.EDU.VN, we’re here to support you every step of the way with expert guidance and comprehensive diagnostic services. Don’t hesitate to reach out for assistance via Whatsapp at +1 (641) 206-8880 or visit our website for more information.
FAQ: Frequently Asked Questions about the 97 Honda CR V OBD2 Port
Where is the OBD2 port located on a 1997 Honda CR-V?
The OBD2 port in a 1997 Honda CR-V is generally located under the dashboard on the driver’s side.
What does an OBD2 port do?
An OBD2 port allows you to connect a diagnostic scanner to your vehicle’s computer to read diagnostic trouble codes (DTCs) and monitor live data.
Why can’t I find the OBD2 port in my CR-V?
Check common hiding spots like behind a small panel, near the steering column, or consult your owner’s manual for the exact location.
What tools do I need to use the OBD2 port?
You will need an OBD2 scanner or a smartphone-based scanner with a compatible app.
Can I damage my car by using an OBD2 scanner?
No, using an OBD2 scanner will not damage your car as long as you follow the manufacturer’s instructions and use a compatible device.
What should I do after reading DTCs from the OBD2 port?
Research the codes to understand the potential issues and take appropriate action, such as repairing the problem or consulting a mechanic.
How often should I check my OBD2 port for diagnostic codes?
Check your OBD2 port regularly, especially if you notice any unusual symptoms or performance issues with your vehicle.
Can MERCEDES-DIAGNOSTIC-TOOL.EDU.VN help me diagnose issues using the OBD2 port?
Yes, MERCEDES-DIAGNOSTIC-TOOL.EDU.VN provides detailed guides, expert advice, and remote diagnostic services to assist you in diagnosing vehicle issues.
Is it better to diagnose my car myself or take it to a professional mechanic?
DIY diagnostics can be helpful for simple issues, but professional mechanics have the expertise and advanced tools for accurate diagnosis and repairs, especially for complex problems.
How can I contact MERCEDES-DIAGNOSTIC-TOOL.EDU.VN for diagnostic support?
You can contact MERCEDES-DIAGNOSTIC-TOOL.EDU.VN via Whatsapp at +1 (641) 206-8880 or visit our website for more information and support.