Amp Research Obd2 Plugs can be wired directly, offering an alternative to using the OBD2 port for power step deployment and retraction. This article, brought to you by MERCEDES-DIAGNOSTIC-TOOL.EDU.VN, explores the methods, benefits, and considerations for wiring Amp Research power steps directly, focusing on enhanced functionality and diagnostics, ensuring your Mercedes operates smoothly. This approach provides customized solutions and seamless integration.
Contents
- 1. Understanding the Amp Research OBD2 Plug and Power Steps
- 1.1. What are Amp Research Power Steps?
- 1.2. How Do Power Steps Typically Connect via OBD2?
- 1.3. Benefits of Direct Wiring vs. OBD2 Connection
- 2. Identifying the Need for Direct Wiring
- 2.1. Conflicts with Other OBD2 Devices
- 2.2. Diagnostic Challenges with OBD2 Connection
- 2.3. Desire for Customized Control
- 2.4. Electrical Interference Issues
- 3. Essential Tools and Materials for Direct Wiring
- 3.1. Wiring Diagram and Vehicle-Specific Information
- 3.2. Multimeter for Testing Connections
- 3.3. Wire Strippers, Crimpers, and Connectors
- 3.4. Electrical Tape and Heat Shrink Tubing
- 3.5. Basic Hand Tools (Screwdrivers, Pliers, etc.)
- 3.6. Optional: Door Jamb Switches
- 4. Step-by-Step Guide to Direct Wiring
- 4.1. Disconnecting the Battery
- 4.2. Identifying the Necessary Wires
- 4.3. Locating Suitable Power and Ground Sources
- 4.4. Wiring the Power and Ground Connections
- 4.5. Connecting the Door Trigger Wires
- 4.6. Testing the Connections
- 4.7. Insulating and Protecting the Wiring
- 5. Alternative Methods for Door Triggering
- 5.1. Using a CAN Bus Interface
- 5.2. Utilizing a Tilt Sensor
- 5.3. Integrating with the Vehicle’s Alarm System
- 6. Troubleshooting Common Issues
- 6.1. Power Steps Not Deploying or Retracting
- 6.2. Steps Deploying or Retracting Erratically
- 6.3. Steps Deploying Only on One Side
- 7. Maintaining Your Directly Wired Power Steps
- 7.1. Regularly Inspecting Wiring Connections
- 7.2. Lubricating Moving Parts
- 7.3. Cleaning the Steps
- 7.4. Checking for Obstructions
- 8. Safety Considerations
- 8.1. Disconnecting the Battery Before Starting
- 8.2. Using Proper Safety Gear (Gloves, Eye Protection)
- 8.3. Avoiding Water and Moisture
- 8.4. Consulting a Professional if Unsure
- 9. Why Choose MERCEDES-DIAGNOSTIC-TOOL.EDU.VN for Your Mercedes Needs
- 9.1. Expertise in Mercedes-Benz Diagnostics and Customization
- 9.2. Comprehensive Diagnostic Tools and Resources
- 9.3. Step-by-Step Guides and Tutorials
- 9.4. Dedicated Customer Support
- 10. Embracing the Future of Mercedes Customization
- 10.1. Exploring Advanced Diagnostic Techniques
- 10.2. Staying Informed About New Customization Options
- 10.3. Leveraging Online Communities and Forums
- FAQ: Addressing Your Questions About Amp Research OBD2 Plug and Direct Wiring
- 1. What is an Amp Research OBD2 plug?
- 2. Why would I want to wire Amp Research power steps directly instead of using the OBD2 plug?
- 3. What tools and materials are needed for direct wiring?
- 4. How do I identify the correct wires for direct wiring?
- 5. Where can I find a suitable power source for direct wiring?
- 6. How do I connect the door trigger wires without using the OBD2 port?
- 7. What are some alternative methods for triggering the power steps?
- 8. What should I do if my power steps are not deploying or retracting after direct wiring?
- 9. How can I maintain my directly wired power steps?
- 10. Is direct wiring safe?
1. Understanding the Amp Research OBD2 Plug and Power Steps
Amp Research power steps are retractable running boards that automatically deploy when a vehicle door opens and retract when the door closes. Typically, these steps utilize an OBD2 plug to receive signals and power, enabling their automatic operation. Wiring them directly bypasses the OBD2 port, offering an alternative installation method that can be advantageous in certain situations.
1.1. What are Amp Research Power Steps?
Amp Research power steps are aftermarket accessories designed to enhance vehicle accessibility and aesthetics. They provide a convenient step for entering and exiting the vehicle, especially useful for trucks and SUVs with higher ground clearance. These steps retract when not in use, maintaining the vehicle’s clean lines and aerodynamics. According to Amp Research, their power steps are built to withstand harsh conditions and provide reliable performance.
1.2. How Do Power Steps Typically Connect via OBD2?
Typically, Amp Research power steps connect to the vehicle’s OBD2 port to receive the necessary signals for deployment and retraction. The OBD2 port provides access to the vehicle’s CAN bus, allowing the power steps controller to monitor door activity and other relevant parameters. This connection method is generally straightforward, but it can sometimes interfere with other OBD2 devices or diagnostic tools.
1.3. Benefits of Direct Wiring vs. OBD2 Connection
Wiring Amp Research power steps directly offers several benefits over the standard OBD2 connection:
- Avoidance of OBD2 Port Conflicts: Direct wiring eliminates potential conflicts with other devices that require access to the OBD2 port, such as diagnostic tools or performance monitors.
- Simplified Diagnostics: By isolating the power steps from the OBD2 system, troubleshooting becomes more straightforward.
- Customization: Direct wiring allows for more customized control options, such as manual override switches or integration with other vehicle systems.
- Reduced Interference: Direct connections can reduce electrical interference that might occur when multiple devices are connected to the OBD2 port.
2. Identifying the Need for Direct Wiring
Several scenarios might necessitate or benefit from directly wiring Amp Research power steps. Understanding these situations can help you determine if this approach is right for your vehicle.
2.1. Conflicts with Other OBD2 Devices
One of the primary reasons for considering direct wiring is conflict with other OBD2 devices. Performance tuners, diagnostic tools, and other aftermarket accessories often require constant connection to the OBD2 port. When multiple devices compete for access, it can lead to communication errors or malfunctions.
2.2. Diagnostic Challenges with OBD2 Connection
When power steps are connected via the OBD2 port, any issues with their operation can complicate vehicle diagnostics. The power steps controller communicates through the CAN bus, and malfunctions can potentially interfere with other vehicle systems, making it difficult to pinpoint the root cause of problems.
2.3. Desire for Customized Control
Direct wiring opens the door to customized control options. For example, you might want to install a manual override switch that allows you to deploy or retract the steps regardless of door activity. This can be useful in situations where you need the steps to remain deployed, such as when working on the vehicle.
2.4. Electrical Interference Issues
In some cases, connecting multiple devices to the OBD2 port can lead to electrical interference, causing erratic behavior in one or more devices. Direct wiring can isolate the power steps and reduce the likelihood of such issues.
3. Essential Tools and Materials for Direct Wiring
Before embarking on the direct wiring process, gather all the necessary tools and materials to ensure a smooth and successful installation.
3.1. Wiring Diagram and Vehicle-Specific Information
The most critical resource is a detailed wiring diagram specific to your vehicle and the Amp Research power steps model. This diagram will provide the exact wire colors and connection points needed for proper operation. Always consult the manufacturer’s documentation for the most accurate information.
3.2. Multimeter for Testing Connections
A multimeter is essential for testing connections and verifying voltage levels. This tool will help you confirm that you are tapping into the correct wires and that the power steps are receiving the appropriate signals.
3.3. Wire Strippers, Crimpers, and Connectors
You’ll need wire strippers to remove insulation from wires, crimpers to secure connections, and a variety of connectors (e.g., butt connectors, T-taps) to join wires together. Choose high-quality connectors that provide a secure and reliable connection.
3.4. Electrical Tape and Heat Shrink Tubing
Electrical tape and heat shrink tubing are crucial for insulating and protecting your connections. Heat shrink tubing offers a more durable and professional finish compared to electrical tape.
3.5. Basic Hand Tools (Screwdrivers, Pliers, etc.)
A basic set of hand tools, including screwdrivers, pliers, and sockets, will be necessary for accessing wiring harnesses and mounting components.
3.6. Optional: Door Jamb Switches
If you want to trigger the power steps based on door activity without using the OBD2 port, you may need door jamb switches. These switches detect when the door is opened and closed, providing a signal to the power steps controller.
4. Step-by-Step Guide to Direct Wiring
Follow these steps to wire your Amp Research power steps directly, ensuring a safe and functional installation.
4.1. Disconnecting the Battery
Before starting any electrical work on your vehicle, disconnect the negative terminal of the battery. This will prevent accidental shorts and protect your vehicle’s electrical system.
4.2. Identifying the Necessary Wires
Using your wiring diagram, identify the wires required for the power steps to function. These typically include:
- Power Wire: Provides the main power supply to the power steps controller.
- Ground Wire: Provides the ground connection for the controller.
- Door Trigger Wires: These wires receive signals from the door switches to deploy and retract the steps.
- Illumination Wire (Optional): This wire connects to the vehicle’s lighting system to illuminate the steps when the headlights are on.
4.3. Locating Suitable Power and Ground Sources
Find a suitable power source that provides a constant 12V supply, even when the ignition is off. A good option is the battery or a distribution block. For the ground connection, choose a clean, unpainted metal surface on the vehicle’s chassis.
4.4. Wiring the Power and Ground Connections
Connect the power wire from the power steps controller to your chosen 12V source, using a fuse to protect the circuit. Connect the ground wire to your chosen ground point. Ensure all connections are secure and properly insulated.
4.5. Connecting the Door Trigger Wires
There are two primary methods for connecting the door trigger wires:
- Using Existing Door Switches: Tap into the existing door switches in your vehicle. These switches typically provide a ground signal when the door is opened. Use your wiring diagram to identify the correct wires and connect them to the door trigger wires on the power steps controller.
- Installing Aftermarket Door Jamb Switches: Install aftermarket door jamb switches that activate when the door is opened. Wire these switches to the door trigger wires on the power steps controller.
4.6. Testing the Connections
After making all the connections, reconnect the battery and test the power steps. Open and close each door to ensure the steps deploy and retract correctly. Use a multimeter to verify that all connections are receiving the correct voltage.
4.7. Insulating and Protecting the Wiring
Once you’ve verified that everything is working correctly, insulate all connections with electrical tape or heat shrink tubing. Secure the wiring harness to the vehicle’s frame using zip ties or electrical tape to prevent it from dangling or rubbing against other components.
5. Alternative Methods for Door Triggering
If you prefer not to tap into the vehicle’s existing door switches or install aftermarket door jamb switches, there are alternative methods for triggering the power steps.
5.1. Using a CAN Bus Interface
A CAN bus interface can be used to monitor door activity and send signals to the power steps controller. This method involves connecting the interface to the vehicle’s CAN bus and programming it to recognize door open/close events. This requires technical expertise but can provide a clean and reliable solution.
5.2. Utilizing a Tilt Sensor
A tilt sensor can be installed on the vehicle’s door, detecting when the door is opened or closed based on its angle. The sensor sends a signal to the power steps controller, triggering the steps to deploy or retract.
5.3. Integrating with the Vehicle’s Alarm System
If your vehicle has an alarm system, you may be able to integrate the power steps with the alarm system’s door sensors. This would allow the power steps to deploy when the alarm system detects that a door has been opened.
6. Troubleshooting Common Issues
Even with careful installation, issues can sometimes arise. Here are some common problems and how to troubleshoot them.
6.1. Power Steps Not Deploying or Retracting
- Check Power and Ground Connections: Ensure that the power and ground connections are secure and receiving the correct voltage.
- Verify Door Trigger Signals: Use a multimeter to verify that the door trigger wires are receiving a signal when the doors are opened and closed.
- Inspect the Controller: Check the power steps controller for any signs of damage or malfunction.
- Check Fuses: Make sure that all relevant fuses are intact.
6.2. Steps Deploying or Retracting Erratically
- Check for Loose Connections: Inspect all wiring connections for looseness or corrosion.
- Verify Door Switch Alignment: If using door jamb switches, ensure that they are properly aligned and functioning correctly.
- Inspect Wiring Harness: Check the wiring harness for any damage or breaks.
- Reduce Electrical Interference: Ensure that the power steps wiring is not running parallel to other electrical wires that could cause interference.
6.3. Steps Deploying Only on One Side
- Check Motor Connections: Inspect the motor connections on the side that is not deploying.
- Verify Wiring: Check the wiring to the motor for any damage or breaks.
- Test the Motor: Use a multimeter to test the motor itself to ensure that it is functioning correctly.
7. Maintaining Your Directly Wired Power Steps
Proper maintenance will ensure the longevity and reliability of your directly wired power steps.
7.1. Regularly Inspecting Wiring Connections
Periodically inspect all wiring connections for looseness, corrosion, or damage. Tighten any loose connections and replace any damaged wiring.
7.2. Lubricating Moving Parts
Lubricate the moving parts of the power steps, such as the hinges and pivot points, with a silicone-based lubricant. This will help keep the steps operating smoothly and prevent wear.
7.3. Cleaning the Steps
Regularly clean the steps to remove dirt, debris, and road salt. Use a mild soap and water solution and a soft brush to clean the steps. Avoid using harsh chemicals or abrasive cleaners that could damage the finish.
7.4. Checking for Obstructions
Check for any obstructions that could prevent the steps from deploying or retracting fully. Remove any debris or objects that are blocking the steps.
8. Safety Considerations
Working with vehicle electrical systems can be dangerous. Always follow these safety precautions:
8.1. Disconnecting the Battery Before Starting
Always disconnect the negative terminal of the battery before starting any electrical work.
8.2. Using Proper Safety Gear (Gloves, Eye Protection)
Wear gloves and eye protection to protect yourself from electrical shock and debris.
8.3. Avoiding Water and Moisture
Avoid working with electrical systems in wet or damp conditions.
8.4. Consulting a Professional if Unsure
If you are unsure about any aspect of the installation process, consult a professional mechanic or electrician.
9. Why Choose MERCEDES-DIAGNOSTIC-TOOL.EDU.VN for Your Mercedes Needs
MERCEDES-DIAGNOSTIC-TOOL.EDU.VN is your trusted partner for all things Mercedes. We offer expert advice, detailed guides, and top-quality diagnostic tools to help you maintain and enhance your vehicle.
9.1. Expertise in Mercedes-Benz Diagnostics and Customization
Our team of experienced technicians specializes in Mercedes-Benz diagnostics and customization. We have the knowledge and expertise to help you with any project, from simple maintenance to complex modifications.
9.2. Comprehensive Diagnostic Tools and Resources
We offer a wide range of diagnostic tools and resources to help you troubleshoot and repair your Mercedes. Our tools are designed to provide accurate and reliable information, helping you get your vehicle back on the road quickly.
9.3. Step-by-Step Guides and Tutorials
Our website features a comprehensive library of step-by-step guides and tutorials that cover a wide range of topics, including diagnostics, maintenance, and customization. These guides are designed to be easy to follow, even for those with limited mechanical experience.
9.4. Dedicated Customer Support
We are committed to providing exceptional customer support. If you have any questions or need assistance with your Mercedes, our team is here to help. Contact us today to learn more about our products and services.
10. Embracing the Future of Mercedes Customization
Direct wiring Amp Research power steps is just one example of the many ways you can customize and enhance your Mercedes. By understanding your vehicle’s electrical system and utilizing the right tools and resources, you can unlock a world of possibilities.
10.1. Exploring Advanced Diagnostic Techniques
As vehicle technology advances, so do diagnostic techniques. Stay up-to-date on the latest diagnostic methods and tools to ensure you can properly maintain and repair your Mercedes.
10.2. Staying Informed About New Customization Options
The aftermarket industry is constantly developing new products and services for Mercedes vehicles. Stay informed about the latest customization options to personalize your vehicle to your exact specifications.
10.3. Leveraging Online Communities and Forums
Online communities and forums are a great resource for sharing information and getting advice from other Mercedes owners. Join these communities to learn from others and stay connected to the Mercedes world.
 Ford Truck Door Jamb Switch for Amp Powersteps Wiring
OEM-style door jamb switch expertly wired for seamless integration with Amp Research Powersteps, enhancing both functionality and vehicle aesthetics.
FAQ: Addressing Your Questions About Amp Research OBD2 Plug and Direct Wiring
1. What is an Amp Research OBD2 plug?
An Amp Research OBD2 plug is a connector used to interface Amp Research power steps with a vehicle’s On-Board Diagnostics II (OBD2) port, allowing the steps to deploy and retract automatically. It simplifies installation by tapping into the vehicle’s electrical system for door activity signals.
2. Why would I want to wire Amp Research power steps directly instead of using the OBD2 plug?
Wiring directly avoids conflicts with other OBD2 devices, simplifies diagnostics by isolating the power steps, allows for customized control options, and reduces potential electrical interference.
3. What tools and materials are needed for direct wiring?
You’ll need a wiring diagram, multimeter, wire strippers, crimpers, connectors, electrical tape, heat shrink tubing, basic hand tools, and optionally, door jamb switches.
4. How do I identify the correct wires for direct wiring?
Consult your vehicle-specific wiring diagram and the Amp Research power steps documentation. Identify the power wire, ground wire, door trigger wires, and optional illumination wire.
5. Where can I find a suitable power source for direct wiring?
A constant 12V supply can be found at the battery or a distribution block. Ensure you use a fuse to protect the circuit.
6. How do I connect the door trigger wires without using the OBD2 port?
You can tap into existing door switches or install aftermarket door jamb switches to provide the necessary door activity signals.
7. What are some alternative methods for triggering the power steps?
Alternative methods include using a CAN bus interface, a tilt sensor on the door, or integrating with the vehicle’s alarm system.
8. What should I do if my power steps are not deploying or retracting after direct wiring?
Check the power and ground connections, verify door trigger signals, inspect the controller, and check all relevant fuses.
9. How can I maintain my directly wired power steps?
Regularly inspect wiring connections, lubricate moving parts, clean the steps, and check for obstructions.
10. Is direct wiring safe?
Yes, if done correctly. Always disconnect the battery before starting, use proper safety gear, avoid water and moisture, and consult a professional if unsure.
Direct wiring your Amp Research power steps can provide enhanced functionality and customization. For expert guidance and assistance with your Mercedes-Benz, contact MERCEDES-DIAGNOSTIC-TOOL.EDU.VN at 789 Oak Avenue, Miami, FL 33101, United States, Whatsapp: +1 (641) 206-8880, or visit our website at MERCEDES-DIAGNOSTIC-TOOL.EDU.VN today!
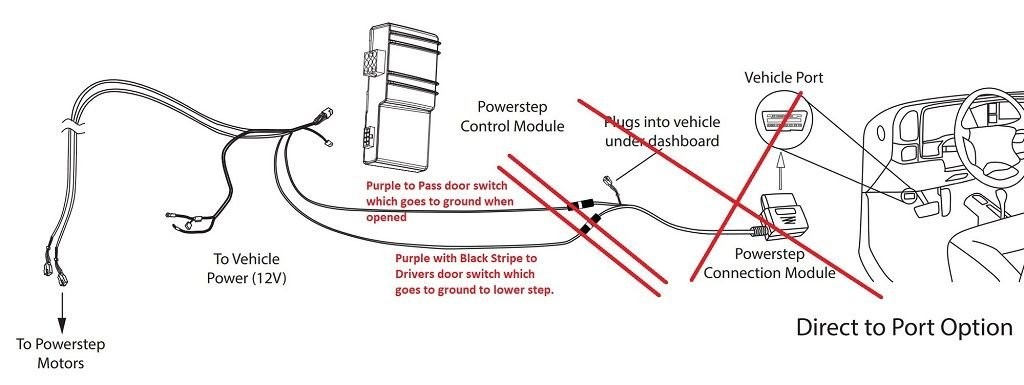 Amp Powersteps Wiring Diagram
Detailed wiring schematic for Amp Research Powersteps, illustrating the connections needed to bypass the OBDII port for a custom installation.
5 Intentions for the Keyword “Amp Research OBD2 Plug”:
- Installation Guidance: Users seek detailed instructions on installing Amp Research power steps, particularly when using or bypassing the OBD2 plug.
- Troubleshooting: Users look for solutions to common issues such as power steps not deploying or retracting correctly.
- Alternative Wiring Methods: Users are interested in alternative methods for triggering power steps without using the OBD2 port.
- Product Information: Users want to understand the features and benefits of Amp Research power steps and the OBD2 plug.
- Customization Options: Users seek ways to customize the operation of their power steps, such as adding manual override switches or integrating with other vehicle systems.