Connecting wires to OBD2 (On-Board Diagnostics II) for your Mercedes diagnostics involves understanding the correct pin configurations and ensuring a secure connection. MERCEDES-DIAGNOSTIC-TOOL.EDU.VN offers comprehensive guidance, tools, and services to simplify this process, ensuring accurate diagnostics and unlocking hidden features. Proper connection enhances diagnostic capabilities, allowing you to troubleshoot issues effectively and maintain your Mercedes Benz with confidence.
This article explores the essential steps, tools, and precautions needed to correctly connect wires to your Mercedes OBD2 port, enhancing your car’s diagnostic capabilities and potentially unlocking hidden features and providing crucial information for car maintenance.
Contents
- 1. Understanding the Basics of Connecting Wires to OBD2
- 1.1. What is OBD2?
- 1.2. Why Connect Wires to OBD2?
- 1.3. Essential Tools and Components
- 1.4. Safety Precautions
- 2. Identifying the Correct OBD2 Pin Configuration for Mercedes
- 2.1. Standard OBD2 Pin Layout
- 2.2. Mercedes-Specific Pin Assignments
- 2.3. Finding Reliable Wiring Diagrams
- 2.4. Verifying Pin Assignments with a Multimeter
- 2.5. Potential Risks of Incorrect Pin Assignments
- 3. Step-by-Step Guide to Connecting Wires to the Mercedes OBD2 Port
- 3.1. Preparing the Wires
- 3.2. Connecting Wires to the OBD2 Connector
- 3.3. Assembling the OBD2 Connector Housing
- 3.4. Connecting the Wires to the Vehicle OBD2 Port
- 3.5. Best Practices for Wire Management
- 4. Common Wiring Configurations for Mercedes OBD2
- 4.1. Standard Diagnostic Connection
- 4.2. CAN Bus Connection
- 4.3. Power and Ground Connection
- 4.4. K-Line Connection
- 4.5. Custom Wiring for Specific Modifications
- 5. Troubleshooting Common Issues When Connecting Wires to OBD2
- 5.1. No Communication with the Vehicle
- 5.2. Intermittent Connection Problems
- 5.3. Short Circuits
- 5.4. Error Codes and Warning Lights
- 5.5. Preventing Future Issues
- 6. Advanced Techniques for OBD2 Wiring
- 6.1. Shielded Wiring
- 6.2. Twisted Pair Wiring
- 6.3. Using Connectors and Adapters
- 6.4. Data Logging Techniques
- 6.5. Remote Diagnostics
- 7. Choosing the Right Diagnostic Tools for Mercedes
- 7.1. Types of Diagnostic Tools
- 7.2. Key Features to Look For
- 7.3. Top Diagnostic Tool Brands for Mercedes
- 7.4. Comparing Popular Diagnostic Tools
- 7.5. Tips for Selecting the Right Tool
- 8. Understanding Mercedes-Specific Diagnostic Trouble Codes (DTCs)
- 8.1. What are DTCs?
- 8.2. Types of DTCs
- 8.3. Common Mercedes DTCs and Their Meanings
- 8.4. How to Interpret DTCs
- 8.5. Resources for Looking Up Mercedes DTCs
- 8.6. Clearing DTCs
- 9. Unlocking Hidden Features on Your Mercedes via OBD2
- 9.1. What are Hidden Features?
- 9.2. Tools and Software Needed
- 9.3. Step-by-Step Guide to Unlocking Hidden Features
- 9.4. Risks and Precautions
- 9.5. Popular Hidden Features to Unlock
- 9.6. Ethical Considerations
- 10. Regular Maintenance and Diagnostics Using OBD2
- 10.1. Importance of Regular Diagnostics
- 10.2. Recommended Maintenance Schedule
- 10.3. Using OBD2 for Routine Checks
- 10.4. Key Parameters to Monitor
- 10.5. Benefits of Proactive Maintenance
- 10.6. When to Seek Professional Help
1. Understanding the Basics of Connecting Wires to OBD2
Connecting wires to the OBD2 port is a crucial step for various automotive diagnostic and modification tasks. The OBD2 port acts as an interface, allowing communication with your vehicle’s electronic control units (ECUs). Understanding the basics ensures a successful and safe connection.
1.1. What is OBD2?
OBD2, or On-Board Diagnostics II, is a standardized system used in most vehicles to monitor and control various engine and vehicle functions. According to the Environmental Protection Agency (EPA), OBD2 was mandated in the United States for all cars and light trucks manufactured after 1996 to standardize emissions monitoring. The OBD2 port provides access to a wealth of diagnostic information.
1.2. Why Connect Wires to OBD2?
Connecting wires to the OBD2 port allows you to:
- Read Diagnostic Trouble Codes (DTCs): Identify issues with your vehicle.
- Access Live Data: Monitor real-time performance parameters.
- Perform Custom Modifications: Unlock hidden features or enhance vehicle performance.
- Flash or Reprogram ECUs: Update or modify the software controlling vehicle functions.
1.3. Essential Tools and Components
Before you begin, gather the necessary tools and components:
- OBD2 Connector: A standard 16-pin connector to interface with your vehicle’s OBD2 port.
- Wires: High-quality wires for making secure connections.
- Wire Strippers/Cutters: For preparing the wires.
- Crimping Tool: To secure the wires to the connector pins.
- Multimeter: To test continuity and voltage.
- Soldering Iron and Solder (Optional): For more secure connections.
- Heat Shrink Tubing (Optional): To insulate and protect connections.
- Wiring Diagram: A specific wiring diagram for your Mercedes model.
- 4-Pin Connector: (link to part used; pin/wire size = 22-16AWG; insulation/seal size = 1.3-1.7mm)
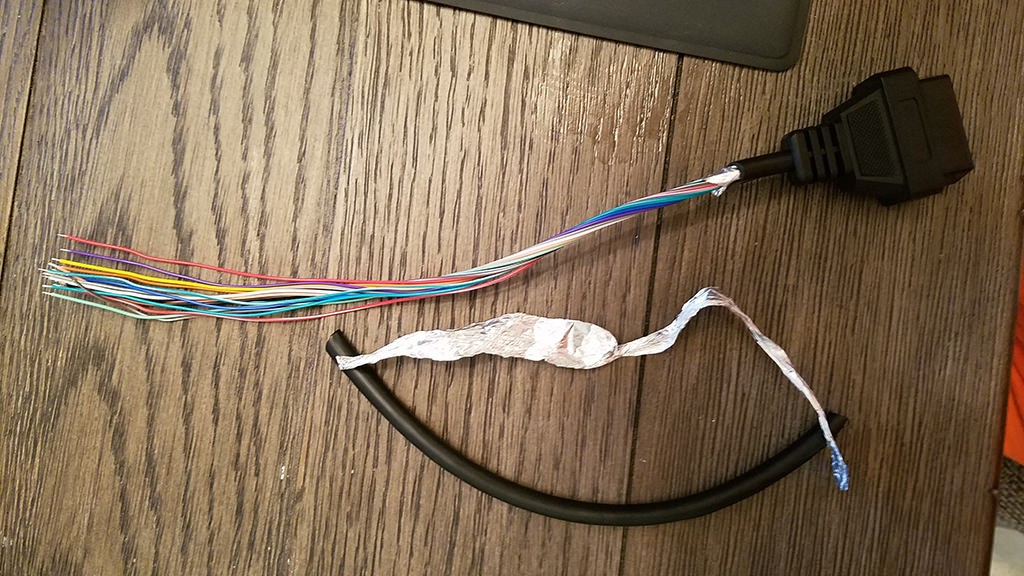
- OBD-II Cable: (link to part used)
1.4. Safety Precautions
- Disconnect the Battery: Always disconnect the negative terminal of your car battery to prevent electrical shorts.
- Use Proper Grounding: Ensure proper grounding to avoid damaging your vehicle’s electronics.
- Double-Check Wiring Diagrams: Verify the wiring diagram is correct for your specific Mercedes model.
- Insulate Connections: Properly insulate all connections to prevent shorts.
2. Identifying the Correct OBD2 Pin Configuration for Mercedes
Identifying the correct OBD2 pin configuration for your Mercedes is crucial for safe and effective diagnostics. Using the wrong configuration can damage your vehicle’s electronic systems.
2.1. Standard OBD2 Pin Layout
The OBD2 port has a standard 16-pin layout, but the functions of these pins can vary depending on the vehicle manufacturer and model. Here’s a general overview:
| Pin Number | Function |
|---|---|
| 2 | SAE J1850 Bus + |
| 4 | Chassis Ground |
| 5 | Signal Ground |
| 6 | CAN High (J-2284) |
| 7 | ISO 9141-2 K Line |
| 10 | SAE J1850 Bus – |
| 14 | CAN Low (J-2284) |
| 15 | ISO 9141-2 L Line |
| 16 | Battery Voltage (12V) |
2.2. Mercedes-Specific Pin Assignments
Mercedes-Benz uses specific pin assignments that may differ from the standard layout. Common pins used in Mercedes vehicles include:
- Pin 4: Chassis Ground
- Pin 6: CAN High (J-2284)
- Pin 14: CAN Low (J-2284)
- Pin 16: Battery Power
2.3. Finding Reliable Wiring Diagrams
To ensure accuracy, consult reliable sources for wiring diagrams:
- Mercedes-Benz Service Manuals: Official service manuals provide the most accurate information.
- Online Databases: Websites like ALLDATA and Mitchell OnDemand offer detailed wiring diagrams.
- Forums and Communities: Online forums and communities dedicated to Mercedes-Benz vehicles can provide valuable information and diagrams shared by experienced users.
2.4. Verifying Pin Assignments with a Multimeter
Before making any connections, verify the pin assignments using a multimeter:
- Ground Connection: Check for continuity between Pin 4 and the vehicle chassis.
- Power Connection: Verify that Pin 16 has 12V with the ignition on.
- CAN Bus Connections: Confirm the CAN High (Pin 6) and CAN Low (Pin 14) connections.
2.5. Potential Risks of Incorrect Pin Assignments
Using incorrect pin assignments can lead to serious issues:
- ECU Damage: Incorrect voltage or signals can damage the ECUs.
- Communication Errors: Incorrect connections can prevent proper communication between diagnostic tools and the vehicle.
- Electrical Shorts: Miswiring can cause electrical shorts, potentially damaging the vehicle’s electrical system.
3. Step-by-Step Guide to Connecting Wires to the Mercedes OBD2 Port
Connecting wires to the Mercedes OBD2 port requires careful attention to detail to ensure a secure and functional connection. Follow these steps to properly connect the wires:
3.1. Preparing the Wires
- Measure and Cut: Measure the required length of wire needed to connect to the OBD2 port and cut accordingly.
- Strip the Ends: Use wire strippers to remove about 1/4 inch of insulation from each end of the wires.
- Tin the Wires (Optional): Apply a small amount of solder to the exposed wire strands to prevent fraying and improve conductivity.
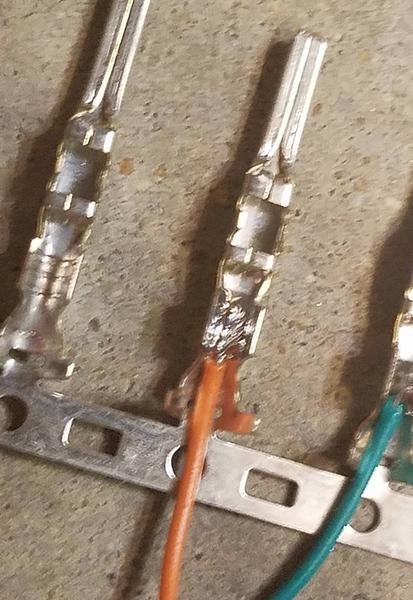
3.2. Connecting Wires to the OBD2 Connector
- Insert Wires into Connector Pins: Insert the stripped end of each wire into the appropriate pin of the OBD2 connector.
- Crimping the Pins: Use a crimping tool to securely crimp the pins onto the wires. Ensure a tight connection to prevent the wires from pulling out.
- Soldering the Pins (Optional): For added security, solder the wires to the pins after crimping. This creates a more robust and reliable connection.
3.3. Assembling the OBD2 Connector Housing
- Insert Pins into Housing: Carefully insert each pin into the correct slot in the OBD2 connector housing.
- Secure the Housing: Ensure the housing is properly assembled and locked to protect the pins and wires.
3.4. Connecting the Wires to the Vehicle OBD2 Port
- Locate the OBD2 Port: Find the OBD2 port in your Mercedes, typically located under the dashboard on the driver’s side.
- Connect the OBD2 Connector: Align the connector with the port and push it in firmly until it clicks into place.
- Test the Connection: Use a multimeter to test the continuity and voltage of each connection to ensure they are correct.
3.5. Best Practices for Wire Management
- Use Wire Ties: Secure the wires with wire ties to keep them organized and prevent them from getting tangled or damaged.
 Organized Wires with Ties
Alt text: Neatly organized wires secured with zip ties to prevent tangling and damage, ensuring a clean and reliable connection.
- Label the Wires: Label each wire with its function to make it easier to identify and troubleshoot in the future.
- Route Wires Safely: Route the wires away from moving parts and heat sources to prevent damage.
4. Common Wiring Configurations for Mercedes OBD2
Different tasks require specific wiring configurations. Here are some common configurations for Mercedes OBD2 connections.
4.1. Standard Diagnostic Connection
For basic diagnostics, the following pins are typically used:
- Pin 4: Chassis Ground
- Pin 6: CAN High
- Pin 14: CAN Low
- Pin 16: Battery Power
This configuration allows you to read diagnostic trouble codes (DTCs) and access live data from your Mercedes.
4.2. CAN Bus Connection
The Controller Area Network (CAN) bus is crucial for communication between ECUs. The CAN bus connection uses:
- Pin 6: CAN High
- Pin 14: CAN Low
This setup is essential for advanced diagnostics, flashing, and reprogramming ECUs.
4.3. Power and Ground Connection
For powering external devices through the OBD2 port, you need:
- Pin 4: Chassis Ground
- Pin 16: Battery Power
This configuration provides a stable power source for diagnostic tools and other electronic devices.
4.4. K-Line Connection
Some older Mercedes models use the K-Line for communication. The K-Line connection utilizes:
- Pin 7: ISO 9141-2 K Line
- Pin 4: Chassis Ground
This connection is necessary for diagnosing older vehicles that do not support CAN bus communication.
4.5. Custom Wiring for Specific Modifications
Depending on the modification, custom wiring configurations may be required. Always consult a reliable wiring diagram and follow these guidelines:
- Double-Check Pin Assignments: Verify the pin assignments before making any connections.
- Use High-Quality Wires: Use wires that meet the required specifications for voltage and current.
- Insulate Connections: Properly insulate all connections to prevent shorts and ensure safety.
5. Troubleshooting Common Issues When Connecting Wires to OBD2
Connecting wires to the OBD2 port can sometimes present challenges. Here’s how to troubleshoot common issues.
5.1. No Communication with the Vehicle
If your diagnostic tool fails to communicate with the vehicle, check the following:
- Pin Connections: Ensure all pins are correctly connected and securely crimped.
- Power Supply: Verify that Pin 16 has 12V with the ignition on.
- Ground Connection: Check for continuity between Pin 4 and the vehicle chassis.
- CAN Bus Connections: Confirm the CAN High (Pin 6) and CAN Low (Pin 14) connections.
- Diagnostic Tool Compatibility: Ensure your diagnostic tool is compatible with your Mercedes model.
5.2. Intermittent Connection Problems
Intermittent connection issues can be frustrating. Here are some potential causes:
- Loose Pins: Check for loose pins in the OBD2 connector housing.
- Damaged Wires: Inspect the wires for any signs of damage or corrosion.
- Poor Crimps: Re-crimp any connections that appear weak or loose.
- Environmental Factors: Temperature and humidity can affect connections. Ensure connections are protected from the elements.
5.3. Short Circuits
Short circuits can damage your vehicle’s electronic systems. If you suspect a short circuit:
- Disconnect the Battery: Immediately disconnect the negative terminal of your car battery.
- Inspect Wiring: Carefully inspect the wiring for any signs of damage or exposed wires.
- Use a Multimeter: Use a multimeter to check for continuity between different pins and ground.
- Isolate the Issue: Disconnect components one at a time to isolate the source of the short.
5.4. Error Codes and Warning Lights
If you receive error codes or warning lights after connecting the wires:
- Read the Codes: Use a diagnostic tool to read the specific error codes.
- Consult the Service Manual: Refer to the Mercedes-Benz service manual for troubleshooting steps.
- Check Wiring Diagrams: Ensure all connections are correct according to the wiring diagram.
- Clear the Codes: After resolving the issue, clear the error codes and monitor the system for any recurrence.
5.5. Preventing Future Issues
To minimize future problems:
- Use High-Quality Components: Invest in high-quality connectors, wires, and tools.
- Proper Installation: Follow the instructions carefully and ensure all connections are secure.
- Regular Inspections: Periodically inspect the wiring and connections for any signs of wear or damage.
- Protective Measures: Use heat shrink tubing and wire ties to protect the wiring from environmental factors and physical stress.
6. Advanced Techniques for OBD2 Wiring
For advanced users, mastering specific wiring techniques can enhance the capabilities of your OBD2 connections.
6.1. Shielded Wiring
Shielded wiring protects sensitive signals from electromagnetic interference (EMI). This is crucial for accurate data transmission and reliable performance.
- Use Shielded Cables: Use cables with a braided shield to block EMI.
- Ground the Shield: Ground the shield to the vehicle chassis to dissipate any captured interference.
- Proper Termination: Ensure the shield is properly terminated at both ends to maintain its effectiveness.
6.2. Twisted Pair Wiring
Twisted pair wiring reduces noise and crosstalk between wires. This technique is particularly useful for CAN bus connections.
- Twist the Wires: Twist the CAN High and CAN Low wires together to cancel out any induced noise.
 Twisted Pair Wiring
Alt text: A close-up of twisted pair wiring, illustrating how the intertwined wires help reduce noise and interference for cleaner signal transmission.
- Maintain Consistent Twist Rate: Keep the twist rate consistent along the entire length of the wires for optimal performance.
6.3. Using Connectors and Adapters
Connectors and adapters can simplify wiring and allow for easy disconnection and reconnection.
- Choose High-Quality Connectors: Use connectors that provide a secure and reliable connection.
- Use Adapters for Different Interfaces: Adapters allow you to connect to different types of interfaces, such as USB or Ethernet.
- Properly Label Connections: Label all connectors and adapters to avoid confusion.
6.4. Data Logging Techniques
Data logging involves recording data from the OBD2 port for analysis and troubleshooting.
- Use a Data Logging Tool: Use a dedicated data logging tool or software.
- Configure Data Parameters: Select the specific parameters you want to log, such as engine speed, temperature, and fuel consumption.
- Analyze the Data: Analyze the logged data to identify trends, anomalies, and potential issues.
6.5. Remote Diagnostics
Remote diagnostics allows you to diagnose and troubleshoot vehicle issues remotely.
- Use a Remote Diagnostic Device: Use a device that can connect to the OBD2 port and transmit data over the internet.
- Secure Communication: Ensure the communication is secure to protect sensitive data.
- Remote Access Software: Use remote access software to connect to the vehicle and perform diagnostics.
7. Choosing the Right Diagnostic Tools for Mercedes
Selecting the right diagnostic tools is essential for effectively troubleshooting and maintaining your Mercedes-Benz. The market offers a variety of options, each with its own set of features and capabilities.
7.1. Types of Diagnostic Tools
-
OBD2 Scanners: Basic scanners read and clear diagnostic trouble codes (DTCs).
-
Advanced Diagnostic Systems: Provide in-depth analysis, live data, and bi-directional control.
-
Professional Diagnostic Tools: Offer advanced features such as ECU programming, module coding, and detailed system diagnostics.
7.2. Key Features to Look For
- Compatibility: Ensure the tool is compatible with your Mercedes model and year.
- Functionality: Choose a tool that offers the features you need, such as reading and clearing codes, live data, bi-directional control, and ECU programming.
- Ease of Use: Look for a tool with an intuitive interface and easy-to-understand instructions.
- Update Capability: Ensure the tool can be updated with the latest software and vehicle information.
- Customer Support: Choose a tool from a reputable manufacturer that offers good customer support.
7.3. Top Diagnostic Tool Brands for Mercedes
-
Mercedes-Benz Star Diagnostic: The official diagnostic system used by Mercedes-Benz dealerships.
-
Autel: Offers a range of diagnostic tools with comprehensive coverage and advanced features.
-
Launch: Provides cost-effective diagnostic solutions with a wide range of capabilities.
-
iCarsoft: Specializes in diagnostic tools for specific vehicle brands, including Mercedes-Benz.
7.4. Comparing Popular Diagnostic Tools
| Tool | Features | Pros | Cons |
|---|---|---|---|
| Mercedes-Benz Star | Comprehensive diagnostics, ECU programming, module coding | Official tool, unmatched compatibility, access to factory data | Expensive, requires specialized training |
| Autel MaxiSys | Advanced diagnostics, live data, bi-directional control, ECU programming | Wide vehicle coverage, user-friendly interface, regular updates | Can be pricey, some advanced features require additional subscriptions |
| Launch X431 | Comprehensive diagnostics, live data, bi-directional control, ECU programming | Wide vehicle coverage, user-friendly interface, regular updates | Can be pricey, some advanced features require additional subscriptions |
| iCarsoft MB II | Reads and clears codes, live data, basic bi-directional control | Affordable, easy to use, Mercedes-specific | Limited functionality compared to professional tools |
7.5. Tips for Selecting the Right Tool
- Assess Your Needs: Determine your diagnostic needs based on your vehicle and the types of issues you typically encounter.
- Read Reviews: Research and read reviews from other users to get an idea of the tool’s performance and reliability.
- Consider Your Budget: Set a budget and choose a tool that offers the best value for your money.
- Check Compatibility: Verify that the tool is compatible with your specific Mercedes model and year.
- Look for Updates: Ensure the tool can be updated with the latest software and vehicle information.
8. Understanding Mercedes-Specific Diagnostic Trouble Codes (DTCs)
Understanding Mercedes-specific Diagnostic Trouble Codes (DTCs) is crucial for accurate vehicle diagnostics. These codes provide valuable information about potential issues within your vehicle’s systems.
8.1. What are DTCs?
DTCs are alphanumeric codes that indicate a specific problem detected by your vehicle’s onboard computer. When a fault occurs, the computer stores a DTC in its memory, which can be retrieved using a diagnostic tool.
8.2. Types of DTCs
DTCs are categorized into different types based on the system they relate to:
- P Codes (Powertrain): Relate to the engine, transmission, and fuel system.
- B Codes (Body): Relate to the body control systems, such as airbags, central locking, and power windows.
- C Codes (Chassis): Relate to the chassis systems, such as ABS, traction control, and suspension.
- U Codes (Network): Relate to the communication network between different ECUs.
8.3. Common Mercedes DTCs and Their Meanings
| DTC | Description | Possible Causes |
|---|---|---|
| P0171 | System Too Lean (Bank 1) | Vacuum leak, faulty MAF sensor, fuel pump issue |
| P0300 | Random Misfire Detected | Faulty spark plugs, ignition coils, fuel injectors |
| B1000 | Control Unit N10 (Front SAM control unit) is faulty | Faulty front SAM unit, wiring issues |
| C1000 | BAS control module N47-5 is defective | Faulty BAS control module, ABS sensor issues |
| U0100 | Lost Communication With ECM/PCM “A” | Wiring issues, faulty ECM/PCM, CAN bus problems |
8.4. How to Interpret DTCs
-
Use a Diagnostic Tool: Connect a diagnostic tool to your vehicle’s OBD2 port to retrieve the DTCs.
-
Record the Codes: Write down all the DTCs that are displayed.
-
Look Up the Codes: Use a reliable source, such as a Mercedes-Benz service manual or an online database, to look up the meaning of each code.
-
Understand the Symptoms: Note any symptoms that accompany the DTCs, such as engine misfires, poor fuel economy, or warning lights.
-
Troubleshoot the Issue: Follow the troubleshooting steps provided in the service manual or online resources to diagnose and repair the problem.
8.5. Resources for Looking Up Mercedes DTCs
- Mercedes-Benz Service Manuals: Provide detailed information about DTCs and troubleshooting procedures.
- Online Databases: Websites like OBD-Codes.com and Mercedes-Benz Forums offer comprehensive DTC information and user discussions.
8.6. Clearing DTCs
After repairing the issue, you need to clear the DTCs from your vehicle’s computer:
-
Use a Diagnostic Tool: Connect a diagnostic tool to your vehicle’s OBD2 port.
-
Select the Clear Codes Function: Follow the tool’s instructions to clear the DTCs.
-
Verify the Repair: After clearing the codes, start the vehicle and monitor for any recurrence of the DTCs or symptoms.
9. Unlocking Hidden Features on Your Mercedes via OBD2
Unlocking hidden features on your Mercedes via the OBD2 port can enhance your driving experience and customize your vehicle to your preferences. This involves accessing and modifying the vehicle’s software to enable features that are not activated by default.
9.1. What are Hidden Features?
Hidden features are functions and settings within your Mercedes’ electronic control units (ECUs) that are disabled or not activated from the factory. These features can include:
- Comfort Features: Enhanced climate control settings, automatic mirror folding.
- Lighting Options: Customizable ambient lighting, cornering lights.
- Performance Enhancements: Optimized throttle response, increased horsepower.
- Safety Features: Advanced driver assistance systems, enhanced braking functions.
9.2. Tools and Software Needed
To unlock hidden features, you’ll need specific tools and software:
- OBD2 Adapter: A reliable OBD2 adapter that supports communication with your Mercedes.
- Coding Software: Software such as Vediamo, DTS Monaco, or similar Mercedes-specific coding tools.
- Laptop: A laptop with the necessary software installed and configured.
- Battery Charger: A stable battery charger to maintain voltage during the coding process.
9.3. Step-by-Step Guide to Unlocking Hidden Features
-
Connect the OBD2 Adapter: Plug the OBD2 adapter into your Mercedes’ OBD2 port.
-
Start the Coding Software: Launch the coding software on your laptop and connect to the vehicle.
-
Select the ECU: Identify and select the specific ECU that controls the feature you want to unlock.
-
Modify the Parameters: Change the relevant parameters within the ECU to enable the hidden feature.
-
Apply the Changes: Save the changes and apply them to the ECU.
-
Test the Feature: Verify that the hidden feature is now active and functioning correctly.
9.4. Risks and Precautions
Unlocking hidden features can be risky if not done correctly:
- ECU Damage: Incorrect coding can damage the ECU, requiring costly repairs.
- Warranty Void: Modifying the vehicle’s software may void the warranty.
- Software Glitches: Unstable or incorrect coding can lead to software glitches and system malfunctions.
- Consult Experts: Before attempting to unlock hidden features, consult with experienced professionals or use reliable guides.
9.5. Popular Hidden Features to Unlock
- Cornering Lights: Activate fog lights to illuminate the direction of a turn.
- Seat Belt Chime Disable: Disable the annoying seat belt chime.
- Video in Motion: Enable video playback on the infotainment screen while driving.
- Enhanced Ambient Lighting: Customize the colors and intensity of the ambient lighting.
9.6. Ethical Considerations
Be aware of the ethical and legal implications of unlocking certain features:
- Safety Regulations: Ensure that any modifications comply with safety regulations.
- Legal Compliance: Verify that the unlocked features are legal in your jurisdiction.
10. Regular Maintenance and Diagnostics Using OBD2
Regular maintenance and diagnostics using the OBD2 port are essential for keeping your Mercedes-Benz in top condition. By routinely monitoring your vehicle’s systems, you can identify and address potential issues before they become major problems.
10.1. Importance of Regular Diagnostics
Regular diagnostics can help you:
- Detect Issues Early: Identify problems such as engine misfires, sensor failures, and emissions issues.
- Prevent Costly Repairs: Address minor issues before they escalate into major repairs.
- Maintain Performance: Ensure your vehicle is running at its optimal performance level.
- Extend Vehicle Life: Prolong the lifespan of your vehicle by keeping it well-maintained.
10.2. Recommended Maintenance Schedule
Follow these guidelines for regular maintenance and diagnostics:
- Every 3 Months: Check tire pressure, fluid levels, and battery condition.
- Every 6 Months: Inspect brakes, suspension, and exhaust system.
- Every Year: Perform a comprehensive diagnostic scan using an OBD2 scanner.
- Every 2 Years: Replace spark plugs, inspect fuel lines, and check emissions.
10.3. Using OBD2 for Routine Checks
-
Connect the OBD2 Scanner: Plug the OBD2 scanner into your vehicle’s OBD2 port.
-
Read Diagnostic Trouble Codes (DTCs): Check for any stored DTCs.
-
Clear the Codes (If Necessary): If there are any DTCs, research the causes and repair the issues before clearing the codes.
-
Monitor Live Data: Use the scanner to monitor live data parameters such as engine temperature, fuel trim, and O2 sensor readings.
-
Record the Data: Keep a record of the diagnostic data for future reference.
10.4. Key Parameters to Monitor
- Engine Temperature: Ensure the engine is operating within the normal temperature range.
- Fuel Trim: Monitor fuel trim values to detect potential fuel system issues.
- O2 Sensor Readings: Check the O2 sensor readings to ensure proper air-fuel mixture.
- Battery Voltage: Verify that the battery voltage is within the specified range.
- MAF Sensor Readings: Monitor the mass airflow (MAF) sensor readings to detect any anomalies.
10.5. Benefits of Proactive Maintenance
Proactive maintenance can provide numerous benefits:
- Improved Fuel Economy: Regular maintenance can help improve fuel efficiency.
- Reduced Emissions: Keeping your vehicle well-maintained can reduce emissions and help you pass emissions tests.
- Enhanced Safety: Regular inspections can identify potential safety issues, such as worn brakes or faulty suspension components.
- Increased Resale Value: A well-maintained vehicle typically has a higher resale value.
10.6. When to Seek Professional Help
While you can perform many maintenance tasks yourself, it’s important to know when to seek professional help:
- Complex Repairs: If you encounter complex issues that require specialized tools or knowledge, consult a qualified mechanic.
- Recurring Issues: If you notice recurring issues or DTCs, it’s best to have a professional diagnose and repair the problem.
- Unfamiliar Symptoms: If you experience unfamiliar symptoms or warning lights, seek professional assistance to avoid further damage to your vehicle.
By following these guidelines for regular maintenance and diagnostics, you can keep your Mercedes-Benz running smoothly and reliably for years to come.
Connecting wires to the OBD2 port of your Mercedes allows for detailed diagnostics, unlocking hidden features, and performing necessary maintenance. By understanding the correct procedures, using the right tools, and following safety precautions, you can effectively manage your vehicle’s health and performance.
For more in-depth guidance, professional tools, and expert services, visit MERCEDES-DIAGNOSTIC-TOOL.EDU.VN. Our team is dedicated to providing the highest quality diagnostic solutions tailored to your Mercedes-Benz.
Ready to take control of your Mercedes-Benz diagnostics and unlock its full potential? Contact us today for expert advice and support!
Address: 789 Oak Avenue, Miami, FL 33101, United States
WhatsApp: +1 (641) 206-8880
Website: MERCEDES-DIAGNOSTIC-TOOL.EDU.VN