D15b Non Vtec Obd2 No Crank Sensor issues can be frustrating, but with the proper knowledge, you can diagnose and resolve them efficiently using resources from MERCEDES-DIAGNOSTIC-TOOL.EDU.VN. This guide dives into the complexities, offering solutions and insights for enthusiasts and professionals alike. You’ll also discover the power of diagnostic tools and wiring insights.
Contents
- Table of Contents
- 1. What Does “D15B Non VTEC OBD2 No Crank Sensor” Mean?
- 1.1 Understanding the D15B Engine
- 1.2 Decoding Non-VTEC
- 1.3 OBD2 Significance
- 1.4 Crank Sensor Function
- 1.5 “No Crank” Scenario
- 2. Why Is The Crank Sensor Important?
- 2.1 Engine Timing
- 2.2 Fuel Injection and Ignition
- 2.3 Diagnostic Functions
- 2.4 Preventing Engine Damage
- 3. Common Symptoms of a Faulty Crank Sensor
- 3.1 Engine Stalling
- 3.2 Difficulty Starting
- 3.3 Check Engine Light
- 3.4 Rough Idling
- 3.5 Decreased Fuel Efficiency
- 4. Diagnosing The “No Crank” Issue
- 4.1 Preliminary Checks
- 4.2 Using an OBD2 Scanner
- 4.3 Visual Inspection of the Crank Sensor
- 4.4 Checking the Wiring and Connectors
- 4.5 Multimeter Testing
- 5. Troubleshooting Steps
- 5.1 Verifying Power Supply
- 5.2 Checking Signal Output
- 5.3 Evaluating Sensor Resistance
- 5.4 Assessing the Ground Connection
- 6. Common Causes For a Crank Sensor Failure
- 6.1 Physical Damage
- 6.2 Wiring Issues
- 6.3 Heat Exposure
- 6.4 Debris and Contamination
- 6.5 Electrical Overload
- 7. Step-by-Step Replacement Guide
- 7.1 Preparation
- 7.2 Locating the Crank Sensor
- 7.3 Disconnecting the Old Sensor
- 7.4 Installing the New Sensor
- 7.5 Final Checks and Startup
- 8. After Replacement: Ensuring Optimal Performance
- 8.1 Clearing OBD2 Codes
- 8.2 Monitoring Engine Performance
- 8.3 Addressing Related Issues
- 9. Advanced Troubleshooting
- 9.1 ECU-Related Problems
- 9.2 Issues with the Starter Motor
- 9.3 Flywheel or Flexplate Damage
- 9.4 Security System Interference
- 10. Preventative Measures
- 10.1 Regular Maintenance
- 10.2 Protecting Wiring
- 10.3 Using Quality Parts
- 11. OBD2 Scanner Recommendations
- 11.1 Basic Scanners
- 11.2 Mid-Range Scanners
- 11.3 Advanced Scanners
- 12. Wiring Diagrams and Pinouts
- 12.1 D15B Non-VTEC OBD2 Crank Sensor Wiring
- 12.2 ECU Pinouts Relevant to Crank Sensor
- 13. Common Mistakes to Avoid
- 13.1 Incorrect Sensor Installation
- 13.2 Neglecting Wiring Issues
- 13.3 Ignoring Related Symptoms
- 14. Case Studies
- 14.1 Scenario 1: Water Damage
- 14.2 Scenario 2: Faulty Wiring
- 14.3 Scenario 3: Heat-Related Failure
- 15. Community Insights and Forums
- 15.1 Online Forums
- 15.2 Local Mechanic Recommendations
- 16. Tips for Maintaining Your Honda
- 16.1 Oil Changes
- 16.2 Spark Plugs
- 16.3 Timing Belt
- 16.4 General Inspection
- 17. How MERCEDES-DIAGNOSTIC-TOOL.EDU.VN Can Help
- 17.1 Diagnostic Tools
- 17.2 Expert Advice
- 17.3 Training Resources
- 18. Frequently Asked Questions (FAQ)
- 18.1 What is a crank sensor?
- 18.2 How often should I replace my crank sensor?
- 18.3 Can I drive with a bad crank sensor?
- 18.4 How do I test a crank sensor with a multimeter?
- 18.5 What does OBD2 code P0335 mean?
- 18.6 Can a bad crank sensor cause a no-start condition?
- 18.7 Are there any special tools needed to replace a crank sensor?
- 18.8 Can I clean a crank sensor instead of replacing it?
- 18.9 How much does it cost to replace a crank sensor?
- 18.10 Where can I find the crank sensor on my D15B engine?
- 19. Conclusion
- 20. Call to Action
Table of Contents
1. What Does “D15B Non VTEC OBD2 No Crank Sensor” Mean?
- 1.1 Understanding the D15B Engine
- 1.2 Decoding Non-VTEC
- 1.3 OBD2 Significance
- 1.4 Crank Sensor Function
- 1.5 “No Crank” Scenario
2. Why Is The Crank Sensor Important?
- 2.1 Engine Timing
- 2.2 Fuel Injection and Ignition
- 2.3 Diagnostic Functions
- 2.4 Preventing Engine Damage
3. Common Symptoms of a Faulty Crank Sensor
- 3.1 Engine Stalling
- 3.2 Difficulty Starting
- 3.3 Check Engine Light
- 3.4 Rough Idling
- 3.5 Decreased Fuel Efficiency
4. Diagnosing The “No Crank” Issue
- 4.1 Preliminary Checks
- 4.2 Using an OBD2 Scanner
- 4.3 Visual Inspection of the Crank Sensor
- 4.4 Checking the Wiring and Connectors
- 4.5 Multimeter Testing
5. Troubleshooting Steps
- 5.1 Verifying Power Supply
- 5.2 Checking Signal Output
- 5.3 Evaluating Sensor Resistance
- 5.4 Assessing the Ground Connection
6. Common Causes For a Crank Sensor Failure
- 6.1 Physical Damage
- 6.2 Wiring Issues
- 6.3 Heat Exposure
- 6.4 Debris and Contamination
- 6.5 Electrical Overload
7. Step-by-Step Replacement Guide
- 7.1 Preparation
- 7.2 Locating the Crank Sensor
- 7.3 Disconnecting the Old Sensor
- 7.4 Installing the New Sensor
- 7.5 Final Checks and Startup
8. After Replacement: Ensuring Optimal Performance
- 8.1 Clearing OBD2 Codes
- 8.2 Monitoring Engine Performance
- 8.3 Addressing Related Issues
9. Advanced Troubleshooting
- 9.1 ECU-Related Problems
- 9.2 Issues with the Starter Motor
- 9.3 Flywheel or Flexplate Damage
- 9.4 Security System Interference
10. Preventative Measures
- 10.1 Regular Maintenance
- 10.2 Protecting Wiring
- 10.3 Using Quality Parts
11. OBD2 Scanner Recommendations
- 11.1 Basic Scanners
- 11.2 Mid-Range Scanners
- 11.3 Advanced Scanners
12. Wiring Diagrams and Pinouts
- 12.1 D15B Non-VTEC OBD2 Crank Sensor Wiring
- 12.2 ECU Pinouts Relevant to Crank Sensor
13. Common Mistakes to Avoid
- 13.1 Incorrect Sensor Installation
- 13.2 Neglecting Wiring Issues
- 13.3 Ignoring Related Symptoms
14. Case Studies
- 14.1 Scenario 1: Water Damage
- 14.2 Scenario 2: Faulty Wiring
- 14.3 Scenario 3: Heat-Related Failure
15. Community Insights and Forums
- 15.1 Online Forums
- 15.2 Local Mechanic Recommendations
16. Tips for Maintaining Your Honda
- 16.1 Oil Changes
- 16.2 Spark Plugs
- 16.3 Timing Belt
- 16.4 General Inspection
17. How MERCEDES-DIAGNOSTIC-TOOL.EDU.VN Can Help
- 17.1 Diagnostic Tools
- 17.2 Expert Advice
- 17.3 Training Resources
18. Frequently Asked Questions (FAQ)
- 18.1 What is a crank sensor?
- 18.2 How often should I replace my crank sensor?
- 18.3 Can I drive with a bad crank sensor?
- 18.4 How do I test a crank sensor with a multimeter?
- 18.5 What does OBD2 code P0335 mean?
- 18.6 Can a bad crank sensor cause a no-start condition?
- 18.7 Are there any special tools needed to replace a crank sensor?
- 18.8 Can I clean a crank sensor instead of replacing it?
- 18.9 How much does it cost to replace a crank sensor?
- 18.10 Where can I find the crank sensor on my D15B engine?
19. Conclusion
20. Call to Action
1. What Does “D15B Non VTEC OBD2 No Crank Sensor” Mean?
The phrase “D15B Non VTEC OBD2 no crank sensor” is packed with information about a specific engine and a potential problem. Let’s break it down to fully understand what each component means.
1.1 Understanding the D15B Engine
The D15B is a 1.5-liter engine produced by Honda. It’s part of the D-series family, known for its reliability and efficiency. It was commonly found in various Honda models, particularly in the 1990s. This engine is a popular choice for engine swaps and modifications due to its availability and performance characteristics.
1.2 Decoding Non-VTEC
VTEC stands for Variable Timing and lift Electronic Control, a technology Honda developed to improve engine performance at both low and high RPMs. A “Non-VTEC” version of the D15B means that the engine does not have this variable valve timing system. Non-VTEC engines are generally simpler in design, which can sometimes translate to increased reliability, but they typically offer less peak horsepower compared to their VTEC counterparts.
1.3 OBD2 Significance
OBD2 refers to the On-Board Diagnostics, second generation, a standardized system used in vehicles to monitor and report on various engine and vehicle parameters. OBD2 systems became mandatory in the United States in 1996, and they provide a wealth of diagnostic information through a standardized port. When we say “OBD2,” it means the engine and vehicle are equipped with this diagnostic system, allowing for easy access to error codes and live data using a scanner.
1.4 Crank Sensor Function
The crank sensor, or Crankshaft Position Sensor (CKP), is a critical component that monitors the position and rotational speed of the crankshaft. This information is essential for the engine control unit (ECU) to accurately control fuel injection, ignition timing, and other engine functions. Without a functioning crank sensor, the ECU won’t know when to fire the spark plugs or inject fuel, leading to significant operational problems.
1.5 “No Crank” Scenario
“No crank” refers to a situation where the engine doesn’t turn over when you try to start the vehicle. This can be due to various issues, such as a dead battery, a faulty starter motor, or, as indicated in the phrase, a problem with the crank sensor. When the crank sensor fails, the ECU may not allow the engine to start, preventing any cranking at all.
2. Why Is The Crank Sensor Important?
The Crankshaft Position (CKP) sensor is a linchpin in the operation of your engine. Its importance spans multiple critical functions, each essential for smooth and efficient performance.
2.1 Engine Timing
The primary role of the crank sensor is to provide the engine control unit (ECU) with precise information about the crankshaft’s position and speed. This data is crucial for accurate engine timing. The ECU uses this information to determine the exact moment to fire the spark plugs and inject fuel into the cylinders. Without this synchronization, the engine cannot operate efficiently.
2.2 Fuel Injection and Ignition
Fuel injection and ignition timing are directly dependent on the data provided by the crank sensor. The ECU calculates the optimal timing for these events based on the crankshaft’s position. If the crank sensor is faulty, the ECU may mistime the fuel injection or ignition, leading to poor engine performance, misfires, or a no-start condition.
2.3 Diagnostic Functions
The crank sensor also plays a significant role in the vehicle’s diagnostic system. When the crank sensor malfunctions, it often triggers the check engine light, and the ECU stores a diagnostic trouble code (DTC). This allows technicians and car owners to identify potential issues using an OBD2 scanner, making it easier to diagnose and fix problems.
2.4 Preventing Engine Damage
By ensuring precise timing, the crank sensor helps prevent potential engine damage. Incorrect timing can lead to issues such as engine knocking, which can cause significant wear and tear on engine components. A properly functioning crank sensor ensures that the engine operates within safe parameters, prolonging its lifespan.
3. Common Symptoms of a Faulty Crank Sensor
When a crank sensor begins to fail, it can manifest in a variety of symptoms. Recognizing these signs early can help you address the issue before it leads to more significant problems.
3.1 Engine Stalling
One of the most common symptoms of a failing crank sensor is engine stalling. This can occur randomly while driving or when the engine is idling. The engine may suddenly shut off, and you might find it difficult to restart it immediately.
3.2 Difficulty Starting
A faulty crank sensor can cause difficulty starting the engine. The engine may crank for an extended period without starting, or it may not start at all. This is because the ECU is not receiving the necessary signals to time the fuel injection and ignition correctly.
3.3 Check Engine Light
The check engine light is a common indicator of a crank sensor problem. When the ECU detects an issue with the crank sensor signal, it will illuminate the check engine light and store a diagnostic trouble code (DTC). Using an OBD2 scanner, you can retrieve the code and confirm if it’s related to the crank sensor.
3.4 Rough Idling
A failing crank sensor can lead to rough idling. The engine may vibrate excessively or run unevenly when the vehicle is stationary. This is due to the inconsistent or inaccurate signals being sent to the ECU, causing misfires and poor combustion.
3.5 Decreased Fuel Efficiency
If the crank sensor is not functioning correctly, the ECU may miscalculate the fuel-air mixture, leading to decreased fuel efficiency. You may notice that you’re getting fewer miles per gallon than usual, and you might need to fill up your gas tank more frequently.
4. Diagnosing The “No Crank” Issue
Diagnosing a “no crank” issue related to the crank sensor involves a systematic approach. Here are the steps to effectively pinpoint the problem.
4.1 Preliminary Checks
Before diving into the crank sensor specifically, perform some basic checks to rule out other potential causes.
- Battery: Ensure the battery is fully charged and in good condition. A weak battery can prevent the engine from cranking.
- Starter Motor: Check the starter motor for any signs of damage or malfunction. You can try tapping the starter motor with a wrench while someone attempts to start the car. If it starts, the starter motor may be the issue.
- Fuses and Relays: Inspect the fuses and relays related to the starting system. Replace any blown fuses or faulty relays.
4.2 Using an OBD2 Scanner
An OBD2 scanner is an invaluable tool for diagnosing engine problems. Connect the scanner to the OBD2 port and check for any diagnostic trouble codes (DTCs). Codes such as P0335 (Crankshaft Position Sensor A Circuit Malfunction) or similar codes related to the crank sensor can confirm the issue.
4.3 Visual Inspection of the Crank Sensor
Visually inspect the crank sensor for any signs of physical damage. Look for cracks, breaks, or corrosion. Also, check the sensor’s tip to see if it’s excessively dirty or damaged. Clean the sensor if necessary, but be gentle to avoid causing further damage.
4.4 Checking the Wiring and Connectors
Inspect the wiring and connectors associated with the crank sensor. Look for frayed wires, loose connections, or corrosion. Use a wiring diagram to ensure all connections are correct and secure. Repair or replace any damaged wiring or connectors.
4.5 Multimeter Testing
A multimeter can be used to test the crank sensor’s functionality. You can check for voltage, resistance, and continuity. Refer to the vehicle’s service manual for the specific values and testing procedures. Common tests include:
- Voltage Test: Check the voltage supply to the sensor.
- Resistance Test: Measure the resistance of the sensor coil.
- Continuity Test: Ensure there are no breaks in the wiring between the sensor and the ECU.
5. Troubleshooting Steps
When dealing with a “no crank” issue potentially linked to the crank sensor, follow these detailed troubleshooting steps to isolate and resolve the problem effectively.
5.1 Verifying Power Supply
Ensure the crank sensor is receiving the correct voltage. Use a multimeter to check the voltage at the sensor connector. Consult your vehicle’s service manual for the specified voltage range. If there is no voltage or the voltage is outside the specified range, there may be an issue with the wiring or the ECU.
5.2 Checking Signal Output
Verify that the crank sensor is sending a signal to the ECU. This can be done using an oscilloscope or a multimeter set to AC voltage. Start the engine (if possible) and observe the signal pattern. The signal should change as the engine cranks. If there is no signal or the signal is erratic, the crank sensor may be faulty.
5.3 Evaluating Sensor Resistance
Measure the resistance of the crank sensor using a multimeter. Disconnect the sensor and set the multimeter to measure resistance (Ohms). Compare the reading to the specified resistance range in your vehicle’s service manual. A reading outside this range indicates a faulty sensor.
5.4 Assessing the Ground Connection
Ensure the crank sensor has a good ground connection. Use a multimeter to check for continuity between the sensor’s ground terminal and the vehicle’s chassis ground. There should be little to no resistance. A poor ground connection can cause intermittent sensor failures.
6. Common Causes For a Crank Sensor Failure
Understanding the common causes of crank sensor failure can help you prevent future issues and diagnose current problems more effectively.
6.1 Physical Damage
Physical damage is a common cause of crank sensor failure. The sensor can be damaged by road debris, impacts, or improper handling during maintenance. Cracks, breaks, or a bent sensor tip can all lead to malfunction.
6.2 Wiring Issues
Wiring issues, such as frayed wires, loose connections, or corrosion, can disrupt the signal from the crank sensor to the ECU. These issues can be caused by environmental factors, wear and tear, or improper installation.
6.3 Heat Exposure
The crank sensor is often located near hot engine components, such as the exhaust manifold. Prolonged exposure to high temperatures can degrade the sensor’s internal components, leading to failure.
6.4 Debris and Contamination
Debris, such as dirt, oil, and metal shavings, can accumulate on the crank sensor. This contamination can interfere with the sensor’s ability to accurately read the crankshaft’s position, leading to inaccurate signals or complete failure.
6.5 Electrical Overload
Electrical overload or voltage spikes can damage the crank sensor’s internal circuitry. This can be caused by issues such as a faulty alternator or electrical system problems.
7. Step-by-Step Replacement Guide
Replacing a crank sensor is a straightforward process that can be done with basic tools. Here’s a step-by-step guide to help you through the replacement.
7.1 Preparation
- Gather Tools: You will need a new crank sensor, socket set, wrench set, screwdriver, multimeter, and OBD2 scanner.
- Safety First: Disconnect the negative terminal of the battery to prevent electrical shock.
- Reference Material: Consult your vehicle’s service manual for specific instructions and torque specifications.
7.2 Locating the Crank Sensor
The crank sensor is typically located near the crankshaft pulley or flywheel. Refer to your vehicle’s service manual for the exact location, as it can vary depending on the model. Common locations include:
- Near the crankshaft pulley
- Behind the engine block
- Near the flywheel or flexplate
7.3 Disconnecting the Old Sensor
- Disconnect Connector: Carefully disconnect the electrical connector from the crank sensor. Use a small screwdriver to release any clips or retainers.
- Remove Sensor: Use a socket or wrench to remove the bolt(s) securing the crank sensor. Gently pull the sensor out of its housing. If it’s stuck, try wiggling it gently to loosen it.
7.4 Installing the New Sensor
- Install New Sensor: Insert the new crank sensor into the housing. Make sure it is properly aligned.
- Secure Sensor: Tighten the bolt(s) to the specified torque. Over-tightening can damage the sensor or housing.
- Reconnect Connector: Reconnect the electrical connector to the new crank sensor. Ensure it clicks into place and is securely attached.
7.5 Final Checks and Startup
- Reconnect Battery: Reconnect the negative terminal of the battery.
- Clear Codes: Use an OBD2 scanner to clear any diagnostic trouble codes (DTCs) related to the crank sensor.
- Start Engine: Start the engine and check for any unusual noises or vibrations.
- Monitor Performance: Monitor the engine’s performance to ensure it is running smoothly and efficiently.
8. After Replacement: Ensuring Optimal Performance
After replacing the crank sensor, it’s essential to take steps to ensure optimal engine performance and prevent future issues.
8.1 Clearing OBD2 Codes
After replacing the crank sensor, use an OBD2 scanner to clear any stored diagnostic trouble codes (DTCs). This will reset the check engine light and allow you to monitor the engine for any new issues.
8.2 Monitoring Engine Performance
Monitor the engine’s performance closely after replacing the crank sensor. Pay attention to factors such as:
- Idle Speed: Ensure the engine idles smoothly and at the correct RPM.
- Fuel Efficiency: Check if your fuel efficiency has improved.
- Starting: Verify that the engine starts quickly and easily.
- Stalling: Ensure the engine does not stall unexpectedly.
8.3 Addressing Related Issues
Replacing the crank sensor may reveal other underlying issues. For example, if the old sensor failed due to wiring problems, address those issues to prevent future sensor failures. Check for:
- Wiring Damage: Repair or replace any damaged wiring or connectors.
- Grounding Issues: Ensure all ground connections are clean and secure.
- Electrical Problems: Address any electrical issues that may have contributed to the sensor failure.
9. Advanced Troubleshooting
If you’ve replaced the crank sensor and are still experiencing issues, advanced troubleshooting steps may be necessary.
9.1 ECU-Related Problems
The ECU (Engine Control Unit) could be the source of the problem. A faulty ECU may not properly interpret the signals from the crank sensor, even if the sensor is functioning correctly. Consider having the ECU tested by a professional.
9.2 Issues with the Starter Motor
Even if the primary issue appears to be the crank sensor, a failing starter motor can mimic similar symptoms. Ensure the starter motor is in good working order and receiving adequate power.
9.3 Flywheel or Flexplate Damage
The crank sensor reads the position of the crankshaft based on the flywheel or flexplate. Damage to these components can cause the sensor to misread the position, leading to a no-start condition or poor engine performance.
9.4 Security System Interference
In some cases, the vehicle’s security system can interfere with the starting system. If the security system is malfunctioning, it may prevent the engine from cranking, even if the crank sensor is working correctly.
10. Preventative Measures
Taking preventative measures can help extend the life of your crank sensor and avoid future issues.
10.1 Regular Maintenance
Follow the recommended maintenance schedule for your vehicle. This includes regular inspections of the engine and related components.
10.2 Protecting Wiring
Protect the wiring and connectors associated with the crank sensor. Use wire loom or electrical tape to protect wires from abrasion and environmental damage.
10.3 Using Quality Parts
When replacing the crank sensor, use a high-quality replacement part from a reputable manufacturer. Cheap aftermarket parts may not meet the OEM specifications and could fail prematurely.
11. OBD2 Scanner Recommendations
Choosing the right OBD2 scanner can make diagnosing engine problems much easier. Here are some recommendations based on different needs and budgets.
11.1 Basic Scanners
Basic OBD2 scanners are affordable and easy to use. They can read and clear diagnostic trouble codes (DTCs) and provide basic engine data.
- Innova 3100i: A popular choice for basic diagnostics, offering code reading, clearing, and live data.
- Autel AutoLink AL319: Provides similar features with a user-friendly interface.
11.2 Mid-Range Scanners
Mid-range scanners offer more advanced features, such as live data streaming, graphing, and enhanced diagnostics.
- BlueDriver Bluetooth Professional OBDII Scan Tool: Connects to your smartphone or tablet via Bluetooth and offers comprehensive diagnostics.
- Innova 3160g: Includes ABS and SRS diagnostics, along with live data and code reading.
11.3 Advanced Scanners
Advanced scanners are designed for professional technicians and offer the most comprehensive diagnostic capabilities, including bi-directional controls, advanced coding, and module programming.
- Autel MaxiCOM MK808: A versatile scanner with advanced features and a user-friendly interface.
- Snap-on Zeus: A high-end scanner with extensive vehicle coverage and advanced diagnostic capabilities.
12. Wiring Diagrams and Pinouts
Understanding the wiring diagrams and pinouts for the D15B Non-VTEC OBD2 crank sensor is crucial for accurate diagnosis and repair.
12.1 D15B Non-VTEC OBD2 Crank Sensor Wiring
The crank sensor typically has three wires:
- Power Supply: Provides voltage to the sensor (usually 5V or 12V).
- Ground: Provides a ground connection for the sensor.
- Signal: Sends the signal to the ECU.
Refer to your vehicle’s service manual for the specific wiring diagram and pinout information.
12.2 ECU Pinouts Relevant to Crank Sensor
Knowing the ECU pinouts that correspond to the crank sensor is essential for troubleshooting wiring issues. Consult your vehicle’s service manual for the ECU pinout diagram. Common ECU pins related to the crank sensor include:
- CKP Signal Input: Receives the signal from the crank sensor.
- CKP Ground: Provides a ground connection for the crank sensor.
- Sensor Power Supply: Supplies voltage to the crank sensor.
13. Common Mistakes to Avoid
Avoiding common mistakes during crank sensor diagnosis and replacement can save you time and prevent further issues.
13.1 Incorrect Sensor Installation
Installing the crank sensor incorrectly can lead to continued problems. Ensure the sensor is properly aligned and securely fastened. Over-tightening the bolts can damage the sensor or housing.
13.2 Neglecting Wiring Issues
Ignoring wiring issues is a common mistake. Even if the crank sensor is replaced, damaged or corroded wiring can cause the new sensor to fail. Always inspect and repair any wiring issues.
13.3 Ignoring Related Symptoms
Focusing solely on the crank sensor can cause you to overlook other related symptoms. Pay attention to factors such as engine idling, fuel efficiency, and starting issues. These symptoms can provide valuable clues about the underlying problem.
14. Case Studies
Examining real-world case studies can provide valuable insights into diagnosing and resolving crank sensor issues.
14.1 Scenario 1: Water Damage
- Problem: A Honda Civic experienced intermittent stalling and a check engine light. The OBD2 scanner revealed a P0335 code (Crankshaft Position Sensor A Circuit Malfunction).
- Diagnosis: Upon inspection, the crank sensor connector was found to be corroded due to water damage.
- Solution: The connector was cleaned and treated with electrical contact cleaner. The wiring was inspected and repaired. The crank sensor was replaced, and the code was cleared.
- Outcome: The engine ran smoothly, and the stalling issue was resolved.
14.2 Scenario 2: Faulty Wiring
- Problem: A Honda Accord had difficulty starting and exhibited rough idling. The check engine light was illuminated, and the OBD2 scanner showed a P0335 code.
- Diagnosis: The wiring harness leading to the crank sensor was found to be damaged due to rodent activity.
- Solution: The damaged wiring harness was replaced. The crank sensor was tested and found to be in good condition.
- Outcome: The engine started easily, idled smoothly, and the check engine light was turned off.
14.3 Scenario 3: Heat-Related Failure
- Problem: A Honda CR-V stalled frequently, especially after running for an extended period. The OBD2 scanner displayed a P0335 code.
- Diagnosis: The crank sensor was located near the exhaust manifold and had suffered heat-related damage.
- Solution: A heat shield was installed to protect the new crank sensor from excessive heat.
- Outcome: The engine ran reliably, and the stalling issue was resolved.
15. Community Insights and Forums
Leveraging community insights and online forums can provide valuable information and support when troubleshooting crank sensor issues.
15.1 Online Forums
Online forums dedicated to Honda vehicles are a great resource for troubleshooting advice and community support. Popular forums include:
- Honda-Tech: Offers a wealth of technical information and discussions.
- Civic Forums: Specifically focused on Honda Civic models.
- Honda Owners Club: A community of Honda enthusiasts sharing tips and advice.
15.2 Local Mechanic Recommendations
Getting recommendations for local mechanics from community members can help you find a reliable and knowledgeable professional. Ask for recommendations on online forums or local community groups.
16. Tips for Maintaining Your Honda
Regular maintenance is crucial for keeping your Honda running smoothly and preventing issues like crank sensor failures.
16.1 Oil Changes
Change your engine oil and filter regularly, following the manufacturer’s recommended intervals. Clean oil helps keep engine components lubricated and prevents wear.
16.2 Spark Plugs
Replace your spark plugs according to the recommended schedule. Worn spark plugs can cause misfires and poor engine performance.
16.3 Timing Belt
Replace your timing belt at the recommended interval. A broken timing belt can cause serious engine damage.
16.4 General Inspection
Perform regular inspections of your engine and related components. Look for signs of wear, damage, or leaks. Address any issues promptly to prevent them from escalating.
17. How MERCEDES-DIAGNOSTIC-TOOL.EDU.VN Can Help
MERCEDES-DIAGNOSTIC-TOOL.EDU.VN offers a range of resources and services to help you diagnose and resolve issues with your Mercedes-Benz.
17.1 Diagnostic Tools
Access to advanced diagnostic tools designed for Mercedes-Benz vehicles. These tools provide detailed insights into your vehicle’s systems, helping you pinpoint the exact cause of any issues.
17.2 Expert Advice
Consult with experienced technicians who specialize in Mercedes-Benz vehicles. Get personalized advice and guidance to help you troubleshoot and repair your car.
17.3 Training Resources
Access a library of training materials, including videos, articles, and guides, to help you learn about Mercedes-Benz diagnostics and repair.
18. Frequently Asked Questions (FAQ)
18.1 What is a crank sensor?
A crank sensor, or Crankshaft Position Sensor (CKP), monitors the position and rotational speed of the crankshaft. This information is essential for the ECU to control fuel injection and ignition timing.
18.2 How often should I replace my crank sensor?
There is no set replacement interval for a crank sensor. Replace it when it fails or shows signs of malfunction.
18.3 Can I drive with a bad crank sensor?
Driving with a bad crank sensor is not recommended. It can lead to engine stalling, poor performance, and potential engine damage.
18.4 How do I test a crank sensor with a multimeter?
You can test a crank sensor with a multimeter by checking for voltage, resistance, and continuity. Refer to your vehicle’s service manual for the specific testing procedures and values.
18.5 What does OBD2 code P0335 mean?
OBD2 code P0335 indicates a malfunction in the Crankshaft Position Sensor A circuit.
18.6 Can a bad crank sensor cause a no-start condition?
Yes, a bad crank sensor can cause a no-start condition because the ECU needs the signal from the crank sensor to time fuel injection and ignition.
18.7 Are there any special tools needed to replace a crank sensor?
No special tools are typically needed to replace a crank sensor. Basic tools such as a socket set, wrench set, and screwdriver are usually sufficient.
18.8 Can I clean a crank sensor instead of replacing it?
Cleaning a crank sensor may help if it is dirty or contaminated. However, if the sensor is damaged or malfunctioning, it will need to be replaced.
18.9 How much does it cost to replace a crank sensor?
The cost to replace a crank sensor can vary depending on the vehicle model and the cost of labor. On average, it can range from $150 to $350.
18.10 Where can I find the crank sensor on my D15B engine?
The crank sensor on a D15B engine is typically located near the crankshaft pulley or behind the engine block, near the flywheel. Consult your vehicle’s service manual for the exact location.
19. Conclusion
Troubleshooting a “D15B Non VTEC OBD2 no crank sensor” issue requires a systematic approach, starting with basic checks and progressing to more advanced diagnostics. By understanding the function of the crank sensor, recognizing common symptoms, and following the troubleshooting steps outlined in this guide, you can effectively diagnose and resolve the problem. Remember to take preventative measures to extend the life of your crank sensor and maintain optimal engine performance.
20. Call to Action
Experiencing persistent issues with your D15B Non VTEC OBD2 engine? Don’t let a faulty crank sensor keep you off the road. Contact MERCEDES-DIAGNOSTIC-TOOL.EDU.VN today for expert guidance and top-of-the-line diagnostic tools. Our team is ready to assist you with:
- Diagnostic Tools: Get access to the best OBD2 scanners on the market.
- Expert Advice: Speak with our experienced technicians for personalized troubleshooting assistance.
- Service Inquiries: Learn more about our comprehensive diagnostic and repair services.
Reach out now and let us help you get your Honda running smoothly again!
Contact Information:
- Address: 789 Oak Avenue, Miami, FL 33101, United States
- WhatsApp: +1 (641) 206-8880
- Website: MERCEDES-DIAGNOSTIC-TOOL.EDU.VN
 D15B Engine
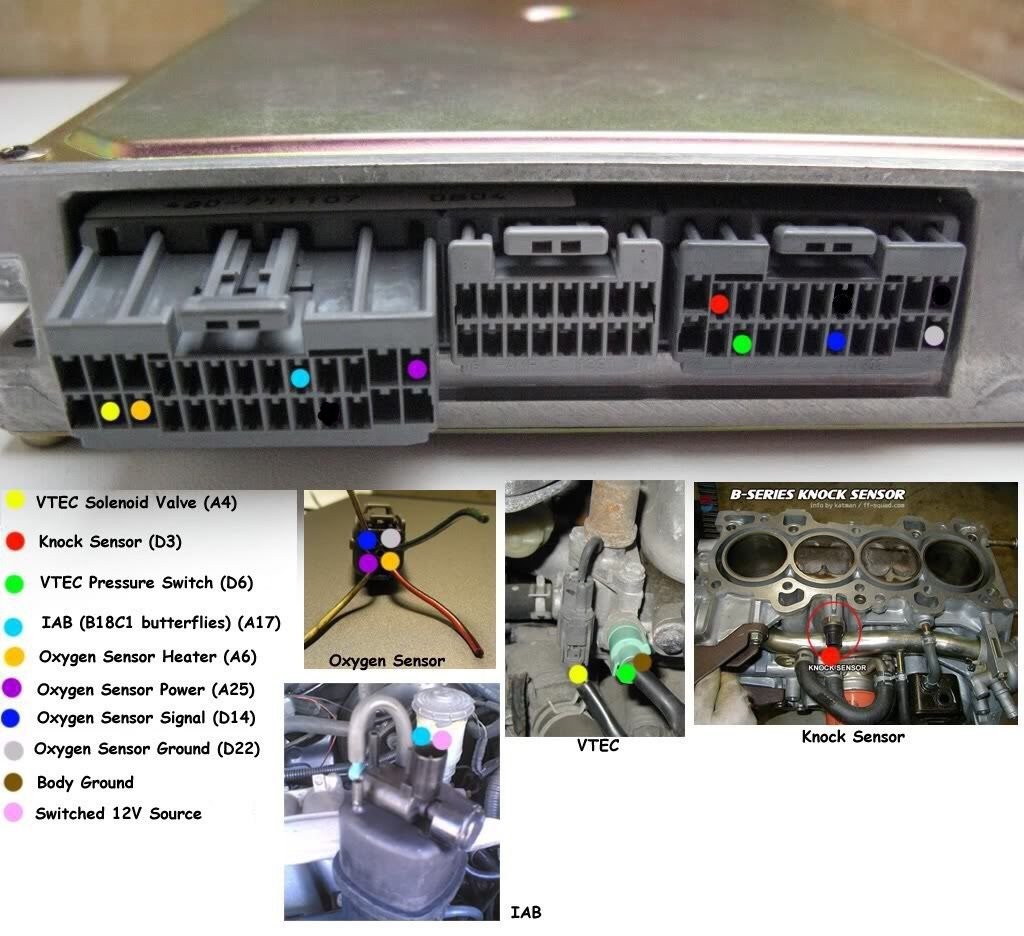
OBD1 ECU Wiring: A detailed diagram showcasing the wiring connections for an OBD1 ECU, highlighting key components and their arrangement.
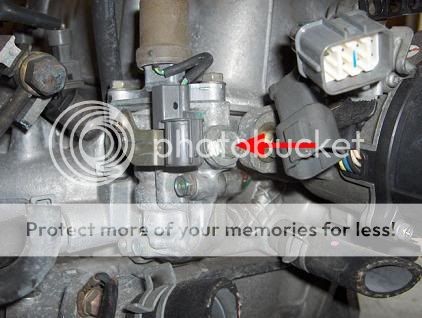 JDM VTEC Solenoid Location
OBD1 IAT Sensor: Demonstrating the correct placement of an OBD1 Intake Air Temperature (IAT) sensor in the intake arm.