Diy Usb To Obd2 Cable offers a cost-effective solution for Mercedes-Benz owners and automotive enthusiasts to perform vehicle diagnostics, unlock hidden features, and conduct routine maintenance. This article, brought to you by MERCEDES-DIAGNOSTIC-TOOL.EDU.VN, guides you through creating your own DIY USB to OBD2 cable, ensuring you have the tools and knowledge to maintain your vehicle efficiently. This guide will provide you with the essential information needed to understand vehicle diagnostics, coding, and maintenance.
Contents
- 1. Understanding the DIY USB to OBD2 Cable
- 2. Who Benefits from a DIY USB to OBD2 Cable?
- 3. Identifying Your Vehicle’s OBD2 Port
- 4. Essential Tools and Components
- 5. Step-by-Step Guide to Building Your DIY Cable
- 6. Understanding the Wiring Diagram
- 7. Selecting the Right Diagnostic Software
- 8. Connecting the Cable to Your Mercedes-Benz
- 9. Basic Troubleshooting
- 10. Unlocking Hidden Features
- 11. Diagnosing Common Mercedes-Benz Issues
- 12. Performing Routine Maintenance
- 13. Advanced Coding and Programming
- 14. Safety Precautions
- 15. Legal Considerations
- 16. Advantages of Using MERCEDES-DIAGNOSTIC-TOOL.EDU.VN
- 17. Choosing the Right Components: A Detailed Look
- 18. Soldering Techniques for a Robust Connection
- 19. Testing the Cable: Ensuring Reliability
- 20. Addressing Common Pitfalls
- 21. Advanced Diagnostics: Reading Live Data
- 22. Clearing Diagnostic Trouble Codes (DTCs)
- 23. Exploring the Mercedes-Benz Community
- 24. Future Trends in Vehicle Diagnostics
- 25. Ensuring Longevity: Maintenance Tips for Your Cable
- 26. Upgrading Your Cable: Enhancements and Modifications
- 27. Resources and Further Reading
- 28. Case Studies: Real-World Applications
- 29. Alternatives to a DIY Cable
- 30. Contact MERCEDES-DIAGNOSTIC-TOOL.EDU.VN for Expert Assistance
- FAQ Section
- 1. What is the primary purpose of a DIY USB to OBD2 cable?
- 2. What are the main components needed to build a DIY USB to OBD2 cable?
- 3. How do I identify the correct pins on the OBD2 connector?
- 4. What diagnostic software is recommended for Mercedes-Benz vehicles?
- 5. What safety precautions should I take when working with my vehicle’s electronics?
- 6. Can modifying my vehicle’s software void the warranty?
- 7. What are some common issues in Mercedes-Benz vehicles that I can diagnose with a DIY cable?
- 8. How can I test my DIY USB to OBD2 cable to ensure it’s working correctly?
- 9. What are some advanced coding and programming possibilities with a DIY cable?
- 10. Where can I find expert assistance and resources for Mercedes-Benz diagnostics and maintenance?
1. Understanding the DIY USB to OBD2 Cable
What exactly is a DIY USB to OBD2 cable, and why would you want to make one? A DIY USB to OBD2 (On-Board Diagnostics II) cable is a custom-built interface that connects your car’s OBD2 port to a computer via USB. It allows you to access diagnostic information, perform vehicle coding, and run maintenance procedures using specialized software.
- Definition: An OBD2 cable typically connects to a vehicle’s OBD2 port and translates the vehicle’s data into a format readable by a computer. When you create a do-it-yourself cable, you’re essentially building a streamlined version of this interface.
- Function: Its primary function is to enable communication between your vehicle’s electronic control units (ECUs) and diagnostic software on a computer, thus allowing users to read diagnostic trouble codes (DTCs), monitor real-time data, and perform other diagnostic functions.
- Purpose: The purpose is to provide an affordable alternative to expensive, proprietary diagnostic tools, giving enthusiasts and budget-conscious owners the means to perform basic diagnostics and customization.
2. Who Benefits from a DIY USB to OBD2 Cable?
Who is this project for, and how can it enhance their automotive experience? The following groups can benefit immensely from creating their own DIY USB to OBD2 cable:
- Mercedes-Benz Owners: Individuals who own Mercedes-Benz vehicles and are keen on performing their own diagnostics and maintenance to save on dealership costs.
- Independent Auto Technicians: Technicians at independent garages specializing in luxury vehicles or those looking to expand their services to include Mercedes-Benz models.
- Car Enthusiasts: People passionate about cars, particularly Mercedes-Benz, who want to explore their vehicle’s capabilities, unlock hidden features, and understand its inner workings.
3. Identifying Your Vehicle’s OBD2 Port
Where is the OBD2 port located in your Mercedes-Benz? Knowing the location of the OBD2 port is the first step toward using your DIY cable:
- Typical Location: In most Mercedes-Benz models, the OBD2 port is typically located under the dashboard on the driver’s side. Look for a 16-pin trapezoidal connector.
- Finding It: Consult your vehicle’s manual for the exact location if you’re having trouble finding it. Alternatively, you can search online forums or Mercedes-Benz-specific resources for guidance.
4. Essential Tools and Components
What tools and parts are necessary for building a DIY USB to OBD2 cable? Here’s what you’ll need:
- Tools:
- Wire strippers/cutters
- Needle-nose pliers
- Multimeter (for testing continuity)
- Soldering iron and solder (optional, but recommended for a more reliable connection)
- Heat shrink tubing or electrical tape
- Components:
- OBD2 Connector: A 16-pin female OBD2 connector to plug into your vehicle’s OBD2 port.
- USB Cable: A standard USB cable (Type A to Type B) that you will modify.
- Electronic Components:
- MCP2551: A CAN (Controller Area Network) transceiver.
- MCP2515: A CAN controller with SPI (Serial Peripheral Interface).
- 9-pin DSUB connector: For connecting to the CAN interface.
- USB to RS232 converter: Such as an FTDI-based converter.
- Jumper wires: For making connections on the breadboard.
- Breadboard: For prototyping the circuit.
- Enclosure: To house the circuit for protection and durability.
5. Step-by-Step Guide to Building Your DIY Cable
How do you assemble the DIY USB to OBD2 cable? Here’s a detailed step-by-step guide:
Step 1: Preparing the OBD2 Connector
- Identify the necessary pins on the OBD2 connector:
- Pin 4: Chassis Ground
- Pin 6: CAN High (J-2234)
- Pin 14: CAN Low (J-2234)
- Pin 16: Battery Power
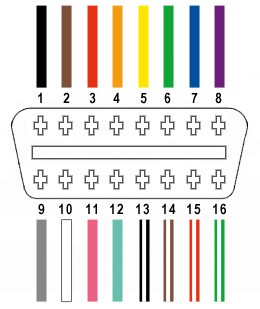 OBD2 Connector Pins
Step 2: Modifying the USB Cable
- Cut the USB cable and expose the wires inside.
- Identify the power (VCC), ground (GND), data positive (D+), and data negative (D-) wires.
- Solder these wires to the appropriate pins on the USB to RS232 converter.
Step 3: Setting Up the CAN Interface
- Connect the MCP2515 CAN controller to the breadboard.
- Wire the MCP2551 CAN transceiver to the MCP2515.
- Connect the 9-pin DSUB connector to the MCP2551 for the CAN interface.
Step 4: Connecting the Components
- Wire the OBD2 connector pins to the appropriate pins on the MCP2551:
- Pin 4 (Ground) to the ground on the circuit.
- Pin 6 (CAN High) to the CAN High pin on the MCP2551.
- Pin 14 (CAN Low) to the CAN Low pin on the MCP2551.
- Pin 16 (Battery Power) to the power supply on the breadboard.
Step 5: Final Assembly and Testing
- Double-check all connections to ensure they are correct.
- Enclose the circuit in a suitable enclosure for protection.
- Connect the DIY cable to your Mercedes-Benz OBD2 port and the USB port on your computer.
- Use diagnostic software to test the connection and read vehicle data.
6. Understanding the Wiring Diagram
Why is a wiring diagram crucial for this project? A wiring diagram is essential for ensuring that all components are connected correctly. It serves as a visual guide to prevent errors that could damage your vehicle’s electronics.
- Importance: The wiring diagram illustrates how each component should be connected, ensuring that you don’t mix up any connections.
- Key Elements: The diagram should clearly show the OBD2 connector, USB cable, MCP2515, MCP2551, and their respective pin connections.
7. Selecting the Right Diagnostic Software
Which software should you use with your DIY USB to OBD2 cable? The diagnostic software you choose will depend on your specific needs and the capabilities of your DIY cable.
- Compatibility: Ensure that the software you select is compatible with Mercedes-Benz vehicles and supports the functions you need, such as reading DTCs, live data monitoring, and vehicle coding.
- Popular Options:
- XENTRY/DAS: The official Mercedes-Benz diagnostic software, offering comprehensive diagnostic and programming capabilities. However, it can be expensive and requires a specific license.
- Autel MaxiSys: A popular aftermarket diagnostic tool that supports a wide range of vehicles, including Mercedes-Benz.
- iCarsoft MB II: A more affordable option specifically designed for Mercedes-Benz vehicles, offering basic diagnostic functions.
- OBD Eleven: A user-friendly app-based diagnostic tool that allows you to perform diagnostics and coding via your smartphone or tablet.
8. Connecting the Cable to Your Mercedes-Benz
How do you properly connect the DIY cable to your vehicle’s OBD2 port? Connecting the cable correctly is crucial to avoid damaging your vehicle’s electronics.
- Safety First: Turn off your vehicle’s ignition before connecting the cable.
- Secure Connection: Plug the OBD2 connector into your vehicle’s OBD2 port, ensuring a secure connection.
- Computer Connection: Connect the USB end of the cable to your computer.
- Software Setup: Launch your diagnostic software and follow the instructions to establish a connection with your vehicle.
9. Basic Troubleshooting
What should you do if your DIY USB to OBD2 cable isn’t working correctly? Troubleshooting is a crucial part of the DIY process.
- Check Connections: Ensure that all connections are secure and correctly wired.
- Verify Power: Use a multimeter to check that the OBD2 connector is receiving power.
- Software Compatibility: Ensure that your diagnostic software is compatible with your vehicle and the DIY cable.
- Driver Issues: Check for any driver issues with the USB to RS232 converter and reinstall drivers if necessary.
10. Unlocking Hidden Features
What hidden features can you unlock with your DIY cable? Unlocking hidden features can enhance your driving experience and add personalized touches to your vehicle.
- Examples of Hidden Features:
- Cornering Lights: Activate cornering lights for improved visibility during turns.
- Ambient Lighting: Adjust ambient lighting colors and intensity.
- Seatbelt Chime: Disable or customize the seatbelt chime.
- Gauge Cluster Display: Customize the information displayed on the gauge cluster.
- Using Diagnostic Software: Use your diagnostic software to access the vehicle’s control modules and modify the necessary parameters to enable these features.
11. Diagnosing Common Mercedes-Benz Issues
How can a DIY USB to OBD2 cable help diagnose common issues? Diagnosing issues early can save you time and money on repairs.
- Reading Diagnostic Trouble Codes (DTCs): Use your diagnostic software to read DTCs, which provide valuable information about potential problems.
- Interpreting DTCs: Look up the DTCs in a Mercedes-Benz-specific database or online forum to understand the issue and potential solutions.
- Common Issues: Common issues in Mercedes-Benz vehicles include:
- Faulty Oxygen Sensors: DTCs related to oxygen sensor performance.
- Transmission Problems: DTCs indicating issues with the transmission control module (TCM).
- Engine Misfires: DTCs related to engine misfires and ignition system problems.
- ABS/ESP Issues: DTCs indicating problems with the anti-lock braking system (ABS) or electronic stability program (ESP).
12. Performing Routine Maintenance
How can you use your DIY cable for routine maintenance? Routine maintenance is essential for keeping your Mercedes-Benz in top condition.
- Service Reset: Use your diagnostic software to reset the service indicator after performing maintenance tasks such as oil changes, brake pad replacements, and filter changes.
- Adaptations and Calibrations: Perform necessary adaptations and calibrations after replacing certain components, such as throttle bodies or mass airflow sensors.
- Monitoring Vehicle Health: Regularly monitor your vehicle’s health by checking for DTCs and reviewing live data parameters.
13. Advanced Coding and Programming
What are the advanced coding and programming possibilities? Advanced coding and programming can allow you to customize your vehicle to your exact preferences.
- ECU Programming: Reprogramming the ECU (Engine Control Unit) to optimize performance or fuel efficiency.
- Module Coding: Coding various control modules to enable or disable specific features, adjust settings, and customize vehicle behavior.
- Expert Knowledge: Advanced coding and programming should only be performed by experienced users with a thorough understanding of vehicle systems.
14. Safety Precautions
What safety measures should you take when working with your vehicle’s electronics? Safety should always be your top priority when working with vehicle electronics.
- Disconnect Battery: Disconnect the negative terminal of your vehicle’s battery before working on any electrical components.
- Proper Grounding: Ensure that your computer and diagnostic equipment are properly grounded to prevent electrical shock.
- Follow Instructions: Always follow the instructions provided by your diagnostic software and any repair manuals.
- Avoid Distractions: Avoid distractions and work in a well-lit and organized environment.
15. Legal Considerations
Are there any legal aspects to consider when modifying your vehicle’s software? Modifying vehicle software may have legal implications, depending on your location.
- Emissions Regulations: Ensure that any modifications you make do not violate emissions regulations.
- Warranty Issues: Be aware that modifying your vehicle’s software may void your warranty.
- Local Laws: Check local laws and regulations regarding vehicle modifications before making any changes.
16. Advantages of Using MERCEDES-DIAGNOSTIC-TOOL.EDU.VN
Why should you choose MERCEDES-DIAGNOSTIC-TOOL.EDU.VN for your diagnostic needs? MERCEDES-DIAGNOSTIC-TOOL.EDU.VN provides a wealth of resources to help you diagnose, maintain, and customize your Mercedes-Benz.
- Comprehensive Guides: Access detailed guides and tutorials on using diagnostic tools, unlocking hidden features, and performing routine maintenance.
- Expert Advice: Benefit from expert advice and support from experienced Mercedes-Benz technicians.
- Software Recommendations: Get recommendations for the best diagnostic software for your specific needs and budget.
- Community Support: Join a community of Mercedes-Benz enthusiasts to share tips, ask questions, and get support from fellow DIYers.
17. Choosing the Right Components: A Detailed Look
How do you ensure you’re selecting high-quality components? Selecting the correct parts is essential for a stable and dependable DIY USB to OBD2 cable.
- OBD2 Connector:
- Quality: Look for connectors made from durable materials that can withstand frequent use.
- Pin Configuration: Make sure the connector has the correct pin configuration for OBD2, including pins for power, ground, CAN High, and CAN Low.
- USB to RS232 Converter:
- FTDI Chip: FTDI-based converters are generally reliable and have good driver support.
- Compatibility: Ensure that the converter is compatible with your computer’s operating system.
- MCP2515 and MCP2551:
- Datasheets: Refer to the datasheets for these components to ensure you understand their specifications and operating requirements.
- Reputable Suppliers: Purchase these components from reputable suppliers to ensure you are getting genuine parts.
18. Soldering Techniques for a Robust Connection
Why is soldering important, and what techniques should you use? Soldering creates a robust, long-lasting connection between wires and components.
- Preparation: Clean the wires and component leads before soldering.
- Tinning: Tin the wires and leads with a thin layer of solder before joining them.
- Heating: Heat the connection point and apply solder to create a strong bond.
- Inspection: Inspect the solder joint to ensure it is smooth and shiny, with no cold solder joints.
Soldering Tips:
- Use a soldering iron with adjustable temperature control.
- Apply heat to the connection, not the solder.
- Allow the connection to cool naturally; avoid blowing on it.
- Use flux to improve solder flow and prevent oxidation.
19. Testing the Cable: Ensuring Reliability
How can you verify that your DIY cable is functioning correctly? Testing your cable thoroughly before using it on your Mercedes-Benz is crucial to prevent damage.
- Continuity Testing: Use a multimeter to test the continuity between the OBD2 connector pins and the corresponding pins on the USB to RS232 converter.
- Voltage Testing: Verify that the OBD2 connector is receiving power by checking the voltage between pins 16 (Battery Power) and 4 (Chassis Ground).
- Loopback Test: Perform a loopback test by connecting the transmit and receive pins on the USB to RS232 converter and sending data to verify that it is being received correctly.
- Vehicle Connection: Connect the cable to your Mercedes-Benz and use diagnostic software to read vehicle data and check for errors.
20. Addressing Common Pitfalls
What common mistakes should you avoid during the DIY process? Being aware of common mistakes can help you avoid frustration and potential damage.
- Incorrect Wiring: Double-check all wiring connections to ensure they are correct.
- Poor Soldering: Ensure that all solder joints are strong and reliable.
- Component Compatibility: Verify that all components are compatible with each other and with your vehicle.
- Software Issues: Ensure that your diagnostic software is compatible with your vehicle and the DIY cable, and that you have the correct drivers installed.
21. Advanced Diagnostics: Reading Live Data
How can live data help you diagnose issues in real-time? Live data provides real-time information about your vehicle’s performance, allowing you to diagnose issues as they occur.
- Parameters to Monitor:
- Engine Speed (RPM): Monitor engine speed to identify issues with idling or acceleration.
- Engine Temperature: Check engine temperature to identify overheating issues.
- Oxygen Sensor Readings: Monitor oxygen sensor readings to diagnose fuel mixture problems.
- Fuel Trims: Check fuel trims to identify issues with fuel delivery or air intake.
- Mass Airflow (MAF) Sensor Readings: Monitor MAF sensor readings to diagnose issues with air intake.
- Analyzing Data: Analyze the live data to identify anomalies and patterns that may indicate underlying problems.
22. Clearing Diagnostic Trouble Codes (DTCs)
How do you clear DTCs after resolving an issue? Clearing DTCs is an important step after repairing a problem, but it should only be done after verifying that the issue has been resolved.
- Using Diagnostic Software: Use your diagnostic software to clear the DTCs from the vehicle’s control modules.
- Verify Repair: Ensure that the issue has been resolved before clearing the DTCs.
- Monitor for Recurrence: Monitor the vehicle for any recurrence of the DTCs after clearing them.
23. Exploring the Mercedes-Benz Community
How can you leverage the Mercedes-Benz community for support? Engaging with the Mercedes-Benz community can provide valuable support and resources.
- Online Forums: Join online forums such as Benzworld and MBWorld to connect with other Mercedes-Benz enthusiasts.
- Social Media Groups: Join social media groups dedicated to Mercedes-Benz vehicles for tips, advice, and support.
- Local Clubs: Join local Mercedes-Benz clubs to meet fellow enthusiasts and participate in events.
- Sharing Knowledge: Share your own experiences and knowledge to help others in the community.
24. Future Trends in Vehicle Diagnostics
What innovations are shaping the future of vehicle diagnostics? The field of vehicle diagnostics is constantly evolving, with new technologies and innovations emerging regularly.
- Wireless Diagnostics: Wireless OBD2 adapters that connect to your smartphone or tablet via Bluetooth or Wi-Fi.
- Cloud-Based Diagnostics: Diagnostic software that utilizes cloud computing to provide advanced analysis and reporting capabilities.
- Artificial Intelligence (AI): AI-powered diagnostic tools that can automatically diagnose issues and provide repair recommendations.
- Remote Diagnostics: Remote diagnostic services that allow technicians to diagnose and repair vehicles remotely.
25. Ensuring Longevity: Maintenance Tips for Your Cable
How do you keep your DIY cable in good working condition? Proper maintenance can extend the life of your DIY USB to OBD2 cable.
- Storage: Store the cable in a dry, protected environment to prevent damage.
- Handling: Avoid bending or twisting the cable excessively.
- Cleaning: Clean the connectors regularly to remove dirt and debris.
- Inspection: Inspect the cable regularly for any signs of damage, such as frayed wires or cracked connectors.
26. Upgrading Your Cable: Enhancements and Modifications
What upgrades can you make to your DIY USB to OBD2 cable? Enhancements can improve the performance and functionality of your cable.
- Shielding: Add shielding to the cable to reduce electromagnetic interference.
- Connector Upgrades: Replace the connectors with higher-quality ones for improved durability.
- Additional Features: Add additional features, such as a built-in multimeter or oscilloscope.
27. Resources and Further Reading
Where can you find more information about vehicle diagnostics and Mercedes-Benz vehicles?
- Mercedes-Benz Official Website: The official Mercedes-Benz website provides valuable information about vehicle specifications, maintenance schedules, and owner’s manuals.
- Online Forums: Online forums such as Benzworld and MBWorld are great resources for tips, advice, and support from fellow enthusiasts.
- Repair Manuals: Repair manuals provide detailed instructions and diagrams for performing repairs and maintenance tasks on your vehicle.
- Diagnostic Software Websites: Diagnostic software websites provide information about their products, including compatibility, features, and pricing.
28. Case Studies: Real-World Applications
How have others used DIY cables to solve real-world problems?
- Case Study 1: Diagnosing a Faulty Oxygen Sensor: A Mercedes-Benz owner used a DIY USB to OBD2 cable to diagnose a faulty oxygen sensor, saving hundreds of dollars on repair costs.
- Case Study 2: Unlocking Hidden Features: A car enthusiast used a DIY cable to unlock hidden features, such as cornering lights and ambient lighting customization.
- Case Study 3: Performing Routine Maintenance: An independent auto technician used a DIY cable to reset the service indicator after performing an oil change, streamlining their workflow and improving customer service.
29. Alternatives to a DIY Cable
What are the alternatives if you don’t want to build your own cable?
- Commercial OBD2 Scanners: Commercial OBD2 scanners are available at various price points, offering a range of features and capabilities.
- Professional Diagnostic Services: Professional diagnostic services provide comprehensive diagnostics and repair services, but can be more expensive.
- Wireless OBD2 Adapters: Wireless OBD2 adapters connect to your smartphone or tablet via Bluetooth or Wi-Fi, offering convenient diagnostics on the go.
30. Contact MERCEDES-DIAGNOSTIC-TOOL.EDU.VN for Expert Assistance
Need help with your Mercedes-Benz diagnostics, coding, or maintenance? Contact MERCEDES-DIAGNOSTIC-TOOL.EDU.VN for expert assistance. We offer comprehensive guides, expert advice, and top-quality diagnostic tools to help you keep your Mercedes-Benz in top condition. Whether you’re looking to diagnose a specific issue, unlock hidden features, or perform routine maintenance, we have the resources and expertise to help you succeed.
Contact us today:
- Address: 789 Oak Avenue, Miami, FL 33101, United States
- WhatsApp: +1 (641) 206-8880
- Website: MERCEDES-DIAGNOSTIC-TOOL.EDU.VN
Unlock the full potential of your Mercedes-Benz with MERCEDES-DIAGNOSTIC-TOOL.EDU.VN. Our team is here to provide the support and resources you need to keep your vehicle running smoothly and efficiently. Contact us now via WhatsApp or visit our website to learn more!
FAQ Section
1. What is the primary purpose of a DIY USB to OBD2 cable?
The primary purpose of a DIY USB to OBD2 cable is to connect your car’s OBD2 port to a computer, allowing you to access diagnostic information, perform vehicle coding, and run maintenance procedures using specialized software. This offers an affordable alternative to expensive, proprietary diagnostic tools.
2. What are the main components needed to build a DIY USB to OBD2 cable?
The main components include an OBD2 connector, a USB cable, an MCP2551 CAN transceiver, an MCP2515 CAN controller, a 9-pin DSUB connector, a USB to RS232 converter, jumper wires, and a breadboard.
3. How do I identify the correct pins on the OBD2 connector?
Identify the following pins: Pin 4 (Chassis Ground), Pin 6 (CAN High), Pin 14 (CAN Low), and Pin 16 (Battery Power). These are essential for establishing the correct connection.
4. What diagnostic software is recommended for Mercedes-Benz vehicles?
Recommended software includes XENTRY/DAS (official Mercedes-Benz software), Autel MaxiSys, iCarsoft MB II, and OBD Eleven. Choose based on your needs and budget.
5. What safety precautions should I take when working with my vehicle’s electronics?
Always disconnect the negative terminal of your vehicle’s battery, ensure proper grounding, follow instructions carefully, and avoid distractions while working.
6. Can modifying my vehicle’s software void the warranty?
Yes, modifying your vehicle’s software may void the warranty, so it’s important to be aware of this risk before making any changes.
7. What are some common issues in Mercedes-Benz vehicles that I can diagnose with a DIY cable?
Common issues include faulty oxygen sensors, transmission problems, engine misfires, and ABS/ESP issues. Reading Diagnostic Trouble Codes (DTCs) can help identify these problems.
8. How can I test my DIY USB to OBD2 cable to ensure it’s working correctly?
Use a multimeter for continuity and voltage testing, perform a loopback test, and connect the cable to your Mercedes-Benz to read vehicle data and check for errors using diagnostic software.
9. What are some advanced coding and programming possibilities with a DIY cable?
Advanced coding includes ECU programming and module coding to enable or disable specific features and customize vehicle behavior. This should be done by experienced users only.
10. Where can I find expert assistance and resources for Mercedes-Benz diagnostics and maintenance?
Contact MERCEDES-DIAGNOSTIC-TOOL.EDU.VN for comprehensive guides, expert advice, and top-quality diagnostic tools to help keep your Mercedes-Benz in top condition.