Does Dodge Neon 2005 Have Obd2? Yes, the 2005 Dodge Neon is equipped with an OBD2 (On-Board Diagnostics II) port, essential for diagnosing vehicle issues and monitoring performance; the MERCEDES-DIAGNOSTIC-TOOL.EDU.VN provides comprehensive information and tools that help you understand how to use this port for effective vehicle maintenance. Learning about OBD2 functionality, diagnostic tools, and potential repair solutions can simplify vehicle care and enhance your understanding of automotive technology, improving your experience in automotive diagnostics and repair tasks. Let’s dive into the details.
Contents
- 1. Understanding OBD2 and Its Importance
- 1.1. History and Evolution of OBD Systems
- 1.2. Key Components of the OBD2 System
- 1.3. The Role of OBD2 in Modern Vehicles
- 2. Confirming OBD2 Compliance in the 2005 Dodge Neon
- 2.1. Locating the OBD2 Port in Your Vehicle
- 2.2. Checking the Vehicle’s Manual for OBD2 Information
- 2.3. Visual Inspection to Confirm OBD2 Port Presence
- 3. Location of the OBD2 Port in the 2005 Dodge Neon
- 3.1. Detailed Description of the Port’s Location
- 3.2. Using Images or Diagrams to Aid Location
- 3.3. Tips for Finding the Port in Hard-to-Reach Areas
- 4. Benefits of Using an OBD2 Scanner
- 4.1. Early Detection of Potential Issues
- 4.2. Cost Savings on Diagnostic Fees
- 4.3. Improved Understanding of Vehicle Health
- 5. Choosing the Right OBD2 Scanner for Your Needs
- 5.1. Basic vs. Advanced OBD2 Scanners
- 5.2. Key Features to Look For in an OBD2 Scanner
- 5.3. Popular OBD2 Scanner Brands and Models
- 6. Performing a Basic OBD2 Scan
- 6.1. Step-by-Step Guide to Connecting the Scanner
- 6.2. Reading Diagnostic Trouble Codes (DTCs)
- 6.3. Clearing Codes and Understanding the Implications
- 7. Common OBD2 Codes and Their Meanings
- 7.1. Decoding Common Engine-Related Codes
- 7.2. Understanding Transmission-Related Codes
- 7.3. Interpreting Emission System Codes
- 8. Troubleshooting Common OBD2 Issues
- 8.1. Diagnosing and Repairing Misfire Issues
- 8.2. Addressing Fuel System Problems
- 8.3. Resolving Emission System Faults
- 9. Advanced Diagnostics with OBD2 Scanners
- 9.1. Using Live Data Streaming for Real-Time Monitoring
- 9.2. Graphing and Data Analysis Techniques
- 9.3. Utilizing Bidirectional Control for System Testing
- 10. OBD2 and Emission Testing
- 10.1. Understanding Emission Readiness Monitors
- 10.2. Preparing Your 2005 Dodge Neon for Emission Testing
- 10.3. Common Reasons for Failing an Emission Test
- 11. DIY Repairs vs. Professional Service
- 11.1. Assessing Your Technical Skills and Resources
- 11.2. Identifying Repairs Best Left to Professionals
- 11.3. Benefits of Professional Automotive Service
- 12. Maintaining Your 2005 Dodge Neon with OBD2
- 12.1. Regular OBD2 Scans for Preventative Maintenance
- 12.2. Tracking Vehicle Performance with OBD2 Data
- 12.3. Creating a Maintenance Schedule Based on OBD2 Insights
- 13. Potential Problems with PCI Bus
- 13.1. Symptoms of a Faulty PCI Bus
- 13.2. Diagnosing PCI Bus Issues
- 13.3. Addressing PCI Bus Problems
- 14. The Role of SKIM and SKIS in Vehicle Security
- 14.1. Understanding How SKIM Works
Table of Contents
- Understanding OBD2 and Its Importance
- Confirming OBD2 Compliance in the 2005 Dodge Neon
- Location of the OBD2 Port in the 2005 Dodge Neon
- Benefits of Using an OBD2 Scanner
- Choosing the Right OBD2 Scanner for Your Needs
- Performing a Basic OBD2 Scan
- Common OBD2 Codes and Their Meanings
- Troubleshooting Common OBD2 Issues
- Advanced Diagnostics with OBD2 Scanners
- OBD2 and Emission Testing
- DIY Repairs vs. Professional Service
- Maintaining Your 2005 Dodge Neon with OBD2
- Potential Problems with PCI Bus
- The Role of SKIM and SKIS in Vehicle Security
- Troubleshooting Starter Issues
- Checking the TPS Harness
- Aftermarket Modifications and Electrical Add-ons
- Using a Digital Multi-Meter for Circuit Testing
- Downloading and Using the Factory Service Manual (FSM)
- Understanding Wiring Schematics
- Double-Start Protection
- Clutch Interlock Switch
- Fuse and Relay Issues
- Impact of Accidents and Rebuilds
- Low Mileage Engine Considerations
- Tips for Avoiding Diagnostic Pitfalls
- The Future of OBD Systems
- Consulting with Professionals
- Case Studies: Successful OBD2 Diagnostics
- Frequently Asked Questions (FAQs)
1. Understanding OBD2 and Its Importance
What is OBD2 and why is it important?
OBD2, or On-Board Diagnostics II, is a standardized system used in most vehicles since 1996 to monitor engine performance and emissions. According to the EPA, OBD2 systems are designed to alert drivers to potential issues that could affect emissions, fuel economy, or overall vehicle performance. It’s essential because it allows mechanics and vehicle owners to diagnose problems quickly using a standard diagnostic port, leading to faster and more accurate repairs. OBD2 provides a wealth of data, including diagnostic trouble codes (DTCs), real-time sensor data, and emission readiness status, making it a crucial tool for modern vehicle maintenance.
1.1. History and Evolution of OBD Systems
How have OBD systems evolved over time?
The evolution of on-board diagnostic systems began with OBD-I, which was implemented in the 1980s but lacked standardization. OBD-II was introduced in the mid-1990s to standardize the diagnostic process across all vehicle manufacturers, providing a consistent set of diagnostic trouble codes (DTCs) and communication protocols. According to a study by the Society of Automotive Engineers (SAE), this standardization made it easier for technicians to diagnose and repair vehicles regardless of make or model. The evolution has continued with enhanced capabilities in OBD-II, including more detailed monitoring of vehicle systems and increased data availability, leading to more effective diagnostics.
1.2. Key Components of the OBD2 System
What are the main parts of an OBD2 system?
The key components of an OBD2 system include the diagnostic port (DLC), the engine control unit (ECU), various sensors throughout the vehicle, and the diagnostic trouble codes (DTCs). The diagnostic port allows access to the data stored within the ECU, which monitors sensor readings from various parts of the vehicle. Sensors track things like engine temperature, oxygen levels, and throttle position, sending this data to the ECU. When the ECU detects a problem, it generates a DTC, which can be read using an OBD2 scanner. Understanding these components is vital for effective diagnostics and repair.
1.3. The Role of OBD2 in Modern Vehicles
How does OBD2 enhance vehicle maintenance?
OBD2 significantly enhances vehicle maintenance by providing real-time data and diagnostic information that can help identify issues before they become major problems. By using an OBD2 scanner, mechanics and vehicle owners can access DTCs, sensor data, and other critical information, enabling them to pinpoint the root cause of a problem quickly. This leads to more accurate repairs, reduces downtime, and can save money by preventing more extensive damage. According to a report by the National Institute for Automotive Service Excellence (ASE), vehicles with well-maintained OBD2 systems often have fewer emissions-related issues and better fuel economy.
2. Confirming OBD2 Compliance in the 2005 Dodge Neon
How do I check if my 2005 Dodge Neon has OBD2?
To verify OBD2 compliance in your 2005 Dodge Neon, check for the OBD2 port, which is typically located under the dashboard on the driver’s side. All vehicles sold in the US after 1996 are required to have an OBD2 system. You can also refer to your vehicle’s owner’s manual, which should provide information about the OBD2 system and its location. If you find the 16-pin diagnostic port, your vehicle is OBD2 compliant.
2.1. Locating the OBD2 Port in Your Vehicle
Where is the OBD2 port located in the 2005 Dodge Neon?
The OBD2 port in the 2005 Dodge Neon is typically located under the dashboard on the driver’s side. You may need to look around the area near the steering column or under the glove compartment. The port is usually a 16-pin connector, and its location is standardized across most vehicles to ensure easy access for diagnostic purposes.
2.2. Checking the Vehicle’s Manual for OBD2 Information
What information can I find in the vehicle manual about OBD2?
The vehicle’s owner’s manual is a valuable resource for information about the OBD2 system. It typically includes the location of the OBD2 port, instructions on how to use it, and a list of common diagnostic trouble codes (DTCs) and their meanings. Additionally, the manual may provide guidance on basic troubleshooting and maintenance related to the OBD2 system, helping you understand how to interpret the data provided by an OBD2 scanner.
2.3. Visual Inspection to Confirm OBD2 Port Presence
What should I look for when visually inspecting for an OBD2 port?
When visually inspecting for an OBD2 port, look for a 16-pin connector, usually trapezoidal in shape. The port is often black or dark gray and located under the dashboard on the driver’s side. Ensure the connector is clean and free from any obstructions. If you find a connector matching this description, your vehicle is likely OBD2 compliant.
3. Location of the OBD2 Port in the 2005 Dodge Neon
Where can I find the OBD2 port in my 2005 Dodge Neon?
The OBD2 port in the 2005 Dodge Neon is usually located under the dashboard on the driver’s side, around the steering column area. You might need to crouch down and look carefully, as it can sometimes be tucked away. The port is a 16-pin connector, making it easy to identify. Knowing the exact location helps in quickly connecting an OBD2 scanner for diagnostics.
3.1. Detailed Description of the Port’s Location
Can you provide a more specific description of where to find the port?
To find the OBD2 port in your 2005 Dodge Neon, start by looking under the dashboard on the driver’s side. Position yourself so you can see the area beneath the steering wheel. The port is typically located near the center console or to the left of the steering column. It’s a 16-pin connector, often black, and should be easily accessible once you’ve located it.
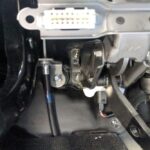
3.2. Using Images or Diagrams to Aid Location
Are there visual aids to help me locate the OBD2 port?
Refer to your vehicle’s repair manual or search online for images or diagrams that show the exact location of the OBD2 port in a 2005 Dodge Neon. Websites like YouTube and automotive forums often have videos or posts with visual guides that can help you pinpoint the port’s location. These visual aids can be particularly helpful if you’re having trouble finding it based on written descriptions alone.
3.3. Tips for Finding the Port in Hard-to-Reach Areas
What if the OBD2 port is difficult to access?
If the OBD2 port is in a hard-to-reach area, use a flashlight to illuminate the space under the dashboard. You might need to move or adjust the position of any carpeting or panels that are obstructing your view. If you still can’t reach it easily, consider using an OBD2 extension cable to bring the port to a more accessible location temporarily. This can be particularly useful if you frequently use an OBD2 scanner.
4. Benefits of Using an OBD2 Scanner
What are the advantages of using an OBD2 scanner?
Using an OBD2 scanner offers numerous benefits, including the ability to diagnose vehicle problems quickly, save money on mechanic fees, and gain a better understanding of your vehicle’s health. According to a report by Consumer Reports, using an OBD2 scanner can help vehicle owners identify minor issues before they turn into major problems. It also provides access to real-time data, such as engine temperature, RPM, and sensor readings, which can be invaluable for troubleshooting and maintenance.
4.1. Early Detection of Potential Issues
How does an OBD2 scanner help in early issue detection?
An OBD2 scanner aids in the early detection of potential issues by continuously monitoring your vehicle’s systems and alerting you to problems as soon as they arise. The scanner reads diagnostic trouble codes (DTCs) generated by the ECU, which indicate specific issues with the engine, transmission, emissions system, or other components. Early detection allows you to address these problems before they escalate, potentially saving you from costly repairs down the road.
4.2. Cost Savings on Diagnostic Fees
Can I save money by using an OBD2 scanner?
Yes, using an OBD2 scanner can lead to significant cost savings on diagnostic fees. Mechanics typically charge a fee for diagnosing vehicle problems, which can range from $75 to $150 or more. By using your own OBD2 scanner, you can identify the issue yourself and potentially fix it without having to pay for a professional diagnosis. Even if you need to take your vehicle to a mechanic, knowing the DTC beforehand can help you get a more accurate estimate and avoid unnecessary repairs.
4.3. Improved Understanding of Vehicle Health
How does an OBD2 scanner improve my understanding of my vehicle?
An OBD2 scanner provides valuable insights into your vehicle’s health by giving you access to real-time data and diagnostic information. You can monitor parameters such as engine temperature, fuel trim, oxygen sensor readings, and more. Understanding these parameters can help you identify potential problems, track your vehicle’s performance, and make informed decisions about maintenance and repairs. This knowledge empowers you to take better care of your vehicle and extend its lifespan.
5. Choosing the Right OBD2 Scanner for Your Needs
How do I select the best OBD2 scanner for my specific needs?
Selecting the right OBD2 scanner involves considering your budget, technical expertise, and specific diagnostic needs. Basic scanners are affordable and can read and clear diagnostic trouble codes (DTCs). More advanced scanners offer features like live data streaming, graphing, and bidirectional control, which allows you to command the vehicle’s systems to perform certain actions for testing purposes. Determine the features that are most important to you and choose a scanner that fits your needs and budget. MERCEDES-DIAGNOSTIC-TOOL.EDU.VN offers reviews and comparisons to help you make an informed decision.
5.1. Basic vs. Advanced OBD2 Scanners
What are the differences between basic and advanced OBD2 scanners?
Basic OBD2 scanners are designed to read and clear diagnostic trouble codes (DTCs). They are typically more affordable and easier to use, making them suitable for beginners and those who only need to perform basic diagnostics. Advanced OBD2 scanners offer a wider range of features, such as live data streaming, graphing, bidirectional control, and advanced diagnostic capabilities. These scanners are more expensive but provide more detailed information and control over the vehicle’s systems, making them suitable for experienced mechanics and serious DIYers.
5.2. Key Features to Look For in an OBD2 Scanner
What features are essential when choosing an OBD2 scanner?
Key features to look for in an OBD2 scanner include:
- DTC Reading and Clearing: The ability to read and clear diagnostic trouble codes.
- Live Data Streaming: Real-time data display of various vehicle parameters.
- Graphing Capability: Visual representation of data for easier analysis.
- Bidirectional Control: The ability to command vehicle systems for testing.
- Compatibility: Ensure the scanner is compatible with your vehicle’s make and model.
- Ease of Use: A user-friendly interface and clear instructions.
- Update Capability: The ability to update the scanner with the latest DTCs and vehicle information.
5.3. Popular OBD2 Scanner Brands and Models
Which OBD2 scanner brands and models are highly recommended?
Some popular OBD2 scanner brands and models include:
- BlueDriver: Known for its Bluetooth connectivity and smartphone app integration.
- Autel: Offers a wide range of scanners from basic to advanced models.
- Innova: Popular for its user-friendly interface and comprehensive features.
- Launch: Known for its professional-grade scanners with advanced capabilities.
- OBDLink: Offers reliable and accurate scanners with a focus on data security.
6. Performing a Basic OBD2 Scan
How do I perform a basic OBD2 scan on my 2005 Dodge Neon?
To perform a basic OBD2 scan, first, locate the OBD2 port in your 2005 Dodge Neon. Plug the OBD2 scanner into the port. Turn the ignition key to the “ON” position without starting the engine. Follow the scanner’s instructions to read the diagnostic trouble codes (DTCs). Record any codes that appear and research their meanings. Finally, you can clear the codes if desired, but be sure to address the underlying issue first.
6.1. Step-by-Step Guide to Connecting the Scanner
Can you provide a detailed guide on connecting the OBD2 scanner?
Follow these steps to connect the OBD2 scanner:
- Locate the OBD2 Port: Find the 16-pin diagnostic port under the dashboard on the driver’s side.
- Prepare the Scanner: Ensure the scanner is powered off and ready to connect.
- Plug in the Scanner: Firmly plug the OBD2 scanner into the diagnostic port.
- Turn on the Ignition: Turn the ignition key to the “ON” position without starting the engine.
- Power on the Scanner: Turn on the OBD2 scanner and wait for it to initialize.
- Follow On-Screen Prompts: Follow the scanner’s on-screen instructions to begin the diagnostic process.
6.2. Reading Diagnostic Trouble Codes (DTCs)
How do I read the diagnostic trouble codes using the scanner?
To read diagnostic trouble codes (DTCs), follow these steps:
- Navigate to the DTC Menu: Use the scanner’s navigation buttons to find the “Read Codes” or “Diagnostic Codes” option.
- Select the Option: Select the appropriate option to initiate the code reading process.
- View the Codes: The scanner will display any stored DTCs. Record these codes for further research.
- Understand the Codes: Use the scanner’s built-in code definitions or consult online resources to understand the meaning of each code.
6.3. Clearing Codes and Understanding the Implications
What happens when I clear the codes, and what should I know?
Clearing the codes will erase the stored diagnostic trouble codes (DTCs) from the vehicle’s computer. This can be useful for resetting the check engine light after addressing the underlying issue. However, it’s important to understand that clearing the codes does not fix the problem. If the underlying issue persists, the DTCs will reappear. Additionally, clearing the codes will also reset the vehicle’s emission readiness monitors, which may affect your ability to pass an emissions test.
7. Common OBD2 Codes and Their Meanings
What are some typical OBD2 codes and what do they indicate?
Common OBD2 codes include P0300 (random misfire detected), P0171 (system too lean), P0420 (catalyst system efficiency below threshold), and P0101 (mass air flow sensor circuit range/performance). According to the National Highway Traffic Safety Administration (NHTSA), these codes indicate specific problems with the engine, fuel system, or emissions system. Understanding these codes can help you diagnose and address issues more effectively. MERCEDES-DIAGNOSTIC-TOOL.EDU.VN provides a detailed database of OBD2 codes and their meanings.
7.1. Decoding Common Engine-Related Codes
How do I interpret engine-related OBD2 codes?
To interpret engine-related OBD2 codes, start by understanding the basic categories of codes. P0 codes typically relate to the powertrain, which includes the engine and transmission. Common engine-related codes include:
- P0300-P0309: Misfire detected in various cylinders.
- P0171/P0174: System too lean (fuel system issue).
- P0100-P0104: Mass Air Flow (MAF) sensor issues.
- P0110-P0114: Intake Air Temperature (IAT) sensor issues.
Research the specific code using online resources or a repair manual to understand the potential causes and troubleshooting steps.
7.2. Understanding Transmission-Related Codes
What do OBD2 codes related to the transmission indicate?
Transmission-related OBD2 codes typically start with a P07xx designation. These codes can indicate a range of issues, such as:
- P0700: Transmission control system malfunction.
- P0715: Input/Turbine Speed Sensor Circuit Malfunction.
- P0740: Torque Converter Clutch Circuit Malfunction.
- P0730: Incorrect Gear Ratio.
These codes often require professional diagnosis, as transmission issues can be complex and may require specialized tools and expertise.
7.3. Interpreting Emission System Codes
How do I understand OBD2 codes related to the emission system?
Emission system codes often start with a P04xx designation. Common emission-related codes include:
- P0420: Catalyst System Efficiency Below Threshold.
- P0401: Exhaust Gas Recirculation (EGR) Flow Insufficient Detected.
- P0440-P0457: Evaporative Emission Control System (EVAP) leaks or malfunctions.
These codes can indicate problems with the catalytic converter, EGR valve, EVAP system, or other components related to emissions control. Addressing these issues is crucial for maintaining vehicle performance and passing emissions tests.
8. Troubleshooting Common OBD2 Issues
How can I fix typical problems indicated by OBD2 codes?
Troubleshooting common OBD2 issues involves identifying the root cause of the problem and taking appropriate steps to repair or replace the faulty component. For example, if you get a P0171 code (system too lean), you might check for vacuum leaks, a faulty MAF sensor, or a clogged fuel filter. According to a study by the Car Care Council, addressing these issues promptly can improve fuel economy and reduce emissions. MERCEDES-DIAGNOSTIC-TOOL.EDU.VN offers troubleshooting guides and repair tips to help you resolve common OBD2 issues.
8.1. Diagnosing and Repairing Misfire Issues
What steps should I take to diagnose and fix a misfire?
To diagnose and repair a misfire (P0300-P0309 codes), follow these steps:
- Identify the Cylinder: If the code specifies a particular cylinder (e.g., P0301 for cylinder 1), focus on that cylinder. Otherwise, a P0300 indicates a random misfire.
- Check Spark Plugs: Inspect the spark plugs for wear, damage, or fouling. Replace as needed.
- Check Ignition Coils: Test the ignition coils using a multimeter to ensure they are functioning correctly. Replace any faulty coils.
- Check Fuel Injectors: Ensure the fuel injectors are delivering fuel properly. You can use a stethoscope to listen for injector clicking or have them professionally tested.
- Check for Vacuum Leaks: Inspect vacuum lines for cracks or leaks. Use a smoke machine to identify any hidden leaks.
- Check Compression: Perform a compression test to ensure the cylinder has adequate compression.
8.2. Addressing Fuel System Problems
How do I troubleshoot fuel system-related OBD2 codes?
To troubleshoot fuel system problems (e.g., P0171, P0174), consider these steps:
- Check for Vacuum Leaks: Inspect vacuum lines, intake manifold gaskets, and other potential leak points.
- Check Fuel Filter: Replace the fuel filter if it’s clogged or overdue for replacement.
- Check Fuel Pump: Ensure the fuel pump is delivering adequate fuel pressure. You may need a fuel pressure gauge to test this.
- Check Fuel Injectors: Clean or replace fuel injectors if they are clogged or malfunctioning.
- Check MAF Sensor: Clean the Mass Air Flow (MAF) sensor. If cleaning doesn’t help, consider replacing it.
8.3. Resolving Emission System Faults
What steps can I take to resolve emission system faults indicated by OBD2 codes?
To resolve emission system faults (e.g., P0420, P0401, P0440), follow these steps:
- Check Catalytic Converter: For a P0420 code, inspect the catalytic converter for damage or degradation. It may need to be replaced.
- Check EGR Valve: For a P0401 code, clean or replace the EGR valve. Also, check the EGR passages for blockages.
- Check EVAP System: For P0440-P0457 codes, inspect the EVAP system for leaks. Check the gas cap, EVAP hoses, and the charcoal canister. A smoke test can help identify leaks.
- Check Oxygen Sensors: Ensure the oxygen sensors are functioning correctly. Replace if necessary.
9. Advanced Diagnostics with OBD2 Scanners
What advanced features do some OBD2 scanners offer?
Advanced OBD2 scanners offer features such as live data streaming, graphing, bidirectional control, and enhanced code definitions. These tools provide deeper insights into your vehicle’s systems, allowing for more precise diagnostics. According to a study by the Automotive Management Institute (AMI), technicians who use advanced diagnostic tools can diagnose and repair vehicles more efficiently. MERCEDES-DIAGNOSTIC-TOOL.EDU.VN provides training and resources on using advanced OBD2 features.
9.1. Using Live Data Streaming for Real-Time Monitoring
How can live data streaming help in diagnostics?
Live data streaming allows you to monitor various vehicle parameters in real-time, providing valuable insights into how different systems are functioning. By observing parameters such as engine temperature, RPM, fuel trim, and oxygen sensor readings, you can identify anomalies and potential problems that may not trigger a DTC. This feature is particularly useful for diagnosing intermittent issues or fine-tuning engine performance.
9.2. Graphing and Data Analysis Techniques
How can graphing and data analysis improve diagnostic accuracy?
Graphing and data analysis techniques allow you to visualize live data streams, making it easier to identify trends and patterns. By graphing parameters such as oxygen sensor voltage or fuel trim over time, you can quickly spot irregularities that would be difficult to detect by simply looking at numerical data. This can help you pinpoint the root cause of a problem more accurately and efficiently.
9.3. Utilizing Bidirectional Control for System Testing
What is bidirectional control and how is it used?
Bidirectional control allows you to command the vehicle’s systems to perform certain actions for testing purposes. For example, you can use bidirectional control to activate the fuel pump, cycle the ABS module, or command the EGR valve to open or close. This feature is invaluable for verifying the functionality of various components and diagnosing complex issues. It requires an advanced OBD2 scanner and a good understanding of the vehicle’s systems.
10. OBD2 and Emission Testing
How does OBD2 relate to emission testing?
OBD2 plays a crucial role in emission testing by monitoring the performance of emission-related components and systems. During an emission test, the testing equipment connects to the OBD2 port to check for diagnostic trouble codes (DTCs) and verify that all emission monitors are ready. If there are any DTCs or if the monitors are not ready, the vehicle will likely fail the emission test. According to the EPA, OBD2-based emission testing has significantly improved air quality by ensuring that vehicles meet emission standards.
10.1. Understanding Emission Readiness Monitors
What are emission readiness monitors and why are they important?
Emission readiness monitors are diagnostic routines that the vehicle’s computer runs to verify the functionality of emission-related systems. These monitors check components such as the catalytic converter, oxygen sensors, EGR valve, and EVAP system. Before a vehicle can pass an emission test, all applicable monitors must be in a “ready” or “complete” state, indicating that the system has been tested and is functioning correctly. If the monitors are not ready, it could indicate a problem with the system or that the vehicle has recently had its codes cleared, which resets the monitors.
10.2. Preparing Your 2005 Dodge Neon for Emission Testing
How can I prepare my car for an emission test?
To prepare your 2005 Dodge Neon for an emission test, follow these steps:
- Check for DTCs: Use an OBD2 scanner to check for any diagnostic trouble codes (DTCs). Address any issues indicated by the codes before the test.
- Complete Drive Cycle: Ensure all emission readiness monitors are in a “ready” or “complete” state. This may require completing a specific drive cycle, which involves driving the vehicle under certain conditions to allow the monitors to run.
- Check Fluid Levels: Ensure all fluid levels (oil, coolant, etc.) are at the correct levels.
- Inspect Components: Visually inspect emission-related components, such as the gas cap and EVAP hoses, for any damage or leaks.
- Avoid Recent Code Clearing: Avoid clearing the codes shortly before the test, as this will reset the monitors and could cause the vehicle to fail.
10.3. Common Reasons for Failing an Emission Test
What are the most frequent causes of emission test failures?
Common reasons for failing an emission test include:
- Diagnostic Trouble Codes (DTCs): Any stored DTCs related to emission systems will cause a failure.
- Non-Ready Monitors: If emission readiness monitors are not in a “ready” state, the vehicle will fail.
- Visual Inspection Failures: Issues such as a missing gas cap or damaged EVAP hoses can cause a failure.
- High Emissions Readings: Excessive levels of pollutants such as hydrocarbons (HC), carbon monoxide (CO), or nitrogen oxides (NOx) can cause a failure.
11. DIY Repairs vs. Professional Service
When should I attempt a repair myself, and when should I seek professional help?
Deciding between DIY repairs and professional service depends on your technical skills, the complexity of the problem, and the tools you have available. Simple repairs, such as replacing spark plugs or cleaning a MAF sensor, can often be done at home. However, more complex repairs, such as transmission work or engine rebuilds, should be left to professionals. According to a survey by the Automotive Aftermarket Industry Association (AAIA), many vehicle owners prefer to handle basic maintenance tasks themselves but rely on professionals for more complicated repairs. MERCEDES-DIAGNOSTIC-TOOL.EDU.VN offers resources to help you assess your skills and determine the best course of action.
11.1. Assessing Your Technical Skills and Resources
How do I evaluate my ability to perform a repair?
To assess your ability to perform a repair, consider the following factors:
- Complexity of the Repair: Is the repair straightforward, or does it involve intricate procedures?
- Required Tools: Do you have the necessary tools, or will you need to purchase or rent them?
- Technical Knowledge: Do you understand the system you’re working on and the potential risks involved?
- Time Commitment: Do you have enough time to complete the repair without rushing?
- Availability of Information: Can you find reliable repair information and instructions?
If you’re unsure about any of these factors, it’s best to consult with a professional mechanic.
11.2. Identifying Repairs Best Left to Professionals
What types of repairs are better handled by a professional mechanic?
Certain types of repairs are best left to professionals due to their complexity and the potential for serious damage if done incorrectly. These include:
- Transmission Repairs: Transmission work often requires specialized tools and expertise.
- Engine Rebuilds: Engine rebuilds are complex and require precise measurements and assembly.
- ABS/Brake System Repairs: ABS and brake system repairs can be dangerous if not done correctly.
- Airbag System Repairs: Airbag systems are highly sensitive and can be dangerous to work on without proper training.
- Complex Electrical Diagnostics: Diagnosing and repairing complex electrical issues often requires advanced diagnostic tools and knowledge.
11.3. Benefits of Professional Automotive Service
What are the advantages of using a professional mechanic?
The benefits of using a professional mechanic include:
- Expertise: Professional mechanics have the knowledge and experience to diagnose and repair complex issues.
- Specialized Tools: They have access to specialized tools and equipment that are not available to the average DIYer.
- Warranty: Many professional repairs come with a warranty, providing peace of mind.
- Time Savings: Professional mechanics can often complete repairs more quickly than DIYers.
- Safety: They can ensure that repairs are done safely and correctly, reducing the risk of accidents or further damage.
12. Maintaining Your 2005 Dodge Neon with OBD2
How can OBD2 help me maintain my 2005 Dodge Neon?
OBD2 can significantly aid in maintaining your 2005 Dodge Neon by providing early warnings of potential problems, allowing you to address them before they become major issues. Regular OBD2 scans can help you monitor the health of your engine, transmission, and emission systems, ensuring optimal performance and longevity. According to a report by AAA, proactive maintenance based on OBD2 data can extend the life of your vehicle and reduce the likelihood of costly repairs. MERCEDES-DIAGNOSTIC-TOOL.EDU.VN offers maintenance schedules and tips based on OBD2 data.
12.1. Regular OBD2 Scans for Preventative Maintenance
How often should I scan my vehicle for maintenance purposes?
Regular OBD2 scans should be performed at least every three months or whenever you notice unusual symptoms, such as a check engine light or decreased fuel economy. Frequent scans can help you catch minor issues before they escalate into major problems. Additionally, it’s a good idea to perform an OBD2 scan before and after any major maintenance or repair work to ensure everything is functioning correctly.
12.2. Tracking Vehicle Performance with OBD2 Data
How can OBD2 data help me track my vehicle’s performance?
OBD2 data provides valuable insights into your vehicle’s performance. By monitoring parameters such as engine temperature, RPM, fuel trim, and oxygen sensor readings, you can track changes over time and identify potential problems. For example, a sudden increase in fuel trim values could indicate a vacuum leak or a faulty oxygen sensor. Tracking this data can help you optimize your vehicle’s performance and prevent costly repairs.
12.3. Creating a Maintenance Schedule Based on OBD2 Insights
How can I use OBD2 data to create a customized maintenance schedule?
You can use OBD2 data to create a customized maintenance schedule by identifying the specific needs of your vehicle. For example, if you notice that your oxygen sensor readings are consistently out of range, you may need to replace the oxygen sensors more frequently than the manufacturer’s recommended interval. Similarly, if you notice increased engine temperature, you may need to flush the cooling system more often. By tailoring your maintenance schedule to your vehicle’s specific needs, you can ensure optimal performance and longevity.
13. Potential Problems with PCI Bus
What are the potential issues related to the PCI bus in my Dodge Neon?
Problems with the PCI (Peripheral Component Interconnect) bus can cause a range of issues, including communication failures between different modules in the vehicle, such as the instrument cluster and the SKIM (Sentry Key Immobilizer Module). If you can’t retrieve codes with a scanner and the instrument cluster isn’t working correctly, a PCI bus problem may be the cause. This can result in various electrical and electronic malfunctions.
13.1. Symptoms of a Faulty PCI Bus
What are the signs of a malfunctioning PCI bus?
Symptoms of a faulty PCI bus can include:
- Inability to retrieve diagnostic trouble codes (DTCs) with an OBD2 scanner.
- Malfunctioning instrument cluster (e.g., gauges not working).
- Communication errors between different modules in the vehicle.
- Starting problems.
- Issues with the Sentry Key Immobilizer System (SKIS).
13.2. Diagnosing PCI Bus Issues
How can I determine if there’s a problem with the PCI bus?
Diagnosing PCI bus issues typically involves:
- Checking for DTCs: Attempt to retrieve diagnostic trouble codes (DTCs) using an OBD2 scanner. If the scanner cannot communicate with the vehicle’s computer, it may indicate a PCI bus problem.
- Inspecting Wiring: Check the wiring and connections related to the PCI bus for damage, corrosion, or loose connections.
- Testing Modules: Test the individual modules that communicate via the PCI bus to ensure they are functioning correctly.
- Using a Multimeter: Use a multimeter to check the voltage and continuity of the PCI bus wires.
13.3. Addressing PCI Bus Problems
What steps can be taken to fix a faulty PCI bus?
Addressing PCI bus problems may involve:
- Repairing or Replacing Wiring: Repair or replace any damaged or corroded wiring related to the PCI bus.
- Cleaning Connections: Clean any corroded or loose connections.
- Replacing Faulty Modules: Replace any modules that are not communicating properly on the PCI bus.
- Consulting a Professional: In some cases, diagnosing and repairing PCI bus issues may require specialized tools and expertise, so consulting a professional mechanic may be necessary.
14. The Role of SKIM and SKIS in Vehicle Security
What are SKIM and SKIS, and how do they protect my vehicle?
SKIM (Sentry Key Immobilizer Module) and SKIS (Sentry Key Immobilizer System) are security features designed to prevent vehicle theft. The SKIM is a module that communicates with a transponder in the ignition key. If the key is recognized as valid, the SKIM allows the engine to start. The SKIS is the overall system that includes the SKIM, the transponder key, and the vehicle’s computer. If the SKIS detects an unauthorized key or a communication problem, it will prevent the engine from starting.
14.1. Understanding How SKIM Works
How does the Sentry Key Immobilizer Module function?
The Sentry Key Immobilizer Module (SKIM) functions by:
- Reading the Key Transponder: When the ignition key is inserted, the SKIM reads the transponder chip in the key.
- Verifying the Key: The SKIM verifies that the key is authorized by comparing the transponder code to a stored code in its memory.
- Communicating with the PCM: If the key is verified, the SKIM sends a signal to the Powertrain Control Module (PCM) allowing the engine to start.