The best Gx470 Obd2 Diagnostic Cable to use is one that is compatible with the OBD2 port of your GX470 and the diagnostic software you intend to use, available at MERCEDES-DIAGNOSTIC-TOOL.EDU.VN. It is essential to understand what features to look for and how to use such a cable effectively. This ensures you can efficiently diagnose and maintain your vehicle using scan tools, code readers, and similar diagnostic equipment.
Contents
- 1. What Is An OBD2 Diagnostic Cable For A GX470?
- 1.1. Key Functions Of An OBD2 Diagnostic Cable
- 1.2. Why The Right Cable Matters
- 1.3. Standards Compliance
- 1.4. Common Types Of OBD2 Cables
- 2. Identifying The Correct OBD2 Port On Your GX470
- 2.1. Location Of The OBD2 Port In GX470
- 2.2. Understanding The OBD2 Port Layout
- 2.3. Using An Extension Cable
- 2.4. Avoiding Common Mistakes
- 3. Key Features To Look For In A GX470 OBD2 Diagnostic Cable
- 3.1. Compatibility With GX470
- 3.2. Cable Quality And Durability
- 3.3. Data Transmission Speed
- 3.4. Additional Features
- 3.5. Connector Type
- 4. Top OBD2 Diagnostic Cables For GX470 Available On The Market
- 4.1. Comparison Of Popular OBD2 Cables
- 4.2. Detailed Reviews
- 4.3. User Recommendations
- 4.4. Avoiding Counterfeit Cables
- 5. How To Use An OBD2 Diagnostic Cable With Your GX470
- 5.1. Step-By-Step Guide
- 5.2. Software Options
- 5.3. Interpreting Diagnostic Trouble Codes (DTCs)
- 5.4. Safety Precautions
- 6. Advanced Diagnostic Procedures With OBD2 Cables
- 6.1. Live Data Streaming
- 6.2. Actuator Testing
- 6.3. Reading Freeze Frame Data
- 6.4. Performing System Resets
- 7. Maintaining Your GX470 With OBD2 Diagnostics
- 7.1. Routine Checks
- 7.2. Monitoring Fuel Efficiency
- 7.3. Detecting Emissions Issues
- 7.4. Verifying Repairs
- 7.5. Keeping Records
- 8. Troubleshooting Common OBD2 Cable Issues
- 8.1. Cable Not Connecting
- 8.2. Data Transmission Errors
- 8.3. Software Not Recognizing Cable
- 8.4. Vehicle Not Responding
- 9. The Future Of OBD2 Diagnostic Technology
- 9.1. Wireless Diagnostics
- 9.2. Cloud-Based Diagnostics
- 9.3. Artificial Intelligence (AI) Integration
- 9.4. Enhanced Data Security
- 9.5. Integration With ADAS Systems
- 10. Expert Tips For Using OBD2 Diagnostic Cables
- 10.1. Keep Your Software Updated
- 10.2. Use High-Quality Cables
- 10.3. Learn Your Vehicle’s Systems
- 10.4. Document Your Findings
- 10.5. Seek Professional Help When Needed
1. What Is An OBD2 Diagnostic Cable For A GX470?
An OBD2 (On-Board Diagnostics II) diagnostic cable for a GX470 is a specialized cable used to connect your vehicle’s diagnostic port to a scanning tool or computer, with MERCEDES-DIAGNOSTIC-TOOL.EDU.VN offering a range of compatible options. This connection allows you to read diagnostic trouble codes (DTCs), monitor vehicle performance, and perform various diagnostic tests. Understanding the functions and importance of an OBD2 diagnostic cable will empower you to maintain your vehicle efficiently.
1.1. Key Functions Of An OBD2 Diagnostic Cable
The OBD2 diagnostic cable serves multiple critical functions:
- Reading Diagnostic Trouble Codes (DTCs): The primary function is to retrieve DTCs from the vehicle’s computer, helping identify potential issues.
- Monitoring Vehicle Performance: It allows real-time monitoring of various parameters such as engine temperature, speed, and fuel consumption.
- Performing Diagnostic Tests: Enables specific tests to assess the functionality of different vehicle components.
- Clearing Codes: After addressing the identified issues, the cable can be used to clear the DTCs, turning off the check engine light.
- Programming and Configuration: Some advanced cables support programming and configuration of vehicle modules.
1.2. Why The Right Cable Matters
Using the correct OBD2 diagnostic cable is crucial because:
- Compatibility: Ensures the cable works seamlessly with your GX470 and diagnostic tools.
- Data Accuracy: Provides reliable and accurate data for effective diagnostics.
- Safety: Prevents potential damage to the vehicle’s electronic systems.
- Efficiency: Streamlines the diagnostic process, saving time and effort.
1.3. Standards Compliance
OBD2 cables must comply with industry standards to ensure compatibility and reliability. These standards include:
- SAE J1962: Specifies the physical connector and pinout for the OBD2 port.
- ISO 15765-4 CAN: Defines the communication protocol used by many modern vehicles, including the GX470.
- SAE J1850: An older protocol used in some vehicles, but less common in newer models.
1.4. Common Types Of OBD2 Cables
Different types of OBD2 cables are available, each designed for specific purposes and compatibility:
- Standard OBD2 Cable: Basic cable for reading and clearing DTCs.
- USB OBD2 Cable: Connects to a computer via USB for use with diagnostic software.
- Bluetooth OBD2 Adapter: Wireless connection to smartphones or tablets.
- Ethernet OBD2 Cable: High-speed connection for advanced diagnostics and programming.
2. Identifying The Correct OBD2 Port On Your GX470
To use an OBD2 diagnostic cable effectively, you must first locate the OBD2 port in your GX470 and understand its layout. The location and configuration of the OBD2 port are standardized, but knowing the specifics for your vehicle model is beneficial. The team at MERCEDES-DIAGNOSTIC-TOOL.EDU.VN can provide guidance on locating and using the OBD2 port correctly.
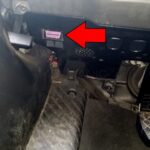
2.1. Location Of The OBD2 Port In GX470
The OBD2 port in a GX470 is typically located:
- Under the dashboard on the driver’s side.
- Near the steering column.
- Sometimes behind a small cover or panel.
2.2. Understanding The OBD2 Port Layout
The OBD2 port has a standardized 16-pin layout. Key pins include:
- Pin 4: Chassis Ground.
- Pin 5: Signal Ground.
- Pin 6: CAN High (J-2284).
- Pin 7: ISO 9141-2 K Line.
- Pin 10: SAE J1850 Bus-.
- Pin 14: CAN Low (J-2284).
- Pin 15: ISO 9141-2 L Line.
- Pin 16: Battery Power.
2.3. Using An Extension Cable
In some cases, accessing the OBD2 port may be difficult. An OBD2 extension cable can help by providing easier access without damaging the original port. This extension cable simply plugs into the existing OBD2 port and provides a more accessible connection point.
2.4. Avoiding Common Mistakes
When connecting an OBD2 cable, avoid these common mistakes:
- Forcing the Connector: Ensure the connector aligns properly before inserting it.
- Using Damaged Cables: Check for any signs of damage to the cable or connector.
- Ignoring Polarity: Ensure correct alignment to avoid electrical damage.
3. Key Features To Look For In A GX470 OBD2 Diagnostic Cable
When selecting an OBD2 diagnostic cable for your GX470, several key features can ensure optimal performance and reliability. Understanding these features will help you choose the right cable for your needs. The experts at MERCEDES-DIAGNOSTIC-TOOL.EDU.VN can offer advice on selecting a cable with the best features for your diagnostic requirements.
3.1. Compatibility With GX470
- Vehicle Protocol Support: Ensure the cable supports the communication protocols used by the GX470, such as CAN (Controller Area Network).
- Software Compatibility: Verify that the cable is compatible with the diagnostic software you plan to use.
- Model Year Coverage: Confirm the cable supports the specific model year of your GX470.
3.2. Cable Quality And Durability
- Material: Look for high-quality materials that can withstand regular use and environmental conditions.
- Construction: Check for sturdy construction and reinforced connectors to prevent damage.
- Shielding: Ensure the cable has adequate shielding to minimize interference and ensure accurate data transmission.
3.3. Data Transmission Speed
- High-Speed Data Transfer: A cable with fast data transmission speeds can significantly reduce diagnostic time.
- Stable Connection: Look for features that ensure a stable and reliable connection during data transfer.
3.4. Additional Features
- LED Indicators: Some cables have LED indicators to show connection status and data activity.
- Overload Protection: Built-in overload protection can prevent damage to the cable and vehicle’s electrical system.
- Firmware Upgradability: Cables with upgradable firmware can support new features and vehicle models in the future.
3.5. Connector Type
- USB: Suitable for connecting to laptops and desktop computers.
- Bluetooth: Offers wireless connectivity for smartphones and tablets.
- Ethernet: Provides high-speed connectivity for advanced diagnostic tools.
4. Top OBD2 Diagnostic Cables For GX470 Available On The Market
Several OBD2 diagnostic cables are available for the GX470. Here are some of the top-rated options, each offering unique benefits and features. MERCEDES-DIAGNOSTIC-TOOL.EDU.VN can provide detailed comparisons and recommendations based on your specific needs.
4.1. Comparison Of Popular OBD2 Cables
| Cable | Compatibility | Key Features | Data Speed | Price |
|---|---|---|---|---|
| Autel MaxiAP AP200 | iOS, Android | Bluetooth, comprehensive diagnostics, free software updates | High | $60 |
| BlueDriver Bluetooth Pro | iOS, Android | Bluetooth, advanced diagnostics, vehicle-specific repairs | High | $120 |
| Veepeak Mini Bluetooth OBD2 | iOS, Android | Bluetooth, compact design, basic diagnostics | Medium | $30 |
| ScanTool OBDLink MX+ | iOS, Android | Bluetooth, advanced diagnostics, secure data transfer | High | $140 |
| KOBRA OBD2 USB Cable | Windows | USB connection, reliable data transfer, easy to use | High | $40 |
4.2. Detailed Reviews
- Autel MaxiAP AP200: Known for its ease of use and comprehensive diagnostic capabilities.
- BlueDriver Bluetooth Pro: Highly recommended for its vehicle-specific repair information.
- Veepeak Mini Bluetooth OBD2: A budget-friendly option for basic diagnostics.
- ScanTool OBDLink MX+: Praised for its advanced features and secure data transfer.
- KOBRA OBD2 USB Cable: Ideal for users who prefer a wired connection for reliability.
4.3. User Recommendations
Many GX470 owners recommend the BlueDriver Bluetooth Pro for its accurate diagnostics and vehicle-specific repair suggestions. The Autel MaxiAP AP200 is also a popular choice due to its user-friendly interface and comprehensive features.
4.4. Avoiding Counterfeit Cables
To ensure you are purchasing a genuine OBD2 cable, consider the following:
- Buy from Reputable Sellers: Purchase from authorized dealers or well-known retailers.
- Check for Certifications: Look for certifications such as CE, FCC, and RoHS.
- Read Reviews: Check online reviews for feedback on the product’s authenticity and performance.
5. How To Use An OBD2 Diagnostic Cable With Your GX470
Using an OBD2 diagnostic cable with your GX470 involves a few simple steps. This section provides a detailed guide on how to connect the cable, use diagnostic software, and interpret the results. For additional support, MERCEDES-DIAGNOSTIC-TOOL.EDU.VN offers comprehensive tutorials and expert advice.
5.1. Step-By-Step Guide
- Locate the OBD2 Port: Find the OBD2 port under the dashboard on the driver’s side.
- Connect the Cable: Plug the OBD2 cable into the port, ensuring a secure connection.
- Turn on the Ignition: Turn the ignition to the “ON” position without starting the engine.
- Launch Diagnostic Software: Open the diagnostic software on your computer, smartphone, or tablet.
- Establish Connection: Follow the software’s instructions to connect to the vehicle’s ECU (Engine Control Unit).
- Read Diagnostic Trouble Codes: Use the software to read and record any DTCs.
- Interpret the Codes: Research the meaning of the codes to understand the potential issues.
- Perform Additional Tests: Conduct any additional diagnostic tests as needed.
- Clear the Codes (if applicable): After addressing the issues, clear the DTCs using the software.
- Verify the Repair: Confirm that the issues are resolved and no new codes appear.
5.2. Software Options
Several diagnostic software options are compatible with the GX470:
- OBD Auto Doctor: User-friendly software for basic diagnostics.
- Torque Pro (Android): Popular app for real-time monitoring and diagnostics.
- FORScan (Windows): Powerful software for advanced diagnostics and programming.
- Techstream (Toyota): Toyota’s official diagnostic software for in-depth analysis.
5.3. Interpreting Diagnostic Trouble Codes (DTCs)
DTCs are standardized codes that indicate specific issues with the vehicle. Here are some common DTCs and their meanings:
- P0171: System too Lean (Bank 1).
- P0300: Random/Multiple Cylinder Misfire Detected.
- P0420: Catalyst System Efficiency Below Threshold (Bank 1).
- P0441: Evaporative Emission Control System Incorrect Purge Flow.
- P0455: Evaporative Emission Control System Leak Detected (Gross Leak).
5.4. Safety Precautions
When using an OBD2 diagnostic cable, follow these safety precautions:
- Read the Manual: Always read and understand the diagnostic tool’s manual before use.
- Work in a Safe Area: Ensure the vehicle is parked in a well-ventilated and safe location.
- Avoid Distractions: Focus on the diagnostic process to avoid errors.
- Disconnect the Cable: Disconnect the cable when not in use to prevent battery drain.
6. Advanced Diagnostic Procedures With OBD2 Cables
Beyond basic code reading and clearing, OBD2 cables can be used for advanced diagnostic procedures. These procedures can help you identify and address more complex issues. MERCEDES-DIAGNOSTIC-TOOL.EDU.VN provides resources and expert guidance for performing advanced diagnostics.
6.1. Live Data Streaming
Live data streaming allows you to monitor various vehicle parameters in real-time. This can help you identify intermittent issues and performance problems. Key parameters to monitor include:
- Engine RPM: Revolutions per minute of the engine.
- Coolant Temperature: Engine coolant temperature.
- Oxygen Sensor Readings: Voltage output of the oxygen sensors.
- Fuel Trims: Short-term and long-term fuel trim values.
- Mass Air Flow (MAF): Airflow into the engine.
6.2. Actuator Testing
Actuator testing allows you to control various vehicle components using the diagnostic tool. This can help you verify the functionality of these components. Common actuator tests include:
- Fuel Injector Test: Activating and deactivating individual fuel injectors.
- Idle Air Control (IAC) Valve Test: Adjusting the IAC valve to control idle speed.
- EVAP Purge Solenoid Test: Activating and deactivating the EVAP purge solenoid.
6.3. Reading Freeze Frame Data
Freeze frame data captures the vehicle’s operating conditions when a DTC is triggered. This information can provide valuable clues about the cause of the problem. Key data points include:
- Engine Load: Percentage of maximum engine load.
- Vehicle Speed: Speed of the vehicle at the time of the DTC.
- Fuel Pressure: Fuel pressure in the fuel system.
- Timing Advance: Ignition timing advance.
6.4. Performing System Resets
Some diagnostic tools allow you to perform system resets, which can help resolve certain issues. Common system resets include:
- Throttle Position Sensor (TPS) Reset: Resetting the TPS after cleaning or replacement.
- Idle Learn Procedure: Relearning the idle settings after cleaning the throttle body.
- Transmission Adaptive Learning Reset: Resetting the transmission’s adaptive learning data.
7. Maintaining Your GX470 With OBD2 Diagnostics
Regular OBD2 diagnostics can help you maintain your GX470 and prevent costly repairs. By monitoring your vehicle’s performance and addressing issues early, you can extend its lifespan and ensure optimal performance. The team at MERCEDES-DIAGNOSTIC-TOOL.EDU.VN can help you establish a proactive maintenance routine.
7.1. Routine Checks
Perform routine OBD2 checks at least every three months to monitor your vehicle’s health. Look for any new or recurring DTCs and address them promptly.
7.2. Monitoring Fuel Efficiency
Use the OBD2 cable to monitor fuel efficiency parameters such as fuel trims and oxygen sensor readings. This can help you identify issues that may be affecting your vehicle’s fuel economy.
7.3. Detecting Emissions Issues
Regularly check for emissions-related DTCs such as P0420 (Catalyst System Efficiency Below Threshold) and P0441 (Evaporative Emission Control System Incorrect Purge Flow). Addressing these issues can help you pass emissions tests and reduce your vehicle’s environmental impact.
7.4. Verifying Repairs
After performing any repairs, use the OBD2 cable to verify that the issues have been resolved and no new DTCs have appeared. This ensures that the repairs were effective and that your vehicle is running properly.
7.5. Keeping Records
Maintain a record of all OBD2 diagnostic checks, DTCs, and repairs. This can help you track your vehicle’s maintenance history and identify any recurring issues.
8. Troubleshooting Common OBD2 Cable Issues
Even with high-quality cables, issues can arise. Here are some common problems and how to troubleshoot them. The experts at MERCEDES-DIAGNOSTIC-TOOL.EDU.VN can provide additional troubleshooting support and guidance.
8.1. Cable Not Connecting
If the OBD2 cable is not connecting to the vehicle, check the following:
- Cable Connection: Ensure the cable is securely plugged into the OBD2 port.
- Ignition Position: Make sure the ignition is in the “ON” position.
- Software Compatibility: Verify that the diagnostic software is compatible with the cable and vehicle.
- Driver Installation: Ensure that the necessary drivers are installed on your computer.
8.2. Data Transmission Errors
If you are experiencing data transmission errors, try the following:
- Check Cable Condition: Inspect the cable for any signs of damage or wear.
- Minimize Interference: Keep the cable away from sources of electromagnetic interference.
- Update Software: Ensure that the diagnostic software is up to date.
- Try a Different Cable: Test with a different OBD2 cable to rule out a faulty cable.
8.3. Software Not Recognizing Cable
If the diagnostic software is not recognizing the OBD2 cable, try the following:
- Reinstall Drivers: Reinstall the drivers for the OBD2 cable.
- Check COM Port Settings: Verify that the COM port settings in the software are correct.
- Update Software: Ensure that the diagnostic software is up to date.
- Contact Support: Contact the software vendor for technical support.
8.4. Vehicle Not Responding
If the vehicle is not responding to the diagnostic tool, check the following:
- ECU Power: Ensure that the vehicle’s ECU is receiving power.
- Fuse Check: Check the fuses related to the OBD2 port and ECU.
- Cable Compatibility: Verify that the OBD2 cable is compatible with the vehicle’s communication protocols.
9. The Future Of OBD2 Diagnostic Technology
OBD2 diagnostic technology continues to evolve, with new features and capabilities being introduced regularly. Staying informed about these advancements can help you get the most out of your diagnostic tools. MERCEDES-DIAGNOSTIC-TOOL.EDU.VN is committed to providing the latest information and resources on OBD2 technology.
9.1. Wireless Diagnostics
Wireless OBD2 adapters are becoming increasingly popular, offering the convenience of connecting to your vehicle without the need for a physical cable. These adapters typically use Bluetooth or Wi-Fi to communicate with your smartphone, tablet, or computer.
9.2. Cloud-Based Diagnostics
Cloud-based diagnostic platforms are emerging, allowing you to store and analyze diagnostic data in the cloud. This can provide valuable insights into your vehicle’s performance and maintenance needs.
9.3. Artificial Intelligence (AI) Integration
AI is being integrated into diagnostic tools to provide more accurate and insightful diagnostics. AI algorithms can analyze diagnostic data to identify potential issues and recommend repairs.
9.4. Enhanced Data Security
With the increasing use of wireless and cloud-based diagnostic tools, data security is becoming more important. New security measures are being implemented to protect your vehicle’s data from unauthorized access.
9.5. Integration With ADAS Systems
OBD2 diagnostic tools are being integrated with Advanced Driver Assistance Systems (ADAS) to provide comprehensive diagnostics and calibration. This allows you to diagnose and repair ADAS-related issues, such as malfunctioning sensors or calibration errors.
10. Expert Tips For Using OBD2 Diagnostic Cables
To maximize the effectiveness of your OBD2 diagnostic cable, consider these expert tips. These insights can help you perform more accurate and efficient diagnostics. The team at MERCEDES-DIAGNOSTIC-TOOL.EDU.VN is dedicated to sharing expert knowledge and best practices.
10.1. Keep Your Software Updated
Ensure that your diagnostic software is always up to date. Software updates often include new features, bug fixes, and support for new vehicle models.
10.2. Use High-Quality Cables
Invest in high-quality OBD2 cables from reputable manufacturers. High-quality cables are more durable and provide more reliable data transmission.
10.3. Learn Your Vehicle’s Systems
Familiarize yourself with the various systems in your GX470, such as the engine, transmission, and emissions control system. This will help you better understand diagnostic data and identify potential issues.
10.4. Document Your Findings
Keep detailed records of all diagnostic checks, DTCs, and repairs. This can help you track your vehicle’s maintenance history and identify any recurring issues.
10.5. Seek Professional Help When Needed
If you are unsure about a diagnostic procedure or repair, seek professional help from a qualified mechanic or diagnostic specialist. Attempting to perform complex repairs without the necessary knowledge and experience can damage your vehicle.
Selecting the right OBD2 diagnostic cable for your GX470 is essential for effective vehicle maintenance and diagnostics. By understanding the key features, compatibility requirements, and troubleshooting techniques, you can ensure that you are getting the most out of your diagnostic tools. Remember to always follow safety precautions and seek professional help when needed.
Are you ready to take control of your Mercedes-Benz diagnostics? Contact us at MERCEDES-DIAGNOSTIC-TOOL.EDU.VN today for expert advice on selecting the right diagnostic tools, unlocking hidden features, and performing essential repairs and maintenance. Reach out via WhatsApp at +1 (641) 206-8880 or visit our location at 789 Oak Avenue, Miami, FL 33101, United States. Let us help you keep your Mercedes-Benz running at its best.