OBD2 build harness ensures seamless communication between your Mercedes-Benz and diagnostic tools. At MERCEDES-DIAGNOSTIC-TOOL.EDU.VN, we provide expert guidance and resources to help you create a reliable OBD2 harness, ensuring accurate diagnostics and efficient troubleshooting for your vehicle. Explore advanced diagnostics, unlock hidden features, and customize your Mercedes-Benz with confidence.
Contents
- 1. What is an OBD2 Build Harness and Why Do I Need It for My Mercedes?
- 1.1. Understanding the Importance of a Properly Built OBD2 Harness
- 1.2. Key Components of an OBD2 Build Harness
- 1.3. Benefits of Building Your Own OBD2 Harness
- 2. What Are the Essential Tools and Parts to Help OBD2 Build Harness?
- 2.1. Essential Tools
- 2.2. Necessary Parts
- 2.3. Where to Source Parts
- 3. How to Identify the OBD2 Pinout for Your Mercedes-Benz Model to Help OBD2 Build Harness?
- 3.1. Standard OBD2 Pinout
- 3.2. Finding the Mercedes-Benz Specific Pinout
- 3.3. Common OBD2 Pins Used in Mercedes-Benz Harnesses
- 4. Step-by-Step Guide to Help OBD2 Build Harness
- 4.1. Planning and Preparation
- 4.2. Wiring the Connectors
- 4.3. Assembling the Harness
- 4.4. Final Touches
- 5. What Are the Safety Precautions When Working with OBD2 Harnesses?
- 5.1. Disconnect the Battery
- 5.2. Use Proper Tools
- 5.3. Avoid Working in Wet Conditions
- 5.4. Double-Check Your Connections
- 5.5. Use a Multimeter to Verify Connections
- 5.6. Wear Safety Glasses
- 6. Common Mistakes to Avoid to Help OBD2 Build Harness
- 6.1. Incorrect Pinout Information
- 6.2. Poorly Crimped or Soldered Connections
- 6.3. Using the Wrong Gauge Wire
- 6.4. Not Protecting the Wires
- 6.5. Skipping the Testing Phase
- 7. Advanced Tips and Techniques to Help OBD2 Build Harness
- 7.1. Using Shielded Wiring
- 7.2. Adding a Fuse
- 7.3. Using a Connector with a Strain Relief
- 7.4. Incorporating a Diagnostic LED
- 7.5. Documenting Your Work with a Wiring Diagram
- 8. How Can MERCEDES-DIAGNOSTIC-TOOL.EDU.VN Help You?
- 8.1. Comprehensive Guides and Tutorials
- 8.2. Expert Advice and Support
- 8.3. High-Quality Parts and Components
- 8.4. Custom Harness Building Services
- 8.5. Access to Advanced Diagnostic Tools and Software
- 9. What Are the Benefits of Using MERCEDES-DIAGNOSTIC-TOOL.EDU.VN for Your OBD2 Harness Needs?
- 10. Frequently Asked Questions (FAQ) to Help OBD2 Build Harness
- 10.1. What is the best tool for crimping OBD2 connector pins?
- 10.2. Can I use a generic OBD2 connector for my Mercedes-Benz?
- 10.3. What gauge wire should I use for my OBD2 harness?
- 10.4. How do I find the OBD2 pinout for my specific Mercedes-Benz model?
- 10.5. What should I do if I accidentally shorted a wire while building my OBD2 harness?
- 10.6. Can I use a pre-made OBD2 extension cable instead of building my own harness?
- 10.7. How do I test my OBD2 harness after building it?
- 10.8. What are the benefits of using shielded wiring in my OBD2 harness?
- 10.9. Where can I find high-quality parts and components for building my OBD2 harness?
- 10.10. Can MERCEDES-DIAGNOSTIC-TOOL.EDU.VN build a custom OBD2 harness for me?
1. What is an OBD2 Build Harness and Why Do I Need It for My Mercedes?
An OBD2 (On-Board Diagnostics II) build harness is a custom-made cable assembly that connects your Mercedes-Benz’s OBD2 port to a diagnostic tool or other electronic devices. The OBD2 port is a standardized interface found in all modern vehicles, including Mercedes-Benz models, that allows access to the vehicle’s computer systems for diagnostics, data logging, and programming.
1.1. Understanding the Importance of a Properly Built OBD2 Harness
A properly built OBD2 harness is crucial for several reasons:
- Accurate Data Transmission: Ensures reliable communication between the diagnostic tool and the vehicle’s electronic control units (ECUs).
- Safe Connection: Prevents damage to the vehicle’s electrical system or the diagnostic tool by providing a secure and correctly wired connection.
- Access to Advanced Features: Enables access to advanced diagnostic features, such as reading fault codes, monitoring live data, and performingmodule programming.
- Customization and Tuning: Allows for customization of vehicle parameters and performance tuning when used with appropriate software and tools.
1.2. Key Components of an OBD2 Build Harness
An OBD2 build harness typically consists of the following components:
- OBD2 Connector: A 16-pin connector that plugs into the vehicle’s OBD2 port.
- Connector for Diagnostic Tool/Device: A connector that matches the interface of the diagnostic tool or other device being used.
- Wiring: High-quality wires that connect the OBD2 connector to the diagnostic tool connector, ensuring proper signal transmission.
- Protective Sheathing: A protective layer around the wires to prevent damage and ensure durability.
1.3. Benefits of Building Your Own OBD2 Harness
Building your own OBD2 harness offers several advantages:
- Cost Savings: Can be more cost-effective than purchasing a pre-made harness, especially if you have some of the necessary components already.
- Customization: Allows you to create a harness that is specifically tailored to your needs and the devices you want to connect.
- Quality Control: Gives you control over the quality of the components and the construction of the harness.
- Learning Experience: Provides a valuable learning experience in automotive electronics and diagnostics.
2. What Are the Essential Tools and Parts to Help OBD2 Build Harness?
Before you begin building your OBD2 harness, gather the necessary tools and parts. Having the right equipment will make the process smoother and ensure a professional-quality result.
2.1. Essential Tools
- Wire Strippers/Cutters: For stripping the insulation from wires and cutting them to the desired length.
- Crimping Tool: For crimping the connector pins onto the wires, ensuring a secure and reliable connection. A Molex crimping tool is recommended for high-quality crimps.
- Soldering Iron and Solder: For soldering the wires to the connector pins, providing an even stronger and more durable connection.
- Heat Gun or Heat Shrink Tubing: For insulating the soldered connections and protecting them from corrosion and damage.
- Multimeter: For testing the continuity and voltage of the wires to ensure proper connections.
- Needle-Nose Pliers: For manipulating small parts and connectors.
- Helping Hands or Vise: To hold the connectors and wires in place while soldering or crimping.
2.2. Necessary Parts
- OBD2 Connector: A 16-pin female OBD2 connector. Ensure it is compatible with your Mercedes-Benz model.
- Connector for Diagnostic Tool/Device: A connector that matches the interface of your diagnostic tool or other device. This could be a DB9 connector, a USB connector, or another type of connector.
- Wiring: High-quality, shielded wires of the appropriate gauge (typically 22-16 AWG). Use different colors for each wire to help with identification.
- Connector Pins: Pins that fit into the OBD2 connector and the diagnostic tool connector. Ensure they are compatible with the wire gauge you are using.
- Rubber Seals: Seals that fit around the wires to protect the connections from moisture and corrosion.
- Heat Shrink Tubing: For insulating and protecting the soldered connections.
- Cable Sheathing or Loom: To protect the wires and give the harness a professional appearance.
2.3. Where to Source Parts
You can source the necessary parts from various online and local suppliers:
- Online Electronics Retailers: Websites like Amazon, eBay, and специализированные electronics stores offer a wide selection of OBD2 connectors, wiring, and other components.
- Automotive Parts Stores: Local auto parts stores may carry some of the necessary components, such as wiring, connectors, and heat shrink tubing.
- Specialized Connector Suppliers: Companies like Corsa-Technic (https://www.corsa-technic.com/) specialize in automotive connectors and wiring components.
3. How to Identify the OBD2 Pinout for Your Mercedes-Benz Model to Help OBD2 Build Harness?
The OBD2 pinout specifies the function of each of the 16 pins in the OBD2 connector. Identifying the correct pinout for your Mercedes-Benz model is essential to ensure proper connections and avoid damaging your vehicle’s electronics.
3.1. Standard OBD2 Pinout
While the OBD2 standard defines the function of several pins, some pins are manufacturer-specific. Here’s a table showing the standard OBD2 pinout:
| Pin | Function |
|---|---|
| 1 | Manufacturer Discretion |
| 2 | SAE J1850 Bus Positive |
| 3 | Manufacturer Discretion |
| 4 | Chassis Ground |
| 5 | Signal Ground |
| 6 | CAN High (J-2284) |
| 7 | ISO 9141-2 K Line |
| 8 | Manufacturer Discretion |
| 9 | Manufacturer Discretion |
| 10 | SAE J1850 Bus Negative |
| 11 | Manufacturer Discretion |
| 12 | Manufacturer Discretion |
| 13 | Manufacturer Discretion |
| 14 | CAN Low (J-2284) |
| 15 | ISO 9141-2 L Line |
| 16 | Battery Power |
3.2. Finding the Mercedes-Benz Specific Pinout
To determine the specific pinout for your Mercedes-Benz model, consult the following resources:
- Vehicle Repair Manual: The official repair manual for your Mercedes-Benz model will provide detailed information on the OBD2 pinout and wiring diagrams.
- Online Forums and Communities: Online forums and communities dedicated to Mercedes-Benz vehicles often have discussions and resources on OBD2 pinouts.
- Diagnostic Tool Documentation: The documentation for your diagnostic tool may include pinout information for various Mercedes-Benz models.
- MERCEDES-DIAGNOSTIC-TOOL.EDU.VN: Our website provides a comprehensive database of OBD2 pinouts for Mercedes-Benz models, along with expert guidance on harness construction.
3.3. Common OBD2 Pins Used in Mercedes-Benz Harnesses
In most Mercedes-Benz OBD2 harnesses, the following pins are commonly used:
- Pin 4: Chassis Ground
- Pin 5: Signal Ground
- Pin 6: CAN High (J-2284)
- Pin 14: CAN Low (J-2284)
- Pin 16: Battery Power
4. Step-by-Step Guide to Help OBD2 Build Harness
Follow these steps to build your own OBD2 harness for your Mercedes-Benz:
4.1. Planning and Preparation
- Determine Your Needs: Decide what you want to use the harness for (e.g., diagnostics, data logging, tuning) and identify the necessary connections.
- Gather Information: Find the OBD2 pinout for your specific Mercedes-Benz model and the pinout for the diagnostic tool or device you will be connecting.
- Prepare Your Workspace: Set up a clean, well-lit workspace with all the necessary tools and parts within easy reach.
4.2. Wiring the Connectors
-
Cut and Strip the Wires: Cut the wires to the desired length, allowing some extra length for flexibility. Use wire strippers to remove about 1/4 inch of insulation from each end of the wires.
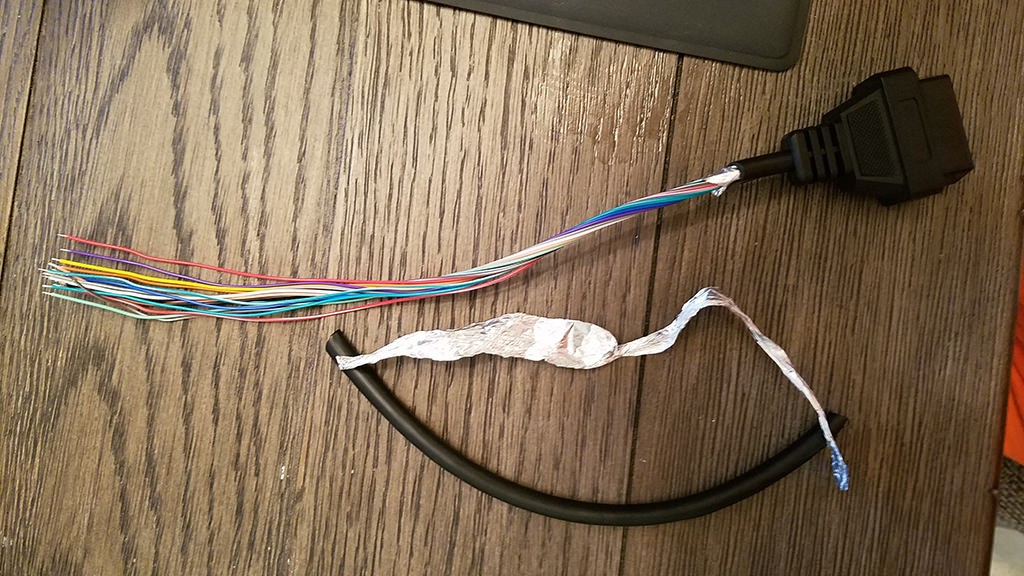 Stripped sheath and shielding
 -
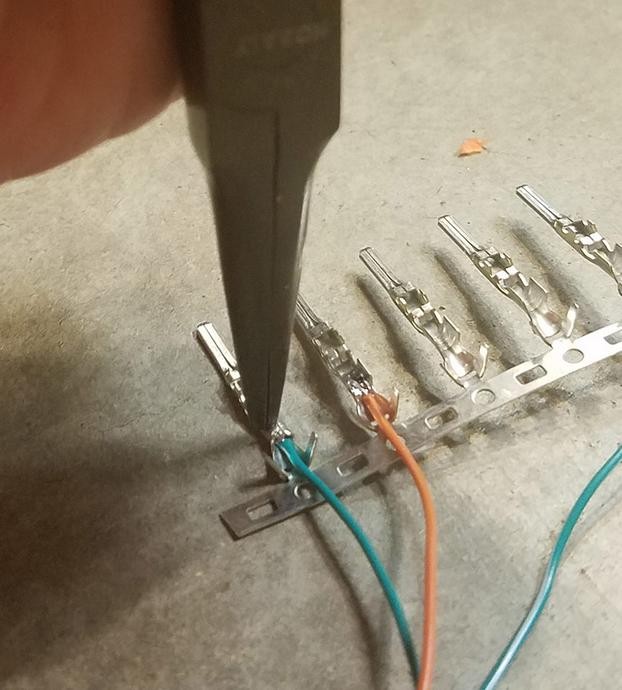
Attach the Connector Pins: Slide a rubber seal over each wire. Insert the exposed wire into the connector pin and use a crimping tool to crimp the pin securely onto the wire. If you prefer, you can solder the wire to the pin for a stronger connection.
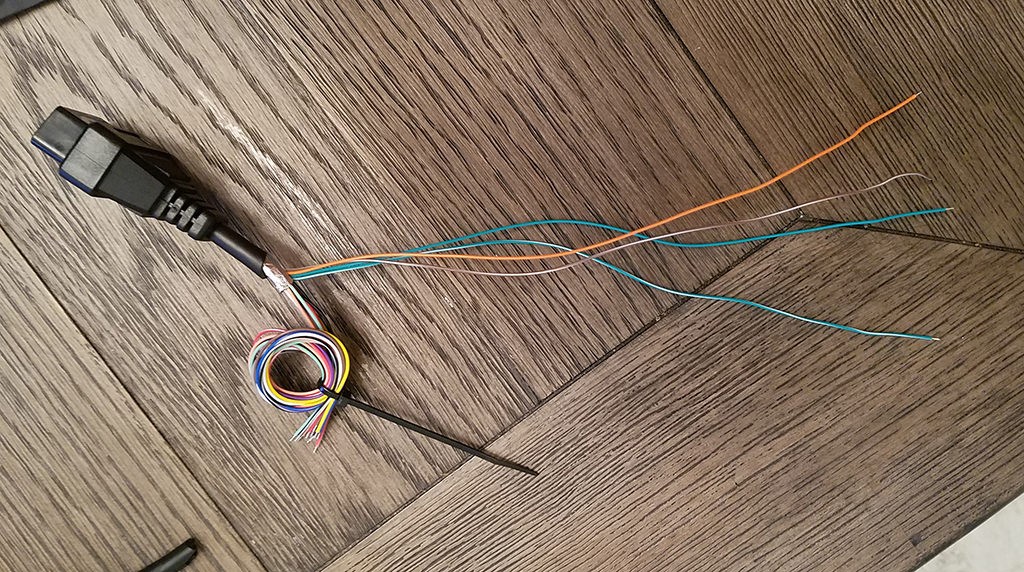 Wires Being Used
 -
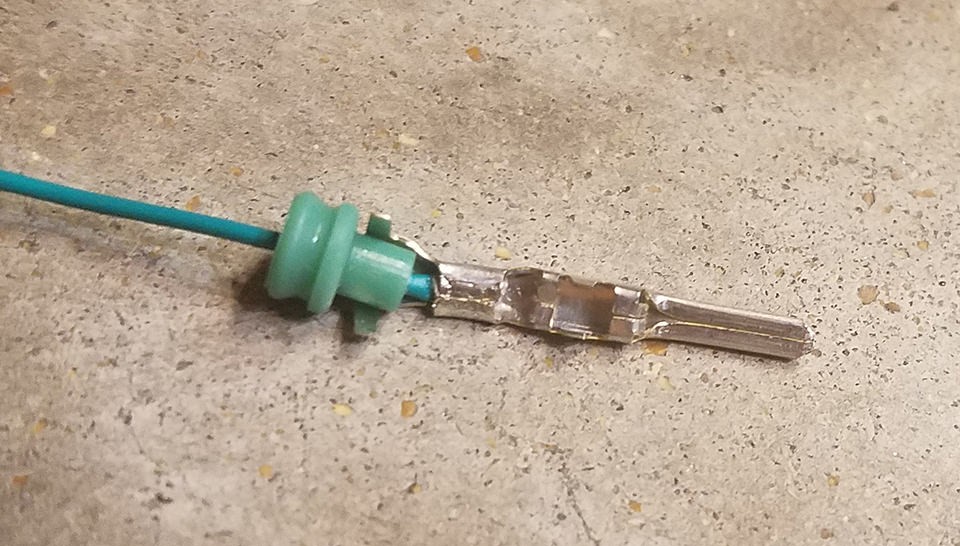
Insulate the Connections: Use heat shrink tubing to insulate the soldered or crimped connections. Slide a piece of heat shrink tubing over the connection and use a heat gun to shrink the tubing, creating a tight seal.
 Wiring is small compared to the pin connector
 -
Insert the Pins into the Connectors: Refer to the OBD2 pinout and the pinout for your diagnostic tool or device. Insert the connector pins into the appropriate slots in the OBD2 connector and the diagnostic tool connector. Ensure the pins lock securely into place.
 Fold Over the Seal
4.3. Assembling the Harness
-
Organize the Wires: Arrange the wires neatly and group them together using zip ties or cable sheathing.
 Crush The Prongs
 -
Protect the Harness: Cover the wires with cable sheathing or loom to protect them from damage and give the harness a professional appearance.
-
Test the Harness: Use a multimeter to test the continuity of each wire, ensuring that the correct pins are connected. Also, check for shorts between the wires.
4.4. Final Touches
- Label the Wires: Label each wire with its function (e.g., CAN High, CAN Low, Ground, Power) to make it easier to identify in the future.
- Document Your Work: Keep a record of the pinouts and wiring connections you used to build the harness. This will be helpful if you need to troubleshoot or modify the harness in the future.
5. What Are the Safety Precautions When Working with OBD2 Harnesses?
Working with automotive electrical systems can be dangerous if proper safety precautions are not followed. Keep these safety tips in mind when building and using OBD2 harnesses:
5.1. Disconnect the Battery
Before working on any electrical components of your Mercedes-Benz, disconnect the negative terminal of the battery. This will prevent accidental shorts and protect you from electric shock.
5.2. Use Proper Tools
Use high-quality tools that are in good condition. Damaged or poorly made tools can cause shorts, damage to the vehicle, or personal injury.
5.3. Avoid Working in Wet Conditions
Never work on electrical systems in wet or damp conditions. Water can conduct electricity and increase the risk of electric shock.
5.4. Double-Check Your Connections
Before connecting the harness to your Mercedes-Benz or diagnostic tool, double-check all your connections to ensure they are correct and secure. Incorrect connections can damage the vehicle’s electronics or the diagnostic tool.
5.5. Use a Multimeter to Verify Connections
Use a multimeter to verify the continuity and voltage of the wires before connecting the harness. This will help you identify any shorts or incorrect connections.
5.6. Wear Safety Glasses
Wear safety glasses to protect your eyes from flying debris when cutting or stripping wires.
6. Common Mistakes to Avoid to Help OBD2 Build Harness
Building an OBD2 harness can be a straightforward process, but it’s important to avoid common mistakes that can lead to problems.
6.1. Incorrect Pinout Information
Using the wrong pinout information is one of the most common mistakes. Always double-check the pinout for your specific Mercedes-Benz model and the diagnostic tool you are using.
6.2. Poorly Crimped or Soldered Connections
Poorly crimped or soldered connections can result in intermittent connections or complete failures. Use a high-quality crimping tool and ensure that the connections are secure and properly insulated.
6.3. Using the Wrong Gauge Wire
Using the wrong gauge wire can cause voltage drops or overheating. Use the appropriate gauge wire for the current requirements of the circuit.
6.4. Not Protecting the Wires
Failing to protect the wires with cable sheathing or loom can result in damage and shorts. Protect the wires to ensure the harness is durable and reliable.
6.5. Skipping the Testing Phase
Skipping the testing phase can result in undetected errors. Always use a multimeter to test the continuity and voltage of the wires before connecting the harness.
7. Advanced Tips and Techniques to Help OBD2 Build Harness
For those looking to take their OBD2 harness building skills to the next level, here are some advanced tips and techniques:
7.1. Using Shielded Wiring
Shielded wiring can help reduce electromagnetic interference (EMI) and ensure more reliable data transmission. Use shielded wiring for critical connections, such as CAN bus lines.
7.2. Adding a Fuse
Adding a fuse to the power wire can protect your Mercedes-Benz and diagnostic tool from overcurrent conditions. Choose a fuse with a rating that is appropriate for the circuit.
7.3. Using a Connector with a Strain Relief
A connector with a strain relief can help prevent the wires from being pulled out of the connector. This is especially important for harnesses that will be subjected to frequent use or movement.
7.4. Incorporating a Diagnostic LED
Adding an LED to the harness can provide visual feedback on the status of the connection. For example, you can use an LED to indicate when power is being supplied to the diagnostic tool.
7.5. Documenting Your Work with a Wiring Diagram
Creating a detailed wiring diagram can be helpful for troubleshooting and future modifications. Use a software tool or create a hand-drawn diagram to document all the connections in your harness.
8. How Can MERCEDES-DIAGNOSTIC-TOOL.EDU.VN Help You?
At MERCEDES-DIAGNOSTIC-TOOL.EDU.VN, we are dedicated to providing you with the resources and expertise you need to successfully build and use OBD2 harnesses for your Mercedes-Benz.
8.1. Comprehensive Guides and Tutorials
Our website features a comprehensive collection of guides and tutorials on OBD2 harness construction, including detailed instructions, wiring diagrams, and troubleshooting tips.
8.2. Expert Advice and Support
Our team of experienced technicians is available to provide expert advice and support. Whether you have questions about pinouts, wiring, or troubleshooting, we are here to help.
8.3. High-Quality Parts and Components
We offer a wide selection of high-quality parts and components for OBD2 harness construction, including connectors, wiring, and tools.
8.4. Custom Harness Building Services
If you prefer not to build your own harness, we offer custom harness building services. Our technicians can create a harness that is specifically tailored to your needs.
8.5. Access to Advanced Diagnostic Tools and Software
We provide access to advanced diagnostic tools and software that can help you diagnose and troubleshoot problems with your Mercedes-Benz.
9. What Are the Benefits of Using MERCEDES-DIAGNOSTIC-TOOL.EDU.VN for Your OBD2 Harness Needs?
Choosing MERCEDES-DIAGNOSTIC-TOOL.EDU.VN for your OBD2 harness needs offers several key benefits:
- Reliable Information: Our guides and tutorials are based on extensive research and real-world experience, ensuring you receive accurate and reliable information.
- Expert Support: Our team of experienced technicians is available to provide expert advice and support, helping you overcome any challenges you may encounter.
- Quality Products: We offer high-quality parts and components that are designed to meet the demands of automotive applications.
- Custom Solutions: We can provide custom harness building services to meet your specific needs.
- Comprehensive Resources: Our website offers a wealth of information on Mercedes-Benz diagnostics, programming, and customization.
10. Frequently Asked Questions (FAQ) to Help OBD2 Build Harness
Here are some frequently asked questions about building OBD2 harnesses for Mercedes-Benz vehicles:
10.1. What is the best tool for crimping OBD2 connector pins?
A Molex crimping tool is generally considered the best tool for crimping OBD2 connector pins. It provides a precise and reliable crimp that ensures a secure connection.
10.2. Can I use a generic OBD2 connector for my Mercedes-Benz?
While you can use a generic OBD2 connector, it’s important to ensure that it is compatible with your Mercedes-Benz model. Check the pinout and connector type to ensure a proper fit.
10.3. What gauge wire should I use for my OBD2 harness?
A wire gauge of 22-16 AWG is typically suitable for most OBD2 harness applications. Choose a wire gauge that is appropriate for the current requirements of the circuit.
10.4. How do I find the OBD2 pinout for my specific Mercedes-Benz model?
Consult the vehicle repair manual, online forums, or the documentation for your diagnostic tool. MERCEDES-DIAGNOSTIC-TOOL.EDU.VN also provides a database of OBD2 pinouts for Mercedes-Benz models.
10.5. What should I do if I accidentally shorted a wire while building my OBD2 harness?
Disconnect the battery immediately and inspect the wiring for any damage. Repair or replace any damaged wires before reconnecting the battery and testing the harness.
10.6. Can I use a pre-made OBD2 extension cable instead of building my own harness?
Yes, you can use a pre-made OBD2 extension cable, but ensure it is of high quality and compatible with your Mercedes-Benz model. Building your own harness allows for greater customization and quality control.
10.7. How do I test my OBD2 harness after building it?
Use a multimeter to test the continuity of each wire, ensuring that the correct pins are connected. Also, check for shorts between the wires.
10.8. What are the benefits of using shielded wiring in my OBD2 harness?
Shielded wiring can help reduce electromagnetic interference (EMI) and ensure more reliable data transmission.
10.9. Where can I find high-quality parts and components for building my OBD2 harness?
You can source parts from online electronics retailers, automotive parts stores, or specialized connector suppliers like Corsa-Technic.
10.10. Can MERCEDES-DIAGNOSTIC-TOOL.EDU.VN build a custom OBD2 harness for me?
Yes, we offer custom harness building services. Our technicians can create a harness that is specifically tailored to your needs. Contact us for more information.
Building your own OBD2 harness for your Mercedes-Benz can be a rewarding and cost-effective way to access advanced diagnostic features and customize your vehicle. By following the steps outlined in this guide and utilizing the resources available at MERCEDES-DIAGNOSTIC-TOOL.EDU.VN, you can create a reliable and professional-quality harness that meets your specific needs. Enhance your diagnostic capabilities, unlock hidden features, and customize your Mercedes-Benz with confidence.
Ready to take control of your Mercedes-Benz diagnostics? Contact MERCEDES-DIAGNOSTIC-TOOL.EDU.VN today for expert guidance, high-quality parts, and custom harness building services. Reach us at 789 Oak Avenue, Miami, FL 33101, United States, or connect via Whatsapp at +1 (641) 206-8880. Visit our website at MERCEDES-DIAGNOSTIC-TOOL.EDU.VN for more information.