Honda Obd2 O2 Sensor Wiring is crucial for maintaining optimal engine performance and fuel efficiency. At MERCEDES-DIAGNOSTIC-TOOL.EDU.VN, we provide comprehensive guidance to diagnose and resolve O2 sensor wiring issues, ensuring your Honda runs smoothly. Explore our expert advice and services for optimal O2 sensor performance, emission control, and Honda diagnostic tools, along with detailed insights into oxygen sensor functionality and ECU integration.
Contents
- 1. What is the Honda OBD2 O2 Sensor Wiring and Why is it Important?
- 2. What are the Common Symptoms of O2 Sensor Wiring Problems in Hondas?
- 3. How to Diagnose Honda OBD2 O2 Sensor Wiring Issues
- 4. What Tools are Needed to Inspect Honda O2 Sensor Wiring?
- 5. How to Locate the O2 Sensor in Your Honda
- 6. How to Test the O2 Sensor Wiring for Continuity
- 7. How to Identify Different Types of O2 Sensors Used in Honda Vehicles
- 8. What Does the O2 Sensor Voltage Range Indicate?
- 9. How to Interpret Honda OBD2 Codes Related to O2 Sensor Wiring
- 10. What are the Common Mistakes to Avoid When Working on Honda O2 Sensor Wiring?
- 11. How to Replace a Damaged O2 Sensor Connector in Honda
- 12. What is the Role of the ECU in O2 Sensor Functionality?
- 13. How to Perform a Visual Inspection of Honda O2 Sensor Wiring
- 14. What are the Best Practices for Maintaining Honda O2 Sensor Wiring?
- 15. What Aftermarket O2 Sensor Options are Available for Honda Vehicles?
- 16. How to Troubleshoot O2 Sensor Heater Circuit Problems in Hondas
- 17. What is the Difference Between Upstream and Downstream O2 Sensors?
Table of Contents
- What is the Honda OBD2 O2 Sensor Wiring and Why is it Important?
- What are the Common Symptoms of O2 Sensor Wiring Problems in Hondas?
- How to Diagnose Honda OBD2 O2 Sensor Wiring Issues
- What Tools are Needed to Inspect Honda O2 Sensor Wiring?
- How to Locate the O2 Sensor in Your Honda
- How to Test the O2 Sensor Wiring for Continuity
- How to Identify Different Types of O2 Sensors Used in Honda Vehicles
- What Does the O2 Sensor Voltage Range Indicate?
- How to Interpret Honda OBD2 Codes Related to O2 Sensor Wiring
- What are the Common Mistakes to Avoid When Working on Honda O2 Sensor Wiring?
- How to Replace a Damaged O2 Sensor Connector in Honda
- What is the Role of the ECU in O2 Sensor Functionality?
- How to Perform a Visual Inspection of Honda O2 Sensor Wiring
- What are the Best Practices for Maintaining Honda O2 Sensor Wiring?
- What Aftermarket O2 Sensor Options are Available for Honda Vehicles?
- How to Troubleshoot O2 Sensor Heater Circuit Problems in Hondas
- What is the Difference Between Upstream and Downstream O2 Sensors?
- How to Use a Multimeter to Test Honda O2 Sensor Wiring
- What are the Potential Causes of O2 Sensor Failure in Honda?
- How Does O2 Sensor Wiring Affect Fuel Efficiency and Emissions?
- What is the Importance of Proper Grounding for Honda O2 Sensors?
- How to Protect Honda O2 Sensor Wiring from Environmental Damage
- What are the Steps to Reset the ECU After Replacing an O2 Sensor?
- How to Upgrade Your Honda O2 Sensors for Better Performance
- How to Diagnose Intermittent O2 Sensor Wiring Problems in Honda
- What Special Considerations Apply to Honda Hybrid O2 Sensor Wiring?
- How to Use Live Data to Monitor Honda O2 Sensor Performance
- How to Find Reliable Honda O2 Sensor Wiring Diagrams
- What are the Legal Requirements for O2 Sensors in Different States?
- How to Properly Dispose of Old O2 Sensors from Honda Vehicles
- What are the Long-Term Effects of Ignoring O2 Sensor Wiring Problems?
- What are the Common Brands of O2 Sensors Recommended for Honda?
- How to Ensure Proper O2 Sensor Compatibility with Your Honda Model
- How to Use an Oscilloscope to Diagnose Honda O2 Sensor Wiring Issues
- What Are Some Advanced Diagnostic Techniques for Honda O2 Sensors?
- Frequently Asked Questions (FAQs) About Honda OBD2 O2 Sensor Wiring
1. What is the Honda OBD2 O2 Sensor Wiring and Why is it Important?
Honda OBD2 O2 sensor wiring refers to the electrical connections that link the oxygen sensors to the vehicle’s Engine Control Unit (ECU). These connections transmit vital data about the exhaust gas composition. Proper wiring ensures accurate readings, leading to optimal air-fuel mixture, reduced emissions, and efficient engine performance. Faulty Honda oxygen sensor circuits can cause inaccurate readings, potentially damaging your vehicle’s catalytic converter and reducing fuel economy.
The O2 sensor’s functionality is paramount for several reasons:
- Emissions Control: O2 sensors help maintain the correct air-fuel ratio, minimizing harmful emissions such as nitrogen oxides (NOx), carbon monoxide (CO), and hydrocarbons (HC).
- Fuel Efficiency: Accurate O2 sensor readings enable the ECU to adjust the fuel mixture, maximizing fuel economy.
- Engine Performance: Proper air-fuel balance ensures smooth engine operation and prevents issues like stalling, misfires, and rough idling.
According to a study by the EPA, faulty O2 sensors can decrease fuel economy by as much as 40% and significantly increase emissions. The Honda oxygen sensor, therefore, is a crucial element in modern automotive engineering.
2. What are the Common Symptoms of O2 Sensor Wiring Problems in Hondas?
Several symptoms can indicate problems with the Honda OBD2 O2 sensor wiring. Recognizing these signs early can prevent further damage and costly repairs. Common symptoms include:
- Check Engine Light: This is the most common indicator. The light may illuminate due to various diagnostic trouble codes (DTCs) related to O2 sensor malfunctions.
- Poor Fuel Economy: Inaccurate O2 sensor readings can cause the engine to run rich (too much fuel) or lean (not enough fuel), reducing fuel efficiency.
- Rough Idling: An improper air-fuel mixture can lead to unstable idling, causing the engine to vibrate or stall.
- Failed Emissions Test: If the O2 sensor is not functioning correctly, the vehicle may fail an emissions test due to excessive pollutants.
- Hesitation or Stumbling: The engine may hesitate or stumble during acceleration due to an incorrect air-fuel ratio.
- Black Smoke from Exhaust: A rich-running engine caused by faulty O2 sensor wiring can produce black smoke from the exhaust pipe.
- Reduced Engine Power: The engine may lack power and responsiveness due to an imbalanced air-fuel mixture.
According to the National Institute for Automotive Service Excellence (ASE), O2 sensor issues are a primary cause of driveability problems and emission failures. If you notice any of these symptoms, it’s essential to inspect the O2 sensor and its wiring promptly.
3. How to Diagnose Honda OBD2 O2 Sensor Wiring Issues
Diagnosing Honda OBD2 O2 sensor wiring issues requires a systematic approach to identify the root cause of the problem. Here are the steps to follow:
- Read Diagnostic Trouble Codes (DTCs):
- Use an OBD2 scanner to retrieve any stored DTCs. Common codes related to O2 sensor wiring include P0130, P0131, P0132, P0133, P0135, P0136, P0137, P0138, P0139, P0141, and similar codes for other sensors.
- Visual Inspection:
- Check the O2 sensor wiring and connectors for any signs of damage, such as cuts, breaks, corrosion, or loose connections.
- Continuity Test:
- Use a multimeter to test the continuity of the O2 sensor wiring. This test verifies that the wires are intact and conducting electricity properly.
- Voltage Test:
- Measure the voltage at the O2 sensor connector to ensure it is within the specified range. Consult the Honda service manual for the correct voltage values.
- Resistance Test:
- Check the resistance of the O2 sensor heater circuit to ensure it is within the specified range. This test verifies the integrity of the heater element.
- Live Data Monitoring:
- Use an OBD2 scanner to monitor the O2 sensor readings in real-time. This allows you to observe how the sensor responds to changes in engine conditions.
- Component Testing:
- If the wiring appears to be in good condition, test the O2 sensor itself to rule out any internal failures.
According to a study by Bosch, approximately 90% of O2 sensor failures are related to wiring and connector issues. Therefore, thoroughly inspecting the wiring is crucial for accurate diagnosis.
4. What Tools are Needed to Inspect Honda O2 Sensor Wiring?
Inspecting Honda O2 sensor wiring requires specific tools to ensure accurate diagnosis and safe handling of electrical components. Essential tools include:
- OBD2 Scanner:
- Used to retrieve diagnostic trouble codes (DTCs) and monitor live sensor data.
- Multimeter:
- Used to measure voltage, resistance, and continuity in the wiring.
- Wiring Diagram:
- Provides a detailed layout of the O2 sensor wiring, helping you identify the correct wires and their connections.
- Wire Strippers:
- Used to safely strip insulation from wires when making repairs or modifications.
- Crimping Tool:
- Used to securely crimp connectors onto wires, ensuring a reliable electrical connection.
- Electrical Tape:
- Used to insulate and protect wiring repairs from moisture and corrosion.
- Terminal Release Tool:
- Used to safely remove terminals from connectors without damaging them.
- Flashlight or Work Light:
- Provides adequate lighting for inspecting the wiring in hard-to-reach areas.
- Safety Glasses and Gloves:
- Protect your eyes and hands from potential hazards during the inspection.
Having these tools readily available will streamline the diagnostic process and help you identify and resolve O2 sensor wiring issues efficiently. You can find these diagnostic tools and services at MERCEDES-DIAGNOSTIC-TOOL.EDU.VN, or contact us via WhatsApp at +1 (641) 206-8880.
5. How to Locate the O2 Sensor in Your Honda
Locating the O2 sensor in your Honda is the first step in diagnosing any wiring issues. Hondas typically have multiple O2 sensors: an upstream sensor before the catalytic converter and a downstream sensor after it. Here’s how to find them:
- Consult the Vehicle’s Service Manual:
- The service manual provides detailed diagrams and locations of the O2 sensors specific to your Honda model.
- Locate the Catalytic Converter:
- The O2 sensors are usually located near the catalytic converter in the exhaust system. The upstream sensor is closer to the engine, while the downstream sensor is further away.
- Follow the Exhaust Manifold:
- The upstream O2 sensor is typically screwed into the exhaust manifold or the exhaust pipe directly before the catalytic converter.
- Check Behind the Catalytic Converter:
- The downstream O2 sensor is located after the catalytic converter, usually screwed into the exhaust pipe.
- Identify the Sensor Connectors:
- Look for electrical connectors attached to the sensors. These connectors are usually clipped to the body or frame of the vehicle.
- Use an OBD2 Scanner:
- An OBD2 scanner can help identify the location of the faulty sensor by providing specific error codes. For example, P0131 indicates a problem with the upstream O2 sensor on Bank 1.
Knowing the precise location of each O2 sensor will simplify the inspection and testing process, saving you time and effort.
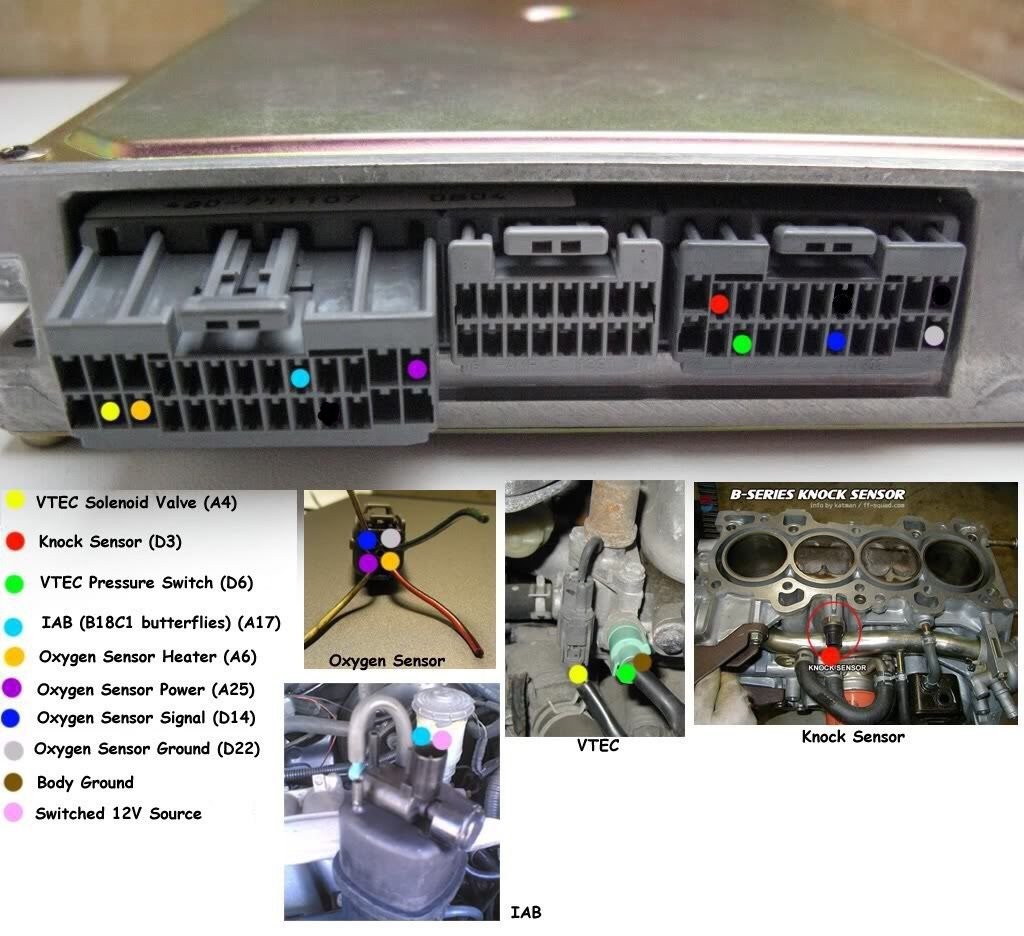 Honda O2 Sensor Location
6. How to Test the O2 Sensor Wiring for Continuity
Testing the O2 sensor wiring for continuity is essential to ensure that the wires are intact and can conduct electricity properly. Here’s a step-by-step guide:
- Gather Your Tools:
- You will need a multimeter, wiring diagram for your specific Honda model, and safety glasses.
- Disconnect the Battery:
- For safety, disconnect the negative terminal of the battery before starting any electrical tests.
- Locate the O2 Sensor Connector:
- Find the O2 sensor connector you want to test. It’s usually clipped to the vehicle’s frame near the sensor.
- Disconnect the Connector:
- Carefully disconnect the O2 sensor connector from the sensor.
- Set the Multimeter to Continuity Mode:
- Turn on the multimeter and set it to the continuity testing mode. This mode is usually indicated by a diode symbol or a sound wave symbol.
- Identify the Wires to Test:
- Refer to the wiring diagram to identify the specific wires you want to test for continuity. These wires typically include the signal wire, ground wire, and heater circuit wires.
- Test Each Wire:
- Place one probe of the multimeter on one end of the wire and the other probe on the corresponding pin in the ECU connector.
- If the multimeter beeps or shows a value close to zero ohms, the wire has continuity and is intact.
- If the multimeter shows an open circuit (no continuity), the wire is broken or damaged and needs to be repaired or replaced.
- Repeat for All Wires:
- Repeat the continuity test for all the wires in the O2 sensor connector to ensure each wire is functioning correctly.
- Inspect the Connectors:
- Check the connector pins for corrosion or damage. Clean or replace the connector if necessary.
- Reconnect and Retest:
- Once you have tested all the wires, reconnect the O2 sensor connector and retest to ensure the connections are secure.
- Reconnect the Battery:
- After completing the tests, reconnect the negative terminal of the battery.
By following these steps, you can effectively test the continuity of the O2 sensor wiring and identify any potential issues.
7. How to Identify Different Types of O2 Sensors Used in Honda Vehicles
Honda vehicles use various types of O2 sensors, each designed to meet specific emission control requirements. Identifying the correct type is crucial for accurate diagnosis and replacement. Here are the common types:
- Zirconia O2 Sensors:
- These are the most common type, used in older Honda models. They generate their own voltage based on the difference in oxygen levels between the exhaust gas and the ambient air.
- Titania O2 Sensors:
- Less common than zirconia sensors, titania sensors change their resistance based on oxygen levels. They require a reference voltage from the ECU.
- Wideband O2 Sensors (Air-Fuel Ratio Sensors):
- Used in newer Honda models, wideband sensors provide more precise air-fuel ratio measurements over a wider range. They allow the ECU to make finer adjustments for optimal performance and emissions.
- Heated O2 Sensors:
- These sensors have a built-in heater element that warms the sensor to its operating temperature quickly. This ensures accurate readings even during cold starts and idling.
- Unheated O2 Sensors:
- Used in older vehicles, these sensors rely solely on exhaust gas temperature to reach their operating temperature.
- Two-Wire O2 Sensors:
- Typically unheated, with one wire for the signal and one for ground.
- Three-Wire O2 Sensors:
- Usually heated, with two wires for the heater circuit and one for the signal.
- Four-Wire O2 Sensors:
- Also heated, with two wires for the heater circuit, one for the signal, and one for ground.
- Five-Wire O2 Sensors:
- Typically wideband sensors with multiple signal wires for precise air-fuel ratio measurements.
Refer to your Honda’s service manual to determine the specific type of O2 sensor used in your vehicle. Using the wrong type of sensor can lead to inaccurate readings and performance issues.
8. What Does the O2 Sensor Voltage Range Indicate?
The voltage range of the O2 sensor provides valuable information about the air-fuel mixture and the sensor’s performance. Here’s what different voltage levels typically indicate:
- Zirconia O2 Sensors:
- Low Voltage (0.1V – 0.3V): Indicates a lean air-fuel mixture (too much oxygen, not enough fuel).
- High Voltage (0.7V – 0.9V): Indicates a rich air-fuel mixture (too much fuel, not enough oxygen).
- Fluctuating Voltage (between 0.1V and 0.9V): Indicates the sensor is functioning correctly and responding to changes in the air-fuel mixture.
- Wideband O2 Sensors:
- Wideband sensors output a current signal rather than a voltage. The current signal varies based on the air-fuel ratio. An air-fuel ratio of 14.7:1 (stoichiometric) typically corresponds to a specific current value, which can be monitored using a scan tool.
- Heated O2 Sensors:
- Heated sensors should reach their operating temperature quickly after the engine starts. A multimeter can test the heater circuit voltage and resistance to ensure it’s functioning correctly.
- Titania O2 Sensors:
- Unlike zirconia sensors, titania sensors vary in resistance rather than voltage. High resistance indicates a lean mixture, while low resistance indicates a rich mixture.
Monitoring the O2 sensor voltage range helps diagnose various issues, such as:
- Lean Conditions: Caused by vacuum leaks, faulty injectors, or low fuel pressure.
- Rich Conditions: Caused by faulty injectors, high fuel pressure, or a malfunctioning mass airflow (MAF) sensor.
- Slow Response: Indicates a degraded sensor that needs replacement.
- Stuck Signal: Indicates a faulty sensor or wiring issue.
Consult your Honda’s service manual for the specific voltage ranges and diagnostic procedures relevant to your vehicle’s O2 sensors.
9. How to Interpret Honda OBD2 Codes Related to O2 Sensor Wiring
Interpreting Honda OBD2 codes related to O2 sensor wiring is essential for accurate diagnosis and repair. These codes provide specific information about the nature and location of the problem. Here are some common codes and their interpretations:
- P0130: O2 Sensor Circuit Malfunction (Bank 1, Sensor 1)
- Indicates a general problem with the O2 sensor circuit on Bank 1, Sensor 1 (upstream sensor).
- Possible causes: Faulty sensor, wiring issues, or ECU problem.
- P0131: O2 Sensor Circuit Low Voltage (Bank 1, Sensor 1)
- Indicates the O2 sensor voltage is too low, suggesting a lean condition or a faulty sensor.
- Possible causes: Vacuum leak, low fuel pressure, or faulty sensor.
- P0132: O2 Sensor Circuit High Voltage (Bank 1, Sensor 1)
- Indicates the O2 sensor voltage is too high, suggesting a rich condition or a faulty sensor.
- Possible causes: Faulty injectors, high fuel pressure, or faulty sensor.
- P0133: O2 Sensor Circuit Slow Response (Bank 1, Sensor 1)
- Indicates the O2 sensor is responding slowly to changes in the air-fuel mixture.
- Possible causes: Degraded sensor or exhaust leak.
- P0135: O2 Sensor Heater Circuit Malfunction (Bank 1, Sensor 1)
- Indicates a problem with the O2 sensor heater circuit.
- Possible causes: Faulty heater element, wiring issues, or ECU problem.
- P0136: O2 Sensor Circuit Malfunction (Bank 1, Sensor 2)
- Indicates a general problem with the O2 sensor circuit on Bank 1, Sensor 2 (downstream sensor).
- Possible causes: Faulty sensor, wiring issues, or exhaust leak.
- P0137: O2 Sensor Circuit Low Voltage (Bank 1, Sensor 2)
- Indicates the O2 sensor voltage is too low, suggesting a lean condition or a faulty sensor.
- Possible causes: Exhaust leak, faulty sensor, or wiring issues.
- P0138: O2 Sensor Circuit High Voltage (Bank 1, Sensor 2)
- Indicates the O2 sensor voltage is too high, suggesting a rich condition or a faulty sensor.
- Possible causes: Faulty sensor, wiring issues, or ECU problem.
- P0139: O2 Sensor Circuit Slow Response (Bank 1, Sensor 2)
- Indicates the O2 sensor is responding slowly to changes in the exhaust gas composition.
- Possible causes: Degraded sensor or exhaust leak.
- P0141: O2 Sensor Heater Circuit Malfunction (Bank 1, Sensor 2)
- Indicates a problem with the O2 sensor heater circuit.
- Possible causes: Faulty heater element, wiring issues, or ECU problem.
When diagnosing O2 sensor codes, it’s essential to consider other related symptoms and perform thorough testing to pinpoint the exact cause of the problem.
10. What are the Common Mistakes to Avoid When Working on Honda O2 Sensor Wiring?
Working on Honda O2 sensor wiring can be challenging, and avoiding common mistakes is crucial for ensuring a successful repair. Here are some pitfalls to watch out for:
- Incorrect Diagnosis:
- Failing to properly diagnose the problem before replacing the O2 sensor. Always read DTCs, inspect wiring, and test the sensor before making any replacements.
- Using the Wrong O2 Sensor:
- Installing an incorrect O2 sensor type for your Honda model. Always refer to the service manual to ensure you are using the correct sensor.
- Damaging the Wiring:
- Pulling or yanking on the wiring can cause damage. Always handle the wiring carefully and use appropriate tools for disconnecting connectors.
- Ignoring Wiring Issues:
- Replacing the O2 sensor without addressing underlying wiring problems. Faulty wiring can quickly damage the new sensor.
- Over-Tightening the Sensor:
- Over-tightening the O2 sensor during installation can damage the threads in the exhaust manifold or pipe. Use a torque wrench to tighten the sensor to the specified torque.
- Forgetting to Apply Anti-Seize Compound:
- Failing to apply anti-seize compound to the O2 sensor threads can make it difficult to remove the sensor in the future.
- Neglecting Safety Precautions:
- Working on the electrical system without disconnecting the battery can lead to electrical shock or damage to the vehicle’s electronics.
- Improper Wiring Repairs:
- Using improper wiring techniques or materials can result in unreliable connections and future problems. Always use high-quality wiring and connectors and follow proper crimping and soldering procedures.
- Skipping ECU Reset:
- Failing to reset the ECU after replacing the O2 sensor. Resetting the ECU allows it to learn the new sensor’s characteristics and optimize engine performance.
- Ignoring Grounding Issues:
- Failing to ensure proper grounding for the O2 sensor. A poor ground connection can cause inaccurate readings and performance problems.
By avoiding these common mistakes, you can ensure a successful O2 sensor repair and maintain your Honda’s performance and fuel efficiency.
11. How to Replace a Damaged O2 Sensor Connector in Honda
Replacing a damaged O2 sensor connector in your Honda can restore proper communication between the sensor and the ECU. Here’s a step-by-step guide:
- Gather Your Tools and Supplies:
- You will need a new O2 sensor connector, wire strippers, crimping tool, electrical tape, heat shrink tubing, a heat gun, and safety glasses.
- Disconnect the Battery:
- Disconnect the negative terminal of the battery to prevent electrical shock.
- Locate the Damaged Connector:
- Find the damaged O2 sensor connector. It’s usually clipped to the vehicle’s frame near the sensor.
- Cut the Wires:
- Use wire strippers to carefully cut the wires leading to the damaged connector, leaving enough length to work with.
- Strip the Wire Ends:
- Strip about 1/2 inch of insulation from the ends of the wires.
- Prepare the New Connector:
- If the new connector comes with pre-stripped wires, skip this step. Otherwise, strip the wires on the new connector.
- Connect the Wires:
- Match the wires from the vehicle harness to the corresponding wires on the new connector. Refer to the wiring diagram for your specific Honda model to ensure correct connections.
- Crimp the Connections:
- Use a crimping tool to securely crimp the wires together. Ensure the connections are tight and reliable.
- Insulate the Connections:
- Slide heat shrink tubing over the crimped connections and use a heat gun to shrink the tubing, providing insulation and protection. Alternatively, you can use electrical tape to wrap the connections.
- Secure the Connector:
- Plug the new connector into the O2 sensor and secure it in place.
- Reconnect the Battery:
- Reconnect the negative terminal of the battery.
- Test the Connection:
- Start the engine and use an OBD2 scanner to check for any O2 sensor-related error codes. Monitor the O2 sensor readings to ensure they are within the normal range.
By following these steps, you can effectively replace a damaged O2 sensor connector and restore proper O2 sensor functionality.
12. What is the Role of the ECU in O2 Sensor Functionality?
The Engine Control Unit (ECU) plays a central role in O2 sensor functionality. It receives signals from the O2 sensors and uses this information to adjust the air-fuel mixture, ignition timing, and other engine parameters. Here’s a breakdown of the ECU’s role:
- Receiving O2 Sensor Signals:
- The ECU receives voltage signals from the O2 sensors, which indicate the oxygen content in the exhaust gas.
- Adjusting Air-Fuel Mixture:
- Based on the O2 sensor readings, the ECU adjusts the amount of fuel injected into the engine. If the O2 sensor indicates a lean condition (too much oxygen), the ECU increases fuel injection. If the O2 sensor indicates a rich condition (not enough oxygen), the ECU reduces fuel injection.
- Monitoring Catalytic Converter Efficiency:
- The ECU uses the downstream O2 sensor to monitor the efficiency of the catalytic converter. By comparing the signals from the upstream and downstream sensors, the ECU can determine if the catalytic converter is functioning correctly.
- Detecting Faults:
- The ECU monitors the O2 sensor circuits for any malfunctions, such as open circuits, short circuits, or out-of-range signals. When a fault is detected, the ECU stores a diagnostic trouble code (DTC) and illuminates the check engine light.
- Controlling Heater Circuit:
- For heated O2 sensors, the ECU controls the heater circuit, ensuring the sensor reaches its operating temperature quickly.
- Adapting to Sensor Changes:
- When an O2 sensor is replaced, the ECU needs to learn the new sensor’s characteristics. Resetting the ECU after replacing the O2 sensor allows it to adapt and optimize engine performance.
According to research by the Society of Automotive Engineers (SAE), the ECU’s ability to accurately interpret and respond to O2 sensor signals is critical for meeting emission standards and maintaining fuel efficiency.
13. How to Perform a Visual Inspection of Honda O2 Sensor Wiring
A visual inspection of Honda O2 sensor wiring is a crucial first step in diagnosing any O2 sensor-related issues. Here’s how to perform a thorough inspection:
- Gather Your Tools:
- You will need a flashlight or work light, safety glasses, and gloves.
- Locate the O2 Sensors and Wiring:
- Refer to your Honda’s service manual to locate the O2 sensors and their wiring harnesses.
- Check for Physical Damage:
- Inspect the wiring for any signs of physical damage, such as cuts, breaks, or abrasions. Look for areas where the wiring may have rubbed against sharp edges or hot components.
- Inspect the Connectors:
- Examine the O2 sensor connectors for any signs of damage, corrosion, or loose connections. Ensure the connectors are securely attached to the sensors.
- Look for Corrosion:
- Check the wiring and connectors for any signs of corrosion, which can impede electrical conductivity. Corrosion is often indicated by a green or white powdery residue.
- Check for Melted or Burned Wires:
- Inspect the wiring for any signs of melting or burning, which can indicate a short circuit or overheating.
- Examine the Wire Routing:
- Ensure the wiring is properly routed and secured, and that it is not in contact with hot exhaust components or moving parts.
- Check the Ground Connection:
- Ensure the O2 sensor ground wire is securely connected to the vehicle’s chassis or engine block. A poor ground connection can cause inaccurate sensor readings.
- Document Your Findings:
- Make notes of any damage or issues you find during the visual inspection. This information will be helpful when troubleshooting the problem.
A thorough visual inspection can often reveal obvious wiring problems that can be easily repaired, saving time and money on more complex diagnostic procedures.
14. What are the Best Practices for Maintaining Honda O2 Sensor Wiring?
Maintaining Honda O2 sensor wiring is essential for ensuring accurate sensor readings and optimal engine performance. Here are some best practices to follow:
- Regular Visual Inspections:
- Periodically inspect the O2 sensor wiring for any signs of damage, corrosion, or loose connections.
- Proper Wire Routing and Securing:
- Ensure the wiring is properly routed and secured, and that it is not in contact with hot exhaust components or moving parts.
- Use High-Quality Wiring and Connectors:
- When making repairs or modifications, use high-quality wiring and connectors that are designed to withstand the harsh environment under the hood.
- Protect Wiring from Environmental Damage:
- Use protective sleeves or wraps to shield the wiring from moisture, chemicals, and abrasion.
- Proper Grounding:
- Ensure the O2 sensor ground wire is securely connected to the vehicle’s chassis or engine block.
- Avoid Over-Tightening:
- When installing or removing O2 sensors, avoid over-tightening, which can damage the threads in the exhaust manifold or pipe.
- Apply Anti-Seize Compound:
- Apply anti-seize compound to the O2 sensor threads to prevent them from seizing in the exhaust manifold or pipe.
- Reset the ECU After Replacement:
- Reset the ECU after replacing an O2 sensor to allow it to learn the new sensor’s characteristics.
- Monitor Sensor Performance:
- Use an OBD2 scanner to monitor the O2 sensor readings and detect any signs of degradation or malfunction.
- Address Issues Promptly:
- Address any O2 sensor-related issues promptly to prevent further damage and maintain optimal engine performance.
By following these best practices, you can extend the life of your Honda’s O2 sensors and ensure accurate sensor readings for years to come.
15. What Aftermarket O2 Sensor Options are Available for Honda Vehicles?
When it comes to replacing O2 sensors in your Honda, you have a variety of aftermarket options to choose from. Here are some popular brands and types:
- Bosch:
- Bosch is a well-known and respected brand in the automotive industry, offering a wide range of O2 sensors for Honda vehicles. Their sensors are known for their quality, reliability, and performance.
- Denso:
- Denso is another popular brand that offers high-quality O2 sensors for Honda vehicles. Denso is the original equipment manufacturer (OEM) for many Honda models, so their aftermarket sensors are often a good choice.
- NGK:
- NGK is a leading manufacturer of spark plugs and O2 sensors. Their O2 sensors are known for their durability and accurate readings.
- Walker Products:
- Walker Products offers a range of O2 sensors for various Honda models. Their sensors are typically more affordable than those from Bosch or Denso.
- ACDelco:
- ACDelco offers a variety of automotive parts, including O2 sensors. Their sensors are designed to meet or exceed OEM specifications.
When choosing an aftermarket O2 sensor, consider the following factors:
- Compatibility:
- Ensure the sensor is compatible with your specific Honda model and engine type.
- Quality:
- Choose a sensor from a reputable brand that is known for its quality and reliability.
- Warranty:
- Check the warranty offered by the manufacturer. A longer warranty indicates greater confidence in the sensor’s durability.
- Price:
- Compare prices from different brands and retailers to find the best deal.
According to a survey by Consumer Reports, Bosch and Denso O2 sensors consistently receive high ratings for performance and reliability.
16. How to Troubleshoot O2 Sensor Heater Circuit Problems in Hondas
O2 sensor heater circuit problems can lead to inaccurate sensor readings and reduced engine performance. Here’s how to troubleshoot these issues in your Honda:
- Check the Check Engine Light:
- A malfunctioning O2 sensor heater circuit will typically trigger the check engine light and store a diagnostic trouble code (DTC).
- Read Diagnostic Trouble Codes (DTCs):
- Use an OBD2 scanner to retrieve any stored DTCs. Common codes related to O2 sensor heater circuit problems include P0135, P0141, P0155, and P0161.
- Inspect the Wiring:
- Check the O2 sensor wiring for any signs of damage, corrosion, or loose connections. Pay close attention to the heater circuit wires.
- Test the Heater Circuit Resistance:
- Disconnect the O2 sensor connector and use a multimeter to measure the resistance of the heater circuit. Refer to your Honda’s service manual for the specified resistance range.
- Test the Heater Circuit Voltage:
- With the engine running, use a multimeter to measure the voltage at the O2 sensor heater circuit connector. You should see battery voltage (approximately 12 volts).
- Check the Heater Circuit Fuse:
- Locate the fuse for the O2 sensor heater circuit and check if it is blown. Replace the fuse if necessary.
- Test the Heater Relay:
- If the fuse is intact, test the heater relay to ensure it is functioning correctly. Use a multimeter to check for continuity and voltage.
- Inspect the ECU:
- In rare cases, a faulty ECU can cause O2 sensor heater circuit problems. Inspect the ECU connector and wiring for any signs of damage or corrosion.
By following these steps, you can effectively troubleshoot O2 sensor heater circuit problems and restore proper O2 sensor functionality.
17. What is the Difference Between Upstream and Downstream O2 Sensors?
Understanding the difference between upstream and downstream O2 sensors is essential for accurate diagnosis and repair. Here’s a breakdown of their roles and functions:
- Upstream O2 Sensor (Sensor 1):
- Location: Located before the catalytic converter, typically in the exhaust manifold or exhaust pipe close to the engine.
- Function: Measures the oxygen content in the exhaust gas coming directly from the engine.
- Role: Provides feedback to the ECU to adjust the air-fuel mixture for optimal combustion. It helps the ECU maintain the correct air-fuel ratio for efficient engine performance and reduced emissions.