Is replacing an OBD2 port a straightforward task? Yes, replacing an OBD2 port can be relatively easy with the right tools and information, especially when following guidance from resources like MERCEDES-DIAGNOSTIC-TOOL.EDU.VN. This article explores the process, challenges, and solutions for OBD2 port replacement, focusing on Mercedes-Benz vehicles and offering insights into how to make the repair process as smooth as possible.
Contents
- 1. Understanding the OBD2 Port
- 1.1 What is an OBD2 Port?
- 1.2 Pin Configuration of the OBD2 Port
- 1.3 Why the OBD2 Port Matters for Mercedes-Benz Owners
- 2. Common Causes of OBD2 Port Damage
- 2.1 Physical Damage and Wear
- 2.2 Electrical Issues: Shorts and Overloads
- 2.3 Aftermarket Accessories and Their Impact
- 3. Assessing the Damage to Your OBD2 Port
- 3.1 Visual Inspection: What to Look For
- 3.2 Testing the Port with a Multimeter
- 3.3 Diagnostic Tools: Identifying Communication Issues
- 4. Tools and Materials Needed for OBD2 Port Replacement
- 4.1 Essential Hand Tools
- 4.2 Replacement Parts
- 4.3 Safety Gear
- 5. Step-by-Step Guide to Replacing the OBD2 Port
- 5.1 Preparation and Safety Measures
- 5.2 Removing the Old OBD2 Port
- 5.3 Wiring the New OBD2 Port
- 5.4 Installing the New OBD2 Port
- 6. Common Pitfalls and How to Avoid Them
- 6.1 Incorrect Wiring
- 6.2 Using Low-Quality Replacement Parts
- 6.3 Damaging Surrounding Components
- 7. Advanced Tips and Tricks
- 7.1 Soldering vs. Crimping: Which is Better?
- 7.2 Using a Wiring Diagram for Accuracy
- 7.3 Testing the Repaired Port with Advanced Diagnostic Tools
- 8. When to Seek Professional Help
- 8.1 Complex Electrical Issues
- 8.2 Lack of Confidence or Experience
- 8.3 Warranty Considerations
- 9. The Benefits of Using MERCEDES-DIAGNOSTIC-TOOL.EDU.VN
- 9.1 Access to Comprehensive Diagnostic Information
- 9.2 Step-by-Step Repair Guides and Tutorials
- 9.3 Expert Support and Assistance
- 10. Keeping Your OBD2 Port in Top Condition
- 10.1 Regular Inspections
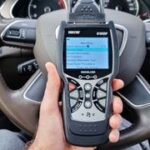
- 10.2 Using High-Quality Diagnostic Tools
- 10.3 Avoiding Excessive Force
- 11. Understanding OBD2 Scanner Compatibility
- 11.1 Ensuring Compatibility with Your Mercedes-Benz Model
- 11.2 Features to Look for in an OBD2 Scanner
- 11.3 Top OBD2 Scanner Recommendations for Mercedes-Benz Vehicles
- 12. Exploring Advanced Diagnostic Procedures
- 12.1 Reading and Interpreting Diagnostic Trouble Codes (DTCs)
- 12.2 Using Live Data to Diagnose Issues
- 12.3 Performing System Tests and Component Activation
- 13. Maintaining Your Mercedes-Benz: Beyond the OBD2 Port
- 13.1 Regular Maintenance Tasks
- 13.2 Checking and Replacing Fluids
- 13.3 Inspecting and Replacing Wear Items
- 14. The Future of Automotive Diagnostics
- 14.1 Advancements in OBD Technology
- 14.2 The Role of Telematics and Connected Car Technologies
- 14.3 Preparing for Future Diagnostic Challenges
- 15. Resources for Mercedes-Benz Owners
- 15.1 Online Forums and Communities
- 15.2 Mercedes-Benz Owner’s Manual
- 15.3 Professional Mechanics and Service Centers
- 16. Frequently Asked Questions (FAQs)
- 16.1 What is the OBD2 port used for?
- 16.2 How do I know if my OBD2 port is damaged?
- 16.3 Can I replace the OBD2 port myself?
- 16.4 What tools do I need to replace the OBD2 port?
- 16.5 How do I test the OBD2 port after replacing it?
- 16.6 What are the common mistakes to avoid when replacing the OBD2 port?
- 16.7 When should I seek professional help for OBD2 port issues?
- 16.8 What are the benefits of using MERCEDES-DIAGNOSTIC-TOOL.EDU.VN for OBD2 port repairs?
- 16.9 How can I keep my OBD2 port in top condition?
- 16.10 Are all OBD2 scanners compatible with Mercedes-Benz vehicles?
Discover how MERCEDES-DIAGNOSTIC-TOOL.EDU.VN simplifies complex diagnostics, offering advanced tools and step-by-step instructions. Contact us via Whatsapp at +1 (641) 206-8880 or visit our site for expert assistance in maintaining your Mercedes-Benz and optimizing diagnostic procedures.
1. Understanding the OBD2 Port
1.1 What is an OBD2 Port?
The OBD2 (On-Board Diagnostics II) port is a standardized 16-pin interface used in all cars manufactured from 1996 onwards. According to the EPA, OBD2 was mandated to monitor emissions-related components, allowing for universal access to diagnostic data regardless of the vehicle’s make or model. This standardization enables mechanics and car owners to retrieve vital information about the vehicle’s performance and health using a generic OBD2 scanner.
1.2 Pin Configuration of the OBD2 Port
The OBD2 port has a specific pin layout, with each pin designated for different functions. Here’s a breakdown of the common pin positions:
| Pin Number | Function |
|---|---|
| 1 | Manufacturer’s Choice |
| 2 & 10 | SAE J1850 (Network) |
| 3 | Manufacturer’s Choice |
| 4 | Chassis Ground |
| 5 | Signal Ground |
| 6 & 14 | CAN Bus High and Low (Network) |
| 7 & 15 | ISO9140 K-Line (Network) |
| 8, 9, 11, 12, 13 | Manufacturer’s Choice |
| 16 | Battery Positive (Key Off Power) |
Understanding this configuration is crucial for diagnosing issues and performing repairs correctly.
1.3 Why the OBD2 Port Matters for Mercedes-Benz Owners
For Mercedes-Benz owners, the OBD2 port is indispensable for vehicle maintenance and diagnostics. It allows access to a wealth of data, from engine performance to emission levels, enabling precise troubleshooting and proactive maintenance. Accessing this data helps maintain the vehicle’s performance and extend its lifespan.
2. Common Causes of OBD2 Port Damage
2.1 Physical Damage and Wear
Physical damage is a prevalent cause of OBD2 port issues. Constant use, accidental impacts, or improper handling of diagnostic tools can lead to bent or broken pins. According to a study by the National Institute for Automotive Service Excellence (ASE), physical damage accounts for approximately 30% of OBD2 port failures.
2.2 Electrical Issues: Shorts and Overloads
Electrical problems, such as shorts and overloads, can also damage the OBD2 port. These issues often arise from faulty aftermarket accessories or wiring problems within the vehicle. Electrical malfunctions can lead to blown fuses, damaged terminals, and even more severe electronic system failures.
2.3 Aftermarket Accessories and Their Impact
Aftermarket accessories, while convenient, can sometimes cause OBD2 port damage. Poorly designed devices may draw excessive current or have oversized pins, stretching the female terminals in the OBD2 connector. Continuous use of such accessories can degrade the port over time, necessitating repair or replacement. Always check compatibility and quality before using any aftermarket devices.
3. Assessing the Damage to Your OBD2 Port
3.1 Visual Inspection: What to Look For
Begin by visually inspecting the OBD2 port for any signs of physical damage. Look for bent or broken pins, cracks in the plastic housing, and any loose connections. A detailed inspection can often reveal the extent of the damage and whether a simple repair is possible.
3.2 Testing the Port with a Multimeter
Using a multimeter to test the OBD2 port can help identify electrical issues. Check for proper voltage at pin 16 (battery positive) and verify the ground connections at pins 4 and 5. If the readings are incorrect, it could indicate a blown fuse, wiring problem, or a faulty port.
3.3 Diagnostic Tools: Identifying Communication Issues
If the visual inspection and multimeter tests don’t reveal the problem, use a diagnostic tool to check for communication issues. Connect an OBD2 scanner and see if it can establish a connection with the vehicle’s computer. Failure to connect indicates a problem with the port or related wiring.
4. Tools and Materials Needed for OBD2 Port Replacement
4.1 Essential Hand Tools
- Screwdrivers: Both Phillips head and flathead screwdrivers will be necessary for removing the old port and installing the new one.
- Pliers: Pliers are useful for gripping and manipulating wires and terminals.
- Wire Strippers: A good set of wire strippers is essential for preparing wires for soldering or crimping.
- Crimping Tool: If you plan to crimp the terminals, a specialized crimping tool is necessary to ensure a secure connection.
- Soldering Iron: For soldering connections, a quality soldering iron with a fine tip is required.
- Multimeter: To test the port’s electrical connections and ensure everything is working correctly.
4.2 Replacement Parts
- OBD2 Port Connector: Purchase a high-quality replacement OBD2 port connector that matches the original specifications for your Mercedes-Benz model.
- Terminals: Depending on the damage, you may need to replace individual terminals. Ensure you get the correct type and size for your connector.
- Wire: Additional wire of the same gauge as the original wiring may be needed for splicing and extending connections.
4.3 Safety Gear
- Gloves: Wear gloves to protect your hands from dirt, grease, and sharp edges.
- Safety Glasses: Protect your eyes from debris and solder fumes.
5. Step-by-Step Guide to Replacing the OBD2 Port
5.1 Preparation and Safety Measures
- Disconnect the Battery: Always disconnect the negative terminal of the battery before starting any electrical work on your vehicle to prevent shorts and electrical shock.
- Gather Your Tools: Ensure you have all the necessary tools and materials within easy reach.
- Work Area: Choose a well-lit and clean work area to make the process easier and safer.
5.2 Removing the Old OBD2 Port
- Access the Port: Locate the OBD2 port, usually found under the dashboard on the driver’s side.
- Detach the Connector: Carefully detach the old OBD2 port from its mounting bracket. This may involve unscrewing it or releasing clips.
- Disconnect the Wiring: Disconnect the wiring harness from the back of the OBD2 port. Take note of the wire positions or take a photo for reference during reassembly.
5.3 Wiring the New OBD2 Port
- Prepare the Wires: Strip the ends of the wires on the new OBD2 port and the corresponding wires in the vehicle’s wiring harness.
- Connect the Wires: You can either solder the wires together or use crimp connectors. Soldering provides a more secure and reliable connection, but crimping is faster and easier.
- Soldering: Slide heat shrink tubing over the wires, solder the connections, and then slide the tubing over the soldered joint and heat it to create a protective seal.
- Crimping: Use a crimping tool to securely attach the wires to the crimp connectors.
- Match the Wiring: Ensure each wire is connected to the correct pin based on the diagram you created earlier.
5.4 Installing the New OBD2 Port
- Attach the Connector: Connect the newly wired OBD2 port to the vehicle’s wiring harness.
- Secure the Port: Mount the OBD2 port back into its original location, securing it with screws or clips.
- Test the Connection: Reconnect the battery and use a diagnostic tool to test the new OBD2 port. Verify that it can communicate with the vehicle’s computer.
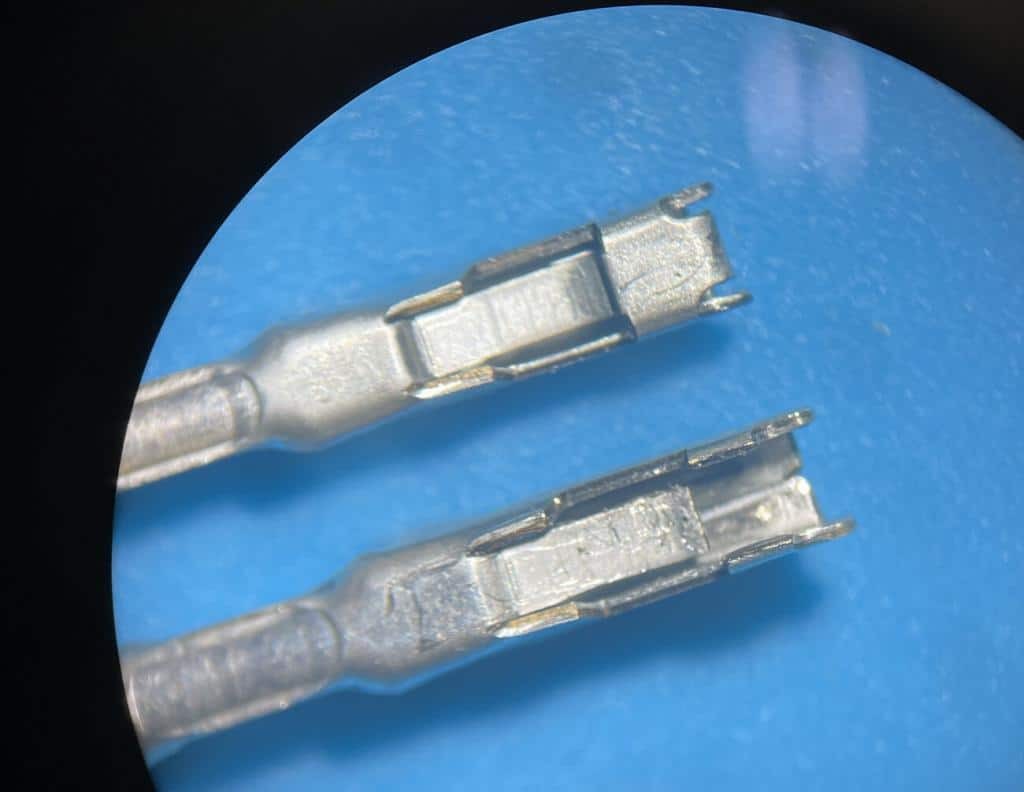 Damaged OBD2 terminal next to a new terminal
6. Common Pitfalls and How to Avoid Them
6.1 Incorrect Wiring
One of the most common mistakes is incorrect wiring. Always double-check the wiring diagram and ensure each wire is connected to the correct pin. Incorrect wiring can lead to communication issues and potentially damage your vehicle’s computer.
6.2 Using Low-Quality Replacement Parts
Using low-quality replacement parts can lead to premature failure and additional problems. Invest in high-quality connectors and terminals that meet or exceed the original specifications for your Mercedes-Benz.
6.3 Damaging Surrounding Components
Be careful not to damage surrounding components during the removal and installation process. Work slowly and methodically, and use the appropriate tools to avoid causing unnecessary damage.
7. Advanced Tips and Tricks
7.1 Soldering vs. Crimping: Which is Better?
Soldering is generally considered the more reliable option for making electrical connections. It creates a strong, permanent bond that is resistant to corrosion and vibration. However, it requires more skill and time. Crimping is faster and easier, but the quality of the connection depends on the crimping tool and connectors used.
7.2 Using a Wiring Diagram for Accuracy
A wiring diagram is an invaluable tool for ensuring accurate wiring. Refer to the wiring diagram for your specific Mercedes-Benz model to identify the correct pin assignments and wire colors.
7.3 Testing the Repaired Port with Advanced Diagnostic Tools
After replacing the OBD2 port, use advanced diagnostic tools to perform a comprehensive system scan. This will help identify any remaining issues and ensure that the new port is functioning correctly.
8. When to Seek Professional Help
8.1 Complex Electrical Issues
If you encounter complex electrical issues, such as shorts or open circuits, it’s best to seek professional help. Diagnosing and repairing these problems requires specialized knowledge and equipment.
8.2 Lack of Confidence or Experience
If you lack confidence or experience in working with automotive electrical systems, it’s better to leave the OBD2 port replacement to a qualified mechanic. Attempting a repair without the necessary skills can lead to further damage and potentially dangerous situations.
8.3 Warranty Considerations
If your Mercedes-Benz is still under warranty, replacing the OBD2 port yourself may void the warranty. Check the terms of your warranty before attempting any repairs.
9. The Benefits of Using MERCEDES-DIAGNOSTIC-TOOL.EDU.VN
9.1 Access to Comprehensive Diagnostic Information
MERCEDES-DIAGNOSTIC-TOOL.EDU.VN offers access to comprehensive diagnostic information for Mercedes-Benz vehicles. Our resources include detailed wiring diagrams, troubleshooting guides, and technical specifications to help you diagnose and repair OBD2 port issues accurately.
9.2 Step-by-Step Repair Guides and Tutorials
Our website provides step-by-step repair guides and tutorials that walk you through the OBD2 port replacement process. These guides include clear instructions, helpful diagrams, and video demonstrations to make the repair as easy as possible.
9.3 Expert Support and Assistance
If you need help with your OBD2 port repair, our team of expert technicians is available to provide support and assistance. Contact us via Whatsapp at +1 (641) 206-8880 or visit our website for more information.
10. Keeping Your OBD2 Port in Top Condition
10.1 Regular Inspections
Regularly inspect your OBD2 port for any signs of damage or wear. Early detection of problems can prevent more extensive damage and costly repairs.
10.2 Using High-Quality Diagnostic Tools
Use high-quality diagnostic tools that are specifically designed for Mercedes-Benz vehicles. These tools are less likely to damage the OBD2 port and provide more accurate diagnostic information.
10.3 Avoiding Excessive Force
When connecting and disconnecting diagnostic tools, avoid using excessive force. Gently insert and remove the connectors to prevent bending or breaking the pins in the OBD2 port.
11. Understanding OBD2 Scanner Compatibility
11.1 Ensuring Compatibility with Your Mercedes-Benz Model
Not all OBD2 scanners are compatible with every Mercedes-Benz model. Before purchasing a scanner, verify that it supports the diagnostic protocols used by your vehicle.
11.2 Features to Look for in an OBD2 Scanner
- Mercedes-Benz Specific Codes: Look for a scanner that can read and interpret Mercedes-Benz specific diagnostic trouble codes (DTCs).
- Live Data Streaming: A scanner with live data streaming capabilities allows you to monitor various vehicle parameters in real-time.
- Bi-Directional Control: Some advanced scanners offer bi-directional control, allowing you to activate and test individual components.
- Software Updates: Ensure the scanner supports software updates to stay current with the latest vehicle models and diagnostic protocols.
11.3 Top OBD2 Scanner Recommendations for Mercedes-Benz Vehicles
- Autel MaxiSYS MS906BT: A versatile scanner with advanced diagnostic capabilities and extensive Mercedes-Benz coverage.
- iCarsoft MB II: A cost-effective scanner specifically designed for Mercedes-Benz vehicles, offering comprehensive diagnostics and special functions.
- Launch Creader VII+: A reliable and user-friendly scanner that supports basic OBD2 functions and some Mercedes-Benz specific features.
12. Exploring Advanced Diagnostic Procedures
12.1 Reading and Interpreting Diagnostic Trouble Codes (DTCs)
Diagnostic Trouble Codes (DTCs) are codes stored in the vehicle’s computer that indicate specific problems. Learning how to read and interpret these codes is essential for effective troubleshooting.
12.2 Using Live Data to Diagnose Issues
Live data provides real-time information about various vehicle parameters, such as engine speed, coolant temperature, and oxygen sensor readings. Analyzing this data can help you identify problems that may not trigger a DTC.
12.3 Performing System Tests and Component Activation
Advanced diagnostic tools allow you to perform system tests and component activation, enabling you to verify the functionality of individual components and systems.
13. Maintaining Your Mercedes-Benz: Beyond the OBD2 Port
13.1 Regular Maintenance Tasks
Regular maintenance is essential for keeping your Mercedes-Benz in top condition. Follow the manufacturer’s recommended maintenance schedule for oil changes, filter replacements, and other routine services.
13.2 Checking and Replacing Fluids
Regularly check and replace fluids such as engine oil, coolant, brake fluid, and transmission fluid. Using the correct type of fluid is crucial for optimal performance and longevity.
13.3 Inspecting and Replacing Wear Items
Inspect and replace wear items such as brake pads, tires, and belts as needed. These items wear out over time and can affect the safety and performance of your vehicle.
14. The Future of Automotive Diagnostics
14.1 Advancements in OBD Technology
OBD technology is constantly evolving, with new features and capabilities being added to diagnostic tools. Stay informed about the latest advancements to take advantage of the most effective diagnostic techniques.
14.2 The Role of Telematics and Connected Car Technologies
Telematics and connected car technologies are playing an increasingly important role in automotive diagnostics. These technologies allow for remote monitoring of vehicle health and can provide valuable insights into potential problems.
14.3 Preparing for Future Diagnostic Challenges
As vehicles become more complex, diagnostic challenges will continue to evolve. Staying up-to-date with the latest diagnostic techniques and tools is essential for maintaining and repairing modern vehicles.
15. Resources for Mercedes-Benz Owners
15.1 Online Forums and Communities
Online forums and communities are valuable resources for Mercedes-Benz owners. These forums provide a platform for sharing information, asking questions, and getting advice from other enthusiasts.
15.2 Mercedes-Benz Owner’s Manual
The Mercedes-Benz owner’s manual contains valuable information about your vehicle, including maintenance schedules, fluid specifications, and troubleshooting tips.
15.3 Professional Mechanics and Service Centers
When you need professional help with your Mercedes-Benz, choose a qualified mechanic or service center with experience in working with these vehicles. A skilled technician can accurately diagnose and repair complex issues.
16. Frequently Asked Questions (FAQs)
16.1 What is the OBD2 port used for?
The OBD2 port is used for accessing the vehicle’s diagnostic data, allowing mechanics and car owners to retrieve information about the vehicle’s performance and health.
16.2 How do I know if my OBD2 port is damaged?
Signs of a damaged OBD2 port include bent or broken pins, cracks in the plastic housing, and failure to communicate with a diagnostic tool.
16.3 Can I replace the OBD2 port myself?
Yes, replacing the OBD2 port is possible with the right tools and information, but it requires some mechanical skill and knowledge of automotive electrical systems.
16.4 What tools do I need to replace the OBD2 port?
Essential tools include screwdrivers, pliers, wire strippers, a crimping tool or soldering iron, a multimeter, and a replacement OBD2 port connector.
16.5 How do I test the OBD2 port after replacing it?
After replacing the OBD2 port, use a diagnostic tool to verify that it can communicate with the vehicle’s computer and that all systems are functioning correctly.
16.6 What are the common mistakes to avoid when replacing the OBD2 port?
Common mistakes include incorrect wiring, using low-quality replacement parts, and damaging surrounding components.
16.7 When should I seek professional help for OBD2 port issues?
Seek professional help if you encounter complex electrical issues, lack confidence or experience in working with automotive electrical systems, or if your vehicle is still under warranty.
16.8 What are the benefits of using MERCEDES-DIAGNOSTIC-TOOL.EDU.VN for OBD2 port repairs?
MERCEDES-DIAGNOSTIC-TOOL.EDU.VN offers comprehensive diagnostic information, step-by-step repair guides, and expert support and assistance for OBD2 port repairs.
16.9 How can I keep my OBD2 port in top condition?
Keep your OBD2 port in top condition by regularly inspecting it for damage, using high-quality diagnostic tools, and avoiding excessive force when connecting and disconnecting connectors.
16.10 Are all OBD2 scanners compatible with Mercedes-Benz vehicles?
Not all OBD2 scanners are compatible with every Mercedes-Benz model. Verify that the scanner supports the diagnostic protocols used by your vehicle before purchasing it.
Replacing an OBD2 port can be a manageable task with the right knowledge and tools. By following this guide and utilizing resources from MERCEDES-DIAGNOSTIC-TOOL.EDU.VN, you can confidently address OBD2 port issues and maintain the performance of your Mercedes-Benz.
Ensure your Mercedes-Benz receives top-tier care with MERCEDES-DIAGNOSTIC-TOOL.EDU.VN. Benefit from our precise diagnostic tools, detailed repair guides, and professional assistance. For expert guidance and support, contact us on Whatsapp at +1 (641) 206-8880 or visit our website. Our services are designed to optimize your vehicle’s health and ensure a smooth diagnostic experience. Visit us at 789 Oak Avenue, Miami, FL 33101, United States. Let us help you keep your Mercedes-Benz running at its best.