Are you looking to build your own OBD2 interface for your Mercedes-Benz? You can construct an OBD2 interface for your Mercedes-Benz using readily available tools and parts, which is discussed in detail by MERCEDES-DIAGNOSTIC-TOOL.EDU.VN. This will allow you to diagnose issues, access hidden features, and perform maintenance tasks, empowering you to understand and care for your vehicle better. By understanding the process, you gain valuable insights into your car’s systems.
Contents
- 1. Understanding the OBD2 Interface and Its Importance
- 1.1 What is an OBD2 Interface?
- 1.2 Why Build Your Own OBD2 Interface?
- 1.3 Key Components of an OBD2 Interface
- 2. Essential Tools and Parts for Building an OBD2 Interface
- 2.1 Tools You’ll Need
- 2.2 Parts List
- 2.3 Selecting the Right Microcontroller
- 2.4 Gathering Necessary Datasheets and Schematics
- 3. Step-by-Step Guide to Building an OBD2 Interface
- 3.1 Preparing the OBD2 Connector
- 3.2 Connecting Wires to the 4-Pin Connector
- 3.3 Pairing and Twisting the Wires
- 3.4 Inserting Pins into the 4-Pin Connector
- 3.5 Connecting to the Microcontroller
- 3.6 Programming the Microcontroller
- 3.7 Testing the OBD2 Interface
- 3.8 Troubleshooting Common Issues
- 4. Software Options for Your OBD2 Interface
- 4.1 Free and Open-Source Software
- 4.2 Paid Software
- 4.3 Developing Your Own Software
- 5. Advanced Features and Customization
- 5.1 Reading and Clearing Diagnostic Trouble Codes (DTCs)
- 5.2 Monitoring Real-Time Sensor Data
- 5.3 Accessing Hidden Features
- 5.4 Performing Custom Diagnostics
- 6. Safety Precautions and Best Practices
- 6.1 Electrical Safety
- 6.2 Data Security
- 6.3 Vehicle Compatibility
- 6.4 Legal Considerations
- 7. Understanding Mercedes-Benz Specific OBD2 Protocols
- 7.1 CAN Bus Communication
- 7.2 K-Line Communication
- 7.3 Mercedes-Benz Specific PIDs
- 8. Utilizing MERCEDES-DIAGNOSTIC-TOOL.EDU.VN for Assistance
- 8.1 Expert Guidance
- 8.2 Detailed Tutorials
- 8.3 Community Support
- 9. Maintaining and Upgrading Your OBD2 Interface
- 9.1 Keeping Software Up-to-Date
- 9.2 Adding New Features
- 9.3 Upgrading Hardware
- 10. Frequently Asked Questions (FAQ) About Building an OBD2 Interface
- 10.1 What is the best microcontroller for building an OBD2 interface?
- 10.2 What software can I use with my OBD2 interface?
- 10.3 How do I read and clear diagnostic trouble codes (DTCs) with my OBD2 interface?
- 10.4 Can I unlock hidden features on my Mercedes-Benz with an OBD2 interface?
- 10.5 What are the safety precautions I should take when working with an OBD2 interface?
- 10.6 How do I troubleshoot common issues with my OBD2 interface?
- 10.7 What is CAN bus communication?
- 10.8 What are Mercedes-Benz specific PIDs?
- 10.9 How can MERCEDES-DIAGNOSTIC-TOOL.EDU.VN help me with building an OBD2 interface?
- 10.10 How often should I update the software on my OBD2 interface?
- 11. Why Choose MERCEDES-DIAGNOSTIC-TOOL.EDU.VN for Your Mercedes-Benz Diagnostic Needs?
- 11.1 Comprehensive Diagnostic Solutions
- 11.2 Expert Support and Guidance
- 11.3 Cutting-Edge Technology
- 11.4 Trusted and Reliable Information
- 11.5 Community Engagement
- 12. Contact Us for Expert Assistance
1. Understanding the OBD2 Interface and Its Importance
1.1 What is an OBD2 Interface?
An On-Board Diagnostics II (OBD2) interface is a standardized system used in most vehicles, including Mercedes-Benz, to provide access to the vehicle’s computer. This system allows you to read diagnostic trouble codes (DTCs), monitor sensor data, and even perform certain control functions. According to the Environmental Protection Agency (EPA), OBD2 was standardized in 1996 to monitor emission-related components and systems.
1.2 Why Build Your Own OBD2 Interface?
Building your own OBD2 interface offers several advantages:
- Cost Savings: Off-the-shelf OBD2 scanners can be expensive, especially those with advanced features. Creating your own interface can save you money.
- Customization: You can tailor the interface to your specific needs and integrate it with custom software or hardware.
- Educational Value: Building an OBD2 interface provides a deeper understanding of automotive diagnostics and electronics.
- DIY Satisfaction: For car enthusiasts, there’s a sense of accomplishment in creating your own tools.
1.3 Key Components of an OBD2 Interface
An OBD2 interface typically consists of the following components:
- OBD2 Connector: This connects to the vehicle’s OBD2 port, usually located under the dashboard.
- Microcontroller: This processes the data received from the OBD2 port and communicates with a computer or smartphone.
- Communication Interface: This allows the microcontroller to communicate with a computer or smartphone, typically via USB, Bluetooth, or Wi-Fi.
- Software: This is used to read and interpret the data from the OBD2 port.
2. Essential Tools and Parts for Building an OBD2 Interface
2.1 Tools You’ll Need
To build your OBD2 interface, gather the following tools:
- Wire Strippers/Cutters: For cutting and stripping wires to the correct length.
- Needle-Nose Pliers: For handling small components and making precise connections.
- Multimeter: For testing continuity and voltage levels.
- Soldering Iron and Solder: For making secure and reliable electrical connections (recommended).
- Crimping Tool: For attaching connectors to wires (may not be required if soldering).
- Computer with USB Port: For programming the microcontroller and running diagnostic software.
2.2 Parts List
Here’s a list of the parts you’ll need:
- OBD2 Connector: A 16-pin female OBD2 connector to plug into your Mercedes-Benz’s OBD2 port.
- 4-Pin Connector: A connector to link the OBD2 connector to your chosen interface. (e.g., https://www.corsa-technic.com/item.php?item_id=394; pin/wire size = 22-16AWG; insulation/seal size = 1.3-1.7mm)
- OBD-II Cable: An OBD-II cable to connect to your diagnostic tools. (e.g., https://www.corsa-technic.com/item.php?item_id=712&category_id=166)
- Wires: Four wires of appropriate gauge (22-26 AWG) to connect the OBD2 connector to the microcontroller.
- Resistors: Resistors of specific values (e.g., 120 ohms) may be needed for CAN bus termination.
- Microcontroller (e.g., Arduino): A microcontroller to process the data from the OBD2 port.
- Communication Module (e.g., Bluetooth or USB): To enable communication with a computer or smartphone.
- Enclosure (Optional): A case to house the OBD2 interface for protection.
2.3 Selecting the Right Microcontroller
Choosing the right microcontroller is crucial. Popular options include:
- Arduino: Easy to use and widely supported, with plenty of libraries and tutorials available.
- ESP32: Offers built-in Wi-Fi and Bluetooth capabilities, making it suitable for wireless applications.
- Teensy: A more powerful option with faster processing speeds and more memory.
2.4 Gathering Necessary Datasheets and Schematics
Before you start building, gather the datasheets for all the components you’ll be using. These datasheets contain important information about the components’ pinouts, voltage requirements, and other specifications. You’ll also need a schematic diagram to guide your wiring.
3. Step-by-Step Guide to Building an OBD2 Interface
3.1 Preparing the OBD2 Connector
-
Identify the Necessary Pins: Only four pins on the OBD2 connector are needed for basic diagnostics:
- Pin 4: Chassis Ground (orange wire on OBD2C)
- Pin 6: CAN (J-2234) High (green wire on OBD2C)
- Pin 14: CAN (J-2234) Low (brown w/white stripe wire on OBD2C)
- Pin 16: Battery Power (green w/white stripe wire on OBD2C)
-
Prepare the Wires: Strip the ends of the four wires you’ll be using to connect to the OBD2 connector. If the wires in the OBD2C are smaller than the pins for the 4-pin connector, fold the exposed wire over itself to thicken it.
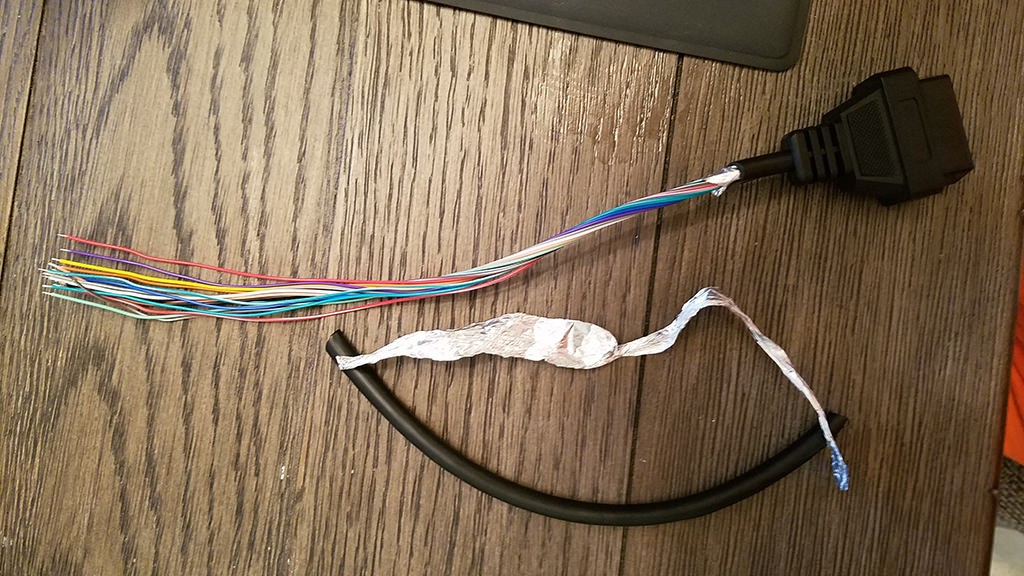 Stripped sheath and shielding
3.2 Connecting Wires to the 4-Pin Connector
-
Slide Rubber Seals: Slide a rubber seal over each of the four wires.
-
Attach Pins: Insert the exposed wire into the pin connector. Solder the wire to the pin connector for a solid connection.
 Wiring compared to pin connector
 -
Crimp the Connector: If you have a crimping tool, crimp the connector over the wire. If not, use needle-nose pliers to fold the prongs over the wire.
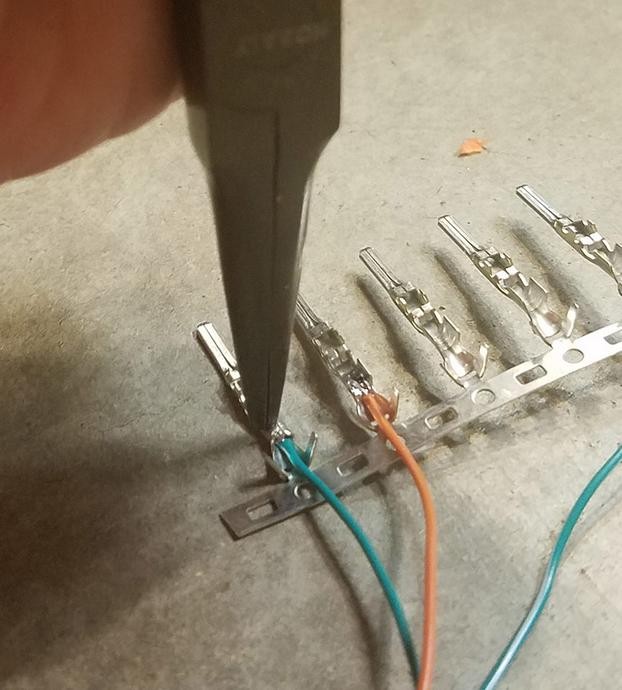 Crimping the connector with pliers
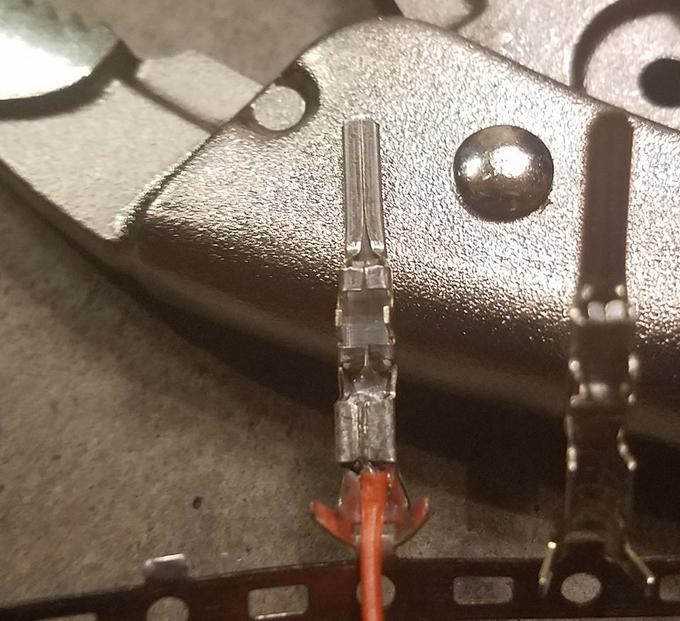 Crimped connector
 -
Seal the Connection: Slide the rubber seal up to fit between the back prongs and fold the prongs over the seal.
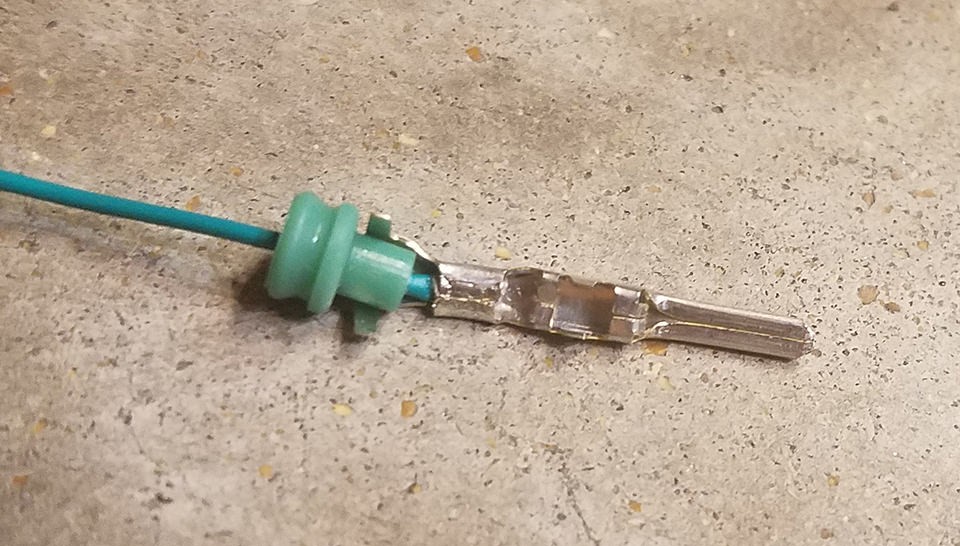 Sealing the connection
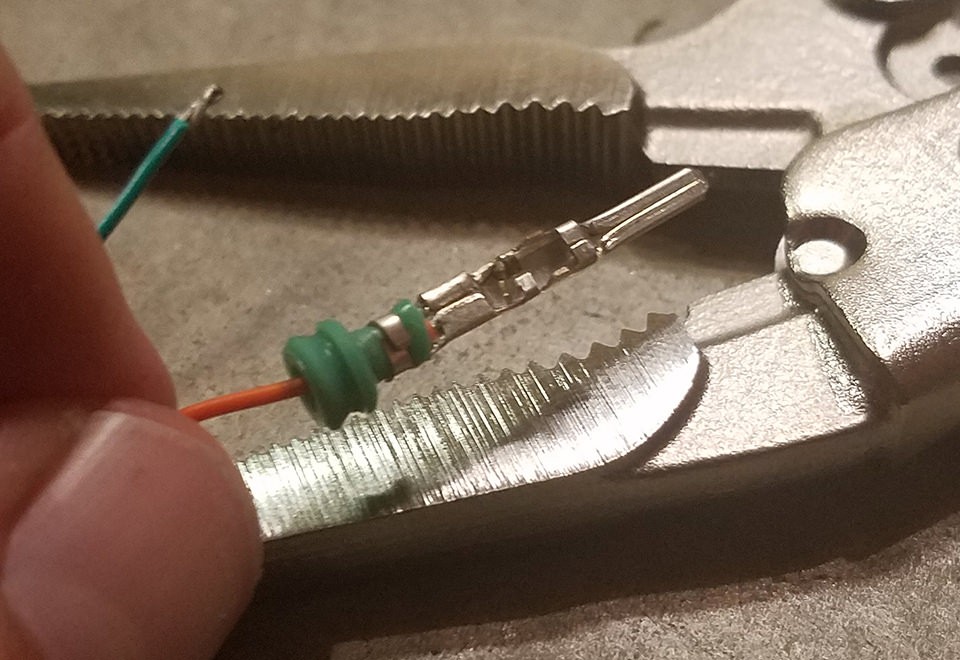 Seal in place
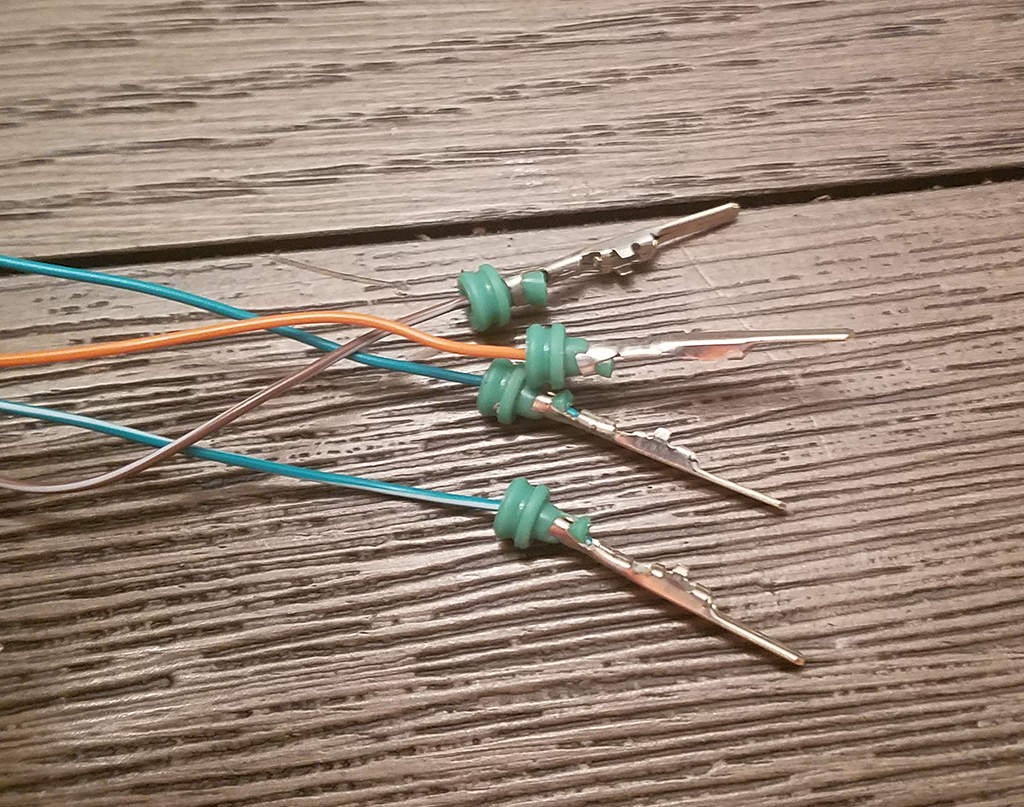 Prongs folded over seal
3.3 Pairing and Twisting the Wires
Pair the wires in the following manner and twist them together:
- Pin 4 (orange) / Pin 16 (green w/white stripe)
- Pin 6 (green) / Pin 14 (brown w/white stripe)
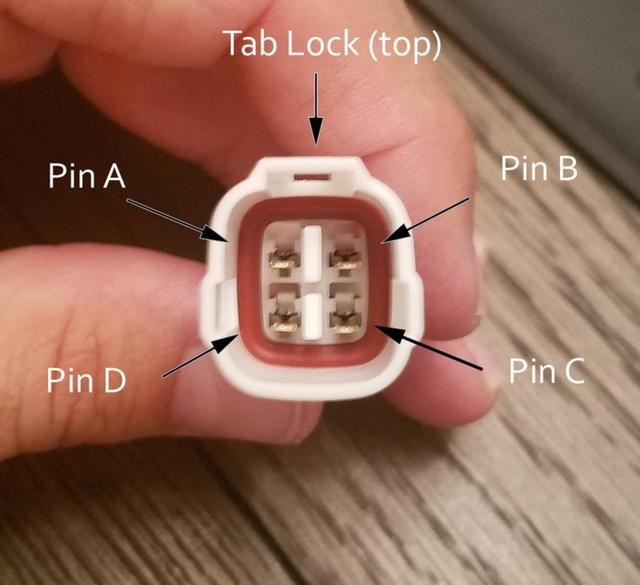
3.4 Inserting Pins into the 4-Pin Connector
Insert the pins into the 4-pin connector in the following orientation:
- Pin 14 (brown w/white stripe) > connector slot A
- Pin 6 (green) > connector slot B
- Pin 16 (green w/white stripe) > connector slot C
- Pin 4 (orange) > connector slot D
Insert the pin through the rear of the connector and use needle-nose pliers to pull the pin and lock it into the connector. You’ll hear an audible click once it locks into place.
 4-Pin Connector
3.5 Connecting to the Microcontroller
- Refer to Datasheets: Consult the datasheets for your chosen microcontroller and communication module to determine the correct pins for connecting the OBD2 interface.
- Wire the Connections: Connect the wires from the OBD2 connector to the appropriate pins on the microcontroller. This typically involves connecting the CAN High and CAN Low wires to the microcontroller’s CAN bus interface, and the power and ground wires to the microcontroller’s power supply pins.
- Add Resistors (If Necessary): If your microcontroller requires CAN bus termination, add a 120-ohm resistor between the CAN High and CAN Low lines.
3.6 Programming the Microcontroller
- Install the Arduino IDE: Download and install the Arduino IDE (or the appropriate IDE for your chosen microcontroller) on your computer.
- Install Necessary Libraries: Install any necessary libraries for your microcontroller and communication module. For example, if you’re using an Arduino with a CAN bus shield, you’ll need to install the appropriate CAN bus library.
- Write the Code: Write the code to read data from the OBD2 port and transmit it to your computer or smartphone. This typically involves initializing the CAN bus interface, sending OBD2 requests, and parsing the responses.
- Upload the Code: Upload the code to your microcontroller using the Arduino IDE.
3.7 Testing the OBD2 Interface
- Connect to Your Mercedes-Benz: Plug the OBD2 connector into your Mercedes-Benz’s OBD2 port.
- Connect to Your Computer or Smartphone: Connect the microcontroller to your computer or smartphone via USB, Bluetooth, or Wi-Fi.
- Run Diagnostic Software: Run the diagnostic software on your computer or smartphone. This software should be able to connect to the OBD2 interface and display the data from your Mercedes-Benz’s computer.
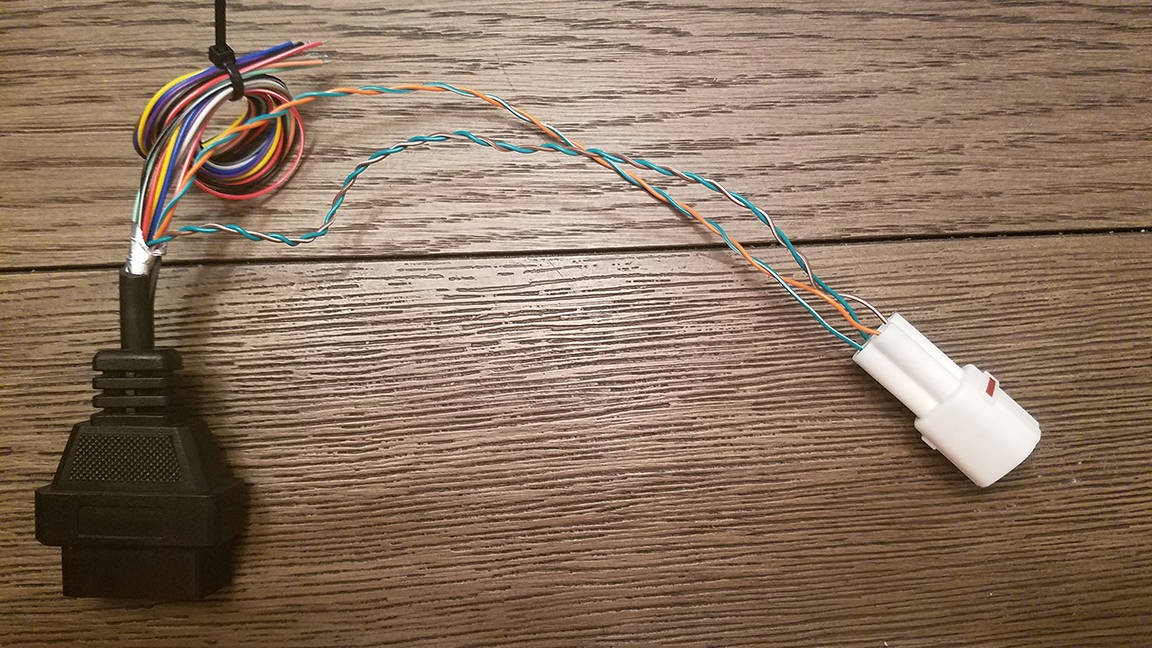 Completed OBD2 Interface
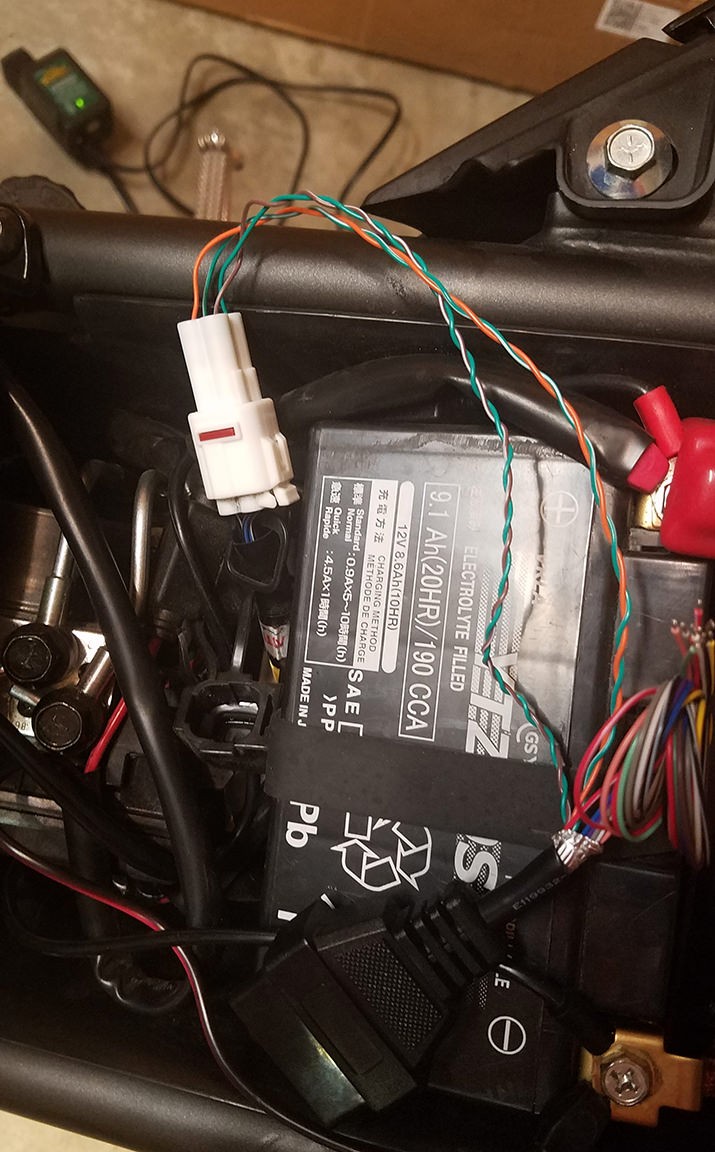 OBD2 Interface Connected
3.8 Troubleshooting Common Issues
- No Connection: Check the wiring and make sure all connections are secure. Verify that the microcontroller is powered on and the diagnostic software is configured correctly.
- Incorrect Data: Double-check the code and make sure you’re sending the correct OBD2 requests and parsing the responses correctly.
- Communication Errors: Verify that the CAN bus interface is initialized correctly and that the CAN bus termination resistor is present if required.
4. Software Options for Your OBD2 Interface
4.1 Free and Open-Source Software
- OBD-II Scantool: A simple open-source scantool for reading OBD2 data.
- PyOBD: A Python library for accessing OBD2 data.
- ScanTool.net: A free scantool with basic diagnostic capabilities.
4.2 Paid Software
- OBD Auto Doctor: A popular scantool with a user-friendly interface and advanced features.
- Torque Pro (Android): An Android app that can connect to your OBD2 interface via Bluetooth and display real-time data.
- FORScan (Windows): A powerful scantool specifically designed for Ford vehicles, but it also supports generic OBD2 protocols.
4.3 Developing Your Own Software
If you’re a programmer, you can develop your own software to interface with your OBD2 interface. This allows you to create custom dashboards, log data, and perform advanced diagnostics.
5. Advanced Features and Customization
5.1 Reading and Clearing Diagnostic Trouble Codes (DTCs)
One of the primary functions of an OBD2 interface is to read and clear DTCs. These codes provide valuable information about potential problems with your Mercedes-Benz.
5.2 Monitoring Real-Time Sensor Data
An OBD2 interface can also be used to monitor real-time sensor data, such as engine temperature, RPM, and fuel consumption. This data can be used to diagnose performance issues and optimize fuel efficiency.
5.3 Accessing Hidden Features
Some Mercedes-Benz vehicles have hidden features that can be unlocked using an OBD2 interface. These features may include:
- Enabling or Disabling Daytime Running Lights
- Adjusting Instrument Cluster Settings
- Activating Sport Mode
- Customizing Interior Lighting
5.4 Performing Custom Diagnostics
With a custom-built OBD2 interface and software, you can perform advanced diagnostics that are not possible with off-the-shelf scantools. This may include:
- Analyzing CAN Bus Traffic
- Decoding Custom PIDs (Parameter IDs)
- Performing ECU Flashing
6. Safety Precautions and Best Practices
6.1 Electrical Safety
When working with electronics, it’s important to take precautions to avoid electrical shock. Always disconnect the vehicle’s battery before working on the OBD2 interface.
6.2 Data Security
Be careful when accessing and modifying data on your Mercedes-Benz’s computer. Incorrect data can cause serious problems with your vehicle.
6.3 Vehicle Compatibility
Make sure your OBD2 interface is compatible with your Mercedes-Benz’s model and year. Some vehicles may use different OBD2 protocols or require specific adapters.
6.4 Legal Considerations
Be aware of any legal restrictions on modifying your vehicle’s computer. Some modifications may be illegal or void your warranty.
7. Understanding Mercedes-Benz Specific OBD2 Protocols
7.1 CAN Bus Communication
Mercedes-Benz vehicles primarily use the Controller Area Network (CAN) bus for communication between various electronic control units (ECUs). Understanding CAN bus communication is essential for building an effective OBD2 interface.
7.2 K-Line Communication
Older Mercedes-Benz models may use K-Line communication, a slower and less robust protocol than CAN bus. If you’re working on an older vehicle, you may need to use a K-Line adapter.
7.3 Mercedes-Benz Specific PIDs
Mercedes-Benz uses a variety of proprietary PIDs (Parameter IDs) to access data that is not available through standard OBD2 protocols. These PIDs can provide valuable information about your vehicle’s performance and condition.
8. Utilizing MERCEDES-DIAGNOSTIC-TOOL.EDU.VN for Assistance
8.1 Expert Guidance
MERCEDES-DIAGNOSTIC-TOOL.EDU.VN offers expert guidance on building and using OBD2 interfaces for Mercedes-Benz vehicles. Our team of experienced technicians can provide assistance with everything from selecting the right components to troubleshooting common issues.
8.2 Detailed Tutorials
Our website features detailed tutorials and guides on building OBD2 interfaces for various Mercedes-Benz models. These tutorials provide step-by-step instructions and clear explanations to help you succeed.
8.3 Community Support
Join our online community to connect with other Mercedes-Benz enthusiasts and get answers to your questions. Our community is a valuable resource for sharing knowledge and troubleshooting issues.
9. Maintaining and Upgrading Your OBD2 Interface
9.1 Keeping Software Up-to-Date
Regularly update the software on your OBD2 interface to ensure compatibility with the latest Mercedes-Benz models and protocols.
9.2 Adding New Features
As you become more familiar with OBD2 technology, you may want to add new features to your interface, such as:
- Data Logging
- Custom Dashboards
- Remote Access
9.3 Upgrading Hardware
If you need more processing power or communication capabilities, you can upgrade the hardware on your OBD2 interface. This may involve replacing the microcontroller, communication module, or other components.
10. Frequently Asked Questions (FAQ) About Building an OBD2 Interface
10.1 What is the best microcontroller for building an OBD2 interface?
The best microcontroller depends on your specific needs and budget. Arduino is a popular choice for beginners due to its ease of use and wide support. ESP32 offers built-in Wi-Fi and Bluetooth capabilities, making it suitable for wireless applications. Teensy is a more powerful option with faster processing speeds and more memory.
10.2 What software can I use with my OBD2 interface?
There are many free and paid software options available for use with your OBD2 interface. Some popular choices include OBD-II Scantool, PyOBD, ScanTool.net, OBD Auto Doctor, Torque Pro (Android), and FORScan (Windows).
10.3 How do I read and clear diagnostic trouble codes (DTCs) with my OBD2 interface?
Most diagnostic software provides a function for reading and clearing DTCs. Simply connect your OBD2 interface to your Mercedes-Benz, run the software, and select the “Read DTCs” or “Clear DTCs” option.
10.4 Can I unlock hidden features on my Mercedes-Benz with an OBD2 interface?
Yes, some Mercedes-Benz vehicles have hidden features that can be unlocked using an OBD2 interface. These features may include enabling or disabling daytime running lights, adjusting instrument cluster settings, activating sport mode, and customizing interior lighting.
10.5 What are the safety precautions I should take when working with an OBD2 interface?
Always disconnect the vehicle’s battery before working on the OBD2 interface. Be careful when accessing and modifying data on your Mercedes-Benz’s computer. Make sure your OBD2 interface is compatible with your Mercedes-Benz’s model and year. Be aware of any legal restrictions on modifying your vehicle’s computer.
10.6 How do I troubleshoot common issues with my OBD2 interface?
If you’re experiencing issues with your OBD2 interface, check the wiring and make sure all connections are secure. Verify that the microcontroller is powered on and the diagnostic software is configured correctly. Double-check the code and make sure you’re sending the correct OBD2 requests and parsing the responses correctly. Verify that the CAN bus interface is initialized correctly and that the CAN bus termination resistor is present if required.
10.7 What is CAN bus communication?
CAN (Controller Area Network) bus is a communication protocol used in modern vehicles to allow various electronic control units (ECUs) to communicate with each other. Understanding CAN bus communication is essential for building an effective OBD2 interface.
10.8 What are Mercedes-Benz specific PIDs?
Mercedes-Benz uses a variety of proprietary PIDs (Parameter IDs) to access data that is not available through standard OBD2 protocols. These PIDs can provide valuable information about your vehicle’s performance and condition.
10.9 How can MERCEDES-DIAGNOSTIC-TOOL.EDU.VN help me with building an OBD2 interface?
MERCEDES-DIAGNOSTIC-TOOL.EDU.VN offers expert guidance, detailed tutorials, and community support to help you build and use OBD2 interfaces for Mercedes-Benz vehicles. Our team of experienced technicians can provide assistance with everything from selecting the right components to troubleshooting common issues.
10.10 How often should I update the software on my OBD2 interface?
Regularly update the software on your OBD2 interface to ensure compatibility with the latest Mercedes-Benz models and protocols.
11. Why Choose MERCEDES-DIAGNOSTIC-TOOL.EDU.VN for Your Mercedes-Benz Diagnostic Needs?
11.1 Comprehensive Diagnostic Solutions
At MERCEDES-DIAGNOSTIC-TOOL.EDU.VN, we provide comprehensive diagnostic solutions tailored specifically for Mercedes-Benz vehicles. Whether you are a DIY enthusiast or a professional technician, our resources and tools are designed to meet your needs.
11.2 Expert Support and Guidance
Our team of experienced Mercedes-Benz technicians offers expert support and guidance to help you navigate the complexities of automotive diagnostics. We are committed to providing you with the knowledge and assistance you need to keep your vehicle running smoothly.
11.3 Cutting-Edge Technology
We stay at the forefront of automotive technology, offering the latest diagnostic tools and software for Mercedes-Benz vehicles. Our tools are designed to provide accurate and reliable results, helping you diagnose and resolve issues quickly and efficiently.
11.4 Trusted and Reliable Information
MERCEDES-DIAGNOSTIC-TOOL.EDU.VN is a trusted source of information for Mercedes-Benz owners and technicians. Our content is carefully curated and reviewed by experts to ensure accuracy and reliability.
11.5 Community Engagement
Join our vibrant community of Mercedes-Benz enthusiasts and technicians to share knowledge, ask questions, and get support. Our community is a valuable resource for connecting with others who share your passion for Mercedes-Benz vehicles.
12. Contact Us for Expert Assistance
Ready to take control of your Mercedes-Benz diagnostics? Contact us today for expert assistance with building your OBD2 interface and unlocking the full potential of your vehicle.
Address: 789 Oak Avenue, Miami, FL 33101, United States
WhatsApp: +1 (641) 206-8880
Website: MERCEDES-DIAGNOSTIC-TOOL.EDU.VN
By following this comprehensive guide, you can build your own OBD2 interface for your Mercedes-Benz and gain valuable insights into your vehicle’s performance and condition. With the help of MERCEDES-DIAGNOSTIC-TOOL.EDU.VN, you’ll be well-equipped to tackle any diagnostic challenge.
Are you ready to start building your own OBD2 interface and unlock the full potential of your Mercedes-Benz? Contact MERCEDES-DIAGNOSTIC-TOOL.EDU.VN today via Whatsapp at +1 (641) 206-8880 for expert guidance on selecting the right diagnostic tools, unlocking hidden features, and accessing detailed repair and maintenance guides. Our team of experienced Mercedes-Benz technicians is here to help you every step of the way. Let us empower you to take control of your Mercedes-Benz ownership experience. Address: 789 Oak Avenue, Miami, FL 33101, United States. Website: MERCEDES-DIAGNOSTIC-TOOL.EDU.VN.
