Using your Innova OBD2 scan tool effectively involves connecting the tool, reading the diagnostic trouble codes (DTCs), and interpreting the information. At MERCEDES-DIAGNOSTIC-TOOL.EDU.VN, we offer expert guidance on utilizing Innova OBD2 scanners to diagnose and maintain your Mercedes-Benz. Our resources and support will help you troubleshoot issues, understand error codes, and optimize your vehicle’s performance, ensuring you make the most of your diagnostic tool.
Contents
- 1. Understanding the Innova OBD2 Scan Tool
- Key Features of Innova OBD2 Scan Tools
- Benefits of Using an Innova OBD2 Scan Tool
- 2. Preparing Your Mercedes-Benz for Scanning
- Ensure Vehicle Readiness
- Locating the OBD2 Port
- Safety Precautions
- Checking the Battery
- Ensuring Proper Lighting
- 3. Connecting the Innova OBD2 Scan Tool
- Step-by-Step Connection Guide
- Troubleshooting Connection Issues
- Understanding the Initial Display
- Establishing Communication
- 4. Reading Diagnostic Trouble Codes (DTCs)
- Accessing the DTC Menu
- Understanding DTC Categories
- Interpreting DTCs
- Using the Scan Tool’s Resources
- записывая коды
- 5. Understanding Freeze Frame Data
- Accessing Freeze Frame Data
- Key Parameters in Freeze Frame Data
- Interpreting Freeze Frame Data
- Using Freeze Frame Data for Diagnostics
- Limitations of Freeze Frame Data
- 6. Live Data Streaming and Monitoring
- Accessing Live Data
- Interpreting Live Data
- Using Live Data for Diagnostics
- Graphing Live Data
- Recording Live Data
- 7. Performing Component Tests
- Accessing Component Tests
- Types of Component Tests
- Performing Component Tests
- Example: Testing an Oxygen Sensor
- Safety Precautions
- 8. Clearing Diagnostic Trouble Codes (DTCs)
- Accessing the Clear Codes Function
- Understanding the Implications of Clearing Codes
- When to Clear Codes
- Verifying the Repair
- Potential Issues After Clearing Codes
- 9. Advanced Functions and Customization
- Bidirectional Controls
- Module Programming
- Customization Settings
- Software Updates
- Potential Risks
- 10. Maintenance and Care of Your Innova OBD2 Scan Tool
- Cleaning the Scan Tool
- Storing the Scan Tool
- Updating the Software
- Replacing the Battery
- Inspecting the Cable
- Avoiding Moisture
- Handling with Care
1. Understanding the Innova OBD2 Scan Tool
What is an Innova OBD2 scan tool and why is it essential for Mercedes-Benz owners? An Innova OBD2 scan tool is a diagnostic device that reads data from your vehicle’s onboard computer, allowing you to identify and address potential issues. For Mercedes-Benz owners, this tool is essential because it offers insights into the car’s performance, helps diagnose problems, and aids in preventative maintenance, potentially saving significant repair costs.
The Innova OBD2 scan tool connects to your Mercedes-Benz’s OBD2 port, typically located under the dashboard, and retrieves diagnostic trouble codes (DTCs). These codes are standardized across all OBD2-compliant vehicles, including Mercedes-Benz models manufactured after 1996, according to the Environmental Protection Agency (EPA). These codes help you identify issues related to the engine, transmission, emissions system, and other critical components.
Key Features of Innova OBD2 Scan Tools
Innova OBD2 scan tools offer a range of features designed to make vehicle diagnostics easier and more efficient. Some of the most valuable features include:
- Code Reading and Clearing: Reads diagnostic trouble codes (DTCs) and allows you to clear them after addressing the underlying issues.
- Live Data Streaming: Provides real-time data from various sensors and systems, helping you monitor performance and identify anomalies.
- Freeze Frame Data: Captures data when a DTC is triggered, giving you a snapshot of the conditions at the time of the fault.
- অক্সিজেন Sensor Testing: Tests oxygen sensor output to ensure proper function and emissions control.
- I/M Readiness Testing: Checks the status of emissions-related systems to ensure your vehicle will pass an emissions test.
- Battery and Charging System Testing: Assesses the health of your battery and charging system to prevent unexpected breakdowns.
According to Innova, their scan tools are designed to be user-friendly, with intuitive interfaces and clear displays. This makes it easier for both experienced mechanics and DIY enthusiasts to diagnose and resolve vehicle issues effectively.
Benefits of Using an Innova OBD2 Scan Tool
Using an Innova OBD2 scan tool offers several benefits for Mercedes-Benz owners:
- Early Problem Detection: Identifying issues early can prevent minor problems from escalating into major repairs.
- Cost Savings: Diagnosing and addressing issues yourself can save money on expensive mechanic fees.
- Improved Vehicle Performance: Monitoring live data and addressing performance issues can improve your vehicle’s efficiency and reliability.
- Informed Decision Making: Having diagnostic information at your fingertips allows you to make informed decisions about repairs and maintenance.
- Peace of Mind: Knowing the condition of your vehicle and being able to address issues promptly can provide peace of mind.
The National Institute for Automotive Service Excellence (ASE) emphasizes the importance of using diagnostic tools for proper vehicle maintenance. Regular diagnostics can help extend the life of your Mercedes-Benz and ensure it operates at peak performance.
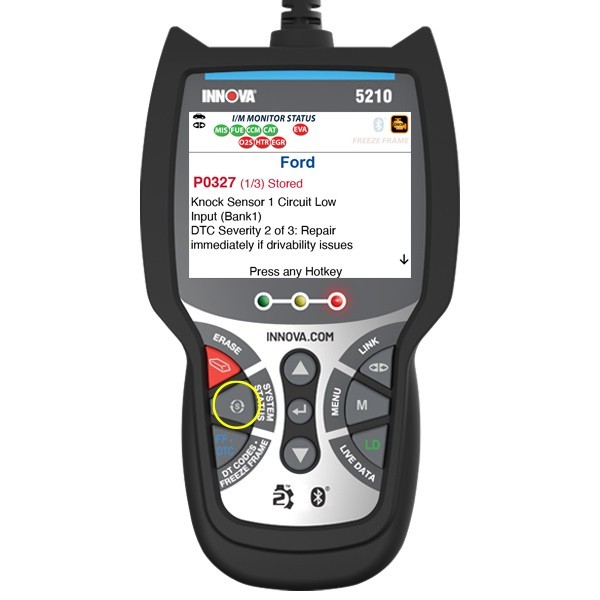 An OBD2 scanner displaying diagnostic codes.
2. Preparing Your Mercedes-Benz for Scanning
How do I prepare my Mercedes-Benz for a diagnostic scan using an Innova OBD2 tool? Preparing your Mercedes-Benz for a diagnostic scan involves ensuring the vehicle is in the correct state, locating the OBD2 port, and understanding basic safety precautions. At MERCEDES-DIAGNOSTIC-TOOL.EDU.VN, we provide detailed instructions to ensure a smooth and accurate diagnostic process. This preparation will help you get the most reliable data from your scan.
Before connecting your Innova OBD2 scan tool, take these preparatory steps:
Ensure Vehicle Readiness
- Turn off the Engine: Make sure the engine is completely off. The ignition should be in the “OFF” position.
- Park Safely: Park your Mercedes-Benz in a safe, well-lit area. Engage the parking brake to prevent any movement.
- Gather Information: Have your vehicle’s manual handy. This can provide valuable information about specific systems and components.
Locating the OBD2 Port
The OBD2 port is a standardized diagnostic port found in all vehicles manufactured after 1996. In Mercedes-Benz vehicles, it is typically located:
- Under the Dashboard: Most commonly found on the driver’s side, beneath the steering wheel.
- Near the Center Console: In some models, it may be located near the center console or gear shifter.
- Behind a Panel: Occasionally, the port may be hidden behind a small access panel.
Refer to your vehicle’s manual for the exact location if you are unsure. The port is usually trapezoidal and has 16 pins.
Safety Precautions
- Wear Safety Glasses: Protect your eyes from any potential debris or sparks.
- Use Gloves: Wear gloves to keep your hands clean and protect them from any potential hazards.
- Avoid Water: Ensure the area around the OBD2 port is dry to prevent electrical issues.
- Read the Scan Tool Manual: Familiarize yourself with the Innova OBD2 scan tool’s manual to understand its functions and safety guidelines.
According to the Society of Automotive Engineers (SAE), following these precautions ensures a safe and accurate diagnostic process.
Checking the Battery
Before starting the scan, check the condition of your Mercedes-Benz’s battery. A weak or failing battery can cause inaccurate readings or prevent the scan tool from functioning correctly.
- Visual Inspection: Check the battery terminals for corrosion. Clean them with a wire brush if necessary.
- Voltage Test: Use a multimeter to check the battery voltage. A fully charged battery should read around 12.6 volts.
- Load Test: If possible, perform a load test to assess the battery’s ability to hold a charge under load.
If the battery is weak, consider charging it before proceeding with the diagnostic scan.
Ensuring Proper Lighting
Adequate lighting is essential for locating the OBD2 port and reading the scan tool’s display. Use a flashlight or work light to illuminate the area.
- Position the Light: Place the light source so that it shines directly on the OBD2 port.
- Adjust as Needed: Adjust the light as necessary to eliminate shadows and improve visibility.
Proper lighting will help you connect the scan tool correctly and read the diagnostic information accurately.
3. Connecting the Innova OBD2 Scan Tool
How do I connect my Innova OBD2 scan tool to my Mercedes-Benz? Connecting your Innova OBD2 scan tool to your Mercedes-Benz involves inserting the tool into the OBD2 port and establishing a connection. At MERCEDES-DIAGNOSTIC-TOOL.EDU.VN, we offer clear, step-by-step instructions to ensure a successful connection, enabling you to retrieve accurate diagnostic data. This proper connection is crucial for effective diagnostics.
Connecting the Innova OBD2 scan tool to your Mercedes-Benz is a straightforward process. Follow these steps to ensure a secure and reliable connection:
Step-by-Step Connection Guide
- Locate the OBD2 Port: As mentioned earlier, the OBD2 port is typically located under the dashboard on the driver’s side. Refer to your vehicle’s manual if you have trouble finding it.
- Prepare the Scan Tool: Ensure the Innova OBD2 scan tool is powered off. Some models may have an on/off switch, while others activate automatically when connected.
- Insert the Scan Tool: Align the scan tool connector with the OBD2 port. Gently push the connector into the port until it clicks into place. The connection should be firm and secure.
- Turn on the Ignition: Turn the ignition to the “ON” position without starting the engine. This provides power to the vehicle’s computer and allows the scan tool to communicate with it.
- Power on the Scan Tool: If your scan tool has a power button, turn it on. The scan tool should now power up and begin communicating with the vehicle’s computer.
Troubleshooting Connection Issues
If the scan tool does not power on or fails to connect, consider the following troubleshooting steps:
- Check the Connection: Ensure the connector is fully inserted into the OBD2 port. A loose connection can prevent the scan tool from communicating with the vehicle.
- Verify Power: Make sure the vehicle’s ignition is in the “ON” position. Without power, the scan tool cannot communicate with the vehicle’s computer.
- Check the Scan Tool Battery: If the scan tool is battery-powered, ensure the battery is fully charged. A low battery can prevent the scan tool from functioning correctly.
- Inspect the OBD2 Port: Check the OBD2 port for any damage or debris that may be preventing a secure connection.
The Equipment and Tool Institute (ETI) recommends regular inspection and maintenance of diagnostic tools to ensure proper functionality.
Understanding the Initial Display
Once the scan tool is connected and powered on, it will typically display an initial screen with vehicle information or a menu.
- Vehicle Information: The scan tool may automatically detect your vehicle’s make, model, and VIN (Vehicle Identification Number). Verify that this information is correct.
- Main Menu: The main menu typically includes options such as “Read Codes,” “Erase Codes,” “Live Data,” and “System Tests.” Use the scan tool’s navigation buttons to select the desired option.
Familiarize yourself with the scan tool’s menu structure to navigate efficiently and access the diagnostic information you need.
Establishing Communication
After selecting an option from the main menu, the scan tool will attempt to establish communication with the vehicle’s computer. This process may take a few seconds.
- Communication Status: The scan tool will display a message indicating that it is communicating with the vehicle.
- Error Messages: If the scan tool fails to communicate, it will display an error message. Refer to the troubleshooting steps mentioned earlier to resolve the issue.
According to a study by the National Highway Traffic Safety Administration (NHTSA), proper communication between the scan tool and the vehicle’s computer is essential for accurate diagnostics.
4. Reading Diagnostic Trouble Codes (DTCs)
How do I read diagnostic trouble codes (DTCs) using my Innova OBD2 scanner on my Mercedes-Benz? Reading DTCs involves navigating the scan tool’s menu, accessing the codes, and understanding their meanings. At MERCEDES-DIAGNOSTIC-TOOL.EDU.VN, we provide resources to help you interpret these codes accurately, enabling you to diagnose issues effectively. This understanding is key to resolving vehicle problems.
Once your Innova OBD2 scan tool is successfully connected to your Mercedes-Benz, the next step is to read the Diagnostic Trouble Codes (DTCs). These codes provide valuable information about potential issues with your vehicle.
Accessing the DTC Menu
- Navigate to the Main Menu: Use the scan tool’s navigation buttons to access the main menu.
- Select “Read Codes”: Look for an option labeled “Read Codes,” “Diagnostic Codes,” or similar. Use the navigation buttons to highlight this option and press the “Enter” button.
- Wait for Code Retrieval: The scan tool will begin retrieving the DTCs from the vehicle’s computer. This process may take a few seconds.
Understanding DTC Categories
DTCs are categorized into several groups based on the affected system or component. The most common categories include:
- P Codes (Powertrain): These codes relate to the engine, transmission, and related components.
- B Codes (Body): These codes relate to the vehicle’s body systems, such as airbags, power windows, and door locks.
- C Codes (Chassis): These codes relate to the chassis systems, such as ABS (Anti-lock Braking System) and traction control.
- U Codes (Network): These codes relate to the vehicle’s communication network.
The first character of the DTC indicates the category. For example, a code that starts with “P” is a powertrain code.
Interpreting DTCs
Each DTC consists of five characters: a letter followed by four numbers. The letter indicates the category, and the numbers provide more specific information about the issue.
- Example: P0300 – Random/Multiple Cylinder Misfire Detected
In this example, “P” indicates a powertrain code, “0300” indicates a random or multiple cylinder misfire.
Using the Scan Tool’s Resources
Many Innova OBD2 scan tools have built-in resources to help you interpret DTCs.
- Code Definitions: The scan tool may display a brief definition of each code.
- Troubleshooting Tips: Some scan tools provide troubleshooting tips and potential solutions for common DTCs.
- Online Databases: Some scan tools can connect to online databases to provide more detailed information about DTCs.
According to a report by J.D. Power, having access to code definitions and troubleshooting tips can significantly improve the accuracy and efficiency of vehicle diagnostics.
записывая коды
It’s essential to record the DTCs that the scan tool retrieves.
- Write Down the Codes: Use a pen and paper to write down each DTC.
- Note the Order: Pay attention to the order in which the codes are listed, as this may indicate the severity or priority of the issues.
- Include Definitions: Write down the definition of each code as provided by the scan tool.
Having a written record of the DTCs will help you research the issues and develop a plan for repairs.
5. Understanding Freeze Frame Data
What is freeze frame data and how can it help me diagnose issues on my Mercedes-Benz using the Innova OBD2 scan tool? Freeze frame data captures vehicle operating conditions at the moment a DTC is triggered, offering valuable insights into the cause of the problem. At MERCEDES-DIAGNOSTIC-TOOL.EDU.VN, we explain how to use freeze frame data to enhance your diagnostic accuracy and efficiency. This deeper understanding allows for more targeted repairs.
Freeze frame data is a snapshot of your Mercedes-Benz’s operating conditions at the moment a Diagnostic Trouble Code (DTC) is triggered. This data can provide valuable insights into the cause of the problem and help you diagnose issues more effectively.
Accessing Freeze Frame Data
- Read DTCs First: Before accessing freeze frame data, read the DTCs as described in the previous section.
- Select “Freeze Frame Data”: Look for an option labeled “Freeze Frame Data” or similar in the scan tool’s menu. This option may be located in the same menu as “Read Codes.”
- Choose the Relevant Code: If multiple DTCs are present, the scan tool may prompt you to select the code for which you want to view freeze frame data.
Key Parameters in Freeze Frame Data
Freeze frame data typically includes the following parameters:
- Engine Speed (RPM): Indicates the engine speed at the time the DTC was triggered.
- Vehicle Speed: Indicates the vehicle speed at the time the DTC was triggered.
- Engine Load: Indicates the percentage of maximum engine load.
- Coolant Temperature: Indicates the engine coolant temperature.
- Fuel Trim: Indicates the adjustments made to the fuel mixture by the engine control unit (ECU).
- Intake Manifold Pressure: Indicates the pressure in the intake manifold.
- Oxygen Sensor Readings: Indicates the voltage output of the oxygen sensors.
Interpreting Freeze Frame Data
Analyzing freeze frame data can help you understand the conditions that led to the DTC being triggered.
- Example: If a DTC for a misfire (P0300) is accompanied by freeze frame data showing high engine speed and low coolant temperature, this may indicate a cold start misfire.
- Matching Conditions: Compare the freeze frame data to the conditions under which the problem occurs. If the data matches the conditions, it is more likely that the data is relevant to the problem.
Using Freeze Frame Data for Diagnostics
Freeze frame data can be a valuable tool for diagnosing intermittent problems.
- Identify the Conditions: Use the freeze frame data to identify the conditions under which the problem occurred.
- Recreate the Conditions: Try to recreate those conditions to see if the problem reoccurs.
- Monitor Live Data: While recreating the conditions, monitor live data from the scan tool to see if any other parameters change.
According to a study by the American Automobile Association (AAA), using freeze frame data can reduce diagnostic time by up to 25%.
Limitations of Freeze Frame Data
Freeze frame data has some limitations:
- Not Always Available: Freeze frame data is not always available for every DTC.
- Limited Parameters: Freeze frame data only includes a limited number of parameters.
- Snapshot in Time: Freeze frame data is a snapshot in time and may not capture the entire sequence of events leading to the DTC.
Despite these limitations, freeze frame data can be a valuable tool for diagnosing vehicle issues.
6. Live Data Streaming and Monitoring
How do I use live data streaming with my Innova OBD2 scan tool to monitor my Mercedes-Benz’s performance in real-time? Live data streaming allows you to monitor various parameters as your vehicle operates, providing crucial insights into its health. At MERCEDES-DIAGNOSTIC-TOOL.EDU.VN, we guide you in interpreting this data to identify anomalies and optimize performance. This real-time monitoring is invaluable for proactive maintenance.
Live data streaming allows you to monitor various parameters of your Mercedes-Benz’s engine and other systems in real-time. This can be a valuable tool for diagnosing performance issues and identifying potential problems before they become serious.
Accessing Live Data
- Connect the Scan Tool: Connect the Innova OBD2 scan tool to your Mercedes-Benz as described in previous sections.
- Select “Live Data”: Look for an option labeled “Live Data,” “Data Stream,” or similar in the scan tool’s menu.
- Choose Parameters: The scan tool will display a list of available parameters. Select the parameters you want to monitor. Common parameters include engine speed, vehicle speed, coolant temperature, fuel trim, and oxygen sensor readings.
Interpreting Live Data
Interpreting live data requires some knowledge of how your Mercedes-Benz’s systems operate.
- Engine Speed (RPM): Should be stable at idle and increase smoothly as you accelerate.
- Vehicle Speed: Should match your actual speed.
- Coolant Temperature: Should rise to the normal operating range after the engine warms up.
- Fuel Trim: Should be close to zero. Large positive or negative values may indicate a fuel system problem.
- Oxygen Sensor Readings: Should fluctuate rapidly as the engine operates.
Using Live Data for Diagnostics
Live data can be used to diagnose a variety of issues.
- Example: If your Mercedes-Benz is experiencing poor fuel economy, you can use live data to monitor fuel trim values. If the fuel trim values are consistently high, this may indicate a vacuum leak or a problem with the fuel injectors.
- Identifying Anomalies: Look for any unusual or unexpected values in the live data. These anomalies may indicate a problem with a specific system or component.
Graphing Live Data
Some Innova OBD2 scan tools allow you to graph live data. This can be helpful for visualizing trends and identifying anomalies.
- Select “Graph Mode”: Look for an option labeled “Graph Mode” or similar in the scan tool’s menu.
- Choose Parameters: Select the parameters you want to graph.
- View the Graph: The scan tool will display a graph of the selected parameters over time.
By viewing the data in graph form, you can more easily identify trends and anomalies that may be difficult to see in numerical form.
Recording Live Data
Some Innova OBD2 scan tools allow you to record live data. This can be helpful for diagnosing intermittent problems.
- Select “Record Data”: Look for an option labeled “Record Data” or similar in the scan tool’s menu.
- Choose Parameters: Select the parameters you want to record.
- Start Recording: Start the recording and drive your Mercedes-Benz under the conditions that cause the problem.
- Stop Recording: Stop the recording when the problem occurs.
- Review the Data: Review the recorded data to see if any parameters changed leading up to the problem.
According to a study by the Automotive Management Institute (AMI), recording live data can significantly improve the accuracy and efficiency of diagnosing intermittent problems.
7. Performing Component Tests
How can I perform component tests using my Innova OBD2 scan tool on my Mercedes-Benz to pinpoint specific issues? Component tests allow you to evaluate the functionality of individual parts of your vehicle. At MERCEDES-DIAGNOSTIC-TOOL.EDU.VN, we provide detailed guidance on conducting these tests to ensure accurate diagnoses and effective repairs. These tests are essential for targeted troubleshooting.
Component tests allow you to test the functionality of specific components in your Mercedes-Benz’s engine and other systems. This can be a valuable tool for pinpointing the source of a problem.
Accessing Component Tests
- Connect the Scan Tool: Connect the Innova OBD2 scan tool to your Mercedes-Benz as described in previous sections.
- Select “Component Tests”: Look for an option labeled “Component Tests,” “Actuator Tests,” or similar in the scan tool’s menu.
- Choose the Component: The scan tool will display a list of available components. Select the component you want to test. Common components include fuel injectors, oxygen sensors, and EGR valves.
Types of Component Tests
The types of component tests available will vary depending on the scan tool and the vehicle. Common types of component tests include:
- Actuator Tests: These tests allow you to activate and deactivate specific components to see if they are functioning properly.
- Sensor Tests: These tests allow you to monitor the output of specific sensors to see if they are within the expected range.
- Circuit Tests: These tests allow you to check the continuity and voltage of specific circuits.
Performing Component Tests
The procedure for performing a component test will vary depending on the scan tool and the component being tested.
- Follow the Instructions: Carefully follow the instructions provided by the scan tool.
- Observe the Results: Observe the results of the test to see if the component is functioning properly.
- Interpret the Results: Interpret the results of the test to determine if the component needs to be replaced.
Example: Testing an Oxygen Sensor
- Select “Oxygen Sensor Test”: Choose the oxygen sensor test from the component tests menu.
- Follow the Instructions: Follow the instructions provided by the scan tool. This may involve starting the engine and allowing it to warm up.
- Observe the Readings: Observe the voltage readings from the oxygen sensor. The voltage should fluctuate rapidly as the engine operates.
- Interpret the Results: If the voltage is not fluctuating, the oxygen sensor may need to be replaced.
Safety Precautions
When performing component tests, it’s important to take certain safety precautions.
- Disconnect the Battery: Disconnect the battery before performing any tests that involve electrical circuits.
- Wear Safety Glasses: Wear safety glasses to protect your eyes from any potential hazards.
- Follow the Instructions: Carefully follow the instructions provided by the scan tool and the vehicle manufacturer.
According to the National Safety Council (NSC), following safety precautions can significantly reduce the risk of injury when working on vehicles.
8. Clearing Diagnostic Trouble Codes (DTCs)
How do I clear diagnostic trouble codes (DTCs) on my Mercedes-Benz using my Innova OBD2 scanner after making repairs? Clearing DTCs involves navigating the scan tool’s menu and following the prompts. At MERCEDES-DIAGNOSTIC-TOOL.EDU.VN, we emphasize the importance of only clearing codes after addressing the underlying issues to ensure accurate monitoring. This practice is crucial for maintaining your vehicle’s diagnostic integrity.
Clearing Diagnostic Trouble Codes (DTCs) is the final step in the diagnostic process. However, it’s important to clear DTCs only after you have addressed the underlying issues.
Accessing the Clear Codes Function
- Connect the Scan Tool: Connect the Innova OBD2 scan tool to your Mercedes-Benz as described in previous sections.
- Select “Erase Codes”: Look for an option labeled “Erase Codes,” “Clear Codes,” or similar in the scan tool’s menu.
- Confirm the Action: The scan tool will display a warning message asking you to confirm that you want to erase the codes. Read the message carefully and confirm the action.
Understanding the Implications of Clearing Codes
Clearing DTCs will erase the stored diagnostic information from the vehicle’s computer. This can have several implications:
- Loss of Freeze Frame Data: Clearing DTCs will erase any freeze frame data associated with those codes.
- Resetting Readiness Monitors: Clearing DTCs will reset the readiness monitors, which are used to verify that the emissions systems are functioning properly.
- Potential for Reappearance: If the underlying issue has not been addressed, the DTCs may reappear.
When to Clear Codes
You should only clear DTCs after you have:
- Diagnosed the Issue: Identified the underlying cause of the DTCs.
- Repaired the Issue: Repaired or replaced any faulty components.
- Verified the Repair: Verified that the repair has resolved the issue.
Clearing DTCs before addressing the underlying issues can mask the problem and make it more difficult to diagnose in the future.
Verifying the Repair
After clearing DTCs, it’s important to verify that the repair has resolved the issue.
- Drive the Vehicle: Drive the vehicle under the conditions that caused the DTCs to be triggered.
- Monitor for Reappearance: Monitor the vehicle for any signs that the DTCs have reappeared.
- Check Readiness Monitors: Check the readiness monitors to ensure that they have completed.
If the DTCs reappear or the readiness monitors do not complete, this may indicate that the repair was not successful.
Potential Issues After Clearing Codes
After clearing DTCs, you may experience some issues.
- Rough Idle: The engine may idle rough for a short period of time.
- Poor Fuel Economy: The fuel economy may be poor for a short period of time.
- Hesitation: The engine may hesitate when accelerating.
These issues are typically temporary and will resolve themselves as the vehicle’s computer relearns the optimal settings.
9. Advanced Functions and Customization
What advanced functions and customization options does my Innova OBD2 scan tool offer for my Mercedes-Benz, and how can I use them? Advanced functions can include bidirectional controls, module programming, and customization settings. At MERCEDES-DIAGNOSTIC-TOOL.EDU.VN, we offer resources to help you understand and utilize these advanced features safely and effectively. These capabilities can greatly enhance your diagnostic and maintenance efforts.
Advanced functions and customization options can significantly enhance your diagnostic capabilities.
Bidirectional Controls
Bidirectional controls allow you to send commands to the vehicle’s computer and activate specific components. This can be useful for testing components and diagnosing issues.
- Example: You can use bidirectional controls to activate the fuel pump, the cooling fan, or the EGR valve.
- Accessing Bidirectional Controls: The process for accessing bidirectional controls will vary depending on the scan tool. Look for an option labeled “Bidirectional Controls,” “Actuator Tests,” or similar in the scan tool’s menu.
- Safety Precautions: When using bidirectional controls, it’s important to take certain safety precautions. Follow the instructions provided by the scan tool and the vehicle manufacturer.
Module Programming
Module programming allows you to reprogram the vehicle’s computer modules. This can be necessary after replacing a module or to update the software.
- Complexity: Module programming is a complex process that should only be performed by experienced technicians.
- Potential Risks: Incorrect module programming can damage the vehicle’s computer.
- Accessing Module Programming: The process for accessing module programming will vary depending on the scan tool. Look for an option labeled “Module Programming,” “ECU Programming,” or similar in the scan tool’s menu.
- Safety Precautions: When performing module programming, it’s important to take certain safety precautions. Follow the instructions provided by the scan tool and the vehicle manufacturer.
Customization Settings
Some Innova OBD2 scan tools offer customization settings that allow you to modify certain vehicle functions.
- Example: You can use customization settings to adjust the sensitivity of the automatic headlights, the volume of the turn signal chime, or the behavior of the automatic door locks.
- Accessing Customization Settings: The process for accessing customization settings will vary depending on the scan tool. Look for an option labeled “Customization,” “Settings,” or similar in the scan tool’s menu.
- Safety Precautions: When using customization settings, it’s important to take certain safety precautions. Only modify settings that you understand and follow the instructions provided by the scan tool and the vehicle manufacturer.
Software Updates
Innova regularly releases software updates for their OBD2 scan tools. These updates may include new features, bug fixes, and compatibility updates.
- Importance of Updates: It’s important to keep your scan tool’s software up to date to ensure that it is functioning properly and that you have access to the latest features.
- Updating Software: The process for updating the software will vary depending on the scan tool. Follow the instructions provided by Innova.
Potential Risks
Using advanced functions and customization options can be risky if not done properly.
- Damage to Vehicle: Incorrect use of these features can damage the vehicle’s computer or other components.
- Loss of Functionality: Incorrect use of these features can cause the vehicle to lose functionality.
- Safety Concerns: Incorrect use of these features can create safety concerns.
It’s important to proceed with caution and to follow the instructions provided by the scan tool and the vehicle manufacturer.
10. Maintenance and Care of Your Innova OBD2 Scan Tool
How do I properly maintain and care for my Innova OBD2 scan tool to ensure its longevity and accuracy when diagnosing my Mercedes-Benz? Proper maintenance involves cleaning, storing, and updating the tool. At MERCEDES-DIAGNOSTIC-TOOL.EDU.VN, we provide tips to help you keep your tool in optimal condition, ensuring reliable performance. This care is essential for accurate and consistent diagnostics.
Proper maintenance and care of your Innova OBD2 scan tool are essential to ensure its longevity and accuracy.
Cleaning the Scan Tool
Keep the scan tool clean by wiping it down with a soft, dry cloth.
- Avoid Harsh Chemicals: Avoid using harsh chemicals or solvents, as these can damage the scan tool.
- Clean the Connector: Clean the connector with a cotton swab to remove any dirt or debris.
Storing the Scan Tool
Store the scan tool in a safe, dry place.
- Avoid Extreme Temperatures: Avoid storing the scan tool in extreme temperatures, as these can damage the components.
- Use a Case: Use a case or bag to protect the scan tool from dust and moisture.
Updating the Software
Keep the scan tool’s software up to date.
- Check for Updates: Regularly check for software updates on Innova’s website.
- Follow the Instructions: Follow the instructions provided by Innova to update the software.
Replacing the Battery
If the scan tool is battery-powered, replace the battery when it gets weak.
- Use the Correct Battery: Use the correct type of battery.
- Follow the Instructions: Follow the instructions provided by Innova to replace the battery.
Inspecting the Cable
Regularly inspect the cable for damage.
- Look for Cracks: Look for cracks or breaks in the cable.
- Replace if Damaged: Replace the cable if it is damaged.
Avoiding Moisture
Keep the scan tool away from moisture.
- Avoid Wet Environments: Avoid using the scan tool in wet environments.
- Dry Immediately: If the scan tool gets wet, dry it immediately with a soft, dry cloth.
Handling with Care
Handle the scan tool with care.
- Avoid Dropping: Avoid dropping the scan tool.
- Avoid Impact: Avoid exposing the scan tool to impact.
Following these maintenance and care tips will help you keep your Innova OBD2 scan tool in good condition and ensure that it provides accurate and reliable diagnostic information for years to come.
By understanding how to use your Innova OBD2 scan tool effectively, you can diagnose and address issues with your Mercedes-Benz, potentially saving significant repair costs and ensuring your vehicle operates at peak performance.
For expert guidance, detailed instructions, and comprehensive support on utilizing Innova OBD2 scanners for your Mercedes-Benz, contact us at MERCEDES-DIAGNOSTIC-TOOL.EDU.VN. Call us at +1 (641) 206-8880 or visit us at 789 Oak Avenue, Miami, FL 33101, United States. Let us help you unlock the full potential of your diagnostic tool and keep your Mercedes-Benz running smoothly.