Is A 96 Prelude Obd1 Or Obd2? The answer, meticulously explained by MERCEDES-DIAGNOSTIC-TOOL.EDU.VN, is that the 1996 Honda Prelude can be either OBD1 or OBD2 depending on several factors. We’ll explore these distinctions, offering clarity and solutions for owners and technicians alike, ensuring your Prelude receives the correct diagnostic and repair approaches, with insights into engine control units, diagnostic ports, and sensor compatibility.
Contents
- 1. Understanding OBD1 and OBD2 Systems
- 1.1. What is OBD1?
- 1.2. What is OBD2?
- 1.3. Key Differences Between OBD1 and OBD2
- 2. Why the 1996 Prelude Can Be a Grey Area
- 2.1. Transition Year Challenges
- 2.2. Factors Determining OBD System Type
- 2.3. Real-World Examples
- 3. How to Identify Whether Your 96 Prelude is OBD1 or OBD2
- 3.1. Checking the Diagnostic Port
- 3.2. Examining the ECU (Engine Control Unit)
- 3.3. Looking for Labels and Stickers
- 3.4. Using a Scan Tool
- 4. Implications of Having OBD1 vs. OBD2
- 4.1. Diagnostic Procedures
- 4.2. Repair Processes
- 4.3. Modification Options
- 4.4. Emission Testing
- 5. Common Issues When Interfacing OBD1 Engine with OBD2 Chassis
- 5.1. Sensor Compatibility
- 5.2. Wiring Harness Differences
- 5.3. ECU Compatibility
- 5.4. Diagnostic Port Functionality
- 5.5. Emission Compliance
- 5.6. Crank Position Sensor (CKP) and Top Dead Center (TDC) Sensor Issues
- 6. Step-by-Step Guide to Converting from OBD1 to OBD2 (If Applicable)
- 6.1. Assess the Feasibility
- 6.2. Gather Necessary Components
- 6.3. Wiring and Connections
- 6.4. Sensor Installation
- 6.5. ECU Programming and Calibration
- 6.6. Testing and Verification
- 7. Using Aftermarket Solutions for OBD1/OBD2 Compatibility
- 7.1. Conversion Harnesses
- 7.2. Standalone ECUs
- 7.3. OBD2 Emulators
- 7.4. Sensor Adapters
- 7.5. Diagnostic Scan Tools
- 8. Tips for Maintaining a 96 Prelude with an OBD1 Engine
- 8.1. Regular Inspections
- 8.2. Proper Diagnostic Procedures
- 8.3. Stay Informed
- 8.4. Component Care
- 8.5. Emission Compliance
- 9. Real-World Case Studies
- 9.1. Case Study 1: OBD1 Prelude with Misfire Code
- 9.2. Case Study 2: OBD2 Prelude with O2 Sensor Code
- 9.3. Case Study 3: OBD1 Engine in OBD2 Chassis Conversion
- 10. FAQ About 96 Prelude OBD Systems
- 10.1. How Can I Tell if My 1996 Prelude is OBD1 or OBD2?
- 10.2. What Does OBD Stand For?
- 10.3. Can I Use an OBD2 Scanner on an OBD1 System?
- 10.4. What Are Common Issues with OBD1 Systems?
- 10.5. What Are the Benefits of OBD2 Systems?
- 10.6. How Can I Convert an OBD1 System to OBD2?
- 10.7. What is a CKP Sensor?
- 10.8. What is a TDC Sensor?
- 10.9. How Do I Find the Diagnostic Port in My 1996 Prelude?
- 10.10. Where Can I Get Help with Diagnosing My 1996 Prelude?
1. Understanding OBD1 and OBD2 Systems
On-Board Diagnostics (OBD) systems are essential for monitoring a vehicle’s performance and emissions. OBD1 and OBD2 are two generations of these systems, each with distinct characteristics. Understanding these differences is vital for diagnosing and repairing vehicles effectively.
1.1. What is OBD1?
OBD1, the first generation of on-board diagnostic systems, was implemented in vehicles before 1996. It lacked standardization, meaning each manufacturer could use different diagnostic connectors, protocols, and trouble codes. This made diagnosing issues more complex and required specialized tools for each car brand.
1.2. What is OBD2?
OBD2, introduced in 1996, standardized diagnostic systems across all vehicles sold in the United States. It features a universal diagnostic connector (SAE J1962), a standardized set of diagnostic trouble codes (DTCs), and enhanced monitoring capabilities for emissions-related components. OBD2 provides more detailed and consistent diagnostic information, making it easier for technicians to identify and fix problems.
1.3. Key Differences Between OBD1 and OBD2
| Feature | OBD1 | OBD2 |
|---|---|---|
| Standardization | Non-standardized | Standardized across all vehicles |
| Diagnostic Connector | Various, manufacturer-specific | Universal SAE J1962 connector |
| Trouble Codes | Manufacturer-specific | Standardized DTCs (P0xxx, P1xxx, etc.) |
| Monitoring | Limited monitoring capabilities | Enhanced monitoring of emissions components |
| Data Access | Requires specialized tools | Accessible with standard OBD2 scanners |
| Year of Adoption | Before 1996 | 1996 and newer |
Understanding these differences helps in accurately diagnosing and addressing issues in your vehicle, ensuring proper repairs and maintenance. According to a study by the EPA, OBD2 systems have significantly improved the detection and repair of emissions-related problems, leading to cleaner air and better vehicle performance.
2. Why the 1996 Prelude Can Be a Grey Area
The 1996 Honda Prelude’s diagnostic system isn’t always clear-cut. As the automotive industry transitioned to OBD2 in 1996, some models were equipped with OBD1, while others had OBD2. This transition period creates confusion, requiring owners and technicians to verify the specific diagnostic system in their vehicle.
2.1. Transition Year Challenges
1996 was a pivotal year for automotive diagnostics, with manufacturers phasing in OBD2 systems. This transition means that some 1996 models might have been produced with leftover OBD1 components, while others were fully equipped with OBD2. The exact production date and market destination can influence which system is installed.
2.2. Factors Determining OBD System Type
Several factors determine whether a 1996 Prelude has OBD1 or OBD2:
- Production Date: Early 1996 models are more likely to have OBD1, while later models may have OBD2.
- Market Destination: Vehicles manufactured for sale in California, which often had stricter emissions standards, were more likely to have OBD2.
- Specific Model Trim: Certain trim levels or special editions might have been equipped with OBD2 earlier than standard models.
2.3. Real-World Examples
Consider these scenarios:
- Scenario 1: A 1996 Prelude manufactured in early 1996 and sold outside California is likely to have OBD1.
- Scenario 2: A 1996 Prelude manufactured in late 1996 and sold in California is likely to have OBD2.
These examples illustrate the importance of checking your specific vehicle to determine its diagnostic system.
3. How to Identify Whether Your 96 Prelude is OBD1 or OBD2
Identifying whether your 1996 Prelude is OBD1 or OBD2 involves checking the diagnostic port, examining the ECU, and looking for specific labels or stickers. These steps will provide a definitive answer.
3.1. Checking the Diagnostic Port
The easiest way to determine your Prelude’s OBD system is to check the diagnostic port:
- OBD1: The diagnostic port is typically located under the dashboard, but it is not a standard 16-pin connector. It may be a 2-pin connector or another proprietary connector.
- OBD2: The diagnostic port is a standard 16-pin (SAE J1962) connector, usually located under the dashboard on the driver’s side.
 OBD2 Port
3.2. Examining the ECU (Engine Control Unit)
The ECU can provide clues about the OBD system:
- OBD1 ECU: The ECU code will typically be specific to OBD1 systems and may not be compatible with OBD2 scanners.
- OBD2 ECU: The ECU code will be designed for OBD2 systems and should be compatible with standard OBD2 scanners.
Check the ECU part number and research it online to confirm its OBD compatibility.
3.3. Looking for Labels and Stickers
Check for labels or stickers under the hood or on the driver’s side doorjamb:
- OBD1 Vehicles: May have labels indicating compliance with OBD1 standards or specific diagnostic procedures.
- OBD2 Vehicles: Should have a sticker stating “OBD2 Compliant” or “Certified to meet U.S. EPA OBD2 regulations.”
3.4. Using a Scan Tool
The most straightforward method is to use a scan tool:
- OBD1 Scan Tool: If the scan tool connects and retrieves data, your vehicle is likely OBD1.
- OBD2 Scan Tool: If the scan tool connects and retrieves data, your vehicle is OBD2.
If an OBD2 scanner fails to connect, it suggests the vehicle might be OBD1.
4. Implications of Having OBD1 vs. OBD2
The type of OBD system in your 1996 Prelude has significant implications for diagnostics, repairs, and modifications. Understanding these implications ensures you use the correct tools and procedures.
4.1. Diagnostic Procedures
- OBD1: Requires specialized tools and knowledge. Diagnostic trouble codes (DTCs) are manufacturer-specific, making it harder to interpret issues without the correct resources.
- OBD2: Uses standardized DTCs and can be diagnosed with any standard OBD2 scanner. This makes it easier to identify and address problems.
4.2. Repair Processes
- OBD1: Repair information may be limited and harder to find. Correcting issues might require more trial and error.
- OBD2: Repair information is widely available, and the standardized system allows for more precise diagnostics, leading to more efficient repairs.
4.3. Modification Options
- OBD1: Modifying an OBD1 system can be challenging due to the lack of standardization. Aftermarket parts and tuning options may be limited.
- OBD2: Offers more flexibility for modifications due to the standardized interface. A wide range of aftermarket parts and tuning solutions are available.
4.4. Emission Testing
- OBD1: Emission testing may involve different procedures and equipment, depending on local regulations.
- OBD2: Emission testing is standardized, with the testing equipment directly reading diagnostic data from the OBD2 port.
According to a report by the California Air Resources Board (CARB), OBD2 systems have significantly improved the accuracy and efficiency of emission testing, leading to better compliance with environmental regulations.
5. Common Issues When Interfacing OBD1 Engine with OBD2 Chassis
When interfacing an OBD1 engine with an OBD2 chassis, several common issues can arise. Addressing these issues correctly is essential for ensuring your vehicle runs smoothly and complies with emissions standards.
5.1. Sensor Compatibility
- Problem: OBD1 and OBD2 systems use different sensors that may not be directly compatible.
- Solution: Use conversion harnesses or adapters to ensure proper signal translation between the engine sensors and the chassis wiring. Verify that the sensors are correctly calibrated for the OBD2 system.
5.2. Wiring Harness Differences
- Problem: The wiring harnesses for OBD1 and OBD2 vehicles are different, leading to connection issues.
- Solution: Create custom wiring harnesses or use adapter harnesses to bridge the gap between the OBD1 engine and the OBD2 chassis. Ensure all connections are secure and properly insulated.
5.3. ECU Compatibility
- Problem: The OBD1 ECU may not be compatible with the OBD2 vehicle’s systems, such as the immobilizer or other electronic components.
- Solution: Consider using a standalone ECU that can be programmed to work with both the OBD1 engine and the OBD2 chassis. Ensure the ECU is correctly tuned for optimal performance and emissions.
5.4. Diagnostic Port Functionality
- Problem: The OBD1 engine will not communicate correctly with the OBD2 diagnostic port, making it difficult to read diagnostic trouble codes.
- Solution: Install an OBD2-to-OBD1 conversion adapter or rewire the diagnostic port to be compatible with the OBD1 ECU. This allows you to read diagnostic information using an OBD1 scanner.
5.5. Emission Compliance
- Problem: An OBD1 engine in an OBD2 chassis may not meet current emission standards, leading to failed emission tests.
- Solution: Ensure the engine is correctly tuned and equipped with all necessary emission control devices. Consider using a catalytic converter and other emission components designed for OBD2 compliance.
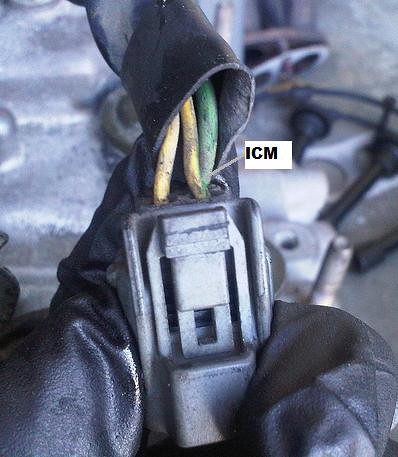
5.6. Crank Position Sensor (CKP) and Top Dead Center (TDC) Sensor Issues
- Problem: OBD2 systems often rely on CKP and TDC sensors for engine timing and diagnostics, which may not be present or compatible in an OBD1 engine.
- Solution: Install CKP and TDC sensors that are compatible with the OBD2 system. If the OBD1 engine lacks these sensors, consider using an OBD1 distributor with internal sensors and create a subharness to connect it to the OBD2 system.
6. Step-by-Step Guide to Converting from OBD1 to OBD2 (If Applicable)
Converting a 1996 Prelude from OBD1 to OBD2 is a complex process that requires significant technical expertise. If you’re considering this conversion, follow these steps carefully.
6.1. Assess the Feasibility
- Evaluate the Costs: Converting to OBD2 involves purchasing new components, wiring harnesses, and possibly a new ECU.
- Consider the Complexity: This project requires advanced electrical and mechanical skills. If you’re not experienced, seek professional help.
- Check Local Regulations: Ensure the conversion complies with local emission standards.
6.2. Gather Necessary Components
- OBD2 ECU: Obtain an OBD2 ECU compatible with your engine.
- OBD2 Wiring Harness: Acquire a complete OBD2 wiring harness or conversion harness.
- OBD2 Sensors: Purchase OBD2-compatible sensors for your engine (e.g., O2 sensors, CKP sensor, TPS sensor).
- OBD2 Diagnostic Port: Get an OBD2 diagnostic port connector.
6.3. Wiring and Connections
- ECU Wiring: Connect the OBD2 ECU to the engine wiring harness, ensuring all pins are correctly aligned.
- Sensor Connections: Install and connect the OBD2 sensors to the wiring harness.
- Diagnostic Port Wiring: Wire the OBD2 diagnostic port connector to the ECU, following the pinout diagram.
6.4. Sensor Installation
- Install OBD2 Sensors: Replace the OBD1 sensors with OBD2-compatible sensors. This may require modifying sensor mounts or using adapters.
- CKP and TDC Sensors: Ensure these sensors are correctly installed and aligned for proper engine timing.
6.5. ECU Programming and Calibration
- Program the ECU: Flash the OBD2 ECU with the correct software for your engine.
- Calibrate Sensors: Use a professional scan tool to calibrate the new sensors, ensuring they provide accurate readings.
6.6. Testing and Verification
- Run Diagnostics: Use an OBD2 scanner to read diagnostic trouble codes and verify that all sensors are functioning correctly.
- Perform Emission Testing: Check if the converted system passes local emission tests.
7. Using Aftermarket Solutions for OBD1/OBD2 Compatibility
Several aftermarket solutions can help bridge the gap between OBD1 and OBD2 systems, making it easier to diagnose and manage your vehicle.
7.1. Conversion Harnesses
- Function: Adapter harnesses allow you to connect an OBD1 engine to an OBD2 chassis without extensive rewiring.
- Benefits: Simplifies the installation process, reduces the risk of wiring errors, and maintains the integrity of the original wiring.
- Example: A conversion harness for installing an OBD1 H22A engine into a 1996-2001 Honda Prelude.
7.2. Standalone ECUs
- Function: These ECUs replace the factory ECU and offer full control over engine parameters.
- Benefits: Allows for custom tuning, supports a wide range of sensors, and can be configured to work with both OBD1 and OBD2 systems.
- Example: AEM EMS Series 2, Hondata S300.
7.3. OBD2 Emulators
- Function: These devices simulate OBD2 signals, allowing an OBD1 system to communicate with OBD2 diagnostic tools.
- Benefits: Enables you to read diagnostic trouble codes and monitor engine performance using a standard OBD2 scanner.
- Limitations: May not provide full OBD2 functionality.
7.4. Sensor Adapters
- Function: These adapters allow you to use OBD2 sensors with an OBD1 engine, or vice versa.
- Benefits: Simplifies sensor installation and ensures compatibility between different systems.
- Example: Adapters for using OBD2 O2 sensors with an OBD1 exhaust system.
7.5. Diagnostic Scan Tools
- Function: Specialized scan tools that support both OBD1 and OBD2 systems.
- Benefits: Allows you to diagnose a wide range of vehicles with a single tool.
- Example: Snap-on MT2500 Red Brick, Autel MaxiSys MS906BT.
8. Tips for Maintaining a 96 Prelude with an OBD1 Engine
Maintaining a 1996 Prelude with an OBD1 engine requires specific knowledge and care. Here are some tips to keep your vehicle running smoothly.
8.1. Regular Inspections
- Check Sensor Connections: Regularly inspect sensor connections for corrosion or damage. Clean and secure connections as needed.
- Monitor Wiring Harness: Inspect the wiring harness for cracks, fraying, or damage. Repair or replace damaged sections to prevent electrical issues.
- Examine Vacuum Lines: Check vacuum lines for leaks or cracks, which can affect engine performance. Replace any damaged lines.
8.2. Proper Diagnostic Procedures
- Use a Compatible Scan Tool: Use a scan tool that supports OBD1 diagnostics to read trouble codes and monitor engine parameters.
- Consult Repair Manuals: Refer to the Honda Prelude repair manual for OBD1-specific diagnostic procedures and troubleshooting tips.
8.3. Stay Informed
- Join Online Forums: Participate in online forums and communities dedicated to Honda Preludes. Share experiences and learn from other owners.
- Keep Records: Maintain detailed records of repairs, maintenance, and modifications. This helps track issues and plan future maintenance.
8.4. Component Care
- Distributor Maintenance: Regularly inspect and maintain the distributor, including the cap, rotor, and ignition coil.
- Sensor Replacement: Replace sensors as needed, using high-quality replacements to ensure accurate readings.
8.5. Emission Compliance
- Monitor Emission Components: Regularly check emission components, such as the catalytic converter and oxygen sensors, to ensure they are functioning correctly.
- Perform Regular Tune-Ups: Keep the engine properly tuned to minimize emissions and maintain optimal performance.
9. Real-World Case Studies
Examining real-world case studies can provide practical insights into diagnosing and resolving OBD issues in 1996 Honda Preludes.
9.1. Case Study 1: OBD1 Prelude with Misfire Code
- Vehicle: 1996 Honda Prelude with an OBD1 system.
- Problem: Engine misfire, indicated by a misfire code on the OBD1 scanner.
- Diagnosis:
- Checked spark plugs, wires, distributor cap, and rotor.
- Found a cracked distributor cap causing intermittent spark.
- Solution: Replaced the distributor cap, resolving the misfire issue.
- Lesson Learned: Regular inspection of ignition components is crucial for OBD1 systems.
9.2. Case Study 2: OBD2 Prelude with O2 Sensor Code
- Vehicle: 1996 Honda Prelude with an OBD2 system.
- Problem: Check engine light on, indicating an O2 sensor code.
- Diagnosis:
- Used an OBD2 scanner to confirm the O2 sensor code.
- Tested the O2 sensor with a multimeter and found it was not responding correctly.
- Solution: Replaced the faulty O2 sensor, clearing the check engine light.
- Lesson Learned: OBD2 systems provide precise diagnostic information, making it easier to identify and replace faulty sensors.
9.3. Case Study 3: OBD1 Engine in OBD2 Chassis Conversion
- Vehicle: 1996 Honda Prelude with an OBD2 chassis, converted to run an OBD1 engine.
- Problem: Difficulty getting the OBD2 diagnostic port to communicate with the OBD1 engine.
- Diagnosis:
- Verified wiring and connections between the OBD1 engine and the OBD2 chassis.
- Found the CKP and TDC sensors were not properly connected.
- Solution: Created a custom wiring harness to connect the CKP and TDC sensors to the OBD2 system.
- Lesson Learned: Proper wiring and sensor compatibility are essential for successful OBD1-to-OBD2 conversions.
10. FAQ About 96 Prelude OBD Systems
10.1. How Can I Tell if My 1996 Prelude is OBD1 or OBD2?
Check the diagnostic port under the dashboard. OBD1 systems have a non-standard connector, while OBD2 systems have a standard 16-pin connector.
10.2. What Does OBD Stand For?
OBD stands for On-Board Diagnostics, a system that monitors a vehicle’s performance and emissions.
10.3. Can I Use an OBD2 Scanner on an OBD1 System?
No, OBD2 scanners are not compatible with OBD1 systems without an adapter or conversion.
10.4. What Are Common Issues with OBD1 Systems?
Common issues include non-standard diagnostic connectors, manufacturer-specific trouble codes, and limited diagnostic information.
10.5. What Are the Benefits of OBD2 Systems?
OBD2 systems offer standardized diagnostic connectors, trouble codes, and enhanced monitoring capabilities, making diagnostics and repairs easier.
10.6. How Can I Convert an OBD1 System to OBD2?
Converting to OBD2 involves replacing the ECU, wiring harness, sensors, and diagnostic port. It’s a complex process that requires significant technical expertise.
10.7. What is a CKP Sensor?
A CKP (Crankshaft Position) sensor monitors the position and speed of the crankshaft, providing essential data for engine timing and diagnostics.
10.8. What is a TDC Sensor?
A TDC (Top Dead Center) sensor detects when a piston is at its highest point in the cylinder, providing critical data for engine control.
10.9. How Do I Find the Diagnostic Port in My 1996 Prelude?
The diagnostic port is typically located under the dashboard on the driver’s side. Check your vehicle’s repair manual for the exact location.
10.10. Where Can I Get Help with Diagnosing My 1996 Prelude?
You can seek assistance from MERCEDES-DIAGNOSTIC-TOOL.EDU.VN, online forums, and qualified mechanics specializing in Honda vehicles.
Is a 96 Prelude OBD1 or OBD2? Navigating the nuances of your 1996 Honda Prelude’s diagnostic system requires careful inspection and the right tools. At MERCEDES-DIAGNOSTIC-TOOL.EDU.VN, we’re dedicated to providing you with the expertise and resources needed to accurately diagnose and maintain your vehicle. Whether you’re dealing with an OBD1 or OBD2 system, our comprehensive guides, professional advice, and top-of-the-line diagnostic tools ensure your Prelude performs at its best.
Ready to take the next step in diagnosing and optimizing your 1996 Prelude? Contact us today for expert guidance and personalized solutions. Visit MERCEDES-DIAGNOSTIC-TOOL.EDU.VN or call +1 (641) 206-8880. Our team is here to help you unlock the full potential of your Mercedes-Benz. You can find us at 789 Oak Avenue, Miami, FL 33101, United States.
Keywords: OBD1, OBD2, Honda Prelude, diagnostic port, ECU, sensors, conversion harness, emission testing, engine control unit, diagnostic tools.
LSI Keywords: On-Board Diagnostics, Crank Position Sensor, Top Dead Center Sensor, Automotive Diagnostics, Engine Performance.