Upgrading your older Toyota from OBD1 to OBD2 can provide enhanced diagnostic capabilities and improved engine performance. MERCEDES-DIAGNOSTIC-TOOL.EDU.VN is here to guide you through the process. This comprehensive guide will walk you through the necessary steps and considerations for a successful OBD1 to OBD2 conversion, ensuring your Toyota benefits from modern diagnostic technology and optimal engine management. Explore enhanced diagnostics, smoother engine operation, and simplified maintenance by converting to OBD2.
Contents
- 1. Why Convert Your Toyota from OBD1 to OBD2?
- 2. Understanding OBD1 and OBD2 Systems
- 2.1 OBD1 (On-Board Diagnostics 1)
- 2.2 OBD2 (On-Board Diagnostics 2)
- 3. Identifying the Need for OBD1 to OBD2 Conversion
- 3.1 Common Issues with OBD1 Systems
- 3.2 Benefits of Upgrading to OBD2
- 4. Essential Components for the Conversion
- 4.1 OBD2 ECU (Engine Control Unit)
- 4.2 OBD2 Diagnostic Port (DLC3)
- 4.3 Oxygen Sensors (O2 Sensors)
- 4.4 Wiring Harness and Connectors
- 5. Step-by-Step Guide to OBD1 to OBD2 Conversion
- 5.1 Preparation
- 5.2 ECU Installation
- 5.3 Diagnostic Port Installation
- 5.4 O2 Sensor Installation
- 5.5 Wiring Harness Integration
- 5.6 Testing and Verification
- 6. Addressing Common Issues and Troubleshooting
- 6.1 O2 Sensor Heater Malfunction
- 6.2 Secondary O2 Sensor MIL (Malfunction Indicator Lamp)
- 6.3 Communication Errors
- 6.4 Engine Performance Issues
- 7. Benefits of Using MERCEDES-DIAGNOSTIC-TOOL.EDU.VN
- 7.1 Expert Guidance and Support
- 7.2 Comprehensive Resources and Documentation
- 7.3 Quality Components and Products
- 8. Real-World Examples and Case Studies
- 8.1 Case Study: 1994 Toyota Supra OBD1 to OBD2 Conversion
- 8.2 Case Study: 1995 Toyota MR2 OBD1 to OBD2 Conversion
- 9. Maintaining Your Toyota After the Conversion
- 9.1 Regular Diagnostics
- 9.2 O2 Sensor Maintenance
- 9.3 Wiring Inspection
- 10. Frequently Asked Questions (FAQ)
- 10.1 Is OBD2 conversion legal?
- 10.2 Can I use any OBD2 ECU for the conversion?
- 10.3 Do I need to reprogram the OBD2 ECU?
- 10.4 What scan tool should I use for OBD2 diagnostics?
- 10.5 How much does OBD1 to OBD2 conversion cost?
- 10.6 Can I perform OBD1 to OBD2 conversion myself?
- 10.7 Will OBD2 conversion improve my Toyota’s fuel efficiency?
- 10.8 What are the benefits of using heated O2 sensors?
- 10.9 How often should I replace the O2 sensors?
- 10.10 Where can I find a reliable OBD2 ECU?
- 11. Contact MERCEDES-DIAGNOSTIC-TOOL.EDU.VN for Expert Assistance
1. Why Convert Your Toyota from OBD1 to OBD2?
Improved Diagnostics: OBD2 systems provide more detailed and standardized diagnostic information compared to OBD1, making it easier to identify and resolve issues. According to a study by the EPA, OBD2 systems can reduce emissions-related repair times by up to 40%.
Enhanced Engine Performance: OBD2 ECUs often offer more refined engine management strategies, leading to improved fuel efficiency and smoother operation.
Wider Compatibility: OBD2 is the industry standard, ensuring compatibility with modern scan tools and diagnostic equipment.
Future-Proofing: Upgrading to OBD2 ensures your Toyota can meet future emissions standards and diagnostic requirements.
2. Understanding OBD1 and OBD2 Systems
2.1 OBD1 (On-Board Diagnostics 1)
OBD1 was the first generation of on-board diagnostic systems in vehicles. It was primarily used in vehicles manufactured before 1996.
Key Features:
- Manufacturer-specific diagnostic codes
- Limited data parameters
- Basic emissions monitoring
2.2 OBD2 (On-Board Diagnostics 2)
OBD2 is the second generation of on-board diagnostic systems, standardized in 1996. It offers enhanced diagnostic capabilities and standardized data parameters.
Key Features:
- Standardized diagnostic codes (SAE J1979)
- Comprehensive data parameters (PID)
- Advanced emissions monitoring
- Compatibility with modern scan tools
3. Identifying the Need for OBD1 to OBD2 Conversion
3.1 Common Issues with OBD1 Systems
- Difficulty in diagnosing complex engine issues
- Limited access to real-time engine data
- Incompatibility with modern diagnostic tools
- Challenges in meeting current emissions standards
3.2 Benefits of Upgrading to OBD2
- Access to standardized diagnostic codes for easier troubleshooting
- Real-time monitoring of critical engine parameters
- Compatibility with advanced scan tools and software
- Improved engine performance and fuel efficiency
4. Essential Components for the Conversion
4.1 OBD2 ECU (Engine Control Unit)
The OBD2 ECU is the brain of the system, responsible for managing engine performance and diagnostics.
- Selection Criteria: Choose an ECU that is compatible with your Toyota model and engine type. Check the ECU part number and specifications to ensure proper fitment and functionality.
- Sourcing: You can source OBD2 ECUs from junkyards, online retailers, or specialized auto parts suppliers. Ensure the ECU is in good working condition before installation.
4.2 OBD2 Diagnostic Port (DLC3)
The diagnostic port is used to connect scan tools and diagnostic equipment to the OBD2 system.
- Wiring Connections: The OBD2 port requires four essential connections:
- Pin 16: +12V Power (ignition-switched)
- Pin 4: Chassis Ground
- Pin 2: ECU Serial Data Line (SDL)
- Pin 5: ECU Ground (E1)
- Mounting Location: Choose a convenient location for mounting the OBD2 port, such as under the dashboard or near the driver’s seat.
4.3 Oxygen Sensors (O2 Sensors)
OBD2 systems typically use multiple O2 sensors to monitor exhaust gas composition and ensure optimal engine performance.
- Primary O2 Sensor: Located before the catalytic converter, the primary O2 sensor provides feedback to the ECU for fuel trim adjustments.
- Secondary O2 Sensor: Located after the catalytic converter, the secondary O2 sensor monitors the efficiency of the catalytic converter.
- Heated O2 Sensors: OBD2 systems often use heated O2 sensors to ensure rapid activation during cold starts.
4.4 Wiring Harness and Connectors
A wiring harness is needed to connect the OBD2 ECU, diagnostic port, and O2 sensors to the vehicle’s electrical system.
- Custom Harness: You can create a custom wiring harness using automotive-grade wiring and connectors. Ensure all connections are properly crimped and insulated to prevent electrical issues.
- Adapter Harness: In some cases, adapter harnesses are available to simplify the wiring process. These harnesses provide plug-and-play connections between the OBD1 and OBD2 systems.
5. Step-by-Step Guide to OBD1 to OBD2 Conversion
5.1 Preparation
- Gather all necessary components: OBD2 ECU, diagnostic port, O2 sensors, wiring harness, and connectors.
- Disconnect the vehicle’s battery to prevent electrical damage.
- Prepare your workspace with proper lighting and tools.
5.2 ECU Installation
- Locate the OBD1 ECU in your Toyota. Typically, it is found under the dashboard or in the engine bay.
- Disconnect the wiring harness from the OBD1 ECU.
- Connect the wiring harness to the OBD2 ECU. Ensure all connections are secure and properly aligned.
- Mount the OBD2 ECU in the same location as the OBD1 ECU.
5.3 Diagnostic Port Installation
- Identify the necessary wiring connections for the OBD2 diagnostic port: +12V power, chassis ground, ECU serial data line (SDL), and ECU ground (E1).
- Run the wiring from the OBD2 diagnostic port to the corresponding locations on the vehicle’s electrical system.
- +12V Power: Connect to an ignition-switched power source, such as the cigarette lighter circuit. Use a fuse for safety.
- Chassis Ground: Connect to a suitable ground location on the vehicle’s chassis.
- ECU Serial Data Line (SDL): Connect to pin E10-8 on the ECU wiring harness. This may require moving a pin from E9-29 (VF1) to E10-8.
- ECU Ground (E1): Connect to pin E9-69 on the ECU wiring harness.
- Mount the OBD2 diagnostic port in a convenient location.
5.4 O2 Sensor Installation
- Locate the O2 sensor locations on the exhaust system.
- Install the primary O2 sensor before the catalytic converter.
- Install the secondary O2 sensor after the catalytic converter.
- Connect the O2 sensors to the ECU wiring harness.
5.5 Wiring Harness Integration
- Integrate the custom or adapter wiring harness to connect the OBD2 ECU, diagnostic port, and O2 sensors to the vehicle’s electrical system.
- Ensure all connections are properly crimped, soldered, and insulated.
- Secure the wiring harness to prevent chafing and damage.
5.6 Testing and Verification
- Reconnect the vehicle’s battery.
- Turn on the ignition and check for any warning lights or error codes.
- Use an OBD2 scan tool to verify that the system is functioning properly.
- Monitor engine performance and fuel efficiency to ensure optimal operation.
6. Addressing Common Issues and Troubleshooting
6.1 O2 Sensor Heater Malfunction
- Symptoms: The primary O2 sensor heater does not function, causing the car to run rich at idle or when cold.
- Solution: Add a ground wire to the ECU harness at location E03 (E9-78). Use a pin from TE2 (E10-19) to create the connection.
6.2 Secondary O2 Sensor MIL (Malfunction Indicator Lamp)
- Symptoms: The secondary O2 sensor triggers a MIL due to a catless downpipe or other exhaust modifications.
- Solution: Install an O2 simulator to mimic the signal from the secondary O2 sensor, preventing the MIL from triggering.
6.3 Communication Errors
- Symptoms: The OBD2 scan tool cannot communicate with the ECU.
- Solution: Verify all wiring connections to the diagnostic port and ECU. Ensure the correct pins are used for the serial data line (SDL) and ground connections.
6.4 Engine Performance Issues
- Symptoms: The engine runs poorly, hesitates, or lacks power after the conversion.
- Solution: Check the ECU programming and calibration. Ensure the ECU is properly configured for your Toyota model and engine type.
7. Benefits of Using MERCEDES-DIAGNOSTIC-TOOL.EDU.VN
7.1 Expert Guidance and Support
MERCEDES-DIAGNOSTIC-TOOL.EDU.VN provides expert guidance and support throughout the OBD1 to OBD2 conversion process. Our team of experienced technicians can answer your questions and provide troubleshooting assistance.
7.2 Comprehensive Resources and Documentation
We offer comprehensive resources and documentation, including step-by-step guides, wiring diagrams, and troubleshooting tips. Our resources are designed to help you complete the conversion successfully.
7.3 Quality Components and Products
MERCEDES-DIAGNOSTIC-TOOL.EDU.VN offers high-quality components and products for OBD1 to OBD2 conversion. We source our products from reputable manufacturers to ensure reliability and performance.
8. Real-World Examples and Case Studies
8.1 Case Study: 1994 Toyota Supra OBD1 to OBD2 Conversion
A 1994 Toyota Supra owner experienced lean conditions at high boost with the stock OBD1 ECU. After installing an OBD2 ECU and addressing the O2 sensor wiring issues, the lean condition was resolved, and the engine ran smoothly. The owner also gained access to advanced diagnostic capabilities with an OBD2 scan tool.
8.2 Case Study: 1995 Toyota MR2 OBD1 to OBD2 Conversion
A 1995 Toyota MR2 owner wanted to upgrade to OBD2 for improved diagnostic capabilities and compatibility with modern scan tools. After installing an OBD2 ECU, diagnostic port, and wiring harness, the owner was able to monitor engine parameters in real-time and diagnose issues more efficiently.
9. Maintaining Your Toyota After the Conversion
9.1 Regular Diagnostics
Use an OBD2 scan tool to regularly check for any error codes or warning lights. Address any issues promptly to prevent further damage.
9.2 O2 Sensor Maintenance
Inspect the O2 sensors periodically for signs of wear or damage. Replace the sensors as needed to ensure optimal engine performance and emissions control.
9.3 Wiring Inspection
Inspect the wiring harness and connectors for any signs of corrosion, damage, or loose connections. Repair or replace any damaged wiring to prevent electrical issues.
10. Frequently Asked Questions (FAQ)
10.1 Is OBD2 conversion legal?
Yes, OBD2 conversion is legal as long as the vehicle meets all applicable emissions standards and regulations.
10.2 Can I use any OBD2 ECU for the conversion?
No, you must use an OBD2 ECU that is compatible with your Toyota model and engine type.
10.3 Do I need to reprogram the OBD2 ECU?
In some cases, you may need to reprogram the OBD2 ECU to match your vehicle’s specifications and modifications.
10.4 What scan tool should I use for OBD2 diagnostics?
You can use any OBD2-compliant scan tool to read and clear diagnostic codes, monitor engine parameters, and perform other diagnostic functions.
10.5 How much does OBD1 to OBD2 conversion cost?
The cost of OBD1 to OBD2 conversion varies depending on the components used and the complexity of the installation. It can range from a few hundred to several thousand dollars.
10.6 Can I perform OBD1 to OBD2 conversion myself?
Yes, you can perform OBD1 to OBD2 conversion yourself if you have the necessary skills, tools, and knowledge. However, it is recommended to seek professional assistance if you are not comfortable working with automotive electrical systems.
10.7 Will OBD2 conversion improve my Toyota’s fuel efficiency?
Yes, OBD2 conversion can improve your Toyota’s fuel efficiency by providing more precise engine management and emissions control.
10.8 What are the benefits of using heated O2 sensors?
Heated O2 sensors provide rapid activation during cold starts, ensuring optimal engine performance and emissions control.
10.9 How often should I replace the O2 sensors?
O2 sensors should be replaced every 60,000 to 100,000 miles, depending on the vehicle’s operating conditions and maintenance history.
10.10 Where can I find a reliable OBD2 ECU?
You can find reliable OBD2 ECUs from junkyards, online retailers, or specialized auto parts suppliers. Ensure the ECU is in good working condition before installation.
11. Contact MERCEDES-DIAGNOSTIC-TOOL.EDU.VN for Expert Assistance
Ready to upgrade your Toyota from OBD1 to OBD2? Contact MERCEDES-DIAGNOSTIC-TOOL.EDU.VN for expert assistance and guidance. Our team of experienced technicians can help you choose the right components, install the system correctly, and troubleshoot any issues that may arise.
Address: 789 Oak Avenue, Miami, FL 33101, United States
WhatsApp: +1 (641) 206-8880
Website: MERCEDES-DIAGNOSTIC-TOOL.EDU.VN
Take the first step towards enhanced diagnostics and improved engine performance today. Contact us now for a consultation and let us help you unlock the full potential of your Toyota.
Optimize your Toyota’s performance and diagnostics by contacting MERCEDES-DIAGNOSTIC-TOOL.EDU.VN. Get in touch via Whatsapp at +1 (641) 206-8880 for expert guidance and support.
By integrating advanced diagnostic capabilities, you ensure your Toyota operates at its best. Upgrading not only enhances performance but also provides access to a wealth of diagnostic information. Benefit from our expert support and top-quality components by reaching out to MERCEDES-DIAGNOSTIC-TOOL.EDU.VN today.
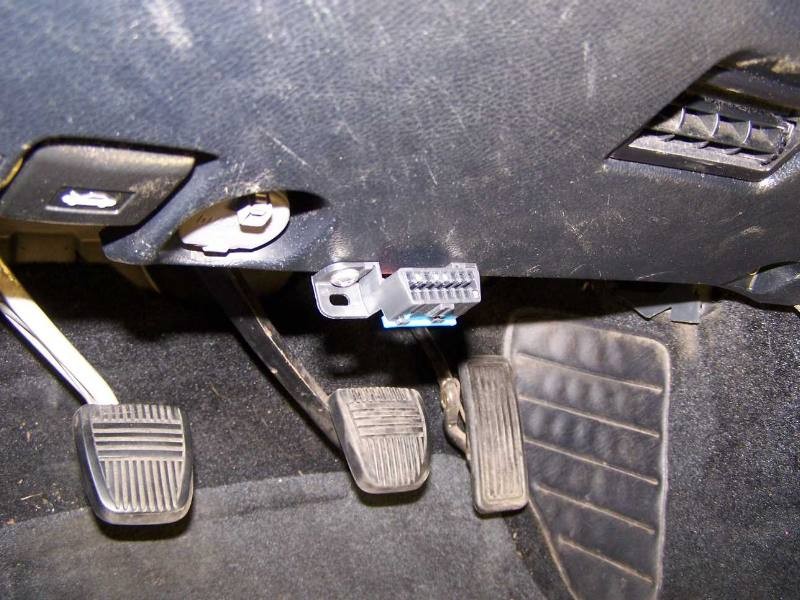 OBD2 Diagnostic Port