Are you looking to diagnose issues with your Tesla Model 3 but struggling to find the OBD2 port? This comprehensive guide from MERCEDES-DIAGNOSTIC-TOOL.EDU.VN will pinpoint the exact location of the Tesla Model 3 OBD2 port and walk you through the process of accessing it, ensuring you can effectively use diagnostic tools. Let’s explore how to access diagnostic data and enhance your vehicle maintenance using essential tools and unlocking hidden features, improving vehicle performance, and streamlining maintenance procedures.
Contents
- 1. Understanding the Tesla Model 3 OBD2 Port
- 1.1. What is an OBD2 Port?
- 1.2. Why Tesla Uses a Proprietary Connector
- 2. Locating the OBD2 Port in Tesla Model 3
- 2.1. Step-by-Step Guide to Accessing the Diagnostic Connector
- 2.2. Tools Needed to Access the Port
- 2.3. Precautions Before Accessing the Port
- 3. Recommended OBD2 Tools for Tesla Model 3
- 3.1. OBDLink MX+
- 3.2. Scan My Tesla App
- 3.3. TM-Spy App
- 4. Using the OBD2 Port for Diagnostics
- 4.1. Reading Error Codes
- 4.2. Monitoring Real-Time Data
- 4.3. Common Issues Diagnosed via OBD2
- 5. Advanced Diagnostics and Customization
- 5.1. Unlocking Hidden Features
- 5.2. Performance Tuning
- 5.3. Risks and Benefits of Advanced Diagnostics
- 6. Maintaining Your Tesla Model 3 with OBD2 Diagnostics
- 6.1. Regular Health Checks
- 6.2. Identifying Potential Issues Early
- 6.3. Extending Vehicle Lifespan
- 7. Troubleshooting Common OBD2 Connection Issues
- 7.1. Verifying Cable Connections
- 7.2. Ensuring Dongle Compatibility
- 7.3. App Compatibility
- 7.4. Software Updates
- 7.5. Vehicle Shutdown
- 8. Safety Considerations
- 8.1. Avoiding Electrical Damage
- 8.2. Protecting Vehicle Data
- 8.3. Disclaimer of Liability
- 9. Alternatives to Using the OBD2 Port
- 9.1. Tesla Service Center
- 9.2. Mobile Service
- 9.3. Third-Party Repair Shops
- 10. Future of Tesla Diagnostics
- 10.1. Over-the-Air Diagnostics
- 10.2. AI-Powered Diagnostics
- 10.3. Enhanced Data Access
- FAQ: Tesla Model 3 OBD2 Port
- 1. What is the OBD2 port used for in a Tesla Model 3?
- 2. Where is the OBD2 port located in the Tesla Model 3?
- 3. What tools do I need to access the OBD2 port in my Tesla Model 3?
- 4. How do I read error codes using the OBD2 port?
- 5. Can I unlock hidden features using the OBD2 port?
- 6. Is it safe to use the OBD2 port for advanced diagnostics?
- 7. How often should I perform a health check using the OBD2 port?
- 8. What should I do if I can’t connect to the OBD2 port?
- 9. What are some alternatives to using the OBD2 port for diagnostics?
- 10. How can I protect my vehicle’s data when using the OBD2 port?
1. Understanding the Tesla Model 3 OBD2 Port
Is there an OBD2 port in a Tesla Model 3, and why is it important?
Yes, the Tesla Model 3 has a diagnostic port, although it isn’t a standard OBD2 port. Instead, it uses a proprietary Tesla connector. This port is crucial for accessing vehicle data, diagnosing potential issues, and even unlocking certain features. The diagnostic port allows technicians and owners to read CAN bus data, which provides insights into various vehicle systems, including battery health, motor performance, and sensor readings. Having access to this data is essential for proactive maintenance and resolving issues that might not be immediately apparent.
1.1. What is an OBD2 Port?
What is the purpose of an OBD2 port in modern vehicles?
An OBD2 (On-Board Diagnostics II) port is a standardized interface used in most modern vehicles to access diagnostic data. It allows technicians and vehicle owners to connect diagnostic tools to read error codes, monitor system performance, and troubleshoot issues. This standardized port simplifies vehicle diagnostics and maintenance, making it easier to identify and resolve problems quickly.
1.2. Why Tesla Uses a Proprietary Connector
Why doesn’t Tesla use a standard OBD2 port in the Model 3?
Tesla uses a proprietary connector in the Model 3 to control access to vehicle data and ensure compatibility with their diagnostic systems. This approach allows Tesla to maintain a higher level of security and integration with their software and hardware. While it requires the use of specific adapters, it also ensures that only authorized tools and technicians can access sensitive vehicle information, protecting against potential tampering and unauthorized modifications.
2. Locating the OBD2 Port in Tesla Model 3
Where is the OBD2 port located in the Tesla Model 3?
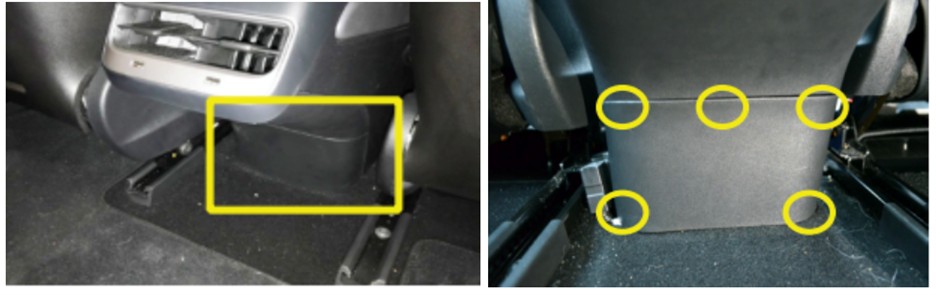
The diagnostic connector in the Tesla Model 3 is located at the rear of the center console, under the air vents. It’s accessible from the rear legroom after removing the rear center console cover. This location is consistent across most Model 3 vehicles, but slight variations may exist depending on the production year and specific model configurations.
2.1. Step-by-Step Guide to Accessing the Diagnostic Connector
How do I physically access the diagnostic connector in my Tesla Model 3?
Follow these steps to access the diagnostic connector in your Tesla Model 3:
- Prepare the Vehicle: Slide both front seats all the way forward to create more space in the back.
- Locate the Plastic Panel: Go to the back seat and find the small plastic panel at the bottom of the center console, positioned between the two front seats.
- Remove the Panel: This panel is held in place by five push-fit clips. These clips release when pressure is applied, allowing the panel to be opened by hand.
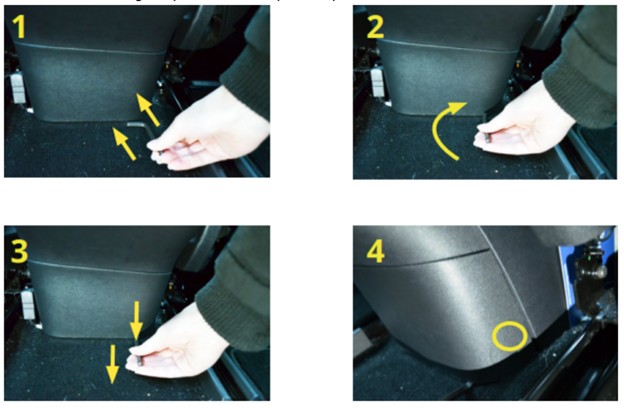
- Use an Allen Wrench or Screwdriver: Slide the short end of an Allen wrench or L-shaped screwdriver under the panel on the right side. Rotate the tool so the short end is vertical and pull towards you, parallel to the floor, to loosen the bottom right clip.
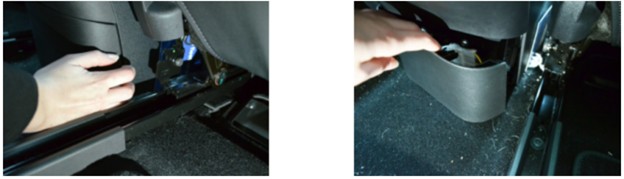
- Pull the Panel Free: Use your hands to pull the panel toward you, loosening the clip at the top right. Continue loosening and opening the remaining three clips until the panel is completely free.
- Access the Connector: Inside the panel, you will find the Tesla Proprietary Diagnostic Connector.
- Disconnect the White Connector: Press the clip that holds the white connector in place and slide it to the left to release it.
- Plug in the Diagnostic Cable: Plug the two white ends of the diagnostic cable into the corresponding connectors in the vehicle, ensuring they click into place.
- Connect the OBDLink Dongle: Plug in the OBDLink dongle and connect it to your phone or tablet to start the diagnostic process.
 Tesla Model 3 Diagnostic Port Location
2.2. Tools Needed to Access the Port
What tools are required to access the Tesla Model 3 diagnostic port?
To access the diagnostic port, you’ll need a few basic tools:
- Allen Wrench or L-shaped Screwdriver: To help remove the plastic panel covering the diagnostic port.
- Tesla Model 3 Diagnostic Cable: A proprietary cable that adapts the Tesla connector to a standard OBD2 connection.
- OBDLink OBD2 Dongle: A device that plugs into the diagnostic cable and communicates with your phone or tablet via Bluetooth or Wi-Fi.
- Suitable App: Such as Scan My Tesla or TM-Spy, to read and interpret the diagnostic data.
2.3. Precautions Before Accessing the Port
What precautions should I take before accessing the diagnostic port on my Tesla Model 3?
Before accessing the diagnostic port, it’s crucial to take the following precautions:
- Turn Off the Vehicle: Ensure the Tesla Model 3 is completely turned off before plugging in the diagnostic cable.
- Allow Shutdown Time: The shutdown process takes about 15 minutes and can be initiated from the main screen in the Tesla.
- Avoid Damage: Failure to turn off the car before inserting the cable can potentially damage the vehicle and cause errors.
- Inspect the Cable: Always check the diagnostic cable for any signs of damage before each use to prevent potential issues.
- Understand Risks: Connecting equipment to your Tesla is done entirely at your own risk. Be aware that Carvitas cannot be held responsible for any damage to your vehicle caused by improper use of diagnostic tools.
3. Recommended OBD2 Tools for Tesla Model 3
Which OBD2 tools are recommended for use with the Tesla Model 3?
Several OBD2 tools are compatible with the Tesla Model 3, each offering different features and capabilities. Here are some recommended options:
3.1. OBDLink MX+
Why is the OBDLink MX+ a popular choice for Tesla Model 3 diagnostics?
The OBDLink MX+ is a highly recommended OBD2 scanner for Tesla Model 3 due to its fast performance, comprehensive vehicle support, and compatibility with various diagnostic apps. It supports both Bluetooth and Wi-Fi connectivity, making it easy to connect to your smartphone or tablet. The MX+ also offers advanced features such as enhanced diagnostics, live data streaming, and the ability to clear trouble codes.
3.2. Scan My Tesla App
What are the key features of the Scan My Tesla app for Model 3 diagnostics?
Scan My Tesla is a dedicated app designed specifically for Tesla vehicles, providing in-depth diagnostic information and access to various vehicle parameters. Key features include:
- Real-Time Data: Displays real-time data from various sensors and systems.
- Error Code Reading: Reads and clears diagnostic trouble codes (DTCs).
- Battery Monitoring: Monitors battery health, voltage, and temperature.
- Detailed Analytics: Provides detailed analytics on vehicle performance and energy consumption.
3.3. TM-Spy App
How does the TM-Spy app enhance Tesla Model 3 diagnostics?
TM-Spy is another popular app for Tesla diagnostics, offering similar features to Scan My Tesla but with a different user interface and additional capabilities. Key features include:
- Advanced Diagnostics: Provides advanced diagnostic information and access to hidden vehicle settings.
- Data Logging: Allows you to log data for later analysis.
- Customizable Dashboards: Enables you to create custom dashboards to monitor specific parameters.
- Remote Access: Offers remote access capabilities, allowing you to monitor your vehicle from anywhere.
4. Using the OBD2 Port for Diagnostics
How can I use the OBD2 port to diagnose issues with my Tesla Model 3?
Once you have accessed the diagnostic port and connected an OBD2 tool, you can use it to diagnose various issues with your Tesla Model 3. Here’s a general process:
4.1. Reading Error Codes
How do I read and interpret error codes using an OBD2 scanner?
- Connect the Scanner: Plug the OBD2 scanner into the diagnostic port and turn on the vehicle.
- Launch the App: Open the diagnostic app on your smartphone or tablet and connect to the scanner via Bluetooth or Wi-Fi.
- Read Codes: Select the option to read error codes. The app will display a list of diagnostic trouble codes (DTCs) along with their descriptions.
- Interpret Codes: Research the meaning of each DTC to understand the potential issue. Online resources and vehicle-specific forums can be helpful in interpreting the codes.
- Clear Codes (Optional): If you have resolved the issue, you can clear the error codes using the app. However, be cautious when clearing codes, as it may erase important diagnostic information.
4.2. Monitoring Real-Time Data
What real-time data can I monitor using the OBD2 port?
The OBD2 port allows you to monitor a wide range of real-time data, including:
- Battery Voltage: Monitor the voltage of the high-voltage battery.
- Motor Temperature: Track the temperature of the electric motor.
- Battery Temperature: Monitor the temperature of the battery pack.
- Cell Balancing: Observe the cell balancing process in the battery pack.
- Charging Status: View the current charging status and rate.
- Energy Consumption: Track energy consumption and efficiency.
- Speed and RPM: Monitor vehicle speed and motor RPM.
4.3. Common Issues Diagnosed via OBD2
What are some common issues that can be diagnosed using the Tesla Model 3 OBD2 port?
The OBD2 port can help diagnose a variety of issues, including:
- Battery Problems: Issues with battery health, voltage, or temperature.
- Motor Malfunctions: Problems with the electric motor, such as overheating or performance issues.
- Sensor Failures: Failures in various sensors throughout the vehicle.
- Charging Issues: Problems with the charging system or charging rate.
- Communication Errors: Errors in communication between different vehicle systems.
5. Advanced Diagnostics and Customization
Can the OBD2 port be used for advanced diagnostics and customization on the Tesla Model 3?
Yes, the OBD2 port can be used for advanced diagnostics and customization, but it requires specialized knowledge and tools.
5.1. Unlocking Hidden Features
What hidden features can be unlocked using the OBD2 port?
Some Tesla owners use the OBD2 port to unlock hidden features or customize vehicle settings. These features can include:
- Performance Enhancements: Adjusting motor parameters for increased performance.
- Display Customization: Customizing the display settings and user interface.
- Feature Activation: Activating features that were disabled by default.
However, it’s important to note that modifying vehicle settings can void the warranty and potentially cause damage if not done correctly. Always proceed with caution and consult with experienced professionals before making any modifications.
5.2. Performance Tuning
Is it possible to tune the Tesla Model 3 for better performance using the OBD2 port?
Yes, it is possible to tune the Tesla Model 3 for better performance using the OBD2 port, but it requires specialized software and expertise. Performance tuning can involve adjusting motor parameters, optimizing battery usage, and tweaking other settings to improve acceleration, top speed, or overall efficiency.
5.3. Risks and Benefits of Advanced Diagnostics
What are the potential risks and benefits of performing advanced diagnostics on the Tesla Model 3?
Benefits:
- Enhanced Performance: Improved acceleration, top speed, or efficiency.
- Customization: Personalizing vehicle settings and features.
- Detailed Insights: Gaining deeper insights into vehicle performance and system behavior.
Risks:
- Warranty Voidance: Modifying vehicle settings can void the manufacturer’s warranty.
- Potential Damage: Incorrect modifications can cause damage to the vehicle’s systems.
- Security Risks: Unauthorized access to the OBD2 port can pose security risks.
6. Maintaining Your Tesla Model 3 with OBD2 Diagnostics
How can OBD2 diagnostics help with the maintenance of my Tesla Model 3?
OBD2 diagnostics can play a crucial role in maintaining your Tesla Model 3 by providing valuable insights into the vehicle’s health and performance.
6.1. Regular Health Checks
How often should I perform a health check using the OBD2 port?
Performing regular health checks using the OBD2 port can help you identify potential issues before they become major problems. It’s recommended to perform a health check at least once a month or before any long trips. This proactive approach allows you to monitor key parameters, such as battery health, motor temperature, and sensor readings, ensuring your vehicle is in optimal condition.
6.2. Identifying Potential Issues Early
How can OBD2 diagnostics help identify potential issues early?
By monitoring real-time data and reading error codes, you can identify potential issues early and take corrective action before they escalate. For example, detecting a drop in battery voltage or an increase in motor temperature can indicate a problem that needs attention. Early detection can prevent costly repairs and extend the lifespan of your vehicle.
6.3. Extending Vehicle Lifespan
How can regular OBD2 diagnostics contribute to extending the lifespan of my Tesla Model 3?
Regular OBD2 diagnostics can contribute to extending the lifespan of your Tesla Model 3 by allowing you to address issues promptly and maintain optimal performance. By monitoring key parameters and identifying potential problems early, you can ensure that your vehicle operates efficiently and reliably for years to come.
 Tesla Model 3 OBD2 Port
7. Troubleshooting Common OBD2 Connection Issues
What should I do if I encounter issues connecting to the OBD2 port in my Tesla Model 3?
If you encounter issues connecting to the OBD2 port, here are some troubleshooting steps to consider:
7.1. Verifying Cable Connections
How do I ensure that the diagnostic cable is properly connected?
- Check Connections: Ensure that the diagnostic cable is securely connected to both the Tesla diagnostic port and the OBDLink dongle.
- Inspect Cables: Check the cables for any signs of damage, such as frayed wires or loose connectors.
- Try Again: Disconnect and reconnect the cables to ensure a proper connection.
7.2. Ensuring Dongle Compatibility
Is my OBD2 dongle compatible with the Tesla Model 3?
Not all OBD2 dongles are compatible with the Tesla Model 3. Ensure that you are using a compatible dongle, such as the OBDLink MX+. Check the manufacturer’s website or user manual for compatibility information.
7.3. App Compatibility
Is the diagnostic app compatible with my OBD2 dongle and Tesla Model 3?
Ensure that the diagnostic app you are using is compatible with both your OBD2 dongle and Tesla Model 3. Some apps may require specific dongles or software versions to function correctly. Check the app’s documentation for compatibility requirements.
7.4. Software Updates
Are the OBD2 dongle and diagnostic app up to date?
Outdated software can cause compatibility issues and prevent the OBD2 dongle from connecting to the diagnostic port. Ensure that both the OBD2 dongle and diagnostic app are updated to the latest versions.
7.5. Vehicle Shutdown
Has the Tesla Model 3 been properly shut down before connecting the OBD2 dongle?
The Tesla Model 3 must be completely shut down before connecting the OBD2 dongle. The shutdown process takes about 15 minutes and can be initiated from the main screen in the Tesla. Failure to properly shut down the vehicle can cause communication errors and prevent the dongle from connecting.
8. Safety Considerations
What safety precautions should I keep in mind when working with the OBD2 port?
When working with the OBD2 port, it’s important to prioritize safety to prevent damage to your vehicle or personal injury.
8.1. Avoiding Electrical Damage
How can I prevent electrical damage when connecting to the OBD2 port?
- Turn Off the Vehicle: Always turn off the vehicle before connecting or disconnecting any diagnostic equipment.
- Use Proper Equipment: Use only approved and compatible diagnostic tools and cables.
- Avoid Short Circuits: Be careful not to create any short circuits when working with electrical connectors.
- Inspect Cables: Regularly inspect cables for any signs of damage, such as frayed wires or exposed conductors.
8.2. Protecting Vehicle Data
How can I protect my vehicle’s data when using the OBD2 port?
- Use Secure Apps: Use only trusted and secure diagnostic apps from reputable sources.
- Avoid Public Networks: Avoid connecting to public Wi-Fi networks when using the OBD2 port, as they may be vulnerable to hacking.
- Update Software: Keep your diagnostic app and OBD2 dongle software up to date to protect against security vulnerabilities.
- Limit Access: Limit access to the OBD2 port to authorized personnel only.
8.3. Disclaimer of Liability
What are the limitations of liability when using the OBD2 port?
Connecting equipment to your Tesla is done entirely at your own risk. Carvitas cannot be held responsible for any damage to your vehicle caused by improper use of diagnostic tools. The user is responsible for checking for any damage to the cable before use, both upon receipt and before each use. The cable we supply is an adapter that allows you to read data from the car. The cable uses the car’s CAN hi and Lo signals and also powers the OBD dongle.
9. Alternatives to Using the OBD2 Port
What are some alternative methods for diagnosing issues with the Tesla Model 3?
While the OBD2 port is a valuable tool for diagnosing issues, there are alternative methods that can be used as well.
9.1. Tesla Service Center
What are the benefits of taking my Tesla Model 3 to a Tesla Service Center for diagnostics?
Taking your Tesla Model 3 to a Tesla Service Center offers several benefits:
- Expert Technicians: Access to trained and certified Tesla technicians.
- Specialized Tools: Use of specialized diagnostic tools and equipment.
- Warranty Coverage: Potential warranty coverage for repairs.
- Genuine Parts: Use of genuine Tesla parts.
9.2. Mobile Service
What is Tesla Mobile Service, and how can it help with diagnostics?
Tesla Mobile Service is a convenient option that brings diagnostic and repair services directly to your location. A Tesla technician will come to your home or office to diagnose and fix your vehicle. This can save you time and hassle compared to taking your car to a service center.
9.3. Third-Party Repair Shops
Are there any reputable third-party repair shops that specialize in Tesla vehicles?
Yes, there are several reputable third-party repair shops that specialize in Tesla vehicles. These shops often offer diagnostic and repair services at competitive prices. However, it’s important to choose a shop with experienced technicians and a good reputation.
10. Future of Tesla Diagnostics
What does the future hold for Tesla diagnostics, and how will it impact vehicle maintenance?
The future of Tesla diagnostics is likely to involve more advanced technologies and greater integration with vehicle systems.
10.1. Over-the-Air Diagnostics
Will Tesla offer over-the-air diagnostic capabilities in the future?
It’s likely that Tesla will offer more advanced over-the-air diagnostic capabilities in the future. This would allow Tesla to remotely monitor vehicle health and identify potential issues without the need for a physical connection to the OBD2 port.
10.2. AI-Powered Diagnostics
How could AI and machine learning enhance Tesla diagnostics?
AI and machine learning could be used to analyze vehicle data and predict potential issues before they occur. This would enable proactive maintenance and prevent costly repairs.
10.3. Enhanced Data Access
Will Tesla provide greater access to vehicle data for owners and third-party developers?
It’s possible that Tesla will provide greater access to vehicle data for owners and third-party developers in the future. This would enable the development of new diagnostic tools and applications, empowering owners to take greater control of their vehicle’s maintenance.
 Tesla Model 3 Diagnostic Cable
Understanding the Tesla Model 3 Obd2 Port Location and how to use it is essential for maintaining your vehicle’s health and performance. By following the steps outlined in this guide, you can effectively diagnose issues, monitor real-time data, and even unlock hidden features. Whether you’re a seasoned technician or a Tesla owner looking to take control of your vehicle’s maintenance, having access to the diagnostic port is a valuable asset.
For more in-depth guidance, advanced diagnostic tools, and expert services, contact us at MERCEDES-DIAGNOSTIC-TOOL.EDU.VN. Our team is ready to assist you with all your Tesla diagnostic needs.
Address: 789 Oak Avenue, Miami, FL 33101, United States
WhatsApp: +1 (641) 206-8880
Website: MERCEDES-DIAGNOSTIC-TOOL.EDU.VN
FAQ: Tesla Model 3 OBD2 Port
1. What is the OBD2 port used for in a Tesla Model 3?
The OBD2 port in a Tesla Model 3, though proprietary, is used to access vehicle diagnostic data, read error codes, monitor real-time data, and potentially unlock hidden features or customize vehicle settings.
2. Where is the OBD2 port located in the Tesla Model 3?
The diagnostic connector is located at the rear of the center console, under the air vents. It’s accessible from the rear legroom after removing the rear center console cover.
3. What tools do I need to access the OBD2 port in my Tesla Model 3?
You will need an Allen wrench or L-shaped screwdriver, a Tesla Model 3 diagnostic cable, an OBDLink OBD2 dongle, and a suitable app like Scan My Tesla or TM-Spy.
4. How do I read error codes using the OBD2 port?
Connect the OBD2 scanner to the diagnostic port, launch the app on your smartphone or tablet, connect to the scanner, and select the option to read error codes. The app will display a list of diagnostic trouble codes (DTCs) along with their descriptions.
5. Can I unlock hidden features using the OBD2 port?
Yes, some Tesla owners use the OBD2 port to unlock hidden features or customize vehicle settings, but it requires specialized knowledge and tools. Modifying vehicle settings can void the warranty and potentially cause damage if not done correctly.
6. Is it safe to use the OBD2 port for advanced diagnostics?
Using the OBD2 port for advanced diagnostics carries risks, including warranty voidance, potential damage to vehicle systems, and security risks. Always proceed with caution and consult with experienced professionals before making any modifications.
7. How often should I perform a health check using the OBD2 port?
It’s recommended to perform a health check at least once a month or before any long trips to monitor key parameters such as battery health, motor temperature, and sensor readings.
8. What should I do if I can’t connect to the OBD2 port?
Verify cable connections, ensure dongle compatibility, check app compatibility, update software, and ensure the vehicle has been properly shut down before connecting the OBD2 dongle.
9. What are some alternatives to using the OBD2 port for diagnostics?
Alternatives include taking your Tesla Model 3 to a Tesla Service Center, using Tesla Mobile Service, or visiting a reputable third-party repair shop that specializes in Tesla vehicles.
10. How can I protect my vehicle’s data when using the OBD2 port?
Use secure apps from reputable sources, avoid public networks, keep your diagnostic app and OBD2 dongle software up to date, and limit access to the OBD2 port to authorized personnel only.
By understanding these key aspects of the Tesla Model 3 OBD2 port, you can ensure your vehicle remains in top condition. For personalized assistance and advanced diagnostic solutions, contact MERCEDES-DIAGNOSTIC-TOOL.EDU.VN today! Our team is ready to provide expert guidance and support for all your Tesla diagnostic needs. Reach out to us via WhatsApp at +1 (641) 206-8880 or visit our website at MERCEDES-DIAGNOSTIC-TOOL.EDU.VN. Let us help you unlock the full potential of your Tesla Model 3 with our comprehensive diagnostic services.