Are you struggling with climate control issues in your Mercedes-Benz? Understanding the diagnostic procedures is the first step to resolving these problems, and MERCEDES-DIAGNOSTIC-TOOL.EDU.VN is here to guide you through a comprehensive approach. This guide provides a detailed eight-step diagnostic process to help you identify and address climate control issues effectively, saving you time and money by focusing on the root cause of the problem. Explore refrigerant checks, airflow analysis, and module communications to diagnose your climate control system.
Contents
- Understanding Diagnostic Procedures for Climate Control Problems in Mercedes-Benz Vehicles
- 1. Identifying the Intent of Users Searching for Climate Control Diagnostic Procedures
- 2. Pre-Diagnostic Steps for Climate Control Systems
- 2.1 Gathering Information from the Customer
- 2.2 Performing a Visual Inspection
- 2.3 Checking Fuses and Relays
- 3. Diagnostic Tools for Climate Control Systems
- 3.1 Scan Tools
- 3.2 Multimeters
- 3.3 Manifold Gauge Set
- 3.4 Refrigerant Leak Detector
- 3.5 Thermometers
- 4. Step-by-Step Diagnostic Procedures
- 4.1 Retrieving Diagnostic Trouble Codes (DTCs)
- 4.2 Analyzing Live Data Parameters
- 4.3 Performing Component Tests
- 4.4 Checking the Refrigerant Charge
- 4.5 Diagnosing Airflow Problems
- 4.6 Testing Sensors and Actuators
- 5. Common Climate Control Problems and Solutions
- 6. Advanced Diagnostic Techniques
- 6.1 Smoke Testing
- 6.2 Thermal Imaging
- 6.3 Vibration Analysis
- 7. Safety Precautions
- 8. Importance of Regular Maintenance
- 9. Utilizing MERCEDES-DIAGNOSTIC-TOOL.EDU.VN for Climate Control Diagnostics
- 10. Case Studies and Examples
- Case Study 1: A/C Not Blowing Cold
- Case Study 2: Temperature Discrepancy
- Common Questions About Diagnosing Vehicle Climate Control Issues
- 1. What Are the Initial Steps in Diagnosing a Climate Control Problem in a Vehicle?
- 2. What Tools Are Essential for Diagnosing Climate Control Problems?
- 3. How Do I Use a Scan Tool to Diagnose Climate Control Issues?
- 4. What Does It Mean When My Car’s A/C Is Not Blowing Cold Air?
- 5. How Can I Diagnose Temperature Differences in a Dual-Zone Climate Control System?
- 6. What Are Some Common Causes of Weak Airflow in a Vehicle’s Climate Control System?
- 7. How Do I Check the Refrigerant Charge in My Vehicle’s A/C System?
- 8. What Are Some Common Problems With Refrigerant Leaks in a Car’s A/C System?
- 9. How Can I Prevent Climate Control Problems in My Vehicle?
- 10. What Resources Does MERCEDES-DIAGNOSTIC-TOOL.EDU.VN Offer for Diagnosing Climate Control Issues?
1. Reviewing the Customer Issue
The initial step in diagnosing any climate control problem is thoroughly understanding the customer’s complaint. Gather as much information as possible from the service advisor and, if possible, directly from the customer. This involves asking specific questions to clarify the nature and conditions of the problem.
Key questions to consider:
- When did the problem start?
- Does the issue occur consistently or intermittently?
- If it’s a dual-zone system, is there a temperature difference between the driver and passenger sides?
- Has the vehicle been previously serviced for this issue by another shop?
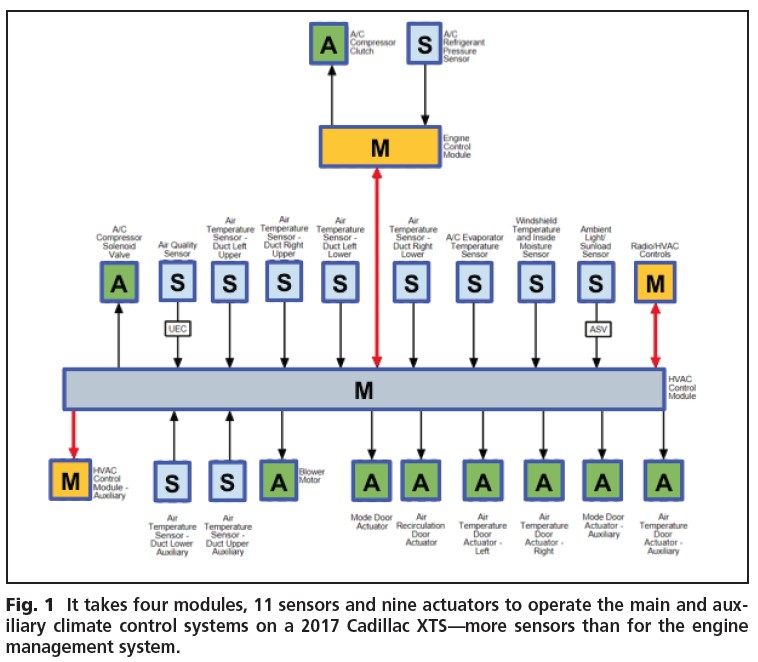
Understanding the specific details helps narrow down potential causes and focus your diagnostic efforts effectively. For instance, a 2017 Cadillac XTS climate control system, as shown in Fig. 1, utilizes a complex network of modules, sensors, and actuators. Identifying whether the issue is with the front, rear, or dual-zone functionality can significantly streamline the diagnostic process.
 2017 Cadillac XTS climate control system
2. Duplicating the Problem
Attempting to replicate the reported issue is a critical step in the diagnostic process. You need to verify the problem exists and understand its symptoms firsthand. Start by performing a basic functional test of the climate control system.
Key actions to take:
- Measure the air outlet temperature using a thermometer at the center vent.
- Connect a scan tool to check for any stored diagnostic trouble codes (DTCs).
- Activate all climate control functions, including blower speeds and mode door operation.
- Check the operation of the blend air door and ensure it fully closes to prevent warm air from mixing.
- Test both the radio touchpad display and manual controls, if available.
If you cannot duplicate the problem, revisit Step 1 and gather more detailed information from the customer or service advisor. Intermittent issues may require additional probing to identify the conditions under which the problem occurs.
3. Determining the Affected System Portion
To streamline the diagnostic process, it’s essential to identify which part of the climate control system is experiencing the issue. This can be divided into three main categories:
- Refrigerant/Pressure Section: Involves components like the compressor, condenser, evaporator, and expansion valve.
- Airflow Volume: Concerns issues related to the blower motor, fan speed control, and air intake system.
- Airflow Delivery: Focuses on the mode doors, blend doors, and ductwork that direct airflow to the correct locations.
For example, referring back to Fig. 1, if the issue lies within the refrigerant/pressure section, you can narrow your focus to components such as the HVAC control module, A/C refrigerant pressure sensor, A/C evaporator temperature sensor, A/C compressor clutch, and A/C compressor solenoid valve.
4. Researching the System
Before diving into hands-on diagnostics, take time to research the specific climate control system in the vehicle. This involves consulting service information, technical service bulletins (TSBs), and wiring diagrams.
Key research tasks:
- Check for TSBs related to the reported issue, as they may provide known solutions or software updates.
- Review wiring diagrams to understand the electrical circuits and component locations.
- Identify any reprogramming procedures or calibrations that could potentially resolve the problem.
For example, Fig. 2 shows a wiring schematic for the A/C system of the 2017 Cadillac XTS. By studying the diagram, you can understand the power supply, control circuits, and sensor connections, which helps you develop a targeted diagnostic plan. The wiring diagram provides critical information for diagnosing electrical issues, such as validating power at pins 86 and 30 of the A/C compressor clutch relay or checking the ground signal for relay control at ECM pin 32.
 2017 Cadillac XTS A/C system wiring schematic
5. Developing a Diagnostic Plan
A well-structured diagnostic plan is crucial for efficient and accurate troubleshooting. Document your plan in writing, outlining the steps you will take and the tools you will use.
Elements of a comprehensive diagnostic plan:
- List the specific tests you will perform, such as voltage checks, continuity tests, and sensor readings.
- Note the parameters you will monitor using a scan tool, such as refrigerant pressure, temperature readings, and actuator positions.
- Identify any bidirectional controls or system tests you will perform, such as cycling the A/C compressor or recalibrating mode doors.
- Make notes on the wiring schematic, highlighting the circuits you will be testing and the expected values.
Documenting your results as you perform each test will help you stay organized and track your progress. This documentation will be invaluable if you need to revisit your diagnostic process or seek assistance from a colleague or technical support hotline.
6. Ensuring Necessary Tools Are Available
Having the right tools is essential for effectively diagnosing climate control issues. Service information is often written assuming technicians have access to factory tools, including scan tools, A/C diagnostic machines, and specialty tools.
Consider the following:
- Determine if your shop’s current equipment is capable of performing the recommended diagnostic procedures.
- If necessary, consider borrowing a scan tool from another shop or purchasing a short-term subscription to access the factory scan tool through a J2534 device.
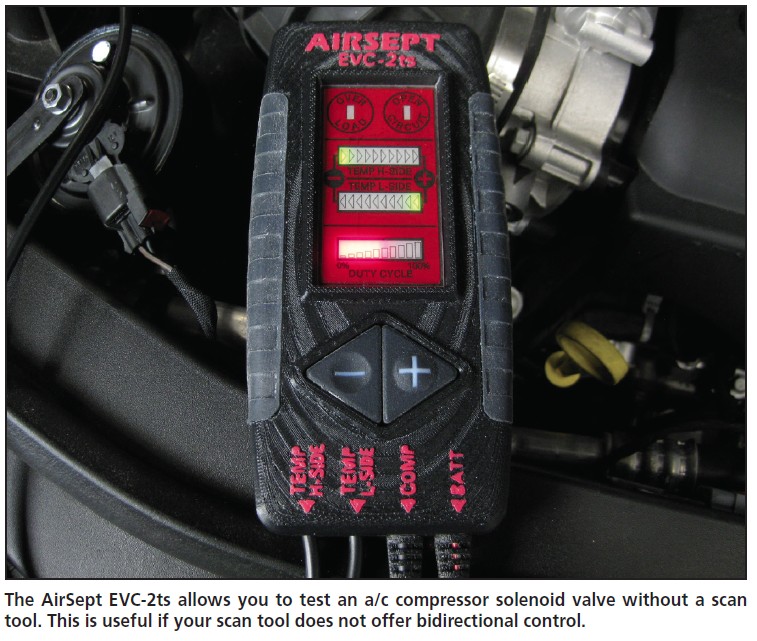
- Invest in specialty tools that can streamline specific diagnostic tasks, such as the AirSept EVC-2ts, which allows you to test the A/C compressor solenoid valve without a scan tool.
The availability of the necessary tools will significantly impact your ability to execute the diagnostic plan efficiently and accurately.
7. Executing the Diagnostic Plan
With a clear plan and the right tools, you can now execute the diagnostic process. Begin by connecting a scan tool to the vehicle and accessing the HVAC control module.
Key steps to follow:
- Verify communication with the module and check for live data parameters to confirm the network is functioning.
- Monitor data from other modules, such as engine RPM from the ECM, to ensure proper communication between modules.
- Evaluate data parameters like module voltage and A/C refrigerant pressure to identify potential issues.
- Observe the blend and mode door actuators while cycling through different positions to assess their functionality.
For example, Fig. 3 shows scan tool data from the HVAC control module on a 2013 Chrysler 200. Confirming that the module voltage is within the acceptable range and that the A/C refrigerant pressure is present can quickly narrow down the potential causes of the problem. If the customer complaint involves inaccurate temperature in a dual-zone system, compare the temperature sensor readings from each zone, as shown in Fig. 4 for a 2017 Cadillac XTS.
 HVAC sensor data from a 2017 Cadillac XTS
8. Seeking Assistance When Needed
Even with a well-executed diagnostic plan, you may encounter situations where you get stuck. In such cases, it’s important to have a strategy for seeking assistance.
Recommended steps:
- Take a break to gather your thoughts and review your diagnostic process.
- Consult with a trusted colleague to get a fresh perspective on the problem.
- Utilize diagnostic support hotlines, providing them with detailed information about the tests you have performed and the results you have obtained.
- Leverage parts availability knowledge to confirm your diagnosis. For example, if you suspect a faulty blend door actuator, check with the parts department to see how often that part is requested.
By following these steps, you can effectively diagnose and resolve climate control issues in vehicles.
Understanding Diagnostic Procedures for Climate Control Problems in Mercedes-Benz Vehicles
Are you experiencing issues with your Mercedes-Benz climate control system? Understanding the diagnostic procedures is crucial to identifying and resolving these problems efficiently. MERCEDES-DIAGNOSTIC-TOOL.EDU.VN provides a comprehensive guide to help you navigate the complexities of modern automotive climate control systems.
1. Identifying the Intent of Users Searching for Climate Control Diagnostic Procedures
Understanding the intent behind user searches is crucial for providing relevant and helpful content. Here are five key search intents related to diagnosing climate control problems in vehicles:
- Troubleshooting a Non-Functional A/C System: Users want to identify why their A/C is not blowing cold air and seek steps to diagnose the issue.
- Diagnosing Temperature Discrepancies in Dual-Zone Climate Control: Users want to understand why there is a temperature difference between the driver and passenger sides of the vehicle.
- Identifying Faulty Components in the Climate Control System: Users aim to pinpoint specific components, such as sensors, actuators, or modules, that are causing climate control problems.
- Understanding Error Codes and Scan Tool Data: Users need help interpreting diagnostic trouble codes (DTCs) and live data parameters from a scan tool to diagnose climate control issues.
- Learning the Proper Procedures for Refrigerant Handling and System Checks: Users seek guidance on safely and effectively checking refrigerant levels, pressure, and overall system health.
2. Pre-Diagnostic Steps for Climate Control Systems
Before diving into complex diagnostics, it’s important to perform some preliminary checks and gather information to streamline the process.
2.1 Gathering Information from the Customer
The first step is to gather as much information as possible from the customer about the problem they are experiencing. This includes:
- When did the problem start?
- Does the problem occur consistently or intermittently?
- Are there any specific conditions under which the problem occurs (e.g., only when the engine is hot, only at certain speeds)?
- If it’s a dual-zone system, is there a temperature difference between the driver and passenger sides?
- Has the vehicle been serviced for this issue before, and if so, what was done?
2.2 Performing a Visual Inspection
Conduct a thorough visual inspection of the climate control system, including:
- Checking the condition of the A/C compressor, condenser, and evaporator.
- Inspecting hoses and connections for leaks or damage.
- Verifying the operation of the blower motor and fan.
- Examining the air vents and ductwork for obstructions.
2.3 Checking Fuses and Relays
Ensure that all fuses and relays related to the climate control system are in good condition and properly seated. Use a multimeter to test the continuity of fuses and the functionality of relays.
3. Diagnostic Tools for Climate Control Systems
Having the right tools is essential for accurately diagnosing climate control problems. Here are some of the most important tools:
3.1 Scan Tools
A scan tool is an indispensable tool for accessing the vehicle’s computer systems and retrieving diagnostic trouble codes (DTCs).
- Reading DTCs: Scan tools can read and clear DTCs related to the climate control system, providing valuable clues about the nature of the problem.
- Live Data Monitoring: Scan tools can display live data parameters, such as refrigerant pressure, temperature readings, and actuator positions, allowing you to monitor the system’s performance in real-time.
- Bidirectional Controls: Some scan tools offer bidirectional control capabilities, allowing you to command specific components, such as the A/C compressor or mode doors, to activate and observe their response.
3.2 Multimeters
A multimeter is essential for performing electrical tests, such as:
- Voltage Checks: Measuring voltage at various points in the circuit to identify voltage drops or open circuits.
- Continuity Tests: Checking the continuity of wires and connections to ensure they are intact.
- Resistance Measurements: Measuring the resistance of components, such as sensors and actuators, to verify they are within specifications.
3.3 Manifold Gauge Set
A manifold gauge set is used to measure the high-side and low-side pressures in the refrigerant system. This information can help diagnose issues such as:
- Low Refrigerant Charge: Low pressures on both sides indicate a refrigerant leak or undercharge.
- Compressor Problems: Abnormal pressure readings can indicate a faulty compressor.
- Restriction in the System: High-side pressure that is too high and low-side pressure that is too low can indicate a restriction in the system.
3.4 Refrigerant Leak Detector
A refrigerant leak detector is used to identify the source of refrigerant leaks in the system. There are two main types of leak detectors:
- Electronic Leak Detectors: These detectors use a sensor to detect the presence of refrigerant in the air.
- UV Leak Detection: This method involves injecting a UV dye into the refrigerant system and using a UV light to identify leaks.
3.5 Thermometers
A thermometer is used to measure the air outlet temperature at the vents. This can help diagnose issues such as:
- Poor Cooling Performance: High outlet temperatures indicate a problem with the cooling system.
- Temperature Discrepancies: Temperature differences between the driver and passenger sides in a dual-zone system indicate a problem with blend door actuators or temperature sensors.
4. Step-by-Step Diagnostic Procedures
Here’s a detailed, step-by-step guide to diagnosing climate control problems, tailored for Mercedes-Benz vehicles:
4.1 Retrieving Diagnostic Trouble Codes (DTCs)
- Connect a scan tool to the vehicle’s diagnostic port (OBD-II port).
- Turn the ignition on, but do not start the engine.
- Navigate to the climate control system module in the scan tool menu.
- Read and record any DTCs that are present.
- Research the DTCs to understand their potential causes and related components.
4.2 Analyzing Live Data Parameters
- With the scan tool connected, access the live data parameters for the climate control system.
- Monitor parameters such as:
- Refrigerant pressure (high-side and low-side)
- Evaporator temperature
- Compressor clutch status
- Blower motor speed
- Mode door positions
- Blend door positions
- Temperature sensor readings (ambient, duct, evaporator)
- Compare the live data parameters to the manufacturer’s specifications to identify any abnormalities.
4.3 Performing Component Tests
- Use the scan tool to perform component tests, such as:
- Activating and deactivating the A/C compressor clutch
- Cycling the mode doors and blend doors
- Adjusting the blower motor speed
- Observe the component’s response and compare it to the expected behavior.
4.4 Checking the Refrigerant Charge
- Connect a manifold gauge set to the vehicle’s A/C service ports.
- Measure the high-side and low-side pressures with the engine running and the A/C system turned on.
- Compare the pressure readings to the manufacturer’s specifications, taking into account the ambient temperature.
- If the refrigerant charge is low, use a refrigerant leak detector to identify the source of the leak.
4.5 Diagnosing Airflow Problems
- Verify that the blower motor is operating at all speeds.
- Check the air vents to ensure that air is flowing from the correct locations (e.g., defrost, panel, floor).
- Inspect the mode doors and blend doors to ensure they are moving freely and directing airflow properly.
- Use a scan tool to monitor the mode door and blend door positions, if available.
4.6 Testing Sensors and Actuators
- Use a multimeter to test the sensors and actuators in the climate control system, such as:
- Temperature sensors
- Pressure sensors
- Mode door actuators
- Blend door actuators
- Measure the voltage, resistance, or signal output of the sensors and actuators and compare them to the manufacturer’s specifications.
- Replace any sensors or actuators that are out of specification.
5. Common Climate Control Problems and Solutions
Here are some common climate control problems and their potential causes:
| Problem | Possible Causes | Solutions |
|---|---|---|
| A/C Not Blowing Cold | Low refrigerant charge, faulty compressor, clogged expansion valve, faulty temperature sensor | Recharge refrigerant, replace compressor, replace expansion valve, replace temperature sensor |
| Weak Airflow | Faulty blower motor, clogged cabin air filter, blocked air ducts, faulty mode door actuator | Replace blower motor, replace cabin air filter, clear air ducts, replace mode door actuator |
| Temperature Discrepancy | Faulty blend door actuator, faulty temperature sensor, low refrigerant charge | Replace blend door actuator, replace temperature sensor, recharge refrigerant |
| A/C Works Intermittently | Faulty compressor clutch, loose wiring connections, faulty pressure switch | Replace compressor clutch, repair wiring connections, replace pressure switch |
| Strange Noises | Worn compressor, debris in blower motor, faulty expansion valve | Replace compressor, clean blower motor, replace expansion valve |
| A/C Smells Bad | Mold or mildew in evaporator core | Clean evaporator core with A/C evaporator cleaner |
| A/C System Leaks Refrigerant | Leaks in hoses, fittings, evaporator, or condenser | Replace leaking components, repair fittings |
| Compressor Won’t Engage | Faulty pressure switch, faulty compressor clutch, wiring problems, faulty ECM | Replace pressure switch, replace compressor clutch, repair wiring, replace ECM |
| Overheating Issues | Clogged condenser, faulty cooling fan, low coolant level | Clean condenser, replace cooling fan, top off coolant level |
| Icing Issues | Faulty thermistor, overcharged system, expansion valve issues | Replace thermistor, recover refrigerant, replace expansion valve |
| Electric Fan Problems | Faulty fan motor, faulty relay, temperature sensor issues | Replace fan motor, replace relay, replace temperature sensor |
| Odor Issues | Dirty cabin filter, bacterial growth in evaporator box, contaminated refrigerant | Replace cabin filter, clean evaporator box, recover and recharge refrigerant |
| Airflow Distribution Issues | Vacuum leak, actuator failure, stuck mode door | Locate and repair vacuum leak, replace actuator, free up mode door |
| Inaccurate Readings | Failing sensor, wiring issues, incorrect installation | Replace sensor, repair wiring, check and correct installation |
| Defrosting Problems | Vacuum leak, actuator failure, stuck mode door, compressor issues | Locate and repair vacuum leak, replace actuator, free up mode door, check compressor |
| Refrigerant Leaks | Corrosion, seal degradation, loose fittings | Identify and repair leaks, replace seals and fittings |
| Moisture in System | Damaged receiver drier, faulty seals, atmospheric exposure | Replace receiver drier, replace faulty seals, evacuate and recharge system |
| Unusual Refrigerant Levels | Inaccurate charging, system leak, component failure | Perform leak test, recharge system, replace faulty component |
| System Not Switching Off | Relay issues, switch malfunction, sensor faults | Replace relay, replace switch, check sensors |
| Frozen Evaporator Coils | Faulty thermistor, overcharged system, expansion valve issues | Replace thermistor, recover refrigerant, replace expansion valve |
| Unusual Noises from System | Worn bearings, loose components, refrigerant issues | Identify and replace worn components, tighten loose components, address refrigerant issues |
| Heater Issues | Low coolant, blend door issues, thermostat failure | Top off coolant, address blend door issues, replace thermostat |
| A/C Clutch Problems | Worn clutch plate, electrical issues, relay failure | Replace clutch plate, address electrical issues, replace relay |
| Cooling Fan Issues | Faulty fan motor, relay issues, temperature sensor problems | Replace fan motor, replace relay, address temperature sensor issues |
| Electrical Problems | Wiring damage, fuse issues, relay problems, faulty sensors | Repair or replace wiring, replace fuses, replace relays, replace sensors |
| System Contamination | Debris, incorrect refrigerant, oil breakdown | Flush system, use correct refrigerant, replace oil |
| High-Pressure Readings | Clogged condenser, overcharged system, non-condensables in system | Clean condenser, recover refrigerant, evacuate and recharge system |
| Low-Pressure Readings | Low refrigerant charge, compressor issues, leak | Perform leak test, recharge system, address compressor issues |
| System Overcharge | Improper charging, incorrect gauge readings, component failure | Recover refrigerant, use correct gauges, replace faulty component |
| Incorrect Gauge Readings | Faulty gauges, improper connections, inexperienced user | Use calibrated gauges, check connections, seek professional help |
| Thermal Expansion Valve (TXV) Problems | Clogged TXV, incorrect TXV size, TXV failure | Replace TXV, ensure correct size, address failure |
| Receiver Drier Issues | Clogged drier, moisture saturation, physical damage | Replace receiver drier, evacuate and recharge system |
| Condenser Fan Issues | Faulty fan motor, relay problems, wiring issues | Replace fan motor, replace relay, address wiring issues |
| Belt-Related Problems | Worn belt, tensioner failure, misalignment | Replace belt, replace tensioner, realign components |
| Compressor Oil Problems | Incorrect oil type, contamination, system leak | Use correct oil, flush system, repair leaks |
| Expansion Valve Problems | Clogged valve, incorrect valve size, valve failure | Replace valve, ensure correct size, address failure |
| Relay Problems | Faulty relay, incorrect voltage, corrosion | Replace relay, check voltage, clean corrosion |
6. Advanced Diagnostic Techniques
For more complex climate control problems, advanced diagnostic techniques may be required:
6.1 Smoke Testing
Smoke testing involves introducing smoke into the climate control system to identify leaks in the ductwork or components.
6.2 Thermal Imaging
Thermal imaging can be used to identify temperature differences in the system, which can help pinpoint problems such as clogged condensers or faulty blend door actuators.
6.3 Vibration Analysis
Vibration analysis can be used to diagnose problems with the A/C compressor or blower motor.
7. Safety Precautions
Working on climate control systems involves handling refrigerant, which can be hazardous if not handled properly. Always follow these safety precautions:
- Wear safety glasses and gloves.
- Work in a well-ventilated area.
- Use a refrigerant recovery machine to recover refrigerant before disconnecting any A/C lines.
- Dispose of used refrigerant properly.
- Follow all manufacturer’s recommendations for handling and servicing A/C systems.
8. Importance of Regular Maintenance
Regular maintenance can help prevent climate control problems and extend the life of the system. Here are some important maintenance tasks:
- Replace the cabin air filter regularly (every 12,000 to 15,000 miles).
- Have the refrigerant charge checked periodically (every 2 years).
- Inspect the hoses and connections for leaks or damage.
- Clean the condenser fins to ensure proper airflow.
9. Utilizing MERCEDES-DIAGNOSTIC-TOOL.EDU.VN for Climate Control Diagnostics
MERCEDES-DIAGNOSTIC-TOOL.EDU.VN provides valuable resources for diagnosing and repairing climate control problems in Mercedes-Benz vehicles. Our website offers:
- Detailed diagnostic procedures and troubleshooting guides
- Wiring diagrams and component locations
- Technical service bulletins (TSBs)
- Expert advice and support
By utilizing these resources, you can effectively diagnose and resolve climate control problems in your Mercedes-Benz vehicle, saving time and money.
10. Case Studies and Examples
Let’s explore a couple of case studies to illustrate the diagnostic process:
Case Study 1: A/C Not Blowing Cold
- Vehicle: Mercedes-Benz C-Class
- Problem: A/C is not blowing cold air.
- Diagnostic Steps:
- Retrieved DTCs: No DTCs present.
- Analyzed live data: Low refrigerant pressure.
- Performed component tests: Compressor clutch engages properly.
- Checked refrigerant charge: Low refrigerant charge.
- Used refrigerant leak detector: Identified a leak at the condenser.
- Solution: Replaced the condenser and recharged the refrigerant system.
Case Study 2: Temperature Discrepancy
- Vehicle: Mercedes-Benz E-Class
- Problem: Temperature difference between driver and passenger sides.
- Diagnostic Steps:
- Retrieved DTCs: DTC for faulty blend door actuator.
- Analyzed live data: Blend door position not changing on one side.
- Performed component tests: Blend door actuator not responding.
- Tested blend door actuator: Actuator is faulty.
- Solution: Replaced the blend door actuator.
These case studies demonstrate the importance of following a systematic diagnostic approach to accurately identify and resolve climate control problems.
Navigating climate control problems in Mercedes-Benz vehicles requires a systematic approach, the right tools, and a clear understanding of the system. By following the steps outlined in this guide and utilizing the resources available at MERCEDES-DIAGNOSTIC-TOOL.EDU.VN, you can effectively diagnose and resolve climate control issues, ensuring a comfortable and enjoyable driving experience.
Have questions or need personalized guidance on diagnosing climate control issues in your Mercedes-Benz? Contact us today via Whatsapp at +1 (641) 206-8880 or visit our website at MERCEDES-DIAGNOSTIC-TOOL.EDU.VN. Our team of experts is ready to assist you with detailed diagnostic procedures, component testing, and repair solutions. Located at 789 Oak Avenue, Miami, FL 33101, United States, we’re here to help you keep your Mercedes-Benz running smoothly.
Common Questions About Diagnosing Vehicle Climate Control Issues
1. What Are the Initial Steps in Diagnosing a Climate Control Problem in a Vehicle?
The initial steps involve gathering information about the problem from the customer, duplicating the problem, and determining which part of the system is affected. This includes checking refrigerant levels, airflow, and electrical components.
2. What Tools Are Essential for Diagnosing Climate Control Problems?
Essential tools include a scan tool, multimeter, manifold gauge set, refrigerant leak detector, and thermometer. These tools help diagnose electrical issues, refrigerant pressure, leaks, and temperature discrepancies.
3. How Do I Use a Scan Tool to Diagnose Climate Control Issues?
A scan tool can read diagnostic trouble codes (DTCs), monitor live data parameters, and perform component tests. This helps identify faulty sensors, actuators, and other components within the climate control system.
4. What Does It Mean When My Car’s A/C Is Not Blowing Cold Air?
This could indicate several issues, including a low refrigerant charge, faulty compressor, clogged expansion valve, or a faulty temperature sensor. Checking refrigerant levels and component functionality is crucial.
5. How Can I Diagnose Temperature Differences in a Dual-Zone Climate Control System?
Use a scan tool to monitor temperature sensor readings from each zone. A temperature discrepancy can indicate a faulty blend door actuator or temperature sensor.
6. What Are Some Common Causes of Weak Airflow in a Vehicle’s Climate Control System?
Common causes include a faulty blower motor, clogged cabin air filter, blocked air ducts, or a faulty mode door actuator. Inspecting and replacing these components can improve airflow.
7. How Do I Check the Refrigerant Charge in My Vehicle’s A/C System?
Connect a manifold gauge set to the A/C service ports and measure the high-side and low-side pressures. Compare the pressure readings to the manufacturer’s specifications to determine if the refrigerant charge is adequate.
8. What Are Some Common Problems With Refrigerant Leaks in a Car’s A/C System?
Common causes of refrigerant leaks include leaks in hoses, fittings, the evaporator, or the condenser. Use a refrigerant leak detector to identify the source of the leak.
9. How Can I Prevent Climate Control Problems in My Vehicle?
Regular maintenance is key, including replacing the cabin air filter, checking the refrigerant charge, and inspecting hoses and connections. This helps prevent issues and extend the system’s life.
10. What Resources Does MERCEDES-DIAGNOSTIC-TOOL.EDU.VN Offer for Diagnosing Climate Control Issues?
MERCEDES-DIAGNOSTIC-TOOL.EDU.VN provides detailed diagnostic procedures, wiring diagrams, technical service bulletins (TSBs), and expert advice to help you diagnose and resolve climate control problems in Mercedes-Benz vehicles.