Is your Mercedes-Benz horn not working? Discover the diagnostic procedures for vehicles with horn problems with MERCEDES-DIAGNOSTIC-TOOL.EDU.VN, your go-to resource for Mercedes-Benz diagnostics and repair. We will help you to troubleshoot common horn issues and provide reliable repair solutions, including car horn diagnosis and electrical testing, and provide a clear path to restoring your vehicle’s functionality.
Contents
- 1. What Are The Initial Checks For a Non-Functioning Car Horn?
- 1.1 How To Check The Horn Fuse
- 1.2 How To Check The Horn Relay
- 1.3 Inspect The Horn Assembly
- 2. What Are The Steps For Testing The Horn Circuit?
- 2.1 How To Use a Multimeter To Test Voltage
- 2.2 Identifying Wiring Issues
- 3. How To Diagnose A Faulty Horn Switch?
- 3.1 Accessing The Horn Switch
- 3.2 Testing Continuity
- 4. What Are The Diagnostic Procedures For A Faulty Clock Spring?
- 4.1 Identifying The Clock Spring
- 4.2 Testing The Clock Spring
- 5. How To Inspect And Repair The Horn Ground Connection?
- 5.1 Locating The Ground Connection
- 5.2 Cleaning And Securing The Ground
- 6. What Is The Process For Diagnosing Intermittent Horn Problems?
- 6.1 Checking For Loose Connections
- 6.2 Using a Multimeter While Driving
- 7. What Are The Tools Needed For Car Horn Diagnostics?
- 7.1 Multimeter
- 7.2 Fuse Tester
- 7.3 Wire Brush and Electrical Contact Cleaner
- 7.4 Basic Hand Tools
- 8. How Does Humidity Affect Horn Function?
- 8.1 Inspecting Connections
- 8.2 Using Protective Sprays
- 9. What Are The Common Misdiagnoses In Car Horn Repair?
- 9.1 Avoiding Common Mistakes
- 10. How To Replace A Car Horn
- 10.1 Disconnecting The Old Horn
- 10.2 Connecting The New Horn
- 11. What Are The Maintenance Tips To Prevent Horn Problems?
- 11.1 Regular Inspection
- 11.2 Avoiding Prolonged Use
- 11.3 Protecting From Weather
- 12. How To Handle Aftermarket Horn Installation Issues?
- 12.1 Wiring Requirements
- 12.2 Proper Grounding
- 13. What Are The Safety Precautions During Horn Diagnostics?
- 13.1 Disconnecting The Battery
- 13.2 Avoiding Airbag Deployment
- 13.3 Using Safety Gear
- 14. How To Diagnose Horn Problems In Specific Mercedes-Benz Models?
- 14.1 Model-Specific Service Manuals
- 14.2 Online Resources
- 15. What Are The Common Causes Of Car Horn Failure?
- 15.1 Blown Fuses
- 15.2 Faulty Relays
- 15.3 Corroded Connections
- 15.4 Bad Horns
- 15.5 Faulty Horn Switches
- 16. How To Test A Car Horn Directly?
- 16.1 Direct Connection
- 17. What Are The Diagnostic Trouble Codes (DTCs) Related To Horn Problems?
- 17.1 OBD-II Scanner
- 17.2 Interpreting DTCs
- 18. How To Locate Wiring Diagrams For Car Horn Systems?
- 18.1 Service Manual
- 18.2 Online Databases
- 19. What Is The Role Of The Body Control Module (BCM) In Horn Operation?
- 19.1 BCM Function
- 19.2 BCM Diagnostics
- 20. How Does Car Alarm System Affect Horn Diagnostics?
- 20.1 Alarm System Integration
- 20.2 Alarm System Diagnostics
- 21. What Are The Legal Requirements Regarding Car Horns?
- 21.1 Sound Level Requirements
- 21.2 Proper Use
- 22. How To Test The Horn Relay With A Multimeter?
- 22.1 Testing The Relay Coil
- 22.2 Testing The Switch Contacts
- 23. What Are The Alternative Methods To Diagnose A Car Horn?
- 23.1 Using A Test Light
- 23.2 Tapping The Horn
- 24. How To Interpret Car Horn Sound To Detect Problems?
- 24.1 Unusual Sounds
- 24.2 Normal Sound
- 25. What Are The Key Components Of A Car Horn System?
- 25.1 Horn
- 25.2 Fuse
- 25.3 Relay
- 25.4 Horn Switch
- 25.5 Wiring
- 25.6 BCM or Alarm System
- 26. How To Prevent Corrosion In A Car Horn System?
- 26.1 Dielectric Grease
- 26.2 Regular Cleaning
- 26.3 Moisture Protection
- 27. What Are The Factors Affecting The Lifespan Of A Car Horn?
- 27.1 Frequency of Use
- 27.2 Environmental Conditions
- 27.3 Quality of the Horn
- 28. How To Test The Horn Switch Without Removing It?
- 28.1 Voltage Check
- 28.2 Continuity Check
- 29. What Are The Indications Of A Failing Horn Relay?
- 29.1 Intermittent Operation
- 29.2 Clicking Sound
- 29.3 Non-Functional Horn
- 30. How To Address Car Horn Problems Caused By Rodents?
- 30.1 Inspect Wiring
- 30.2 Repair or Replace
- 31. What Is The Impact Of Car Modifications On Horn Function?
- 31.1 Aftermarket Accessories
- 31.2 Wiring Changes
- 32. How To Interpret The Wiring Diagram Of A Car Horn System?
- 32.1 Symbols and Connections
- 32.2 Tracing the Circuit
- 33. What Are The Special Considerations For Electric Vehicle (EV) Horns?
- 33.1 Voltage Requirements
- 33.2 System Integration
- 34. How To Clean Corroded Car Horn Terminals?
- 34.1 Remove Corrosion
- 34.2 Apply Cleaner
- 34.3 Protect Terminals
- 35. What Are The Aftermarket Car Horn Options And Their Diagnostic Differences?
- 35.1 Air Horns
- 35.2 Electric Horns
- 35.3 Musical Horns
- 36. How To Check The Car Horn System Using A Jumper Wire?
- 36.1 Bypassing Components
- 36.2 Isolating Problems
- 37. What Are The Steps To Diagnose A Car Horn That Only Works Sometimes?
- 37.1 Loose Connections
- 37.2 Corroded Terminals
- 37.3 Faulty Components
- 38. How To Test The Car Horn With A Power Probe?
- 38.1 Supplying Power
- 38.2 Testing Functionality
- 39. What Are The Safety Measures To Follow While Testing A Car Horn?
- 39.1 Disconnect Battery
- 39.2 Wear Safety Glasses
- 39.3 Avoid Loud Sounds
- 40. How Does The Location Of The Car Horn Affect Its Performance?
- 40.1 Exposure to Moisture
- 40.2 Exposure to Debris
- 41. What Are The Common Mistakes To Avoid While Diagnosing A Car Horn?
- 41.1 Testing the Circuit
- 41.2 Ground Connection
- 41.3 Fuse or Relay
- 42. How To Troubleshoot A Car Horn That Sounds Muffled?
- 42.1 Check for Obstructions
- 42.2 Check Diaphragm
- 43. What Are The Ways To Protect A Car Horn From Environmental Damage?
- 43.1 Protective Cover
- 43.2 Corrosion-Resistant Coatings
- 43.3 Regular Cleaning
- 44. How To Ensure The Replacement Car Horn Is Compatible With The Vehicle?
- 44.1 Check Voltage
- 44.2 Check Amperage
- 44.3 Mounting Specifications
- 45. What Are The Diagnostic Procedures For A Car Horn That Blasts Continuously?
- 45.1 Stuck Horn Switch
- 45.2 Short in Wiring
- 45.3 Faulty Horn Relay
- 46. How To Test A Car Horn When The Steering Wheel Is Removed?
- 46.1 Jumper Wire
- 46.2 Bypassing Switch
- 47. What Are The Aftermarket Car Horn Brands And Their Reliability?
- 47.1 Wolo
- 47.2 PIAA
- 47.3 Hella
- 48. How To Use A Scan Tool To Diagnose Car Horn Problems?
- 48.1 Read DTCs
- 48.2 Troubleshooting Information
- 49. What Are The Long-Term Effects Of Ignoring Car Horn Problems?
- 49.1 Safety Issues
- 49.2 Legal Troubles
- 49.3 Electrical Damage
- 50. How To Find A Qualified Mechanic For Car Horn Repair?
- 50.1 Seek Recommendations
- 50.2 Read Reviews
- 50.3 Verify Certifications
Here’s a detailed exploration of troubleshooting steps
1. What Are The Initial Checks For a Non-Functioning Car Horn?
Begin by checking the fuse and relay associated with the horn, and then inspect the horn itself for physical damage. According to automotive experts, a blown fuse is a common cause of horn failure, often overlooked but simple to fix.
1.1 How To Check The Horn Fuse
Locate the fuse box, usually under the dashboard or in the engine compartment, and find the fuse labeled for the horn. Use a fuse tester to check if the fuse is blown.
- Locate the Fuse Box: Refer to your Mercedes-Benz owner’s manual to find the location of the fuse box. It’s typically under the dashboard, in the glove compartment, or in the engine bay.
- Identify the Horn Fuse: Consult the fuse box diagram (usually printed on the fuse box cover) to identify the fuse that corresponds to the horn.
- Visually Inspect the Fuse: Remove the fuse and visually inspect it. If the wire inside the fuse is broken or the fuse looks burnt, it’s likely blown.
1.2 How To Check The Horn Relay
The horn relay, often found in the fuse box, can be tested by swapping it with an identical relay and testing the horn again. If it works, the relay is faulty.
- Locate the Relay Box: Similar to the fuse box, refer to your owner’s manual to locate the relay box.
- Identify the Horn Relay: Use the relay box diagram to identify the horn relay.
- Test the Relay: The easiest way to test a relay is to swap it with another identical relay (e.g., the relay for the rear window defogger). If the horn works after the swap, the original relay is faulty and needs replacement.
1.3 Inspect The Horn Assembly
Visually inspect the horn assembly for any physical damage or corrosion. Clean any visible corrosion with a wire brush and electrical contact cleaner.
- Locate the Horn: Typically located behind the grille or near the front bumper.
- Check for Damage: Look for any visible damage, such as cracks, breaks, or corrosion.
- Clean Corrosion: If you find corrosion, use a wire brush to gently remove it. Apply electrical contact cleaner to protect the contacts.
2. What Are The Steps For Testing The Horn Circuit?
Use a multimeter to test for voltage at the horn connector when the horn is activated. Lack of voltage indicates a wiring issue or a faulty horn switch.
2.1 How To Use a Multimeter To Test Voltage
- Set Up the Multimeter: Set your multimeter to measure DC voltage.
- Locate the Horn Connector: Disconnect the electrical connector from the horn.
- Test for Voltage: Place the multimeter probes on the terminals of the connector. Have someone press the horn. You should see a voltage reading (typically 12V).
2.2 Identifying Wiring Issues
If there’s no voltage, inspect the wiring from the horn to the relay and from the relay to the horn switch. Look for breaks, frays, or loose connections.
- Visual Inspection: Check the entire length of the wiring for any visible damage.
- Continuity Test: Use a multimeter to perform a continuity test on the wires. Disconnect the battery before doing this to avoid electrical shock.
3. How To Diagnose A Faulty Horn Switch?
Check the horn switch in the steering wheel by testing for continuity when the horn is pressed. No continuity means the switch is defective.
3.1 Accessing The Horn Switch
- Safety First: Disconnect the battery to prevent accidental airbag deployment.
- Remove Airbag: Carefully remove the airbag from the steering wheel. Refer to your Mercedes-Benz service manual for the specific procedure.
- Locate the Horn Switch: The horn switch is usually located behind the airbag.
3.2 Testing Continuity
- Set Up the Multimeter: Set the multimeter to measure continuity.
- Test the Switch: Place the probes on the terminals of the horn switch. Press the horn. The multimeter should show continuity (usually indicated by a beep).
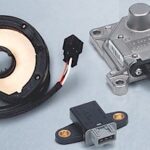
4. What Are The Diagnostic Procedures For A Faulty Clock Spring?
A faulty clock spring can disrupt the electrical connection to the horn. Testing involves checking continuity through the clock spring while turning the steering wheel.
4.1 Identifying The Clock Spring
The clock spring is a spiral-wound ribbon cable that allows the steering wheel to turn while maintaining an electrical connection to the airbag, horn, and other steering wheel-mounted controls.
4.2 Testing The Clock Spring
- Disconnect Battery: Disconnect the battery to prevent electrical accidents.
- Access Clock Spring: Remove the steering wheel and airbag to access the clock spring.
- Continuity Test: Use a multimeter to check continuity through the clock spring terminals while slowly turning the steering wheel. If the continuity is interrupted at any point, the clock spring is faulty.
5. How To Inspect And Repair The Horn Ground Connection?
A poor ground connection can prevent the horn from working. Inspect the ground connection for corrosion and ensure it is securely attached to the vehicle’s chassis.
5.1 Locating The Ground Connection
The ground connection for the horn is typically located near the horn assembly or on the vehicle’s chassis.
5.2 Cleaning And Securing The Ground
- Inspect for Corrosion: Check the ground connection for any signs of corrosion.
- Clean the Connection: Use a wire brush to clean the ground connection and the surrounding area on the chassis.
- Secure the Connection: Ensure the ground connection is securely attached. You may need to tighten the bolt or replace the connector if it’s damaged.
6. What Is The Process For Diagnosing Intermittent Horn Problems?
Intermittent horn problems can be challenging to diagnose. Check for loose connections, corroded terminals, and chafed wires. Driving the vehicle while monitoring the horn circuit with a multimeter can help identify the cause.
6.1 Checking For Loose Connections
Carefully inspect all connections in the horn circuit, including the horn connector, relay terminals, and ground connections.
6.2 Using a Multimeter While Driving
- Set Up the Multimeter: Connect the multimeter to the horn connector or relay terminals.
- Monitor Voltage: Have someone drive the vehicle while you monitor the voltage reading on the multimeter.
- Identify the Issue: Note any drops in voltage or interruptions in the circuit when the horn fails to work.
7. What Are The Tools Needed For Car Horn Diagnostics?
Essential tools include a multimeter, fuse tester, wire brush, electrical contact cleaner, and a set of basic hand tools.
7.1 Multimeter
A multimeter is essential for testing voltage, continuity, and resistance in the horn circuit.
7.2 Fuse Tester
A fuse tester quickly checks the integrity of fuses without removing them from the fuse box.
7.3 Wire Brush and Electrical Contact Cleaner
These tools are used to clean corrosion from electrical connections.
7.4 Basic Hand Tools
A set of basic hand tools, including screwdrivers, pliers, and wrenches, is necessary for accessing and disassembling components in the horn circuit.
8. How Does Humidity Affect Horn Function?
Humidity can cause corrosion on electrical connections, leading to horn failure. Regular inspection and cleaning of connections can prevent this.
8.1 Inspecting Connections
Regularly inspect the horn connections for signs of corrosion, especially in humid environments.
8.2 Using Protective Sprays
Apply electrical contact cleaner or a similar protective spray to prevent corrosion.
9. What Are The Common Misdiagnoses In Car Horn Repair?
Common misdiagnoses include overlooking the fuse or ground connection, assuming the horn is bad without testing the circuit, and neglecting the clock spring in steering wheel issues.
9.1 Avoiding Common Mistakes
- Check the Basics: Always start with the simplest checks, such as the fuse and ground connection.
- Test the Circuit: Use a multimeter to test the entire horn circuit before assuming the horn is bad.
- Consider the Clock Spring: If the horn problem is intermittent or related to steering wheel movement, consider the clock spring.
10. How To Replace A Car Horn
Replacing a car horn involves disconnecting the old horn, connecting the new horn, and ensuring it is securely mounted.
10.1 Disconnecting The Old Horn
- Disconnect the Battery: Disconnect the battery to prevent electrical shock.
- Remove the Connector: Disconnect the electrical connector from the horn.
- Remove the Horn: Unbolt the horn from its mounting bracket.
10.2 Connecting The New Horn
- Mount the Horn: Bolt the new horn to the mounting bracket.
- Connect the Connector: Connect the electrical connector to the horn.
- Test the Horn: Reconnect the battery and test the horn.
11. What Are The Maintenance Tips To Prevent Horn Problems?
Regularly inspect and clean horn connections, avoid prolonged horn use, and protect the horn from extreme weather conditions.
11.1 Regular Inspection
Inspect the horn and its connections at least once a year.
11.2 Avoiding Prolonged Use
Avoid using the horn for extended periods, as this can overheat the horn and damage its components.
11.3 Protecting From Weather
Protect the horn from extreme weather conditions, such as heavy rain or snow, which can cause corrosion and damage.
12. How To Handle Aftermarket Horn Installation Issues?
Aftermarket horns may have different wiring requirements. Ensure correct wiring and proper grounding to avoid issues.
12.1 Wiring Requirements
Check the wiring diagram for the aftermarket horn and ensure it matches your vehicle’s wiring.
12.2 Proper Grounding
Ensure the aftermarket horn has a proper ground connection to prevent electrical issues.
13. What Are The Safety Precautions During Horn Diagnostics?
Always disconnect the battery before working on the electrical system, avoid airbag deployment, and use appropriate safety gear.
13.1 Disconnecting The Battery
Always disconnect the battery to prevent electrical shock or accidental airbag deployment.
13.2 Avoiding Airbag Deployment
When working near the airbag, follow the manufacturer’s instructions carefully to avoid accidental deployment.
13.3 Using Safety Gear
Wear appropriate safety gear, such as gloves and eye protection, when working on the horn circuit.
14. How To Diagnose Horn Problems In Specific Mercedes-Benz Models?
Different Mercedes-Benz models may have unique horn system designs. Refer to the service manual for model-specific diagnostic procedures.
14.1 Model-Specific Service Manuals
Consult the service manual for your specific Mercedes-Benz model to identify any unique features or diagnostic procedures for the horn system.
14.2 Online Resources
Use online forums and resources to find model-specific information and troubleshooting tips.
15. What Are The Common Causes Of Car Horn Failure?
The most common causes include blown fuses, faulty relays, corroded connections, bad horns, and faulty horn switches.
15.1 Blown Fuses
A blown fuse is one of the most common causes of horn failure.
15.2 Faulty Relays
A faulty relay can prevent the horn from receiving power.
15.3 Corroded Connections
Corrosion on electrical connections can disrupt the horn circuit.
15.4 Bad Horns
The horn itself may fail due to age or damage.
15.5 Faulty Horn Switches
A faulty horn switch in the steering wheel can prevent the horn from working.
16. How To Test A Car Horn Directly?
Bypass the vehicle’s electrical system by connecting the horn directly to a 12V power source to test its functionality.
16.1 Direct Connection
- Disconnect the Horn: Disconnect the horn from the vehicle’s electrical system.
- Connect to 12V: Connect the horn directly to a 12V power source, such as a car battery or a battery charger.
- Observe the Horn: If the horn works when connected directly to a 12V power source, the problem is likely in the vehicle’s electrical system.
17. What Are The Diagnostic Trouble Codes (DTCs) Related To Horn Problems?
While horn issues don’t always trigger DTCs, related electrical problems might. Use an OBD-II scanner to check for any relevant codes.
17.1 OBD-II Scanner
Use an OBD-II scanner to check for any diagnostic trouble codes (DTCs) related to the horn circuit or other electrical problems.
17.2 Interpreting DTCs
Refer to the vehicle’s service manual or an online resource to interpret any DTCs found by the OBD-II scanner.
18. How To Locate Wiring Diagrams For Car Horn Systems?
Wiring diagrams are essential for troubleshooting electrical problems. Find them in the vehicle’s service manual or online databases.
18.1 Service Manual
The vehicle’s service manual typically includes detailed wiring diagrams for all electrical systems, including the horn system.
18.2 Online Databases
Use online databases and forums to find wiring diagrams for your specific vehicle model.
19. What Is The Role Of The Body Control Module (BCM) In Horn Operation?
In some modern vehicles, the BCM controls the horn. A faulty BCM can cause horn problems, requiring professional diagnostics.
19.1 BCM Function
The Body Control Module (BCM) is an electronic control unit that manages various functions in the vehicle, including the horn.
19.2 BCM Diagnostics
If you suspect a faulty BCM, it’s best to take your vehicle to a professional technician who has the tools and expertise to diagnose and repair BCM issues.
20. How Does Car Alarm System Affect Horn Diagnostics?
If the horn is part of the car alarm system, diagnosing horn problems may require understanding the alarm system’s wiring and components.
20.1 Alarm System Integration
If the horn is integrated with the car alarm system, diagnosing horn problems may require checking the alarm system’s wiring and components.
20.2 Alarm System Diagnostics
Refer to the car alarm system’s manual or consult a professional technician to diagnose any issues with the alarm system.
21. What Are The Legal Requirements Regarding Car Horns?
Car horns must meet specific sound level requirements and be used only for alerting others to ensure compliance with traffic laws.
21.1 Sound Level Requirements
Car horns must meet specific sound level requirements to ensure they are loud enough to be heard but not too loud as to be a nuisance.
21.2 Proper Use
Car horns should only be used for alerting other drivers or pedestrians of your presence, not as a form of aggression or frustration.
22. How To Test The Horn Relay With A Multimeter?
Check the relay’s coil and switch contacts for continuity and proper operation to ensure it’s functioning correctly.
22.1 Testing The Relay Coil
- Set Up the Multimeter: Set the multimeter to measure resistance.
- Test the Coil: Place the probes on the coil terminals of the relay. You should see a resistance reading. An open circuit (no resistance) indicates a faulty coil.
22.2 Testing The Switch Contacts
- Set Up the Multimeter: Set the multimeter to measure continuity.
- Test the Contacts: Place the probes on the switch terminals of the relay. With the relay unpowered, the multimeter should show continuity between the normally closed (NC) terminals. When the relay is powered, the multimeter should show continuity between the normally open (NO) terminals.
23. What Are The Alternative Methods To Diagnose A Car Horn?
If a multimeter isn’t available, use a test light to check for power at the horn connector or try tapping the horn to see if it works intermittently.
23.1 Using A Test Light
A test light can be used to check for power at the horn connector. If the test light illuminates when the horn is activated, power is reaching the horn.
23.2 Tapping The Horn
Sometimes, tapping the horn can temporarily restore its function, indicating a loose connection or a faulty component within the horn itself.
24. How To Interpret Car Horn Sound To Detect Problems?
Unusual horn sounds like weak, distorted, or no sound at all indicate potential issues with the horn or its circuit.
24.1 Unusual Sounds
Listen for any unusual sounds when the horn is activated. A weak, distorted, or no sound at all indicates a potential problem with the horn or its circuit.
24.2 Normal Sound
A normal horn should produce a loud, clear sound.
25. What Are The Key Components Of A Car Horn System?
Key components include the horn, fuse, relay, horn switch, wiring, and sometimes the BCM or alarm system.
25.1 Horn
The horn is the component that produces the sound.
25.2 Fuse
The fuse protects the horn circuit from overloads.
25.3 Relay
The relay controls the flow of power to the horn.
25.4 Horn Switch
The horn switch activates the horn when pressed.
25.5 Wiring
The wiring connects all the components of the horn system.
25.6 BCM or Alarm System
In some vehicles, the Body Control Module (BCM) or the alarm system controls the horn.
26. How To Prevent Corrosion In A Car Horn System?
Use dielectric grease on electrical connections, regularly clean terminals, and protect the horn from moisture to prevent corrosion.
26.1 Dielectric Grease
Apply dielectric grease to electrical connections to protect them from moisture and corrosion.
26.2 Regular Cleaning
Regularly clean the terminals and connections in the horn system to remove any dirt or corrosion.
26.3 Moisture Protection
Protect the horn from moisture by ensuring it is properly sealed and shielded from the elements.
27. What Are The Factors Affecting The Lifespan Of A Car Horn?
Factors include frequency of use, environmental conditions, and the quality of the horn itself.
27.1 Frequency of Use
The more frequently the horn is used, the shorter its lifespan is likely to be.
27.2 Environmental Conditions
Exposure to extreme weather conditions, such as heat, cold, and moisture, can shorten the lifespan of the horn.
27.3 Quality of the Horn
The quality of the horn itself also affects its lifespan. Higher-quality horns are typically more durable and last longer.
28. How To Test The Horn Switch Without Removing It?
Check for voltage at the horn relay when the switch is pressed to determine if the switch is sending a signal.
28.1 Voltage Check
Check for voltage at the horn relay when the switch is pressed. If voltage is present, the switch is sending a signal.
28.2 Continuity Check
If possible, check for continuity through the switch without removing it. This can help determine if the switch is making a proper connection when pressed.
29. What Are The Indications Of A Failing Horn Relay?
A failing horn relay may cause intermittent horn operation, a clicking sound from the relay, or a completely non-functional horn.
29.1 Intermittent Operation
The horn may work sometimes and not others if the relay is failing.
29.2 Clicking Sound
A clicking sound from the relay may indicate that it is trying to engage but is unable to do so properly.
29.3 Non-Functional Horn
A completely non-functional horn may be a sign of a failed relay.
30. How To Address Car Horn Problems Caused By Rodents?
Inspect the wiring for damage caused by rodents and repair or replace any affected wires.
30.1 Inspect Wiring
Carefully inspect the wiring in the horn system for any signs of damage caused by rodents.
30.2 Repair or Replace
Repair or replace any wires that have been damaged by rodents.
31. What Is The Impact Of Car Modifications On Horn Function?
Car modifications, such as aftermarket accessories or wiring changes, can affect horn function. Ensure all modifications are properly installed and compatible with the horn system.
31.1 Aftermarket Accessories
Ensure that any aftermarket accessories are properly installed and compatible with the horn system.
31.2 Wiring Changes
If any wiring changes have been made, ensure that they are done correctly and do not interfere with the horn system.
32. How To Interpret The Wiring Diagram Of A Car Horn System?
Understand the symbols and connections in the wiring diagram to trace the circuit and identify potential problems.
32.1 Symbols and Connections
Familiarize yourself with the symbols and connections used in the wiring diagram.
32.2 Tracing the Circuit
Use the wiring diagram to trace the circuit and identify any potential problems.
33. What Are The Special Considerations For Electric Vehicle (EV) Horns?
EV horns may have different voltage requirements or be integrated with other vehicle systems. Refer to the EV’s service manual for specific diagnostic procedures.
33.1 Voltage Requirements
EV horns may have different voltage requirements than traditional car horns.
33.2 System Integration
EV horns may be integrated with other vehicle systems, requiring a different approach to diagnostics.
34. How To Clean Corroded Car Horn Terminals?
Use a wire brush or sandpaper to remove corrosion, then apply electrical contact cleaner and dielectric grease to protect the terminals.
34.1 Remove Corrosion
Use a wire brush or sandpaper to remove corrosion from the terminals.
34.2 Apply Cleaner
Apply electrical contact cleaner to the terminals to remove any remaining dirt or corrosion.
34.3 Protect Terminals
Apply dielectric grease to the terminals to protect them from future corrosion.
35. What Are The Aftermarket Car Horn Options And Their Diagnostic Differences?
Aftermarket horns include air horns, electric horns, and musical horns, each with unique wiring and diagnostic considerations.
35.1 Air Horns
Air horns require an air compressor and may have different wiring requirements than traditional car horns.
35.2 Electric Horns
Electric horns are similar to traditional car horns but may have different sound levels or tones.
35.3 Musical Horns
Musical horns play a tune when activated and may have more complex wiring and electronic components.
36. How To Check The Car Horn System Using A Jumper Wire?
Use a jumper wire to bypass components and isolate problems in the horn circuit, such as the horn switch or relay.
36.1 Bypassing Components
Use a jumper wire to bypass components and isolate problems in the horn circuit.
36.2 Isolating Problems
By selectively bypassing components, you can quickly determine which part of the circuit is causing the problem.
37. What Are The Steps To Diagnose A Car Horn That Only Works Sometimes?
Check for loose connections, corroded terminals, and a faulty horn switch or relay that may be causing intermittent operation.
37.1 Loose Connections
Check for loose connections in the horn circuit.
37.2 Corroded Terminals
Check for corroded terminals in the horn circuit.
37.3 Faulty Components
Check for a faulty horn switch or relay that may be causing intermittent operation.
38. How To Test The Car Horn With A Power Probe?
A power probe can supply power to the horn directly, allowing you to test its functionality without using a multimeter.
38.1 Supplying Power
A power probe can supply power to the horn directly, allowing you to test its functionality.
38.2 Testing Functionality
Use the power probe to test the horn and determine if it is working properly.
39. What Are The Safety Measures To Follow While Testing A Car Horn?
Disconnect the battery, wear safety glasses, and avoid prolonged exposure to loud horn sounds to protect yourself during testing.
39.1 Disconnect Battery
Disconnect the battery to prevent electrical shock.
39.2 Wear Safety Glasses
Wear safety glasses to protect your eyes.
39.3 Avoid Loud Sounds
Avoid prolonged exposure to loud horn sounds.
40. How Does The Location Of The Car Horn Affect Its Performance?
A car horn placed in a location exposed to moisture or debris may experience corrosion and reduced performance.
40.1 Exposure to Moisture
A car horn placed in a location exposed to moisture may experience corrosion.
40.2 Exposure to Debris
A car horn placed in a location exposed to debris may experience reduced performance.
41. What Are The Common Mistakes To Avoid While Diagnosing A Car Horn?
Avoid assuming the horn is bad without testing the circuit, neglecting the ground connection, and overlooking the fuse or relay.
41.1 Testing the Circuit
Always test the circuit before assuming the horn is bad.
41.2 Ground Connection
Don’t neglect the ground connection.
41.3 Fuse or Relay
Don’t overlook the fuse or relay.
42. How To Troubleshoot A Car Horn That Sounds Muffled?
Check for obstructions blocking the horn’s sound output or a failing horn diaphragm.
42.1 Check for Obstructions
Check for obstructions blocking the horn’s sound output.
42.2 Check Diaphragm
Check for a failing horn diaphragm.
43. What Are The Ways To Protect A Car Horn From Environmental Damage?
Use a protective cover, apply corrosion-resistant coatings, and regularly clean the horn to protect it from environmental damage.
43.1 Protective Cover
Use a protective cover to shield the horn from the elements.
43.2 Corrosion-Resistant Coatings
Apply corrosion-resistant coatings to protect the horn from corrosion.
43.3 Regular Cleaning
Regularly clean the horn to remove dirt and debris.
44. How To Ensure The Replacement Car Horn Is Compatible With The Vehicle?
Check the voltage, amperage, and mounting specifications to ensure the replacement horn is compatible with the vehicle.
44.1 Check Voltage
Check the voltage of the replacement horn to ensure it is compatible with the vehicle’s electrical system.
44.2 Check Amperage
Check the amperage of the replacement horn to ensure it does not overload the vehicle’s electrical system.
44.3 Mounting Specifications
Check the mounting specifications of the replacement horn to ensure it will fit properly in the vehicle.
45. What Are The Diagnostic Procedures For A Car Horn That Blasts Continuously?
Check for a stuck horn switch, a short in the wiring, or a faulty horn relay that is continuously supplying power to the horn.
45.1 Stuck Horn Switch
Check for a stuck horn switch that is continuously activating the horn.
45.2 Short in Wiring
Check for a short in the wiring that is continuously supplying power to the horn.
45.3 Faulty Horn Relay
Check for a faulty horn relay that is continuously supplying power to the horn.
46. How To Test A Car Horn When The Steering Wheel Is Removed?
Use a jumper wire to connect the horn circuit terminals directly, bypassing the horn switch in the steering wheel.
46.1 Jumper Wire
Use a jumper wire to connect the horn circuit terminals directly.
46.2 Bypassing Switch
This bypasses the horn switch in the steering wheel, allowing you to test the horn.
47. What Are The Aftermarket Car Horn Brands And Their Reliability?
Popular brands include Wolo, PIAA, and Hella, known for their quality and reliability in aftermarket car horns.
47.1 Wolo
Wolo is a popular brand known for its quality and reliability in aftermarket car horns.
47.2 PIAA
PIAA is another popular brand known for its quality and reliability in aftermarket car horns.
47.3 Hella
Hella is a well-known brand known for its quality and reliability in aftermarket car horns.
48. How To Use A Scan Tool To Diagnose Car Horn Problems?
A scan tool can read diagnostic trouble codes (DTCs) related to the horn circuit, providing valuable information for troubleshooting.
48.1 Read DTCs
A scan tool can read diagnostic trouble codes (DTCs) related to the horn circuit.
48.2 Troubleshooting Information
These DTCs can provide valuable information for troubleshooting the horn system.
49. What Are The Long-Term Effects Of Ignoring Car Horn Problems?
Ignoring car horn problems can lead to safety issues, legal troubles, and further damage to the vehicle’s electrical system.
49.1 Safety Issues
Ignoring car horn problems can lead to safety issues on the road.
49.2 Legal Troubles
Operating a vehicle with a non-functional horn may result in legal penalties.
49.3 Electrical Damage
Ignoring car horn problems can lead to further damage to the vehicle’s electrical system.
50. How To Find A Qualified Mechanic For Car Horn Repair?
Seek recommendations, read reviews, and verify certifications to find a qualified mechanic for car horn repair.
50.1 Seek Recommendations
Seek recommendations from friends, family, or online forums.
50.2 Read Reviews
Read reviews online to get an idea of the mechanic’s reputation.
50.3 Verify Certifications
Verify that the mechanic has the necessary certifications to work on car horn systems.
Experiencing horn problems in your Mercedes-Benz can be frustrating, but with the right diagnostic procedures, it’s a manageable issue. At MERCEDES-DIAGNOSTIC-TOOL.EDU.VN, we’re dedicated to providing you with expert guidance and resources to tackle these challenges effectively. Our detailed guides ensure you have the knowledge to address horn malfunctions efficiently, ensuring your vehicle’s safety and functionality are quickly restored.
Ready to get your Mercedes-Benz horn working again? Contact us for personalized assistance and expert advice. Reach out via WhatsApp at +1 (641) 206-8880, visit our website at MERCEDES-DIAGNOSTIC-TOOL.EDU.VN, or stop by our location at 789 Oak Avenue, Miami, FL 33101, United States. Let us help you keep your Mercedes-Benz in top condition.