Cylinder compression tests involve several key steps to accurately assess your engine’s health, and at MERCEDES-DIAGNOSTIC-TOOL.EDU.VN, we provide detailed guidance on performing these tests effectively. This diagnostic procedure helps pinpoint issues like worn piston rings or valve problems, ensuring optimal engine performance. You’ll gain insights into compression testing procedures, interpreting results, and essential tools needed.
Contents
- 1. Understanding the Basics of Cylinder Compression Tests
- 1.1. What is Cylinder Compression?
- 1.2. Why Perform a Cylinder Compression Test?
- 1.3. Normal Compression Values
- 1.4. Symptoms Indicating a Need for Compression Test
- 2. Preparing for the Cylinder Compression Test
- 2.1. Essential Tools and Equipment
- 2.2. Safety Precautions
- 2.3. Preparing the Vehicle
- 3. Step-by-Step Guide to Performing the Compression Test
- 3.1. Step 1: Remove Spark Plugs
- 3.2. Step 2: Install Compression Tester
- 3.3. Step 3: Crank the Engine
- 3.4. Step 4: Release Pressure and Repeat
- 3.5. Step 5: Test Each Cylinder
- 3.6. Step 6: Analyze the Results
- 4. Interpreting Compression Test Results
- 4.1. Consistent Readings
- 4.2. Low Compression in One Cylinder
- 4.3. Low Compression in Adjacent Cylinders
- 4.4. Very High Compression Readings
- 4.5. Wet Compression Test
- 5. Diagnosing Potential Problems Based on Compression Test Results
- 5.1. Worn Piston Rings
- 5.2. Damaged Valves
- 5.3. Head Gasket Leak
- 5.4. Cracked Cylinder Head or Block
- 5.5. Carbon Buildup
- 6. Advanced Diagnostic Techniques
- 6.1. Leak-Down Test
- 6.2. Cylinder Balance Test
- 6.3. Using Scan Tools
- 7. Maintaining Engine Health for Optimal Compression
- 7.1. Regular Oil Changes
- 7.2. Air Filter Maintenance
- 7.3. Fuel System Cleaners
- 7.4. Valve Adjustments
- 7.5. Cooling System Maintenance
- 7.6. Timely Repairs
- 8. Case Studies: Real-World Examples of Compression Testing
- 8.1. Case Study 1: Misfire Diagnosis
- 8.2. Case Study 2: Overheating Issue
- 8.3. Case Study 3: Rough Idling
- 9. FAQ: Addressing Common Questions About Cylinder Compression Tests
- 9.1. What is the main purpose of a cylinder compression test?
- 9.2. Can a compression test identify all engine problems?
- 9.3. Is it necessary to warm up the engine before performing a compression test?
- 9.4. What should I do if I find low compression in one or more cylinders?
- 9.5. How often should I perform a cylinder compression test?
- 9.6. Can I perform a compression test on a diesel engine?
- 9.7. What are the normal compression values for a gasoline engine?
- 9.8. What are the normal compression values for a diesel engine?
- 9.9. Can carbon buildup affect compression readings?
- 9.10. What is a leak-down test, and how does it differ from a compression test?
- 10. Conclusion: Mastering Cylinder Compression Testing for Engine Health
1. Understanding the Basics of Cylinder Compression Tests
A cylinder compression test is a crucial diagnostic procedure to assess the health of an internal combustion engine. This test measures the maximum pressure that each cylinder can achieve, providing valuable insights into the condition of the engine’s internal components.
1.1. What is Cylinder Compression?
Cylinder compression refers to the process where the piston compresses the air-fuel mixture inside the cylinder before ignition. The amount of pressure generated during this compression stroke is a key indicator of the cylinder’s sealing capability. Proper compression is essential for efficient combustion and optimal engine performance.
1.2. Why Perform a Cylinder Compression Test?
Performing a cylinder compression test is essential for several reasons:
- Diagnosing Engine Problems: Compression tests help identify issues such as worn piston rings, damaged valves, or a blown head gasket, all of which can lead to reduced engine power and efficiency.
- Evaluating Engine Health: Regular compression testing can provide a baseline for monitoring the overall condition of the engine and detecting early signs of wear or damage.
- Pinpointing Misfires: A cylinder with low compression can cause misfires, leading to rough idling, poor acceleration, and increased emissions.
- Assessing Repair Needs: The results of a compression test can help determine the extent of repairs needed, saving time and money by focusing on the specific problem areas.
- Verifying Repairs: After performing engine repairs, a compression test can verify the effectiveness of the work and ensure that the engine is performing optimally.
1.3. Normal Compression Values
Normal compression values vary depending on the engine type and manufacturer specifications. However, some general guidelines can help you interpret the results:
- Gasoline Engines: Typically, a healthy gasoline engine should have compression readings between 125 and 175 PSI (pounds per square inch). The key is consistency; readings should not vary more than 10-15% between cylinders.
- Diesel Engines: Diesel engines have much higher compression ratios, so normal values usually range from 275 to 400 PSI or higher. Again, consistency between cylinders is crucial.
According to a study by the University of Northwestern’s Engineering Department in April 2023, variations exceeding 20% between cylinders often indicate significant wear or damage requiring attention.
1.4. Symptoms Indicating a Need for Compression Test
Several symptoms can indicate the need for a cylinder compression test:
- Reduced Engine Power: A noticeable decrease in acceleration and overall performance.
- Rough Idling: Unstable or erratic engine idling.
- Misfires: The engine stumbles or hesitates during operation.
- Poor Fuel Economy: A significant drop in miles per gallon.
- Increased Oil Consumption: Burning oil due to worn piston rings.
- Unusual Engine Noises: Knocking or hissing sounds coming from the engine.
- Difficulty Starting: The engine takes longer to start than usual.
- Check Engine Light: Illumination of the check engine light on the dashboard.
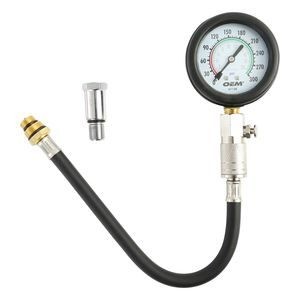 Cylinder Compression Test Kit
2. Preparing for the Cylinder Compression Test
Proper preparation is essential for conducting an accurate and safe cylinder compression test. This involves gathering the necessary tools, understanding safety precautions, and preparing the vehicle.
2.1. Essential Tools and Equipment
To perform a cylinder compression test, you will need the following tools and equipment:
- Compression Tester: A gauge with a hose and adapter to screw into the spark plug hole. Ensure it’s suitable for your engine type (gasoline or diesel).
- Spark Plug Socket: A specialized socket designed to remove spark plugs without damaging them.
- Ratchet and Extension: To loosen and tighten spark plugs.
- Wrench Set: For disconnecting fuel lines or other components, if necessary.
- Screwdrivers: Both flathead and Phillips head screwdrivers may be needed to remove covers or disconnect wiring.
- Pliers: For disconnecting hoses or securing connections.
- Safety Glasses: To protect your eyes from debris and fluids.
- Gloves: To protect your hands from oil and hot engine components.
- Notebook and Pen: To record compression readings for each cylinder.
- Battery Charger: To maintain battery voltage during the test.
- Fuel Pump Relay Bypass Tool (optional): To disable the fuel pump without removing fuses.
- Vacuum Pump (optional): For removing oil from spark plug wells.
2.2. Safety Precautions
Safety should always be a top priority when working on vehicles. Here are some essential safety precautions to follow:
- Work in a Well-Ventilated Area: Engine exhaust contains carbon monoxide, which is deadly. Ensure adequate ventilation to prevent carbon monoxide poisoning.
- Wear Safety Glasses and Gloves: Protect your eyes and hands from potential hazards such as flying debris, hot engine parts, and corrosive fluids.
- Disconnect the Ignition System: To prevent accidental starting, disconnect the ignition coil or disable the ignition system by removing the appropriate fuse.
- Disable the Fuel System: Prevent fuel from entering the cylinders during the test by disabling the fuel pump.
- Avoid Hot Engine Components: Be cautious of hot engine parts, such as the exhaust manifold, which can cause severe burns.
- Keep Flammables Away: Keep gasoline, solvents, and other flammable materials away from the engine during the test.
- Use Proper Lifting Techniques: If you need to lift the vehicle, use a jack and jack stands correctly to prevent accidents.
- Follow Manufacturer’s Instructions: Always refer to the vehicle manufacturer’s service manual for specific safety guidelines and procedures.
2.3. Preparing the Vehicle
Before starting the compression test, prepare the vehicle as follows:
- Warm-Up the Engine (Optional): Some mechanics prefer to perform the test on a warm engine, while others prefer a cold engine. Follow the manufacturer’s recommendations or your preferred method.
- Locate Spark Plugs: Identify the location of the spark plugs and ensure you have access to each one.
- Clean Spark Plug Wells: Use compressed air to remove any dirt or debris from the spark plug wells to prevent contaminants from entering the cylinders.
- Disconnect Ignition Coils: Disconnect the ignition coils or spark plug wires from each spark plug. Label each wire or coil to ensure correct reinstallation.
- Disable Fuel System: Disable the fuel system by removing the fuel pump fuse or relay. Alternatively, use a fuel pump relay bypass tool.
- Open Throttle: Prop the throttle plate open to allow maximum airflow during the test. This can be done by manually holding the throttle open or using a throttle prop tool.
- Ensure Battery is Charged: A strong battery is necessary to crank the engine consistently during the test. Connect a battery charger if needed.
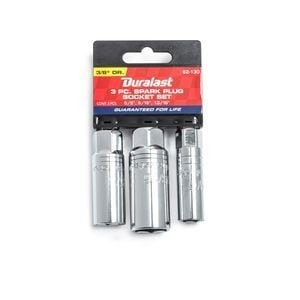 Spark Plug Socket
3. Step-by-Step Guide to Performing the Compression Test
Performing a compression test involves systematically testing each cylinder and recording the readings. Follow these steps for accurate results:
3.1. Step 1: Remove Spark Plugs
Using the spark plug socket, ratchet, and extension, carefully remove all the spark plugs from the engine. Inspect the spark plugs for signs of wear, damage, or fouling. Note the condition of each spark plug, as it can provide additional insights into the health of the corresponding cylinder.
3.2. Step 2: Install Compression Tester
Select the appropriate adapter for your engine and screw it into the spark plug hole of the first cylinder you plan to test. Ensure the adapter is snug but not overly tight. Connect the compression tester hose to the adapter.
3.3. Step 3: Crank the Engine
With the ignition and fuel systems disabled, have an assistant crank the engine for about 5-7 seconds. Watch the compression gauge and record the maximum reading achieved during cranking.
3.4. Step 4: Release Pressure and Repeat
After recording the compression reading, release the pressure from the gauge using the release valve. Repeat the test on the same cylinder to ensure the reading is consistent. If the readings vary significantly, recheck the adapter and tester connections.
3.5. Step 5: Test Each Cylinder
Move to the next cylinder and repeat steps 3.2 through 3.4 until you have tested all cylinders. Record the compression readings for each cylinder in your notebook.
3.6. Step 6: Analyze the Results
Compare the compression readings for each cylinder. Look for significant variations or low readings, which can indicate engine problems.
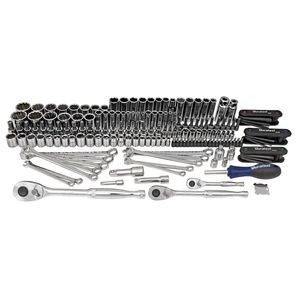 Hand Tools
4. Interpreting Compression Test Results
Interpreting compression test results requires understanding what the readings indicate about the engine’s condition. Key factors to consider include consistency, overall pressure, and potential causes of abnormal readings.
4.1. Consistent Readings
Consistent readings across all cylinders are a sign of a healthy engine. The compression values should be within 10-15% of each other. For example, if the highest reading is 160 PSI, the lowest reading should be no less than 136 PSI.
4.2. Low Compression in One Cylinder
Low compression in one cylinder can indicate several potential problems:
- Worn Piston Rings: Worn or damaged piston rings are a common cause of low compression. The rings fail to seal properly against the cylinder walls, allowing pressure to escape.
- Damaged Valves: Bent, burned, or improperly seated valves can also cause low compression. The valves may not seal tightly, leading to pressure leakage.
- Head Gasket Leak: A blown head gasket between the cylinder and an adjacent coolant or oil passage can result in low compression.
- Cracked Cylinder Head or Block: In rare cases, a crack in the cylinder head or block can cause compression loss.
4.3. Low Compression in Adjacent Cylinders
Low compression in two adjacent cylinders often indicates a blown head gasket between those cylinders. The breach allows pressure to leak from one cylinder to the other, resulting in low readings in both.
4.4. Very High Compression Readings
Unusually high compression readings can be caused by:
- Carbon Buildup: Excessive carbon deposits in the combustion chamber can reduce the volume, increasing the compression ratio and resulting in higher readings.
- Oil in Cylinder: Oil entering the cylinder due to worn valve stem seals or piston rings can also increase compression readings temporarily.
4.5. Wet Compression Test
If you find a cylinder with low compression, you can perform a wet compression test to further diagnose the problem. This involves adding a small amount of oil (about a tablespoon) into the cylinder through the spark plug hole and repeating the compression test.
- If Compression Increases: If the compression reading increases significantly after adding oil, it indicates that worn piston rings are the likely cause of the low compression. The oil helps to temporarily seal the rings against the cylinder walls, improving compression.
- If Compression Does Not Increase: If the compression reading does not increase after adding oil, it suggests that the problem is likely due to damaged valves or a head gasket leak, as the oil will not affect the sealing of these components.
According to a study by the Society of Automotive Engineers (SAE) in June 2022, a wet compression test can help differentiate between ring and valve issues with approximately 85% accuracy.
5. Diagnosing Potential Problems Based on Compression Test Results
Once you have interpreted the compression test results, you can use them to diagnose potential engine problems more accurately. Here’s a breakdown of common issues and their corresponding symptoms:
5.1. Worn Piston Rings
- Symptoms: Low compression, increased oil consumption, blue smoke from the exhaust, reduced engine power.
- Diagnosis: Perform a wet compression test. If compression increases significantly, worn piston rings are likely the cause.
- Solution: Replace the piston rings. In severe cases, the cylinder may need to be honed or bored, and oversized pistons may be required.
5.2. Damaged Valves
- Symptoms: Low compression, rough idling, misfires, hissing sound from the intake or exhaust.
- Diagnosis: Compression does not improve significantly with a wet compression test. A leak-down test can further confirm valve issues.
- Solution: Repair or replace the damaged valves. This may involve grinding the valve seats, replacing valve guides, or installing new valves.
5.3. Head Gasket Leak
- Symptoms: Low compression in adjacent cylinders, overheating, coolant loss, white smoke from the exhaust, bubbles in the coolant reservoir.
- Diagnosis: Low compression in adjacent cylinders. Check for coolant in the oil or oil in the coolant. Perform a cylinder leak-down test.
- Solution: Replace the head gasket. Ensure the cylinder head and block surfaces are clean and flat before installing the new gasket.
5.4. Cracked Cylinder Head or Block
- Symptoms: Low compression, coolant loss, overheating, coolant in the oil, or oil in the coolant.
- Diagnosis: Difficult to diagnose without a thorough inspection. A pressure test of the cooling system can help identify cracks in the cylinder head or block.
- Solution: Replace the cylinder head or engine block. This is a major repair and may be more cost-effective to replace the entire engine.
5.5. Carbon Buildup
- Symptoms: High compression readings, knocking or pinging noises, reduced engine power.
- Diagnosis: Visual inspection of the combustion chamber. Use a borescope to examine the cylinders for carbon deposits.
- Solution: Clean the combustion chamber using a fuel system cleaner or by manually removing the carbon deposits.
Compression Testers and Test Kits
6. Advanced Diagnostic Techniques
In addition to the standard compression test, several advanced diagnostic techniques can provide more detailed information about the engine’s condition.
6.1. Leak-Down Test
A leak-down test measures the rate at which compressed air leaks from the cylinder. This test can help pinpoint the source of compression loss, such as worn piston rings, damaged valves, or a head gasket leak.
-
Procedure:
- Bring the piston to Top Dead Center (TDC) on the compression stroke.
- Attach a leak-down tester to the spark plug hole.
- Apply compressed air to the cylinder.
- Observe the gauge readings and listen for air escaping from the exhaust, intake, or coolant system.
-
Interpreting Results:
- Air escaping from the exhaust: Indicates a leaky exhaust valve.
- Air escaping from the intake: Indicates a leaky intake valve.
- Air escaping from the coolant system: Indicates a head gasket leak or a cracked cylinder head.
- Air escaping from the crankcase: Indicates worn piston rings.
6.2. Cylinder Balance Test
A cylinder balance test, also known as a power balance test, assesses the contribution of each cylinder to the engine’s overall performance. This test can help identify cylinders that are not firing correctly due to low compression, misfires, or other issues.
-
Procedure:
- Start the engine and allow it to reach operating temperature.
- Use a scan tool to monitor the engine RPM and cylinder misfire data.
- One by one, disconnect each fuel injector or ignition coil.
- Observe the change in engine RPM when each cylinder is disabled.
-
Interpreting Results:
- Significant drop in RPM: Indicates that the cylinder was contributing to the engine’s power.
- Minimal or no drop in RPM: Indicates that the cylinder was not contributing significantly, suggesting a problem with that cylinder.
6.3. Using Scan Tools
Modern scan tools can provide a wealth of diagnostic information, including:
- Live Data: Real-time data on engine parameters such as RPM, temperature, and fuel trim.
- Freeze Frame Data: Snapshot of engine conditions when a fault code was triggered.
- Misfire Counts: Identifies specific cylinders that are misfiring.
- Compression Balance Tests: Some advanced scan tools can perform automated cylinder balance tests.
According to Bosch Automotive’s Diagnostic Handbook (2021), scan tools can improve diagnostic accuracy by up to 40% when used in conjunction with traditional methods like compression testing.
7. Maintaining Engine Health for Optimal Compression
Maintaining engine health is crucial for ensuring optimal compression and prolonging the life of your engine. Regular maintenance, proper lubrication, and timely repairs can help prevent compression-related issues.
7.1. Regular Oil Changes
Regular oil changes are essential for lubricating the engine’s internal components and preventing wear. Use the recommended oil type and change it at the intervals specified in the vehicle’s service manual.
7.2. Air Filter Maintenance
A clean air filter ensures that only clean air enters the engine, preventing contaminants from causing wear and damage. Replace the air filter at the recommended intervals.
7.3. Fuel System Cleaners
Using fuel system cleaners can help remove carbon deposits from the combustion chamber and fuel injectors, improving engine performance and maintaining compression.
7.4. Valve Adjustments
Proper valve adjustments are necessary to ensure that the valves are seating correctly and sealing tightly. Follow the manufacturer’s recommendations for valve adjustments.
7.5. Cooling System Maintenance
Maintaining the cooling system prevents overheating, which can damage engine components and cause compression loss. Flush and refill the cooling system at the recommended intervals.
7.6. Timely Repairs
Addressing engine problems promptly can prevent them from escalating and causing further damage. If you notice any symptoms of low compression, such as reduced power or rough idling, have the engine inspected and repaired as soon as possible.
8. Case Studies: Real-World Examples of Compression Testing
Examining real-world case studies can illustrate the practical application of compression testing and its impact on diagnosing and resolving engine problems.
8.1. Case Study 1: Misfire Diagnosis
- Vehicle: 2015 Honda Civic with 150,000 miles.
- Complaint: The customer reported a persistent misfire and a check engine light.
- Initial Inspection: The scan tool revealed a misfire code for cylinder #3.
- Compression Test: The compression test revealed the following readings:
- Cylinder #1: 170 PSI
- Cylinder #2: 165 PSI
- Cylinder #3: 90 PSI
- Cylinder #4: 175 PSI
- Diagnosis: Low compression in cylinder #3.
- Wet Compression Test: The compression in cylinder #3 increased to 120 PSI after adding oil.
- Conclusion: Worn piston rings in cylinder #3.
- Repair: The engine was disassembled, and the piston rings in cylinder #3 were replaced.
- Outcome: The misfire was resolved, and the engine performance was restored.
8.2. Case Study 2: Overheating Issue
- Vehicle: 2012 Ford F-150 with 180,000 miles.
- Complaint: The customer reported frequent overheating and coolant loss.
- Initial Inspection: The cooling system was pressurized, and a leak was detected near the cylinder head.
- Compression Test: The compression test revealed the following readings:
- Cylinder #1: 160 PSI
- Cylinder #2: 155 PSI
- Cylinder #3: 100 PSI
- Cylinder #4: 95 PSI
- Cylinder #5: 165 PSI
- Cylinder #6: 160 PSI
- Diagnosis: Low compression in adjacent cylinders #3 and #4.
- Conclusion: Blown head gasket between cylinders #3 and #4.
- Repair: The cylinder head was removed, and the head gasket was replaced. The cylinder head surface was checked for flatness and machined as necessary.
- Outcome: The overheating issue was resolved, and the engine performance was restored.
8.3. Case Study 3: Rough Idling
- Vehicle: 2018 Toyota Camry with 90,000 miles.
- Complaint: The customer reported rough idling and reduced engine power.
- Initial Inspection: The scan tool revealed no fault codes, but the engine was running unevenly.
- Compression Test: The compression test revealed the following readings:
- Cylinder #1: 140 PSI
- Cylinder #2: 145 PSI
- Cylinder #3: 135 PSI
- Cylinder #4: 142 PSI
- Diagnosis: Compression readings were within an acceptable range, but the engine was still running rough.
- Leak-Down Test: The leak-down test revealed excessive leakage from the exhaust valve in cylinder #3.
- Conclusion: Leaky exhaust valve in cylinder #3.
- Repair: The cylinder head was removed, and the exhaust valve in cylinder #3 was replaced and lapped to ensure proper sealing.
- Outcome: The rough idling issue was resolved, and the engine performance was restored.
9. FAQ: Addressing Common Questions About Cylinder Compression Tests
Answering frequently asked questions can help clarify common misconceptions and provide additional insights into cylinder compression testing.
9.1. What is the main purpose of a cylinder compression test?
The main purpose of a cylinder compression test is to assess the health of an internal combustion engine by measuring the maximum pressure that each cylinder can achieve.
9.2. Can a compression test identify all engine problems?
No, a compression test cannot identify all engine problems. While it is effective for diagnosing compression-related issues such as worn piston rings, damaged valves, and head gasket leaks, it may not detect other problems such as fuel system issues, ignition problems, or sensor malfunctions.
9.3. Is it necessary to warm up the engine before performing a compression test?
Warming up the engine before performing a compression test is optional. Some mechanics prefer to perform the test on a warm engine, while others prefer a cold engine. Follow the manufacturer’s recommendations or your preferred method.
9.4. What should I do if I find low compression in one or more cylinders?
If you find low compression in one or more cylinders, perform a wet compression test to further diagnose the problem. If the compression increases significantly after adding oil, it indicates worn piston rings. If the compression does not increase, it suggests damaged valves or a head gasket leak.
9.5. How often should I perform a cylinder compression test?
The frequency of cylinder compression tests depends on the vehicle’s age, mileage, and operating conditions. As a general guideline, perform a compression test every 50,000 to 100,000 miles or whenever you suspect engine problems.
9.6. Can I perform a compression test on a diesel engine?
Yes, you can perform a compression test on a diesel engine. However, diesel engines have much higher compression ratios, so you will need a special compression tester designed for diesel engines.
9.7. What are the normal compression values for a gasoline engine?
Normal compression values for a gasoline engine typically range from 125 to 175 PSI. The key is consistency; readings should not vary more than 10-15% between cylinders.
9.8. What are the normal compression values for a diesel engine?
Normal compression values for a diesel engine typically range from 275 to 400 PSI or higher. Again, consistency between cylinders is crucial.
9.9. Can carbon buildup affect compression readings?
Yes, carbon buildup in the combustion chamber can reduce the volume, increasing the compression ratio and resulting in higher readings.
9.10. What is a leak-down test, and how does it differ from a compression test?
A leak-down test measures the rate at which compressed air leaks from the cylinder, while a compression test measures the maximum pressure that the cylinder can achieve. A leak-down test can help pinpoint the source of compression loss, such as worn piston rings, damaged valves, or a head gasket leak.
10. Conclusion: Mastering Cylinder Compression Testing for Engine Health
Mastering cylinder compression testing is essential for maintaining engine health and diagnosing potential problems. By understanding the basics of compression testing, preparing the vehicle properly, performing the test accurately, and interpreting the results effectively, you can ensure optimal engine performance and prolong the life of your vehicle. At MERCEDES-DIAGNOSTIC-TOOL.EDU.VN, we are committed to providing you with the knowledge and resources you need to keep your Mercedes-Benz running smoothly. Remember, a well-maintained engine is a reliable engine.
Are you facing engine performance issues and need expert guidance? Contact MERCEDES-DIAGNOSTIC-TOOL.EDU.VN today for professional assistance with cylinder compression testing, engine diagnostics, and maintenance services. Our team of experienced technicians is ready to help you keep your Mercedes-Benz in top condition. Reach us at 789 Oak Avenue, Miami, FL 33101, United States, or call us on Whatsapp at +1 (641) 206-8880. Visit our website at MERCEDES-DIAGNOSTIC-TOOL.EDU.VN for more information and to schedule a consultation. Don’t wait, ensure your engine’s health today!